1
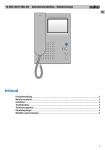
DYMOLM200 Electronic Labelmaker Instructions for Use GB Elektroniczna Drukarka Etykiet Instrukcja Obsługi PL Elektromos Címkekészítő Használati Utasítás HUN Elektronická Tiskárna Štítků Návod k obsluze CZ Elektronická Tlačiareň Štítkov Návod na obsluhu SK ➊ ➋ 2 B A ➊ ➌ ➋ ➋ ➌ ➊ CC ➌ E ➊ ➋ F 2 3 £ _ ´ ± 4 5 6 ¥ $ # | @ & ; : ° < = > ➨ 6 mm ➊ 2 ¢ / \ “ ‘ * ÷ ( ) ? ¿ 1 /2 ™ λ µ Ğ ğ à À ò Ò á Á ó Ó â  î û ç Ç ä Ä ö Ö ñ Ñ å Å ć Ć ě Ě š Š ł Ł ń Ń ź Ź e ➨ 19 mm D 9/12mm 'CLICK!' 1 A B C D E F G H I J K L M N O P Q R S T U V W X Y Z ! © ¡ ® è ù é ú ê È Ù É Ú Ê Ω ~ ➨ ❹ ^ ➨ . # ø Ø i ı ì Ì o p Í Í y´ Y´ ô Oˆ æ Æ œ Œ ą Ą eĘ Ę ë ü ã u˚ č ň 8 = ŕ Ő Ë Ü Ã U˚ Č Ň Ť L’ Ŕ Ő ï ÿ õ ż 0 ř ž ĺ s´ ű Ï ß Õ Ż Ď Ř Ž Ĺ Ś Ű 1 , 2, 3 .. .n ON/OFF 1 PRINT BOXES UL SIZE STYLE LTH VERT # % - + . , = & 3 4 5 6 7 8 9 0 Z S Q T R E D G F J H O I U Y L K 1 X C V B N É SYMBOL Ç Œ SPACE È ˆ : ˜ ! LTH JUST - + . , 5 £ 2 3 4 6 T R E S A M Ù VERT 8 7 0 9 O I U Y & = P PG BRK PG BRK D G F J H ´ L K ´ PREVIEW ) W STYLE @ W PRINT BOXES UL % Q P PREVIEW CAPS SIZE ON/OFF 2 ALIGN COPIES DEL JUST @ A CLEAR ALIGN COPIES DEL .. .n 1 , 2, 3 CLEAR CAPS ( / / ´ Z X C S Ñ V B N M Ø Å / G SYMBOL ´ ‘AZERTY’ SPACE ‘QWERTY’ (EU) 3 Æ ˜ : ¨ ? Accessories Tape cassettes Width: Length: Black/Clear Blue/Clear Red/Clear Black/White Blue/White Red/White Black/Blue Black/Red Black/Yellow Black/Green White/Clear White/Black Black/Silver Black/Gold Black/Fluo Green Black/Fluo Red European Adaptor GB 6mm 7m 43610 ––––– ––––– 43613 ––––– ––––– ––––– ––––– 43618 ––––– ––––– ––––– ––––– ––––– ––––– ––––– 40076 9mm 7m 40910 ––––– ––––– 40913 40914 40915 40916 40917 40918 40919 ––––– ––––– ––––– ––––– ––––– ––––– 12mm 7m 45010 45011 45012 45013 45014 45015 45016 45017 45018 45019 45020 45021 45022 45023 45024 45025 19mm 7m 45800 ––––– ––––– 45803 45804 45805 45806 45807 45808 45809 45810 45811 45812 45813 ––––– ––––– Akcesoria Kasety z taśmą Szerokość: 6mm Długość: 7m Czarny/Przezroczysty 43610 Niebieski/Przezroczysty ––– Czerwony/Przezroczysty ––– Czarny/Biały 43613 Niebieski/Biały ––––– Czerwony/Biały ––––– Czarny/Niebieski ––––– Czarny/Czerwony ––––– Czarny/Żółty 43618 Czarny/Zielony ––––– Biały/Przezroczysty ––––– Biały/Czarny ––––– Czarny/Srebrny ––––– Czarny/Żółty ––––– Czarny/Fluo Zielony ––––– Czarny/Fluo Czerwony ––– Zasilacz 40076 PL 9mm 7m 40910 ––––– ––––– 40913 40914 40915 40916 40917 40918 40919 ––––– ––––– ––––– ––––– ––––– ––––– 12mm 7m 45010 45011 45012 45013 45014 45015 45016 45017 45018 45019 45020 45021 45022 45023 45024 45025 19mm 7m 45800 ––––– ––––– 45803 45804 45805 45806 45807 45808 45809 45810 45811 45812 45813 ––––– ––––– This product is CE marked in accordance with the EMC directive and the low voltage directive and is designed to conform with the following international standards: Safety – EN 60950, IEC 950, UL 1950 EMC emissions – EN 55022 Class B, CIS PR22 Class B, FCC pt15 Sub pt B Class B EMC immunity – EN50082-1, IEC801-2 & IEC801-3 Tartozékok Kazetták Szélesség: Hossz: Fekete/Víztiszta Kék/Víztiszta Piros/Víztiszta Fekete/Fehér Kék/Fehér Piros/Fehér Fekete/Kék Fekete/Piros Fekete/Sárga Fekete/Zöld Fehér/Víztiszta Fehér/Fekete Fekete/Sárga Fekete/Arany Fekete/Fluo Zöld Fekete/Fluo Piros AC Adaptor HUN 6mm 7m 43610 ––––– ––––– 43613 ––––– ––––– ––––– ––––– 43618 ––––– ––––– ––––– ––––– ––––– ––––– ––––– 40076 9mm 7m 40910 ––––– ––––– 40913 40914 40915 40916 40917 40918 40919 ––––– ––––– ––––– ––––– ––––– ––––– 12mm 7m 45010 45011 45012 45013 45014 45015 45016 45017 45018 45019 45020 45021 45022 45023 45024 45025 19mm 7m 45800 ––––– ––––– 45803 45804 45805 45806 45807 45808 ––––– ––––– 45811 ––––– ––––– ––––– ––––– Doplňky Kazety s páskou Šíře: Délka: Černá/Průhledná Modrá/Průhledná Červená/Průhledná Černá/Bílá Modrá/Bílá Červená/Bílá Černá/Modrá Černá/Červená Černá/Žlutá Černá/Zelená Bílá/Průhledná Bílá/Černá Černá/Stříbrná Černá/Zlatá Černá/Fluo Zelená Černá/Fluo Červená Adaptér CZ 6mm 7m 43610 ––––– ––––– 43613 ––––– ––––– ––––– ––––– 43618 ––––– ––––– ––––– ––––– ––––– ––––– ––––– 40076 9mm 7m 40910 ––––– ––––– 40913 40914 40915 40916 40917 40918 40919 ––––– ––––– ––––– ––––– ––––– ––––– 12mm 7m 45010 45011 45012 45013 45014 45015 45016 45017 45018 45019 45020 45021 45022 45023 45024 45025 19mm 7m 45800 ––––– ––––– 45803 45804 45805 45806 45807 45808 45809 45810 45811 45812 45813 ––––– ––––– Príslušenstvo Kazetové pásky Šírka: 6mm Dížka: 7m Čierna/Priesvitná 43610 Modrá/Priesvitná ––––– Červená/Priesvitná ––––– Čierna/Biela 43613 Modrá/Biela ––––– Červená/Biela ––––– Čierna/Modrá ––––– Čierna/Červená ––––– Čierna/Žltá 43618 Čierna/Zelená ––––– Biela/Priesvitná ––––– Biela/Čierna ––––– Čierna/Strieborná ––––– Čierna/Zlatá ––––– Čierna/Svietiaca zelená ––– Čierna/Svietiaca červená –– Adaptér 40076 SK 9mm 7m 40910 ––––– ––––– 40913 40914 40915 40916 40917 40918 40919 ––––– ––––– ––––– ––––– ––––– ––––– 12mm 7m 45010 45011 45012 45013 45014 45015 45016 45017 45018 45019 45020 45021 45022 45023 45024 45025 19mm 7m 45800 ––––– ––––– 45803 45804 45805 45806 45807 45808 45809 45810 45811 45812 45813 ––––– ––––– © Esselte Dymo 2000 Written by DAW Publications, Cambridge Introduction Creating your first label The Dymo LabelManager LM200 enables you to create a wide variety of high quality self-adhesive labels of up to 90 characters. You will no doubt be anxious to see what your new LabelManager LM200 can do. Before we go on to explore the many advanced features of the LM200, follow these simple steps to create your first label: The LabelManager uses 6mm (1/4"), 9mm ( 3/8"), 12mm (1/2") or 19mm (3/4") wide tape cassettes in a number of label colours. Labels are back slit for easy removal from the backing tape. Text can be printed horizontally or vertically in a variety of sizes and styles and can be leftjustified, right-justified or centred on the label. GB 1. Fit the batteries, or connect the AC adaptor, plug in and switch on at the wall socket - see ‘Power Supply’. 2. Open the battery/cassette compartment cover and install a tape cassette – see page 2 and ‘Changing the Cassette’. Check that the cassette is fitted correctly. 3. Close the cover, then press to switch the power on. The welcome message ‘DYMO’ will appear, and then the display should look like this: Warranty Registration Please complete the warranty registration card and return it to the relevant customer service address, within seven days– see the warranty booklet for details. 1 Power Supply BATTERIES • With the Labelmaker positioned as shown in fig A➊ on page 2, open the machine by hinging down the keyboard. Apply pressure to point A➋ of the battery/ tape compartment cover to release the catch, then hinge down the cover. • Insert six size AA alkaline or re-chargeable Nickelcadmium batteries, observing the polarity markings A➌, and close the cover. • Remove batteries if the LabelManager is to be unused for some time. Cursor flashing 4. Use the keyboard to type in your full name. Each character you enter will appear on the display, for example: 1 DYMO • For an UPPER CASE character, press and hold down followed by the character required. • Press CAPS for all subsequent characters in UPPER CASE. • Press the space bar once for the space between each name. If you make a mistake, press DEL to delete the error, then type in the correction. 5. When you have finished, press . A label will be printed and will emerge from the slot in the top right hand side of the machine. Wait until the mechanism has stopped, then press the cutter lever E to cut off the label and remove it from the machine. You should now have a high quality printed name label — don’t waste it! If this is your personal machine, why not fix the label to the underside to identify its owner? You have just found the first of many uses for your DYMO labels. AC ADAPTOR (optional) • Connect the AC adaptor to socket B➊. Inserting the adaptor plug disconnects the supply from the batteries. • Unplug the AC adaptor from the LabelManager before disconnecting the mains power to the adaptor, otherwise last label memory settings may be lost (see also ON/OFF). PRINT Changing the cassette • Apply pressure to point A➋ of the battery/tape compartment cover to release the catch, then hinge down the cover. • Hold as shown, then lift cassette C➊ straight up and out. • Ensure tape and ribbon C➋ are taut across mouth of cassette and tape passes between guideposts before installing as shown. If necessary, turn spool C➌ clockwise to tighten ribbon. • Check that cassette switch D➊ is set for the cassette type – see page 2. A notch in the cassette will fit over the switch when it is set correctly. • Insert cassette with tape and ribbon positioned as shown between print head D➋ and pinch rollerD➌. • Push firmly D❹ until cassette clicks into place. Ensure tape and ribbon are positioned correctly. • Close the compartment cover. DYMO 3 The Display Italic CURSOR KEY • Press or to move the cursor along the text, one character at a time. • Press and hold to scan through the text. • Press + or to move the cursor to the beginning or end of the line of text. • When used in conjunction with certain function keys, use or to select options. • To insert characters into the text, use or to position the cursor under the character to the right of the insertion point, then type in the characters required. • Press or to move the cursor to the start of the previous or next line of a multi-line label. + or to move the cursor to the • Press beginning or end of the label. Page indicators Line indicator Shift on Copies on Box Outline Justify Underline 1 2 ABCDEFGHIJKLMN CAPS on BIG font on Mirror on Vertical text The display shows: • Up to 15 characters, plus the cursor, at one time. • Function indicators – as shown above. • The display will flash if you press an incorrect key in a function sequence. PRINTING • Press PRINT PRINT to print the label. • Use cutter lever E to release the label – see page 2. • If the display shows ↕↕↕↕↕↕↕↕↕↕, the tape cassette installed in the machine is too narrow for the label to be printed; change the cassette to a wider tape. Function keys ON/OFF Switches the power on and off. • Switches off automatically after two minutes if no keys are pressed. The last label created will be retained and displayed when next turned on. Any stored label and settings will be retained. Note: If the batteries are removed for more than a few seconds, all text and settings will be lost. PREVIEW Allows you to preview your label before printing it. PREVIEW CAPS and the entire text will scroll across the display. On labels with 2 lines, the message will be previewed as a single line message. When power is restored, the display will show a flashing cursor (no text) and the settings will be full height standard width text with all other settings off. CAPITALS + • Press SPACE KEY • Press CAPS to insert a space into the text. • Press for all subsequent characters in UPPER CASE (CAPITALS), as confirmed by the CAPS indicator in the display. + SYMBOLS • Press to select a symbol character – see SYMBOLS AND SPECIAL CHARACTERS and the symbols table on page 2. • Press again to cancel and return to lower case. TEXT SIZE SHIFT KEY • The display shows the current selection of text print size: Press and hold down for “shift” position. before pressing an alphabet key • Press and hold to produce an UPPER CASE (CAPS) character. • For dual-purpose keys, press and hold first to produce the legend above the key. • Pressing and holding before pressing an alphabet key, while CAPS is set, will give a lower case character. DELETE Height Normal Extended normal DEL + Condensed small • Normal height is available on all except 6mm labels. Small height is available on all labels. • Press to delete the character to the left of the cursor, or to exit certain function key operations. CLEAR TEXT SIZE • Press SIZE to select the size menu: CLEAR DEL B • Press to clear all the current text and cancel any fixed length setting, but leave the text size and other settings unchanged. Also use to exit or clear certain function key operations. Use to select the size symbol required, then press to confirm the selection. 4 The "B" (BIG FONT) mode will produce highly visible labels using the entire print height on all except 6mm labels. • To create a label in "B" mode use or to move the • Use cursor under "B" and press (BFONT lights in display). • In "B" mode, you can select between condensed, normal or extended, but all other options are not available. JUSTIFY JUST Labels are normally printed with the text left-justified. On 2-line labels, press JUST to select left-justified, rightjustified or centred text, as shown in the display. See also LABEL LENGTH. VERTICAL TEXT The label length function displays the last used fixed label length, eg: VERT 10 45mm 1 • Press to exit the length function without changing the length, or: • Use or to increase (5000mm / 196.85 inches max.) or decrease the length in 1mm / 0.4 inch steps, or or to increase or decrease the length in 10mm / 0.4 inch steps. The minimum fixed label length is 45mm. v e r t i c a l l y DEL Note: Vertical text is not available on 2-line labels. MULTI-LINE PRINTING • Press to start the next line of text on a 2-line label, e.g. This is a two line label in the display will be printed as: • Press to fix the length for all subsequent labels, confirmed by the LTH SET indicator in the display. • Press LTH to cancel the fixed length and restore the automatic length. • If the fixed length is too short for the text, when you and the display will indicate 2 lines: •2 • 3 Labels can be created as follows: This is a two line label press PRINT or + PREVIEW CAPS the display will show how much longer the label is than the fixed length, eg: 1 line small text 19mm Up to 2 lines small text Up to 2 lines small text and it will not print. Either cancel the fixed length (see to increase above), or press LTH twice and use the length; the label is now long enough and can be printed. 1 line normal text 19mm 1 line normal text 12mm BOX/UL LABEL LENGTH LTH The length is normally calculated automatically, according to the length of the text on the label. • Press again to cancel and return to horizontal text. 9mm to move the cursor under the desired • When the or — indicator is displayed, press to cancel the Box/Underline option. • Rotates the text through 90° so that the label is printed , as confirmed by the VERT indicator in the display. 6mm 9mm or option. Either press to select the option (confirmed by the or — indicator displayed), or DEL to exit . Up to 2 lines small text COPIES MULTIPLE COPIES + STYLE • Your LabelManager can provide multiple copies within the range 1-99. 12mm 1 line normal text COPIES • To use this facility press then STYLE to show the last number of copies set on the display, for example The line indicator in the display will confirm the number of lines in the label. BOXED/UNDERLINED PRINTING # = 03 BOX/UL BOX/UL . Use or to increase or decrease the number of copies required, then press • If no Box/Underline option has been selected, pressing to confirm (COPIES indicator lights in the display). To print the desired quantity press . • To cancel an existing multiple copies setting, press once will display the menu below: PRINT Underlined - — = Square Box - = Pointed Box - = Round Corners - = + STYLE . Note: A row of vertical dots will print between each label as a cutting guide. INCREMENTAL NUMBERING Labels can be printed in increments of 1 automatically. • Key in your starting number as the right most digit on = 1, 2, 3 the label. Press then the display will automatically move up a digit to the next number. PRINT Shaded Box - . ..n ZigZag Box - COPIES DYMO = 5 1, 2, 3 . ..n ‘Sale 10.00/’ becomes ‘Sale 10.00/BF403.40’ If the original number is at the end of the label, it will be replaced by the BF value: ‘Sale 10.00’ becomes ‘Sale BF403.40’ Press then to continue the sequence. • It is also possible to include automatic incremental numbering when printing multiple copies. • Key in your starting number, eg. LABEL 1A . PRINT COPIES • Pressing C will convert the number on the label into Euros and add the Euro value to the end of the label: ‘Sale 10.00/’ becomes ‘Sale 10.00/e0.24’ If the original number is at the end of the label, it will be replaced by the Euro value: ‘Sale 10.00’ becomes ‘Sale e0.24’ Note that values are rounded to the nearest one hundreth of a unit. • Next press then STYLE followed by until the desired number of copies are displayed, eg.10, or use or to move the cursor under the number digits and key in the number required. Press 1, 2, 3 to confirm. ..n . Now press then . This will print ten labels LABEL 1A to LABEL 10A. While using fixed length setting, the LabelManager will stop printing when the label exceeds the fixed length. PRINT STYLE EURO SET-UP To set the currency for conversion to Euros: STYLE • Press to display the style menu: • Press Z Use to select italic, outline or mirrored text, or STYLE • Use again to cancel and return to normal text. PAGE BREAK + You can divide your label into 'pages' or blocks of text, each with its own text size and style settings. The number of lines which can be created in each page will depend on the label width. • Press • Press + + to insert a page break. PREVIEW CAPS to preview the label; each page break Press is identified by the symbol •||•. LTH ALIGN • If a fixed label length is set, each press of + LTH will align the image to the left, the centre or the right of the label, as shown in the display. EURO CONVERSION C or + BF40,3399 or to step through the currencies available: Austria: 13,7603 öS Belgium: BF 40,3399 Germany: DM 1,95583 Spain: 166,386 Pts Finland: 5,94573 mk France: 6,55957 Fr Ireland: £ 0.78756 Italy: L1936,27 Luxembourg: LF 40,3399 e1 = _ to confirm the selection. C ALIGN + C . The display will + C , the • The next time that you press C or conversion will be between Euros and the chosen currency. The line showing e1 = _ is user-definable. You can enter a currency symbol and rate for your currency against the Euro, eg $US. Note that for currencies larger than the Euro, you must enter ‘0’ before the decimal point of the value. LAST LABEL MEMORY • The unit will store the last label text and settings when turned off. Upon power-up, these will be restored and displayed. Removal of the batteries for more than a few seconds may cause this information to be lost. ALIGNMENT and then BEF then press to confirm. The indicator for the selected style will light in the display. • Press + show the previously selected currency and its conversion rate into Euros, eg: Symbols and special characters INTERNATIONAL CHARACTERS To add a diacritical (accent) to create an international character, enter the character first, followed immediately by the diacritical, e.g. press E followed by / to get é. C C The LabelManager can be set to convert a chosen C currency into C or out of + C Euros. When this is selected, the label is scanned from right to left for a valid number. The first occurence of a comma (,) or a full stop (.), reading from right to left, will be read as a decimal point. For example: To add a diacritical to an existing character, use or to place the cursor under the character to the right of the character to be changed, then press the appropriate diacritical key. SYMBOLS • If set to convert between Euros and Belgian Francs SYMBOLS + • Press to show symbols and special characters, some of which are not available direct from the keyboard. The display will show the last used symbol character, for C C (see ‘Euro Set-up’ below), pressing + will convert the number on the label into Belgian Francs and add the BF value to the end of the label: 6 No response to print key • !!!!!!!!!!!!!!! in the display indicates a printer jam. Press any key to return to normal display. Open the cassette compartment and free the jam. • flashing in the display indicates discharged batteries. Press any key to return to normal display. Replace the batteries. No success? • Call the DYMO customer service hotline telephone number for your country – see the warranty booklet. A1 example: with a line of symbols above it. Each letter selects a line of symbol characters, numbered 1 to 6, as shown in the table on page 2. • Press DEL to cancel, or • Press a letter key ‘A’ to ‘Z’ until you find the line of symbols required. You can then press a number key ‘1’ to ‘6’ to select the symbol required. Alternatively, use or to step through the rows A to Z, then use or to move the cursor under the symbol required. Press to place the symbol in the label. PRINT CONTRAST — may be adjusted by pressing + SYMBOLS followed by • Use or PRINT to display the contrast . symbols to select lighter or darker print. • Press to confirm the setting. The contrast level will revert to the mid-setting when the LabelManager is turned off and on again. Note: This function enables you to adjust the print quality under extreme temperature conditions. Cleaning • Clean the cutter blade regularly: Press and hold down cutter lever E to expose cutter blade D➊, then use a cotton bud and alcohol to clean both sides of the blade. Release cutter lever E. • Check and clean print head face D➋ regularly using a cotton bud and alcohol ONLY. Troubleshooting No display • check machine is on • replace discharged batteries • check AC adaptor. No printing or poor text • replace discharged batteries • check tape cassette installed correctly • clean the print head • replace the tape cassette. Poor print quality with white ink • When using a White on Black or a White on Clear cassette, it may be necessary to use the darkest contrast setting in order to obtain good print quality. To change the contrast setting via the keyboard, read and follow the instructions as described in the paragraph “Print Contrast”. Tape jammed • lift out tape cassette carefully • remove/release jammed tape • DO NOT cut the ink ribbon – turn spool C➌ to tighten • cut off excess label tape • refit/replace the tape cassette. Poor cutter performance • clean the cutter blade regularly 7 8