1
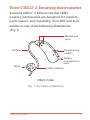
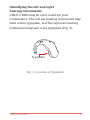
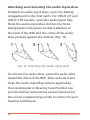
CIELO 2
®
Siemens Hearing Instruments
Your CIELO 2 hearing instrument
®
Siemens CIELO® 2 Behind-the-Ear (BTE)
hearing instruments are designed for comfort,
performance and durability. Your BTE will look
similar to one of the following illustrations
(Fig.1).
Microphone
ports
LifeTube
Programming
socket*
Battery
compartment
door
LifeTip
LifeTip Adapter
CIELO 2 Life
Fig. 1: Location of features
CIELO 2 BTEs
1
Earhook
Directional microphones
Programming socket*
Memory button
Battery
compartment door
CIELO 2 S
Microphones
Earhook
Volume control
wheel
Programming
socket*
Battery
compartment
door
Audio
input flap
CIELO 2
2
Siemens Hearing Instruments
Microphones
Earhook
Volume
control wheel
Programming socket*
Memory button
Audio input
Battery
compartment door
CIELO 2 P
Microphones
Earhook
Volume
control wheel
Programming socket*
Memory button
Audio input
Battery
compartment door
CIELO 2 SP
* For Hearing Care Professionals use only.
CIELO 2 BTEs
3
Digital technology
Inside your hearing instrument, the microphone,
analog-to-digital converter, digital signal
processor, receiver and other specialized
components process sound that is directed to the
eardrum and auditory system.
The microphone picks up sound waves from
the air and converts them to electrical signals.
The analog-to-digital converter encodes the
electrical signals into a format that is usable
by the digital signal processor.
The digital signal processor has been
programmed by your Audiologist or Hearing Care
Provider to execute the required digital signal
processing for your particular hearing loss.
4
Siemens Hearing Instruments
Identifying the left and right
hearing instruments
CIELO 2 BTEs may be color-coded for your
convenience. The left ear hearing instrument may
have a blue typeplate, and the right ear hearing
instrument may have a red typeplate (Fig. 2).
Typeplate
Fig. 2: Location of typeplate
CIELO 2 BTEs
5
On CIELO 2 Life BTEs, the left ear hearing
instrument also has a blue number on the LifeTip
Adapter, and the right ear hearing instrument
also has a red number on the LifeTip Adapter (Fig.
3).
Color-coded number
on Tip Adapter
Fig. 3: Location of right and left designator
on LifeTip Adapter
6
Siemens Hearing Instruments
Using your CIELO 2
hearing instrument
Battery size
The chart below provides the proper battery size
used in your hearing instrument. It’s
recommended that you also check with your
Audiologist or Hearing Care Provider regarding
the correct battery.
Model
CIELO 2 Life Behind-the-Ear
Battery size
312
CIELO 2 S Behind-the-Ear
13
CIELO 2 Behind-the-Ear
13
CIELO 2 P Behind-the-Ear
13
CIELO 2 SP Behind-the-Ear
675
CIELO 2 BTEs
7
Inserting the battery
To insert the battery into the hearing instrument,
swivel open the door of the battery compartment.
Place the proper size battery (see "Battery" section
or consult your Audiologist or Hearing Care
Provider) in the battery compartment so that the
"+" symbol on the battery coincides with the "+"
mark on the battery compartment door.
Gently close the battery compartment. Do not force
the door shut. If it does not close easily, check to
see if the battery was inserted properly. When the
battery door is completely closed, your hearing
instrument is ready for operation (Fig. 4/Fig. 5).
Open the
battery
compartment
Insert the
battery
Close the
battery
compartment
Fig. 4: Inserting the battery into
CIELO 2, CIELO 2 S, CIELO 2 P, and CIELO 2 SP
8
Siemens Hearing Instruments
Fig. 5: Inserting the battery into CIELO 2 Life
Battery compartment door lock
(not available on CIELO 2 Life)
CIELO 2 hearing instruments are equipped with
a lock that prevents the unintentional opening of
the battery compartment. This feature is located
on the inner side of the hearing aid battery
compartment door (Fig. 5).
Pushing the slide toward the right locks the
battery compartment door. Pushing the slide
toward the left unlocks the battery compartment
for opening (Fig. 6). Your Audiologist or Hearing
Care Provider can instruct you on the use of this
feature, if required.
CIELO 2 BTEs
9
Remember, the battery should be removed when
your hearing instrument is not in use. This
prevents possible damage from battery leakage
and avoids draining the battery if the hearing
instrument is not switched off.
Locked
Unlocked
Fig. 6: Battery compartment door lock
Low battery indicator
Your hearing instrument may be programmed to
inform you when the battery should be replaced
for best performance. If this feature is activated in
your hearing instruments, you may hear two long,
low pitched beeps and/or experience low
amplification power or volume. Change the
battery immediately when either of these occur.
10
Siemens Hearing Instruments
WARNING: Choking hazard posed by small parts.
• Keep hearing instruments, batteries and
accessories out of children’s reach.
• If swallowed consult a physician or a hospital
immediately.
• If infants, small children or mentally disabled
persons need to wear hearing instruments,
ensure adequate supervision.
Battery tips
• CAUTION! Batteries can be harmful if
swallowed.
• If a battery is accidentally swallowed,
seek medical attention immediately, or call
The National Button Battery Hotline collect
at (202) 625-3333.
• Always use the battery size recommended on
your warranty card or by your Audiologist or
Hearing Care Provider for your model for best
performance.
• Remove the battery from your instrument when
not in use. This prevents possible damage from
CIELO 2 BTEs
11
expansion or leakage of the battery, if the
instrument is not fully turned off.
• Always carry spare batteries in the event that
your current battery goes dead. Place each spare
battery in an individual, non-metallic container
to prevent contact with other batteries or metal
objects, such as keys or coins.
• Follow your local recycling rules for battery
disposal.
Note: Do not throw used batteries into household trash.
Return them to your Audiologist or Hearing Care
Provider for environmentally correct disposal.
WARNING: Risk in explosive environments, i.e.
mining areas!
• Don’t use your hearing instruments (and remote
control) in areas where there is a danger of
explosions.
Turning the hearing instrument on or off
To use the battery door, insert a battery into the
instrument and completely close the door to turn
the instrument on. To turn the instrument off
using the battery door, open it to the first catch.
12
Siemens Hearing Instruments
Your hearing instrument may also be
programmed to allow you to turn it on and off
using the memory button, where applicable. To
turn the instrument off using the memory button,
press and hold the button for 3 – 5 seconds.
To turn the instrument back on, press and hold
the memory button for 3 – 5 seconds.
Please note that after having turned the
instrument off using the memory button, you
must wait approximately 10 seconds for the
system to reset before turning the instrument
back on again by using the memory button.
Check with your Audiologist or Hearing Care
Provider about which on/off functions are
available on your hearing instrument.
Power-on delay feature
Your hearing instrument may be equipped with a
"power-on delay" feature that can be activated by
your Audiologist or Hearing Care Provider. This
allows you to insert the hearing instrument into
your ear without experiencing unpleasant
feedback (whistling).
Note: You can also use the remote control to turn your
hearing instrument on and off.
CIELO 2 BTEs
13
Attaching the earmold (where provided)
If your earmold detaches, gently insert the
earhook of the hearing instrument into
the tubing and earmold supplied by your
Audiologist or Hearing Care Provider (Fig. 7).
Earhook
Tubing
Earmold
Fig. 7: Attaching the earmold
Inserting and removing CIELO 2 hearing
instruments with an earmold
Take the earmold between your thumb and index
finger. Gently work the earmold into its proper
position by adjusting it until it is firmly seated
in your ear. Then lift the hearing instrument over
the top of your ear and adjust it to fit behind your
ear (Fig. 8).
14
Siemens Hearing Instruments
Fig. 8: Inserting the hearing instrument
Lightly push on the back of the ear to help release
the earmold and gently pull it out (Fig. 9).
Fig. 9: Removing the hearing instrument
Inserting and removing the CIELO 2 Life
hearing instrument
Take the LifeTip between your thumb and index
finger. Gently work the LifeTip into its proper
position by adjusting it until it is firmly seated
in your ear. Then lift the hearing instrument over
the top of your ear and adjust it to fit behind your
CIELO 2 BTEs
15
ear (Fig. 10). Finally, place the retention strand
into the bottom of the ''bowl'' of your ear.
Fig. 10: Inserting the hearing instrument
To remove the instrument, gently pull the
LifeTip out of your ear (Fig. 11) and carefully lift
the hearing instrument off of your ear. Do not pull
or tug on the LifeTube to remove the LifeTip or
instrument.
Fig. 11: Removing the hearing instrument
16
Siemens Hearing Instruments
Health considerations
If soreness or skin irritation develops, discontinue
wearing your hearing instrument, and bring the
instrument and earmold to your Audiologist or
Hearing Care Provider. Minor fit adjustments and
earmold modification can often correct this
condition. If soreness persists, discontinue
wearing the hearing instrument and see your
physician.
If excessive earwax accumulates when wearing
your hearing instrument, consult your Audiologist
or Hearing Care Provider.
ePocket® remote control
An optional ePocket remote control is available for
all CIELO 2 hearing systems. ePocket can be used
to change the memory and volume of your
hearing instrument, as well as read out the
system settings without having to manually adjust
the hearing instruments.
For further information on the ePocket, speak to
your Audiologist or Hearing Care Provider or
refer to the ePocket instruction manual, if
applicable.
CIELO 2 BTEs
17
Using the memory button
(where provided)
Your CIELO 2 BTE hearing instrument may have
up to 4 memories, also called hearing programs.
The memories are selected with the memory
button. The last memory in CIELO 2, CIELO 2 P,
and CIELO 2 SP instruments is activated
automatically when an audio input shoe is
attached (see ''Audio Input'' section.) Each
memory is different and designed to help you hear
better in different situations.
When initially turned on (after the battery
compartment door is closed) the microphone
is ON and ready for general use, the default is
memory 1. Your Audiologist or Hearing Care
Provider will provide you with the number of
memories most appropriate for your needs. Each
time you press the memory button, your CIELO 2
BTE hearing instrument changes to the next
memory. The memory change is confirmed by
alerting tones or beeps which correlate to the
memory you are in. That means if you select
memory "3," then the hearing instrument beeps 3
times.
18
Siemens Hearing Instruments
Below is a list of listening environments
programmed into your CIELO 2 hearing
instrument.
Memory
number
Listening
environment
1
_________________________________
2
_________________________________
3
_________________________________
Audio Input (where provided)
_________________________________
4
CIELO 2 BTEs
19
Using the directional
microphone system
According to your hearing needs, the hearing
instrument can be adjusted to focus on those
sounds in front of you (directional mode), for
when you are having a face to face conversation in
a noisy environment. The hearing instrument can
also be adjusted for when you are participating in
more quiet environments and want to hear the
sounds around you (omnidirectional).
Your Audiologist or Hearing Care Provider will
program the operation of the directional
microphone system to function in conjunction
with the memory button based on your particular
hearing requirements. Consult your Audiologist
or Hearing Care Provider for more information on
use of the directional microphone system based
on the settings of your specific hearing
instrument(s).
20
Siemens Hearing Instruments
Using the telecoil
(not available on CIELO 2 Life)
The telecoil mode is intended for telephone use.
In the telecoil mode, place the telephone receiver
close to your hearing instrument for
best reception. By trying various positions of the
telephone receiver, you will discover what works
best for you.
Note: In order for the telecoil to function properly, your
telephone must be "hearing aid compatible." Check your
telephone’s instruction manual to find out whether your
phone has this capability.
Your Audiologist or Hearing Care Provider can
advise you on the proper use of all hearing
instrument settings.
Automatic telephone feature (where provided)
The AutoPhone option allows the telecoil
to automatically switch on when a ''hearing aid
compatible'' telephone handset is brought close
to the hearing instrument. To operate, bring
the telephone handset close to the hearing
instrument. The telecoil will automatically engage
to the presence of the electromagnetic signal
from the telephone. When you are finished
CIELO 2 BTEs
21
speaking on the phone, move the handset away
from the hearing instrument and the microphone
mode will re-establish itself.
AutoPhone magnet accessory
There is an AutoPhone magnet accessory available
for your telephone that can be used with the
AutoPhone feature of your hearing instrument.
Ask your Audiologist or Hearing Care Provider
about this accessory and if it is appropriate for
your individual hearing care needs.
Note: When magnets are properly cared for, they are safe
to use and can last a lifetime. However, the following guidelines should be followed while using these magnets.
Magnets can pose risks to electronics and magnetic storage
media when placed in close proximity. Be careful not to
place magnets near computers, color monitors, television
sets, floppy discs, video/audio tape and other electronic
equipment. Magnets may interfere with the operation of life
support systems, such as pacemakers, magnetic valves, etc.
Make certain to maintain a distance of at least 4 inches
between to magnet and the area of your support system.
Keep magnets out of the reach of children or pets. If
accidentally swallowed, seek medical attention.
22
Siemens Hearing Instruments
Volume control (where provided)
Your CIELO 2 BTE hearing instrument is fully
automatic. There is no need to manually adjust
the volume control. However, if you prefer
manual volume control, your CIELO 2, CIELO 2 P,
or CIELO 2 SP BTE can be programmed for
manual adjustments, too.
If your instrument is programmed for manual
adjustment, the wheel-shaped volume control
can be rotated up or down to select the most
desired listening position (louder or softer).
Before placing the hearing instrument in your
ear, be sure that the hearing instrument is on
lowest volume by rotating the control down.
To increase the volume, place your index finger
gently against the volume control wheel and
rotate it upwards. Once full volume has been
reached, further rotation of the volume control
wheel will have no effect. To reduce the volume,
rotate the wheel in the opposite direction.
CIELO 2 BTEs
23
If your hearing instrument has not been
programmed for manual control adjustment,
the volume will adjust automatically and
rotating the volume control wheel will have
no effect.
24
Siemens Hearing Instruments
Audio input (where available)
The CIELO 2, CIELO 2 P, and CIELO 2 SP hearing
instrument is equipped with audio input
capability. This enables you to connect your
hearing instrument into other audio sources such
as a tape recorder, television, infrared or FM
system using an audio shoe accessory. It can be
useful for adults in difficult listening situations
and for children using auditory training
equipment in classrooms, for example. Because
the sound is coming directly from the sound
source to the hearing instrument, the signal is
clearer and unaffected by poor room acoustics.
CIELO 2 BTEs
25
Attaching and removing the audio input shoe
To attach an audio input shoe, open the battery
compartment to the first catch. For CIELO 2 P and
CIELO 2 SP models, open the audio input flap.
Hook the audio input shoe in from the front.
Gently press it into place so that it attaches to
the back of the BTE and the curve of the audio
shoe presses against the bottom (Fig. 12).
Fig. 12: Attaching the audio input shoe
To remove the audio shoe, press the audio shoe
toward the front of the BTE. Then unhook it and
close the audio input flap (where applicable).
Your Audiologist or Hearing Care Provider can
provide further instructions and accessories for
the sound equipment you wish to connect to your
hearing instrument.
26
Siemens Hearing Instruments
Identification information
Your hearing instruments have a serial number
engraved on them. The location of the serial
number will vary according to the style of hearing
instrument you have chosen.
The year of manufacture is incorporated into the
serial number. Please note the warranty is based
upon the date of purchase, not the date of
manufacture. The serial number may look similar
to this sample: AS12345. The second letter of this
serial number refers to the year of manufacture
of the hearing instrument. The letters S or T
indicate a 2008 year of manufacture. Your
Audiologist or Hearing Care Provider can answer
any questions you may have about the identifying
code on your hearing instrument.
-
+
AS12345
Serial number
Fig. 13: Identification information
CIELO 2 BTEs
27
Maintenance and care
Consult your Audiologist or Hearing Care Provider
about appropriate cleaning and maintenance for
your particular type of earmold(s) or LifeTube(s)
and LifeTip(s).
Always store your hearing instrument inside its
case. A soft carrying pouch is also included for
your convenience when traveling.
Never immerse your hearing instrument
in water!
If needed, your CIELO 2 hearing instrument can
be wiped with a tissue or other clean, dry cloth.
Do not use water, alcohol, benzene, or any other
liquid or household cleaning agent to clean your
instruments, as it may damage them.
28
Siemens Hearing Instruments
Your Audiologist or Hearing Care Provider:
Siemens Hearing Instruments, Inc.
P.O. Box 1397
Piscataway, NJ 08855-1397
www.usa.siemens.com/hearing
Information in this manual subject to change without notice.
Copyright © 2009 Siemens Hearing Instruments, Inc. All Rights Reserved
7793396 7/09 3.2 22P208 5K
SHI/10548-9