1
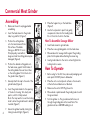
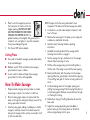
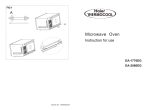
Commercial
Meat Grinder
US
BONdes
Inclu es
Recip
Model #3500
IMPORTANT
Please keep these instructions
Model
3200box
and your
original
packaging.
INSTRUCTIONS
FOR PROPER USE AND CARE
IMPORTANT SAFEGUARDS
When using this electrical appliance, safety precautions
should always be observed, including the following:
n Read all of the instructions.
n To protect against risk of electrical shock do not put meat
grinder in water, other liquid, or where water may flood
the area.
n Place the meat grinder securely in the center of the
counter or work space on a flat surface.
n Close adult supervision must be provided when this
appliance is used by or near children. This appliance is
not recommended for children.
n Unplug from outlet when not in use, before putting on
or taking off parts, and before cleaning.
n Avoid contact with moving parts. Never feed food by
hand. Always use food pusher. Keep hair, hands, clothing,
and utensils away from moving plates while operating to
reduce the risk of personal injury and/or damage to the
meat grinder.
n Do not use fingers to scrape away food from discharge
disc while appliance is operating. Injury may result.
CAUTION: DO NOT PUT YOUR FINGERS NEAR THE
HOPPER OR HEAD WHILE IN OPERATION.
n Do not operate with a damaged cord, plug, after the
appliance malfunctions, or if it is dropped or damaged
in any manner. Return the meat grinder to Keystone
Manufacturing Co., Inc. for examination, repair or
electrical or mechanical adjustment.
n Using attachments not recommended or sold by
Keystone Manufacturing Co., Inc. may cause hazards.
n
n
n
n
n
n
n
n
n
n
n
Do not use outdoors, household use only.
Do not let cord hang over edge of table or counter. Do not
let cord come in contact with hot surfaces, including the stove.
WARNING: The cutting blade is sharp. Handle with care when
both using and cleaning.
Do not place near hot gas, electric burner, in an oven, or in a
dishwasher.
Never leave meat grinder unattended while it is operating.
If motor stalls, turn off immediately and unplug power unit. To
avoid injury, first detach meat grinder head then disassemble
and remove clogged pieces.
Do not use an extension cord with this meat grinder. However,
if one is used, it must have a rating equal to or exceeding the
rating of this appliance.
The meat grinder should always be in the off position before
inserting or removing plug from a wall outlet.
Do not pull on the power cord to disconnect, pull on the head
of the plug.
This meat grinder should not be used for other than the
intended use.
The Deni Meat Grinder has a polarized plug (one blade is
wider than the other). This plug will fit in a polarized outlet
only one way, as a safety feature. Reverse the plug if the plug
does not fit fully in the outlet. Contact a qualified electrician
if it still does not fit. Do not attempt to defeat this safety
feature.
SAVE THESE INSTRUCTIONS
1
Commercial Meat Grinder
Features
Food Pusher
Hopper Plate
Grinder Head
Locking Knob
Cap
Grinding Plates
• Coarse
• Medium
• Fine
Operating Buttons
• On
• Off
• Reverse
Screw Ring
Feed Screw
Cutting Blade
2
Stainless Steel
Motor Housing
Functions
Operating
Allows you to turn the unit ON, OFF and REVERSE the
Buttons:
direction of the feed screw if the unit jams.
Locking Knob: Holds the grinder head tightly in place.
Motor Housing: Provides an outer shell for the motor mechanism.
Food Pusher:
Used to feed foods into the hopper opening.
Hopper Tray:
Holds food to be ground.
Grinder Head: Holds feed screw, cutting blade, and cutting plates for
grinding.
Feed Screw:
Rotates cutting blade to grind meat.
Cutting Blade: Cuts the food before going through the grinding plates.
Cutting Plates: Grinds meat into the desired texture; fine, medium, or coarse.
Sausage
Works as a funnel to fill sausage casings.
Stuffer:
Holds the cutting blade and cutting plates in place during
Cap:
grinding.
3
Commercial Meat Grinder
Assembling
1.
Make sure the unit is unplugged while
assembling.
2.
Insert the feed screw into the grinder
tube, long end first. (Figure 1)
3.
Position the cutting blade
onto the feed screw with the
flat surface of the blade
facing you. NOTE: If it is not
fitted properly, meat will not
be ground and the cutting plate may be
damaged. (Figure 2)
4.
9.
Place the hopper tray on the feed tube.
(Figure 7)
Use the food pusher to push food gently,
one piece at a time into the feeding tube.
Do not force the food into the tube.
How To Assemble Sausage Maker
1.
Insert feed screw into grinder tube.
2.
Place the coarse grinding plate onto the feed screw.
3.
Place wide end of sausage stuffer against the grinding
plate. Hold in place while attaching the screw ring.
4.
Insert grinder tube into the motor unit and tighten the
locking knob to secure.
How To Operate
1.
Before using for the first time, remove all packaging and
wash parts. DO NOT place in dishwasher.
5.
Securely attach the cap to the end of the
grinder tube. (Figure 4)
2.
Place the unit on a sturdy work surface so the air-vents
at the bottom and back are not blocked.
6.
Insert the grinder head into the opening
of the motor housing. Turn slowly and
push in, until it is firmly seated.
Note: You may need to loosen the locking
knob to allow the grinder head to be fully
inserted. (Figure 5)
3.
Make sure the unit is OFF. Plug the unit in.
4.
Place a bowl or plate beneath the grinding tube to catch
the ground meat.
5.
Turn the grinder on. The ground meat will come out
through the grinding plate in the head. Note: The
grinder must be on BEFORE adding food.
7.
4
Position the desired cutting plate onto
the feed screw, against the flat sides of
the cutting blade. Be sure the notches
on the cutting plate fit into the slots in
the grinder tube. (Figure 3)
8.
Secure the grinder head by turning the
locking knob until tight. (Figure 6)
6.
7.
Place food in the hopper tray and use
the food pusher to feed food into the
hopper opening. CAUTION: DO NOT
USE YOUR FINGERS TO FEED FOOD
THROUGH THE HOPPER. NOTE: The
grinder head may rotate slightly during use, but it is
normal. Do not over tighten to stop this movement.
It may cause damage. (Figure 8)
NOTE: Vinegar softens the casing and makes it more
transparent. This makes the finished sausage look better.
4.
Cut meat into one inch cubes and put in freezer for half
hour to firm up.
5.
Measure the seasonings for the recipe you are using and
combine in a small bowl. Set aside.
6.
Grind the meat, following the basic operating
instructions.
7.
Assemble the meat grinder with the sausage stuffer
following the instructions on page 4.
Fine: used for breakfast sausages, spreads, pâtés, baby
food, and hamburgers.
8.
Test the sausage. Fry up a small amount of the sausage
mixture. Adjust seasonings to taste.
Medium: used for Polish and Italian style sausages,
ground meat in soups or relishes.
9.
Pull the entire sausage casing over the stuffing tube so
that the end of the casing is even with the tube opening.
Coarse: used for salami and larger style sausages,
ground meat for chili or with vegetables.
10. Slowly feed the meat, with the pusher, into the hopper
opening. When the ground meat is flush with the opening
of the stuffing tube, pull off 2 inches of casing and tie into
a knot.
Turn the unit OFF when complete.
Cutting Plates
n
n
n
How To Make Sausage
1.
Prepare natural casing by running it under cool water.
Soak casing in a bowl of cool water for a half hour.
2.
Rinse the casing again under cool water and let the
water run through the casing by holding one end of the
casing open under the faucet.
3.
Soak the casing again, adding one tablespoon of white
vinegar for each cup of water in the bowl. Leave the
casing in the vinegar solution until you are ready to stuff
it, then rinse and drain.
11. Continue feeding meat into the hopper opening and
stuffing the sausage casing. Pack the casing firmly but not
to the bursting point. Maintain an even thickness throughout the length of casing.
12. Slide leftover casing off stuffing tube when all meat has
been used.
13. Inspect the sausage by pricking any air bubbles or
pockets with a pin. Note: Air pockets can fill with fat
while cooking allowing mold to grow.
5
Commercial Meat Grinder
14. Twist off the links. By starting at the tied end of the
stuffed casing, grasp 3 inches of stuffed casing or the
desired length of sausage you wish to make and gently
twist two or three times in the same direction to form a
link. Continue twisting off links until the entire casing is
done.
15. Using a sharp knife, cut the links apart and cut off any
empty casing at the end.
16. Arrange the links in a single layer on a plate covered
with plastic wrap and refrigerate for a couple of hours.
Note: If you are not going to eat the sausage within 2
days, it is recommended that you use one of Deni’s
vacuum sealers or vacuum packaging systems.
Sausage Making Tips
n
n
6
Make sure the meat is as cold as possible, without being
frozen, before you grind it. Cold meat is easier to grind
and the fat doesn’t clog up the grinding plate.
When mixing sausage with your hands, place a bowl of
cold water nearby. Rinse your hands frequently in the
cold water so that the fat doesn’t stick to your fingers.
Cleaning
n
n
n
n
n
n
Make sure the unit is OFF and the motor has stopped completely
before disassembling the unit.
Unscrew cap.
To remove grinding plate easily, knock the head on the table with
the cutting plate face up.
Wash each part in warm soapy water. Use care when handling the
sharp blades. Note: Do not wash any parts in the dishwasher or
use abrasive cleaning agents or cloths when cleaning. Bleaching
solutions containing chlorine will discolor aluminum surfaces.
Thinners and benzynes will crack or change the color of the unit.
Wipe motor housing with a damp cloth. Do not immerse in water.
Coat feed screw, cutting blade, and cutting plates with salad oil
after washing and drying. Note: The oil will keep parts lubricated.
Hints and Tips
n
n
n
n
n
n
n
n
n
n
n
n
n
When carrying the unit, be sure to hold motor housing
with both hands. Do not hold or carry by the hopper
plate.
Make sure all parts are tightly assembled. Loose parts
will cause food to get caught and clog up the grinder.
n
n
n
Always turn the unit ON before inserting food.
n
Process a small amount of fat from the meat through the
meat grinder before grinding to lubricate the grinding
mechanism.
n
Cut food into strips or cubes slightly smaller than the
opening on the feeding tube.
Do not grind hard foods such as bones and nuts.
Do not grind ginger and other materials with hard fiber.
Do not use the unit for more than 20 minutes without
interruption. If longer use is necessary, allow unit to cool
down thoroughly before reusing it.
To avoid jamming, do not apply excessive pressure while
operating.
Grinding bread pieces may help to remove food residue
left in the meat grinder after use.
Chill meat before grinding to reduce the loss of juices.
Refrigerate ground meat immediately and cook within 24
hours.
Make sure food is free of bone, tough tendon, nutshells,
etc. before grinding.
Do not use food pusher on bread crumbs or nuts. They
will feed themselves.
When making bread crumbs, only use the coarse grinding
disc.
Never try to undo the parts or to repair the unit by
yourself contact Keystone Manufacturing Company, Inc.
When switching from ON to OFF then to REVERSE or
vice versa, wait about 6 seconds to assure that the motor
has stopped completely.
To maintain the freshness of your ground meat for up to
five times as long as traditional food storage methods,
it is recommended that you use one of Deni’s vacuum
sealers or vacuum packaging systems. To order, or for
more information, call 1-800-DENI-VAC.
Troubleshooting
n
Meat Grinder shut off or no meat is coming out.
The unit may be jammed. Shut it off. Press REVERSE to
clear jamming of bone or other materials. NOTE: Reverse
operation will continue for as long as the button is
pressed. Unplug the unit and follow cleaning instructions.
Re-assemble. Never force food through the meat grinder.
7
Commercial Meat Grinder
Recipes
Classic Italian Sausage
Servings: Makes 4 lbs of sausage or 16, 4 oz patties
Ingredients:
4 lbs pork butt, cubed
3 tbsp fennel seeds, whole
2 tbsp kosher salt
2 tsp black pepper
1 tbsp crushed red pepper flakes
1/2 cup cold water
Method:
1. Combine all of the ingredients in a bowl and mix well.
2. Use the coarse grinding plate and follow operating
instructions on page 4.
3. When you are finished grinding, remove the grinding plate
and attach the large sausage stuffer to the meat grinder
following the assembly instructions on page 4.
4. Feed the mixture into the prepared casings (see page 5-6).
If making patties, take the ground meat and shape into
4 oz patties or larger.
Cajun Style Chicken Sausage with Monterey Jack Cheese
Ingredients:
2 lbs chicken breast cut into 1” cubes
2 lbs chicken thighs cut into 1” cubes
1/2 lb Monterey Jack cheese cut into small cubes
1 tsp fresh garlic, finely minced
1 tbsp kosher salt
1 tsp black pepper
2 tbsp prepared Cajun spice mixture or from the recipe below
Prepared sausage casings
Cajun Spice Mixture:
1 tbsp kosher salt
1 tbsp granulated garlic
1 tbsp dried oregano, finely ground
1 tbsp dried thyme
1 tsp black pepper
1/2
tsp white pepper
1 tsp cayenne pepper (more if desired)
1 tbsp Paprika
Procedure for Cajun Spice Mixture:
1. Combine the ingredients.
2. Mix well and store in a covered container.
Continued on the next page.
8
Method:
1. Combine all of the sausage ingredients in a bowl. Mix well.
2. If possible, allow the mixture to blend for several hours or
overnight.
3. Feed the seasoned meat into the grinder using the coarse
grinding plate and follow operating instructions on page 4.
4. Remove grinding plate.
5. Assemble the large sausage stuffer following the directions
on page 4.
6. Slide the casing onto the sausage stuffer (see page 5-6).
Be careful not to over stuff the casing so that you can twist
the sausage into links.
7. If making patties, divide ground meat into portions and shape
the mixture to the desired size. Note: If storing the patties
for later use, separate them using plastic wrap.
Mini Italian Sausage Links
Ingredients:
2 lbs pork butt cut into 1” cubes
1 tbsp fennel seeds
1 tbsp kosher salt
2 tsp crushed red pepper flakes
1/2 cup romano cheese
2 tbsp chopped parsley
1/2 cup cold water
small diameter prepared sausage casings
(available at most meat markets)
Method:
1. Mix all of the ingredients together in a medium bowl.
2. Following operating instructions on page 4, feed the seasoned
meat into the grinder using the medium grinding plate.
3. Remove the grinding plate.
4. Assemble the medium sausage stuffer following the directions
on page 4.
5. Slide the prepared sausage casing onto the sausage stuffer.
6. Follow sausage instructions on page 5 and 6. Turn the grinder
on and feed the ground meat into the machine being careful
not to fill the sausage too tightly so that they can be easily
twisted into links.
7. Link the sausages into 3” sections or smaller.
9
Commercial Meat Grinder
Breakfast Sausage
Beef Burgers
Servings: 2 lbs breakfast sausage
Serves: 4
Ingredients:
2 lbs well marbled, pork butt cut into 1” cubes
1 tbsp rubbed sage (more if desired)
11/2 tsp black pepper
2 tsp kosher salt
1/2 cup cold water
Small diameter prepared sausage casings as needed
Ingredients:
1 lb beef chuck, cubed
1/2 cup oatmeal
1
/2 cup diced onion
1/2 cup chopped parsley
3 tbsp ketchup
2 tsp worcestershire sauce
2 tsp salt
1 tsp black pepper
Method:
1. Combine all of the ingredients except the casings in a medium
bowl. Mix well.
2. Feed seasoned meat into the grinder using the small grinding
plate and follow operating instructions on page 4.
3. Remove grinding plate.
4. Assemble the small sausage stuffer following the directions
on page 4.
5. Slide the prepared sausage casing onto the sausage stuffer.
6. Turn the grinder on and feed ground meat into hopper
(see page 5-6) being careful not to stuff the casing too tightly
to allow for easy linking.
10
Method:
1. Follow operating instructions on page 4. Feed meat, oatmeal,
onion, and parsley alternately through the grinder using the fine
grinding plate.
2. Mix well and allow the mixture to sit for a few hours to enhance
the flavors.
3. Add the ketchup, worcestershire sauce, salt and black pepper.
Mix well.
4. Shape into 4 patties and grill to desired doneness.
BBQ Cocktail Meat Balls
Stuffed Savoy Cabbage Rolls
Ingredients:
2 lbs beef chuck cut into 1” cubes
11/3 cup oatmeal
1/2 cup diced onion
1
/2 cup chopped parsley
1/2 cup ketchup
1 tbsp worcestershire sauce
1 tbsp salt
2 tsp black pepper
1 egg
Oil for frying
Prepared BBQ sauce as needed
Servings: 10
Method:
1.
2.
3.
4.
5.
6.
7.
8.
Combine all of the ingredients except the BBQ sauce and oil,
in a large bowl. Mix well and allow several hours to blend the
flavors.
Grind the mixture through the fine cutting plate, following the
operating instructions on page 4.
Shape ground meat into meat balls about 11/2” in diameter.
Add a small amount of oil to a skillet and bring to frying
temperature.
Saute the meat balls in batches until almost cooked through.
Transfer to a saucepan.
Add enough prepared BBQ sauce to almost cover the meat
balls.
Simmer for about 1 hour.
Ingredients:
10 large cabbage leaves, boiled for 2 minutes in salted water
and drained well
1/2 lb beef chuck cut into 1” cubes
1/2 lb pork butt cut into 1” cubes
1/2 cup chopped onion
1 clove garlic, diced fine
3 tbsp chopped parsley
11/2 cups cooked rice
2 tbsp tomato paste
2 tsp salt
1/2 tsp black pepper
Method:
1. Using the medium grinding plate, follow operating instructions
on page 4. Grind the beef, pork, onion garlic, and parsley into
a medium bowl.
2. Add the rice, tomato paste, salt, and pepper. Mix well.
3. Divide the filling among the cooked cabbage leaves, being
careful not to overfill.
4. Fold the edges in as you roll the leaves to hold the filling.
5. Place in an oiled casserole dish with the seam edge of the rolled
leaf on the bottom to hold the shape.
6. Coat generously with tomato sauce.
7. Cover casserole and gently simmer for about 1 hour.
11
Commercial Meat Grinder
Ham Salad
Stuffed Banana Peppers
Servings: Makes 3 cups
Servings: 6 peppers as an appetizer
Ingredients:
3 cups cooked ham, diced
1/2 cup chopped sweet onion (Spanish or Vidalia)
1
/2 cup sweet pickles, chopped
1/2 cup mayonnaise (more or less to taste)
1 tbsp dijon mustard
Ingredients:
11/2 lbs beef chuck cut into 1” cubes
1 cup oatmeal
1/2 cup diced onion
1/2 cup chopped parsley
1/2 cup ketchup
2 tsp worcestershire sauce
2 tsp salt
1 tsp black pepper
12 banana (or finger) peppers, sweet or hot (stem/seeds removed)
Oil for frying
Tomato sauce to serve on the side if desired
Method:
1. Put ham, pickles, and onion through the grinder using the
coarse grinding plate following the operating instructions
on page 4.
2. Add the mayonnaise and mustard. Mix well.
12
Method:
1. In a medium size bowl, combine all of the ingredients except
the peppers, oil, and tomato sauce. Mix well.
2. Allow several hours to marinate if possible.
3. Grind the mixture using the fine or medium cutting plates
following the operating instructions on page 4.
4. Stuff the ground mixture into the prepared peppers.
5. Heat oil in a sauté pan.
6. Saute the peppers in batches until well browned and the meat
mixture is fully cooked.
7. If desired serve with Tomato Sauce
Note: For a different flavor use pickled peppers instead of fresh.
Shake off excess liquid before stuffing.
Meat Loaf
Lemon and Port Wine Poached Fig Tarts
Serves: 6
Servings: 12 tarts
Ingredients:
2 eggs, beaten
3/4 cup milk
2-3 slices day old bread
1/2 cup finely chopped onion
2 tbsp snipped parsley
2 tsp worcestershire sauce
1 tsp salt
1/2 tsp ground sage
11/2 pounds chuck beef roast
1/4 cup ketchup
2 tsp brown sugar
1 tsp dry mustard
Ingredients:
12 pre-baked 3” tart shells
11/2 cups dried figs
11/2 cups port wine or any other sweet red wine
1 cup toasted pecans, coarsely chopped
11/2 cups prepared lemon pie filling
Whipped cream as needed
Fresh raspberries and mint leaves for garnish
Method:
1. Preheat oven to 350°F.
2. Using the medium grinding plate, grind bread and then beef,
following the instructions on page 4.
3. Combine eggs, milk, stir in bread crumbs, parsley, salt, sage
and 1/8 tsp of pepper. Add beef, mix well. Pat mixture into a
8”x 4”x 2” loaf pan. Bake for 1/4 hours. Spoon off excess fat.
Combine ketchup, brown sugar, and mustard, spread over
meat. Bake an additional 10-150 minutes.
Method:
1. Combine figs and wine in a small sauce pan. Bring to a simmer
for 5 minutes.
2. Turn off heat and allow figs to cool in the wine.
3. Drain off excess liquid and save for filling.
4. Grind the cooled figs using coarse grinding plate following the
operating instructions on page 4.
5. Combine the ground figs and toasted pecans with the additional
poaching liquid.
6. Spread a layer of filling onto each of the pastry shells.
Note: If there is leftover filling, put it into the freezer for
future use.
7. Top each of the shells with lemon pie filling.
8. Mound the top with whipped cream.
9. Garnish with raspberries and a mint sprig.
Note: If any poaching liquid is left over it can be combined with
some fresh raspberries and pureed in a blender for a
complementary sauce.
13
CUSTOMER SERVICE
If you have any questions
or problems regarding the
operation of your Deni
Commercial Meat Grinder,
call our customer service
department toll free:
Monday through Friday
8:30 a.m. to 5:00 p.m.
(Eastern Standard Time)
1-800-DENI-VAC
1-800-3364-822
or email us at
[email protected]
ONE-YEAR LIMITED WARRANTY
Your Deni Commercial Meat Grinder is warranted for one year from date of
purchase or receipt against all defects in material and workmanship. Should your
appliance prove defective within one year from date of purchase or receipt, return the
unit, freight prepaid, along with an explanation of the claim. If purchased in the U.S.A.
or other country, please send to: Keystone Manufacturing Company, Inc. 33 Norris
Street, Buffalo, NY 14207. If purchased in Canada, please send to: Keystone
Manufacturing Company, Inc., 151 Cushman Road, St. Catharines, Ontario L2M 6T4.
(Please package your appliance carefully in its original box and packing material to
avoid damage in transit. Keystone is not responsible for any damage caused to the
appliance in return shipment.) Under this warranty, Keystone Manufacturing Company,
Inc. undertakes to repair or replace any parts found to be defective.
This warranty is only valid if the appliance is used solely for household purposes in
accordance with the instructions. This warranty is invalid if the unit is connected to an
unsuitable electrical supply, or dismantled or interfered with in any way or damaged
through misuse.
We ask that you kindly fill in the details on your warranty card and return it within
one week from date of purchase or receipt.
This warranty gives you specific legal rights. You may also have other rights which
vary from state/province to state/province.
www.deni.com
Deni by Keystone Manufacturing Company, Inc.®
© 2007 Keystone Manufacturing Company, Inc.