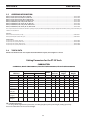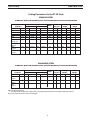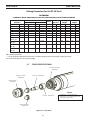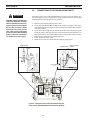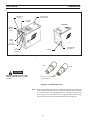
1
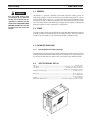
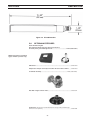
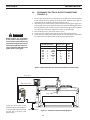
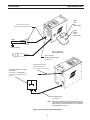
ESP-50
Plasma Arc Cutting Package
Instruction Manual (GB)
This manual provides installation and operation instructions for the following ESP-50 cutting packages starting with Serial No.
Consoles:
P/N 0558004371 - 208/230 V, 50/60 Hz, 1 or 3-phase
P/N 0558004372 - (380-400)/460 V, 50/60 Hz, 3-phase, CE
0558004720
:
Be sure this information reaches the operator.
You can get extra copies through your supplier.
caution
These INSTRUCTIONS are for experienced operators. If you are not fully familiar with the
principles of operation and safe practices for arc welding and cutting equipment, we urge
you to read our booklet, “Precautions and Safe Practices for Arc Welding, Cutting, and
Gouging,” Form 52-529. Do NOT permit untrained persons to install, operate, or maintain
this equipment. Do NOT attempt to install or operate this equipment until you have read
and fully understand these instructions. If you do not fully understand these instructions,
contact your supplier for further information. Be sure to read the Safety Precautions before installing or operating this equipment.
USER RESPONSIBILITY
This equipment will perform in conformity with the description thereof contained in this manual and accompanying labels and/or inserts when installed, operated, maintained and repaired in accordance with the instructions provided. This equipment must be checked periodically. Malfunctioning or poorly maintained equipment
should not be used. Parts that are broken, missing, worn, distorted or contaminated should be replaced immediately. Should such repair or replacement become necessary, the manufacturer recommends that a telephone
or written request for service advice be made to the Authorized Distributor from whom it was purchased.
This equipment or any of its parts should not be altered without the prior written approval of the manufacturer.
The user of this equipment shall have the sole responsibility for any malfunction which results from improper
use, faulty maintenance, damage, improper repair or alteration by anyone other than the manufacturer or a service facility designated by the manufacturer.
READ AND UNDERSTAND THE INSTRUCTION MANUAL BEFORE INSTALLING OR OPERATING.
PROTECT YOURSELF AND OTHERS!
74
TABLE OF CONTENTS
SECTION
TITLE
PAGE
SECTION 1
1.0
Safety Precautions..................................................................................................................................77
Safety Precautions...........................................................................................................................................77
SECTION 2
2.1
2.2
2.3
2.4
2.5
2.6
2.7
2.8
2.9
SECTION 2
3.1
3.2
3.3
3.4
3.5
3.6
3.7
3.8
DESCRIPTION.......................................................................................................................................................79
General....................................................................................................................................................................79
Scope.......................................................................................................................................................................79
Packages Available..............................................................................................................................................79
Specifications........................................................................................................................................................79
Ordering Information.........................................................................................................................................80
Torch Data..............................................................................................................................................................80
Torch Specifications............................................................................................................................................82
Optional Accessories..........................................................................................................................................83
Spare Parts Kits.....................................................................................................................................................84
INSTALLATION....................................................................................................................................................85
General....................................................................................................................................................................85
Equipment Required..........................................................................................................................................85
Location..................................................................................................................................................................85
Inspection...............................................................................................................................................................85
Primary Electrical Input Connections...........................................................................................................85
Secondary Electrical Output Connections.................................................................................................86
Connecting ESP-50 for 200(208)Vac Input.................................................................................................89
Connecting ESP-50 for 400(460)Vac Input.................................................................................................90
SECTION 3OPERATION..........................................................................................................................................................91
4.1
ESP-50 Controls....................................................................................................................................................91
4.2
Common Cutting Problems.............................................................................................................................93
75
TABLE OF CONTENTS
76
section 1safety precautions
1.0
Safety Precautions
Users of ESAB welding and plasma cutting equipment have the ultimate responsibility for ensuring that anyone
who works on or near the equipment observes all the relevant safety precautions. Safety precautions must meet
the requirements that apply to this type of welding or plasma cutting equipment. The following recommendations
should be observed in addition to the standard regulations that apply to the workplace.
All work must be carried out by trained personnel well acquainted with the operation of the welding or plasma
cutting equipment. Incorrect operation of the equipment may lead to hazardous situations which can result in
injury to the operator and damage to the equipment.
1.
Anyone who uses welding or plasma cutting equipment must be familiar with:
- its operation
- location of emergency stops
- its function
- relevant safety precautions
- welding and / or plasma cutting
2. The operator must ensure that:
- no unauthorized person stationed within the working area of the equipment when it is started up.
- no one is unprotected when the arc is struck.
3. The workplace must:
- be suitable for the purpose
- be free from drafts
4. Personal safety equipment:
- Always wear recommended personal safety equipment, such as safety glasses, flame proof
clothing, safety gloves.
- Do not wear loose fitting items, such as scarves, bracelets, rings, etc., which could become
trapped or cause burns.
5.
General precautions:
- Make sure the return cable is connected securely.
- Work on high voltage equipment may only be carried out by a qualified electrician.
- Appropriate fire extinquishing equipment must be clearly marked and close at hand.
- Lubrication and maintenance must not be carried out on the equipment during operation.
77
section 1safety precautions
WARNING
WELDING AND PLASMA CUTTING CAN BE INJURIOUS TO YOURSELF AND
OTHERS. TAKE PRECAUTIONS WHEN WELDING OR CUTTING. ASK FOR
YOUR EMPLOYER’S SAFETY PRACTICES WHICH SHOULD BE BASED ON
MANUFACTURERS’ HAZARD DATA.
ELECTRIC SHOCK - Can kill.
- Install and earth (ground) the welding or plasma cutting unit in accordance with applicable standards.
- Do not touch live electrical parts or electrodes with bare skin, wet gloves or wet clothing.
- Insulate yourself from earth and the workpiece.
- Ensure your working stance is safe.
FUMES AND GASES - Can be dangerous to health.
- Keep your head out of the fumes.
- Use ventilation, extraction at the arc, or both, to take fumes and gases away from your breathing zone
and the general area.
ARC RAYS - Can injure eyes and burn skin.
- Protect your eyes and body. Use the correct welding / plasma cutting screen and filter lens and wear
protective clothing.
- Protect bystanders with suitable screens or curtains.
FIRE HAZARD
- Sparks (spatter) can cause fire. Make sure therefore that there are no inflammable materials nearby.
NOISE - Excessive noise can damage hearing.
- Protect your ears. Use earmuffs or other hearing protection.
- Warn bystanders of the risk.
MALFUNCTION - Call for expert assistance in the event of malfunction.
READ AND UNDERSTAND THE INSTRUCTION MANUAL BEFORE INSTALLING OR OPERATING.
PROTECT YOURSELF AND OTHERS!
78
section 2description
warning
Use only ESAB torches that
are designed for use with this
console. Use of torches not designed for use with this console
could create an ELECTRIC SHOCK
HAZARD. Do NOT use or modify
any other torch for use on this
console.
2.1 General
The ESP-50 is a compact, completely self-contained plasma cutting system. As
shipped, the system is ready to cut after being connected to input power, a source
of compressed air (60 - 100 psi / 4.1 - 6.9 bars) and a PT-35 torch. The ESP-50 package
uses the PT-35 torch to deliver cutting power for severing materials up to 5/8 inch
(15.9 mm) thick. Refer to the following paragraphs for descriptions of the ESP-50
packages available as well as performance specifications.
2.2 scope
The purpose of this manual is to provide the operator with all the information required
to install and operate the ESP-50 plasma arc cutting package. Technical reference
material is also provided to assist in troubleshooting the cutting package.
2.3 Packages Available
2.3.1
ESP-50 Mechanized Cutting Packages
The ESP-50 plasma cutting package combines the ESP-50 and PT-35 torch. A typical
package includes: ESP-50 Console/Power Source, PT-35 Torch - 25' (7.6 m) or 50' (15.2
m), Torch Spare Parts Kit and a power cable. See Section 3 for installation details.
2.4
Specifications: ESP-50
Cuts ................................................................................................................................................................50 in. (12.7 mm)
1 ph. Input............................................................................................................ 208/230 vac, 1 ph, 50/60 Hz, 46/41 A
3 ph. Input...................................................................................................................208/230 vac, 3 ph, 50/60 Hz, 22 A
........................................................................................................................ 400/460 vac, 3 ph, 50/60 Hz, (10-9)/8 A
Output @ 100% duty cycle............................................................................................................... 50 amps @ 100 vac
Dimensions . .........................................................................................................................................W = 10.1” (275 mm)
...............................................................................................................................................................H = 18.3” (465 mm)
...............................................................................................................................................................D = 20.3” (576 mm)
Weight............................................................................................................................................................ 85 lbs. (38.6 kg)
Minimum Air Requirements ................................................................250 cfh @ 60 psig (117.9 l/min @ 4.1 bars)
79
section 2description
2.5Ordering Information:
ESP-50, 230/230 V, 25 ft. (7.6m), PT-35, with rack................................................................................................................................................................................0558004378
ESP-50, 208/230 V, 50 ft. (15.2m), PT-35, with rack.............................................................................................................................................................................0558004379
ESP-50, 230/230 V, 25 ft. (7.6m), PT-35, without rack.........................................................................................................................................................................0558004973
ESP-50, 208/230 V, 50 ft. (15.2m), PT-35, without rack......................................................................................................................................................................0558004974
ESP-50, 400CE/460 V, 25 ft. (7.6m), PT-35, with rack..........................................................................................................................................................................0558004376
ESP-50, 400CE/460 V, 50 ft. (15.2m), PT- 35, with rack.......................................................................................................................................................................0558004377
ESP-50, 400CE/460 V, 25 ft. (7.6m), PT-35, without rack...................................................................................................................................................................0558004374
ESP-50, 400CE/460 V, 50 ft. (15.2m), PT- 35, without rack...............................................................................................................................................................0558004375
The components that are included in the ESP-50 packages may be purchased separately by using the appropriate P/N when placing orders. Individual part
numbers are listed below:
Consoles:
ESP-50 208/230 V, 50/60 Hz, 1/3-ph................................................................................................................................................................................................................0558004371
ESP-50 (380-400)/460 V, 50/60 Hz, 3-ph........................................................................................................................................................................................................0558004372
PT-35 Torches:
PT-35 Torch, 25 ft. (7.6m), with rack.................................................................................................................................................................................................................0558004351
PT-35 Torch, 50 ft. (15.2m), with rack...............................................................................................................................................................................................................0558004352
PT-35 Torch, 25 ft. (7.6m), without rack..........................................................................................................................................................................................................0558004353
PT-35 Torch, 50 ft. (15.2m), without rack........................................................................................................................................................................................................0558004354
2.6
Torch Data
ESP-50 uses the PT-35 torch. For complete list and breakdown of parts, refer to Figure 2.1 and 2.2.
Cutting Parameters for the PT-35 Torch
Carbon Steel
50 AMP Data, Nozzle P/N 0558004356, Heat Shield P/N 0558004357, Electrode P/N 0558005200
Metal
Thickness
mm
in.
15.875
.625 12.700
.500
9.525
.375
6.350
.250
3.175
.125
2.515
.099
(12/13 ga.)
1.499
.059 ( 16 ga.)
1.067
.042 (19 ga.)
0.610
.024 (24 ga.)
Travel Speed
Maximum
Optimum
ipm (mm/min) ipm (mm/min)
12
18
457
304
25
30
762
635
42
48
1219
101
82
86
2184
2082
150
200
5080
3810
225
250
6350
5715
Amps
50
50
50
50
50
50
Air
Pressure
psig bar
60 4.1
60 4.1
60 4.1
60 4.1
60 4.1
60 4.1
Cutting
Height
mm
in.
3.175
.125
3.175
.125
3.175
.125
3.175
.125
3.175
.125
3.175
.125
Pierce
Height
mm
in.
NR
NR
NR
NR
.187* 4.750
.156* 3.962
.156* 3.962
.125 3.175
375
9525
450
11430
50
60
4.1
.125
3.175
.125
3.175
450
11430
600
15240
50
60
4.1
.125
3.175
.125
3.175
750+
19050+
750+
19050+
50
60
4.1
.125
3.175
.125
3.175
NR = Not Recommended
* = If using a fixed height torch or plate rider, set cutting height equal to pierce height; cutting speed may have to be reduced due to increased cut height.
80
section 2description
Cutting Parameters for the PT-35 Torch
STAINLESS Steel
50 AMP Data, Nozzle P/N 0558004356, Heat Shield P/N 0558004357, Electrode P/N 0558005200
Metal
Thickness
mm
in.
12.700
.500
9.525
.375
6.350
.250
4.763
.188
3.175
.125
2.515
.105
(12/13 ga.)
1.499
.060 (16 ga.)
1.067
.043
(19 ga.)
0.610
.025
(24 ga.)
Travel Speed
Maximum
Optimum
ipm (mm/min) ipm (mm/min)
18
457
13
330
30
762
22
558
60
1524
50
1270
93
2362
70
1778
162
4114
125
3175
195
4953
172
4368
50
50
50
50
50
50
Air
Pressure
psig bar
60
4.1
60
4.1
60
4.1
60
4.1
60
4.1
60
4.1
Pierce
Cutting
Height
Height
mm
in.
mm
in.
NR
3.175 NR
.125
NR
3.175 NR
.125
3.175 .187* 4.750
.125
3.175 .187* 4.750
.125
3.175 .156* 3.962
.125
3.175 .125 3.175
.125
Amps
345
8763
390
9906
50
60
4.1
.125
3.175
.125
3.175
750+
19050+
750+
19050+
50
60
4.1
.125
3.175
.125
3.175
750+
19050+
750+
19050+
50
60
4.1
.125
3.175
.125
3.175
GALVANIZED Steel
50 AMP Data, Nozzle P/N 0558004356, Heat Shield P/N 0558004357, Electrode P/N 0558005200
Metal
Thickness
mm
in.
1.803
.071
(15 ga.)
1.575
.062 (16 ga.)
0.635
.025
(25 ga.)
Travel Speed
Maximum
Optimum
ipm (mm/min) ipm (mm/min)
210
5334
170
4318
50
Air
Pressure
psig bar
60
4.1
Pierce
Cutting
Height
Height
mm
mm
in.
in.
3.175 .125 3.175
.125
Amps
315
8001
352
8940
50
60
4.1
.125
3.175 .125
3.175
450
11430
750
19050
50
60
4.1
.125
3.175 .125
3.175
NR = Not Recommended
* = If using a fixed height torch or plate rider, set cutting height equal to pierce height; cutting speed may have to be reduced due to increased cut height.
81
section 2description
Cutting Parameters for the PT-35 Torch
ALUMINUM
50 AMP Data, Nozzle P/N 0558004356, Heat Shield P/N 0558004357, Electrode P/N 0558005200
Metal
Thickness
mm
in.
12.700
.500
9.525
.375
7.950
.313
6.350
.250
4.763
.188
3.175
.125
2.413
.095
(10/11 ga.)
1.245
.049
(16 ga.)
1.092
.043
(17 ga.)
0.762
.031
(20 ga.)
Travel Speed
Maximum
Optimum
(mm/min)
ipm
ipm (mm/min)
30
762
21
533
45
1143
36
914
57
1447
50
1270
87
2209
72
1828
150
3810
110
2794
230
5842
200
5080
300
7620
275
6985
50
50
50
50
50
50
50
Air
Pressure
psig bar
60 4.1
60 4.1
60 4.1
60 4.1
60 4.1
60 4.1
60 4.1
Cutting
Height
mm
in.
3.175
.125
3.175
.125
3.175
.125
3.175
.125
3.175
.125
3.175
.125
3.175
.125
Amps
Pierce
Height
mm
in.
NR
NR
NR
NR
.250* 6.350
.188* 4.775
.156* 3.962
.156* 3.962
.125 3.175
420
10668
465
11811
50
60
4.1
.125
3.175
.125
3.175
450
11430
502
12750
50
60
4.1
.125
3.175
.125
3.175
750+
19050+
750+
19050+
50
60
4.1
.125
3.175
.125
3.175
NR = Not Recommended
* = If using a fixed height torch or plate rider, set cutting height equal to pierce height; cutting speed may have to be reduced due to increased cut height.
2.7
Torch Specifications:
Torch Body Assembly 0558004390
Cutting "A" Nozzle 0558004356
Electrode - 0558005200
Heat Shield 50A 0558004357
Nozzles
Insulator - 0558004387
Cutting "B" Nozzle 0558004358
Figure 2-1. PT-35 Torch
82
• 0558004356 - Standard "A" Nozzle
• 0558004358 - Special "B" Nozzle for duct cutting & expanded metal
With Rack; 7.6m (25 ft.) ............................................................. 0558004351
With Rack; 15.2m (50 ft.) ........................................................... 0558004352
Without Rack; 7.6m (25 ft.) ........................................................ 0558004353
Without Rack; 15.2m (50 ft.) ...................................................... 0558004354
section 2description
Figure 2-2. PT-35 Dimensions
2.8Optional Accessories:
Plasma Flow Measuring Kit:
This valuable troubleshooting tool allows measurement of
the actual plasma gas flow through the torch.............................................. 19765 (0558000739)
(NOTE: Part numbers in parenthesis
apply to "CE"/European units only.)
CNC Cable 50'...................................................................................................................0558004366
Adaptor Cable - Adaptor to directly connect HT or TD control cable to ESP-50...........0558004363
Torch Holder Assembly..................................................................................... 16V83 (0558004250)
11
Plate Rider - height control for PT-35............................................................................ 0560936972
Standoff Tool - Designed for use with Plate Rider for setting nozzle standoff height.
Can also be used separately. ................................................................................................................. 0558004364
83
section 2description
2.9
Spare Parts Kits:
50 A Spare Parts Kit.........................................................................................................0558005210
PT-35, 50 A, Spare Parts Kit, P/N 0558005210
Contents:
Description
P/N
Quantity
Shield, Retaining
50 amp "A" Nozzle
Electrode
Fuse 2amp, 600vdc
Insulator
0558004357
0558004356
0558005200
0558003075
0558004387
1
4
6
1
1
Consumable Value Pack..................................................................................................0558005203
Consumable Value Pack, P/N 0558005203
Contents:
Description
P/N
Quantity
Electrode
50 amp "A" Nozzle
0558005200
0558004356
10
15
Consumable Set...............................................................................................................0558005201
Consumable Set, P/N 0558005201
Contents:
Description
P/N
Quantity
Electrode
50 amp "A" Nozzle
0558005200
0558004356
1
1
Consumable Set...............................................................................................................0558005202
Consumable Set, P/N 0558005202
Contents:
Description
P/N
Quantity
Electrode
50 amp "B" Nozzle
0558005200
0558004358
84
1
1
section 3installation
3.1 CAUTION
Installing or placing any type of
filtering device will restrict the
volume of intake air, thereby subjecting the power source internal
components to overheating. The
warranty is void if any type of
filter device is used.
warning
ELECTRIC SHOCK CAN KILL! Precautionary measures should be taken
to provide maximum protection
against electrical shock. Be sure
that all power is off by opening the
line (wall) disconnect switch and by
unplugging the power cord to the
unit when connections are made
inside of the power source.
CAUTION
Be sure that the power source is
properly configured for your input
power supply. DO NOT connect
a power source configured for
208/230 V to a 460 V input power
supply. Damage to the machine
may occur.
Proper installation is important for satisfactory and trouble-free operation of the
ESP-50 cutting package. It is suggested that each step in this section be studied
carefully and followed closely.
3.2 The chassis must be connected to
an approved electrical ground.
Failure to do so may result in
electrical shock, severe burns
or death.
Equipment Required
A source of clean, dry air that supplies 250 cfh (118.0 l/m) at 60-75 psig (4.1 - 5.2 bars)
is required for the cutting operation. The air supply should not exceed 150 psig (10.3
bars) (the maximum inlet pressure rating of the air filter-regulator supplied with the
package).
3.3 Location
Adequate ventilation is necessary to provide proper cooling of the ESP-50. The
amount of dirt, dust, and excessive heat to which the equipment is exposed, should
be minimized. There should be at least one foot of clearance between the ESP-50
power source and wall or any other obstruction to allow freedom of air movement
through the power source.
3.4 A.
B.
C.
3.5 Inspection
Remove the shipping container and all packing material and inspect for evidence
of concealed damage which may not have been apparent upon receipt of the
ESP-50. Notify the carrier of any defects or damage at once.
Check container for any loose parts prior to disposing of shipping materials.
Check air louvers and any other openings to ensure that any obstruction is
removed.
Primary Electrical Input Connections
(Figure 3-2)
NOTE: If using 200(208) V input power, the ESP-50 must be reconnected for 200 V
use as directed in Section 3.7 and Figure 3-4.
warning
General
If using (380-400) V input power, the ESP-50 must be reconnected as directed
in Section 3.8, Figure 3-5.
NOTE: The 208/230 V models are equipped with a plug for single-phase connection
only. The plug is mounted to a 4-conductor cable. If 3-phase connection is
desired, remove the plug and proceed as described.
A line (wall) disconnect switch with fuses or circuit breakers should be provided at
the main power panel (see Table 3-1 for fuse sizes). The input power cable of the
console may be connected directly to the disconnect switch or you may purchase a
proper plug and receptacle from a local electrical supplier. If using plug/receptacle
combination, see Table 3-1 for recommended input conductors for connecting receptacle to line disconnect switch.
85
section 3installation
3.6
SECONDARY ELECTRICAL OUTPUT CONNECTIONS
(FIGURE 3-2)
1. For operator safety, the torch connections are located on the output terminal
board behind the lower portion of the front panel. Remove access door to
output terminal board from right panel of power source.
2. Thread the power cable & pilot arc cable of the PT-35 through the right open
bushing of the front panel. Connect power cable to the torch fitting (left-hand
threads); bolt the pilot arc cable ring connection to the copper terminal. Make
sure the power and pilot arc cable connections are wrench-tight.
3. Reassemble the access door to the power source.
4. Connect your air supply to the inlet connection of the filter-regulator.
5. Clamp the work cable to the workpiece. Be sure the workpiece is connected
to an approved earth ground with a properly sized ground cable.
warning
Before making any connections
to the power source output terminals, make sure that all primary
input power to the power source is
deenergized (off) at the main disconnect switch and that the input
power cable is unplugged.
Input Requirements
Volts
PhaseAmps
Input & GndFuse
Conductor
Size
CU/AWGAmps
208
1
55A
6
80
208
3
26A/Ph.
6
50
230
1
49A
6
80
230
3
24A/Ph.
6
50
400 Operation,
3
13and Maintenance
10
25 for the
Installation,
Manual
460
3
11
10
25
SHADOW
Table 3-1. Recommended Sizes For Input Conductors and Line Fuses
GANTRY SHAPE CUTTING MACHINE
Torch cable
CNC Control cable
PT-35
Clamp the work cable to the
workpiece. Be sure the workpiece
is connected to an approved earth
ground with a properly sized
ground cable.
SAFETY GROUND
Figure 3-1. PowerCut Interconnection Diagram
86
F14-080 A
May, 1999
section 3installation
TORCH
PILOT
ARC
CONNECTION
Allow at least 10 ft. (3m)
between work and power source
TORCH
POWER
CABLE
CONNECTION
WORK
SAFETY GROUND
ACCESS DOOR FOR
TORCH CONNECTION
ACCESS FOR CNC
INTERFACE CONNECTIONS.
(See Detail “A”)
CUSTOMER FUSED LINE DISCONNECT SWITCH
(See Table 3.1 and WARNING in
regards to chassis ground in Section 3.5.)
Prefiltered AIR SUPPLY
(Customer Supplied)
(100 psig max /6.9 bars max)
INPUT POWER CABLE
(See Table 3.1)
NOTE:
The 208/230 V models are equipped with a plug for singlephase connection only. The plug is mounted to a 4-conductor
cable. If 3-phase connection is desired, remove and discard
the plug and refer to Sect. 3.5.
Figure 3-2. ESP-50 Interconnection Diagram
87
section 3installation
FACTORY WIRED
MACHINES
1
2
3
4
5
6
BLUE
ORANGE
RED
BLACK
GREEN
WHITE
DETAIL "A"
Figure 3.3 - MECHANICAL CUTTING INTERFACE DIAGRAM
CNC Interface Connection (Located inside console, left side of base.)
88
section 3installation
3.7
warning
Connecting ESP-50 for 200(208) Vac Input
The ESP-50 power source with 200/230 vac, single-phase input capability is factory
set for 230 vac input. If using 200(208) vac input, the ESP-50 must be reconnected
as follows before connecting to your input power:
ELECTRIC SHOCK CAN KILL! Precautionary measures should be
taken to provide maximum protection against electrical shock.
Be sure that all power is off by
opening the line (wall) disconnect switch and by unplugging
the power cord to the unit when
primary electrical connections
are made to the power supply.
1. Remove the cover from the ESP-50 power source.
2. Locate the Input Bridge (IBR) and TB5 terminal block (see Figure 3.4.A) on the
left side towards the rear panel. Disconnect the gray lead from TB5-2 and then
connect it to TB5-1.
3. Locate the output bridge (D1) on left side towards the front panel (see Figure
3.4.B). Disconnect and swap leads X2 and X3 from the main transformer. For
200(208) vac input, X2 is connected to TB3 and X3 is connected to terminal 3
of D1. Make sure the connections are firmly tightened.
4. Leave all other wires the same.
5. Reinstall the cover and connect the ESP-50 to 208 vac input power.
Note: Factory set for 230 VAC input.
For 208VAC move GRY wire from TB5-2 to TB5-1, move T1-X2 to TB3 and T1-X3 to D1-3
Figure 3.4.A
Figure 3.4.B
FROM MAIN TRANSFORMER
GRY
TB5
BLK
BLK
GRY
(IBR)
INPUT
BRIDGE
R2
+
R
S G
OUTPUT BRIDGE
(D1)
T +
~
1
~
2
~3
X1
20
8
INP VAC
UT
208 230
VAC VAC
Figure 3-4. Original Factory Setup for 230 Vac Input on
Power Source with 200/230 Vac Input Power Capability
89
T1-X2
230
V
INPU AC
T
T1-X3
TB3
section 3installation
3.8
warning
Connecting ESP-50 for 400/460 Vac Input
The ESP-50 power source with (380-400)/460 vac, 3-phase input capability is factory set for 460 vac input. If using 400 vac input, the ESP-50 must be reconnected
as follows before connecting to your input power:
ELECTRIC SHOCK CAN KILL! Precautionary measures should be
taken to provide maximum protection against electrical shock.
Be sure that all power is off by
opening the line (wall) disconnect switch and by unplugging
the power cord to the unit when
primary electrical connections
are made to the power supply.
1. Remove cover from the ESP-50 power source.
2. Locate the Input Bridge (IBR) and TB5 terminal block (see Figure 3.5.A) on the
left side towards the rear panel. Disconnect the gray lead from TB5-2 and then
connect it to TB5-1.
3. Locate the output bridge (D1) on left side towards the front panel (see Figure
3.5.B). Disconnect and swap leads X2 and X3 from the main transformer. For
400 vac input, X2 is connected to TB3 and X3 is connected to terminal 3 of D1.
Make sure the connections are firmly tightened.
4. Leave all other wires the same.
5. Reinstall cover and connect the ESP-50 to 400 vac input power.
Figure 3.5.A
Figure 3.5.B
FROM MAIN TRANSFORMER
GRY
TB5
BLU
WHT
(IBR)
INPUT
BRIDGE
R2
+
R
S G
OUTPUT BRIDGE
(D1)
T +
~
1
~
2
~3
X1
40
0
INP VAC
UT
400 460
VAC VAC
Figure 3-5. Original Factory Setup for 460 Vac Input on
Power Source with 400/460 Vac Input Power Capability
90
T1-X2
460
V
INPU AC
T
T1-X3
TB3
section 4
operation
4.1 A.
warning
ELECTRIC SHOCK can kill.
• Do NOT operate the unit with the
cover removed.
• Do NOT apply power to the unit
while holding or carrying the
unit.
• Do NOT touch any torch parts forward of the torch handle (nozzle,
heat shield, electrode, etc.) with
power switch on.
warning
ARC RAYS can burn eyes and skin;
NOISE can damage hearing.
• Wear welding helmet with No. 6
or 7 lens shade.
• Wear eye, ear, and body protection.
Position the ESP-50 at least 10
feet (3 meters) from the cutting
area. Sparks and hot slag from
the cutting operation can damage
the unit.
Power Switch (located on rear panel). When placed in ON position, the white
pilot light will glow indicating control circuit is energized and the cooling fan
will run.
B.Output Current Control. Adjustable from 20 to 50 amperes.
C.Air Test Switch. When placed in Test position, air filter-regulator can be adjusted
to desired pressure (60 - 75 psig / 4.1 - 5.2 bars) before cutting operations. Allow air to flow for a few minutes. This should remove any condensation that
may have accumulated during shutdown period. Be sure to place switch in
OPERATE position before starting cutting operations.
D.
Pilot Arc Select Switch.
Low: Maintains "Low" pilot arc current level. May improve consumable life.
Auto: Adjusts pilot arc based on output current selected. Use for standard
cutting.
Hi: Set pilot arc current level to "High" when improved stability is needed. May
lessen consumable life.
E.Fault Light. Will glow amber under the following conditions and operations will come to a complete stop.
CAUTION
ESP-50 CONTROLS (FIGURE 4-1)
Start Signal: On power-up, fault light will be on continuously when a start
signal is present. Remove start signal to reset.
Parts in Place Fault: The fault light will be on continuously at power-up. This
indicates missing or worn consumables. Turn power off and inspect torch.
Over Temperature: The fault light will be mostly off but will flick on for
about 1/10th of a second every second. This indicates that the duty cycle has
been exceeded. Allow the power source to cool down before continuing to
operate.
High/Low Line Voltage: The fault light will rapidly blink on and off (five
times per second). This indicates that the input voltage is outside the “+ or -”
15% range of the input rating.
Over-Current: The fault light will be on continuously. This indicates that input
current has been exceeded.
All fault signals will remain on for a minimum of 10 seconds. If fault clears,
all will reset automatically except for over-current. To clear over-current,
the power must be shut off for 5 seconds and then turned back on.
91
section 4
operation
POWER LIGHT
(WHITE)
AIR REGULATOR
CONTROL KNOB
FAULT LIGHT
(AMBER)
REAR VIEW
CURRENT
CONTROL
KNOB
AIR TEST
SWITCH
PILOT ARC
SELECT SWITCH
AIR
PRESSURE
GAUGE
FUSE (3A)
POWER ON-OFF
(I-O) SWITCH
Figure 4-1. ESP-50 Controls
NEW
WORN
CAUTION
REPLACE ELECTRODE BEFORE LENGTH
BECOMES SHORTER THAN .060" INCH
(1.5 MM)
Replace when eroded beyond
.060"(1.5mm) Depth.
Figure 4-2. Electrode Wear Limit
NOTE: When replacing the nozzle, always inspect the electrode for wear. If electrode
wear is greater than .060" (1.5 mm), replace the electrode. If the electrode
is used beyond this recommended wear limit, damage to the torch and
power source may occur. Nozzle life is also greatly reduced when using
the electrode beyond the recommended limit. Refer to Figure 4-2.
92
section 4
operation
4.2 Common Cutting Problems
Listed below are common cutting problems followed by the probable cause of each.
If problems are determined to be caused by the ESP-50, refer to the maintenance
section of this manual. If the problem is not corrected after referring to the maintenance section, contact your ESAB distributor.
A. Insufficient Penetration.
1.
2.
3.
4.
5.
Current too low.
Cutting speed too fast.
Damaged cutting nozzle.
Improper air pressure.
Low air flow rate.
B. Main Arc Extinguishes.
1. Cutting speed too slow.
2. Worn electrode.
C. Dross Formation. (In some materials and thicknesses, it may be impossible
to get dross-free cuts.)
1.
2.
3.
4.
5.
Current too low.
Cutting speed too fast or too slow.
Improper air pressure.
Faulty nozzle or electrode.
Low air flow rate.
D. Double Arcing. (Damaged Nozzle Orifice.)
1.
2.
3.
4.
Low air pressure.
Damaged cutting nozzle.
Loose cutting nozzle.
Heavy spatter accumulation on nozzle.
E.Uneven Arc.
1. Damaged cutting nozzle or worn electrode.
F.Unstable Cutting Conditions.
1. Incorrect cutting speed.
2. Loose cable or hose connections.
3. Electrode and/or cutting nozzle in poor condition.
G. Main Arc Does Not Strike.
1. Worn electrode.
2. Loose connections.
3. Work cable not attached.
H. Poor Consumable Life.
1. Improper gas pressure.
2. Contaminated air supply.
3. Low air flow rate.
93
section 4
operation
94