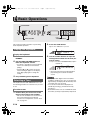
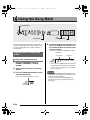
1
CTK240_es_Cover_1-4.fm 8 ページ 2010年3月2日 火曜日 午前11時4分 Esta marca de reciclaje indica que el empaquetado se ajusta a la legislación de protección ambiental en Alemania. CASIO COMPUTER CO.,LTD. 6-2, Hon-machi 1-chome Shibuya-ku, Tokyo 151-8543, Japan O MA1003-A Printed in China CTK240ES1A USER’S GUIDE GUÍA DEL USUARIO Please keep all information for future reference. Guarde toda información para tener como referencia futura. CTK240ES1A Español This recycle mark indicates that the packaging conforms to the environmental protection legislation in Germany. English ES CTK240_es_Cover_1-4.fm 9 ページ 2010年2月12日 金曜日 午前10時12分 GUIDELINES LAID DOWN BY FCC RULES FOR USE OF THE UNIT IN THE U.S.A. (not applicable to other areas). NOTICE This equipment has been tested and found to comply with the limits for a Class B digital device, pursuant to Part 15 of the FCC Rules. These limits are designed to provide reasonable protection against harmful interference in a residential installation. This equipment generates, uses and can radiate radio frequency energy and, if not installed and used in accordance with the instructions, may cause harmful interference to radio communications. However, there is no guarantee that interference will not occur in a particular installation. If this equipment does cause harmful interference to radio or television reception, which can be determined by turning the equipment off and on, the user is encouraged to try to correct the interference by one or more of the following measures: • Reorient or relocate the receiving antenna. • Increase the separation between the equipment and receiver. • Connect the equipment into an outlet on a circuit different from that to which the receiver is connected. • Consult the dealer or an experienced radio/TV technician for help. FCC WARNING Changes or modifications not expressly approved by the party responsible for compliance could void the user’s authority to operate the equipment. Important! Please note the following important information before using this product. • Before using the optional AD-E95100L Adaptor to power the unit, be sure to check the AC Adaptor for any damage first. Carefully check the power cord for breakage, cuts, exposed wire and other serious damage. Never let children use an AC adaptor that is seriously damaged. • Never attempt to recharge batteries. • Do not use rechargeable batteries. • Never mix old batteries with new ones. • Use recommended batteries or equivalent types. • Always make sure that positive (+) and negative (–) poles are facing correctly as indicated near the battery compartment. • Replace batteries as soon as possible after any sign they are getting weak. • Do not short-circuit the battery terminals. • The product is not intended for children under 3 years. • Use only CASIO AD-E95100L adaptor. • The AC adaptor is not a toy. • Be sure to disconnect the AC adaptor before cleaning the product. This mark applies in EU countries only. Manufacturer: CASIO COMPUTER CO.,LTD. 6-2, Hon-machi 1-chome, Shibuya-ku, Tokyo 151-8543, Japan Responsible within the European Union: CASIO EUROPE GmbH Casio-Platz 1, 22848 Norderstedt, Germany CTK240_e.book 1 ページ 2010年2月1日 月曜日 午前11時55分 Safety Precautions Symbols Various symbols are used in this user’s guide and on the product itself to ensure that the product is used safely and correctly, and to prevent injury to the user and other persons as well as damage to property. Those symbols along with their meanings are shown below. Symbol Examples ’ This triangle symbol (/) means that the user should be careful. (The example at left indicates electrical shock caution.) ! This circle with a line through it (-) means that the indicated action must not be performed. Indications within or nearby this symbol are specifically prohibited. (The example at left indicates that disassembly is prohibited.) $ The black dot (0) means that the indicated action must be performed. Indications within this symbol are actions that are specifically instructed to be performed. (The example at left indicates that the power plug must be unplugged from the electrical socket.) * DANGER This symbol indicates information that, if ignored or applied incorrectly, creates the danger of death or serious personal injury. * WARNING This indication stipulates matters that have the risk of causing death or serious injury if the product is operated incorrectly while ignoring this indication. * CAUTION This indication stipulates matters that have the risk of causing injury as well as matters for which there is the likelihood of occurrence of physical damage only if the product is operated incorrectly while ignoring this indication. E-1 English Before using the instrument, be sure to carefully read through the instructions contained in this manual. CTK240_e.book 2 ページ 2010年2月1日 月曜日 午前11時55分 Safety Precautions * DANGER Alkaline Batteries Perform the following steps immediately if fluid leaking from alkaline batteries ever gets into your eyes. 1. Do not rub your eyes! Rinse them with water. 2. Contact your physician immediately. Leaving alkaline battery fluid in your eyes can lead to loss of sight. + * WARNING Smoke, Strange Odor, Overheating Continued use of the product while it is emitting smoke, a strange odor, or heat creates the risk of fire and electric shock. Take the following steps immediately. 1. Turn off power. 2. If you are using the AC adaptor for power, unplug it from the wall outlet. 3. Contact your original retailer or an authorized CASIO Service Provider. AC Adaptor ●Misuse of the AC adaptor creates the risk of fire and electric shock. Always make sure you observe the following precautions. • Be sure to use only the AC adaptor that is specified for this product. • Use only a power source whose voltage is within the rating marked on the AC adaptor. • Do not overload electrical outlets and extension cords. E-2 + - ●Misuse of the AC adaptor’s electric cord can damage or break it, creating the risk of fire and electric shock. Always make sure you observe the following precautions. • Never place heavy objects on the cord or subject it to heat. • Never try to modify the cord or subject it to excessive bending. • Never twist or stretch the cord. • Should the electric cord or plug become damaged, contact your original retailer or authorized CASIO Service Provider. ●Never touch the AC adaptor while your hands are wet. Doing so creates the risk of electric shock. ●Use the AC adaptor where it will not be splashed with water. Water creates the risk of fire and electric shock. ●Do not place a vase or any other container filled with liquid on top of the AC adaptor. Water creates the risk of fire and electric shock. Batteries Misuse of batteries can cause them to leak, resulting in damage to nearby objects, or to explode, creating the risk of fire and personal injury. Always make sure you observe the following precautions. • Never try to take batteries apart or allow them to become shorted. • Never expose batteries to heat or dispose of them by incineration. • Never mix old batteries with new ones. • Never mix batteries of different types. • Do not charge the batteries. • Make sure the positive (+) and negative (–) ends of the batteries are facing correctly. + " + % - CTK240_e.book 3 ページ 2010年2月1日 月曜日 午前11時55分 Do not incinerate the product. Never throw the product into fire. Doing so can cause it to explode, creating the risk of fire and personal injury. Water and Foreign Matter Water, other liquids, and foreign matter (such as pieces of metal) getting into the product create the risk of fire and electric shock. Take the following steps immediately. 1. Turn off power. 2. If you are using the AC adaptor for power, unplug it from the wall outlet. 3. Contact your original retailer or an authorized CASIO Service Provider. Disassembly and Modification Never try to take this product apart or modify it in any way. Doing so creates the risk of electric shock, burn injury, or other personal injury. Leave all internal inspection, adjustment, and maintenance up to your original retailer or authorized CASIO Service Provider. Dropping and Impact Continued use of this product after it has been damaged by dropping or subjecting it to strong impact creates the risk of fire and electric shock. Take the following steps immediately. 1. Turn off power. 2. If you are using the AC adaptor for power, unplug it from the wall outlet. 3. Contact your original retailer or an authorized CASIO Service Provider. % Plastic Bags Never place the plastic bag the product comes in over your head or in your mouth. Doing so creates the risk of suffocation. Particular care concerning this precaution is required where small children are present. Keep off of the product and stand.* Climbing onto the product or stand can cause it to tip over or become damaged. Particular care concerning this precaution is required where small children are present. ! Location Avoid locating the product on an unstable stand, on an uneven surface, or any other unstable location. An unstable location can cause the product to fall over, creating the risk of personal injury. - - - E-3 English Safety Precautions CTK240_e.book 4 ページ 2010年2月1日 月曜日 午前11時55分 Safety Precautions * CAUTION AC Adaptor Misuse of the AC adaptor creates the risk of fire and electric shock. Always make sure you observe the following precautions. • Do not locate the electric cord near a stove or other sources of heat. • Never pull on the cord when unplugging from the electrical outlet. Always grasp the AC adaptor when unplugging. • Insert the AC adaptor into the wall outlet as far as it will go. • Unplug the AC adaptor from the wall outlet during lightening storms or before leaving on a trip or other longterm absence. • At least once a year, unplug the AC adaptor from the wall outlet and wipe away any dust that is built up in the area around the prongs of the plug. • Never use detergent to clean the power cord, especially the plug and jack parts. Relocating the Product Before relocating the product, always unplug the AC adaptor from the wall outlet and disconnect all other cables and connecting cords. Leaving cords connected creates the risk of damage to the cords, fire, and electric shock. Cleaning Before cleaning the product, always unplug the AC adaptor from the wall outlet first. Leaving the AC adaptor plugged in creates the risk of damage to the AC adaptor, fire, and electric shock. E-4 + $ $ Batteries Misuse of batteries can cause them to leak resulting in damage to nearby objects, or to explode, creating the risk of fire and personal injury. Always make sure you observe the following precautions. • Use only batteries that are specified for use with this product. • Remove batteries from the product if you do not plan to use it for a long time. Connectors Connect only the specified devices and equipment to the product’s connectors. Connection of a non-specified device or equipment creates the risk of fire and electric shock. Location Avoid the following locations for this product. Such locations create the risk of fire and electric shock. • Areas subject to high humidity or large amounts of dust. • In food preparation areas or other areas subject to oil smoke. • Near air conditioning equipment, on a heated carpet, in areas exposed to direct sunlight, inside of a vehicle parked in the sun, or any other area that subjects the product to high temperatures. - CTK240_e.book 5 ページ 2010年2月1日 月曜日 午前11時55分 Display Screen • Never push on the display screen’s LCD panel or subject it to strong impact. Doing so can cause the LCD panel’s glass to crack, creating the risk of personal injury. • Should the LCD panel ever crack or break, never touch the liquid inside of the panel. LCD panel liquid can cause skin irritation. • Should LCD panel liquid ever get inside your mouth, immediately wash out your mouth with water and contact your physician. • Should LCD panel liquid ever get into your eyes or onto your skin, rinse with clear water for at least 15 minutes, and then contact a physician. Sound Volume Do not listen to music at very loud volumes for long periods. Particular care concerning this precaution is required when using headphones. High volume settings can damage your hearing. Heavy Objects Never place heavy object on top of the product. Doing so can make the product top heavy, causing the product to tip over or the object to fall from it, creating the risk of personal injury. - Correct Stand* Assembly An incorrectly assembled stand can tip over, causing the product to fall and creating the risk of personal injury. Make sure you assemble the stand correctly, following the assembly instructions that come with it. Make sure you mount the product on the stand correctly. + * Stand is available as an option. When using batteries, be sure to replace them or shift to one of the alternate power sources whenever you notice any of the following symptoms. - • Instrument does not turn on • Display that is flickering, dim, or difficult to read • Abnormally low speaker/headphone volume • Distortion of sound output • Occasional interruption of sound when playing at high volume • Sudden power failure when playing at high volume • Flickering or dimming of the display when playing at high volume • Continued sound output even after you release a key • A tone that is totally different from the one that is selected • Abnormal rhythm pattern and Song Bank play E-5 English Safety Precautions CTK240_e.book 6 ページ 2010年2月1日 月曜日 午前11時55分 Introduction Congratulations upon your selection of this CASIO musical instrument. This keyboard provides you with the following features and functions. ■ 100 tones Choose from among orchestral sounds, synthesized sounds, and more. ■ 100 rhythms 100 versatile rhythms help to add plenty of life to all your keyboard performances. ■ Auto Accompaniment Simply play a chord and the corresponding rhythm, bass and chord parts play automatically. ■ 50-tune Song Bank A wide selection of favorites including “ODE TO JOY” and “JINGLE BELLS” is yours for your listening enjoyment or play along fun. A simple operation cuts out the melody part of the tune, allowing you to play along on the keyboard. E-6 CTK240_e.book 7 ページ 2010年2月1日 月曜日 午前11時55分 Contents Using the Song Bank ...... E-24 Playing Back a Song Bank Tune .......... E-24 Introduction ....................... E-6 Song Bank Mode Display ..................... E-25 General Guide ................... E-8 Adjusting the Tempo of a Song Bank Tune................................... E-26 Attachment of the Score Stand .............. E-9 Using the Display ................................. E-10 Song Bank Quick Reference.............. E-11 Playing Back a Song Bank Tune.......... E-11 Power Supply .................. E-13 Using a Household Power Outlet ......... E-13 Using Batteries ..................................... E-13 Auto Power Off ..................................... E-14 Settings ................................................ E-14 Connections .................... E-15 Changing the Tone of a Song Bank Tune’s Melody.................... E-26 Playing Along with a Song Bank Tune................................... E-26 Applause Sound ................................... E-27 Playing Back All Song Bank Tunes in Succession ............................ E-28 Keyboard Settings .......... E-29 Transposing the Keyboard ................... E-29 Tuning the Keyboard ............................ E-30 Troubleshooting.............. E-31 Specifications.................. E-33 Phones/Output Terminal ...................... E-15 Accessories and Options...................... E-15 Basic Operations ............ E-16 Playing the Keyboard ........................... E-16 Selecting a Tone .................................. E-16 Auto Accompaniment..... E-18 Selecting a Rhythm .............................. E-18 Playing a Rhythm ................................. E-19 Operating Precautions.... E-34 Appendix............................ A-1 Tone List ................................................. A-1 Rhythm List............................................. A-2 Note Table .............................................. A-3 Fingered Chord Chart .............................A-5 Percussion Instrument List ..................... A-7 Song List................................................. A-8 Adjusting the Tempo ............................ E-19 Using Auto Accompaniment ................. E-20 Using a Fill-in Pattern ........................... E-22 Synchro Starting Accompaniment with Rhythm Play.................................. E-22 Adjusting the Accompaniment Volume ................................................. E-23 E-7 English Safety Precautions............ E-1 CTK240_e.book 8 ページ 2010年2月1日 月曜日 午前11時55分 General Guide 1 2 3 5 6 7 8 4 bo bk bp bt bl bm bn bq br bs ck cl E-8 9 cm bo CTK240_e.book 9 ページ 2010年2月1日 月曜日 午前11時55分 POWER/MODE switch SONG BANK button MAIN VOLUME buttons Speakers Display TRANSPOSE/TUNE button ACCOMP VOLUME button Song bank list SYNCHRO/FILL-IN button Rhythm list START/STOP button Tone list Chord name TEMPO buttons ● SONG BANK CONTROLLER English General Guide Percussion instrument list MELODY ON/OFF button [+]/[–] buttons • Negative values can be changed only by using [+] and [–] to increase and decrease the displayed value. PLAY/PAUSE button STOP button TONE button Number buttons • For input of numbers to change displayed settings. RHYTHM button Rear Panel PHONES/OUTPUT terminal DC 9.5V jack cn co *Attachment of the Score Stand Insert both ends of the music stand provided with the keyboard into the two holes on the top surface. E-9 CTK240_e.book 10 ページ 2010年2月1日 月曜日 午前11時55分 General Guide Using the Display 2 1 3 4 Od e T o J o y 9 8 7 6 5 • This is how the display appears while the Song Bank is in use. 1. An indicator appears next to the type of setting you are currently performing (TONE, RHYTHM, SONG BANK). 2. 3. 4. 5. 6. 7. 8. 9. Tone number, rhythm number, song number, keyboard settings value Rhythm, auto-accompaniment, Song Bank tune beats Tone name, rhythm name, song name, mode name, keyboard setting names Auto-accompaniment and Song Bank chord names “MELODY” indicates the on/off status of the melody part during Song Bank playback. Rhythm, auto-accompaniment, Song Bank tune tempo Rhythm, auto-accompaniment, Song Bank tune tempo; volume setting Song Bank controller indicators • Display examples shown in this User’s Guide are intended for illustrative purposes only. The actual text and values that appear on the display may differ from the examples shown in this User’s Guide. E-10 CTK240_e.book 11 ページ 2010年2月1日 月曜日 午前11時55分 POWER/MODE PLAY/PAUSE MAIN VOLUME A selection of 50 Song Bank tunes comes built-in for your listening pleasure or play along fun. A simple operation cuts out the melody part of the tune, allowing you to play along on the keyboard. See “Using the Song Bank” on page E-24 for details on playing along with Song Bank tunes. SONG BANK 4. 2. Use the MAIN VOLUME buttons to lower the keyboard volume to a relatively low level. Use the Song Bank list to find the tune you want to play back, and then use the number buttons to input the tune’s two-digit number. Od e T o J o y • Not all of the available songs are shown on the song bank list printed on the keyboard console. For a complete list, see the “Song List” on page A-8. To play back a Song Bank tune Set the POWER/MODE switch to NORMAL. Number buttons Example: To select “40 ODE TO JOY”, input 4 and then 0. Playing Back a Song Bank Tune 1. English Song Bank Quick Reference 5. Press the PLAY/PAUSE button to start play of the tune. • The tune plays in an endless loop, restarting after it reaches the end. Od e T o J o y 3. Press the SONG BANK button to enter the Song Bank Mode. Appears when SONG BANK button is pressed Chord name E-11 CTK240_e.book 12 ページ 2010年2月1日 月曜日 午前11時55分 Song Bank Quick Reference MELODY ON/OFF STOP 6. TONE PLAY/PAUSE Press the MELODY ON/OFF button to turn off the melody part and try playing along on the keyboard. Od e T o J o y 7. Press the MELODY ON/OFF button again to turn the melody part back on. 8. Press the STOP button to stop playback of the Song Bank tune. 9. Press the TONE button to exit the Song Bank Mode and return to the tone and rhythm selection screen. P i ano 1 Indicator turns off • You can also perform the following operation during play of a Song Bank tune. • Pause: Press the PLAY/PAUSE button. E-12 CTK240_03_e.fm 13 ページ 2010年2月19日 金曜日 午前10時46分 Prepare a household power outlet or batteries. • Be sure to comply with the “Safety Precautions” provided in this manual. Incorrect use of this product creates the risk of electric shock and fire. • Always make sure that the Digital Keyboard is turned off before plugging in or unplugging the AC adaptor, or before loading or removing batteries. Using a Household Power Outlet Using Batteries You can use six AA-size batteries for power. • Use alkaline or zinc-carbon batteries. Never use oxyride or any other nickel based batteries. Open the battery cover on the bottom of the Digital Keyboard, load the batteries, and then close the cover. • Take care to ensure that the positive + and negative - ends of the batteries are facing correctly. Open the battery cover. Pressing here, slide in the direction indicated by the arrow. Make sure that you use only the AC adaptor specified for this keyboard. Use of a different type of AC adaptor can cause malfunction. Specified AC Adaptor: AD-E95100L (JEITA Standard plug) Household power outlet DC 9.5V terminal Load the batteries. AC adaptor • The AC adaptor will become warm to the touch after very long use. This is normal and does not indicate malfunction. • To prevent breaking of the wire, take care to avoid putting any type of load on the power cord. No bending! No winding! E-13 English Power Supply CTK240_03_e.fm 14 ページ 2010年3月5日 金曜日 午前10時3分 Power Supply Important Battery Information ■ The following shows the approximate battery life. Zinc-carbon batteries ..........................6 hours* * The above value is standard battery life at normal temperature, with the keyboard volume at medium setting. Temperature extremes or playing at very loud volume settings can shorten battery life. ■ Any of the following symptoms indicate low battery power. Replace batteries as soon as possible whenever any of the following occurs. • Instrument does not turn on • Display that is flickering, dim, or difficult to read • Abnormally low speaker/headphone volume • Distortion of sound output • Occasional interruption of sound when playing at high volume • Sudden power failure when playing at high volume • Flickering or dimming of the display when playing at high volume • Continued sound output even after you release a key • A tone that is totally different from the one that is selected • Abnormal rhythm pattern and Song Bank play E-14 Auto Power Off The Digital Keyboard will turn off automatically to preserve battery power if you do not perform any operation for about six minutes (Auto Power Off). To disable Auto Power Off Hold down the TONE button while turning on the keyboard to disable Auto Power Off. • When Auto Power Off is disabled, the keyboard does not turn off automatically no matter how long it is left with no operation being performed. • Auto Power Off is automatically enabled whenever you turn on keyboard power. Settings All keyboard settings are returned to their initial defaults whenever keyboard power is turned back on after being turned off by operation of the POWER/MODE switch or Auto Power Off. CTK240_03_e.fm 15 ページ 2010年2月8日 月曜日 午後2時27分 Phones/Output Terminal Before connecting phones or other external equipment, be sure to first turn down the volume settings of the keyboard and the connected equipment. You can then adjust volume to the desired level after connections are complete. [Rear Panel] PHONES/OUTPUT Terminal Audio connection Stereo standard plug 1 3 2 Keyboard amp, guitar amp,etc. * Be sure to use a connecting cord that has standard plugs on the ends you connect to the keyboard and amplifier. When connected to a musical instrument amplifier, set the volume of the keyboard to a relatively low level and make output volume adjustments using the amplifier’s controls. [Connection Example] To keyboard’s PHONES/OUTPUT jack PIN plug White Musical Instrument Amplifier (Figure ) Use a commercially available connecting cord* to connect the keyboard to a musical instrument amplifier. Red LEFT RIGHT INPUT Standard plug Keyboard or guitar amp AUX IN or similar terminalof audio amplifier Connecting Phones (Figure ) Connecting phones cuts off output from the keyboard’s built-in speakers, so you can play even late at night without disturbing anyone. Audio Equipment (Figure ) Connect the keyboard to an audio equipment using a commercially available connecting cord with a standard plug on one end and two PIN plugs on the other end. In this configuration, you normally set the input selector of the audio equipment to the terminal (usually marked AUX IN or something similar) where the cord from the keyboard is connected. See the user documentation that comes with your audio equipment for full details. Accessories and Options Use only the accessories and options specified for this keyboard. Use of non-authorized items creates the danger of fire, electrical shock, and personal injury. • You can get information about accessories that are sold separately for this product from the CASIO catalog available from your retailer, and from the CASIO website at the following URL. http://world.casio.com/ E-15 English Connections CTK240_e.book 16 ページ 2010年2月1日 月曜日 午前11時55分 Basic Operations POWER/MODE TONE [+]/[-] Number buttons MAIN VOLUME This section provides information on performing basic keyboard operations. 2. Press the TONE button. Appears when TONE button is pressed Playing the Keyboard P i ano 1 To play the keyboard 1. Set the POWER/MODE switch to NORMAL. 2. Use the MAIN VOLUME buttons to lower the keyboard volume. • It’s always a good idea to set the keyboard volume at a relatively low level before playing. • Pressing [e] or [r] causes the current volume setting to appear on the display. Press [e] or [r] again to change the setting. 3. Use the number buttons to input the two digit tone number for the tone you want to select. Example: To select “26 WOOD BASS”, input 2 and then 6 . Wo o dBa s s • Now notes played on the keyboard will be played using an acoustical wood bass sound. Play something on the keyboard. Selecting a Tone This keyboard comes with 100 built-in tones. Use the following procedure to select the tone you want to use. To select a tone 1. 3. Find the tone you want to use in the tone list and note its tone number. • Not all of the available tones are shown on the tone list printed on the keyboard console. For a complete list, see the “Tone List” on page A-1. E-16 • Always input both digits for the tone number, including a leading zero (if any). If you input one digit and stop, the display will automatically clear your input after a few seconds. • You can also increment the displayed tone number by pressing [+] and decrement it by pressing [–]. • Sound effect tones such as 77 VEHICLE sound best when you keep a keyboard key depressed. CTK240_e.book 17 ページ 2010年2月1日 月曜日 午前11時55分 Basic Operations Polyphony Layered Tones (Tone Numbers: 80 through 89) Example: 80 STR PIANO This tone layers a strings tone with a piano tone so they both sound when a keyboard key is pressed. Split Tones (Tone Numbers: 90 through 96) Example: 90 BASS/PIANO This tone splits the keyboard so one range is assigned a bass tone and another range is assigned a piano tone. BASS The term polyphony refers to the maximum number of notes you can play at the same time. The keyboard has 12-note polyphony, which includes the notes you play as well as the rhythms and autoaccompaniment patterns that are played by the keyboard. This means that when a rhythm or autoaccompaniment pattern is being played by the keyboard, the number of notes (polyphony) available for keyboard play is reduced. Also note that some of the tones offer only 6-note polyphony. • When rhythm or auto accompaniment is playing, the number of sounds simultaneously played is reduced. PIANO Digital Sampling Percussion sounds Example: 99 PERCUSSION This tone assigns various percussion sounds to the keyboard. See the “Percussion Instrument List” on page A-7 for full details. Sound Effect Tones With sound effect tones 77 through 79, the type of sound produced depends on the octave where the key you press is located. When 78 PHONE is selected available sound types are PUSH TONE 1, PUSH TONE 2, RING 1, and RING 2. A number of the tones that are available with this keyboard have been recorded and processed using a technique called digital sampling. To ensure a high level of tonal quality, samples are taken in the low, mid, and high ranges and then combined to provide you with sounds that are amazingly close to the originals. You may notice very slight differences in volume or sound quality for some tones when you play them at different positions on the keyboard. This is an unavoidable result of multiple sampling, and it is not a sign of malfunction. E-17 English Combination tones The following describes the two types of combination tones that are available. CTK240_03_e.fm 18 ページ 2010年2月3日 水曜日 午後3時8分 Auto Accompaniment RHYTHM [+]/[-] Number buttons This keyboard automatically plays bass and chord parts in accordance with the chords you finger. The bass and chord parts are played using sounds and tones that are automatically selected to select the rhythm you are using. All of this means that you get full, realistic accompaniments for the melody notes you play with your right hand, creating the mood of a one-person ensemble. 2. Press the RHYTHM button. Appears when RHYTHM button is pressed C l ub Pop 3. Use the number buttons to input the two digit rhythm number for the rhythm you want to select. Example: To select “64 WALTZ”, input 6 and then 4. Wa l t z Selecting a Rhythm This keyboard provides you with 100 exciting rhythms that you can select using the following procedure. To select a rhythm 1. Find the rhythm you want to use in the rhythm list and note its rhythm number. • Not all of the available rhythms are shown on the rhythm list printed on the keyboard console. For a complete list, see the “Rhythm List” on page A-2. E-18 • “00 CLUB POP” is the initial default rhythm setting whenever you turn on keyboard power. • You can also increment the displayed rhythm number by pressing [+] and decrement it by pressing [–]. CTK240_e.book 19 ページ 2010年2月1日 月曜日 午前11時55分 Auto Accompaniment English POWER/MODE START/STOP TEMPO Playing a Rhythm Use the following procedure to start and stop rhythm play. To play a rhythm 1. Set the POWER/MODE switch to NORMAL. 2. Press the START/STOP button to start play of the currently selected rhythm. 3. To stop rhythm play, press the START/ STOP button again. • All of the keyboard keys are melody keys while the POWER/MODE switch is set to NORMAL. To adjust the tempo 1. Use the TEMPO buttons (e / r) to adjust the tempo. e : Increases the tempo value. r : Decreases the tempo value. Example: Hold down the r tempo value 110 is on the display. • Pressing both TEMPO buttons (e and r) at the same time resets the tempo to the default value of the currently selected rhythm. About the Graphic Metronome Adjusting the Tempo You can adjust the tempo of rhythm play within a range of 20 to 255 beats per minute. The tempo setting is applied to Auto Accompaniment chord play, and song bank operations. The graphic metronome appears on the display along with the tempo value and beat of a rhythm or built-in tune. The graphic metronome helps you keep in time as you play along with a rhythm or built-in tune. Beat Tempo value Graphic metronome E-19 CTK240_e.book 20 ページ 2010年2月1日 月曜日 午前11時55分 Auto Accompaniment Using Auto Accompaniment The following procedure describes how to use the keyboard’s Auto Accompaniment feature. Before starting, you should first select the rhythm you want to use and set the tempo of the rhythm to the value you want. CASIO CHORD Accompaniment Keyboard and Melody Keyboard Accompaniment keyboard Melody keyboard To use Auto Accompaniment 1. Set the POWER/MODE switch to CASIO CHORD or FINGERED. 2. Press the START/STOP button to start play of the currently selected rhythm. 3. Play a chord. • The accompaniment keyboard can be used for playing chords only. No sound will be produced if you try playing single melody notes on the accompaniment keyboard. • The actual procedure you should use to play a chord depends on the current POWER/ MODE switch position. Refer to the following pages for details on chord play. Chord Types CASIO CHORD accompaniment lets you play four types of chords with minimal fingering. CASIO CHORD........................ This page FINGERED .............................. Page E-21 C l ub Pop Chord name 4. To stop Auto Accompaniment play, press the START/STOP button again. CASIO CHORD This method of chord play makes it possible for anyone to easily play chords, regardless of previous musical knowledge and experience. The following describes the CASIO CHORD “Accompaniment keyboard” and “Melody keyboard”, and tells you how to play CASIO CHORDs. E-20 Chord Types Major chords Major chord names are marked above the keys of the accompaniment keyboard. Note that the chord produced when you press an accompaniment keyboard does not change octave, regardless of which key you use to play it. Minor chords (m) To play a minor chord, keep the major chord key depressed and press any other accompaniment keyboard key located to the right of the major chord key. Seventh chords (7) To play a seventh chord, keep the major chord key depressed and press any other two accompaniment keyboard keys located to the right of the major chord key. Minor seventh chords (m7) To play a minor seventh chord, keep the major chord key depressed and press any other three accompaniment keyboard keys located to the right of the major chord key. Example C Major (C) C minor (Cm) C seventh (C7) C minor seventh (Cm7) CTK240_e.book 21 ページ 2010年2月1日 月曜日 午前11時55分 Auto Accompaniment English • It makes no difference whether you press black or white keys to the right of a major chord key when playing minor and seventh chords. FINGERED FINGERED provides you with a total of 15 different chord types. The following describes the FINGERED “Accompaniment keyboard” and “Melody keyboard”, and tells you how to play a C-root chord using FINGERED. FINGERED Accompaniment Keyboard and Melody Keyboard Accompaniment keyboard Melody keyboard • The accompaniment keyboard can be used for playing chords only. No sound will be produced if you try playing single melody notes on the accompaniment keyboard. See the “Fingered Chord Chart” on page A-5 for details on playing chords with other roots. *1: Inverted fingerings cannot be used. The lowest note is the root. *2: The same chord can be played without pressing the 5th G. • Except for the chords specified in note*1 above, inverted fingerings (i.e. playing E-G-C or G-C-E instead of C-E-G) will produce the same chords as the standard fingering. • Except for the exception specified in note*2 above, all of the keys that make up a chord must be pressed. Failure to press even a single key will not play the desired FINGERED chord. E-21 CTK240_e.book 22 ページ 2010年2月1日 月曜日 午前11時55分 Auto Accompaniment POWER/MODE START/STOP SYNCHRO/FILL-IN Using a Fill-in Pattern Fill-in patterns let you momentarily change the rhythm pattern to add some interesting variation to your performances. To use synchro start 1. The following procedure describes how to use the Fill-in feature. Press the SYNCHRO/FILL-IN button to put the keyboard into synchro start standby. Flash To insert a fill-in 1. Press the START/STOP button to start rhythm play. 2. Press the SYNCHRO/FILL-IN button to insert a fill-in pattern for the rhythm you are using. Synchro Starting Accompaniment with Rhythm Play You can set up the keyboard to start rhythm play at the same time you play the accompaniment on the keyboard. The following procedure describes how to use synchro start. Before starting, you should first select the rhythm you want to use, set the tempo, and use the POWER/MODE switch to select the chord play method you want to use (CASIO CHORD, FINGERED). E-22 2. Play a chord on the accompaniment keyboard and the rhythm pattern starts to play automatically. • If the POWER/MODE switch is set to NORMAL, only the rhythm plays (without a chord) when you play on the accompaniment keyboard. • To cancel synchro start standby, press the SYNCHRO/FILL-IN button one more time. CTK240_e.book 23 ページ 2010年2月1日 月曜日 午前11時55分 English Auto Accompaniment ACCOMP VOLUME [+]/[-] Number buttons Adjusting the Accompaniment Volume You can adjust the volume of the accompaniment parts as a value in the range of 0 (minimum) to 9. 1. Press the ACCOMP VOLUME button. Current accompaniment volume setting A c cmp V o l 2. Use the number buttons or the [+]/[–] buttons to change the current volume setting value. Example: 5 A c cmp V o l • The current accompaniment volume value that appears in Step 1 automatically clears from the display if you do not input anything within about five seconds. • Pressing [+] and [–] buttons at the same time automatically sets an accompaniment volume of 7. E-23 CTK240_e.book 24 ページ 2010年2月1日 月曜日 午前11時55分 Using the Song Bank POWER/MODE [+]/[-] Number buttons SONG BANK A selection of 50 Song Bank tunes comes built-in for your listening enjoyment or play along fun. You can turn off the melody part to practice with the remaining part. Playing Back a Song Bank Tune To play back a Song Bank tune 1. Set the POWER/MODE switch to NORMAL, FINGERED, or CASIO CHORD. 2. Adjust the main volume and accomp volume. 3. Press the SONG BANK button to enter the Song Bank Mode. Appears when SONG BANK button is pressed E-24 4. Use the Song Bank list to find the tune you want to play back, and then use the number buttons to input the tune’s two-digit number. Example: To select “31 ALOHA OE”, input 3 and then 1. Song Number Song Name A l o h a Oe • Not all of the available songs are shown on the song bank list printed on the keyboard console. For a complete list, see the “Song List” on page A-8. • “00 TWINKLE TWINKLE LITTLE STAR” is the initial default Song Bank tune setting whenever you turn on keyboard power. • You can also increment the displayed tune number by pressing [+] and decrement is by pressing [–]. CTK240_e.book 25 ページ 2010年2月1日 月曜日 午前11時55分 Using the Song Bank MELODY ON/OFF PLAY/PAUSE STOP TONE 5. Press the PLAY/PAUSE button to start play of the tune. Appears when PLAY/PAUSE button is pressed A l o h a Oe English TEMPO [+]/[-] Number buttons • Each time you select a new Song Bank tune, the tone, tempo, and rhythm that is programmed for the tune are automatically selected. You can change a tune’s tone and tempo during playback, but you cannot change the rhythm. • You can also adjust the accompaniment volume (page E-23) for Song Bank tunes. Song Bank Mode Display Chord name 6. Press the STOP button to stop playback of the Song Bank tune. In the Song Bank Mode, the display shows a variety of information about the tune being played. [Playback Display] Notes played To pause Song Bank tune play 1. A l o h a Oe While a Song Bank tune is playing, press the PLAY/PAUSE button to pause it. The indicator “ll” appears while a tune play is paused. Tune tempo 2. Chord name To resume play, press PLAY/PAUSE again. E-25 CTK240_e.book 26 ページ 2010年2月1日 月曜日 午前11時55分 Using the Song Bank Adjusting the Tempo of a Song Bank Tune To change the tempo of a Song Bank tune The tempo can be set within a range of 20 to 255 beats per minute. The tempo setting can be adjusted while the tune is stopped, playing back, or paused. 1. Use the TEMPO buttons [e / r] to adjust the tempo. e : Increases the tempo value. r : Decreases the tempo value. • Pressing both the [+] and [–] buttons at the same time selects “00 PIANO 1”. • To return a Song Bank tune to its original settings, simply select that tune again. Playing Along with a Song Bank Tune Each Song Bank tune has an accompaniment part and a melody part. You can turn off the melody part of a Song Bank tune and play along with the remaining part on the keyboard. To play along with a Song Bank tune 1. Perform steps 1 through 4 under “To play back a Song Bank tune” on page E-24 to select the song you want to play along with. 2. Press the MELODY ON/OFF button to turn off the melody part. • Pressing both the [e] and [r] TEMPO buttons at the same time returns the tempo setting to the preset value for the currently selected tune. Changing the Tone of a Song Bank Tune’s Melody You can select any one of the keyboard’s 100 tones to be used to play the melody part of a Song Bank tune. The tone setting can be changed while the tune is stopped or playing back. 1. While a song is playing back, press the TONE button. Gu t G t r 2. • The on/off status of the melody part is indicated by “MELODY” that appears on the display. The melody part is turned on when “MELODY” is displayed, and turned off when “MELODY” is not displayed. Find the tone you want in the Tone List, and then use the number buttons or the [+] and [–] buttons to specify the tone number. Example: To select “30 VIOLIN”, input 3 and then 0. Viol in E-26 Indicator turns off. CTK240_e.book 27 ページ 2010年2月1日 月曜日 午前11時55分 Using the Song Bank English MELODY ON/OFF PLAY/PAUSE STOP TONE 3. Press the PLAY/PAUSE button to start play of the Song Bank Tune. • Only the accompaniment part is played, so you can play the melody part on the keyboard. A l o h a Oe 4. To end playback, press the STOP button. • The selected Song Bank tune continues to repeat until you stop playback by pressing the STOP button. RHYTHM Applause Sound Whenever you turn off the melody part of a Song Bank tune and play it back, an applause sound is produced when the tune reaches the end. To turn off the applause sound 1. Press the STOP button and the MELODY ON/OFF button at the same time. A p l s =O f f • Pressing the STOP button and the MELODY ON/OFF button at the same time again turns the applause sound back on. E-27 CTK240_e.book 28 ページ 2010年2月1日 月曜日 午前11時55分 Using the Song Bank Playing Back All Song Bank Tunes in Succession 1. Use the TONE or RHYTHM button to change to any mode other than the Song Bank Mode. • Make sure a dot is not on the display next to the SONG BANK indicator. Indicator turns off. Gu t G t r 2. Press the PLAY/PAUSE button to start playback of the Song Bank tunes starting from tune 00. 3. To stop Song Bank tune playback, press the STOP button. • Pausing playback automatically cancels consecutive playback of all Song Bank tunes. Re-starting playback causes repeat playback of the current tune only. E-28 CTK240_e.book 29 ページ 2010年2月1日 月曜日 午前11時55分 English Keyboard Settings TRANSPOSE/TUNE [+]/[-] Transposing the Keyboard Transpose lets you raise and lower the overall key of the keyboard in semitone units. If you want to play an accompaniment for a vocalist who sings in a key that’s different from the keyboard, for example, simply use transpose to change the key of the keyboard. To transpose the keyboard 1. Press the TRANSPOSE/TUNE button until the transpose screen appears on the display. • The keyboard can be transposed within a range of –6 to +5. • The default transpose setting is “0” when keyboard power is turned on. • If you leave the transpose screen on the display for about five seconds without doing anything, the screen is automatically cleared. • The transpose setting also affects Auto Accompaniment. • Playing back a Song Bank tune automatically returns the transpose setting to its standard default of “0”. Tr ans 2. Use [+] and [–] to change the transpose setting of the keyboard. Example: To transpose the keyboard five semitones upwards. Tr ans ( + ) E-29 CTK240_e.book 30 ページ 2010年2月1日 月曜日 午前11時55分 Keyboard Settings Tuning the Keyboard The tuning feature lets you fine tune the keyboard to match the tuning of another musical instrument. To tune the keyboard 1. Press the TRANSPOSE/TUNE button twice to display the tuning screen. Tune 2. Use [+] and [–] to change the tuning setting of the keyboard. Example: To lower the tuning by 20. Tune (-) • The keyboard can be tuned within a range of –50 cents to +50 cents. * 100 cents is equivalent to one semitone. • The default tuning setting is “00” when keyboard power is turned on. • If you leave the tuning screen on the display for about five seconds without doing anything, the screen is automatically cleared. • The tuning setting also affects Auto Accompaniment. • Playing back a Song Bank tune automatically returns the tuning setting to its standard default of “00”. E-30 CTK240_e.book 31 ページ 2010年2月1日 月曜日 午前11時55分 Problem No keyboard Sound Possible Cause Action See 1. Power supply problem. 1. Correctly attach the AC adaptor, make sure that batteries poles (+/–) are facing correctly, and check to make sure that batteries are not dead. Pages E-13, 14 2. Power is not turned on. 2. Set the POWER/MODE switch to the NORMAL position. Page E-16 3. Volume setting is too low. 3. Use the MAIN VOLUME buttons to increase volume. Page E-16 4. The POWER/MODE switch is in the CASIO CHORD or FINGERED position. 4. Normal play is not possible Page E-16 on the accompaniment keyboard while the POWER/ MODE switch is set to CASIO CHORD or FINGERED. Change the POWER/MODE switch setting to NORMAL. Any of the following symptoms Low battery power while using battery power. • Instrument does not turn on • Display that is flickering, dim, or difficult to read • Abnormally low speaker/ headphone volume • Distortion of sound output • Occasional interruption of sound when playing at high volume • Sudden power failure when playing at high volume • Flickering or dimming of the display when playing at high volume • Continued sound output even after you release a key • A tone that is totally different from the one that is selected • Abnormal rhythm pattern and Song Bank play Replace the batteries with a Pages set of new ones or use the AC E-13, 14 adaptor. Auto Accompaniment does not Auto accompaniment volume sound. is set to 0. Use the ACCOMP VOLUME Page E-23 button to increase the volume. E-31 English Troubleshooting CTK240_e.book 32 ページ 2010年2月1日 月曜日 午前11時55分 Troubleshooting Problem Possible Cause Action See The key or tuning does not The tuning or transpose match when playing along with parameter is set to a value another instrument. other than 0 or 00. Change the transpose or Pages tuning parameter value to 0 or E-29, 30 00. Missing Song Bank tune Press the MELODY ON/OFF button to turn on the melody part. E-32 Melody part is turned off. Page E-26 CTK240_04_e.fm 33 ページ 2010年3月2日 火曜日 午前11時1分 Model: CTK-240 Keyboard: 49 standard-size keys, 4 octaves Tones: 100 Polyphony: 12 notes maximum (6 for certain tones) English Specifications Auto Accompaniment Rhythm Patterns: 100 Tempo: Variable (236 steps, 2= 20 to 255) Chords: 2 fingering methods (CASIO CHORD, FINGERED) Rhythm Controller: START/STOP, SYNCHRO/FILL-IN Accomp Volume: 0 to 9 (10 steps) Song Bank Tunes: 50 Controllers: PLAY/PAUSE, STOP, MELODY ON/OFF Display Name display: TONE, RHYTHM, SONG BANK name/number, keyboard setting names/values Tempo: Tempo value, metronome, synchro standby, beat indicator Chord: Chord name Song Bank Status: PLAY, PAUSE, MELODY ON/OFF Other Functions Transpose: 12 steps (–6 semitones to +5 semitones) Tuning: Variable (A4 = approximately 440Hz ±50 cents) Volume: 0 to 9 (10 steps) Terminals Phones/Output Terminal: Stereo standard jack (Output is monaural.) Output Impedance: 78 Output Voltage: 1.9V (RMS) MAX Power Supply Terminal: 9.5V DC Power Supply: Batteries: Dual power supply system 6 AA-size zinc-carbon batteries or alkaline batteries Battery Life: Approximately 6 hours continuous operation on zinc-carbon batteries AC Adaptor: AD-E95100L Auto Power Off: Turns power off approximately 6 minutes after last operation. Speaker Output: 10cm × 2 (1.6W + 1.6W) Power Consumption: 9.5V = 5.0W Dimensions: 91.4 × 23.7 × 7.5 cm (36 × 9 5/16 × 2 15/16 inch) Weight: Approximately 2.8 kg (6.2 lbs) (without batteries) • Design and specifications are subject to change without notice. E-33 CTK240_04_e.fm 34 ページ 2010年2月3日 水曜日 午後2時42分 Operating Precautions Be sure to read and observe the following operating precautions. ■ Location Avoid the following locations for this product. • Areas exposed to direct sunlight and high humidity • Areas subjected to temperature extremes • Near a radio, TV, video deck, or tuner The above devices will not cause malfunction of the product, but the product can cause interference in the audio or video of a nearby device. ■ User Maintenance • Never use benzine, alcohol, thinner, or other chemical agents to clean the product. • To clean the product or its keyboard, wipe with a soft cloth moistened in a weak solution of water and a mild neutral detergent. Wring all excess moisture from the cloth before wiping. ■ Included and Optional Accessories Use only accessories that are specified for use with this product. Use of unauthorized accessories creates the risk of fire, electric shock, and personal injury. ■ AC Adaptor Handling Precautions • Use a power outlet that is easily accessible so you can unplug the AC adaptor when a malfunction occurs or whenever else you need to do so. • The AC adaptor is intended for indoor use only. Do not use it where it might be exposed to splashing or moisture. Do not place any container, such as a flower vase, that contains liquid on the AC adaptor. • Store the AC adaptor in a dry place. • Use the AC adaptor in an open, well-ventilated area. • Never cover the AC adaptor with newspaper, a table cloth, a curtain, or any other similar item. • Unplug the AC adaptor from the power outlet if you do not plan to use the product for a long time. • Never try to repair the AC adaptor or modify it in any way. • AC adaptor operating environment Temperature: 0 to 40°C Humidity: 10% to 90% RH • Output polarity: & ■ Weld Lines Lines may be visible on the exterior of the product. These are “weld lines” that result from the plastic molding process. They are not cracks or scratches. ■ Musical Instrument Etiquette Always be aware of others around you whenever using this product. Be especially careful when playing late at night to keep the volume at levels that do not disturb others. Other steps you can take when playing late at night are closing windows and using headphones. E-34 CTK240_e.book 35 ページ 2010年2月1日 月曜日 午前11時55分 ● Any reproduction of the contents of this manual, either in part or its entirety, is prohibited. Except for your own, personal use, any other use of the contents of this manual without the consent of CASIO is prohibited under copyright laws. ● IN NO EVENT SHALL CASIO BE LIABLE FOR ANY DAMAGES WHATSOEVER (INCLUDING, WITHOUT LIMITATION, DAMAGES FOR LOSS OF PROFITS, BUSINESS INTERRUPTION, LOSS OF INFORMATION) ARISING OUT OF THE USE OF OR INABILITY TO USE THIS MANUAL OR PRODUCT, EVEN IF CASIO HAS BEEN ADVISED OF THE POSSIBILITY OF SUCH DAMAGES. ● The contents of this manual are subject to change without notice. ● The actual appearance of the product may be different from that shown in the illustrations in this User’s Guide. ● Company and product names used in this manual may be registered trademarks of others. E-35 English Operating Precautions CTK240_s.book 1 ページ 2010年2月15日 月曜日 午後7時5分 Appendix / Apéndice Tone List / Lista de sonidos PIANO/ORGAN 00 PIANO1 01 PIANO2 02 HONKY-TONK 03 STUDIOPIANO 04 ELEC PIANO1 05 ELEC PIANO2 06 ELEC PIANO3 07 ELEC PIANO4 08 HARPSICHORD 09 CLAVELECTRO 10 ELEC ORGAN1 11 ELEC ORGAN2 12 ELEC ORGAN3 13 ELEC ORGAN4 14 CHURCH ORGAN 15 PIPE ORGAN 16 REED ORGAN 17 ACCORDION 18 BANDONEON 19 HARMONICA GUITAR/BASS/STRINGS 20 GUT GUITAR 21 ACOUS GUITAR 22 JAZZ GUITAR 23 ELEC GUITAR 24 MUTE GUITAR 25 DIST GUITAR 26 WOOD BASS 27 ELEC BASS 28 SLAP BASS 29 BANJO 30 VIOLIN 31 CELLO 32 HARP 33 STRINGS1 34 STRINGS2 35 STRINGS3 36 SYNTH-STR1 37 SYNTH-STR2 38 CHOIR 39 VOICE OOH BRASS/REED/PIPE 40 TRUMPET 41 TUBA 42 BRASS ENS 43 FR.HORN1 44 FR.HORN2 45 BRASS1 46 BRASS2 47 SYN-BRASS1 48 SYN-BRASS2 49 SYN-BRASS3 50 SOPRANO SAX 51 ALTO SAX 52 TENOR SAX 53 OBOE 54 CLARINET 55 PICCOLO 56 FLUTE 57 RECORDER 58 PAN FLUTE 59 WHISTLE SYNTH-SOUND 60 SYN-LEAD1 61 SYN-LEAD2 62 SYN-LEAD3 63 SYN-CALLIOPE 64 SYN-PAD1 65 SYN-PAD2 66 SYN-PAD3 67 GLASS HMCA 68 COUNTRY FARM 69 SYN-BASS 70 PEARL DROP 71 COSMIC SOUND 72 SOUNDTRACK 73 SPACE PAD 74 VOICE BASS 75 APPLAUSE 76 SYNTH-SFX 77 VEHICLE 78 PHONE 79 FUNNY LAYER/SPLIT/PERCUSSION 80 STR PIANO 81 STR E.PIANO 82 CHOIRE.P 83 CHOIR ORGAN 84 STR GUITAR 85 STR HARP 86 BRASS STR 87 VIB PAD 88 12 STR GTR 89 CHOIR STR 90 BASS/PIANO 91 BASS/E.PIANO 92 BASS/VIB 93 BASS/GUT GTR 94 V.BASS/OOH 95 STR/PIANO 96 STR/TRUMPET 97 VIBRAPHONE 98 MARIMBA 99 PERCUSSION A-1 CTK240_s.book 2 ページ 2010年2月15日 月曜日 午後7時5分 Appendix / Apéndice Rhythm List / Lista de ritmos POPS I 00 CLUB POP 01 VOCAL POP 02 RAP POP 03 FUNKY POP 1 04 SOUL BALLAD 05 POP BALLAD 06 LOVE BALLAD 07 FUNKY POP 2 08 EPIC BALLAD 09 LITE POP POPS II 10 16 BEAT SHUFFLE 11 16 BEAT POP 12 16 BEAT FUNK 13 8 BEAT POP 14 8 BEAT SOUL 15 8 BEAT SHUFFLE 16 DANCE POP 1 17 DANCE POP 2 18 POP FUSION 19 FOLKIE POP ROCK I 20 ROCK WALTZ 21 SLOW ROCK 1 22 SLOW ROCK 2 23 SOFT ROCK 1 24 SOFT ROCK 2 25 SOFT ROCK 3 26 POP ROCK 1 27 POP ROCK 2 28 50’S ROCK 29 60’S SOUL ROCK II 30 4 BEAT ROCK 31 ROCK 32 HEAVY ROCK 33 8 BEAT ROCK 34 STRAIGHT ROCK A-2 35 HEAVY METAL 36 TWIST 37 NEW ORLNS R&R 38 CHICAGO BLUES 39 R&B JAZZ/FUSION 40 BIG BAND 41 SLOW SWING 42 SWING 43 FOX TROT 44 JAZZ WALTZ 45 MODERN JAZZ 46 COOL 47 HARD BOP 48 ACID JAZZ 49 LATIN FUSION DANCE/FUNK 50 VOCAL GROOVE 51 RAVE 52 CLUB GROOVE 53 TECHNO 54 TRANCE 55 HOUSE 56 GROOVE SOUL 57 DISCO 58 RAP 59 FUNK EUROPEAN 60 POLKA 1 61 POLKA 2 62 MARCH 1 63 MARCH 2 64 WALTZ 65 VIENNESE WALTZ 66 FRENCH WALTZ 67 SLOW WALTZ 68 SERENADE 69 TANGO 1 LATIN I 70 BOSSA NOVA 71 SAMBA 72 MAMBO 73 RHUMBA 74 CHA-CHA-CHA 75 MERENGUE 76 REGGAE 77 BOLERO 78 TANGO 2 79 LAMBADA LATIN II/VARIOUS I 80 PUNTA 81 CUMBIA 82 SKA 83 TEX-MEX 84 SALSA 85 FOLKLORE 86 PASODOBLE 87 RUMBA CATALANA 88 SEVILLANA 89 FOLK VARIOUS II 90 COUNTRY 91 BLUEGRASS 92 TOWNSHIP 93 FAST GOSPEL 94 SLOW GOSPEL 95 ADANI 96 BALADI 97 BAROQUE 98 ENKA 99 NEW AGE CTK240_s.book 3 ページ 2010年2月15日 月曜日 午後7時5分 Appendix / Apéndice Note Table / Tabla de notas (1) (2) (3) (1) (2) (3) (1) (2) (3) (1) (2) (3) (1) (2) (3) 00 01 02 03 04 05 06 07 08 09 12 12 6 6 12 12 6 6 12 12 A A A A A A A A A A 10 11 12 13 14 15 16 17 18 19 12 12 12 6 12 6 12 6 12 12 A A A A A A A A A A 20 21 22 23 24 25 26 27 28 29 12 12 12 12 12 12 12 12 12 12 A A A A A A B B B A 30 31 32 33 34 35 36 37 38 39 12 12 12 12 12 6 12 6 12 12 A B A A A A A A A A 40 41 42 43 44 45 46 47 48 49 12 12 6 12 6 12 6 12 6 6 A B A B B B B B B B (1) (2) (3) (1) (2) (3) (1) (2) (3) (1) (2) (3) (1) (2) (3) 50 51 52 53 54 55 56 57 58 59 12 12 12 12 12 12 12 12 12 12 A A A A A C A A A A 60 61 62 63 64 65 66 67 68 69 12 6 12 6 6 6 6 6 6 12 A A A A A A A A A B 70 71 72 73 74 75 76 77 78 79 6 6 6 6 12 12 6 6 12 6 A A A A B D A D D D 80 81 82 83 84 85 86 87 88 89 6 6 6 6 6 6 6 6 6 6 A A A A A A B A A A 90 91 92 93 94 95 96 97 98 99 12 6 12 12 12 12 12 12 12 12 E E E E E E E A A D (1): Tone number (2): Maximum polyphony (3): Range type (1): Número de sonido (2): Polifonía máxima (3): Tipo de gama A-3 CTK240_s.book 4 ページ 2010年2月15日 月曜日 午後7時5分 Appendix / Apéndice • See the illustration below for a description of range types (A through E). • Vea la ilustración siguiente para una descripción de los tipos de gama (A a E). Range Type Tipo de gama C-1 C0 A0 C1 A1 C2 A2 C3 C4 C5 A (Standard type) (Tipo estándar) B Low pitch instruments Instrumentos de altura tonal baja C (“55 PICCOLO”only) Solamente “55 PICCOLO” D (Sound Effect) (Efecto de sonido) E (SPLIT) (División) No scale for tones. Sin escala para los sonidos. Scale changes in accordance with tone. La escala cambia de acuerdo con el sonido. ........Range of keyboard play ........Gama de ejecución de teclado A-4 C6 C7 C8 C9 G9 CTK240_s.book 5 ページ 2010年2月15日 月曜日 午後7時5分 Appendix / Apéndice Fingered Chord Chart / Cuadros de acordes Fingered This table shows the left-hand fingerings (including inverted forms) for a number of often-used chords. Esta tabla muestra las digitaciones (incluyendo las formas invertidas) para varios de los acordes más a menudo usados. • Chords marked with asterisk (*) cannot be played in the Fingered Mode on this keyboard. • En este teclado, los acordes marcados con asterisco (*) no pueden ejecutarse en el modo Fingered. A-5 CTK240_s.book 6 ページ 2010年2月15日 月曜日 午後7時5分 Appendix / Apéndice Root A-6 Chord Type CTK240_s.book 7 ページ 2010年2月15日 月曜日 午後7時5分 Appendix / Apéndice Percussion Instrument List / Lista de instrumentos de percusión • PERCUSSION (tone 99) assigns 39 percussion sound to the keyboard as illustrated below. The sound assigned to each key are indicated above the keyboard. • PERCUSSION (sonido 99) asigna 39 sonidos de percusión al teclado como se ilustra debajo. Los sonidos asignados a cada tecla se indican sobre el teclado. * No sound is produced when the keys in this range are pressed. * Cuando se presionan las teclas en esta gama no se produce ningún sonido. BASS DRUM CRASH CYMBAL 1 MUTE HIGH CONGA SIDE STICK HIGH TOM 1 OPEN HIGH CONGA ACOUSTIC SNARE RIDE CYMBAL 1 LOW CONGA HAND CLAP CHINESE CYMBAL HIGH TIMBALE ELECTRIC SNARE RIDE BELL LOW TIMBALE LOW TOM 2 TAMBOURINE HIGH AGOGO CLOSED HI-HAT SPLASH CYMBAL LOW AGOGO LOW TOM 1 COWBELL CABASA PEDAL HI-HAT CRASH CYMBAL 2 MARACAS MID TOM 2 CLAVES VOICE BASS DRUM OPEN HI-HAT RIDE CYMBAL 2 VOICE SNARE MID TOM 1 HIGH BONGO VOICE CLOSED HI-HAT HIGH TOM 2 LOW BONGO VOICE OPEN HI-HAT A-7 CTK240_05_es_App.fm 8 ページ 2010年2月19日 金曜日 午前10時45分 Appendix / Apéndice Song List / Lista de canciones SONG BANK / BANCO DE CANCIONES 00 01 02 03 04 05 06 07 08 09 10 11 12 13 14 15 16 17 18 19 20 21 22 23 24 A-8 TWINKLE TWINKLE LITTLE STAR GRANDFATHER’S CLOCK WHEN THE SAINTS GO MARCHING IN WE WISH YOU A MERRY CHRISTMAS JINGLE BELLS SILENT NIGHT O CHRISTMAS TREE GREENSLEEVES AMAZING GRACE AULD LANG SYNE ACH DU LIEBER AUGUSTIN LONDON BRIDGE J’AI PERDU LE DO DE MA CLARINETTE SUR LE PONT D’AVIGNON I’VE BEEN WORKING ON THE RAILROAD LITTLE BROWN JUG LONG LONG AGO SIPPIN’ CIDER THROUGH A STRAW UNDER THE SPREADING CHESTNUT TREE SUMM SUMM SUMM DANNY BOY MY DARLING CLEMENTINE HOUSE OF THE RISING SUN AURA LEE WHEN JOHNNY COMES MARCHING HOME 25 26 27 28 29 30 31 32 33 34 35 36 37 38 39 40 41 42 43 44 45 46 47 48 49 SWANEE RIVER (OLD FOLKS AT HOME) YANKEE DOODLE HOME ON THE RANGE OH! SUSANNA BEAUTIFUL DREAMER TURKEY IN THE STRAW ALOHA OE JAMAICA FAREWELL LA CUCARACHA LA PALOMA TROIKA SZLA DZIEWECZKA WALTZING MATILDA AJO MAMMA RASA SAYANG ODE TO JOY BRIDAL MARCH FROM “LOHENGRIN” AIR FROM “SUITE no.3” SCENE FROM “SWAN LAKE” MARCH FROM “THE NUTCRACKER” TRIUMPHAL MARCH FROM “AIDA” TOY SYMPHONY SERENADE FROM “EINE KLEINE NACHTMUSIK” CHANSON DU TOREADOR FROM “CARMEN” SPRING FROM “THE FOUR SEASONS”