1
DinoCapture
User Manual
AnMo Electronics Corp.
www.anmo.com.tw
IDCP/Dino-Lite Europe
www.dino-lite.eu
2
Content
Chapter 1 - Getting Started ........................................................................................................ 3
1.1 Installation Instructions .................................................................................................. 3
1.2 Important Note for Windows Vista Users ....................................................................... 8
Chapter 2 - Using File Functions ................................................................................................ 9
2.1 Open ............................................................................................................................. 9
2.2 Save As......................................................................................................................... 9
2.3 Copy.............................................................................................................................. 9
2.4 Share ............................................................................................................................ 9
2.5 Mail ............................................................................................................................. 10
2.6 Set Magnification ......................................................................................................... 10
2.7 Delete Select ............................................................................................................... 11
2.8 Delete All ..................................................................................................................... 11
2.9 Exit .............................................................................................................................. 11
Chapter 3 - Dino-Lite Settings .................................................................................................. 12
3.1 Microtouch................................................................................................................... 12
3.2 Run DinoCapture with Microtouch ............................................................................... 13
3.3 Audio Setting ............................................................................................................... 13
3.4 Real -Time Image Setting ............................................................................................ 13
3.5 Resolution ................................................................................................................... 14
3.6 DinoCapture Auto Update ........................................................................................... 14
3.7 Sound Effect................................................................................................................ 15
3.8 Cross Line ................................................................................................................... 15
3.9 Annotations ................................................................................................................. 16
3.10 Coordinates ............................................................................................................... 16
3.11 Magnification ............................................................................................................. 17
3.12 Date & Time .............................................................................................................. 18
3.13 Skin Setting ............................................................................................................... 18
Chapter 4 - Capturing Still Images............................................................................................ 19
4.1 Taking Pictures ........................................................................................................... 19
Chapter 5 - Capturing Video ..................................................................................................... 21
1
5.2 Capturing Time Lapsed Video ......................................................................................22
Chapter 6 - Measurement Functions .........................................................................................23
6.1 Steps for Using Measurement Functions......................................................................23
6.2 Angle Measurement .....................................................................................................25
6.3 Line Measurement .......................................................................................................25
6.4 Continuous Line Measurement.....................................................................................26
6.5 Radius Circle Measurement .........................................................................................26
6.6 Diameter Circle Measurement ......................................................................................27
6.7 Three Point Circle Measurement ..................................................................................27
Chapter 7 - DinoCapture Calibration .........................................................................................28
7.1 How to Use the Calibration Function ............................................................................28
Chapter 8 - Help Options ..........................................................................................................32
8.1 DinoCapture Update ....................................................................................................32
8.2 About DinoCapture.......................................................................................................32
8.3 Faq ..............................................................................................................................32
2
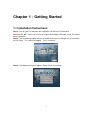
Chapter 1 - Getting Started
1.1 Installation Instructions
Step 1: Turn on your PC and place the installation CD into the CD-ROM drive.
Warning! DO NOT connect the Dino-Lite Digital Microscope USB cable to the PC before
driver installation.
Step 2: The installation program will run automatically once the installation CD is placed into
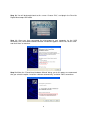
the CD-ROM. This screen will appear. Press “Continue.”
Step 3: The following screen will appear. Select “Driver Installation.”
3
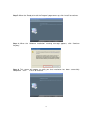
Step 4: The Installation Wizard will come up. Click “Next” on the bottom of this screen.
Step 5: The License Agreement will come up. Please read the License Agreement
carefully. To install the Dino-Lite Plus and Pro you must accept the agreement. After
reading the License Agreement, click “Yes” to accept.
Step 6: When the “Choose Destination Location” screen comes up, select “Browse” to
choose your own destination folder for program installation. Click “Next” to continue.
4
Step 7: When the “Ready to Install the Program” page comes up, click “Install” to continue.
Step 8: When the “Software Installation” warning message appears, click “Continue
Anyway.”
Step 9: This screen will appear to notify you that installation has been successfully
completed. Click
“Finish” to continue.
5
Step 10: You will be brought back to this screen. Choose “Exit,” and plug-in the Dino-Lite
Digital Microscope USB cable.
Step 11: Once you have connected the microscope to your computer via the USB
connector, the “Found New Hardware Wizard” window will appear. Select “No, not this time”
and click “Next” to continue.
Step 12: When the “Found New Hardware Wizard” brings you to this page, we recommend
that you select the option “Install the software automatically” and click “Next” to continue.
6
Step 13: When the “Hardware Installation” warning message appears, click “Continue
Anyway.”
Step 14: When the “Found New Hardware Wizard” has completed the installation, click
“Finish.” After the window closes, check on your desktop for the Dino-Lite icon. If you
cannot find it there, go to “Start” “All Programs” “Dino-Lite Digital Microscope.
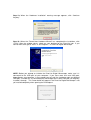
NOTE: Before you attempt to initialize the Dino-Lite Digital Microscope, make sure it is
connected to the USB port of your computer. If you have more than one USB port,
depending on your computer, it may prompt you to install the hardware again on different
USB port. To avoid this, try connecting the microscope to the same USB port you originally
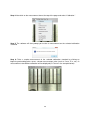
installed it through. The screen below will appear if the Dino-Lite Digital Microscope is not
yet installed completely when opening the DinoCapture.
7
NOTE: We suggest you close DinoCapture before disconnecting the Dino-Lite Digital
Microscope from your computer.
1.2 Important Note for Windows Vista Users
When attempting to run the DinoCapture with Windows Vista for the first time after
installation and update, please RIGHT CLICK the DinoCapture icon and select “Run as
Administrator” from the pop-up menu. Then confirm the operation by clicking “OK” on the
Microsoft Vista pop-up screen.
This is a one time process after which your computer will recognize that the running
DinoCapture is authorized by the administrator. After this additional one-time procedure, you
will then be able to double click on the DinoCapture at any time for future use.
8
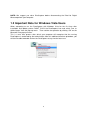
Chapter 2 - Using File Functions
The file functions shall only be available after one or more picture or video in the scroll list have
been selected. Most of the file functions can also be found in the popup-menu when rightclicking the desired images.
2.1 Open
The “Open” option under the “File” tab will open an already existing image in a separate box.
2.2 Save As
The “Save As” option first allows you to choose the resolution quality you would like to save the
image with. After you have chosen the desired resolution, you can save it in whatever location
you choose in your computer, or save it in a different format.
2.3 Copy
The copy option will give you two options when it opens: Copy Image or Copy File. If you
choose to copy image, select “yes”. This will copy the image to and hold it on the clipboard until
you “paste” it in the desired destination. If you select the “Copy File” option, the image file will be
copied until you paste it unto your desktop or another desired destination.
2.4 Share
The Share function will copy the selected pictures to the Shared Documents > Shared Pictures
> DinoShare, or copy the selected pictures to the Shared Documents > Shared Video >
DinoShare so that the other computers on the same local network will be able to view the
pictures or videos you share.
When you click on the “Share” tab, DinoCapture will allow you to choose the resolution of the
image you would like to use when you share the image. The default is set to 640*480, but you
may modify this by clicking on the radio button to the left of the desired resolution.
9
2.5 Mail
The “Mail” option will allow you to email the image to a third person. As with the “Share” option,
you will also be prompted to choose the image quality you desire. After you have chosen the
image quality you desire, you will be prompted to name the file. Lastly if your computer is not set
up to send mail automatically, the Internet Connection Wizard in your computer will guide you
through the steps to set up the feature.
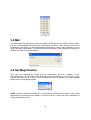
2.6 Set Magnification
Once you have captured the image, enter a magnification value as it appears on the
microscope's dial. This will allow you to take and record measurements such as length, angle,
and the circumference of a circle. These measurements can be placed, seen and recorded
directly on the image being studied.
NOTE: In order to take the measurements just mentioned, a magnification value for each image
captured must be entered. See chapters six and seven of this manual for more information on
setting magnification values.
10
2.7 Delete Select
This option allows you to delete the image or video you have selected from either the “Picture”
or “Video” tab.
2.8 Delete All
The “Delete All” option permits you to delete all of the images or videos shown on either the
“Picture” or “Video” tab. Before deleting one or many images, you will see a prompt which will
ask you to confirm that you want to delete either one image, a few selected images, or all
images.
2.9 Exit
The “Exit” option will directly close DinoCapture and exit you out of the program.
11
Chapter 3 - Dino-Lite Settings
Under the settings tab you will find the following options listed below:
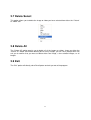
3.1 Microtouch
Disable: Allows you to enable or disable the Microtouch feature.
One Touch: Allows you to set the Microtouch feature so that it takes a picture of what you aim
at with a single touch of your finger
Double Touch: Allows you to set the Microtouch feature to take a picture by touching it twice in
about one second on the designated area. This feature is designed to avoid unwanted pictures
being taken by an unintended touch.
Micro
Touch
12
3.2 Run DinoCapture with Microtouch
The “Run DinoCapture with Microtouch” tab allows you quickly start the DinoCapture program
simply by pressing the Microtouch.
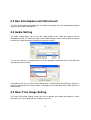
3.3 Audio Setting
The audio setting allows you to save the audio portion of the video you capture with the
microphone of your PC. When you click on the “Audio Settings” tab, you will be given the option
to select the sound format you would like to save the sound in.
To save the sound in a specific format, go to the Attributes drop down menu and select the
audio quality of your choice.
If you desire you may save the sound settings with a specific name by clicking on “Save As.”
Once you have given that setting a name, it will appear on the pull down menu under “Name” as
shown bellow.
3.4 Real -Time Image Setting
The “Real-Time Image Setting” allows the user to regulate and modify the brightness, color,
saturation, etc. of the image you are viewing in real-time.
13
3.5 Resolution
By clicking on the Resolution tab, you will be given the option to choose the resolution quality
you desire for your images.
3.6 DinoCapture Auto Update
DinoCapture Auto Update allows you to update your Dino-Lite Microscope whenever there is an
improvement in the software. When the DinoCapture Auto Update is enabled, the DinoCapture
will automatically check if any updates are available on the Internet when the program starts.
To check whether a new version of the Dino-Lite Digital Microscope is available, simply click on
the DinoCapture Auto Update, or click on the DinoCapture Update under Help. A new window
will open and inform you whether there are any updates or new versions of the software.
14
3.7 Sound Effect
This will enable or disable the photographic camera shutter sound effect whenever you take a
picture.
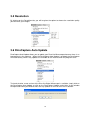
3.8 Cross Line
This function allows you to display a cross line on the preview screen which could be useful in
some industrial applications.
To use the Cross Line function, click on the Cross Line tab. A window will open up allowing you
to set the X/Y coordinates of the object you desire to measure.
15
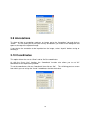
3.9 Annotations
To show or hide an annotation made on an image, go to the “Annotation” tab and click on
“Show.” This will allow you to see input and any annotations you make on the dialog box that
opens at the top of the captured image.
If you desire the annotation to be imprinted on the image, select “Imprint” before saving or
emailing it.
3.10 Coordinates
This option allows the user to “Show” and to “Set” the coordinates.
As with the “Cross Line” function, the “Coordinate” function also allows you to set X/Y
coordinates of the object being studied.
To set the coordinates, click on :Coordinate” then click on “Set”. This will bring you to a screen
from which you can assign the X and Y coordinates their desired value.
16
3.11 Magnification
Set Real Time Magnification
If the Dino-Lite is used in a way that the magnification rate will not be changed and the focus
dial will not be adjusted, this function could help you enter the given magnification rate to each
picture taken after this function is enabled.
When “Set Real Time Magnification” is selected, this function will open a text box on the top
right of the DinoCapture screen where you can input the magnification rate.
To determine the magnification value of the image, refer to the reading on the center of the
focus dial indicated by a small node. This constitutes the magnification value for the captured
image.
Set Magnification After Capture
When activated, this option will bring up a box prompting you to enter the magnification every
time after capturing each picture. This option could help you do measurements after taking
multiple pictures.
Show
When activated, the “Show” option will show the magnification rate on the images captured.
Imprint
The imprint option will allow you to imprint the notes keyed into the dialog box that opens at the
top of the screen.
17
3.12 Date & Time
The date and time function allows you to show the date and time when you took each picture.
To show the date and time on the images you take, go to the Settings tab, then DateTime tab
and select Show.
To show an imprint of the date and time on the pictures taken click on “Imprint.” A check mark
will appear on the left of the imprint tab indicating that the function has been activated.
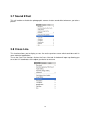
3.13 Skin Setting
This function allows you to choose the Color Scheme for the display window. You can choose
between three colors: Metallic, light blue, and dark blue.
To select the display setting of your choice, simply click on the color scheme you desire and it
will automatically change to the selection of your choice.
18
Chapter 4 - Capturing Still Images
4.1 Taking Pictures
To take a picture of an image you can use any of the following methods:
”
-
Go to the Capture Tab and click on “Picture
-
Click on the Camera icon
-
Left-click on the Real-time preview screen
-
Activate and use the Microtouch feature
-
Press F11
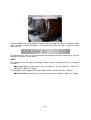
Once you have taken a snapshot of the desired object, the picture will appear under the picture
tab on the left of your screen. To open a picture double click on the selected image.
19
After you double click on the photo on the picture tab, the image will open in a separate window
which will show a toolbar with options. For a quick look at what each tab is, drag your mouse
over each icon.
For information on how to use measurement and calibration functions contained in the icons
above go to chapters six and seven.
NOTE:
The following Dino-Lite Digital Microscope models contain the Measurement & Calibration
Functions:
AM413 Pro Series, among which, but not limited to, are the AM413ZT, AM413FVT,
AM413FVT2, AM413FIT models.
The following Dino-Lite Digital Microscope models contain the Measurement Functions:
AM313 Plus Series, among which, but not limited to, are the AM313T, AM313FVT models
20
Chapter 5 - Capturing Video
To capture video, go to the “Capture” tab on the main toolbar and select Video.
A window will open up allowing you to set the frames rate, set a video recording time limit, and
enable or disable the audio.
Before you start capturing video, click on the Compress tab. The Video Compression window
will give you a list of “Compressors” you can choose from.
To get the most out of the video recording performance, you may opt to download or buy a
codec from a codec provider. DivX (www.divx.com) is one of our recommandations.
After you have selected a Video Compressor from the drop down menu, click OK. The Video
Compression window will close. Then click Start on the Capture Video Parameters window to
start capturing video.
21
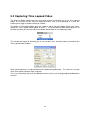
5.2 Capturing Time Lapsed Video
The Dino-Lite Digital Microscope has the unique function of allowing you to set Time Lapsed
Video. This function can be used for capturing events such as the sprouting of a seed, the
hatching of an egg, or the blossoming of a flower.
To capture a Time Lapsed Video, go to the “Capture” tab on the main toolbar on the main menu.
Select the “Time Lapsed Video” option or click F7. A new window will open allowing you to set
the date and time you desire the Dino-Lite Digital Microscope to start capturing video.
This window will open up allowing you to set the date, time, and total frames desired for the
Time Lapsed Video Capture.
Each frame represents a snapshot taken of the object being observed. The “intervals” are how
much time elapses between each snapshot.
The “Insert” tab allows you to insert additional frames to the ones already programmed between
intervals.
22
Chapter 6 - Measurement Functions
6.1 Steps for Using Measurement Functions
Step 1: Bring the image into focus by adjusting the dial on the side of the unit. Once in focus
at the desired magnification, take a picture by clicking “Capture.” The captured image will then
be displayed in the picture scroll list located under the picture tab.
Step 2: To determine the magnification value of the image, refer to the reading on the center of
the focus dial indicated by a small node. This is the magnification value for the captured
image.
23
To enter this value, place your mouse over the captured image in the left-hand column, select
“Set Magnification” and enter the magnification value. This set value will now be displayed in the
upper right hand corner of the image, and will be used as a standard for measurement
purposes.
Step 3: To utilize the measurement features simply double click on the desired image in the left
hand column, and refer to the feature icons in the top row. Click on the “Measure” icon and
choose from one of the selections below.
24
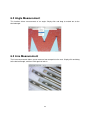
6.2 Angle Measurement
This function allows measurement of an angle. Simply click and drag to extend out to the
desired angle.
6.3 Line Measurement
The Line measurement allows you to measure from one point to the next. Simply click and drag
to the desired length, and then click again to lock-in.
25
6.4 Continuous Line Measurement
The Continuous line function allows measurements of multiple connecting lines. Click and drag
to connect desired points, and then click again to lock-in. Continue until all points have been
connected.
6.5 Radius Circle Measurement
Radius Circle allows you to measure the radius, circumference and area of a circle. Simply click
and extend out to the desired radius.
.
26
6.6 Diameter Circle Measurement
This function allows measurement of the diameter, circumference and area of a circle. Simply
click and extend out to the desired diameter.
6.7 Three Point Circle Measurement
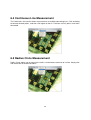
The Three Point Circle allows measurement of the radius, circumference and area of a circle by
simply defining any three points and clicking.
27
Chapter 7 - DinoCapture Calibration
7.1 How to Use the Calibration Function
Step 1: Select a known measurement standard, such as a ruler, to be used for calibration.
Take a picture of the selected measurement standard.
Step 2: Now open the picture of the measurement calibration standard.
Step 3: Determine the magnification value from the reading on the DinoLite adjustment dial.
Enter this value in the “Input Mag” box located in the upper right hand corner of the screen.
28
Step 4: Now click on the measurement icon at the top of the page and select “Calibration.”
Step 5: The software will then prompt you to take a measurement on the selected calibration
standard.
Step 6: Take a sample measurement of the selected calibration standard by clicking on
beginning and ending points across a known measurement value (such as 5 mm, .5 in., etc.). A
measurement value before calibration will be displayed (5.179 mm in the example below).
29
Step 7: Enter the exact known value of the measurement sample (5.0 mm in this example) in
the “Adjusted Mag” window. Click “OK.”
Step 8: The software will automatically calibrate the magnification rate and will show the
adjusted magnification rate in the upper right corner of the picture.
Step 9: Now the software is ready to take calibrated measurements with adjusted magnification
rates. To verify calibration simply take another measurement sample of a known measurement
value.
Notes:
1. Calibration can be done at both lower magnification rates (<80x) and higher magnification
rates (>80x) respectively. However, it will be more accurate if the calibration is done at the
magnification rate closest to the one used for measurement.
2. The calibration can be cleared by selecting “Clear All Calibration.”
30
3. The measurement can also be ignored without clearing the calibration by disabling the
“Measure with Adjusted Mag. Rate.” The Adjusted Mag. will not be shown in the picture if the
calibration is disabled.
4. The following Dino-Lite Digital Microscope models contain the Measurement & Calibration
Functions:
AM413 Pro Series, among which, but not limited to, are the AM413ZT, AM413FVT,
AM413FVT2, AM413FIT, AM413M, AM413T-FVW models.
The following Dino-Lite Digital Microscope models contain the Measurement Functions:
AM313 Plus Series, among which, but not limited to, are the AM313T, AM313FVT models
31
Chapter 8 - Help Options
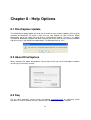
8.1 DinoCapture Update
The DinoCapture Update option will allow you to check for new software updates which may be
available for download. To check if there are any new updates for your Dino-Lite Digital
Microscope, go to the “Help” tab and click on “DinoCapture Update.” If there is an update
available for download a window will open informing you of the new version currently available
and will ask you if you would like to download it. To download click on “Yes.”
8.2 About DinoCapture
When selected, the “About DinoCapture” tab on help will tell you what DinoCapture software
version you are currently running.
8.3 Faq
For any other questions, please check the website www.dino-lite.eu for frequently asked
questions, the latest software versions and contact information for customer support.
32
DinoCapture End User License Agreement
By using this software("DinoCapture Software") you agree to accept a license under and be bound by the following terms
and conditions (the "Agreement").
Non-Commercial Use Only
DinoCapture Software is made available to you for your non-commercial use only. This means that you may use it at work or
at home in conjunction with any product manufactured by AnMo Electronics Corporation (the “AnMo”). But you first need to
obtain permission from AnMo if you want to sell the DinoCapture Software or any information, services, or software
associated with or derived from it, or if you want to modify, copy (except as provided below), license, or create derivative
works from the DinoCapture Software, if you are not using the Software in conjunction with AnMo’s product.
This Agreement allows you to install and use the DinoCapture Software for working with Dino or DinoLite Digital Microscope,
or the DinoEye digital eyepiece for microscope, or any other product manufactured by AnMo. You may make copies of the
DinoCapture Software and distribute such copies to others within your employer organization provided that any such
recipient has had an opportunity to review and agree to be bound by this Agreement. If others within your organization do
not have this opportunity to review and agree and you would still like to distribute copies to them, you may do so provided
that you have the legal right to bind your organization (and others within your organization) to this Agreement. If you do not
have this right and the recipients do not have an opportunity to review and agree to this Agreement, please do not distribute
the DinoCapture Software to them. If you have any questions regarding the terms of distribution, please send an email to
[email protected] .
For each copy of the DinoCapture Software authorized under this license, you may make one backup copy, provided your
backup copy is not installed or used concurrently on different computers. You must reproduce on any such copy all copyright
notices and any other proprietary legends on the original copy of the DinoCapture Software. AnMo is not obligated to
provide maintenance, support, or updates to you for the DinoCapture Software.
If you have comments on DinoCapture Software or ideas on how to improve it, please email [email protected] . Please
note that by doing so, you also grant AnMo and third parties permission to use and incorporate your ideas or comments into
the DinoCapture Software (or third party software) without further compensation.
Automatic Updates
The DinoCapture Software may communicate with AnMo's servers to check for available updates to the DinoCapture
Software, such as bug fixes, patches, enhanced functions, missing plug-ins and new versions (collectively, "Updates"). The
DinoCapture Software sends AnMo a request for the latest DinoCapture Software version information. If a newer version is
available, the DinoCapture Software will give you the option of downloading it. The DinoCapture Software asks for
permission before downloading an updated version. By installing the DinoCapture Software, you hereby agree to
automatically request and receive Updates from AnMo's servers.
Intellectual Property
You acknowledge that AnMo own all right, title and interest in and to the DinoCapture Software, portions thereof, or software
or other materials (not including user photos or message text) provided through or in conjunction with the DinoCapture
Software, including without limitation all intellectual property rights. You agree not to modify, adapt, translate, prepare
derivative works from, decompile, reverse engineer, disassemble or otherwise attempt to derive source code from
DinoCapture Software. You also agree to not remove, obscure, or alter AnMo's or any third party's copyright notice,
trademarks, or other proprietary rights notices affixed to or contained within or accessed in conjunction with or through the
DinoCapture Software.
Disclaimer of Warranties
AnMo and its licensors and suppliers disclaim any responsibility for any harm resulting from your use of the DinoCapture
Software and/or any third party software accessed in conjunction with or through the DinoCapture Software.
THE DINOCAPTURE SOFTWARE AND ANY THIRD PARTY SOFTWARE MADE AVAILABLE IN CONJUNCTION WITH
OR THROUGH THE DINOCAPTURE SOFTWARE ARE PROVIDED "AS IS," WITH NO WARRANTIES WHATSOEVER.
ANMO AND ITS LICENSORS AND SUPPLIERS EXPRESSLY DISCLAIM TO THE FULLEST EXTENT PERMITTED BY
LAW ALL EXPRESS, IMPLIED, AND STATUTORY WARRANTIES, INCLUDING, WITHOUT LIMITATION, THE
WARRANTIES OF MERCHANTABILITY, FITNESS FOR A PARTICULAR PURPOSE, AND NON-INFRINGEMENT OF
PROPRIETARY RIGHTS. ANMO AND ITS LICENSORS AND SUPPLIERS DISCLAIM ANY WARRANTIES REGARDING
THE SECURITY, RELIABILITY, TIMELINESS, AND PERFORMANCE OF DINOCAPTURE SOFTWARE AND SUCH
THIRD PARTY SOFTWARE.
YOU UNDERSTAND AND AGREE THAT YOU DOWNLOAD AND/OR USE THE DINOCAPTURE SOFTWARE AND ALL
THIRD PARTY SOFTWARE MADE AVAILABLE IN CONJUNCTION WITH OR THROUGH THE DINOCAPTURE
SOFTWARE AT YOUR OWN DISCRETION AND RISK AND THAT YOU WILL BE SOLELY RESPONSIBLE FOR ANY
DAMAGES TO YOUR COMPUTER SYSTEM OR LOSS OF DATA THAT RESULTS FROM THE DOWNLOAD OR USE OF
DINOCAPTURE SOFTWARE AND SUCH THIRD PARTY SOFTWARE.
Limitation of Liability
33
UNDER NO CIRCUMSTANCES SHALL ANMO OR ITS LICENSORS AND SUPPLIERS BE LIABLE TO ANY USER ON
ACCOUNT OF THAT USER'S USE OR MISUSE OF THE DINOCAPTURE SOFTWARE. SUCH LIMITATION OF LIABILITY
SHALL APPLY TO PREVENT RECOVERY OF DIRECT, INDIRECT, INCIDENTAL, CONSEQUENTIAL, SPECIAL,
EXEMPLARY, AND PUNITIVE DAMAGES WHETHER SUCH CLAIM IS BASED ON WARRANTY, CONTRACT, TORT
(INCLUDING NEGLIGENCE), OR OTHERWISE. SUCH LIMITATION OF LIABILITY SHALL APPLY WHETHER THE
DAMAGES ARISE FROM USE OR MISUSE OF AND RELIANCE ON THE DINOCAPTURE SOFTWARE, FROM
INABILITY TO USE DINOCAPTURE SOFTWARE OR FROM THE INTERRUPTION, SUSPENSION, OR TERMINATION
OF DINOCAPTURE SOFTWARE (INCLUDING SUCH DAMAGES INCURRED BY THIRD PARTIES). SUCH LIMITATION
SHALL APPLY NOTWITHSTANDING A FAILURE OF ESSENTIAL PURPOSE OF ANY LIMITED REMEDY AND TO THE
FULLEST EXTENT PERMITTED BY LAW.
SOME STATES OR OTHER JURISDICTIONS DO NOT ALLOW THE EXCLUSION OR LIMITATION OF LIABILITY FOR
INCIDENTAL OR CONSEQUENTIAL DAMAGES, SO THE ABOVE LIMITATIONS AND EXCLUSIONS MAY NOT APPLY
TO YOU.
Indemnification
It is your responsibility to ascertain whether any copyright or other licenses for use of content are necessary and to obtain
any such licenses. You agree to copy, distribute, display, and modify only those materials which you have the necessary
permission to use. You agree to hold harmless and indemnify AnMo and its subsidiaries, affiliates, officers, agents, and
employees from and against any third party claim arising from or in any way related to your use of the DinoCapture
Software, including any liability or expense arising from all claims, losses, damages (actual and consequential), suits,
judgments, litigation costs and attorneys' fees, of every kind and nature. In such a case, AnMo will provide you with written
notice of such claim, suit or action.
Miscellaneous Provisions
This Agreement will be governed by and construed in accordance with the laws of the Republic of China, without giving
effect to the conflict of laws provisions of Republic of China or your actual country of residence. If for any reason a court of
competent jurisdiction finds any provision or portion of this Agreement to be unenforceable, the remainder of this Agreement
will continue in full force and effect. This Agreement constitutes the entire agreement between the parties with respect to the
subject matter hereof and supersedes and replaces all prior or contemporaneous understandings or agreements, written or
oral, regarding such subject matter. Any waiver of any provision of this Agreement will be effective only if in writing and
signed by AnMo.
Termination
IF YOU WISH TO TERMINATE THIS AGREEMENT, YOU MAY SIMPLY CEASE USING THE DINOCAPTURE
SOFTWARE AND FOLLOW THE UNINSTALL INSTRUCTIONS. ANMO RESERVES THE RIGHT TO TERMINATE THIS
AGREEMENT AND YOUR AUTHORIZATION TO USE THE DINOCAPTURE SOFTWARE AT ANY TIME WITHOUT
CAUSE.
34
Warranty
The DinoCapture software is provided for use with a Dino-Lite digital microscope
supplied by AnMo Electronics. The use of the DinoCapture software is guided by the End
User License Agreement.
The Dino-Lite product is delivered with a one year warranty from the date of purchase by
the end customer. For warranty issues please contact the reseller or store where you
bought the product.
IDCP/Dino-Lite Europe
Rijksweg 81-J
1411 GE Naarden
Tel. +31 20 6186322
Fax. +31 20 6189692
e-mail: [email protected]
web: www.dino-lite.eu
© AnMo/IDCP/Dino-Lite Europe.
No part of this publication may be reproduced or distributed unless for personal use in
conjunction with usage of Dino-Lite digital microscopes.
35
Patent info:
US Pat. No. 7.102.817.B1
Germany Pat. No. 20 2006 001 409.8
Japan Pat. No. 3123176
Taiwan Pat. No. M302031
36