1
CMS1002R
INITIAL START UP
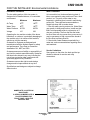
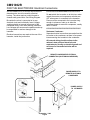
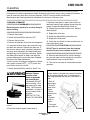
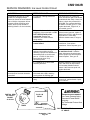
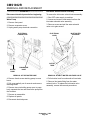
14. Check CUBE SIZE
CUBES (ACTUAL SIZE)
The dimensions of the cubes are fixed by the size
and shape of the molds on the evaporator plate,
except that the thickness of the cube MAY need to
be adjusted at start up. There is only one size of
cube that is correct; adjusting the cube size control
to that size of cube will allow the ice maker to
produce ice at its most efficient size. The correct
size cubes will be fully formed at the edges; will
harvest off of the evaporators beginning with
individual cubes at the top of the evaporator, then
vertical strips for the balance; and will appear
similar to the illustration for “Correct Size Cube”.
TOO
THICK
Adjust for the correct size if needed:
1 1⁄4"
To produce SMALLER sized ice cubes:
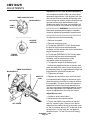
Locate cube size control knob, in the front of the
control box. Rotate this knob one eighth of a turn
counter clockwise. Observe size of the ice cubes
in the next ice cube harvest and adjust again if
needed, until the correct ice cube is achieved.
CORRECT
1 1⁄4"
SIZE
CUBE
To produce LARGER ice cubes:
Locate cube size control on the front of the control
box. Rotate the knob one eighth of a turn
clockwise. Observe size of ice cubes in the next
cube harvest and adjust again until correct the ice
cube size is achieved.
Note: Optimum performance will be achieved when
the ice machine is adjusted to produce this size and
shape of cube. The typical batch weight at this
setting is between 8.25 and 9 pounds.
15. Check harvest time. The machine must harvest
all of the cubes before returning to a freeze cycle.
Increase the harvest time if there is less than 15
seconds of harvest time after the last cube has
fallen into the bin.
Decrease the harvest time if there is much more
than 15 seconds of harvest time after the las cube
has fallen into the bin. Note: Harvest time is
dependent upon the water and air temperatures at
the ice machine. Do not adjust harvest time too
short, as this will cause a freeze up.
See the next page for detailed harvest time
adjustment instructions.
TOO
THIN
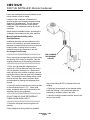
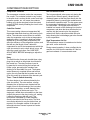
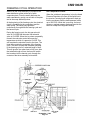
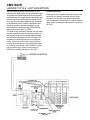
socket about 2" in diameter and located left of the
evaporator plates.
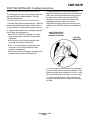
2. When the machine is running, wait untIl near the
end of a “harvest” cycle.
3. Hold a flat object about the size of this service
manual over the ice level sensor socket.
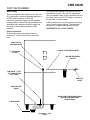
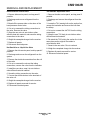
16. Check ICE BIN LEVEL CONTROL
The amount of ice maintained in the bin is
adjustable. The normal setting is “full”. If desired,
the machine may be adjusted to shut off the
machine when the bin is only partially full.
4. The ice machine should turn off at the end of the
harvest cycle.
1. Open the bin door and locate on the bottom of
the ice machine, the ice level sensor. It’s in a
6. The ice machine will start again at the point
where it will maintain the ice level.
5. Slowly lower the flat object straight down.
17. Replace all panels.
September, 1993
Page 11