1
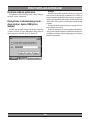
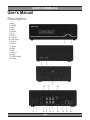
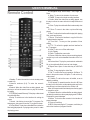
DVBT05
MULTIMEDIA HDD PLAYER
Instrukcja obsługi
User’s Manual
MMRCAM0001 Cyber Eye HD
Cyber Eye HD to stylowe okulary z ukrytą kamerą, pozwalające na dyskretne filmowanie i fotografowanie w doskonałej jakości
HD. Można je wykorzystać jako wygodny aparat do rejestrowania
wyczynów sportowych, do zastosowań prywatnych, rozrywkowych
oraz pracy detektywistycznej. Łatwa obsługa urządzenia za pomocą zaledwie dwóch przycisków, wysokiej jakości lekkie oprawki,
spolaryzowane soczewki dla ochrony oczu oraz dołączony do zestawu futerał ochronny sprawiają, ze Cyber Eye HD sprawdzą się w
każdych warunkach. Okulary zostały wyposażone w pamięć o pojemności 2GB, co wystarcza na zarejestrowanie 50 minut nagrania.
Ponadto urządzenie posiada czytnik kart SD, dzięki czemu można
rozbudować jego pamięć o kolejne 16GB. Sięgnij po Cyber Eye HD
firmy Manta i zaskocz innych tym, co widziałeś…
GPS510 MSX Easy Rider
Funkcjonalność, duże możliwości i wygoda użytkowania to
wszystko cechuje najnowszą nawigację GPS510MSX. Urządzenie wyposażono w dotykowy wyświetlacza LCD TFT o przekątnej 5
cali. Zgrabna i precyzyjnie wykonana ultra cienka obudowa w połączeniu z atrakcyjnym designem może się podobać. Na szczególną
uwagę zasługuje także dołączony do urządzenia uchwyt zapewniający bardzo dobrą stabilność oraz regulację. Nawigacje wyposażono w szybki procesor MStar 550MHz wykorzystujący operacyjną
pamięć SDRAM 64MB i wbudowany flash 4GB.
DVBT01 Tuner DVB-T
Tuner DVBT01 DVB-T HD Tuner to nowoczesny tuner telewizyjny firmy Manta Multimedia dedykowany do odbioru kanałów cyfrowej telewizji naziemnej DVB-T w standardzie MPEG-2 i MPEG-4
oraz w rozdzielczości HD. Urządzenie wyposażone jest w komplet
złączy (SCART, komponentowe, kompozytowe, HDMI) umożliwiających podłączenie go zarówno do starszych telewizorów CRT jak
nowszych LCD i plazmowych niewyposażonych w tuner DVB-T. Tuner jest w pełni sterowany z pilota zdalnego sterowania. Wyposażony jest w wyświetlacz LCD informujący o aktualnym kanale telewizyjnym oraz mechaniczny wyłącznik zasilnia. Urządzenie obsługuje wszystkie standardy odtwarzania cyfrowej wizji i fonii używane
w Polsce. Urządzenie jest w pełni kompatybilne z ustawą o telewizji
cyfrowej!
DVD068 Emperor HDMI/RMVB
Najnowszy odtwarzacz DVD/DivX/RMVB z wyjściem HDMI /
High Definition Multimedia Interface/ oraz kompletem wyjść AUDIO pozwalającym na połączenie z kinem domowym 5.1 to propozycja godna rozważenia. DVD wyposażono w czytnik kart pamięci SD/MMC/MMS umożliwiający oglądanie filmów zapisanych
na zewnętrznym nośniku, słuchanie muzyki w formacie MP3, czy
też oglądanie zdjęć na ekranie telewizora. Emperor posiada funkcję CD-Ripping, tj. tworzenia plików MP3 z płyt Audio CD. Bez problemu zgrasz swoje ulubione utwory z płyty CD na podłączony do
odtwarzacza nośnik pamięci. Ultrapłaska obudowa, elegancki design, wygodnie rozmieszczone przyciski funkcyjne czynią DVD068
niezastąpionym. Możliwość odtwarzania MPEG 4 i XviD z polskimi napisami
DVBT05
Instrukcja obsługi
Opis urządzenia............................................................................................................................................................................5
Pilot.................................................................................................................................................................................................6
Główny interfejs...........................................................................................................................................................................7
Telewizja cyfrowa.........................................................................................................................................................................7
EPG (informacje o programie)...................................................................................................................................................7
Edycja.............................................................................................................................................................................................8
Nagrywanie...................................................................................................................................................................................8
Nagrywanie w czasie rzeczywistym.........................................................................................................................................8
Nagrywanie w trybie EPG.........................................................................................................................................................8
Nagrywanie według czasu........................................................................................................................................................8
Tworzenie ustawionego nagrania.............................................................................................................................................8
Kasowanie ustawionego nagrania............................................................................................................................................9
Przesunięcie czasu....................................................................................................................................................................9
Zarządzanie plikami.....................................................................................................................................................................9
Przeglądanie plików...................................................................................................................................................................9
Filmy................................................................................................................................................................................................9
Odtwarzanie plików wideo.........................................................................................................................................................9
Przeglądanie plików wideo......................................................................................................................................................10
Muzyka.........................................................................................................................................................................................10
Obrazy..........................................................................................................................................................................................10
Odtwarzanie obrazów..............................................................................................................................................................10
Ustawienia systemu...................................................................................................................................................................11
System.......................................................................................................................................................................................11
Dźwięk.......................................................................................................................................................................................11
Wideo........................................................................................................................................................................................11
Sieć............................................................................................................................................................................................12
Inne............................................................................................................................................................................................12
Obsługa BT i Samba..................................................................................................................................................................12
Pobieranie BitTorrent................................................................................................................................................................12
Kontrola zadania pobierania....................................................................................................................................................13
Korzystanie z wbudowanego twardego dysku i dysku USB przez Samba.........................................................................13
3
User’s Manual
DVBT05
Description..................................................................................................................................................................................14
Remote Control...........................................................................................................................................................................15
Main Interface.............................................................................................................................................................................16
Digital TV......................................................................................................................................................................................16
EPG (Electronic program guides)...........................................................................................................................................16
Edit................................................................................................................................................................................................17
Videotape.....................................................................................................................................................................................17
Real-time videotaping..............................................................................................................................................................17
Preset videotape in EPG..........................................................................................................................................................17
Timed videotape.......................................................................................................................................................................17
Create the preset videotape....................................................................................................................................................17
Delete the preset videotape state...........................................................................................................................................18
Time shift...................................................................................................................................................................................18
File Management........................................................................................................................................................................18
Browse files...............................................................................................................................................................................18
Film................................................................................................................................................................................................18
Play the video files....................................................................................................................................................................18
Browse the video files..............................................................................................................................................................19
Music.............................................................................................................................................................................................19
Picture..........................................................................................................................................................................................19
Play the pictures.......................................................................................................................................................................19
System setup..............................................................................................................................................................................19
System.......................................................................................................................................................................................19
Audio......................................................................................................................................................................................... 20
Video........................................................................................................................................................................................ 20
Network.................................................................................................................................................................................... 20
Others........................................................................................................................................................................................21
Operation of BT and Samba . ..................................................................................................................................................21
Download BitTorrent.................................................................................................................................................................21
Control the download task.......................................................................................................................................................21
Visit built-in hard disk and U-drive through Samba...............................................................................................................21
4
Instrukcja obsługi
Instrukcja obsługi
Opis urządzenia
1. Reset
2. Włącznik/wyłącznik
3. USB 1
4. USB 2
5. Kieszeń na dysk
6. Wejście RF
7. Wyjście RF
8. Wejście zasilania
9. Wyjście CVBS
10. Wyjście prawe
11. Wyjście lewe
12. Wyjście optyczne
13. HDMI
14. LAN
15. Mini USB
16. Zasilanie
17. Wyjście Y/PB/PR
18. Złącze koncentryczne
5
Pilot
Instrukcja obsługi
10. Przyciski nawigacyjne: Przyciski strzałek – lewo,
prawo, góra, dół.
11. Menu: Powrót do interfejsu głównego menu.
12. Zegar: Przeskok do interfejsu nagrywania według
czasu.
13. Audio: Gdy odtwarzane są pliki wideo, użyj tego przycisku do włączenia menu ustawiania ścieżki dźwiękowej.
14. Wolno: Odtwarzanie plików multimedialnych w zwolnionym tempie.
15. Powiększanie: Powiększanie odtwarzanego filmu
lub obrazu.
16. Czerwony: Włączanie interfejsu z listą odtwarzania
filmów, muzyki i obrazów.
17. Zielony: Włączanie interfejsu kopiowania plików w
interfejsie zarządzania plikami.
18. Przesunięcie czasu: Wykonanie operacji przesunięcia
czasu:
19. Telegazeta: Włączanie interfejsu graficzno – tekstowego dla programu TV.
20. Wyciszanie: Wyłączanie i włączanie dźwięku.
21. Informacja: Ekran.
22. Proporcje: Ustawianie proporcji obrazu.
23. Przycisk TV-SYS: przełącza między trybami PAL/
NTSC/480/575/720/180
24. Poprzedni/następny: Odtwarzanie poprzedniego/
następnego pliku multimedialnego lub poprzedniego/następnego rozdziału.
25. Otwieranie/zamykanie: Otwieranie lub zamykanie
szufladki płyty DVD, bezpieczne usunięcie nośnika z USB
26. Stop: Zatrzymanie odtwarzania plików wideo.
27. OK: Potwierdzanie bieżącej operacji.
28. Powrót: Powrót do poprzedniego menu.
29. Opcje: Włączanie menu obsługi.
30. Napisy: Włączanie menu napisów oraz ich
ustawianie.
31. Powtarzanie A-B: Powtarzanie fragmentu od A do
B. Naciśnij ten przycisk pierwszy raz, aby ustawić punkt
początkowy, a następnie drugi raz, aby ustawić punkt końcowy fragmentu A-B.
Gdy tryb powtarzania jest włączony, naciśnij ten przycisk
ponownie, aby go wyłączyć.
32. Powtarzanie: Podczas odtwarzania plików multimedialnych użyj tego przycisku do przełączania trybu powtarzaniaodtwarzania.
33. Niebieski: Kasowanie ustawionego nagrania.
34. Żółty: Podgląd plików wideo w interfejsie ustawionego
nagrania.
35. Klawisz Source
36. EPG: Podczas oglądania programu TV użyj tego przycisku do włączenia interfejsu zapowiedzi programowych.
1. Wstrzymanie: Przełączanie urządzenia w tryb wstrzymania lub włączanie.
3. Klawiatura numeryczna (0-9): Wprowadzanie liczb.
4. Wyszukiwanie: Gdy odtwarzane są pliki wideo, użyj tego
przycisku do włączenia menu wyszukiwania i odtwarzania
zawartości skokowo.
5. FF/FR (Przewijanie do przodu/do tyłu): Przyspieszone
odtwarzanie w przód lub wstecz.
6. Ustawienia: Przełączanie do interfejsu menu
ustawień.
7. Nagrywanie: Użyj tego przycisku do nagrywania
programów TV. W tym celu naciśnij go, gdy program jest
odtwarzany.
8-9. Odtwarzanie/Pauza: Odtwarzanie plików multimedialnych lub wstrzymywanie odtwarzania. W trybie odtwarzania
naciśnij ten przycisk, aby włączyć pauzę.
6
Instrukcja obsługi
Główny interfejs
Zmiana kanału
Możesz zmieniać kanał w następujący sposób:
1) W trybie bieżącego kanału wprowadź numer żądanego
kanału i naciśnij OK;
2) W trybie bieżącego kanału naciśnij OK i wybierz program z listy.
3) W trybie bieżącego kanału naciśnij Powrót na pilocie, a
system przełączy się na poprzednio oglądany kanał.
Po zmianie kanału system wyświetli informacje o tym
kanale.
Po włączeniu urządzenia pojawi się główny interfejs
systemu.
Ustawianie głośności
Podczas oglądania programu TV naciśnij przyciski głośności na pilocie, aby ustawić głośność wyjściową systemu.
Wyświetlanie informacji o kanale
Podczas oglądania programu TV możesz nacisnąć
INFO, aby włączyć menu informacji o aktualnie oglądanym
kanale.
Menu opcji
Podczas oglądania programu TV możesz nacisnąć przycisk Opcje na pilocie, aby włączyć menu opcji, w którym
możesz wykonać opisane niżej operacje.
EPG: Włączanie menu EPG.
Edycja: Edycja kanału.
Nagrywanie: Nagrywanie aktualnie oglądanego kanału.
Pauza TV.
Ustawiania obrazu: Włączanie menu ustawień wyjścia
wideo.
Napisy: Przełączanie napisów (jeśli program TV zapew¬nia napisy).
Audio: Przełączanie ścieżek audio (jeśli program TV
zapewnia informacje o ścieżkach).
Teletext: Włączanie informacji graficzno – teksto¬wych programu TV (jeśli program TV zapewnia takie informacje).
Nagrane programy: Przełączanie do katalogu z plikami
nagrań.
Harmonogram: Włączanie menu ustawień nagrania
W głównym interfejsie możesz użyć lewego i prawego przycisku nawigacji do wyboru pozycji i naciśnij OK,
aby potwierdzić wybór. Pozycje interfejsu są następujące:
Zarządzanie plikami: Jeśli do urządzenia podłączone są
urządzenia peryferyjne, takie jak dysk USB lub dysk twardy, będą one wyświetlane w pozycji „Zarządzanie plikami”.
System przeskanuje urządzenia peryferyjne i posortuje
zeskanowane pliki w poszczególnych kategoriach (filmy,
obrazy i muzyka). Przy użyciu tej pozycji możesz odtwarzać i edytować filmy, obrazy i muzykę zapisane na dysku
USB lub dysku twardym. Filmy: W tej pozycji wyświetlane
są tylko pliki wideo. Muzyka: W tej pozycji wyświetlane są
tylko pliki muzyczne. Obrazy: W tej pozycji wyświetlane są
tylko pliki obrazów.
Uwaga:
Ponieważ system może tylko odczytywać zawartość
dysku, pliki tam zapisane nie mogą być dodawane do pozycji
filmów, obrazów i muzyki.
APP Dzięki tej pozycji możesz oglądać filmy wideo i wiadomości z sieci WAN.
Ustawienia systemu: Dzięki tej pozycji możesz skonfigurować system, np. ustawić opcje systemowe, dźwięk,
obraz, sieć i inne.
Menu nawigacyjne
Podczas korzystania z urządzenia naciśnij Menu na pilocie, aby włączyć menu nawigacyjne, w którym możesz
wybrać określony interfejs przy użyciu przycisków nawigacyjnych na pilocie.
Telewizja cyfrowa
EPG (informacje o programie)
Urządzenie może odbierać, odtwarzać i nagrywać cyfrowe
programy TV. W tym celu wybierz Ustawienia systemu ->
TV i wideo, aby wyszukać kanał. Po znalezieniu możesz
mieć dostęp do tego kanału.
Menu EPG zawiera informacje o programach, można tam
też ustawić nagrywanie programu.
Aby przejść do menu EPG użyj jednego z poniższych
sposobów:
7
Instrukcja obsługi
Nagrywanie w czasie rzeczywistym
1) Naciśnij EPG na pilocie, aby włączyć menu EPG.
2) Podczas oglądania programu naciśnij przycisk Opcje
na pilocie, aby włączyć menu opcji, naciśnij przyciski w górę
i w dół, aby wybrać EPG i naciśnij OK, aby potwierdzić.
4) Podgląd informacji: Naciśnij przyciski przewijania na
pilocie, aby obejrzeć wcześniejsze lub późniejsze informacje
o bieżącym programie.
Ustawianie nagrania: Po wybraniu programu naciśnij
Nagrywanie na pilocie, program zostanie nagrany. Po
osiągnięciu ustawionego czasu system będzie nagrywać
program według ustawionego sposobu.
Wyjście z menu EPG: Aby wyjść z menu EPG naciśnij Powrót na pilocie, system powróci do interfejsu odtwarzania.
Podczas oglądania programu TV w trybie pełnoekranowym naciśnij przycisk Nagrywanie na pilocie lub naciśnij
Opcje, aby przejść do menu opcji, wybierz Nagrywanie i
naciśnij OK. Bieżący program będzie nagrywany w czasie
rzeczywistym. Jeśli naciśniesz Nagrywanie kilka razy w
ciągu trzech sekund, możesz ustawić czas nagrywania,
przełączając między 30, 60, 90, 120, 180 i 240 minut lub
wyłączyć ten tryb. Aby zakończyć nagrywanie naciśnij Stop
na pilocie.
Nagrywanie w trybie EPG
Podczas oglądania programu TV naciśnij przycisk EPG
lub Opcje na pilocie, aby włączyć menu opcji, w którym możesz wybrać menu EPG. W tym menu użyj pilota do wybrania
programu do nagrania. Następnie naciśnij Nagrywanie na
pilocie, aby nagrać ten program według wcześniejszych
ustawień
Edycja
Podczas oglądania programu TV możesz nacisnąć przycisk Opcje na pilocie, aby włączyć menu opcji, w którym
możesz wyświetlić interfejs logowania do menu edycji kanałów.. Domyślne ustawienie hasła to 0000.
Po pomyślnym zalogowaniu system przejdzie do menu
edycji kanałów.
W tym menu możesz wykonać następujące operacje:
1) Blokowanie kanału: Po przełączeniu na zablokowany
kanał należy wprowadzić hasło, aby go oglądać.
2) Przeskok: Jeśli kanał jest ustawiony jako „przeskakiwany”, podczas przełączania kanałów przyciskami w górę
i w dół na pilocie jest on ignorowany.
3) Ulubione: Dodawanie wybranego kanału do
ulubionych.
4) Kasowanie: Kasowanie wybranego kanału.
5) Zmiana nazwy: Zmiana nazwy wybranego kanału.
6) Zamiana: Zamiana kanałów. Po wybraniu tej pozycji
system przejdzie do menu zamiany, gdzie bieżący kanał
jest wyświetlany po lewej stronie; użyj przycisków w górę i
w dół do wybrania kanału, z którym ma być zamieniony po
prawej stronie i naciśnij OK, aby potwierdzić. Kanały zostaną
zamienione miejscami.
Nagrywanie według czasu
Możesz ustawić czas i tryb nagrywania według własnych
potrzeb.
W tym celu naciśnij przycisk Zegar na pilocie lub Opcje
podczas oglądania programu TV w trybie pełnoekranowym,
aby włączyć menu opcji. Następnie wybierz Zegar, aby
włączyć menu nagrywania według czasu, gdzie możesz
wykonać następujące operacje: tworzenie ustawionego
nagrania, kasowanie ustawionego nagrania, podgląd historii, zmiana ustawionego nagrania, edycja ustawionego
nagrania itd.
W tym interfejsie przyciski pilota mają następujące
funkcje:
Przycisk czerwony: Tworzenie ustawionego nagrania.
Przycisk zielony: Kasowanie ustawionego nagrania.
Przycisk żółty: Podgląd ustawionego nagrania.
Przycisk niebieski: Zmiana stanu ustawionego
nagrania.
OK: Edycja wybranego zadania nagrywania.
Wyjście: Wyjście z menu nagrywania według czasu.
Tworzenie ustawionego nagrania
Nagrywanie
W menu nagrywania według czasu naciśnij czerwony
przycisk na pilocie, aby włączyć menu ustawień tworzenia
nagrania.
Inne operacje w tym menu:
1) Naciśnij czerwony przycisk na pilocie, możesz przełączać między następującymi trybami nagrywania:
Raz: Nagrywanie tylko jeden raz.
Gdy urządzenie jest podłączone do dysku peryferyjnego
(dysk twardy, USB), program TV może być nagrywany na
tym dysku. Podczas nagrywania dostępne są trzy opcje:
nagrywanie w czasie rzeczywistym, nagrywanie ustawione
i nagrywanie w trybie EPG.
8
Instrukcja obsługi
Zarządzanie plikami
Niedziela – sobota (jeden tydzień) Nagrywanie programu
o danej godzinie każdego dnia tygodnia.
Poniedziałek – piątek: Nagrywanie programu od poniedziałku do piątku.
Niedziela i sobota: Nagrywanie programu o danej godzinie
w niedzielę i w sobotę.
Niedziela: Nagrywanie programu o danej godzinie w
niedzielę.
Poniedziałek: Nagrywanie programu o danej godzinie w
poniedziałek. Możesz też ustawić nagrywanie programu we
wtorek, środę, czwartek lub piątek.
Sobota: Nagrywanie programu o danej godzinie w
sobotę.
2) Przyciskami w lewo i w prawo na pilocie możesz przełączać źródło, czas i długość. Przyciskami w
górę i w dół możesz ustawić źródło, czas i długość.
Źródło: Użyj przycisków w górę i w dół, aby wybrać kanał,
który będzie nagrywany.
Data (rok, miesiąc, dzień): Ustawianie daty rozpoczęcia
nagrywania.
Czas rozpoczęcia (godzina: 0-23; minuty: 0-59): Możesz
użyć przycisków w górę i w dół na pilocie lub bezpośrednio wprowadzić czas rozpoczęcia przy użyciu przycisków
numerycznych.
Czas zakończenia (godzina: 0-23; minuty: 0-59): Możesz
użyć przycisków w górę i w dół na pilocie lub bezpośrednio wprowadzić czas zakończenia przy użyciu przycisków
numerycznych.
Jeśli do urządzenia podłączone są takie urządzenia peryferyjna, jak dysk USB lub dysk twardy, będą one wyświetlane w pozycji „Zarządzanie plikami”. System przeskanuje
urządzenia peryferyjne i posortuje zeskanowane pliki w
poszczególnych kategoriach (filmy, obrazy i muzyka). Aby
przejść do tego interfejsu wybierz Zarządzanie plikami w
głównym menu i naciśnij OK.
Przeglądanie plików
Aby przeglądać pliki, wybierz Zarządzanie plikami w
głównym interfejsie i naciśnij przycisk Opcje na pilocie, aby
włączyć menu opcji.
Tryby przeglądania:
Widok miniatur: Katalogi i pliki są wyświetlane w postaci
miniatur.
Widok listy: Katalogi i pliki są wyświetlane w postaci
listy.
Podgląd: Katalogi i pliki są wyświetlane w postaci
podglądu.
Wyświetlanie wszystkich mediów: Wyświetlanie wszystkich plików (wideo, muzyki i obrazów) i katalogów.
Wyświetlanie filmów: Wyświetlanie tylko plików i katalogów wideo.
Wyświetlanie obrazów: Wyświetlanie tylko plików i katalogów obrazów.
Wyświetlanie muzyki: Wyświetlanie tylko plików i katalogów z muzyką.
Użyj przycisków w górę i w dół na pilocie, aby wybrać tryb
przeglądania i naciśnij OK, aby potwierdzić
Kasowanie ustawionego nagrania
Naciśnij zielony przycisk w menu nagrywania według
czasu, aby włączyć okno dialogowe kasowania ustawionego nagrania.
Anuluj: Anulowanie operacji kasowania ustawionego
nagrania.
Kasowanie wybranego nagrania: Kasowanie tylko wybranego zadania nagrywania.
Kasowanie wszystkich: Kasowanie wszystkich ustawionych nagrań.
Filmy
W tej pozycji wyświetlane są wszystkie pliki wideo, zapisane na urządzeniach peryferyjnych. Możesz przeglądać pliki
lub je odtwarzać. Aby przejść do filmów wybierz odpowiednią
pozycję w głównym menu i naciśnij OK.
Przesunięcie czasu
Odtwarzanie plików wideo
Podczas oglądania cyfrowego programu TV możesz nacisnąć przycisk Przesunięcie czasu lub Opcje na pilocie, aby
włączyć menu opcji, w którym możesz wybrać przesunięcie
czasu. Następnie system przejdzie do trybu przesunięcia
czasu, a obraz bieżącego programu zatrzyma się. Aby kontynuować oglądanie naciśnij przycisk Odtwarzanie na pilocie.
W trybie przesunięcia czasu możesz wykonywać operacje
odtwarzania, pauzy i przewijania w przód i w tył.
Procedura: W pozycji filmów użyj przycisków nawigacyjnych na pilocie, aby wybrać film i naciśnij OK, aby go
odtworzyć na pełnym ekranie.
Podczas odtwarzania filmu niektóre operacje możesz wykonywać przy użyciu przycisków pilota lub poprzez opcje.
Lewy przycisk nawigacyjny: Naciśnij, aby przeskoczyć
do miejsca 10 sekund wcześniej.
9
Instrukcja obsługi
Prawy przycisk nawigacyjny: Naciśnij, aby przeskoczyć
do miejsca 30 sekund później.
Przewijanie do przodu: Odtwarzanie zawartości 1,5, 2,
4, 8, 16 lub 32 razy szybciej niż normalnie.
Przewijanie do tyłu: Odtwarzanie zawartości do tyłu 1,5,
2, 4, 8, 16 lub 32 razy szybciej niż normalnie.
Wolno: Odtwarzanie zawartości do tyłu 3/4, 1/2, 1/4, 1/8
lub 1 raz wolniej niż normalnie.
Poprzedni: Przejście do poprzedniego rozdziału lub pliku
wideo.
Następny: Przejście do następnego rozdziału lub pliku
wideo.
Powiększanie: Powiększanie obrazu 2, 3, 4 lub 8 razy.
Powiększanie: Dowolne powiększanie obrazu
Stop/powrót: Zatrzymanie odtwarzania pliku wideo.
Pauza: Włączanie pauzy podczas odtwarzania.
Ekran: Wyświetlanie informacji o odtwarzanym pliku
wideo.
Powtarzanie: Włączanie trybu powtarzania. Możesz
też użyć przycisku Opcje na pilocie, aby wybrać tryb
powtarzania.
Wyszukiwanie: Użyj tego przycisku do przeskakiwania
treści według czasu lub rozdziałów. Możesz też wybrać
Opcje -> Przeskakiwanie na pilocie, aby włączyć menu
wyszukiwania.
Napisy: Włączanie menu napisów. Możesz też nacisnąć
przycisk Opcje, aby włączyć menu ustawiania napisów,
pozwalające na ustawienie typu napisów, odchylenia pionowego, rozmiaru, przesunięcia czasowego, kodowania i
koloru. Naciskaj przyciski w lewo i w prawo, aby wybrać pole
ustawień, w górę i w dół, aby ustawić wartości lub opcje i
naciśnij OK, aby zapisać ustawienia. Naciśnij Napisy lub
Powrót, aby wyjść z menu.
Menu tytułowe: Podczas oglądania filmu DVD lub odtwarzania obrazu DVD naciśnij Opcje -> Menu filmu, aby
przejść do menu tytułowego filmu.
Menu główne: Podczas oglądania filmu DVD lub odtwarzania obrazu DVD naciśnij Opcje -> Menu główne, aby
przejść do menu głównego filmu.
Przeglądanie plików wideo
Procedura: Przy włączonym menu filmu naciśnij przycisk
Opcje na pilocie, aby włączyć menu operacyjne, gdzie możesz wybrać tryb przeglądania plików przy użyciu przycisków
w górę i w dół. Naciśnij OK w celu potwierdzenia.
Muzyka
W pozycji Muzyka możesz wyszukać wszystkie pliki muzyczne zapisane na urządzeniach peryferyjnych (USB, dysk
twardy) i odtwarzać je. Naciśnij Muzyka w głównym interfejsie
i OK, aby przejść do interfejsu muzyki.
Następnie wybierz plik muzyczny i naciśnij Odtwarzanie
lub OK, aby go odtworzyć. W tym czasie możesz wykonać
następujące operacje:
Poprzedni/następny: Odtwarzanie poprzedniego/następnego pliku muzycznego.
Głośność +/-: Ustawianie głośności.
Stop: Zatrzymanie odtwarzania muzyki.
Opcje -> Odtwarzaj raz w menu operacyjnym: Odtwarzanie wszystkich plików muzycznych jeden raz.
Opcje -> Powtórz ścieżkę w menu operacyjnym: Powtarzanie jednego odtwarzanego pliku muzycznego.
Opcje -> Powtórz wszystko w menu operacyjnym: Powtarzanie wszystkich plików muzycznych.
Opcje -> Losowo w menu operacyjnym: Odtwarzanie
wszystkich plików muzycznych w losowej kolejności.
Powtarzanie: Przełączanie trybów powtarzania podczas
odtwarzania muzyki.
Lewo/prawo: Przeskok 10 sekund do tyłu lub 30 sekund
do przodu od bieżącej pozycji odtwarzania.
Powrót: Wyjście z interfejsu odtwarzania muzyki i powrót
do listy muzyki.
Obrazy
Obrazy zapisane na urządzeniach peryferyjnych (dysk
twardy lub USB) są wyświetlane w pozycji Obrazy. Aby
przejść do nich wybierz pozycję Obrazy w głównym interfejsie i naciśnij OK.
Odtwarzanie obrazów
Procedura: Wybierz obraz i naciśnij Odtwarzaj lub OK,
aby wyświetlić go na pełnym ekranie. Przyciski pilota mają
podczas wyświetlania obrazów następujące funkcje:
Poprzedni/następny: Przełączanie do poprzedniego/
następnego obrazu.
Lewo/prawo: Przełączanie do wyższego/niższego obrazu. Gdy obraz jest powiększony, użyj tego przycisku do
przesuwania go w lewo lub w prawo.
Góra: Obracanie obrazu o 90° w lewo.
Dół: Obracanie obrazu o 90° w prawo.
Powiększanie: Powiększanie obrazu 2, 4, 8 lub 16 razy.
Stop/powrót: Zatrzymanie odtwarzania obrazów.
Ekran: Wyświetlanie informacji o wyświetlanym pliku
obrazu.
10
Instrukcja obsługi
Edycja: Włączanie menu operacyjnego, w którym możesz
ustawić takie pozycje jak czas pokazu slajdów, przełączanie slajdów, tryb powtarzania, muzyka w tle i wyjście
obrazów.
Ustawienia systemu
Procedura: Wybierz Ustawienia systemu w głównym
interfejsie i naciśnij OK, aby przejść do menu.
Pozycje ustawiane w tym menu obejmują: system, dźwięk,
obraz, nagrywanie, sieć i inne.
System
W tej pozycji możesz ustawić cały system i środowisko, włącznie z językiem menu, czasem i wygaszaczem
ekranu.
Wybór języka menu
Procedura: W głównym interfejsie wybierz Ustawienia
systemu -> System -> Wybór języka menu. Użyj przycisków
w górę i w dół na pilocie, aby wybrać język i naciśnij OK,
aby potwierdzić.
Kodowanie znaków
Procedura: W głównym interfejsie wybierz Ustawienia
systemu -> System -> Kodowanie znaków.
Wybierz kodowanie znaków w pozycji System i naciśnij
OK. System przejdzie wtedy do menu kodowania, w którym
możesz wybrać format przy użyciu przycisków w górę i w
dół, naciśnij OK, aby potwierdzić.
Formatowanie
Procedura: W głównym interfejsie wybierz Ustawienia
systemu -> System -> Format.
Użyj tej pozycji do formatowania wbudowanego twardego
dysku. Jeśli chcesz użyć wbudowanego twardego dysku
do takich operacji, jak nagrywanie i przesunięcie czasu,
musisz go sformatować.
Krok 1: Wybierz twardy dysk do formatowania i naciśnij
OK, system wyświetli ostrzeżenie o formatowaniu.
Krok 2: Na ekranie ostrzeżenia naciśnij Potwierdź, aby
przejść do kolejnego etapu. Jeśli nie chcesz formatować
dysku, naciśnij Anuluj lub Powrót na pilocie.
Krok 3: Użyj przycisków w górę i w dół na pilocie do ustawienia przesunięcia czasu i naciśnij Naprzód po ustawieniu
pozostawionego miejsca. Aby wrócić do poprzedniego etapu
naciśnij Powrót.
Krok 4: Wybierz Format, aby rozpocząć proces formatowania. Pamiętaj, aby podczas formatowania nie wykonywać
żadnych innych operacji. Aby wrócić do poprzedniego etapu
naciśnij Powrót.
Krok 5: Po formatowaniu naciśnij Potwierdź w wyświetlonym menu.
Dźwięk
Ta pozycja jest używana do ustawiania dźwięku wyjściowego; dostępne są opcje trybu nocnego, wyjścia HDMI,
wyjścia SPDIF, Surround.
Tryb nocny
Dla trybu nocnego dostępne są trzy opcje.
WYŁĄCZONY: Normalne wyjście, bez żadnych ustawień
głośności.
WŁĄCZONY: Ogólne ściszenie dźwięku dla poprawienia
jego jakości.
KOMFORT: Ściszenie zbyt głośnych dźwięków.
Wyjście HDMI
Dla wyjścia HDMI dostępne są trzy opcje. LPCM: Dwukanałowe wyjście cyfrowe.
LPCM Multi-CH: Wielokanałowe wyjście cyfrowe (5.1
> 7.1).
RAW: Wyjście kodu źródłowego.
Wyjście SPDIF
Dla wyjścia SPDIF dostępne są trzy opcje. LPCM: Dwukanałowe wyjście cyfrowe.
RAW: Wyjście kodu źródłowego.
Dźwięk Dolby Surround
Pozycja ta jest używana do ustawiania efektów przestrzennych z trzema opcjami: Degradacja dźwięku 5.1 i
HD. Jest używana, gdy dźwięk HD i DTS-HD musi zostać
zdegradowany.
Wideo
Pozycja ta jest używana do ustawiania obrazu wyjściowego. Szczegóły obejmują proporcje obrazu, system TV,
powiększanie/zmniejszanie obrazu, 1080p 24 Hz i głębię
kolorów.
Proporcje
Użyj tej pozycji do ustawienia proporcji obrazu, dostępne
są cztery opcje: Panoramiczny 4:3, normalny 4:3, szerokoekranowy 16:9 i szerokoekranowy 16:10.
System TV
Użyj tej pozycji do ustawienia standardu obrazu wyjściowego w zakresie od 480i do 1080p 60 Hz. Uwaga: Jeśli
wybrany standard nie jest obsługiwany przez telewizor,
pojawi się czarny ekran.
Powiększanie/zmniejszanie obrazu
Użyj tej pozycji do ustawienia powiększania i zmniejszania obrazu.
1080p 24 Hz
Włącz tę pozycję, jeśli telewizor ją obsługuje.
Głębia kolorów
Ustawianie głębi kolorów z czterema trybami: Auto, 12
bit, 10 bit i wyłączona.
11
Sieć
Instrukcja obsługi
Użyj tej pozycji do ustawienia połączenia sieciowego.
Opcje: sieć przewodowa, sieć bezprzewodowa i PPPOE.
Ustawianie sieci przewodowej
Gdy urządzenie jest podłączone do sieci, możesz użyć
tej pozycji do ustawienia połączenia sieciowego. Dostępne
są opcje DHCP IP (auto) i FIX IP (ręcznie).
1DHCP IP (auto)
Jeśli wybierzesz Tak, system automatycznie połączy się
z siecią. Po ustanowieniu połączenia uzyskany adres IP i
maska podsieci pojawią się na ekranie.
FIX IP (ręcznie)
W tej pozycji powinieneś ręcznie ustawić adres IP, maskę
podsieci, domyślną bramę, serwer DNS i nacisnąć OK
na pilocie w celu potwierdzenia. System wyświetli pytanie
o zapisanie ustawień sieciowych. Jeśli wybierzesz Tak,
ustawienia zostaną zakończone.
Ustawianie sieci bezprzewodowej
Gdy urządzenie jest podłączone do adaptera sieci bezprzewodowej, możesz użyć tej pozycji do ustawienia połączenia sieciowego.
Powszechna metoda łączenia: Wybierz sieć do połączenia
i naciśnij OK. Jeśli sieć wymaga hasła, wprowadź je w odpowiednim polu i naciśnij OK. Wtedy system automatycznie
sprawdzi połączenie sieciowe. Gdy uzyska się połączenie,
pojawi się odpowiednia informacja.
Połączenie Ad Hoc: Po wybraniu sieci bezprzewodowej
naciśnij czerwony przycisk na pilocie, aby przejść do trybu
ad hoc. Po wprowadzeniu numeru SSID dla połączenia ad
hoc możesz uzyskać taki sam adres IP jak SSID.
WPS (punkt dostępu):
Dla WPS dostępne są dwa tryby:
PBC: Po wybraniu tej pozycji naciśnij przycisk PBC na
routerze, a system się z nim połączy.
PIN: Po wybraniu tej pozycji wprowadź kod PIN podany
przez urządzenie, a system się z nim połączy.
Ustawianie PPPOE
Przewodowy PPPOE: W tej pozycji wybierz „przewodowy”, aby wejść w okno, z którego wprowadzisz dane
konta PPPOE. Naciśnij OK lub Następny, aby przejść do
klawiatury programowej i wprowadzić konto PPPOE, naciśnij jeszcze raz, aby wprowadzić hasło. Po poprawnym
wprowadzeniu hasła system automatycznie połączy się z
siecią. Gdy połączenie będzie uzyskane, na ekranie pojawią
się odpowiednie parametry.
Bezprzewodowy PPPOE: Jedyną różnicą między trybem bezprzewodowym i przewodowym jest fakt, iż przed
połączeniem bezprzewodowym musisz najpierw, w pozycji
ustawień sieci bezprzewodowych, połączyć urządzenie z
siecią bezprzewodową routera z wybieraniem PPPOE, a
następnie wybrać opcję bezprzewodową w pozycji PPPOE
do wykonania wybierania bezprzewodowego. Pozostałe
operacje są takie same jak dla wybierania przewodowego.
Jeśli router wybierający jest szerokopasmowy, najpierw
połącz z nim system, a następnie przejdź do PPPOE, aby
wykonać połączenie bezprzewodowe.
Program BT
Pozycja ta służy do ustawiania włączania programu
BitTorrent. Jeśli jest wyłączona, pobieranie BitTorrent nie
będzie możliwe.
Program Samba
Pozycja ta służy do ustawiania włączania programu
Samba. Jeśli jest wyłączona, usługi Samba nie będą
dostępne.
Zabezpieczenia BT i Samba
Pozycja ta służy do ustawiania konieczności wprowadzania konta i hasła dla programów BT lub Samba. Jeśli jest
wyłączona, nie musisz wprowadzać tych danych.
Inne
W tej pozycji możesz obejrzeć lub ustawić niektóre funkcje,
takie jak informacje o wersji, informacje o bieżącej sieci,
klasyfikację filmów i aktualizację dysku USB.
Obsługa BT i Samba
Pobieranie BitTorrent
Włącz przeglądarkę internetową i wpisz jej adres IP, uzyskasz dostęp do strony odtwarzacza. Konto odtwarzacza
to „admin”, a hasło „123”.
Uwaga: Jeśli pozycja „Ustawienia systemu -> Sieć ->
Zabezpieczenia BT i Samba” jest wyłączona, nie możesz
wprowadzić tych danych.
Naciśnij Przeglądaj, aby wybrać ścieżkę dostępu do pliku
Torrent z lokalnego komputera. Następnie naciśnij Tak,
aby potwierdzić wybór i wrócić do strony pobierania pliku
BitTorrent.
12
Instrukcja obsługi
Kontrola zadania pobierania
Po wybraniu źródła naciśnij przycisk, aby je włączyć,
wyłączyć, usunąć i odświeżyć.
Korzystanie z wbudowanego twardego dysku i dysku USB przez
Samba
Naciśnij Start w lewym dolnym rogu ekranu komputera
i wybierz Uruchom. W oknie dialogowym wpisz adres IP
odtwarzacza (np. \\192.168.44.139 ) i naciśnij OK.
Uwaga!
Konstrukcja produktu i parametry techniczne mogą ulec
zmianie bez wcześniejszego powiadomienia. Dotyczy to
przede wszystkim parametrów technicznych, oprogramowania oraz podręcznika użytkownika. Niniejszy podręcznik
użytkownika służy ogólnej orientacji dotyczącej obsługi
produktu.
Produkt oraz akcesoria do telewizora mogą się różnić od
tych opisanych w instrukcji.
Producent i dystrybutor nie ponoszą żadnej odpowiedzialności tytułem odszkodowania za jakiekolwiek nieścisłości
wynikające z błędów w opisach występujących w niniejszej
instrukcji użytkownika.
13
User’s Manual
User’s Manual
Description
1. Reset
2. POWER
3. USB 1
4. USB 2
5. HDD slot
6. RF IN
7. RF OUT
8. DC Power
9. CVBS output
10. Audio R
11. Audio L
12. Optical
13. HDMI
14. LAN
15. USB 3.0
16. Power
17. Y/PB/PR output
18. Coaxial
14
User’s Manual
Remote Control
1.Standby: To allow the machine to be in standby mode
or wake it up.
3.Numeric numbers (0-9): To enter the numeric
numbers.
4.Search: When the video files are being played, use
this key to call out the search menu to play the contents
by leaping.
5.FF/FR(Fast forward/Reverse): To fast play or fast retreat
the multimedia files.
6.Setup: To switch over to the interface for setting via
menus.
7. Record : Use this key to record the TV programs. For
that purpose, just press it when the TV program is shown.
8-9. Play/Pause: To play the multimedia files or make the
files being played pause. In playing mode, press it to make
the playing pause.
10. Navigation keys: Arrrow Keys - Left, Right, Up,
Down.
11. Menu: To return to the interface of main menu.
12.TIMER: To leap to the timed-recording interface .
13. Audio: When the video files are being played, use
this key to call out the menu with which to adjust the sound
track.
14. Slow: To play the multimedia files in abnormally slow
way.
15. Zoom: To zoom in the video or picture file being
played.
16. Red: To call out the interface with the play list in playing
films, music and pictures.
17. Green: To call out the interface to copy the file in the
file administration interface.
18. Time Shift : To carry out the operation of time
shifting.
19. TTX : To call out the graphic and text interface for
the TV program.
20. Mute: To turn on or off the audio output.
21. Info: Display.
22. Ratio: To adjust the screen ratio.
23. Screen: When the video or pictures are being played,
use this key to call out the detailed information of the current file.
24.Previous/Next: To play the previous/next multimedia
file, or the multimedia file of previous/ next chapter.
25.Open/Close: Open or close disc tray of USB DVD
Rom.
26. Stop: To stop playing the video files.
27. OK: To confirm the current operation. 28.Return: To
return to the previous menu. 29.Option: To call out the operation menu.
30. Subtitle: To call out the menu of subtitle, so as to
adjust the subtitles.
31. A-B repeat: To repeat the section from A to B. Press
this key for the first time to set the starting point and for the
second time to set the end point for the section A-B.
When A-B repeat mode is activated, press the key again
to cancel the mode.
32. Repeat: When the multimedia files are being played,
use this key to switch over the repeat-playing mode. 33.Blue:
To delete the preset videotape.
34.Yellow: To view the video records in the interface of
preset videotape.
35. Source: Invalid key
36.EPG: When watching the TV program, use this key to
call out the interface of program forecast.
15
Main Interface
User’s Manual
In the main interface, you can use the left and right navigation keys to select the items, and press OK to confirm your
selection. The items in the interface are defined as follows:
File Management: If such peripheral equipments as U drive,
USB drive and HD are connected to the machine, they will
be displayed in the item „File Management”. And the system
will scan the peripheral devices and sort the scanned documents into different categories (like film, picture and music).
With the item, the files of film, picture and music saved in
U drive and HD can be played and edited. Film: In this item
only the video files are displayed. Music: In this item only
the music files are displayed. Picture: In this item only the
picture files are displayed.
Note:
As the system can only read the contents in the disk, the
files saved in the disk can’t be added into the items of film,
picture and music.
APP: Through this item you can view the on-line video
contents and news provided by WAN.
System setup: Through this item you can configure the
system, like setting the system, sound, image, video, network and others.
Digital TV
This product can receive, play and record the digital TV
programs. For that purpose, select System Setup->TV &
Video to search the channel. Once found, you can access
the channel in this item.
Change the channel
You can change the channel through the means below:
1) In the current-channel state, enter the number of the
desired channel and press OK;
4) In the current-channel state, press Return on the remote
control, and the system will switch to the channel previous
to the current one. After the channel is switched, the system
will display the menu of channel information.
Adjust the volume
In watching the TV program, you can press Volume +/on the remote control to adjust the volume output by the
system.
Display the information of the channel
In watching the TV program, you can press INFO to call
out the menu of channel information and view that of the
current channel.
Option menu
In watching the TV program, you can press Option on the
remote control to call out the Option Menu, where you can
carry out the operations said below.
EPG: To call out EPG menu; Edit: To edit the channel;
Videotape: To videotape the TV program being currently
watched. Time Shift: To carry out time-shift operation for
the current TV program; Video output setting: To call out
the setup menu of video output;
Subtitle: To switch over the subtitles (subject to whether
the TV program provides subtitles);
Sound: To switch over the sound track (subject to whether
the TV program provides information of sound track);
TELETEXT: To call out the graphic and text information
of the TV program (subject to whether the TV program
provides that information);
Videotape file: To switch to the folder with the videotape
files.
Preset videotape: To call out the menu for preset
videotape.
Navigation menu
When in the item Digital TV, press Menu on the remote
control to call out the navigation menu, where you can select
the interface to be accessed through the navigation keys on
the remote control.
EPG (Electronic program guides)
The menu EPG provides program guides to the channels, and the user can also preset to videotape the program
through this menu.
To access EPG menu, you can use one of the two ways
below: 1)Press EPG on the remote control to call out the
EPG menu;
2) In the current-channel state, press Option on the remote
control to call out the Option menu, press the up and down
keys to select EPG, and then press OK to confirm.
4) View information: Press FF/FR on the remote control
to view the information of the current program either upward
or downward.
1) Preset videotape: After you select the program to be
videotaped, you can press Record on the remote control,
and the program will be videotaped. Once the preset time is
reached, the system will videotape the program in a preset
way.
2) Exit EPG menu: To exit the EPG menu, just press
Return on the remote control, and the system will display
the interface for playing.
16
Edit
User’s Manual
In watching TV program, you can press Option on the
remote control to call out Option menu, where, after you
select and edit the item, the system will display the log-in
interface for channel edition menu. The default password
is 0000.
In this menu, you can conduct the operations below:
1) Lock the channel: Once a channel is locked, when you
switch to this channel, you have to enter the password to
watch the program of that channel.
2) Leap: If the channel is set as „leap”, when you switch
the channels through the up and down keys on the remote
control, the leaped channel will be ignored, and it won’t
switch to channel change.
3) Favorite: To add the select channel to My Favorite.
4) Delete: To delete the selected channel.
12
5) Rename: To rename the selected channel.
6) Exchange: To exchange the channel. Once this items is
selected, the system will reach the exchange menu, where
the current channel is shown in the left box, and you can use
the up and down keys to select a channel to be exchanged
in the right box and press OK to confirm it. Then the channel
goes to the one newly exchanged.
you can use the remote control to select the program to be
videotaped. Then press Record on the remote control to
videotape the program in a preset way.
Timed videotape
With timed videotaping, the user can set the videotaping
time and repeat the videotape mode based on his needs.
For that purpose, press Timer on the remote control, or
press Option on it when watching TV
program in full screen state, to call out the option menu.
And select Timer to call out the
Timed Videotape Menu, where you can realize the operations below: create preset videotape, delete preset videotape, view history, change preset videotape, re-edit preset
videotape, etc.
For this interface, the keys on the remote control can be
defined as follows:
Red key: To create the preset videotape;
Green key: To delete the preset videotape;
Yellow key: To view the preset videotape;
Blue key: To change the state of preset videotape;
OK: To re-edit the selected preset videotape task;
Exit: To exit the timed videotape menu.
Create the preset videotape
Videotape
If the machine is connected with peripheral equipment
(such as HDD, USB device), the TV program can be videotaped into that peripheral device. Three options are available
for videotaping the TV program, namely, Real-time videotaping, preset videotaping, preset videotaping in EPG.
Real-time videotaping
In full-screen interface when watching the TV program,
you can press Record on the remote control, or press Option
on it to call out the Option menu, then select the item Record
and press OK. And the current program will be videotaped
in a real-time manner. If you press Record repeatedly within
three seconds, you can set the videotape time by switching
over the time period between 30, 60, 90, 120, 180 and 240
minutes, or set the state as OFF. To stop videotaping, just
press Stop on the remote control.
Preset videotape in EPG
In watching the TV program, just press EPG or Option on
the remote control to call out the option menu, where you
can select EPG to call out the EPG menu. With EPG menu,
With the timed videotape menu, press the red key on
the remote control to call out the setup menu for creating a
preset videotape.
Other operations for this menu:
1) Press the red key on the remote control, you can switch
over different types of preset videotape modes, with details
as follows:
Once: To videotape only one time;
Sunday-Saturday (one week): To videotape the program
at this time each day of the week; Monday-Friday: To videotape the program from Monday to Friday; Sunday and
Saturday: To videotape the program at this time on Sunday
and Saturday; Sunday: To videotape the program at this
time on Sunday;
Monday: To videotape the program at this time on Monday.
You can also set as such that the program is videotaped in
turn from Tuesday, Wednesday, Thursday to Friday; Saturday:
To videotape the program at this time every Saturday.
2) With the left and right keys on the remote control,
you can switch over between the source, time and length.
With the up and down keys, you can set the source, time
and length.
Source: Use the up and down keys to select the channel
whose programs is expected to be videotaped.
17
User’s Manual
Date (Year, Month, Day): To set the date when the videotaping starts.
Starting time (hour: 0-23; minute: 0-59): You can use the
up and down keys on the remote control or directly enter the
numeric numbers to set the starting time of videotaping.
End time (hour: 0-23; minute: 0-59): You can use the up
and down keys on the remote control or directly enter the
numeric numbers to set the end time of videotaping.
Delete the preset videotape state
Press the green key in the timed videotape menu to call
out the dialogue box, where you can delete the preset videotape task.
Cancel: To cancel the operation for deleting the preset
videotape task;
Delete the select preset videotape mode: Only to delete
the selected preset videotape task;
Delete all: To delete all preset videotape tasks.
Time shift
In watching the digital TV program, you can press Time
Shift or Option on the remote control to call out the option
menu where you can select the item of Time Shift. Then the
system will enter the time-shift state and image of current
program will become still. To continue the playing, just press
Play on the remote control. In time-shift state, you can realize
such operations as „play”, „pause”, „FF” and „FR”.
File Management
If such peripheral equipments as U-drive, USB drive and
HDD are connected to the machine, they will be displayed
in the item „File Management”. And the system will scan
the peripheral devices and sort the scanned documents
into different categories ( film, picture, music). To access
the interface, you can select File Management on the main
interface and press OK.
Browse files
To browse the files, select File Management in the main
interface and press Option on the remote control to call out
the option menu.
The browse modes include:
View the thumbnail: The folder and files are displayed in
the form of thumbnail. View the list: The folder and files are
displayed in the form of list. Preview: The folder and files are
displayed in the form of preview. Display all media: To display
all files (video, music and picture) and folders. Display films:
Only to display the video files and folders. Display pictures:
Only to display the picture files and folders. Display music:
Only to display the music files and folders.
You can use the up and down keys on the remote control
to select the browse mode you desire and press OK to
confirm it.
Film
In this item, all the video files saved in the peripheral devices are displayed. You can view or play them. To access
the item of film, select the corresponding item in the main
interface and press OK.
Play the video files
Operation procedures: With item of film, you can use the
navigation keys on the remote control to select the film file
and press OK to play it in full screen.
In playing the film, some operations can be done through
the keys on the remote control, or called out through the
options.
Left navigation key: Press it to leap to the place 10 seconds earlier.
Right navigation key: Press it to leap to the place 30
seconds later.
FF: To play the contents at a speed 1.5, 2, 4, 8, 16 or 32
times faster than the normal playing. FR: To play back the
contents at a speed 1.5, 2, 4, 8, 16 or 32 times slower than
the normal playing.
Slow: To play the contents at a speed 3/4, 1/2, 1/4, 1/8 or
1 times slower than the normal playing.
Previous: To switch to the previous chapter or video file.
Next: To switch to the next chapter or video file.
Zoom: To zoom in the image by 2, 3, 4 or 8 times.
Stop/Return: To stop playing the video file. Pause: To
make the playing pause.
Screen: To display the related information of the video
file being played.
Repeat: To switch the repeat-playing mode. Or, you can
use the Option key on the remote control to select the repeat mode.
Search: Use this key to leap the contents by time or by
chapter for playing. You can also select Option ->Leap Play
on the remote control to call out the search menu.
Subtitle: To call out the subtitle menu. You can also press
Option to call out the menu for subtitle setting, where you
can set the subtitle’s type, vertical deviation, size, time deviation, code and color. Press the left and right keys to select
the setup box, and up and down keys to set the values or
18
User’s Manual
options, and press OK to save the settings. Press Subtitle
or Return to exit the menu for subtitle setting.
Title menu: When such film sources with menu as DVD
and DVD mirror image are played, you can select Option>Film Menu to access the title film menu.
Root menu: When such film sources with main menu
as DVD and DVD mirror image are played, you can select
Option->Main Menu to access the root menu.
Browse the video files
Operation procedures: With the film menu, you can press
Option on the remote control to call out the operational
menu, where you can select the mode of browsing the files
via the up and down keys on the remote control. Press OK
to confirm the selection.
Music
In the item Music, you can find out all music files saved in
the peripheral devices (like the U drive and HDD), and play
them. Press the item Music in the main interface and OK to
access the music interface.
After you select a music file in the music interface, press
Play or OK to play the file. At the time, you can realize the
operations below:
Previous/Next: To play the previous/next music file.
Volume+/-: To adjust the volume. Stop: To stop playing
the music.
Option->Play Once in operational menu: To play all music
files once.
Option->Repeat Track in operational menu: To re-play
the single music file being played.
Option->Repeat All in operational menu: To re-play all
music files.
Option->Random in operational menu: To play all music
files in the form of random.
Repeat: To switch between the repeat modes in playing
the music.
Left/Right: To leap over to the place 10 seconds previous to
or 30 seconds next to the current position to start playing.
Return: To exit the music-playing interface and return to
the music-list interface.
Picture
The pictures saved in the memory devices (like U-drive
and HDD) are displayed in the item Picture. To access this
item, select Picture in the main interface and press OK.
Play the pictures
Operation procedures: Select the picture and press Play
or OK to play it in full screen. The keys on the remote control
can be operated as follows in playing the pictures :
Previous/Next: To switch to the preview/next picture.
Left/Right: To switch to the up/down picture. When the
picture in zoomed in, use this key to move the focus leftward
or rightward.
Up: To rotate the picture by 90°counterclockwise.
Down: To rotate the picture by 90°clockwise.
Zoom: To zoom in the picture by 2, 4, 8 and 16 times.
Stop, Return: To stop playing the picture.
Screen: To display the information about the picture being played.
Edit: To call out the operational menu, where you can set
such items as slide timing, slide switching, repeat mode,
background music and image output.
System setup
Operation procedures: Select System Setup in the main
interface and press OK to access the menu.
The items that can be set in this menu include: System,
Sound, Image, Videotape, Network and Others.
System
With this item, you can set the whole system and the environment, including OSD language, time and screen saver.
Select OSD language
Operation procedures: In the main interface, select System
Setup->System->Select OSD language Use the up and down
keys on the remote control to select the OSD language, and
press OK to confirm.
Character encoding
Operation procedures: In the main interface, select System
Setup->System->Character Encoding.
Select character encoding under the item System and
press OK. Then the system will access the menu of character
encoding, where you can select the format through the up
and down keys, and press OK to confirm.
Formatting
Operation procedures: In the main interface, select System
Setup->System->Format.
Use this item to format the embedded hard disk. If you
want to use the embedded hard disk in such operations
as videotaping and time shifting, you need to format the
hard disk.
19
User’s Manual
Step 1: Select the hard disk to be formatted and press OK,
and the system access to the interface of format warning.
Step 2: In the interface of format warning, press Confirm
to go to the next step. If you don’t want format the hard disk,
Select Cancel or press Return on the remote control.
Step 3: Use the up and down keys on the remote control
to set time shifting and press Advance after the preset space
is left. To return to the previous step, press Return.
Step 4: Select Format to start the formatting process.
Remember not to do any other operation during formatting.
To return to the previous step, press Return.
Step 5: After formatting, press Confirm in the popped
up menu.
Audio
TV system
Use this item to set the image output standard, with range
from 480i to 1080P 60HZ. Note: If an output standard you set
is not supported by the TV, black screen will occur
Video zoom-in/out
Use this item to set whether the image on the screen
should be zoomed in or out.
1080P 24Hz
Enable this item if the TV supports it.
Deep color
To set the deep colors, and 4 modes are available: Auto,
12bit, 10bit and OFF.
This item is used to set the output sound, and options are
night mode, HDMI output, SPDIF output, Surround.
Network
Night mode
Three options are available for night mode.
OFF: Regular output, without any setting for the
volume.
ON: To turn down the sound in a overall manner to improve
the sound quality.
COMFORT: To turn down the incisive sound.
Set the cable network
When the machine is connected to the network, you can
use this item to set the network connection. Options are
DHCP IP (auto) and FIX IP (manual).
HDMI output
Three options are available for HDMI output. LPCM:
Two-channel digital output.
LPCM Multi-CH: Multi-channel digital output (5.1 > 7.1) .
RAW: Source code output.
SPDIF output
Two options are available for SPDIF output. LPCM: Twochannel digital output.
RAW: Source code output.
Dolby Surround Sound
This item is used to control the surround sound effects,
with three options: degrade 5.1ch and HD audio. It is used
when HD audio and DTS-HD need to be degraded.
Video
This item is used to set the output image. The details
include screen ratio, TV system, video zoom-in/out, 1080P
24Hz and deep color.
Aspect Ratio
Use this item to adjust the screen ratio, and 4 options are
available: Pan Scan 4:3, Letter Box 4:3, wide-screen 16:9
and wide-screen 16:10.
Use this item to set the network connection. Options are:
cable network, wireless network and PPPOE.
DHCP IP (auto)
If you select Yes, the system will be automatically connected to the network. Once the connection is successful,
the obtained IP address and subnet mask will appear on
the screen.
FIX IP (manual)
For this item, you should manually set the IP address,
subnet mask, default gateway, DNS server and IP address,
and press OK on the remote control to confirm. The system
will then prompt whether the network settings need to be
saved. If you select Yes, the network setting will be completed successfully.
Wireless network setting
After the machine is connected to the wireless network
adapter, you can set the network connection through this
item.
3) Common connection method: Select the network to be
connected and press OK. If this network requires a password, you should enter the password in the related field and
press OK. At the time, the system will automatically test the
network connection. Once the connection is successful, the
information indicating the success will appear.
4) Ad Hoc: After you select a wireless network, press the
red key on the remote control, and you will access the ad hoc
mode. When you enter the SSID number for ad hoc connection, you can obtain the same IP address as SSID.
20
User’s Manual
5) WPS (AP) :
Two modes available for WPS:
PBC: When this item is selected, you can press the key
PBC on the router, and the system will be connected to
the router.
PIN: When this item is selected, you can enter the PIN
code provided by the equipment, and the system will be
connected to the router.
PPPOE setting
6) Cable PPPOE: With the item PPPOE, you can select
„cable” to access the box that prompts you to enter the PPPOE account. Press OK to or Next to reach the soft keyboard
and enter the PPPOE account, and press it again to enter
the PPPOE password. Once the password is entered correctly, the system will connect the network automatically.
When the connection is successful, the related parameters
will appear on the screen.
7) Wireless PPPOE: The only difference between the
wireless and cable networks is that, before wireless PPPOE
connection, you should, in the item of wireless setting, first
connect the machine to the wireless network of the router
with PPPOE dialing, and then select the wireless option in
the PPPOE item to carry out wireless dialing. Other operations are the same as cable dialing. If there is wireless BB
on the dialing router, we can first connect the system to this
BB in the wireless settings, and then go to PPPOE to make
wireless connection.
BT program
This item is used to set whether the BitTorrent program
should be run. If it is disabled, BitTorrent downloading can’t
be realized.
Operation of BT and
Samba
Download BitTorrent
Run the Web browser and enter its IP address, and then
you access the Web page of the player. The account of the
player is „admin” and password „123”.
Note: If the series items „system setup ->network>BT&SAMBA security” is disabled, you can’t enter the account and password.
Press Browse to select the path of Torrent file from the
local PC. Then press Yes to confirm the selection and return
to the page of BitTorrent file downloading.
Control the download task
After selecting the seed, clic button to start, stop, delete
and refresh the seed.
Visit built-in hard disk and U-drive
through Samba
Click Start at the lower left corner of the PC, and select
Run. Then enter the IP address
of player in the dialogue box (for example, \\192.168.44.139)
then click OK.
Samba program
This item is used to set whether the Samba program
should be run. If it is disabled, Samba services can’t be
accessed.
BT & Samba security
Use this item to set whether the account and password
should be entered when the BT or Samba program needs
to be accessed. If it is disabled, you don’t need to enter the
account and password.
Others
With this item, you can view or configure some functions,
such as viewing the information of version, viewing the current network information, grading the films and upgrading
the U-drive.
21
NOTE
22
NOTE
23
Dział Obsługi Klienta
tel: +48 22 332 34 63 lub e-mail: [email protected]
od poniedziałku do piątku w godz. 9.00-17.00
Producent zastrzega sobie możliwość wprowadzenia zmian w specyfikację produktu bez uprzedzenia.
Made in P.R.C.
FOR MANTA EUROPE