1
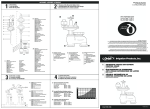
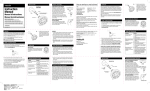
Item: 50024(SP-045)
Page size: 11”(W)x8.5”(H)
Dieline: ______
Layout area: ______
Version Submitted by KAB: R1-1
Submission date: 2014/05/19
ITEM #0050024
MODEL #SP-045
OUTDOOR DIGITAL
TIMER YARD STAKE
Call customer service at 1-866-994-4148,
8 a.m. - 6 p.m., EST, Monday - Thursday,
8 a.m. - 5 p.m., EST, Friday.
B
6. <+> - To increase time and day setting.
7. MODE - Press and hold the “MODE” button to
scroll between the different mode settings.
a. Automatic Timer Program
b. Photocell
c. Timer+Photocell
8. <-> - To reduce time and day setting.
9. RESET - Reset all the functions.
10. ON/OFF Switch - Press the switch ON to start
your desired settings.
2-2
A
B
3. Insert the stake 6 inches into the ground.
PACKAGE CONTENTS
A
2. Attach the assembled \
stake to the Body (A) by
screwing the top of
Upper Stake (B) into the
base of the Body.
Be sure to firmly tighten
the stake to the body
before installing into the
ground.
4. Press the switch to I
position
C
3. Reset
Press the “RESET” button to reset your timer. This
will clear all programmed settings.
2-4
Operating:
1. Plug the yard stake into a GFCI-protected
grounded outlet. (CAUTION: Combined amp load
on all the outlets at any one time must not exceed
1875 watts).
8.5”
PART
DESCRIPTION
Outlet
A
B
C
QUANTITY
1
1
1
Upper Stake
Lower Stake
OPERATING INSTRUCTIONS
1. Installation
1-1
1. Connect the two pieces
of the yard stake
together by screwing
Lower Stake (C) into
Upper Stake (B)
B
C
2. Button Layout
2
1
3
4
2
5
8
6
1. POWER - Power
7
9
indicator light indicate if
the yard stake is turned
on or off.
2. SENSOR - Sensor will
turn yard stake on at dusk
10
and off at dawn.
3. MANU - Manual Override scroll between timer
status options.
a. ON - Always ON
b. OFF - Always OFF
c. AUTO - Timer Will turn ON/OFF according to
the program settings.
d. RDM - Run all events (programs) in a Random
mode.
4. TIME - Press and hold for three seconds to set
current time.
5. PROG - Press and hold for three seconds to
begin setting function.
4. Set Current Time
1. Press and hold "TIME" button to enter the current
time. First, set the day of the week; press "+" or
"-" button to set the correct day.
2. Press the "TIME" button to enter the hour setting.
Press "+"or "-" buttons to set the current hour. Be
sure that AM or PM appears correctly.
3. Press the "TIME" button to enter the minute
setting, Press the "+" or "-" buttons to set the
current minute.
4. Press the "TIME" button to finish setting the
current time and return to normal display.
5. MODE Setting
Press MODE button to choose between function.
Timer→Photocell→Timer + Photocell→Timer
(repeat)
Display
MODE
Explanation
Timer
ON/OFF at your exact
programmed timer.
Photocell
Timer
+
Photocell
ON at dusk or ON immediately;
OFF after 1~12 hours.
ON at dusk, OFF at your exact
programmed timer.
6. Program Setting
Before setting, make sure timer is set to AUTO and
RDM mode.
Press and hold "PROG" button for three seconds to
begin program setting, using the "+" and "-" buttons
XXXXXX
11”
3.3833”
3.3833”
ITEM #0050024
MODEL #SP-045
DIGITAL TIMER
YARD STAKE
Call customer service at 1-866-994-4148,
8 a.m. - 6 p.m., EST, Monday - Thursday,
8 a.m. - 5 p.m., EST, Friday.
B
MODE
+
TIME
SET/
1-2
MODE
+
TIME
SET/
PROG
-
A
B
Plug the yard stake into a GFCI-protected
grounded outlet. (CAUTION: Combined amp load
on all the outlets at any one time must not exceed
1,875 watts).
C
4. Press the switch to “I”
position
PROG
-
1-4
8.5”
MODE
+
PART
DESCRIPTION
QUANTITY
A
Outlet
1
B
Upper Stake
1
C
Lower Stake
1
Before initial use, please plug in the outlet (A) for at
least 30 minutes to charge the internal battery. The unit
will be ready for programming after the LCD display
appears.
OPERATING INSTRUCTIONS
1. Installation
1. Connect the two pieces of
the yard stake together by
screwing the lower stake
(C) into the upper stake
(B).
AB14429
1-1
B
C
2. Panel Layout
TIME
SET/
PROG
-
2-1
1. POWER - Power
2
1
indicator light indicates if
4
the yard stake is turned
MODE
TIME
PROG
5
on or off.
3
+
2. SENSOR - Sensor will
7
8
turn yard stake on at dusk 6
9
and off at dawn.
3. MODE - Manual override
2-2
scroll between timer
status options.
4. TIME - Press and hold for
2 seconds to set current
10
time.
5. PROG - Press and hold
for 2 seconds to begin
setting function. (Only
works under “AUTO ” or “AUTO
” mode).
6. <+> - To increase time and day setting.
7. SET/ - Setting confirms and clear setting (Press
and hold for 2 seconds).
SET/
3.3833”
There is a reset hole under
the dashboard. Insert a pin
or paperclip end into the
hole to reset the timer. This
will clear all programmed
settings.
5-2
The outputs remain
always off.
MODE
TIME
+
PROG
-
SET/
4. Set Current Time
1. Press and hold "TIME" button for 2 seconds to
enter the current time settings. Press "+" or "-"
button to set the correct day.
2. Press the "SET" button to enter the hour setting.
Press "+"or "-" buttons to set the current hour. Be
sure that AM or PM appears correctly.
3. Press the "SET" button to enter the minute
setting. Press the "+" or "-" buttons to set the
current minute.
4. Press the "SET" button to finish setting the
current time and return to normal display.
5. While setting those processes above, press and
hold “SET” button to clear the setting and revert
to the original timer settings. While setting those
processes above, press “TIME” button or wait for
15 seconds to go back to the standby display.
5. MODE Setting
Press “MODE” button to choose the desired mode.
ON → OFF → RDM → AUTO → AUTO
→
AUTO
as follows.
1. ON - Always on.
3.3833”
3. RDM - Security feature.
On at a random time and
will remain ON for 15
minutes.
Remark: Please refer to
“6” for setting in details.
- Photocell
The outputs remain
always on.
5-5
Turn on the power at
dusk and turn off the
power at dawn
automatically.
6. AUTO
Photocell
5-1
5-4
ON/OFF at your exact
programmed timer.
5. AUTO
- Program +
On at dusk, OFF at your
exact programmed time.
Remark: Please refer to
“7” for setting in details.
7. Digital Timer + Photocell Setting
+
TIME
SET/
PROG
-
6
5-6
1. Press "SET" button to
enter the timer time.
Press "+" or "-" button to
set the correct day.
MO →TU →WE→ TH →
FR→SA→SU→MO TU
WE TH FR → SA SU→
MO TU WE TH FR SA
SU (cycle).
6-1
2. Press the "SET" button to
enter the hour setting.
Press "+" or "-" buttons to
set the desired hours for
your timer to turn on. Be
sure that AM or PM
appears correctly.
6-2
3. Press the "SET" button to
enter the minute setting.
Press the "+" or "-"
buttons to set the desired
minutes for your timer to
turn on.
6-3
4. Press “SET” button to enter the program OFF
setting, the “1 OFF” will appear on the display.
Repeat steps 1 to 3 to set your desired OFF time,
up to 8 on/off program settings.
5. While setting the programs, press and hold the
“SET” button 2 seconds to clear the set program
time.
6. Once finished, press “TIME” button or wait for 15
seconds to restore your programs to back the
standby display.
Page 2
MODE
3.3833”
1. Press “MODE” to select
“AUTO Program +
photocell setting”, then
press and hold “PROG”
button for two seconds to
set the off time.
7-1
2. Press “+” or “-“ button to
set the desired OFF day
of the week program.
You can select each day
individually, Monday to
Friday, Saturday/Sunday,
or an entire week to have
your timer turn on at dusk
and off at the set time.
3. Press the “SET” button
to enter the OFF time
hour setting. Press the
"+" or "-" buttons to set
time. Be sure to cycle
through until AM or PM
appears correctly.
4. Press the “SET” button
to enter the OFF time
minutes setting. Press
the "+" or "-" buttons to
set time.
HELPFUL TIPS
• OPERATION: Once assembled, plug the yard stake
into a grounded outlet (total wattage should
not exceed 15 amp or 1,875 watts)
SAFETY INFORMATION
5-3
Up to 5 on/off events
every day. The on/off
events are built-into this
product, turn ON at a
random time and the ON time is different each
day, creating a more “lived-in” look.
4. AUTO - ON/OFF
program at AUTO mode.
3.3833”
6. Program Settings
Make sure the current mode
is at AUTO mode, then
press and hold "PROG"
button for two seconds to
begin program setting,
using the "+" and "-" buttons
to adjust the setting.
3
Page 1
11”
2. OFF - Always off.
8. <-> - To reduce time and day setting.
9. RESET - Reset all the functions.
10. ON/OFF Switch - Press the switch “I” to start
your desired settings.
3. Reset
3. Insert the stake 6 inches into the ground.
PACKAGE CONTENTS
A
2. Attach the assembled
stake to the outlet (A) by
screwing the top of
upper stake (B) into the
base of the outlet.
Be sure to firmly tighten
the stake to the body
before installing into the
ground.
3.3833”
7-2
Disregarding cautions could cause damage, fire, or
fatal shock. When using outdoor electrical products,
basic safety precautions should always be followed to
reduce the risk of fire, electric shock, and personal
injury.
SPECIFICATIONS:
6FT AWG 14/3 SJTW vinyl cord
RATINGS:
125V, 60Hz, 15A, 1,875W general purpose
7-3
7-4
5. You can press “SET” button to enter additional
programs, up to 8 off program setting. While
setting the programs, press and hold the “SET”
button to clear the set program time. Press
“TIME” button or wait for 15 seconds to store the
program, and go back to the standby display.
WARNING
This equipment has been tested and found to comply
with the limits for Class B digital device, pursuant to
part 15 of the FCC Rules. These limits are designed to
provide reasonable protection against harmful
interference in a residential installation. This equipment
generates, uses and can radiate radio frequency
energy and, if not installed and used in accordance
with the instructions, may cause harmful interference to
radio or television reception, which can be determined
by turning the equipment off and on, the user is
encouraged to try to correct the interference by one or
more of the following measures:
• Reorient or relocate the receiving antenna.
• Increase the separation between the equipment and
the receiver.
• Connect the equipment into an outlet on a circuit
different from that to which the receiver is connected.
• Consult the dealer or an experienced radio/TV
technician for help.
This device complies with Part 15 of the FCC Rules.
Operation is subject to the following two conditions: (1)
This device may not cause harmful interference, and
3.3833”
(2) this device must accept any interference received,
including interference that may cause undesired
operation of the device.
Any changes or modifications not
expressly approved by the party responsible for
compliance could void the user's authority to operate
this equipment.
CAUTION
There is a risk of fire when too much power is drawn
from this item. Use only with a total of 15 ampere
maximum Christmas tree or other seasonal lighting
products.
• Risk of fire. Not for permanent installation. Use only
with outdoor equipment, Christmas tree, or other
seasonal decorative-lighting products having a total
of 15 Ampere maximum. Do not install or use this
product for more than a 90-day period.
• If using Christmas tree or decorative-lighting
products that are not marked with an ampere rating,
connect no more than 140 screw-base lamps (C7 or
C9) or 12 strings with push-in lamps to this cord set.
• Cord sets shall be plugged into a GFCI - protected
receptacle.
• If using an outdoor-use cord set for an extended
period of time (greater than 90 days), please consider
hard wiring a permanent outdoor-use receptacle
rated for year-round use in the area that power is
needed. Please contact a licensed electrician for
proper installation of permanent wiring.
• After completion of installation, the connector shall be
maintained a minimum of 6 inches above ground.
• SUITABLE FOR INDOOR/OUTDOOR USE – STORE
INDOORS WHILE NOT IN USE.
• PLUG INTO GROUND FAULT PROTECTED
RECEPTACLE ONLY.
NOTE: Position yard stake away from other light
sources. If it is too close to other light sources, or if the
photocell is facing a light source other than the sun
(such as a porch light or street lamp), the yard stake
may shut off outside of the timer setting you chose. If
this happens, relocate yard stake or eliminate other
light sources. Keep yard stake and power cord out of
common walkways to prevent tripping.
Page 3
3.3833”
3.3833”
CARE AND MAINTENANCE
WARRANTY
• Store indoors in dry location.
• Always unplug when not in use.
• Do not unplug by pulling on cord.
• For information on product warranty please call
customer service at 1-866-994-4148, 8 a.m. - 6 p.m.,
EST, Monday - Thursday, 8 a.m. - 5 p.m., EST,
Friday.
• This product is guaranteed to be free of defects for
a limited period of one year form the date of
purchase.
• If the product suddenly malfunctions and is not
damaged by external factors or personal reasons
within the one year warranty limit from the day of
purchase, the product maybe considered for repair.
If the product is damaged due to natural disaster like
fire, lightning, flood, hurricane, etc., the product will
not be considered for repair.
TROUBLESHOOTING
PROBLEM
POSSIBLE
CAUSE
CORRECTIVE
ACTION
If lights do
not turn on
at dusk.
It could be timer
is not in a good
area for light
meter to function
as there is too
much ambient
light to detect
darkness.
To correct the
problem, move the
timer to another
location where
there is no ambient
light.
If lights do
not turn on
even when
timer is “ON”
position.
It could be lights
are not in “ON”
position, lights
are not
functioning, or
timer is not
receiving power.
To correct the
problem be sure
that lights are
functional by
plugging them
directly into the
outlet. Be sure that
lights are in “ON”
position if they have
their own switch. Be
sure that timer is
receiving power the LED should light
up when plugged
into an outlet and
put in the “ON”
position.
If lights are
flashing
(turning on
and off).
It could be the
timer is in Dusk to
Dawn mode, and
the light from the
plugged-in lights
is affecting the
light sensor.
To correct the
problem, move the
lights away from the
timer, or reposition
the timer so that it
does not face the
lights.
3.3833”
3.3833”
Printed in China
Page 4
3.3833”
3.3833”
ARTÍCULO #0050024
MODELO #SP-045
ESTACA PARA JARDÍN
CON TEMPORIZADOR
DIGITAL
Llame al Departamento de Servicio al Cliente al
1-866-994-4148, de lunes a jueves de 8 a.m. a 6 p.m.,
y los viernes de 8 a.m. a 5 p.m., hora estándar del Este.
CONTENIDO DEL PAQUETE
A
B
MODE
+
TIME
SET/
C
PROG
-
1. Enrosque la estaca
inferior (C) en la estaca
superior (B) para conectar
las dos piezas de la
estaca para jardín.
3.3833”
1-1
B
C
2. Fije la estaca
ensamblada al
tomacorriente (A),
atornillando la parte
superior de la estaca
superior (B) en la base
del tomacorriente.
Asegúrese de fijar bien
la estaca al cuerpo antes
de instalarla en el suelo.
1-2
MODE
+
TIME
SET/
PROG
-
A
B
3. Inserte las estacas a 15,24 cm de profundidad en
el suelo.
8.5”
PIEZA
DESCRIPCIÓN
CANTIDAD
A
Tomacorriente
1
B
Estaca superior
1
C
Estaca inferior
1
Conecte la estaca para jardín en un
tomacorriente con protección GFCI con puesta a
tierra. (PRECAUCIÓN: La carga combinada de
amperios simultánea en todos los tomacorrientes
no debe exceder los 1875 vatios).
4. Coloque el interruptor en
la posición I.
1-4
INSTRUCCIONES DE FUNCIONAMIENTO
1. Instalación
2. Disposición del panel
Page 5
11”
1
6
2
4
MODE
3
3. Restablecimiento
TIME
+
PROG
SET/
9
7
-
5
3.3833”
2. Presione el botón “SET” para ingresar la
configuración de la hora. Presione los botones "+"
o "-" para configurar la hora actual. Asegúrese de
que aparezca AM o PM correctamente.
3. Presione el botón “SET” para ingresar la
configuración de minutos, presione los botones
"+" o "-" para configurar los minutos actuales.
4. Presione el botón “SET” para completar la
configuración de la hora actual y volver a la
pantalla normal.
5. Mientras configura los procedimientos anteriores,
mantenga presionado el botón “SET” para borrar
la configuración y regresar a la configuración
original del temporizador. Mientras configura los
procedimientos anteriores, presione el botón
“TIME” o espere 15 segundos para regresar a la
pantalla de espera.
5. Configuración del MODO
Presione el botón “MODE” para elegir el modo
deseado.
ON → OFF → RDM → AUTO → AUTO
→
AUTO
como sigue:
1. ON: Siempre encendido.
5-1
Las salidas permanecen
encendidas.
3
MODE
+
TIME
SET/
3. RDM : Característica
de seguridad.
3.3833”
5-3
Permanece encendido en
momentos aleatorios y
permanecerá así durante
15 minutos.
Hasta 5 ciclos de
encendido y apagado cada día. Los ciclos de
encendido y apagado están integrados en este
producto, se enciende a un momento aleatorio y
dicho momento es diferente cada día, lo que da
una sensación más realista.
4. AUTO - Programa de
encendido y apagado en
modo AUTO.
5-4
Se enciende y se apaga
según el temporizador
programado exacto.
Nota: Consulte el
número “6” para una configuración en detalle.
5. AUTO
- Fotocélula
5-5
Se enciende al anochecer
y se apaga al amanecer
automáticamente.
PROG
-
4. Configuración de la hora actual
2-1
1. POWER
(ALIMENTACIÓN): La
luz indicadora de
alimentación indica si la
estaca para jardín está
encendida o apagada.
2. SENSOR: El sensor
2-2
encenderá la estaca para
jardín al anochecer y la
apagará al amanecer.
3. MODE (MODO):
10
Anulación manual,
desplácese entre las
opciones de estado del
temporizador.
4. TIME (Tiempo): Mantenga presionado por 2
segundos para configurar la hora actual.
5. PROG (Programa): Mantenga presionado por
2 segundos para comenzar la función de
configuración. (Solo funciona en “AUTO ”o “
AUTO
”).
6. < + > : Para aumentar la configuración de hora y
día.
7. SET/ : Confirmación de la configuración y borrar
configuración (presione y mantenga presionado
durante 2 segundos).
8. < - >: Para reducir la configuración de hora y día.
9. RESET(Restablecer): Restablezca todas las
funciones.
10. ON/OFF Switch (Interruptor de encendido y
apagado): Coloque el interruptor en la posición
“I” para comenzar a ingresar las
configuraciones que desea.
Hay una orificio de reinicio
debajo del tablero. Inserte
un pasador o un extremo de
un gancho para papel en el
orificio para reiniciar el
temporizador. Esto
eliminará todas las
configuraciones programadas.
1
Antes del primer uso, enchufe el temporizador
durante al menos 30 minutos para cargar la batería
interna. Después de que se encienda la pantalla,
la unidad estará lista para ser programada.
3.3833”
1. Mantenga presionado el botón “TIME” durante 2
segundos para ingresar la configuración de la
hora actual. Presione el botón "+" o "-" para
configurar el día correcto.
2. OFF: Siempre apagado.
Las salidas permanecen
apagadas.
5-2
6. AUTO
- Programa +
fotocélula
Se enciende al anochecer
y se apaga según la hora
programada exacta.
Nota: Consulte el número
“8” para una
configuración en detalle.
8
Page 6
5-6
3.3833”
6. Configuración del programa
Asegúrese de que el modo
actual esté en modo
“AUTO ”, luego mantenga
presionado el botón “PROG”
por dos segundos para
comenzar la configuración
del programa, mediante los
botones "+" y "-" para
ajustar la configuración.
6
1. Presione el botón “SET”
para ingresar la hora del
temporizador. Presione el
botón "+" o "-" para
configurar el día correcto.
MO →TU →WE→ TH →
FR→SA→SU→MO TU
WE TH FR → SA SU→
MO TU WE TH FR SA
SU (ciclo).
6-1
2. Presione el botón “SET”
para ingresar la
configuración de la hora.
Presione los botones "+"
o "-" para configurar las
horas deseadas en que
se encenderá el
temporizador. Asegúrese
de que aparezca AM o
PM correctamente.
6-2
3. Presione el botón “SET”
para ingresar la
configuración de los
minutos. Presione los
botones "+" o "-" para
configurar los minutos
deseados en que se
encenderá el
temporizador.
6-3
3.3833”
4. Presione el botón “SET” para ingresar la
configuración de apagado del programa;
aparecerá “1 OFF” en la pantalla. Repita los pasos
1 al 3 para configurar la hora de apagado que
desea, hasta 8 configuraciones de programas de
encendido y apagado.
5. Mientras configura los programas, mantenga
presionado el botón “SET” 2 segundos para borrar
la hora del programa configurado.
6. Una vez terminado, presione el botón “TIME” o
espere 15 segundos para restaurar sus programas
a la pantalla de espera.
7. Configuración del temporizador digital + fotocélula
1. Presione “MODE” para
seleccionar la
configuración de
programas + fotocélulas
automático, luego
mantenga presionado el
botón “PROG” dos
segundos para configurar
la hora de apagado.
7-1
7-4
5. Puede presionar el botón “SET” para ingresar más
programas, hasta 8 configuraciones de apagado.
Mientras configura los programas, mantenga
presionado el botón “SET” para borrar la hora del
programa configurado. Presione el botón “TIME”
o espere 15 segundos para guardar el programa
y regrese a la pantalla de espera.
CONSEJOS PRÁCTICOS
• FUNCIONAMIENTO: Una vez ensamblada, coloque
la estaca para jardín en un tomacorriente con puesta
a tierra (el vataje total no debe exceder los 15
amperios o 1875 vatios)
2. Presione el botón “+” o
7-2
“-” para configurar el día
de apagado deseado del
programa semanal.
Puede seleccionar
individualmente cada
uno de los días: lunes a
viernes, sábado/domingo
o una semana completa
para que el temporizador se encienda al
anochecer y se apague a la misma hora.
3. Presione el botón “SET”
para ingresar la
configuración de la hora
de apagado. Presione el
botón “+” o “-”para
configurar la hora.
Asegúrese de que AM o
PM aparezcan
correctamente.
4. Presione el botón “SET”
para ingresar la
configuración de
minutos de la hora de
apagado. Presione el
botón “+” o “-”para
configurar la hora.
3.3833”
7-3
INFORMACIÓN DE SEGURIDAD
Ignorar las precauciones puede ocasionar daños, un
incendio o una descarga eléctrica mortal. Cuando
utilice productos eléctricos para uso en exteriores,
tome siempre precauciones de seguridad básicas para
reducir el riesgo de incendios, descargas eléctricas y
lesiones personales.
ESPECIFICACIONES:
Cable de vinilo AWG 14/3 SJTW de 1,8 m
CLASIFICACIONES:
125 V, 60 Hz, 15 A, 1875 W uso general
ADVERTENCIA
Este equipo ha sido probado y se ha verificado que
cumple los límites para un dispositivo digital clase B,
conforme a la sección 15 de las reglas de la FCC.
Estos límites han sido diseñados para proporcionar
Page 7
una protección razonable contra la interferencia
perjudicial en una instalación residencial. Este equipo
genera, utiliza y puede irradiar energía de
radiofrecuencia y, si no se instala y usa de acuerdo
con las instrucciones, puede causar interferencia
perjudicial a las comunicaciones de radio. Sin
embargo, no se garantiza que no se producirán
interferencias en una instalación en especial. Si este
equipo causa interferencia perjudicial a la recepción de
radio o televisión, lo que se puede determinar
apagando y encendiendo el equipo, se recomienda al
usuario que intente corregir la interferencia con una o
más de las siguientes medidas:
• Reoriente o reubique la antena de recepción.
• Aumentar la separación entre el equipo y el receptor.
• Conectar el equipo a un tomacorriente de un circuito
distinto al que usa el receptor.
• Solicitar ayuda al concesionario o a un técnico con
experiencia en radio/TV.
Este dispositivo cumple con la sección 15 de las reglas
de la FCC. El funcionamiento está sujeto a las
siguientes dos condiciones: (1) Este dispositivo no
debe causar interferencia perjudicial, y (2) deberá
aceptar cualquier interferencia recibida, incluida la
interferencia que pudiese causar el funcionamiento no
deseado.
Cualquier cambio o modificación que no esté
expresamente aprobado por la parte responsable del
cumplimiento podría anular la autorización del usuario
para utilizar este equipo.
PRECAUCIÓN
Existe un riesgo de incendio cuando se solicita mucha
potencia de este artículo. Úselo solamente con un
árbol de navidad u otros productos de iluminación de
temporada de 15 amperios en total como máximo.
• Riesgo de incendio. No es adecuado para realizar
una instalación permanente. Úselo solamente con un
equipo para exteriores, árbol de navidad u otros
productos de iluminación de temporada de 15
amperios en total como máximo. No instale ni use
este producto durante un período superior a 90 días.
• Si usa un árbol de navidad o productos decorativos
de iluminación que no tienen indicada la clasificación
de amperios, no conecte más de 140 lámparas con
base de rosca (C7 o C9) o 12 juegos de luces con
3.3833”
bombillas a presión a este juego de cables.
• El juego de cables debe estar enchufado en un
tomacorriente con interruptor de circuito por falla a
tierra (GFCI, por sus siglas en inglés).
• Si emplea un juego de cable apto para uso en
exteriores durante un período prolongado (superior a
90 días), considere cablear de forma permanente un
tomacorriente apto para uso en exteriores y durante
todo el año en el área en que se necesita
alimentación. Póngase en contacto con un
electricista calificado para que realice la instalación
adecuada del cableado permanente.
• Después de completar la instalación, el conector
debe mantenerse como mínimo a 15, 24 cm sobre el
suelo.
• APTO PARA USO EN INTERIORES/EXTERIORES:
ALMACENE EN EL INTERIOR CUANDO NO ESTÉ
EN USO.
• ENCHUFE SOLO EN UN TOMACORRIENTE CON
INTERRUPTOR DE CIRCUITO POR FALLA A
TIERRA.
NOTA: Coloque la estaca para jardín alejada de otras
fuentes de iluminación. Si está demasiado cerca de
otras fuentes de iluminación o si la fotocélula apunta
hacia una fuente de iluminación que no sea la luz solar
(como la luz de un porche o un farol), la estaca para
jardín podría apagarse fuera de las configuraciones
que programó. Si esto sucede, cambie la ubicación de
la estaca para jardín o elimine dichas fuentes de
iluminación. Para evitar tropiezos, mantenga la estaca
para tierra y el cable eléctrico alejados de los senderos
más transitados.
CUIDADO Y MANTENIMIENTO
• Almacene en el interior en un lugar seco.
• Desenchufe cuando no esté en uso.
• No jale del cable para desenchufarlo.
3.3833”
3.3833”
SOLUCIÓN DE PROBLEMAS
GARANTÍA
PROBLEMA CAUSA
POSIBLE
ACCIÓN
CORRECTIVA
Las luces
no se
encienden al
anochecer.
Es posible que el
temporizador no
esté ubicado en
un área
adecuada en
donde el medidor
de luz pueda
funcionar, ya que
hay mucha luz
del ambiente y no
puede detectar la
oscuridad.
Para corregir el
problema, mueva el
temporizador a otra
ubicación en donde
no haya luz del
ambiente.
Las luces
no se
encienden,
aun cuando
el
temporizador
está en la
posición de
encendido.
Es posible que
las luces no
estén en la
posición de
encendido, que
las luces no
funcionen o que
el temporizador
no reciba
alimentación.
Para corregir el
problema,
asegúrese de que
las luces funcionan
enchufándolas
directamente al
tomacorriente.
Asegúrese de que
las luces están en
la posición “ON” si
tienen su propio
interruptor.
Asegúrese de que
el temporizador
recibe alimentación;
el LED debe
encenderse cuando
se conecta en un
tomacorriente y se
coloca en la posición
“ON”.
Las luces
destellan
(se
encienden y
se apagan).
Es posible que el
temporizador
esté en el modo
Dusk to dawn y
que la luz
proveniente de
las luces
enchufadas está
afectando el
sensor de luz.
Para corregir el
problema, aleje las
luces del
temporizador o
reposicione el
temporizador para
que no reciba las
luces.
• Si desea más información sobre la garantía del
producto, llame a nuestro Departamento de Servicio
al Cliente al 1-866-994-4148 de lunes a jueves de
8 a.m. a 6 p.m., y los viernes de 8 a.m. a 5 p.m.,
hora estándar del Este.
• Este producto está garantizado contra defectos por
un período de un año a partir de la fecha de compra.
• Si el producto intempestivamente empieza a fallar y
no presenta daños debido a factores externos ni por
razones personales dentro del año de la garantía
desde la fecha de compra, es posible que el producto
califique para la reparación. Si el producto sufre
daños debido a desastres naturales como incendios,
rayos, inundaciones, huracanes, etc., este no
calificará para la reparación.
Impreso en China
Page 8