1
Diva Server for Windows
v8.3
Reference Guide
www.eicon.com/divaserver
Twentyfirst Edition (March 2007)
206-339-21
COPYRIGHT NOTICE AND LEGAL DISCLAIMER
Copyright © 2001-2007 Dialogic Corporation. All Rights Reserved. You may not reproduce this
document in whole or in part without permission in writing from Dialogic Corporation.
All contents of this document are subject to change without notice and do not represent a
commitment on the part of Dialogic Corporation or its subsidiaries. Reasonable effort is made to
ensure the accuracy of the information contained in the document. However, due to ongoing product
improvements and revisions, Dialogic Corporation and its subsidiaries do not warrant the accuracy
of this information and cannot accept responsibility for errors or omissions that may be contained
in this document. It is possible that the use or implementation of any one of the concepts,
applications, or ideas described in this document, in marketing collateral produced by or on web
pages maintained by Dialogic Corporation or its subsidiaries may infringe one or more patents or
other intellectual property rights owned by third parties. Dialogic Corporation or its subsidiaries do
not provide any intellectual property licenses with the sale of Dialogic products other than a license
to use such product in accordance with intellectual property owned or validly licensed by Dialogic
Corporation or its subsidiaries. More detailed information about such intellectual property is available
from Dialogic Corporation's legal department at 9800 Cavendish Blvd., 5th Floor, Montreal, Quebec,
Canada H4M 2V9. The software referred to in this document is provided under a Software License
Agreement. Refer to the Software License Agreement for complete details governing the use of the
software. Please see also the extended license conditions in the Software License Agreement.
Dialogic Corporation encourages all users of its products to procure all necessary
intellectual property licenses required to implement any concepts or applications and does
not condone or encourage any intellectual property infringement and disclaims any
responsibility related thereto. These intellectual property licenses may differ from country
to country and it is the responsibility of those who develop the concepts or applications to
be aware of and comply with different national license requirements.
Please be aware that in the United States, the use of the Dialogic® Diva® digital board to
route facsimile transmissions using DID is likely to infringe certain claims of U.S. Patent Nos.
5,488,651 and 5,291,546 owned by Cantata Technology Inc.
All names, products, and services mentioned herein are the trademarks or registered trademarks
of their respective organizations and are the sole property of their respective owners. Dialogic, Eicon,
Eicon Networks, Diva, Diva ISDN, Diva Client, and Connecting People to Information are registered
trademarks or trademarks of Dialogic Corporation or its subsidiaries.
To contact Dialogic Customer Support, visit our Web site at www.dialogic.com/support.
www.eicon.com/divaserver
Dialogic Corporation License Agreement for use of
software (“Agreement”)
This is an Agreement between you, the Company, and your Affiliates (referred to in some instances
as "You" and in other instances as "Company") and all your Authorized Users and Dialogic
Corporation ("Dialogic").
YOU SHOULD CAREFULLY READ THE FOLLOWING TERMS AND CONDITIONS BEFORE
INSTALLING OR DOWNLOADING THE SOFTWARE. IF YOU AGREE WITH THESE TERMS YOU
MAY PROCEED WITH THE DOWNLOAD OR INSTALLATION OF THE SOFTWARE. IF YOU DO
NOT AGREE WITH THESE TERMS, PLEASE RETURN THE PACKAGE IN "AS NEW" CONDITION
(INCLUDING DOCUMENTATION AND BINDERS OR OTHER CONTAINERS) AND YOUR MONEY
WILL BE REFUNDED. DOWNLOADING OR INSTALLING THE SOFTWARE CONSTITUTES
YOUR ACCEPTANCE OF THESE TERMS AND CONDITIONS. YOU ASSUME RESPONSIBILITY
FOR THE SELECTION OF THE PROGRAM TO ACHIEVE YOUR INTENDED RESULTS, AND
FOR THE INSTALLATION, USE, AND RESULTS OBTAINED FROM THE PACKAGE.
Copyright
The enclosed Software ("Program") and documents are owned by Dialogic and its suppliers and
are protected by copyright laws and international treaty provisions. Therefore, You and your
Authorized Users must treat the Program and documentation like any other copyrighted material
except as expressly permitted in this License Agreement.
License
Under the terms and conditions of this License Agreement:
• You may install and use one copy of the Program on a single-user computer, file server, or on a
workstation of a local area network, and only in conjunction with a legally acquired Dialogic
hardware or software product;
• The primary Authorized User on the computer on which the "Program" is installed may make a
second copy for his/her exclusive use on either a home or portable computer;
• You may copy the Program into any machine readable or printed form for backup or modification
purposes in support of your use of one copy of the Program;
• You may make one copy of Dialogic's documentation provided that all copyright notices contained
within the documentation are retained;
• You may modify the Program and/or merge it into another Program for your use in one computer;
(any portion of this Program will continue to be subject to the terms and conditions of this
Agreement);
• You may transfer the Program, documentation and the license to another eligible party within your
Company if the other party agrees to accept the terms and conditions of this Agreement. If You
transfer the Program and documentation, You must at the same time either transfer all copies
whether in printed or machine readable form to the same party or destroy any copies not
transferred; this includes all modifications and portions of the Program contained in or merged
into other Programs;
• You must reproduce and include the copyright notice on any copy, modification or portion of the
Program merged into another Program;
• You may not rent or lease the Program. You may not reverse engineer, decompile or disassemble
the Program. You may not use, copy, modify or transfer the Program and documentation, or any
copy, modification or merged portion, in whole or in part, except as expressly provided for in this
License Agreement;
www.eicon.com/divaserver
• You transfer possession of any copy, modification or merged portion of the Program or
documentation to another party in any way other than as expressly permitted in this License
Agreement, this license is automatically terminated.
Upgrades
If the Program is provided as an upgrade and the upgrade is an upgrade from another software
product licensed to You and Your Authorized Users by Dialogic, the upgrade is governed by the
License Agreement earlier provided with that software product package and the present License
Agreement does not grant you additional license(s).
Third Party software application
The Program may contain certain software applications and portions of applications which are
provided to You under terms and conditions which are different from this Agreement (such as open
source or community source) or which require Dialogic to provide Customer and its Subsidiaries
with certain notices and/or information (collectively “Excluded Code”). Dialogic will identify such
Excluded Code in a text file or about box or in a file or files referenced thereby (and shall include
any associated license agreement, notices and other related information therein), or the Excluded
Code will contain or be accompanied by its own license agreement. Your use of the Excluded Code
will be subject to the terms and conditions of such other license agreement solely to the extent such
terms and conditions are inconsistent with the terms and conditions of this Agreement or are required
by such other license agreement. By using or not uninstalling such Excluded Code after the initial
installation of the Excluded Code you acknowledge and agree to all such license agreements,
notices and information.
Term
The license is effective until terminated. You may terminate it at any time by destroying the Program
and documentation together with all copies, modifications and merged portions in any form. It will
also terminate upon conditions set forth elsewhere in this Agreement or if you fail to comply with
any terms or conditions of this Agreement. You agree upon such termination to destroy the Program
and documentation together with all copies, modifications and merged portions in any form.
Limited Warranty
The only warranty Dialogic makes is that the medium on which the Program is recorded will be
replaced without charge if Dialogic, in good faith, determines that it was defective in materials or
workmanship and if returned to your supplier with a copy of your receipt within ninety (90) days from
the date you received it. Dialogic offers no warranty for your reproduction of the Program. This
Limited Warranty is void if failure of the Program has resulted from accident, misuse, abuse, or
misapplication.
Customer Remedies
Dialogic's entire liability and You and Your Authorized Users exclusive remedy shall be, at Dialogic's
option, either (a) return of the price paid or (b) repair or replacement of the Program that does not
meet the above Limited Warranty. Any replacement Program will be warranted for the remainder of
the original Warranty period.
No Other Warranties
Dialogic disclaims all other warranties, either expressed or implied, including but not limited to
implied warranties or merchantability and fitness for a particular purpose and the warranty against
latent defects, with respect to the Program and the accompanying documentation. This limited
warranty gives You specific legal rights. You may have others, which may vary from jurisdiction to
jurisdiction.
www.eicon.com/divaserver
No Liability for Consequential Damage
In no event shall Dialogic, its subsidiaries, directors, employees or suppliers be liable for any
damages whatsoever (including without limitation, damages for loss of business profits, business
interruption, loss of information, or other pecuniary loss and indirect, consequential, incidental,
economic, or punitive damages) arising out of the use of or inability to use this Program, even if
Dialogic has been advised of the possibility of such damages. As some jurisdictions do not allow
the exclusion or limitation for certain damages, some of the above limitations may not apply to You
or your Authorized Users.
Limit of Liability
The entire aggregate liability of Dialogic under any provision of this agreement shall be limited to
the amount actually paid by You for the affected Program. Dialogic’s subsidiaries, directors,
employees and suppliers shall have no liability under this Agreement.
Right to Audit
If this Program is not freely downloadable and is licensed for use in a Company, your Company
agrees to keep all usual and proper records and books of accounts and all usual proper entries
relating to each reproduction and Authorized User of the Program during the term of this Agreement
and for a period of three (3) years thereafter. During this period, Dialogic may cause an audit to be
made of the applicable records in order to verify Your compliance with this Agreement and prompt
adjustment shall be made to compensate for any errors or omissions disclosed by such audit. Any
such audit shall be conducted by an independent certified public accountant selected by Dialogic
and shall be conducted during the regular business hours at Your offices and in such a manner as
not to interfere with Your normal business activities. Any such audit shall be paid for by Dialogic
unless material discrepancies are disclosed. For such purposes, "material discrepancies" shall
mean three percent (3%) or more of the Authorized Users within the Company. If material
discrepancies are disclosed, Your Company agrees to pay Dialogic for the costs associated with
the audit as well as the license fees for the additional Authorized Users. In no event shall audits be
made more frequently than semi-annually unless the immediately preceding audit disclosed a
material discrepancy.
Supplementary Software
Any Supplementary Software provided with the Dialogic Program referred to in this License
Agreement is provided "as is" with no warranty of any kind.
U.S. Government Restricted Rights
The Program and documentation are provided with RESTRICTED RIGHTS. Use,
duplication or disclosure by the U.S. Government is subject to restrictions as set forth in
subparagraph c) 1) ii) of The Rights in Technical Data and Computer Software clause at
DFARS 252.227-7013 or subparagraph c) 1) and 2) of the Commercial Computer
Software-Restricted Rights at 48 CFR52.227-19, as applicable.
Contractor/ manufacturer is:
DIALOGIC CORPORATION.
9800 Cavendish Blvd., Montreal, Quebec, Canada H4M 2V9
www.eicon.com/divaserver
Contents
About This Online Guide .............................................................................. 8
How to use this online guide ................................................................................... 8
Structure of this guide ............................................................................................. 8
About Diva Server for Windows ................................................................... 9
Features .................................................................................................................. 9
Supported Hardware ............................................................................................. 14
Requirements for software installation .................................................................. 15
Information on installing downloaded software ..................................................... 16
Software Installation.................................................................................... 17
Installing fully detected Diva Server adapters under Windows XP ....................... 19
Installing fully detected Diva Server adapters under Windows Server 2003 ......... 23
Installing Diva Server adapters detected as ‘New Hardware’ ............................... 31
Software Configuration ............................................................................... 40
Configuration with installed hardware ................................................................... 40
Creating configuration files .................................................................................... 41
Dial-Up Networking and RAS Administration ........................................... 43
RAS client setup .................................................................................................... 43
RAS server setup .................................................................................................. 51
RAS status ............................................................................................................ 56
Uninstalling .................................................................................................. 59
Maintenance Tools....................................................................................... 61
Diva Server Line Test ............................................................................................ 61
Diva Server Diagnostics ........................................................................................ 62
Management Tools ...................................................................................... 63
Diva Server Management ..................................................................................... 63
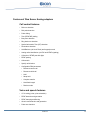
Features........................................................................................................ 64
Features of Diva Server ISDN adapters ................................................................ 65
Features of Diva Server Analog adapters ............................................................. 72
www.eicon.com/divaserver
Customer Services ...................................................................................... 75
Eicon Networks Supplier ....................................................................................... 75
Eicon Networks Help Web .................................................................................... 75
Eicon Networks Customer Support ....................................................................... 76
Comments ............................................................................................................. 76
www.eicon.com/divaserver
CHAPTER
1
About This Online Guide
How to use this online guide
• To view a section, click the corresponding blue underlined phrase in the table below.
• To view a topic that contains further information, click the corresponding blue underlined
phrases in this guide.
• You may wish to print out the pages required for installing the drivers.
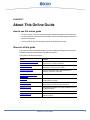
Structure of this guide
This guide provides a detailed description of how to install and configure Diva Server for
Windows, and how to troubleshoot your ISDN connection.
This guide is structured as follows:
Section
Contents
About Diva Server for Windows
Diva Server for Windows features, supported hardware, and
requirements for software installation
Software Installation
Installing the basic drivers, updating drivers or changing
configuration using Diva Server Setup
Software Configuration
Starting a configuration with installed hardware or
performing a manual configuration
Dial-Up Networking and RAS
Administration
RAS client and RAS server setup
Uninstalling
Uninstalling Diva Server adapters in the Device Manager or
with Diva Server Uninstall
Management Tools
Tools available for monitoring active connections and
getting statistic information on all connections
Maintenance Tools
Debugging tools available for locating installation errors or
connection problems
Features
Overview of the functions provided by the various interfaces
Customer Services
Information on how to obtain technical support for Eicon
Networks products.
About This Online Guide
8
CHAPTER
2
About Diva Server for Windows
Diva Server for Windows enables you to use your Eicon Diva Server adapter with Microsoft
Windows 2000, Windows XP, or Windows Server 2003. Diva Server for Windows provides
modem emulation, connectivity over ISDN or channelized T1 lines via the Remote Access
Service (RAS) of Windows 2000, Windows XP, or Windows Server 2003, a CAPI interface
for ISDN-based applications, and a TAPI interface for telephony-based applications. Diva
Server for Windows also provides an SNMP agent to support the Microsoft Windows
implementation of the Simple Network Management Protocol (SNMP).
Features
The list below provides an overview of the features supported by Diva Server for Windows.
For information on further supported features of Diva Server adapters, refer to the
Features section at the end of this reference guide.
General Features
• Support for ISDN basic rate interface (BRI), ISDN primary rate interface (PRI), and for
the channelized T1 interface
• Support for fractional PRI, E1 and T1 lines
• Support for multiple PRI, E1 and T1 lines
• Support for multiple CPU operating systems
• Support for analog lines
• Automatic Diva Server adapter detection
• Support for ISDN lines with a transfer rate of 64 kbps or 56 kbps (for example USA)
• Support for channelized T1 lines with a transfer rate of 56 kbps (see Channelized T1
(robbed bit signaling) on page 13)
• Support for unchannelized lines with a transfer rate of 64 kbps or 56 kbps
• Support for R2 signaling E1 lines with a transfer rate of 64 kbps
• Support for up to 240 B-channels for Diva Server BRI, 4BRI, T1/PRI, and 2PRI adapters
• Support for up to 480 B-channels for Diva Server 4PRI adapters (the total amount of
channels that can be used depends on the application)
• Modem connections up to 56 kbps (V.90)
• COM port (modem emulation)
About Diva Server for Windows
9
• Support for CAPI-based applications through CAPI 2032.DLL and CAPI 20.DLL (32-bit
and 16-bit versions) for Windows 2000, Windows XP, or Windows Server 2003
• Support for TAPI-based applications through the Diva Server Telephony Service
Provider (TSP)
• Support for all known switch types (ISDN protocols)
• Support for Q-Sig protocol (see Q-Sig features on page 13)
• Additional security through support of RSA
• Interfaces: RAS WMP, modem emulation, CAPI, Diva Server TSP
• Compatible to V.22 Fast ConnectTM terminals with V.22 DivaTM Fast Setup via Port driver
• M-Adapter:
• Middleware between Diva Server adapters and interfaces (CAPI, COM port)
• Can group several Diva Server adapters and specific lines of any Diva Server 4BRI
adapter and abstract them as one adapter to the application (see ‘Combined
Adapter’ in the Diva Server Configuration Manager Online Help (DSMain.chm)).
Separate configuration of each individual line of any Diva Server 4BRI, V-2PRI,
and V-4PRI adapter
• Selectable call direction for each port of a Diva Server Analog or V-Analog adapter
• Support for Windows XP Professional 64-bit and Windows Server 2003 64-bit
Note: Diva Server for Windows - 64-bit supports RAS, CAPI, TAPI and SNMP service
Note: Diva Server SoftIP can only be installed on 32-bit operating systems
• Diva Server V-2PRI/E1/T1 and Diva Server V-4PRI/E1/T1: Creation of a trace message
in the trace file if max. operation temperature is exceeded
• Support for IP and TDM hybrid installations by using Diva Server SoftIP (v2.1 or higher
enables fast data transfer using DMA (Direct Memory Access) procedures)
• Support for collecting phone number ranges or a specific number by the adapter with
incoming calls
• Support for a wide range of Windows event logs. Driver and connection errors and
informative messages are listed in the MOM (Microsoft Operation Manager). For a
detailed description of the errors and messages see Diva Server Configuration Online
Help (DSMain.chm)
• Possibility to configure either the use of call deflection or call rerouting
• Support for redirecting number emulation (for incoming calls). In this case the called
party number is delivered as redirecting number to the application
• ECT Link Balance - to avoid confusion with call transfer and mutiple incoming calls,
each incoming call is delivered to a seperate TEI. This feature is only valid for BRI
adapters and Point-to-Multipoint
About Diva Server for Windows
10
• Call Rate Limiter: Limitation of the amount of outgoing calls per second. Some switches
may require limitation of calls in order to grant stability of the PSTN network
RAS features
Note: RAS is the Routing and Remote Access Service of Windows 2000, Windows XP,
or Windows Server 2003.
• Connection to ISDN routers, enabling access to a remote LAN or the Internet
• Network access for PPP-compatible clients
• Connection to a Windows 2000, Windows XP, or Windows Server 2003 server from
digital, analog, and mobile networks with only one telephone number
• Automatic detection of ISDN service, synchronous/asynchronous framing, and
B-channel protocol of incoming calls
• Synchronous/asynchronous conversion
• Support for LAN protocols: TCP/IP, IPX/SPX, NetBIOS, NetBEUI, LAN Manager API
• Support for B-channel protocols: HDLC, X.75, V.120, V.110, PIAFS 1.0 and 2.1, modem
V.34+ and V.90, fax connections, V.42/LAPM (error correction), and V.42bis
compression
• Encryption, data compression, number checking, shorthold mode, callback function
Modem emulation
• COM port for 16-bit Windows applications
• TAPI-compliant pre-initialized modems:
• Eicon Diva Analog Modem
• Eicon Diva Fax Modem (Fax Class 1/ Fax Class 2)
• Eicon Diva V.120 Modem (64K)
• Eicon Diva V.120 Modem (56K)
• Eicon Diva V.110 Modem
• Eicon Diva X.75 Modem (64K)
• Eicon Diva X.75 Modem (56K)
• Eicon Diva PPP-Modem (64K)
• Eicon Diva PPP-Modem (56K)
• Eicon Diva X.25 Modem
• Eicon Diva Generic Server Modem:
• Network access for PPP-compatible clients
About Diva Server for Windows
11
• Automatic detection of ISDN service, synchronous/asynchronous framing and
B-channel protocol
• Synchronous/asynchronous conversion
• Encryption, data compression, number checking, shorthold mode, callback
function
CAPI features
Supplementary services:
• Number identification services: MSN, DDI, SUB, CLIP, CLIR, COLP, COLR, KEY
• Call offering services: TP, CFU, CFB, CFNR
• Call completion services: CW, HOLD, ECT, CCBS, CCNR
• Charging services: AoC
• Three-party conference
• Others: User-to-user signaling
Fax and voice features
• Fax compression (MH, MR 2D coding, MMR T.6 coding) and error-correction mode
(ECM)
• Fax connections up to 33,6 kbps
• Class 1 and class 2 fax interface
• Fax polling
• Extended fax
• Fax tone detection
• Reversal of fax direction
• Dynamic switching of B-channel protocols
• DTMF transmission, DTMF detection
• DTMF clamping
• Cross-board switching via interline connect (DSP-based monitor, bridge, and mixer for
voice connections: supports multiline conference calls)
• Page formats: ISO A4, ISO B4, ISO A3
• Standard, fine, super-fine, and ultra-fine resolution
• Echo cancellation
• Real time protocol (RTP)
About Diva Server for Windows
12
• Dynamic anti-jitter buffering
• Comfort noise generation (CNG)
• Voice activity detection (VAD)
• Support for color fax via CAPI
• Support for JPEG format
• Support for sending and receiving single or multi-page documents
• Support for fallback to gray scale if remote side does not support color fax
Diva Server TSP features
• Supplementary services based on CAPI: CLIP, CLIR, COLP, COLR, HOLD, CFU, CFB,
CFNR, ECT, AoC, CCBS, CCNR
• Media mode (unknown, interactive voice, automated voice)
• Wave audio format (8-bit 8 kHZ a-law, 8-bit 8 kHz µ-law, 8-bit 8 kHz PCM)
• DTMF tone generation and detection (based on CAPI)
Q-Sig features
• Support for generic Q-Sig according to ECMA and ISO (for more information see
Supplementary services)
• Tests have been conducted for the various switch types (for a complete list of all
supported types see Supplementary services)
Channelized T1 (robbed bit signaling)
• Trunk modes (loop, ground, and wink start)
• Tone dialing (DTMF and MF)
• Pulse dialing
• Ringer and busy tone detection
• 56 kbps transfer rate
• Call transfer
About Diva Server for Windows
13
Supported Hardware
Diva Server for Windows supports the following Diva Server adapters (max. eight Analog,
BRI, 4BRI, PRI, 2PRI or four 4PRI in one computer):
ISDN BRI adapters
• Diva Server 2FX
• Diva Server V-BRI-2
• Diva Server BRI-2M 2.0
• Diva Server V-4BRI-8
• Diva Server 4BRI-8M 2.0
ISDN PRI adapters
Diva Server PRI 2.0:
Diva Server PRI 3.0:
Diva Server V-PRI:
• Diva Server PRI-0M
• Diva Server PRI/E1/T1-CTI
• Diva Server V-PRI/E1-30
• Diva Server PRI-4M
• Diva Server PRI/E1/T1-8
• Diva Server PRI-8M
• Diva Server PRI/E1-30
• Diva Server PRI-30M
Diva Server PRI PCIe
Diva Server V-PRI PCIe
• Diva Server PRI-E1/T1-CTI PCIe
• Diva Server V-PRI/E1-30 PCIe
• Diva Server PRI-E1-30 PCIe
About Diva Server for Windows
14
Multiport PRI adapters
• Diva Server V-2PRI/E1/T1
• Diva Server V-4PRI/E1/T1
Analog adapters
Diva Server Analog
Diva Server V-Analog
• Diva Server Analog-2P
• Diva Server Analog-4P
• Diva Server V-Analog-4P
• Diva Server Analog-8P
• Diva Server V-Analog-8P
Requirements for software installation
For the installation of Diva Server for Windows, the following requirements have to be met:
• PC/AT-compatible computer (at least 500 MHz or higher processor with at least 500
MB RAM)
• Windows 2000, Windows XP, or Windows Server 2003 operating system
• At least 15 MB free space on the drive on which the operating system is installed
• An installed Eicon Diva Server adapter
Diva Multiport PRI adapters:
• At least 1.5 GHz or higher processor
• At least 512 MB RAM (if more adapters are installed the capacity needs to be at least
1 GB)
• Power supply with 450 W (6A with 3.3 V per Diva Server Multiport PRI adapter)
Note: Depending on the computer, a stronger power supply needs to be used.
To install your Diva Server adapter in your computer, refer to the printed installation guide
that came with your Diva Server adapter or that you downloaded from the Eicon Web site.
About Diva Server for Windows
15
Information on installing downloaded software
If you downloaded the Diva Server for Windows software from the Eicon Web site, please
note the following:
• Extract the files to your hard disk drive. Do not change the directory structure of the
extracted files.
• This manual assumes that the installation files have been copied into the directory
‘C:\Temp\ISDN’. If necessary, change the drive letter or path according to your system
configuration.
About Diva Server for Windows
16
CHAPTER
3
Software Installation
You should not attempt to install the software for your Diva Server adapter at the same
time as the operating system. Basic driver support for most Diva Server adapters is
provided by the Microsoft operating system. These Diva Server adapters are fully detected
by Windows XP or Windows Server 2003, and a basic set of drivers is installed
automatically. Diva Server adapters without basic driver support are detected as new
hardware.The installation procedure depends on the type of Diva Server adapter and the
operating system that you have:
Windows 2000
• If you are installing one of the following adapters, see Installing Diva Server adapters
detected as ‘New Hardware’ on page 31:
Diva Server 2FX
Diva Server BRI-2M 2.0
Diva Server 4BRI-8M 2.0
Diva Server PRI 2.0 and 3.0
Diva Server T1/PRI
Diva Server Analog
Diva Server PRI PCIe
Diva Server V-BRI-2
Diva Server V-4BRI-8
Diva Server V-PRI
Diva Server V-2PRI
Diva Server V-4PRI
Diva Server V-Analog
Diva Server V-PRI PCIe
Windows XP
• If you are installing one of the following adapters, see Installing fully detected Diva
Server adapters under Windows XP on page 19:
Diva Server 2FX
Diva Server BRI-2M 2.0
Diva Server 4BRI-8M 2.0
Diva Server PRI 2.0
Diva Server T1/PRI
• If you are installing one of the following adapters, see Installing Diva Server adapters
detected as ‘New Hardware’ on page 31:
Diva Server PRI 3.0
Diva Server PRI PCIe
Diva Server Analog
Diva Server V-BRI-2
Diva Server V-4BRI-8
Diva Server V-PRI
Diva Server V-2PRI
Diva Server V-4PRI
Diva Server V-PRI PCIe
Diva Server V-Analog
Software Installation
17
Windows Server 2003
• If you are installing one of the following adapters, see Installing fully detected Diva
Server adapters under Windows Server 2003 on page 23:
Diva Server 2FX
Diva Server BRI-2M 2.0
Diva Server 4BRI-8M 2.0
Diva Server PRI 2.0
Diva Server T1/PRI
• If you are installing one of the following adapters, see Installing Diva Server adapters
detected as ‘New Hardware’ on page 31:
Diva Server PRI 3.0
Diva Server PRI PCIe
Diva Server Analog
Diva Server V-BRI-2
Diva Server V-4BRI-8
Diva Server V-PRI
Diva Server V-2PRI
Diva Server V-4PRI
Diva Server V-PRI PCIe
Diva Server V-Analog
Software Installation
18
Installing fully detected Diva Server adapters under Windows XP
1. After you have installed your Diva Server adapter as described in the printed
installation guide that came with your adapter or that you downloaded from the Eicon
Web site, start your computer.
Note: You must log on with administrator rights to install Diva Server for Windows.
2. Windows detects the Diva Server adapter.
3. The ‘Found New Hardware Wizard’ is displayed. Click ‘Next’ to continue.
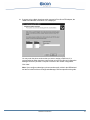
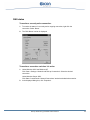
4. In the ‘ISDN Switch Type or D-channel Protocol’ box, select the D-channel protocol
(switch type) as specified by your ISDN service provider, for example European ISDN
(DSS1).
Click ‘Next’.
Software Installation
19
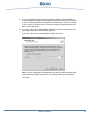
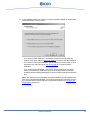
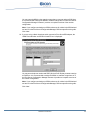
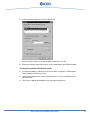
5. The ‘ISDN Multisubscriber Numbers’ box is displayed:
You may enter the MSNs or the extension range that you want to assign to RAS here.
It is recommended to assign the MSNs or extension range later on in the Diva Server
Configuration Manager because it provides a complete overview of the number
configuration.
Click ‘Next’.
Note: If you configure and assign no ISDN numbers at all, neither in the ISDN wizard
nor later on in the Diva Server Configuration Manager, RAS accepts all incoming calls.
Software Installation
20
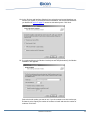
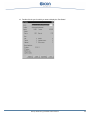
6. If you are using a North American switch type and a Diva Server PRI adapter, the
‘ISDN Phone Number Information’ box is displayed:
You may enter the phone numbers that you want to assign to RAS here. It is
recommended to assign the phone numbers later on in the Diva Server Configuration
Manager because it provides a complete overview of the number configuration.
Click ‘Next’.
Note: If you configure and assign no phone numbers at all, neither in the ISDN wizard
nor later on in the Diva Server Configuration Manager, RAS accepts all incoming calls.
Software Installation
21
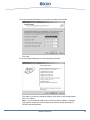
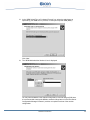
7. If you are using a North American switch type and a Diva Server BRI adapter, the
‘ISDN Phone Number and SPID Information’ box is displayed:
You may enter the phone number and SPID (Service Profil ID) that you want to assign
to RAS here. It is recommended to assign the phone numbers later on in the Diva
Server Configuration Manager because it provides a complete overview of the number
configuration.
Click ‘Next’.
Note: If you configure and assign no phone numbers at all, neither in the ISDN wizard
nor later on in the Configuration Manager, RAS accepts all incoming calls.
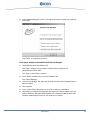
8. In the ‘Found New Hardware Wizard’, click ‘Finish’.
The standard Windows XP drivers for your Diva Server adapter are installed. To be able
to use all features of Diva Server for Windows, you must update the drivers with the
software that is provided on your Diva Server Software Suite CD-ROM or that you
downloaded from the Eicon Networks Web site. To update the drivers, see To update the
drivers: on page 23.
Software Installation
22
Installing fully detected Diva Server adapters under Windows
Server 2003
1. After you have installed your Diva Server adapter as described in the printed
installation guide that came with your adapter or that you downloaded from the Eicon
Web site, start your computer.
Note: You must log on with administrator rights to install Diva Server for Windows.
2. Windows detects the Diva Server adapter.
3. The ‘Found New Hardware Wizard’ is displayed. Click ‘Finish’ to complete the process.
The standard Windows Server 2003 drivers for your Diva Server adapter are installed. To
be able to use all features of Diva Server for Windows, you must update the drivers with
the software that is provided on your Diva Server Software Suite CD-ROM or that you
downloaded from the Eicon Networks Web site. To update the drivers, follow the
instructions below.
Note: Assign the MSNs, extension range, phone numbers, or SPIDs later on in the Diva
Server Configuration Manager after you installed the Diva Server for Windows software.
To update the drivers:
Note: If multiple adapters are installed, the wizard will be visible only once for each update
or configuration of the software. The configured parameters correspond to all adapters.
1. From the Windows task bar, click ‘Start > Run’.
2. Type the path to the update file:
• Insert your Diva Server CD-ROM into the CD-ROM drive and enter the following
path:
D:\DRIVER\i386\ENGLISH\SETUP.EXE
(where D: is your CD-ROM drive letter)
• Or enter the path to the update file on the hard disk, e.g.
C:\Temp\ISDN
(where C: is the hard disk drive letter)
3. In the welcome dialog box, click ‘Next’ to start updating the drivers for all installed Diva
Server adapters.
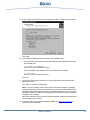
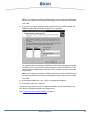
4. If you installed an adapter that is not supported with this software version, the
‘Unsupported Adapter’ box appears. Download the drivers for the unsupported
adapters and continue with the installation of the supported adapters. For supported
adapters see Supported Hardware on page 14. This software version only supports
the adapters listed there.
Software Installation
23
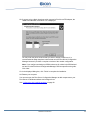
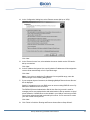
5. If you are updating the drivers from the Diva Server Software Suite CD-ROM, the
‘License Agreement’ box appears. Read the license agreement carefully. If you accept
it, select ‘I accept the above license agreement’ and click ‘Next’. If you do not accept
it, click ‘Cancel’ to exit the process. You need to accept the license agreement to be
able to update the drivers.
6. If you have a Diva Server ISDN adapter installed, select the D-channel protocol for
your configuration in the ‘Default Switch Type’ box.
If you have a Diva Server Analog adapter installed, click ‘Next’.
Note: If you are changing the configuration and you want to use the same switch type
as you selected during the update, select ‘Use existing switch type configuration’.
Click ‘Next’.
Software Installation
24
7. If you have a Diva Server Analog adapter installed, the ‘Default Analog Switch Type’
box appears. In the ‘Analog Switch Type’ box, select the region where you use your
adapter.
Note: If you are changing the configuration and you want to use the same switch type
as you selected during the update, select ‘Use existing switch type configuration’.
Software Installation
25
8. In the ‘Installation Mode’ box, select if you want to install the adapter in default mode,
customized mode, or secure mode.
• If you select ‘Default installation’, the Remote Access Service and CAPI are
installed. Click ‘Next’ and go to step 13 on page 29 to continue with the installation.
• If you select ‘Customized installation’, you can specify the services that are to be
supported. Click ‘Next’ and go to step 10 on page 28 to continue with the
installation.
• If you select ‘Secure installation’, you can set security settings for the various
services and interfaces. Additionally, you can set a password to prevent that
unauthorized users change the settings. Click ‘Next’ and proceed with the following
step.
Note: The services that you deactivate during the installation are not available in the
Diva Server Configuration Manager. You have the opportunity to use these services
if you activate them in the Diva Server Configuration Assistant. See Changing the
configuration: on page 30.
Software Installation
26
9. In the ‘Security Settings’ box, all possible services and interfaces are selected. Disable
the services or interfaces you do not want to use for security reasons. You can set a
password to prevent unauthorized users from changing the settings.
You need to deactivate at least one service. If all services need to be available, you
have to configure them, see step 10 on page 28.
Click ‘Next’.
Software Installation
27
10. In the ‘Services and Interface Selection’ box, select the services and interfaces you
need for your system. If you selected ‘Secure Installation’, the services and interfaces
you disabled in step 9 on page 27 cannot be selected anymore. Click ‘Next’.
11. If you selected the service ‘Modem via serial port and TAPI (Unimodem)’, the ‘Modem
Installation’ box appears.
Select the virtual modem you want to use. If you do not want to use one modem per
B-channel, select ‘Specify the number of modems to install’ and enter the number of
modems. Click ‘Next’.
Software Installation
28
12. In the ‘Incoming Call Policy’ box, select how to handle incoming calls.
Click ‘Next’.
13. In the displayed dialog box, the selected options are listed.
Click ‘Back’ if you need to change the settings. Click ‘Next’ to copy the appropriate
files to your system.
Note: If you are installing a Beta version of the Diva Server software, a message
might appear, warning you that the software has not been tested with Windows.
Continue with the installation.
Software Installation
29
This message indicates only that the Diva Server for Windows software does not yet
have Microsoft certification. This does not prevent a correct installation of the software.
Official final releases of Diva Server for Windows Software are Microsoft certified and
this message does not appear.
14. When the copy process is complete, click ‘Finish’ to complete the update.
Note: Depending on your system configuration, you are prompted to restart your
computer. Make sure that the ‘Restart your computer’ option is selected to restart it
after the update is complete.
You can now open the Diva Server Configuration Manager to add components to your
Diva Server for Windows software and configure them.
See Configuration with installed hardware on page 40.
Changing the configuration:
If you have already updated the drivers and you need to change the configuration:
1. Click ‘Start > Programs > Diva Server for Windows > Diva Server Configuration
Wizard’. The ‘Diva Server Configuration Wizard’ box appears. If you did not set a
password during the update, click ‘Next’. If you set a password, enter it, and then click
‘Next’.
Note: If you change the configuration, existing settings will be overwritten.
2. Proceed as described in step 6 on page 24.
Software Installation
30
Installing Diva Server adapters detected as ‘New Hardware’
The installation procedure of Diva Server adapters detected as ‘New Hardware’ depends
on your operating system:
• If you are installing the Diva Server adapter under Windows 2000, see To install the
Diva Server adapter under Windows 2000: below.
• If you are installing the Diva Server adapter under Windows XP or Windows Server
2003, see To install the Diva Server adapter under Windows XP and Windows Server
2003: on page 36.
To install the Diva Server adapter under Windows 2000:
1. After you have installed your Diva Server adapter as described in the printed
installation guide that came with your adapter or that you downloaded from the Eicon
Web site, start your computer.
Note: You must log on with administrator rights to install Diva Server for Windows.
2. Windows 2000 detects the new hardware and starts the ‘Found New Hardware
Wizard’.
3. In the welcome dialog box, click ‘Next’.
4. In the ‘Install Hardware Device Drivers’ box, select ‘Search for a suitable driver for my
device (recommended)’.
Click ‘Next’.
Software Installation
31
5. In the ‘Locate Driver Files’ box, select ‘Specify a location’. Disable all other options.
Click ‘Next’.
6. In the displayed dialog box enter the path to the installation files:
• Insert your Diva Server Software Suite CD-ROM into the CD-ROM drive and enter
the following path:
D:\DRIVER\i386\ENGLISH
(where D: is your CD-ROM drive letter).
• Or enter the path to the installation file on the hard disk, for example:
C:\Temp\ISDN
(where C: is the hard disk drive letter).
Click ‘OK’.
7. In the ‘Driver Files Search Results’ box, verify that Windows 2000 has found the
appropriate drivers.
Click ‘Next’ to continue the installation.
Note: If you are installing a Beta version of the Diva Server software, a message
might appear warning you that the software has not been tested with Windows. This
message indicates only that the Diva Server for Windows software does not yet have
Microsoft certification. Continue with the installation as this does not prevent a correct
installation of the software.
Official final releases of Diva Server for Windows Software are Microsoft certified and
this message does not appear.
8. If you have a Diva Server Analog adapter installed, go to step 13 on page 35 to
continue with the installation.
Software Installation
32
9. In the ‘ISDN Switch Type or D-channel Protocol’ box, select the switch type as
specified by your ISDN service provider, for example European ISDN (DSS1).
Click ‘Next’.
10. The ‘ISDN Multisubscriber Numbers’ box is displayed:
Software Installation
33
You may enter the MSNs or the extension range that you want to assign to RAS here.
It is recommended to assign the MSNs or extension range later on in the Diva Server
Configuration Manager because it provides a complete overview of the number
configuration.
Note: If you configure and assign no ISDN numbers at all, neither in the ISDN wizard
nor later on in the Diva Server Configuration Manager, RAS accepts all incoming calls.
Click ‘Next’.
11. If you are using a North American switch type and a Diva Server BRI adapter, the
‘ISDN Phone Number and SPID Information’ box is displayed:
You may enter the phone number and SPID (Service Profil ID) that you want to assign
to RAS here. It is recommended to assign the MSNs or extension range later on in
the Diva Server Configuration Manager because it provides a complete overview of
the number configuration.
Note: If you configure and assign no ISDN numbers at all, neither in the ISDN wizard
nor later on in the Diva Server Configuration Manager, RAS accepts all incoming calls.
Click ‘Next’.
Software Installation
34
12. If you are using a North American switch type and a Diva Server PRI adapter, the
‘ISDN Phone Number Information’ box is displayed:
You may enter the phone numbers that you want to assign to RAS here. It is
recommended to assign the phone numbers later on in the Diva Server Configuration
Manager because it provides a complete overview of the number configuration.
Note: If you configure and assign no ISDN numbers at all, neither in the ISDN wizard
nor later on in the Diva Server Configuration Manager, RAS accepts all incoming calls.
Click ‘Next’.
13. In the displayed dialog box, click ‘Finish’ to complete the installation.
14. Restart your computer.
You can now open the Diva Server Configuration Manager to add components to your
Diva Server for Windows software and configure them.
See Configuration with installed hardware on page 40.
Software Installation
35
To install the Diva Server adapter under Windows XP and
Windows Server 2003:
1. After you have installed your Diva Server adapter as described in the printed
installation guide that came with your adapter or that you downloaded from the Eicon
Web site, start your computer.
Note: You must log on with administrator rights to install Diva Server for Windows.
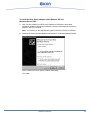
2. Windows XP detects the new hardware and starts the ‘Found New Hardware Wizard’.
Select ‘Install from a list or specific location (Advanced)’.
Click ‘Next’.
Software Installation
36
3. In the displayed dialog box, select ‘Search for the best driver in these locations’.
Select ‘Include this location in the search’. Disable all other search options.
Enter the path to the installation files:
• Insert your Diva Server Software Suite CD-ROM into the CD-ROM drive and enter
the following path:
D:\DRIVER\i386\ENGLISH
(where D: is your CD-ROM drive letter).
• Or enter the path to the installation file on the hard disk, for example
C:\Temp\ISDN
(where C: is the hard disk drive letter).
Click ‘Next’ to install the drivers.
Note: If you are installing a Beta version of the Diva Server software, a message
might appear warning you that the software has not been tested with Windows. This
message indicates only that the Diva Server for Windows software does not yet have
Microsoft certification. Continue with the installation as this does not prevent a correct
installation of the software.
Official final releases of Diva Server for Windows Software are Microsoft certified and
this message will not appear.
4. If you have a Diva Server Analog adapter installed go to step 8 on page 39 to continue
with the installation.
Software Installation
37
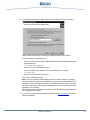
5. In the ‘ISDN Switch Type or D-channel Protocol’ box, select the switch type as
specified by your ISDN service provider, for example European ISDN (DSS1).
Click ‘Next’.
6. The ‘ISDN Multisubscriber Numbers’ box is displayed:
You may enter the MSNs or the extension range that you want to assign to RAS here.
It is recommended to assign the MSNs or extension range later on in the Diva Server
Configuration Manager because it provides a complete overview of the number
configuration.
Software Installation
38
Note: If you configure and assign no ISDN numbers at all, neither in the ISDN wizard
nor later on in the Diva Server Configuration Manager, RAS accepts all incoming calls.
Click ‘Next’.
7. If you are using a North American switch type and a Diva Server BRI adapter, the
‘ISDN Phone Number and SPID Information’ box is displayed:
You may enter the phone number and SPID (Service Profile ID) that you want to assign
to RAS here. It is recommended to assign the phone number and SPID in the Diva
Server Configuration Manager because it provides a complete overview of the number
configuration.
Note: If you configure and assign no ISDN numbers at all, neither in the ISDN wizard
nor later on in the Diva Server Configuration Manager, RAS accepts all incoming calls.
Click ‘Next’.
8. In the displayed dialog box, click ‘Finish’ to complete the installation.
9. If prompted, restart your computer.
You can now open the Diva Server Configuration Manager to add components to your
Diva Server for Windows software and configure them.
See Configuration with installed hardware on page 40.
Software Installation
39
CHAPTER
4
Software Configuration
Configuration with installed hardware
After you installed your Diva Server adapter and the adapter drivers as described in
Software Installation on page 17, you can start the Diva Server Configuration Manager:
1. Click ‘Start > Programs > Diva Server for Windows > Diva Server Configuration
Manager’.
2. The Configuration Manager displays the configuration you chose during the software
installation:
• The detected Diva Server adapter is installed.
• The adapter is assumed to be connected to a corresponding ISDN BRI, PRI, or
analog line.
• Line properties are either set by default, the parameters you set under Windows
2000 and Windows XP in the Windows ISDN wizard, or the parameters you set in
the Diva Server Installation Wizard.
Note: If you plan to use ‘Direct Access Mode’ or ‘R2 Signaling E1’, change the
switch type in the line properties accordingly and your PRI line changes
automatically into an E1 line (see ‘Line Properties’ in the Diva Server Configuration
Manager Online Help (DSMain.chm)).
• If you installed a Diva Server adapter that was detected as ‘New Hardware’, RAS
and CAPI are installed and connected to the adapter.
• If you installed a fully detected Diva Server adapter and chose ‘Default installation’
during the driver update, RAS and CAPI are installed and connected to the Diva
Server adapter.
• If you installed a fully detected Diva Server adapter and chose ‘Customized
installation’ or ‘Secure installation’ during the driver update, the services you
selected are installed and connected to the Diva Server adapter.
If you did not assign a number to RAS in Windows 2000 or Windows XP’s ISDN wizard
or installed Windows Server 2003, both, RAS and CAPI, are configured to accept all
incoming calls. This can cause conflicts between the two services, since both services
are then listening to the same phone numbers. To avoid these conflicts, you should
assign different MSN(s), ISDN numbers, or extension(s) to the services in the binding
properties for each service (see ‘Binding Properties’ in the Diva Server Configuration
Manager Online Help (DSMain.chm)).
Software Configuration
40
When you are using a North-American protocol with a Diva Server BRI adapter, you
must always assign ISDN numbers because otherwise incoming calls cannot be
accepted (see ‘Binding Properties’ in the Diva Server Configuration Manager Online
Help (DSMain.chm)).
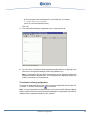
See below an example of a default installation for a Diva Server BRI-2M 2.0:
3. You can now add components to your Diva Server for Windows software and configure
them as described in ‘Configuring’ in the Diva Server Configuration Manager Online
Help (DSMain.chm).
Creating configuration files
You can create configuration files manually, without having a Diva Server adapter installed.
With the manual configuration the system administrator can create a complete
configuration and save it as a configuration file. This configuration file can be made
available to the users who then only need to install the adapter drivers and to activate the
configuration created by the system administrator. As such, users do not need to configure
the software.
To start an empty configuration:
1. Click ‘Start > Run’.
2. To enter the path to the Diva Server Configuration Manager:
• Insert your Diva Server Software Suite CD-ROM into your CD-ROM drive and enter
the following path:
D:\DRIVER\i386\ENGLISH\Disrvcfg.EXE
(where D: is your CD-ROM drive letter).
Software Configuration
41
• Or enter the path to the configuration file on the hard disk, for example:
C:\Temp\ISDN\Disrvcfg.EXE
(where C: is the hard disk drive letter).
Click ‘OK’.
3. The Configuration Manager is displayed with no components at all:
4. You can now do a complete manual configuration as described in ‘Configuring’ in the
Diva Server Configuration Manager Online Help (DSMain.chm).
Note: If configuration files have been created before, you can start the Configuration
Manager and load a configuration file. The configuration file is displayed and you can
modify it according to your requirements.
To activate an existing configuration
To activate a configuration file for your system, open the configuration file and click ‘File
> Activate’; or click the activate button
in the toolbar.
Note: You can only activate a configuration file for your system if the Diva Server adapters
that are available in the Diva Server Configuration Manager correspond to the Diva Server
adapters that are physically installed in your computer.
Software Configuration
42
CHAPTER
5
Dial-Up Networking and RAS
Administration
In the terminology used by the Remote Access Service, the calling station is referred to
as the Client and the called station as the Server. The RAS client/server architecture
allows a station to be defined simultaneously as a server and as a client and therefore
enables simultaneous initiation of outgoing and incoming ISDN connections. For example,
this enables the peer-to-peer connection of two Windows 2000 or Windows XP
workstations.
RAS client setup
The RAS client can be used to establish connections to the following remote stations:
• Windows 2000, Windows XP, or Windows Server 2003 computer with RAS in server
mode
• Internet Service Provider
• TCP/IP router
Setting up a RAS client under Windows 2000, Windows XP, or Windows
Server 2003
Under Windows 2000:
1. Click ‘Start > Settings > Network and Dial-up Connections’.
2. In the ‘Network and Dial-up Connections’ box, double-click ‘Make New Connection’.
3. If the ‘Location Information’ box appears, enter the country/region you are in. Enter
your area code and, if required, your number to access an outside line.
Click ‘OK’.
4. If the ‘Phone and Modem Options’ box appears, select your location.
Click ‘OK’.
5. In the ‘Network Connection Wizard’, click ‘Next’.
Dial-Up Networking and RAS Administration
43
6. In the ‘Network Connection Type’ box, select ‘Dial-up to private network’.
Click ‘Next’.
To continue with the configuration go to step 7 on page 46.
Under Windows XP and Windows Server 2003:
1. Under Windows XP:
Click ‘Start > Settings > Control Panel > Network Connections > New Connection
Wizard’.
In the ‘Network Connections’ window, under ‘Network Tasks’ on the left window side,
double-click ‘Create a new connection’.
Under Windows Server 2003:
Click ‘Start > Control Panel > Network Connections > New Connection Wizard’.
2. If the ‘Location Information’ box appears, enter the country/region you are in. Enter
your area code and, if required, your number to access an outside line.
Click ‘OK’.
3. If the ‘Phone and Modem Options’ box appears, select your location.
Click ‘OK’.
4. In the ‘New Connection Wizard’, click ‘Next’.
Dial-Up Networking and RAS Administration
44
5. In the ‘Network Connection Type’ box, select ‘Connect to the network at my workplace’.
Note: The screen might be slightly different under Windows Server 2003.
Click ‘Next’.
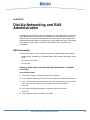
6. In the ‘Network Connection’ box, select ‘Dial-up connection’ and click ‘Next’.
To continue with the configuration go to step 7 on page 46.
Dial-Up Networking and RAS Administration
45
Under Windows 2000, Windows XP, and Windows Server 2003:
7. If you have configured more than one port for outgoing calls, you must specify a port:
Select a port, for example ‘ISDN channel - Eicon Diva Server BRI-2M’ to dedicate a
line to this outgoing connection.
The effect of the setting ‘All available ISDN lines multi-linked’ is that RAS will
automatically establish a connection over all lines.
Note: A larger number of active lines may increase telephone charges. With a normal
basic rate interface, a connection with the setting ‘All available ISDN lines multi-linked’
would be established over both B-channels.
Click ‘Next’.
8. Only Windows XP and Windows Server 2003:
In the ‘Connection Name’ box, enter a name for your RAS connection. Click ‘Next’.
Dial-Up Networking and RAS Administration
46
9. In the ‘Phone Number to Dial’ box, enter the phone number of the server.
If the server is configured to use subaddresses, you must specify the appropriate
subaddresses in the ‘Phone Number to Dial’ box, separated by the vertical stroke ‘|’,
(the pipe symbol, or press [Alt] and the digits [0], [1], [2] and [4] on the numeric keypad).
For example, if the phone number is 07152932640 SUB 41, you must enter
07152932640|41.
If your connection protocol is something other than synchronous HDLC, you must
specify which protocol is used. This information can be attached to the server phone
number, separated by the caret character ‘^’.
For example, for an analog call, add ‘^MODEM’ to the phone number of the server.
For a call to GSM, add ‘^GSM1’, ‘^GSM2’ or ‘^GSM3’.
If your connection uses something other than a transfer rate of 64 kbps, you must
specify which transfer rate is used. This information can also be attached to the server
phone number separated by the caret character ‘^’.
For example, for a call to some regions in the United States where a line, a switch, or
a device only supports a transfer rate of 56 kbps, add ‘^56K’ to the server phone
number. The ‘T1 RBS’ switch type always uses a transfer rate of 56 kbps. Therefore,
you must add ‘^56K’ for all outgoing calls if you use this switch type.
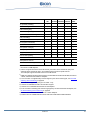
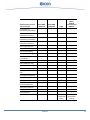
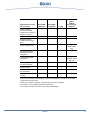
The required information can be found in the following table. The various parameters
can also be entered in combination.
Dial-Up Networking and RAS Administration
47
Designation
Description
Framing
^HDLC
synchronous HDLC
^X.75
synchronous X.75
^ASYNC
additional information asynchronous
^SYNC
additional information synchronous
Services
^XP
synchronous HDLC transparent (standard)
^V.120
asynchronous, default transfer rate is 64K, transfer rates given below
can also be entered
^V.110
asynchronous, default transfer rate is 9600, transfer rates given below
can also be entered
^GSM1
asynchronous without flow control, V.110/9600
^GSM2
asynchronous with flow control, V.110/9600
^GSM3
asynchronous with flow control, without LLC, V.110/9600
^PIAFS
PIAFS 2.1/64K (Diva Server BRI, V-BRI, 4BRI, V-4BRI, any PRI, T1/PRI,
and V-PRI)
^PIAFS^32K
PIAFS 1.0/32K (Diva Server BRI, V-BRI, 4BRI, V-4BRI, any PRI, T1/PRI,
and V-PRI)
^MODEM
asynchronous, entry of transfer speed is ignored, since this is handled
by the modem
Speeds
^600
asynchronous with ^V.110
^1200
asynchronous with ^V.110
^2400
asynchronous with ^V.110
^4800
asynchronous with ^V.110
^9600
asynchronous with ^V.110
^14400
asynchronous with ^V.110
^19200
asynchronous with ^V.110
^28800
asynchronous with ^V.110
^33600
asynchronous
^38400
asynchronous with ^V.110
^56K
HDLC, X.75, V.120
^64K
HDLC, X.75, V.120
Dial-Up Networking and RAS Administration
48
Click ‘Next’.
10. In the ‘Connection Availability’ box, select if the connection should be made available
to all users or only to yourself.
Click ‘Next’.
11. If you are connected to a network and you selected to make the connection available
to all users, the ‘Internet Connection Sharing’ box is displayed.
12. Specify if your Internet connection can be shared by all users or if it should be available
only to yourself. Click ‘Next’.
13. Only Windows 2000:
In the ‘Completing the Network Connection Wizard’ enter a name for your RAS
connection.
14. Click ‘Finish’ to save the newly set up RAS client. If you need to make changes, click
‘Back’ until you reach the box where the changes are to be made.
15. In the displayed dialog box, click the ‘Dial’ button to connect.
Assign multiple phone numbers to a connection
You can assign several phone numbers to a connection. These phone numbers will be
used as alternative numbers if the first number fails for example, when the line is busy.
1. Under Windows 2000:
Click ‘Start > Settings > Network and Dial-up Connections’ and right-click the
connection to which you want to assign multiple numbers.
Under Windows XP:
Click ‘Start > Settings > Control Panel’. Double-click ‘Network Connections’ and
right-click the connection to which you want to assign multiple numbers.
Under Windows Server 2003
Click ‘Start > Control Panel > Network Connections’ and right-click the connection to
which you want to assign multiple numbers.
2. Select ‘Properties’.
3. In the properties dialog box of your connection, click the ‘General’ tab. Click
‘Alternates’.
4. In the ‘Alternate Phone Numbers’ box, check the option ‘If number fails, try next
number’.
5. To add a new phone number to the list, click ‘Add’.
6. In the ‘Add Alternate Phone Number’ box, enter the phone number. Click ‘OK’.
7. Click ‘OK’ to close the ‘Alternate Phone Numbers’ box.
8. Click ‘OK’ again to close the properties dialog box.
Dial-Up Networking and RAS Administration
49
Under Windows 2000 and Windows XP:
To observe the progress of an active connection, click ‘Start > Settings > Network and
Dial-up connections’ and right-click the connection. Select ‘Status’ (see also RAS status
on page 56).
To specify the network protocol(s) for every set-up connection, click ‘Start > Settings >
Network and Dial-up connections’ and right-click the connection. Select ‘Properties’.
In the properties dialog box of your connection, click the ‘Networking’ tab. You can now
activate the desired network protocol(s) for your connection.
For more detailed information on the RAS client, see the Windows 2000 or Windows XP
RAS documentation.
Under Windows Server 2003:
To observe the progress of an active connection, click ‘Start > Control Panel > Network
Connections’ and right-click the connection. Select ‘Status’ (see also RAS status on
page 56).
To specify the network protocol(s) for every set-up connection, click
‘Start > Control Panel > Network Connections’ and right-click the connection. Select
‘Properties’.
In the properties dialog box of your connection, click the ‘Networking’ tab. You can now
activate the desired network protocol(s) for your connection.
For more detailed information on the RAS client, see the Windows Server 2003 RAS
documentation.
Dial-Up Networking and RAS Administration
50
RAS server setup
Note: Windows XP Professional allows you to set up an incoming connection that can
accept up to three incoming calls. To do so, start the ‘New Connection Wizard’ and select
‘Set up an advanced connection > Accept incoming connections’. Since Windows XP
Professional does not allow to set up a RAS server for a large number of incoming
connections, the following description only refers to the Windows 2000 Server and
Windows Server 2003 operating system.
The Remote Access application enables you to configure and control the RAS server.
Your computer is automatically launched as server when Windows 2000 Server starts but
you still need to configure and enable remote access.
To configure remote access under Windows 2000 and Windows XP see To configure and
enable remote access under Windows 2000 and Windows XP: below.
To configure remote access under Windows Server 2003 see To configure and enable
remote access under Windows Server 2003: on page 52.
To configure and enable remote access under Windows 2000 and
Windows XP:
1. Click ‘Start > Programs > Administrative Tools > Routing and Remote Access’.
2. In the ‘Routing and Remote Access’ window, right-click the entry for your computer
and select ‘Configure and Enable Routing and Remote Access’.
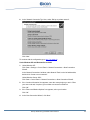
3. In the ‘Routing and Remote Access Server Setup Wizard’, click ‘Next’.
4. In the displayed dialog box, select ‘Remote access server’.
Click ‘Next’.
Dial-Up Networking and RAS Administration
51
5. In the ‘Remote Access Server Setup’ box, select the option ‘Set up an advanced
remote access server’.
Click ‘Next’.
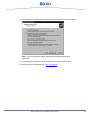
6. In the ‘Remote Client Protocols’ box, verify if all protocols required for remote clients
are installed.
Click ‘Next’.
7. If you are not connected to a network, the ‘No Network Connections Detected’ box is
displayed.
Check the option ‘No, I am setting up a stand-alone server with no access to a
network’.
Click ‘Next’.
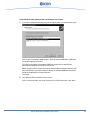
8. In the ‘IP Address Assignment’ box, specify whether IP-addresses will be assigned
to remote clients automatically or from a specified range.
Click ‘Next’.
Note: If you select to assign the IP-addresses from a specified range, enter the
address ranges in the following dialog boxes.
9. If your computer is part of a network, the ‘Managing Multiple Remote Access Servers’
box is displayed.
Specify if you want to set up your RAS server to use an existing RADIUS server. By
default, the RADIUS server is not used.
The RADIUS (Remote Authentication Dial-In User Service) protocol is used for
managing remote user authentication and authorization in dial-up networks or virtual
private networks. If a RADIUS server is available in your LAN you can have your RAS
connections authenticated and monitored by this server. You do not need to create
your own remote access policies.
Click ‘Next’.
10. Click ‘Finish’ to finish the ‘Routing and Remote Access Server Setup Wizard’.
To configure and enable remote access under Windows Server 2003:
1. Click ‘Start > Administrative Tools > Routing and Remote Access’.
2. In the ‘Routing and Remote Access’ window, right-click the entry for your computer
and select ‘Configure and Enable Routing and Remote Access’.
3. In the ‘Routing and Remote Access Server Setup Wizard’, click ‘Next’.
Dial-Up Networking and RAS Administration
52
4. In the ‘Configuration’ dialog box, select ‘Remote access (dial-up or VPN)’.
Click ‘Next’.
5. In the ‘Remote Access’ box, select whether the server should receive VPN and/or
dial-up connections.
Click ‘Next’.
6. In the ‘IP Address Assignment’ box, specify whether IP addresses will be assigned to
remote clients automatically or from a specified range.
Click ‘Next’.
Note: If you select to assign the IP addresses from a specified range, enter the
address ranges in the following dialog boxes.
7. If your computer is part of a network, the ‘Managing Multiple Remote Access Servers’
box is displayed.
Specify if you want to set up your RAS server to use an existing RADIUS server. By
default, the RADIUS server is not used.
The RADIUS (Remote Authentication Dial-In User Service) protocol is used for
managing remote user authentication and authorization in dial-up networks or virtual
private networks. If a RADIUS server is available in your LAN you can have your RAS
connections authenticated and monitored by this server. You do not need to create
your own remote access policies.
Click ‘Next’.
8. Click ‘Finish’ to finish the ‘Routing and Remote Access Server Setup Wizard’.
Dial-Up Networking and RAS Administration
53
To configure access authorizations for the RAS server:
1. Under Windows 2000 and Windows XP:
Click ‘Start > Programs > Administrative Tools > Computer Management’.
Under Windows Server 2003:
Click ‘Start > Administrative Tools > Computer Management’.
2. In the ‘Computer Management’ window, select ‘System Tools > Local Users and
Groups > Users’.
3. In the details pane, right-click the user for whom you want to configure the access
authorizations.
Select ‘Properties’.
4. In the properties dialog box, select the ‘Dial-in’ tab and activate the desired access
rights:
• Allow access
The user has the direct permission to dial into the RAS server. This permission
overrules all remote access policies.
• Deny access
The user has no permission to dial into the RAS server. This denial also overrules
all remote access policies.
Dial-Up Networking and RAS Administration
54
• Control access through Remote Access Policy
Depending on the Remote Access Policy, dial-in permission is granted or denied
to the user. For further information on Remote Access Policies, see your Windows
documentation.
The following callback options can be configured:
• No Callback
The client establishes the connection to the server and maintains the connection.
The user of the RAS client assumes all charges.
• Set by Caller (Routing and Remote Access Service only)
The client establishes the connection to the server, sends its current call number
and then breaks the connection. The server calls the client back at the number
given and therefore assumes the charges for the call. The client’s call can therefore
be made from any site.
• Always Callback to
The client establishes the connection to the server, thereby indicating that a
connection is required, and then breaks the connection. The server calls the client
back at the preassigned call number. This ensures that the client can call from one
telephone terminal only. This ensures that no other partner can call from another
terminal, because this call number cannot be manipulated.
To close the dialog box, click ‘OK’.
Note: Only the users that are set up on the server are shown in the ‘Users’ list. For
information on how to configure authorizations for remote access for Windows 2000 and
Windows Server 2003 domains, see your Windows documentation.
Dial-Up Networking and RAS Administration
55
RAS status
To monitor a currently active connection:
1. To monitor the status of a currently active outgoing connection, right-click the
connection. Select ‘Status’.
2. The ‘RAS Status’ monitor is displayed:
To monitor a connection each time it is active:
1. Under Windows 2000 and Windows XP
Click ‘Start > Settings > Network and Dial-up Connections’. Select the desired
connection.
Under Windows Server 2003
Click ‘Start > Control Panel > Network Connections’ and select the desired connection.
2. In the displayed dialog box, click ‘Properties’.
Dial-Up Networking and RAS Administration
56
3. In the properties dialog box, click the ‘General’ tab:
Check the option ‘Show icon in taskbar when connected’. Click ‘OK’.
4. Each time, when the connection is active, an icon is displayed in the Windows taskbar.
To monitor the status of RAS server ports:
1. To monitor the status of a RAS server port, click ‘Start > Programs > Administrative
Tools > Routing and Remote Access’.
2. In the ‘Routing and Remote Access’ window, click the ‘+’ next to your RAS server to
expand the tree.
3. Click ‘Ports’ to display the available ports in the right window pane.
Dial-Up Networking and RAS Administration
57
4. Double-click the port for which you want to display the ‘Port Status’.
Dial-Up Networking and RAS Administration
58
CHAPTER
6
Uninstalling
If you want to uninstall all installed Diva Server adapters and related software, use Diva
Server Uninstall as described below. If you do not want to uninstall all Diva Server
adapters, use the Device Manager as described on page 60.
Diva Server adapter uninstallation with Diva Server Uninstall:
1. Click ‘Start > Programs > Diva Server for Windows > Diva Server Uninstall’.
2. The welcome dialog box is displayed. Follow the instructions on the screen and click
‘Next’ to continue.
3. In the ‘Confirm Uninstall’ box, all installed Diva Server adapters are displayed:
Click ‘Next’ to uninstall all Diva Server adapters and related drivers.
Uninstalling
59
4. In the displayed dialog box, select if you want to shut down or restart your computer
now or later.
Click ‘Finish’, to complete the process.
Diva Server adapter uninstallation with Device Manager:
1. Under Windows 2000 and Windows XP:
Click ‘Start > Settings > Control Panel’. Double-click the ‘Systems’ icon.
Under Windows Server 2003:
Click ‘Start > Control Panel > System’.
2. In the ‘System Properties’ box, click the ‘Hardware’ tab.
Click ‘Device Manager’.
3. In the ‘Device Manager’ box, right-click the entry of the Diva Server adapter that you
want to uninstall.
4. Click ‘Uninstall’.
5. In the ‘Confirm Device Removal’ box, click ‘OK’ to start the uninstallation.
6. Shut down your computer and physically remove the Diva Server adapter from your
system. Otherwise, Windows 2000, Windows XP, or Windows 2003 will detect and
install the adapter again as soon as you restart your computer.
Uninstalling
60
CHAPTER
7
Maintenance Tools
Diva Server for Windows offers the following tools for testing your connection and controller
on your adapter, and diagnosing and solving problems that might occur with your Diva
Server adapter or the connection:
Diva Server Line Test see below
Diva Server Diagnostics on page 62
Diva Server Line Test
To use the Diva Server Line Test utility, you must have installed your Diva Server adapter,
Diva Server for Windows and connected your ISDN or analog line to the adapter.
1. To open Diva Server Line Test, click ‘Start > Programs > Diva Server for Windows >
Diva Server Line Test’.
2. The ‘Diva Server Line Test’ box opens.
Diva Server Line Test offers the following tests:
• Line Check:
Performs a quick check of your Diva Server Software installation and the physical
connection.
• Hardware Test:
Performs a test only of the controller.
• Phone/Loop Test:
Performs basic inbound or outbound phone tests, to test the connection to other
telephones or to itself.
• Call Transfer Test:
Performs different call transfer tests, with the option to choose the transfer type.
• Fax Test:
Performs basic inbound or outbound fax tests.
For more information about the tests see Diva Server Line Test Online Help
(DSLineTest.chm).
Maintenance Tools
61
If Diva Server Line Test does not return an error, but you cannot get your Diva Server
adapter to work properly, there might be a problem in the configuration of the application
you are using with your Diva Server adapter (such as Dial-Up Networking or faxing
software).
Diva Server Diagnostics
The Diva Server Diagnostics tool can help with the analysis of problems if you encounter
difficulties with the Eicon drivers or the connection.
Every Eicon driver sends status messages and reports any error that occurs. The
messages are saved in a specific memory area of a fixed size, so that the oldest messages
are overwritten when the memory is full.
Diva Server Diagnostics enables the messages from Diva Server adapters and various
drivers to be displayed and saved.
1. To open Diva Server Diagnostics click ‘Start > Programs > Diva Server for Windows
> Diva Server Diagnostics’.
2. The ‘Diva Server Diagnostics’ box opens.
For more information on Diva Server Diagnostics see Diva Server Diagnostics Online Help
(DivaTrace.chm).
Maintenance Tools
62
CHAPTER
8
Management Tools
Diva Server Management
Diva Server Management is integrated into the Microsoft Management Console (MMC)
via a snap-in. You may create your own set of management, for instance the Device
Manager combined with the Diva Server Management.
Diva Server Management is a tool that displays the current status of the connected lines,
the active connections and the history of connections. Simply testing lines and connectivity
is also part of Diva Server management.
To open Diva Server Management as standalone program, click ‘Start > Programs > Diva
Server for Windows > Diva Server Management’.
Diva Server Management offers the following statistics:
• Status:
Displays an overview of all installed Diva Server adapters in the system and the events
taking place on these adapters.
• Active Connections:
Displays the Diva Server adapters with active incoming or outgoing calls.
• Call History:
Displays the history for all conducted ingoing or outgoing calls.
For more information about the statistics see the Diva Server Management Online Help
(DivaServerManagement.chm).
Management Tools
63
CHAPTER
9
Features
Diva Server adapters provide different features and capabilities with Diva Server for
Windows.
The interfaces supported by Diva Server adapters are as follows. However, not all features
may be available on all the supported interfaces.
IDI
ISDN Direct Interface. Supports all features and capabilities of Eicon ISDN
adapters.
WAN Miniport Provides support for WAN protocols running over ISDN, channelized T1, or analog.
Useful for connecting to Windows Remote Access Services (RAS).
COM Port
For applications that require communications via a standard PC communications
port.
CAPI 2.0
Common ISDN Application Programming Interface. A standard interface for
applications to interact with ISDN adapters.
TAPI
Telephony Application Programming Interface. An interface for communication
programs to work with telephony and network services.
For features of Diva Server ISDN adapters see the tables from page 65 on. For features
of Diva Server Analog adapters see the tables from page 72 on.
Features
64
Features of Diva Server ISDN adapters
Features via interface:
IDI
WAN
MiniPort COM Port CAPI 2.0
TAPI
B-channel related:
Transparent HDLC, 64/567) kbps
•
•
•6)
Transparent (Voice)
•
•
•
X.75 64/567) kbps
•
•
•
•6)
T.70/T.90 (T-Online)9)
•
•
•
•6)
V.110 (GSM)1)9)
•
•
•
•
•6)
V.120 64/56 kbps (CompuServe)
•
•
•
•
•6)
V.34+, V.90 analog modem1)7)9)
•
•
•
•
•6)
V.42, V.42bis1)7)9)
•
•
•
•
•6)
X.75/V.42bis
•
•
Change of B-channel protocol during a
call
•
•
X.252), X.31, ISO 8208 in the B-channel
•
PIAFS 1.0 and 2.17)
•
SDLC
•
•
Fax Group 4 (incl. T.90/ISO 8208 and
module mode detection)9)
•
•
T.30 Fax Group 3 (analog),
Class 1 and 21)9)
•
•
•
•6)
Fax with Error Correction Mode (ECM)1)9)
Fax with MR (D2 coding)1)9)
Fax with MMR (T.6 coding)1)9)
•
•
•
•6)
Fax 14.4 kbps1)9)
•
•
•
•6)
Fax 33.6 kbps (V.34)1)9)
•
•
Fax T.38 (up to 33.6 kbps)
•
•
•
•
Fax tone detection
Reversal of fax
1)
direction1)9)
Fax polling / fax on
•
•
•
•
•
•
•5)
•
Speed and feature indication (polling and
ECM)1)9)
•
•
New fax header line1)9)
•
•
•
•
1)9)
Page formats: ISO A4, ISO B4, ISO A3
Features
•6)
•
•
demand1)9)
•
65
Features via interface:
IDI
WAN
MiniPort COM Port CAPI 2.0
TAPI
Resolution: standard, fine, super-fine,
ultra-fine1)9)
•
•
DTMF tone detection and transmission3)
•
•
DTMF clamping
•
•
On-board switching and conferencing (via
line interconnect)8)
•
•
Media mode (unknown, interactive voice,
automated voice)1)
•
•
Wave audio format (8-bit 8 kHz A-Law,
8-bit 8 kHz µ-Law, 8-bit 8 kHz PCM, 16-bit
8 kHz PCM)1)
•
•
10)
Silence detection
•
Volume control
•
Echo cancellation1)7)
Real time protocol
•
(RTP)1)7)
•
1)7)
Comfort noise generation (CNG)
•
Voice activity detection (VAD)1)7)
•
Dynamic anti-jitter
Audio tap
•
buffer1)7)
•
1)7)
GSM and G.726 voice
•
codecs1)7)
•
Recording AGC
•
4)
Supplementary Services:
MSN (multiple subscriber number)
•
•
•
•
•
DDI (direct dialing-in)
•
•
•
•
•
SUB (sub-addressing)
•
CLIP (calling line identification
presentation)
•
CLIR (calling line identification restriction)
•
•
•
•
•
•
COLP (connected line identification
presentation)
•
•
•
COLR (connected line identification
restriction)
•
•
•
CCBS (call completion to busy
subscriber)
•
•
•
CCNR (call completion on no reply)
•
•
•
Features
•
66
Features via interface:
IDI
WAN
MiniPort COM Port CAPI 2.0
TAPI
TP (terminal portability)
•
•
Call forwarding unconditional
•
•
•
Call forwarding busy
•
•
•
Call forwarding no reply
•
•
•
Call deflection/ Call rerouting
•
•
CW (call waiting)
•
•
•
HOLD (hold and retrieve a call)
•
•
•
ECT (explicit call transfer)
•
•
•
Blind transfer
•
AoC (advice of charge)
•
•
Three-party conference
•
•
Large conference
•
•
User-to-user signaling
•
•
Transparent D-channel
•
•
X.25/D-channel including AO/DI support
•
•
•
•
Others:
1)
Features are not available with Diva Server PRI-0M, Diva Server PRI/E1/T1, and all versions of
Diva Server T1/PRI adapters.
2)
CAPI 2.0 supports X.25 in the B- and D-channel, permanent virtual connections (PVC) and
switched virtual connections (SVC), and multiple logical connections per B-channel.
The COM port supports X.25 with one PVC in the B-channel.
3) DTMF tone detection and transmission is done via soft DTMF for Diva Server PRI-0M, Diva Server
T1/PRI, and Diva Server PRI/E1/T1 adapters.
4)
For an overview on supplementary services support by the various switch types, see On-board
switching and conferencing on page 68.
5)
The COM Port supports fax polling for Fax Class 1 only.
6)
Features are available with TAPI via Unimodem support.
7)
Features are not available with Diva Server 2FX adapters.
8) For an overview on switching and conferencing support by the various Diva Server adapters, see
On-board switching and conferencing on page 68.
9)
Features are not available with Diva Server V-Series adapters.
10)
Features are not available with Diva Server PRI and T1/PRI without additional DSPs.
Features
67
On-board switching and conferencing
Some switches do not offer supplementary services such as call transfer, overlap sending,
three-party conference, or large conference. For these switches, the Diva Server adapters
and software can provide these supplementary services by connecting or forwarding calls
directly on the adapter (also known as 'tromboning’).
Support for on-board switching and conferencing depends on the installed Diva Server
adapter. The table below outlines the various types of switching and their support by Diva
Server adapters.
Note: On-board switching and conferencing is only possible if it is supported by your
application.
Switching and conferencing via Switching and conferencing Cross-board switching
adapter:
(within one board)
Diva Server Analog
Diva Server Analog-2P
•
•
Diva Server Analog-4P
•
•
•
•
•
•
•1)
•
•
•
•1)
•
•
•
•
•
Diva Server Analog-8P
Diva Server BRI
Diva Server 2FX
Diva Server BRI-2M 2.0
Diva Server V-BRI-2
Diva Server 4BRI-8M 2.0
Diva Server V-4BRI-8
Diva Server PRI 2.0
Diva Server PRI-0M
Diva Server PRI-4M
Diva Server PRI-8M
Diva Server PRI-30M
Diva Server PRI 3.0
Diva Server PRI/E1/T1-CTI
Diva Server PRI/E1/T1-8
Diva Server PRI/E1-30
Diva Server V-PRI/E1-30
Diva Server Multiport PRI
Diva Server V-2PRI/E1/T1
Diva Server V-4PRI/E1/T1
Features
68
Switching and conferencing via Switching and conferencing Cross-board switching
adapter:
(within one board)
Diva Server PRI PCIe
Diva Server PRI/E1/T1-CTI PCIe
•1)
•
•
•
Diva Server PRI/E1-30 PCIe
Diva Server V-PRI/E1-30 PCIe
1)
Conference functionality is limited to eight participants.
Supplementary services
The Diva Server for Windows software supports basic call services for all switch types
that are available in the Diva Server Configuration Manager. In addition to this, it offers
supplementary services for the following switch types:
• Euro-ISDN (ETSI) BRI and PRI
• 5ESS Custom (AT&T)
• 5ESS NI (Lucent/Avaya)
• DMS 100 (Nortel)
• Q-Sig
Q-Sig support is available for the derivatives ECMA-QSIG, and ISO-QSIG. Thus, the
Q-Sig switch type can be used with any PBX based on one of these derivatives.
Q-Sig has been tested with a number of various switches, for example, Alcatel 4200,
Alcatel 4400, 4410, DeTeWe OpenCom 1000/1010, Ericsson MD 110, Ericsson
BP250, Hicom 150, Hicom 300, Lucent Definity, Matra 65xx, Nortel Meridian, Nortel
M65xx, Siemens HiPath 3000, and Siemens HiPath 4000, Tenovis.
The table below gives a detailed overview of the supplementary services supported by
the switch types listed above.
Note: The availability of supplementary services also depends on your PBX. For detailed
information on supplementary services supported by your PBX, contact the PBX
manufacturer.
Supplementary services
with switch type
Euro-ISDN
(ETSI) PRI
Euro-ISDN
(ETSI) BRI
Q-Sig
MSN (multiple subscriber
number)
•
•
•
DDI (direct dialing-in)
•
•
•
SUB (sub-addressing)
•
•
•
Features
5ESS Custom
(AT&T),
5ESS NI
(Lucent/Avaya),
DMS 100
•
(incoming)
•
69
Supplementary services
with switch type
Euro-ISDN
(ETSI) PRI
Euro-ISDN
(ETSI) BRI
Q-Sig
5ESS Custom
(AT&T),
5ESS NI
(Lucent/Avaya),
DMS 100
CLIP (calling line
identification presentation)
•
•
•
•
CLIR (calling line
identification restriction)
•
•
•
•
COLP (connected line
identification presentation)
•
•
•
•
COLR (connected line
identification restriction)
•
•
•
•
KEY (keypad protocol)
•
•
•4)
•
AoC (advice of charge)
•
•
•
User-to-user signaling
•
•
•
TP (terminal portability)
•
Call forwarding
unconditional
•
Call forwarding busy
•
Call forwarding no reply
•
Call deflection
•
CW (call waiting)
HOLD (hold and retrieve a
call)
•
•
•
1)
•
ECT (explicit call transfer)
•
•
•2)
•
•
•3)
•
ECT by rerouting
•
•3)
ECT by join
Single-step call transfer
(over CAPI deflection)
•
Three-party conference
•
•
Large conference
•
•
Drop conference
•
•
Name identification services
•
(presented by
switch)
Features
•
(presented by
network)
70
Supplementary services
with switch type
Euro-ISDN
(ETSI) PRI
Euro-ISDN
(ETSI) BRI
Q-Sig
Generic functional
procedures (basis for
supplementary services in
Q-Sig environment)
•
Common information
•
Redirected number
translation from Q-Sig to
Q.931
•
5ESS Custom
(AT&T),
5ESS NI
(Lucent/Avaya),
DMS 100
Escape message types
•
(5ESS Custom
only)
Call Appearance/Call
Handling (CACH) plus
configuration
•
Feature activators plus
configuration
•
(5ESS NI + DMS
100 only)
Network display
conversion/treatment
Message waiting
•
•
•
•
CCBS (call completion to
busy subscriber)
•
•
CCNR (call completion on
no reply)
•
•
•
1)
HOLD is not a standard supplementary service for Euro-ISDN PRI, nevertheless some PBXs
support call hold and retrieve.
2)
HOLD is not defined in Q-Sig but corresponding procedures are available.
3)
Call transfer is only possible if path replacement works.
4)
In a Q-Sig environment, the feature is also called ‘Simple Dialog’.
Features
71
Features of Diva Server Analog adapters
Call control features
• Dial tone detection
• Dial pulse detection
• Pulse dialing
• Tone (DTMF/MF) dialing
• Busy tone detection
• Ring back tone detection
• Special Information Tone (SIT) detection
• Fax/modem detection
• Hold/Retrieve (via Hook Flash) and keypad protocol
• Analog caller identification (via FSK and DTMF signaling)
• Collection of DTMF post-dial digits
• DTMF parsing
• Call transfer
• Specify call direction
• Configurable PBX parameters
• Disconnect active call
• Disconnect hold call
• Hold
• Swap hold
• Complete transfer
• Hook-flash length
• Retrieve mode
Voice and speech features
• G.711 coding (a-law, µ-law selectable)
• DTMF detection and generation
• DTMF clamping and filtering
• Generic tone detection and generation
• Pulse tone detection
Features
72
• Full-duplex voice, ‘barge-in’
• Voice activity detection
• Silence detection
• Human talker detection
• Fax signal detection
• G.168 echo cancellation, up to 128 ms tail length
• Recording automatic gain control (AGC)
• Pitch control
• Audio tap
Voice over IP support
• G.711 voice codec (64 kbps, µ-law, A-law)
• G.726 voice codec (32 kbps)
• GSM voice codec (13 kbps)
• G.168 echo cancellation, up to 128 ms tail length
• Adaptive jitter buffer
• Voice activity detection (VAD)
• Comfort noise generation (CNG)
• Real time protocol (RTP framing)
• Impedance calibration
Switching and Conferencing features
• On-board switching and conferencing
• Automatic gain control (AGC)
Fax features
• Support for fax class 1 and 2
• Support for fax group 3, T.30
• V.17, V.29, V.27ter, V.21, V.34 modulation
• Up to 33.600 bps with each channel (send and receive)
• Fax compression MH, MR, MMR
• Error Correction Mode (ECM)
Features
73
• Fax polling/ Fax on demand
• Reversal of fax direction
• Fax password
• Fax sub addressing
• New fax header line
• Page formats: ISO A4, B4, A3
• Standard, fine, super-fine and ultra-fine resolution
• Color fax (JPEG-format)
Data modem features
• V.21, V.22, V.22bis, Bell 103, Bell 212A, V.32, V.32bis, V.34, V.42, V.42bis, V.90, MNP4,
MNP5,
• Modem with extension: V.18, V.21, Bell 103, V.23, EDT, Baudot 45, Baudot 47, Baudot
50 incl. DTMF, V.42, V.42bis
Features
74
CHAPTER
10
Customer Services
Eicon Networks provides various possibilities to obtain technical support for your Eicon
Networks product. We recommend that you contact your Eicon Networks supplier first. If
your supplier is not able to solve your problem visit our help web with its detailed
information about a variety of topics. In the unusual case that the information on the help
web cannot help you fix the problem contact our Customer Support.
For more information see below:
• Eicon Networks Supplier
• Eicon Networks Help Web
• Eicon Networks Customer Support
Eicon Networks Supplier
To obtain technical support for Eicon Networks products contact your Eicon Networks
supplier. Before doing so you might want to use the Diva Server Line Test, Diva Server
Hardware Test, Diva Server Diagnostics and the Diva Server Management tool first to see
if you can already solve the problem herewith. For more information see the online help
files for the respective tool:
• DSLineTest.chm for Diva Server Line Test and Hardware Test
• DivaTrace.chm for Diva Server Diagnostics
• DivaServerManagement.chm for the Diva Server Management tool
Eicon Networks Help Web
If your supplier was not able to help you to solve the problem visit our Help Web. It contains
detailed information on:
• Installation and upgrade of Diva Server drivers, configuration scenarios, and
applications
• Diagnostic and testing utilities
• Basic issues, error messages and how to resolve them
• ‘How to’ guides and wizards
Customer Services
75
• Online training for ISDN, Diva Server API, and X.25 primarily 1st level technical support
people, but much of the course is also suitable for a non-technical audience.
Visit our Help Web at www.eicon.com/support/ema.
Eicon Networks Customer Support
If the information on the Help Web was not sufficient to help you solve the problem, contact
our Customer Support.
Customer Support may probably need:
• A debug trace (see Diva Server Diagnostics Online Help DivaTrace.chm).
• And a copy of your active configuration (see Diva Server Configuration Manager Online
Help DSMain.chm).
See www.eicon.com/support/contact.asp for details on how to contact us.
Comments
If you wish to make comments about your Diva Server adapter or the corresponding
software, address them by e-mail to: [email protected].
Customer Services
76