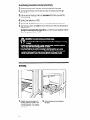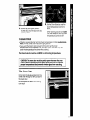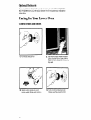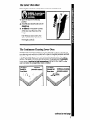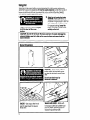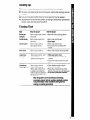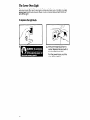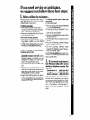
1
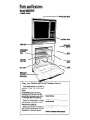
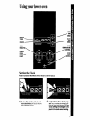
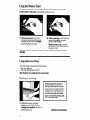
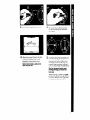
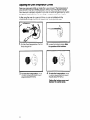
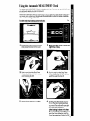
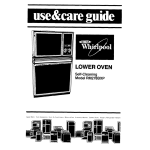
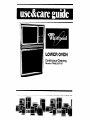
LOWER OVEN
Continuous-Cleaning
Model RM255PXP
~wave
Ovens
Trash Compactors
Room Air Condltloners
Oehumidifler>
Automatic
Washers
Clothes
Dryers.
Freezers.
Reheerator-Freeze1
Contents
Before You Use Your Oven
Important
Safety Instructions
Parts and Features.
Using Your lower Oven.
Setting the Clock
Using the Minute Timer.
Using the Lower Oven
Baking or Roasting
Adjusting the Temperature
Control
Using the Automatic
MEALTIMER* Clock
Paae
-2
3
4
5
5
6
6
6
8
9
Broiling
The Oven Vent.
Optional Rotisserie..
Caring for Your lower Oven
Control Panel
The Lower Oven Door
The Continuous-Cleaning
Oven
Cleaning Chart
The Oven Light
If You Need Service or
Assistance.
Page
10
11
1’2’
12
13
13
15
16
17
1
01985 Whirlpool
‘Tm
Corporation
Before you use your oven
Read and carefully
your oven.
follow
the “INSTALLATION
INSTRUCTIONS”
packed
with
Read this “Use & Care Guide” and your “Cooking Guide” carefully for important
use and safety information. Store these with the Upper Microwave
Oven literature
in a convenient
place for future use.
It is your personal
responsibility
and obligation
to be sure your oven:
Has been installed where it is protected
from the elements.
l Has been
installed and leveled in a wall or cabinet that will hold the weight.
l Has been
properly connected
to electrical
supply and grounded. (See
“Installation
Instructions!‘)
l Is not used by anyone
unable to operate it properly.
l Is properly
maintained.
l Is used only for jobs expected
of a home oven.
See your “Cooking
Guide” and “Upper Microwave
Oven Use 81Care Guide”
for additional
safety and operating
instructions.
l
IMPOR LlNISAFETY INSTRUCTIONS
1.
DO NOT allow children !o~e or
play with any part of the oven. c!
leave them unattended
near It
They could be burned or Injured
2. DO NOT store thongs chridren
might want above the oven ChM
dren could be burned or Injured
while climbing on the Uoor ana
the door could be damaged
3. KEEP children away from the oven
when it is on. The oven walls. racks
and door can get hot enough to
cause burns.
l
Put oven racks where ‘you wan:
them before turning on the oven
Heated racks could cause
severe burns.
l
Do not touch any part of the
oven, especially
the heating elements, until you know they are
completely
cool. Dark elements
can still be hot enough to cause
severe burns
l
4.
Let steam and hot air escape
from the oven before removing
food to prevent burns
DO NOT use the oven to heat a
room. Persons in the room could
be burned or injured, or a fire
( ould start
5.
DO NOT wear loose or hanging
garments when using the oven
They could ignite if they touch a
heating element and you could
be burned
6.
DO NOT heat unopened
containers, they could explode. The
r!ot contents could burn you and
.ontainer particles could cause
‘:l)ury
7.
MAKE SURE to open the oven
door ali the way when adding or
Temoving food to prevent burns.
l FOR YOUR SAFETY l
DO NOT STORE OR USE GASOLINE OR OTHER FLAMMABLE VAPORS AND LIQUIDS
IN THE VICINITY OF THIS OR ANY OTHER APPLIANCE. THEY COULD IGNITE
CAUSING EXPLOSION AND/OR FIRE.
- SAVE THESE INSTRUCTIONS
-
Parts and features
Model RM255PXP
LOWER OVEN
/
MODEL AND SERIAL
NUMBER PLATE
-
CONTROL
OVEN VENTCONTINUOUSCLEANING
OVEN
\
SILICONE /
HEAT SEAL
FOIL LINER /
REMOVABLE
AIR-FLOW OVEN DOOR
Copy your Model and Serial Numbers here...
If you need service, or call with a
question,
have
this information
ready:
1. Complete
Model and Serial
Numbers (from the plate located
behind the microwave
oven door).
2. Purchase date from sales slip.
Copy this information
in these
SDaces. KeeD this book with vour
warranty and sales slip.
’
There is no warranty registration to
return. Proof-of-purchase
is all that is
required for in-warranty
service.
Model
Ser,a, Number
Pumhase Date
Service
4
Number
Company/Phone
Number
PANEL
Using your lower oven
MINUTE
TIMER
-
START
CLOCK
OVEN
TEMPERATURE
,
CONTROL
OVEN
SELECTtDR.
LOWER
OVEN
INDICA TOR
LIGHT
OVEN
LIGHT
SWITCH
Setting the Clock
Push in and turn the Minute
1.
Timer Knob to set the Clock.
Push in Minute Timer Knob and
turn clockwise
until clock shows
the right time of day.
2. let the Minute Timer Knob pop
out. Turn counterclockwise
until
Minute Timer dial shows OFF.The
clock setting will change if you
push in the knob when turning.
Using the Minute Timer
The Minute Timer does not start or stop the oven. It works like a kitchen timer.
DO NOT PUSH IN THE KNOB when setting the Minute Timer.
1.
Without pushing it in, turn the
Minute Timer Knob until the time
showing in the window is longer
than the setting you want.
2. Without pushing in, turn the knob
back to the setting you want
shows in the window.
When the time is up, a buzzer
will sound. To stop the buzzer, turn
the dial to OFF.
PUSHING IN AND TURNING THE MINUTE TIMER KNOB CHANGES THE CLOCK
SETTING.
Using the Lower Oven
The lower oven is always set with two knobs:
-The Oven Selector
-The Oven Temperature Control
Both must be on a setting for the oven to heat.
Baking or roasting
Rack(s) should be placed so
the top of the food will be centered in the oven. Always leave
at leasMY to 2 inches (4-5 cm]
between the sides of the pan
and the oven walls and other
pans. For more information, see
the “Cooking Guide:’
1.
6
Position the rack(s) properly
before turning on the oven. To
change rack position, lift rack at
front and pull out
continued
on next page
2. Set the Oven Selector
on BAKE
4. When the Lower Oven Indicator
Light goes off, the oven is preheated. Put food in the oven
Note: Oven racks, walls and
door will be hot.
3. Set the Oven Temperature Control to the baking temperature
you want
5. During baking, the elements will
turn on and off to keep the oven
temperature
at the setting. The
Lower Oven Indicator Light will
turn on and off with the elements
The top element helps heat
during baking, but does not
turn red.
When baking is done, turn both
the Oven Selector and the Oven
Temperature
Control to OFF.
Adjusting
the Oven Temperature
Control
Does your oven seem hotter or colder than your old oven? The Temperature of
Your old oven may have shifted gradually
without your noticing the change.
Your new oven is properly adjusted to provide accurate temperatures.
But, when
compared
to Your old oven, the new desrgn may give you different results.
If after using the oven for a period of time, you are not satisfied with the
temperature
settings, they can be adjusted by following these steps:
1.
Pull the Oven Temperature
Knob straight off.
Control
3. To lower the temperature,
move
a notch closer to LO. Each notch
equals aboutlO”F (5°C).
2. Loosen the lockina screw. Note
the position of the notches.
4. To raise the temperature,
move
a notch closer to HI. Each notch
equals aboutlO”F (5°C).
Tighten
replace
8
the locking screw and
the control knob.
Using the .4utomatic MEALTIMER*
The automatic
MEALTIMER* Clock is designed
you set, even when you are not around.
Clock
to turn the oven on and off at times
Automatic baking is ideal for foods which do not require a preheated
as meats and casseroles. Do not use the automatic
cycle for cakes,
etc.. . undercooking
will result.
To start and stop baking
1.
oven such
cookies,
automatically
Position the oven rack(s) properly,
and place the food in the oven.
2. Make sure the clock
is set to ‘he
right time of day.
3. Push in and turn the Start Time
Knob clockwise
to the time you
want baking to start.
4. Push in and turn the Stop Time
Knob clockwise
to the time you
want the oven to shut off.
5. Set the Oven Selector
6.
on TIMED
Set the Oven Temperature Control on the baking temperature
you want. The oven will now start
and stop automatically.
After baking Is done or to stop
the oven before preset time, turn
both the Oven Selector and the
Oven Temperature Control to OFF.
9
To start baking
1.
immediately
and stop automatically:
Position the oven rack(s) properly,
and place
the food in the oven.
2. Turn the Set Time Knob until the Start and Stop Time Dials show the right
time of day.
3. Push in and turn the Stop Trme Knob clockwise
oven to shut off.
4. Set the Oven Selector
to the time you want the
on TIMED
5. Set the Oven Temperature
Control on the baking
temperature
you want.
6. After baking is done, turn both the Oven Selector and the Oven Temperature
Control to OFF.
To stop the oven before the preset time, turn both the Oven Selector and the
Oven Temperature
Control to OFF
Broiling
1.
10
Position the rack properly for
broiling. See broil chart in the
“Cooking Guide” or a reliable
cookbook.
2. Put the broiler pan and food on
the rack.
3. Leave the door open about 4
inches (10.2 cm). The door will stay
open by itself.
4. Set the Oven Selector and the
Oven Temoerature Control to
BROIL.
’
When broiling is done, turn both
the Oven Selector and the Oven
Temperature
Control to OFF.
Custom Broil
l
l
If food is cooking too fast, turn the Oven Temperature Control counterclockwise until the Lower Oven Indicator Light goes off
If you want the food to broil slower from the start, set the Oven
Temperature Control between 450” and 325°F (65.5” and 162.7%). The
lower the temperature,
the slower the cooking.
The Oven Selector
must be on BROIL for all broiling
temperatures.
CAUTION: The oven door must be partly open whenever the oven
is set to BROIL. leaving
the door open allows the oven to maintain
proper temperatures
and prevents window glass from cracking.
The Oven Vent
Hot air and moisture escape from the
lower oven through a vent just above
the oven door.
Do not block the vent. Poor baking
can result.
Optional
Rotisserie
If you would like a rotisserie for your lower oven, you can order a kit (Part No.
RCK-79/261881) from your Whirlpool Dealer. The kit includes easy installation
instructions.
Caring for Your Lower Oven
Control Panel and Knobs
1.
Pull knobs straight off.
3. Wash control knobs in warm
soapy water. Rinse well and dry.
12
2.
Use warm soapy water or spray
glass cleaner and a soft cloth to
wipe the control panel. Rinse and
dry well
4. Push control knobs back on.
Make sure they point to OFF.
The Lower Oven Door
Removing
1.
the oven door will help make It easier to clean
the oven
Open the door to the first stop
position.
2. Hold the door at both sides and lift
straight up.
3. To replace, fit the bottom corners
of the door over the ends of the
hinges.
Push the door down evenly. The
door WIII close only when It is on
the hinges correctly
The Continuous-Cleaning
Lower Oven
Standard oven walls are coated with smooth porcelain-enamel.
Your continuous-cleaning
oven walls are coated with a special, rougher porcelain-enamel.
A fat spatter beads up on the smooth surface, but spreads out on the rougher
surface. The bead of fat chars and turns black. The spread-out
fat gradually
burns away at medium to high temperatures
(350”-475”F, 176”-246°C) so the
oven can return to a presentably
clean condition.
continued
on next page
Using Foil
Using foil on the oven bottom is recommended
to catch sugar and starchy
spills from pies and casseroles. It must be used properly. Cut foil from a roll of
heavy-dutyI8-inch
(45 cm] aluminum foil, or buy a foil kit (Part No. 241430)
from your Whirlpool Appliance
dealer.
Lift the cool bake element slightly
to lift the feet off the oven
bottom.
baie e’lement soall
solidly on the foil.
CAUTION: Do not let foil touch the bake element.
element. Make sure foil is flat on the oven bottom
bake element.
feet rest
It could damage
the
and away from the
1
J
Hand Cleaning
RACKS - Use soapy steel-wool
pad for best cleaning
results.
Rinse well.
14
WALLS AND DOOR-Wash
with
hot soapy water. Use a steel-wool
pad or plastic scouring pad for
stubborn spots. Rinse well.
Cleaning
1.
Tips
The oven window
and racks are not coated.
Clean
them by hand..
2. The oven (door does not get as hot as the walls. Some hand cleaning
needed.
3. If you do more broiling
than baking,
hand cleaning
4. Use aluminum foil on the oven bottom according
not burn away and may stain the bottom.
may be
may be needed
to instructions.
Spillovers
do
Cleaning Chart
PART
WHAT TO CLEAN
Broiler pan
and grid
Warm, soapy
wool pad
water
or steel
l
Control
Warm, soapy
so17 cloth.
water
and
l
Control
knobs,
panel
Oven racks
Lower oven
door glass
HOW TO CLEAN
Wash with other cooking
Wash, rinse and dry well.
Do not soak.
l
Warm, soapy water
spray glass cleaner
or
Warm, soapy
SOaDv Sfeel
or
water
WOOI
Wash, rinse and dry well.
Follow directions
provided
cleaner.
l
l
l
l
l
ContinuousCleaning
Oven
Warm, soapy water or
soapy scrubbing
pad.
Heavy-duty
aluminum foil
or order a foil kit (Part No.
241430) from your Whirlpool
dealer or TECH-CARE’ service company
l
l
l
with
Wash, rinse and dry. Use soapy
wool pads for stubborn areas.
l
DCIdS.
Spray glass cleaner
worm.
soapy water or
plastrc scrubbrng
pad
utensils.
steel
Make sure oven is cool.
Follow directions
provided
with
cleaner.
Wash rrnse and dry well with o soft
cloth.
Clean stubborn spots or stains.
Rinse well with water.
Place strip of aluminum foil on the
bottom of the oven to catch spillovers.
Do not use commercial
cleaners.
Most fat spatters on the Continuous-Cleaning
porcelain-enamel
interior surface gradually
reduce
to a presentably
clean condition
during normal
baking or roasting operations.
The Lower Oven Light
The lower oven light will turn on and off automatically
when you open or close
the lower oven door. To turn the light on when the oven door is closed, push the
Oven Light switch at the bottom of the control panel. Push the button again to
turn off the light.
To replace
the light bulb:
2. Remove the light bulb from its
socket. Replace the bulb with a
40-watt appliance
bulb.
Turn the power back
main power supply.
16
on at the
If you need service or assistance,
we suggest you follow these four steps:
1. Before calling for assistance...
Performance
problems
often result
from little things you can fix yourself
without tools of any kind.
if nothing operates:
l Is the oven
correctly wired into a
live circuit with the proper voltage?
[See “Installation
Instructions:‘)
l Have you checked
the main fuse or
circuit breaker box?
If the oven will not operate:
l Is the Oven
Selector turned to a setting (BAKE or BROIL, but not TIMED)?
l Is ihe
Oven Temperature
Control
turned to a temperature
setting?
If soil is visible
on ConfinuousCleaning
oven finish:
l The special
finish is designed
to
gradually
reduce oven soil during
normal baking or roasting. It is not
designed
to keep your oven spotless, only presentably
clean.
l If you broil often, you may
see oven
soil.
l The door
is cooler than the oven
walls. Soil will be more visible on the
door than other areas in the oven.
See page 14 for how to clean.
l Sugar
and starchy spills may leave
stains. See page 14 for hand cleaning tips. Keep foil on oven bottom to
catch these spills.
If cooking
results aren’t what you
expected:
l Is the oven
level?
l Are you using
pans recommended
in the Cooking Guide?
l If baking,
have you allowed 1% to 2
inches (4-5 cm) on all sides of the
pans for air circulation?
l Have you preheated
the oven as the
recipe calls for?
* Are the pans the size called for in the
recipe?
l Are
you following
a tested recipe
from a reliable source?
l Do
the cooking
utensils
have
smooth, flat bottoms and fit the surface unit being used?
See the Cooking Guide for more information on cooking
problems
and
how to solve them.
2. If you need assistance?
Call Whirlpool
COOL-LINER service
assistance
telephone
number. Dial
free from:
Continental
U.S. . . (800) 253-1301
Michigan
. . . . . . . . (800) 632.2243
Alaska & Hawaii
. (800) 253-1121
and talk with one of our trained Consultants The Consultants can instruct
you in how to obtain satisfactory operation from your appliance
or, if service is necessary,
recommend
a
qualified
service company
in your
area.
3.
If you need service‘;‘.. .
Whirlpool
has
a nationwide
network of franchised
TECHCARE” Service
Companies.
mcM-/-CARE
TECH-CARE servFRANCHISED
SERVICE
ice technicians
are trained to fulfill the product warranty and provide
after-warranty
service, anywhere in the United States.
To locate TECH-CARE service in your
area, call our CCCL-LINE service assistance telephone
number (see Step
2) or look in your telephone
directory
Yellow Pages under:
4.
If you have a
problem:..
Call our COOL-LINE service assistance
telephone
number (see Step 2) and
talk with one of our Consultants, or if
you prefer, write to:
Mr. Stephen E. Upton
Senior Vice President
Whirlpool Corporation
Administrative
Center
2000 US-33, North
Benton Harbor, Ml 49022
you must call or write, please provide: model number, serial number,
date of purchase, and a complete
description
of the problem.
This
information
is needed
in order to
better respond
to your request for
assistance.
*If
3P IS a regIstered
trademark
of Whirlpool
Corporotlon
for
qualIly parts Look for this
symbol of quality whenever
FSP
i/au need a replacement
part
8~ for your Whlrlpocl
appliance
FSP replacement
parts
NISI fit rlght and work right because
they are
,nade to the same exacting
speclflcatlons
,~sed
to oulld every new ‘Whirlpool appliance
0
Whirlpool
Home
Maklng
Part No. 312873
cl985
matlc
Washers.
Whirlpool
Clothes
Dryers.
your
world
A ipphances
a httle easier
Rev. A
Corporation
Freezers
Relrlgerator-Freezers
Printed in U.S.A.
Ice Makers
DIshwashers
Built-In
Ovens
and Surface
Units.
Ranges.
MIC