1
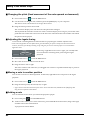
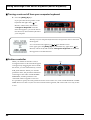
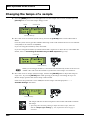
To resize thickness, move all items on the front cover
and center registration marks to left or right
Information
When you need repair service, call your nearest Roland Service Center or authorized Roland distributor in your country as
shown below.
AFRICA
EGYPT
Al Fanny Trading Office
9, EBN Hagar A1 Askalany Street,
ARD E1 Golf, Heliopolis,
Cairo 11341, EGYPT
TEL: 20-2-417-1828
REUNION
Maison FO - YAM Marcel
25 Rue Jules Hermann,
Chaudron - BP79 97 491
Ste Clotilde Cedex,
REUNION ISLAND
TEL: (0262) 218-429
PANAMA
ITALY
ISRAEL
SUPRO MUNDIAL, S.A.
Roland Italy S. p. A.
150 Sims Drive,
SINGAPORE 387381
TEL: 6846-3676
Boulevard Andrews, Albrook,
Panama City, REP. DE PANAMA
TEL: 315-0101
Viale delle Industrie 8,
20020 Arese, Milano, ITALY
TEL: (02) 937-78300
Halilit P. Greenspoon &
Sons Ltd.
CRISTOFORI MUSIC PTE
LTD
PARAGUAY
NORWAY
SINGAPORE
Swee Lee Company
Blk 3014, Bedok Industrial Park E,
#02-2148, SINGAPORE 489980
TEL: 6243-9555
245 Prince Mohammad St.,
Amman 1118, JORDAN
TEL: (06) 464-1200
URUGUAY
POLAND
Easa Husain Al Yousifi Est.
Todo Musica S.A.
P. P. H. Brzostowicz
Francisco Acuna de Figueroa 1771
C.P.: 11.800
Montevideo, URUGUAY
TEL: (02) 924-2335
UL. Gibraltarska 4.
PL-03664 Warszawa POLAND
TEL: (022) 679 44 19
Theera Music Co. , Ltd.
VENEZUELA
330 Verng NakornKasem, Soi 2,
Bangkok 10100, THAILAND
TEL: (02) 2248821
Musicland Digital C.A.
Tecnologias Musica e Audio,
Roland Portugal, S.A.
TAIWAN
ROLAND TAIWAN
ENTERPRISE CO., LTD.
THAILAND
17 Werdmuller Centre,
Main Road, Claremont 7708
SOUTH AFRICA
P.O.BOX 23032, Claremont 7735,
SOUTH AFRICA
TEL: (021) 674 4030
ASIA
CHINA
Roland Shanghai Electronics
Co.,Ltd.
5F. No.1500 Pingliang Road
Shanghai, CHINA
TEL: (021) 5580-0800
Roland Shanghai Electronics
Co.,Ltd.
(BEIJING OFFICE)
10F. No.18 Anhuaxili
Chaoyang District, Beijing,
CHINA
TEL: (010) 6426-5050
HONG KONG
Tom Lee Music Co., Ltd.
Service Division
22-32 Pun Shan Street, Tsuen
Wan, New Territories,
HONG KONG
TEL: 2415 0911
INDIA
Rivera Digitec (India) Pvt. Ltd.
409, Nirman Kendra Mahalaxmi
Flats Compound Off. Dr. Edwin
Moses Road, Mumbai-400011,
INDIA
TEL: (022) 2493 9051
INDONESIA
VIETNAM
Saigon Music
138 Tran Quang Khai St.,
District 1
Ho Chi Minh City
VIETNAM
TEL: (08) 844-4068
AUSTRALIA/
NEW ZEALAND
AUSTRALIA
Roland Corporation
Australia Pty., Ltd.
38 Campbell Avenue
Dee Why West. NSW 2099
AUSTRALIA
TEL: (02) 9982 8266
NEW ZEALAND
Roland Corporation Ltd.
32 Shaddock Street, Mount Eden,
Auckland, NEW ZEALAND
TEL: (09) 3098 715
CENTRAL/LATIN
AMERICA
ARGENTINA
Instrumentos Musicales S.A.
Av.Santa Fe 2055
(1123) Buenos Aires
ARGENTINA
TEL: (011) 4508-2700
Rua San Jose, 780 Sala B
Parque Industrial San Jose
Cotia - Sao Paulo - SP, BRAZIL
TEL: (011) 4615 5666
JUAN Bansbach
Instrumentos Musicales
Ave.1. Calle 11, Apartado 10237,
San Jose, COSTA RICA
TEL: 258-0211
Cosmos Corporation
CHILE
1461-9, Seocho-Dong,
Seocho Ku, Seoul, KOREA
TEL: (02) 3486-8855
Comercial Fancy
140 & 142, Jalan Bukit Bintang
55100 Kuala Lumpur,MALAYSIA
TEL: (03) 2144-3333
PHILIPPINES
G.A. Yupangco & Co. Inc.
339 Gil J. Puyat Avenue
Makati, Metro Manila 1200,
PHILIPPINES
TEL: (02) 899 9801
S.A.
Rut.: 96.919.420-1
Nataniel Cox #739, 4th Floor
Santiago - Centro, CHILE
TEL: (02) 688-9540
EL SALVADOR
OMNI MUSIC
75 Avenida Norte y Final
Alameda Juan Pablo ,
Edificio No.4010 San Salvador,
EL SALVADOR
TEL: 262-0788
MEXICO
Casa Veerkamp, s.a. de c.v.
Av. Toluca No. 323, Col. Olivar
de los Padres 01780 Mexico D.F.
MEXICO
TEL: (55) 5668-6699
Al Emadi Co. (Badie Studio
& Stores)
FBS LINES
Piata Libertatii 1,
RO-4200 Gheorghehi
TEL: (095) 169-5043
MuTek
DENMARK
Roland Scandinavia A/S
Nordhavnsvej 7, Postbox 880,
DK-2100 Copenhagen
DENMARK
TEL: 3916 6200
FRANCE
Roland France SA
4, Rue Paul Henri SPAAK,
Parc de l'Esplanade, F 77 462 St.
Thibault, Lagny Cedex FRANCE
TEL: 01 600 73 500
FINLAND
GERMANY
Roland Elektronische
Musikinstrumente HmbH.
Oststrasse 96, 22844 Norderstedt,
GERMANY
TEL: (040) 52 60090
GREECE
STOLLAS S.A.
Music Sound Light
155, New National Road
Patras 26442, GREECE
TEL: 2610 435400
HUNGARY
3-Bogatyrskaya Str. 1.k.l
107 564 Moscow, RUSSIA
TEL: (095) 169 5043
SPAIN
Roland Electronics
de España, S. A.
Calle Bolivia 239, 08020
Barcelona, SPAIN
TEL: (93) 308 1000
SWEDEN
Roland Scandinavia A/S
SWEDISH SALES OFFICE
UKRAINE
TIC-TAC
Mira Str. 19/108
P.O. Box 180
295400 Munkachevo, UKRAINE
TEL: (03131) 414-40
UNITED KINGDOM
Roland (U.K.) Ltd.
Atlantic Close, Swansea
Enterprise Park, SWANSEA
SA7 9FJ,
UNITED KINGDOM
TEL: (01792) 702701
MIDDLE EAST
BAHRAIN
Moon Stores
IRELAND
CYPRUS
Audio House, Belmont Court,
Donnybrook, Dublin 4.
Republic of IRELAND
TEL: (01) 2603501
Adobe Corporation’s Acrobat Reader is required in order to read the PDF
file. You can download Acrobat Reader from the Adobe website (http://
www.adobe.com/). This address may change without notice.
Corniche Road, Aldossary Bldg.,
1st Floor, Alkhobar,
SAUDI ARABIA
P.O.Box 2154, Alkhobar 31952
SAUDI ARABIA
TEL: (03) 898 2081
SYRIA
Technical Light & Sound
Center
Khaled Ebn Al Walid St.
Bldg. No. 47, P.O.BOX 13520,
Damascus, SYRIA
TEL: (011) 223-5384
SWITZERLAND
Warehouse Area ‘DEPO’ Pf.83
H-2046 Torokbalint, HUNGARY
TEL: (23) 511011
Roland Ireland
aDawliah Universal
Electronics APL
Barkat muzik aletleri ithalat
ve ihracat Ltd Sti
Landstrasse 5, Postfach,
CH-4452 Itingen,
SWITZERLAND
TEL: (061) 927-8383
Radex Sound Equipment Ltd.
17, Diagorou Street, Nicosia,
CYPRUS
TEL: (022) 66-9426
For details on all functions and screens of the VariOS, refer to “VariOS Reference Manual” (VariOS_Reference_E.pdf), found in the English – Manual (PDF) folder of the CDROM. This manual can also be viewed by using the V-Producer “Help” command. This
manual also contains information such as a MIDI implementation chart for the VariOS.
SAUDI ARABIA
TURKEY
Roland (Switzerland) AG
User Guide
P.O. Box 62,
Doha, QATAR
TEL: 4423-554
Danvik Center 28, 2 tr.
S-131 30 Nacka SWEDEN
TEL: (0)8 702 00 20
No.16, Bab Al Bahrain Avenue,
P.O.Box 247, Manama 304,
State of BAHRAIN
TEL: 211 005
Roland East Europe Ltd.
Chahine S.A.L.
Gerge Zeidan St., Chahine Bldg.,
Achrafieh, P.O.Box: 16-5857
Beirut, LEBANON
TEL: (01) 20-1441
ROMANIA
Siemensstrasse 4, P.O. Box 74,
A-6063 RUM, AUSTRIA
TEL: (0512) 26 44 260
Houtstraat 3, B-2260, Oevel
(Westerlo) BELGIUM
TEL: (014) 575811
LEBANON
QATAR
RUSSIA
BELGIUM/HOLLAND/
LUXEMBOURG
Roland Benelux N. V.
Abdullah Salem Street,
Safat, KUWAIT
TEL: 243-6399
Cais Das Pedras, 8/9-1 Dto
4050-465 PORTO
PORTUGAL
TEL: (022) 608 00 60
Roland Austria GES.M.B.H.
Roland Brasil Ltda
COSTA RICA
BENTLEY MUSIC SDN BHD
AUSTRIA
Elannontie 5
FIN-01510 Vantaa, FINLAND
TEL: (0)9 68 24 020
BRAZIL
J1. Cideng Timur No. 15J-150
Jakarta Pusat
INDONESIA
TEL: (021) 6324170
MALAYSIA
EUROPE
Roland Scandinavia As,
Filial Finland
PT Citra IntiRama
KOREA
Av. Francisco de Miranda,
Centro Parque de Cristal, Nivel
C2 Local 20 Caracas
VENEZUELA
TEL: (212) 285-8586
PORTUGAL
KUWAIT
User Guide
That Other Music Shop
(PTY) Ltd.
Paul Bothner (PTY) Ltd.
JORDAN
AMMAN Trading Agency
Lilleakerveien 2 Postboks 95
Lilleaker N-0216 Oslo
NORWAY
TEL: 2273 0074
SOUTH AFRICA
P.O.Box 32918, Braamfontein 2017
Johannesbourg, SOUTH AFRICA
TEL: (011) 403 4105
Roland Scandinavia Avd.
Kontor Norge
J.E. Olear y ESQ. Manduvira
Asuncion PARAGUAY
TEL: (021) 492-124
Room 5, 9fl. No. 112 Chung Shan
N.Road Sec.2, Taipei, TAIWAN,
R.O.C.
TEL: (02) 2561 3339
11 Melle St., Braamfontein,
Johannesbourg, SOUTH AFRICA
Distribuidora De
Instrumentos Musicales
8 Retzif Ha'aliya Hashnya St.
Tel-Aviv-Yafo ISRAEL
TEL: (03) 6823666
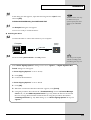
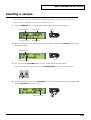
Listening to the demo song
fig.Cover
Siraselviler Caddesi Siraselviler
Pasaji No:74/20
Taksim - Istanbul, TURKEY
TEL: (0212) 2499324
4
1
U.A.E.
Zak Electronics & Musical
Instruments Co. L.L.C.
Zabeel Road, Al Sherooq Bldg.,
No. 14, Grand Floor, Dubai, U.A.E.
TEL: (04) 3360715
3
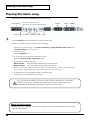
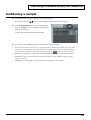
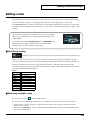
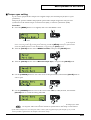
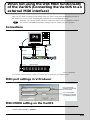
1. Hold down the [EXIT] button and press the [> (CURSOR)] button.
The demo play screen will appear.
NORTH AMERICA
2. Press the [VALUE] dial ([ENTER]) to start playback.
CANADA
3. Turn the [PITCH]/[TIME]/[FORMANT] knobs to adjust these parameters.
Roland Canada Music Ltd.
(Head Office)
5480 Parkwood Way Richmond
B. C., V6V 2M4 CANADA
TEL: (604) 270 6626
Roland Canada Music Ltd.
(Toronto Office)
170 Admiral Boulevard
Mississauga On L5T 2N6
CANADA
TEL: (905) 362 9707
U. S. A.
Roland Corporation U.S.
5100 S. Eastern Avenue
Los Angeles, CA 90040-2938,
U. S. A.
TEL: (323) 890 3700
IRAN
MOCO, INC.
No.41 Nike St., Dr.Shariyati Ave.,
Roberoye Cerahe Mirdamad
Tehran, IRAN
TEL: (021) 285-4169
As of April 1, 2003 (Roland)
03342356
2
’03-5-1N
Before using this unit, carefully read the sections entitled: “IMPORTANT SAFETY
INSTRUCTIONS” (p. 166),
“USING THE UNIT SAFELY” (pp. 2–3), and “IMPORTANT NOTES” (pp. 4–5).
These sections provide important information concerning the proper operation of
the unit. Additionally, in order to feel assured that you
have gained a good grasp of
every feature provided by
your new unit, User Guide
should be read in its entirety.
The manual should be saved
and kept on hand as a convenient reference.
4. Press the [ENTER] button to stop playback.
If you press the [EXIT] button, you're returned to the demo play screen.
*
In addition to the VariOS demo song described here, you can also listen to V-Producer demo songs (p. 47).
*
Since the demo song is stored in internal memory, it will not play if you have deleted the demo song data
from internal memory. In this case, refer to “Reloading the internal demo song into the VariOS”(p. 140).
*
Use of the song data supplied with this product for any purpose other than private, personal enjoyment
without the permission of the copyright holder is prohibited by law. Additionally, this data must not be
copied, nor used in a secondary copyrighted work without the permission of the copyright holder.
Copyright © 2003 ROLAND CORPORATION
All rights reserved. No part of this publication may be reproduced in any form without the
written permission of ROLAND CORPORATION.
To resize thickness, move all items on the front cover
and center registration marks to left or right.
For EU Countries
USING THE UNIT SAFELY
This product complies with the requirements of European Directives EMC 89/336/EEC and LVD 73/23/EEC.
For the USA
The
symbol alerts the user to important instructions
or warnings.The specific meaning of the symbol is
determined by the design contained within the
triangle. In the case of the symbol at left, it is used for
general cautions, warnings, or alerts to danger.
Used for instructions intended to alert
the user to the risk of death or severe
injury should the unit be used
improperly.
Used for instructions intended to alert
the user to the risk of injury or material
damage should the unit be used
improperly.
* Material damage refers
other adverse effects
respect to the home
furnishings, as well
animals or pets.
The
symbol alerts the user to items that must never
be carried out (are forbidden). The specific thing that
must not be done is indicated by the design contained
within the circle. In the case of the symbol at left, it
means that the unit must never be disassembled.
to damage or
caused with
and all its
to domestic
The ● symbol alerts the user to things that must be
carried out. The specific thing that must be done is
indicated by the design contained within the circle. In
the case of the symbol at left, it means that the powercord plug must be unplugged from the outlet.
FEDERAL COMMUNICATIONS COMMISSION
RADIO FREQUENCY INTERFERENCE STATEMENT
This equipment has been tested and found to comply with the limits for a Class B digital device, pursuant to Part 15 of the
FCC Rules. These limits are designed to provide reasonable protection against harmful interference in a residential
installation. This equipment generates, uses, and can radiate radio frequency energy and, if not installed and used in
accordance with the instructions, may cause harmful interference to radio communications. However, there is no guarantee
that interference will not occur in a particular installation. If this equipment does cause harmful interference to radio or
television reception, which can be determined by turning the equipment off and on, the user is encouraged to try to correct the
interference by one or more of the following measures:
– Reorient or relocate the receiving antenna.
– Increase the separation between the equipment and receiver.
– Connect the equipment into an outlet on a circuit different from that to which the receiver is connected.
– Consult the dealer or an experienced radio/TV technician for help.
This device complies with Part 15 of the FCC Rules. Operation is subject to the following two conditions:
(1) This device may not cause harmful interference, and
(2) This device must accept any interference received, including interference that may cause undesired operation.
Tested To Comply With FCC Standards
008a
001
• Before using this unit, make sure to read the
instructions below, and the Owner’s Manual.
..........................................................................................................
002a
• Do not open or perform any internal modifications on the unit.
• The unit should be connected to a power supply
only of the type described in the operating instructions, or as marked on the side of unit.
..........................................................................................................
008ey
..........................................................................................................
..........................................................................................................
009
004
• Never use or store the unit in places that are:
• Subject to temperature extremes (e.g., direct
sunlight in an enclosed vehicle, near a heating
duct, on top of heat-generating equipment); or
are
• Damp (e.g., baths, washrooms, on wet floors);
or are
• Humid; or are
• Exposed to rain; or are
• Dusty; or are
• Subject to high levels of vibration.
..........................................................................................................
• Do not excessively twist or bend the power cord,
nor place heavy objects on it. Doing so can
damage the cord, producing severed elements and
short circuits. Damaged cords are fire and shock
hazards!
..........................................................................................................
..........................................................................................................
006
• When using the unit with a rack or stand recommended by Roland, the rack or stand must be
carefully placed so it is level and sure to remain
stable. If not using a rack or stand, you still need
to make sure that any location you choose for
placing the unit provides a level surface that will
properly support the unit, and keep it from
wobbling.
..........................................................................................................
2
For Canada
NOTICE
This Class B digital apparatus meets all requirements of the Canadian Interference-Causing Equipment Regulations.
AVIS
Cet appareil numérique de la classe B respecte toutes les exigences du Règlement sur le matériel brouilleur du Canada.
010
• This unit, either alone or in combination with an
amplifier and headphones or speakers, may be
capable of producing sound levels that could
cause permanent hearing loss. Do not operate for
a long period of time at a high volume level, or at
a level that is uncomfortable. If you experience
any hearing loss or ringing in the ears, you should
immediately stop using the unit, and consult an
audiologist.
..........................................................................................................
011
• Do not allow any objects (e.g., flammable material,
coins, pins); or liquids of any kind (water, soft
drinks, etc.) to penetrate the unit.
005
• This unit should be used only with a rack or stand
that is recommended by Roland.
Unauthorized changes or modification to this system can void the users authority to operate this equipment.
This equipment requires shielded interface cables in order to meet FCC class B Limit.
• Use only the attached power-supply cord.
003
• Do not attempt to repair the unit, or replace parts
within it (except when this manual provides
specific instructions directing you to do so). Refer
all servicing to your retailer, the nearest Roland
Service Center, or an authorized Roland
distributor, as listed on the "Information" page.
..........................................................................................................
FOR HOME OR OFFICE USE
..........................................................................................................
013
• In households with small children, an adult
should provide supervision until the child is
capable of following all the rules essential for the
safe operation of the unit.
..........................................................................................................
014
• Protect the unit from strong impact.
(Do not drop it!)
..........................................................................................................
For the USA
DECLARATION OF CONFORMITY
Compliance Information Statement
Model Name :
Type of Equipment :
Responsible Party :
Address :
Telephone :
VariOS
Sound Module
Roland Corporation U.S.
5100 S.Eastern Avenue, Los Angeles, CA 90040-2938
(323)890-3700
015
• Do not force the unit’s power-supply cord to share
an outlet with an unreasonable number of other
devices. Be especially careful when using
extension cords—the total power used by all
devices you have connected to the extension
cord’s outlet must never exceed the power rating
(watts/amperes) for the extension cord. Excessive
loads can cause the insulation on the cord to heat
up and eventually melt through.
..........................................................................................................
016
• Before using the unit in a foreign country, consult
with your retailer, the nearest Roland Service
Center, or an authorized Roland distributor, as
listed on the “Information” page.
..........................................................................................................
023
• DO NOT play a CD-ROM disc on a conventional
audio CD player. The resulting sound may be of a
level that could cause permanent hearing loss.
Damage to speakers or other system components
may result.
..........................................................................................................
026
• Do not put anything that contains water (e.g.,
flower vases) on this unit. Also, avoid the use of
insecticides, perfumes, alcohol, nail polish, spray
cans, etc., near the unit. Swiftly wipe away any
liquid that spills on the unit using a dry, soft cloth.
..........................................................................................................
101a
• The unit should be located so that its location or
position does not interfere with its proper ventilation.
..........................................................................................................
102b
• Always grasp only the plug on the power-supply
cord when plugging into, or unplugging from, an
outlet or this unit.
..........................................................................................................
103a
• At regular intervals, you should unplug the power
plug and clean it by using a dry cloth to wipe all
dust and other accumulations away from its
prongs. Also, disconnect the power plug from the
power outlet whenever the unit is to remain
unused for an extended period of time. Any
accumulation of dust between the power plug and
the power outlet can result in poor insulation and
lead to fire.
..........................................................................................................
104
• Try to prevent cords and cables from becoming
entangled. Also, all cords and cables should be
placed so they are out of the reach of children.
..........................................................................................................
106
• Never climb on top of, nor place heavy objects on
the unit.
..........................................................................................................
107b
• Never handle the power cord or its plugs with wet
hands when plugging into, or unplugging from,
an outlet or this unit.
..........................................................................................................
108a
• Before moving the unit, disconnect the power
plug from the outlet, and pull out all cords from
external devices.
..........................................................................................................
109a
• Before cleaning the unit, turn off the power and
unplug the power cord from the outlet.
..........................................................................................................
110a
• Whenever you suspect the possibility of lightning
in your area, pull the plug on the power cord out
of the outlet.
..........................................................................................................
118
• Whenever you've removed any screws—whether
it be when connecting something to the ground
terminal, or when installing a rack-mount adaptor
—be sure to place the screws out of reach of small
children, so they won’t be swallowed accidentally.
..........................................................................................................
3
IMPORTANT NOTES
291b
In addition to the items listed under “IMPORTANT SAFETY INSTRUCTIONS” and “USING THE UNIT SAFELY” on pages 2,
3 and 166, please read and observe the following:
Power Supply
Additional Precautions
301
551
• Do not use this unit on the same power circuit with any
device that will generate line noise (such as an electric
motor or variable lighting system).
• Please be aware that the contents of memory can be
irretrievably lost as a result of a malfunction, or the
improper operation of the unit. To protect yourself against
the risk of loosing important data, we recommend that
you periodically save a backup copy of important data
you have stored in the unit’s memory on a PC card.
307
• Before connecting this unit to other devices, turn off the
power to all units. This will help prevent malfunctions
and/or damage to speakers or other devices.
308
552
• Although the LCD and LEDs are switched off when the
POWER switch is switched off, this does not mean that the
unit has been completely disconnected from the source of
power. If you need to turn off the power completely, first
turn off the POWER switch, then unplug the power cord
from the power outlet. For this reason, the outlet into
which you choose to connect the power cord's plug
should be one that is within easy reach.
• Unfortunately, it may be impossible to restore the contents
of data that was stored on a PC card once it has been lost.
Roland Corporation assumes no liability concerning such
loss of data.
Placement
• Never strike or apply strong pressure to the display.
351
556
553
• Use a reasonable amount of care when using the unit’s
buttons, sliders, or other controls; and when using its jacks
and connectors. Rough handling can lead to malfunctions.
554
• Using the unit near power amplifiers (or other equipment
containing large power transformers) may induce hum.
To alleviate the problem, change the orientation of this
unit; or move it farther away from the source of interference.
• When connecting / disconnecting all cables, grasp the
connector itself—never pull on the cable. This way you
will avoid causing shorts, or damage to the cable’s
internal elements.
352a
• A small amount of heat will radiate from the unit during
normal operation.
• This device may interfere with radio and television
reception. Do not use this device in the vicinity of such
receivers.
352b
• Noise may be produced if wireless communications
devices, such as cell phones, are operated in the vicinity of
this unit. Such noise could occur when receiving or initiating a call, or while conversing. Should you experience
such problems, you should relocate such wireless devices
so they are at a greater distance from this unit, or switch
them off.
354a
• Do not expose the unit to direct sunlight, place it near
devices that radiate heat, leave it inside an enclosed
vehicle, or otherwise subject it to temperature extremes.
Excessive heat can deform or discolor the unit.
557
558a
• To avoid disturbing your neighbors, try to keep the unit’s
volume at reasonable levels. You may prefer to use
headphones, so you do not need to be concerned about
those around you (especially when it is late at night).
559a
• When you need to transport the unit, package it in the box
(including padding) that it came in, if possible. Otherwise,
you will need to use equivalent packaging materials.
562
• Use a cable from Roland to make the connection. If using
some other make of connection cable, please note the
following precautions.
355
• Some connection cables contain resistors. Do not use
cables that incorporate resistors for connecting to this
unit. The use of such cables can cause the sound level
to be extremely low, or impossible to hear. For information on cable specifications, contact the manufacturer of the cable.
• To avoid possible breakdown, do not use the unit in a wet
area, such as an area exposed to rain or other moisture.
Maintenance
401a
• For everyday cleaning wipe the unit with a soft, dry cloth
or one that has been slightly dampened with water. To
remove stubborn dirt, use a cloth impregnated with a
mild, non-abrasive detergent. Afterwards, be sure to wipe
the unit thoroughly with a soft, dry cloth.
402
• Never use benzine, thinners, alcohol or solvents of any
kind, to avoid the possibility of discoloration and/or
deformation.
4
563
• Unauthorized duplication, reproduction, hiring, and
lending prohibited.
564
• Before you open the included CD-ROM, you must read
the “license agreement.” Opening the CD-ROM will be
taken to mean your acceptance of the license agreement.
Using PC Cards
704
• Carefully insert the PC card all the way in—until it is
firmly in place.
fig.PC card
Eject
Supported cards:
PC card, Compact Flash Type II compliant
You can use microdrives or media conversion cards that
are compliant with "Compact Flash Type II."
Interface specification:
PC Card ATA
Operating voltage:
5V
* Cards that operate on 5 V or 5 V/3.3 V can be inserted.
Cards that operate only on 3.3 V cannot be used.
705
• Never touch the terminals of the PC card. Also, avoid
getting the terminals dirty.
• In order to use a PC card, you must first
format it using the VariOS, according to the
procedure described in “8-5 Format” (p. 123).
of this document.
• Do not insert cards whose specifications
differ from those listed above. Doing so may
damage the device.
• Never insert or remove a PC card while data
is being written to the card or while a
formatting operation is being executed. Doing
so may damage the device.
Handling CD-ROMs
801
• Avoid touching or scratching the shiny underside
(encoded surface) of the disc. Damaged or dirty CD-ROM
discs may not be read properly. Keep your discs clean
using a commercially available CD cleaner.
Copyright
851
• Unauthorized recording, distribution, sale, lending, public
performance, broadcasting, or the like, in whole or in part,
of a work (musical composition, video, broadcast, public
performance, or the like) whose copyright is held by a
third party is prohibited by law.
853
• Do not use this unit for purposes that could infringe on a
copyright held by a third party. We assume no responsibility whatsoever with regard to any infringements of
third-party copyrights arising through your use of this
unit.
204
* Microsoft and Windows are registered trademarks of Microsoft Corporation.
206e
* Screen shots in this documents are reprinted with permission from Microsoft Corporation.
206j
* Windows® is known officially as: “Microsoft® Windows® operating system.”
207
* Apple and Macintosh are registered trademark of Apple Computer, Inc.
209
* MacOS is a trademark of Apple Computer, Inc.
231
* OMS is a registered trademark of Opcode Systems, Inc.
232
* FreeMIDI is a trademark of Mark of the Unicorn, Inc.
233
* VST is a trademark of Steinberg Media Technologies AG.
220
* All product names mentioned in this document are trademarks or registered trademarks of their respective owners.
5
Contents
IMPORTANT NOTES ...............................................................................4
Contents ..................................................................................................6
Introduction ...........................................................................................11
Check the contents of the package......................................................................................................... 12
Startup ......................................... 13
Names of Things and What They Do...................................................14
Front Panel................................................................................................................................................. 14
Rear Panel .................................................................................................................................................. 15
V-Producer screen .................................................................................................................................... 16
Restoring the factory settings (Factory Reset)...................................................................................... 18
Connections with external devices .....................................................19
Attaching the rackmount adaptors ........................................................................................................ 19
Connecting MIDI and audio devices..................................................................................................... 20
Installation .............................................................................................21
Windows users.......................................................................................................................................... 21
Installing V-Producer ................................................................................................................... 21
Installing the Driver...................................................................................................................... 22
Macintosh users ........................................................................................................................................ 35
Mac OS X users.............................................................................................................................. 35
Mac OS 9 users............................................................................................................................... 37
About the included MIDI drivers ............................................................................................... 38
Installing OMS............................................................................................................................... 38
Installing V-Producer ................................................................................................................... 39
Connections and OMS setup ....................................................................................................... 40
MIDI and audio settings........................................................................44
Listening to the demo songs ...............................................................47
Loading the demo songs ......................................................................................................................... 47
Playing the demo song ............................................................................................................................ 48
Turning the VariOS on/off ....................................................................49
Turning on the VariOS when connected to a computer ..................................................................... 49
Turning off the VariOS when connected to a computer..................................................................... 50
6
Contents
Operation Guide: Software
(V-Producer) ................................. 51
An overview of V-Producer ..................................................................52
What is VariPhrase?...................................................................................................................... 54
What is encoding? ......................................................................................................................... 55
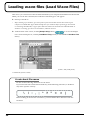
Loading wave files (Load Wave Files) ................................................56
A note about file names................................................................................................................ 56
Make settings for samples and play them (Sample List) ..................58
Auditioning a sample .............................................................................................................................. 59
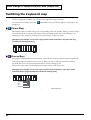
Switching the keyboard map .................................................................................................................. 60
(Phrase Map).................................................................................................................................. 60
(Groove Map)................................................................................................................................. 60
Deleting a sample ..................................................................................................................................... 61
Copying a sample..................................................................................................................................... 61
Editing the sample parameters (Sample Edit)....................................62
Key Assign mode .......................................................................................................................... 62
Playback mode............................................................................................................................... 63
Robot (robot voice switch) ........................................................................................................... 64
Reset ................................................................................................................................................ 64
Re-encoding a sample (Wave Edit) .....................................................65
Waveform preview ....................................................................................................................... 65
Changing the encoding type ....................................................................................................... 66
Changing the original tempo ...................................................................................................... 66
Changing the location of a event ................................................................................................ 67
Creating a song (Vari Track) ................................................................68
Changing the tempo................................................................................................................................. 68
Setting the time signature........................................................................................................................ 68
Arranging samples ................................................................................................................................... 69
Editing a frame.......................................................................................................................................... 70
Select the frame to edit ................................................................................................................. 70
Moving a frame ............................................................................................................................. 71
Changing the length of a frame................................................................................................... 71
Copying a frame............................................................................................................................ 71
Deleting a frame ............................................................................................................................ 72
Loop playback........................................................................................................................................... 73
Using the Quick Loop function to set the loop region............................................................. 73
Editing the settings of a frame (Frame Properties).............................................................................. 74
Solo/Mute/Volume/Pan settings ......................................................................................................... 74
Playing your MIDI keyboard and recording (RealTime Rec)............................................................ 75
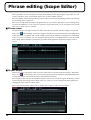
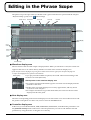
Phrase editing (Scope Editor)..............................................................76
Phrase scope................................................................................................................................... 76
Groove scope ................................................................................................................................. 76
Editing in the Phrase Scope ................................................................77
Waveform display area ................................................................................................................ 77
Note display area .......................................................................................................................... 77
Controller display area................................................................................................................. 77
7
Contents
Editing the Pitch/Time/Formant/Dynamics ...................................................................................... 78
Erasing controller data ................................................................................................................. 80
Editing notes ............................................................................................................................................. 81
Grid Snap setting........................................................................................................................... 81
Selecting multiple notes ............................................................................................................... 81
Changing the pitch (fixed movement of the note upward or downward)........................... 82
Adjusting the legato timing ......................................................................................................... 82
Moving a note to another position ............................................................................................. 82
Adding a note ................................................................................................................................ 82
Changing the length of a note ..................................................................................................... 83
Erasing a note ................................................................................................................................ 83
Copying a note............................................................................................................................... 83
Dividing a note .............................................................................................................................. 83
Joining two notes........................................................................................................................... 84
Editing the velocity ....................................................................................................................... 84
Modify Recording..................................................................................................................................... 85
Quantize..................................................................................................................................................... 86
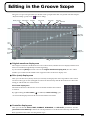
Editing in the Groove Scope................................................................87
Original waveform display area ................................................................................................. 87
Slice (note) display area................................................................................................................ 87
Controller display area................................................................................................................. 87
Editing the Pitch/Time/Formant/Dynamics ...................................................................................... 88
Editing a slice (note)................................................................................................................................. 88
Selecting multiple slices ............................................................................................................... 88
Moving a slice ................................................................................................................................ 88
Adding a slice ................................................................................................................................ 89
Adjusting the length of a slice ..................................................................................................... 89
Deleting a slice............................................................................................................................... 89
Copying a slice by dragging and dropping .............................................................................. 89
Copying a slice with the Copy and Paste commands.............................................................. 90
Random .......................................................................................................................................... 90
Modify Recording..................................................................................................................................... 90
Quantize..................................................................................................................................................... 90
Saving ....................................................................................................91
Saving a song ............................................................................................................................................ 91
Exporting a wave file ............................................................................................................................... 91
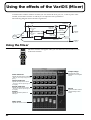
Using the effects of the VariOS (Mixer) ..............................................92
Using the Mixer ........................................................................................................................................ 92
Using effects .............................................................................................................................................. 93
MULTI (Multi-effect) .................................................................................................................... 93
CHORUS ........................................................................................................................................ 93
REVERB .......................................................................................................................................... 93
Switching the effect type .............................................................................................................. 94
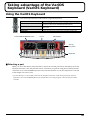
Taking advantage of the VariOS Keyboard (VariOS Keyboard) .......95
Using the VariOS Keyboard.................................................................................................................... 95
Selecting a part .............................................................................................................................. 95
Turning a note on/off from your computer keyboard............................................................ 96
Surface controller .......................................................................................................................... 96
Resetting PITCH/TIME/FORMANT ........................................................................................ 97
Inputting TIME zero ..................................................................................................................... 97
Note name display ........................................................................................................................ 97
8
Contents
Operation guide:
Sound module (VariOS) ................ 99
An overview of the VariOS .................................................................100
Internal structure of the VariOS ........................................................................................................... 100
“Samples” and “performances”................................................................................................ 100
To play sounds ............................................................................................................................ 100
Saving sounds.............................................................................................................................. 100
What is “keyboard map”?.......................................................................................................... 100
Sample playback ......................................................................................................................... 100
Maximum sample time............................................................................................................... 100
Maximum polyphony................................................................................................................. 100
Basic operation of the VariOS ...........................................................102
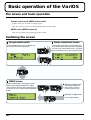
The screen and basic operation ............................................................................................................ 102
Switching the screen .............................................................................................................................. 102
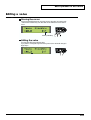
Editing a value ........................................................................................................................................ 103
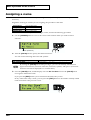
Assigning a name ................................................................................................................................... 104
Selecting a sample .................................................................................................................................. 105
Changing the tempo of a sample ......................................................................................................... 106
Tempo sync setting ..................................................................................................................... 107
Playing the VariOS from a connected keyboard (MIDI Mode) ....................................................... 108
PC mode ....................................................................................................................................... 108
Internal mode............................................................................................................................... 108
Changing how the sounds are produced............................................................................................ 110
Changing the Keyboard Map setting ....................................................................................... 110
Changing the Key Assign Mode ............................................................................................... 110
Changing the Playback Mode ................................................................................................... 111
Loading and saving................................................................................................................................ 111
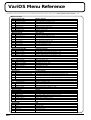
VariOS Menu Reference .....................................................................112
Menu 1 Sample Edit (sample settings) ................................................................................................ 113
Menu 2 Part Edit (part settings) ........................................................................................................... 115
Menu 3 Controller Edit (Controller settings) ..................................................................................... 116
Menu 4 Effect Edit (Effect settings)...................................................................................................... 119
Menu 5 Tune (Tuning settings) ............................................................................................................ 120
Menu 6 Utility ......................................................................................................................................... 120
Menu 7 System........................................................................................................................................ 121
Menu 8 DISK ........................................................................................................................................... 121
9
Contents
Appendix ................................... 125
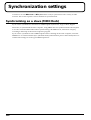
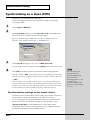
Synchronization settings ...................................................................126
Synchronizing as a slave (MIDI Clock) ............................................................................................... 126
V-Producer synchronization settings....................................................................................... 127
ProTools........................................................................................................................................ 128
Logic Audio.................................................................................................................................. 128
Cubase VST .................................................................................................................................. 129
Digital Performer ........................................................................................................................ 130
SONAR 2.0 ................................................................................................................................... 133
Synchronizing as a slave (MTC)........................................................................................................... 134
Synchronization settings on the master device ...................................................................... 134
Synchronizing as the master (MIDI Clock)......................................................................................... 135
Synchronization settings on the slave device(s) ..................................................................... 135
Synchronizing as the master (MTC) .................................................................................................... 136
Synchronization settings on the slave device(s) ..................................................................... 136
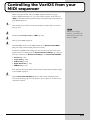
Controlling the VariOS from your MIDI sequencer ..........................137
Using your MIDI sequencer to play data (SMF)
created by V-Producer........................................................................138
Export SMF data.......................................................................................................................... 138
Load the SMF data into your MIDI sequencer ....................................................................... 138
When not using the USB MIDI functionality of the VariOS
(Connecting the VariOS to an external MIDI interface) ...................139
Connections ............................................................................................................................................. 139
MIDI port settings in V-Producer ........................................................................................................ 139
MIDI MODE setting on the VariOS ..................................................................................................... 139
Reloading the internal demo song into the VariOS .........................140
Troubleshooting..................................................................................142
Problems related to the USB driver (Windows) ................................................................................ 142
Problems related to the USB driver (Macintosh) ............................................................................... 145
Problems when using the VariOS ........................................................................................................ 146
Deleting the driver ................................................................................................................................. 154
List of messages.................................................................................156
Error messages displayed by V-Producer........................................................................................... 156
VariOS (sound module) related errors..................................................................................... 156
V-Producer errors........................................................................................................................ 156
Errors displayed by the VariOS (sound module) .............................................................................. 158
MIDI-related ................................................................................................................................ 158
Hardware-related........................................................................................................................ 158
Disk and file-related ................................................................................................................... 158
List of shortcuts..................................................................................160
Specifications......................................................................................162
VariOS: Open System Module .................................................................................................. 162
INDEX ...................................................................................................163
10
Introduction
Thank you, and congratulations on your choice of the VariOS.
The VariOS is a completely new type of audio-based music production environment, which
consists of a VariPhrase sound generator (VariOS) and software (V-Producer for VariOS).
VariPhrase not only lets you edit the tempo and pitch of audio material as easily as you can with
MIDI data, it also provides pinpoint control—graphically, and in real time—over any region
within a phrase sample that you choose to focus in on. Processes that were difficult to perform
on previous audio-based music production systems can now be performed with breathtaking
ease on the VariOS.
Conventions followed in this manual
•
indicates Windows-related explanations.
•
and MacOS indicate MacOS-related explanations.
11
Introduction
Check the contents of the package
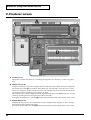
This package contains the following items. When you open the package, check that no items are
missing. If any items are missing, please contact your dealer.
❏ VariOS
fig.01-00aPanel_50
❏ AC cable
This is the only AC cable you should use with the VariOS.
Do not use any AC cable other than the supplied one, since doing so may cause malfunction.
❏ Rackmount adaptor
Use this if you want to install the VariOS in an audio rack.
For details on how to attach the adaptor, refer to “Attaching the rackmount adaptors” (p. 19).
❏ VariOS CD-ROM
This CD-ROM contains the VariOS drivers and software (V-Producer).
* Please be sure to read the included license agreement before you open the CD-ROM case.
* Do not touch the shiny side (data side) of the disc, or allow it to become scratched. The disc may become
unreadable if you do so. If the disc gets dirty, use a commercially available CD cleaner to clean it.
❏ License agreement
This license agreement permits you to use specific software whose copyright is owned by
Roland Corporation. You must read this before you open the CD-ROM case.
■ VariOS User Guide
This is the manual you are holding. It describes how to connect the VariOS and get it set up,
guides you through its basic operation, and offers solutions for some of the problems you may
run into.
* For details on all functions and screens of the VariOS, refer to "VariOS Reference Manual"
(VariOS_Reference_E.pdf), found in the English -- Manual (PDF) folder of the CD-ROM. This manual
can also be viewed by using the V-Producer "Help" command. This manual also contains information
such as a MIDI implementation chart for the VariOS. Adobe Corporation’s Acrobat Reader is required
in order to read the PDF file.
You can download Acrobat Reader from the Adobe website (http://www.adobe.com/). This address may
change without notice.
12
Startup
This section introduces the basic concepts of the VariOS, and explains how to install the
software and drivers, and how to make connections with external devices.
13
Names of Things and What They Do
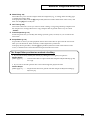
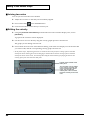
Front Panel
fig.01-01PanelFront_75
E F
A
B
C
D
G
H
I
J
K
A. PC Card Slot
This is used when saving VariOS data (p. 122).
B. PITCH/TIME/FORMANT Knobs
PITCH (C1) Knob
TIME (C2) Knob
FORMANT (C3) Knob
Modifies the pitch.
Modifies the playback speed (time).
Modifies the tonal character (formant).
You are free to assign the parameter that will be adjusted by each knob (p. 116). The above
assignments are the power-on defaults.
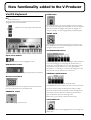
C. Indicators
MIDI
TEMPO
PC
USB
Lights when a MIDI message is received.
Blinks at the tempo (p. 106).
Lights when the MIDI mode of the VariOS is “PC” (p. 108).
Lights when connected to a computer via USB.
D. Display
Various information is shown here according to the operations you perform.
E. MENU Button
Accesses the various functions of the VariOS.
F. EXIT Button
Returns you to the previously displayed screen (p. 102). Depending on the content of the menu,
this button also functions as CANCEL.
G. CURSOR Buttons
Used to move the cursor (p. 103).
H. VALUE Dial
Turn this dial to edit a value. Pressing the VALUE dial will function as ENTER (confirm). If you
turn the VALUE dial while pressing it, the value will change in larger steps (p. 103).
I.
VOLUME Knob
Adjusts the overall volume that is output from the MAIN OUT jacks and the HEADPHONE jack.
By pressing the VOLUME knob you can audition (preview) the current sample.
J. PHONES Jack
You can connect a set of headphones to this jack. Use headphones with an impedance in the
range of 32–600 ohms.
fig.1-01a
K. POWER Switch
Turns the power of the VariOS on/off (p. 49). The
power is on when the switch is in the inward
position, and off when the switch is in the outward
position.
14
Power is on when
switch is depressed
Power is off when
switch is released
Names of Things and What They Do
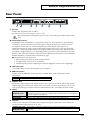
Rear Panel
fig.01-02PanelRear_75
L
M
N
O
P
Q
R
L. AC Inlet
Connect the supplied power cord here.
* For details on the power consumption, refer to p. 162.
The unit should be connected to a power source only of the type marked on the side of
unit.
M. Grounding Terminal
Depending on the circumstances of a particular setup, you may experience a discomforting
sensation, or perceive that the surface feels gritty to the touch when you touch this device,
microphones connected to it, or the metal portions of other objects. This is due to an
infinitesimal electrical charge, which is absolutely harmless. However, if you are concerned
about this, connect the ground terminal (see figure) with an external ground. When the unit is
grounded, a slight hum may occur, depending on the particulars of your installation. If you are
unsure of the connection method, contact the nearest Roland Service Center, or an authorized
Roland distributor, as listed on the “Information” page.
● Unsuitable places for connection
• Water pipes (may result in shock or electrocution)
• Gas pipes (may result in fire or explosion)
• Telephone-line ground or lightning rod (may be dangerous in the event of lightning)
N. USB Connector
Use a USB cable to connect the VariOS to your computer.
O. MIDI Connectors
Connect external MIDI devices here (p. 20). Use MIDI cables (sold separately) to make
connections.
IN
OUT
Receives MIDI messages from an external device.
Transmits MIDI messages to an external device.
P. DIGITAL OUT
These jacks output digital audio signals (stereo). Two types are provided; optical and coaxial.
Output settings are made in the screen where you specify the effect signal flow (p. 92, p. 119).
You can use both types of OUT connector simultaneously; they will output the same sound.
Q. INPUT
AUDIO IN Jacks
LEVEL Knob
GAIN switch
Connect a line-level source or mic here if you want to input audio into the VariOS.
* The audio signal that is input to AUDIO IN will be mixed with the sound of the VariOS and output from MAIN OUT.
Adjusts the level at which audio is input from the AUDIO IN jacks.
Switches the AUDIO IN input jacks between line level and mic level.
R. OUTPUT
Connect your amp or mixer to these jacks. Output settings are made in the screen where you
specify the effect signal flow (p. 92, p. 119).
DIRECT OUT Jacks
MAIN OUT Jacks
Output the sound unprocessed by effects or only the multi-effect sound in stereo.
Output the audio signal in stereo. If you want to use monaural output, connect only
the L jack.
15
Names of Things and What They Do
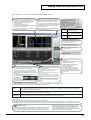
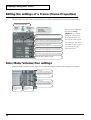
V-Producer screen
fig.02-03_75
A
E
F
d
b'
C
B
D
b
g
G
A. Locator (p. 47)
The locator contains functions for controlling the playback of V-Producer, such as song play/
stop.
B. Sample List (p. 58)
Sample List displays a list of the samples that are loaded into the VariOS. To load a sample into
the VariOS, press the [b’] (Load Wave Files) button (p. 56) and load a wave file (.wav or aiff)
from your computer. At this time the wave file will automatically be converted (encoded) into
a format that allows VariPhrase processing to be used.
The samples shown in the sample list can be played directly from your MIDI keyboard. You can
also drag and drop them to arrange them in the Vari Track.
To display the Sample List, click the [b] (Sample Info) button located at the bottom of the screen.
C. Sample Edit (p. 62)
Sample Edit lets you set various parameters for the samples in the sample list. These settings
determine how the sample will sound.
To display Sample Edit, click the [b] (Sample Info) button located at the bottom of the screen.
16
Names of Things and What They Do
D. Wave Edit (p. 65)
Wave Edit lets you re-encode samples from the sample list (e.g., to change their encoding type
or modify the tempo data).
To display Wave Edit, click the [b] (Sample Info) button located at the bottom of the screen, and
then click the [d] (Wave Edit) tab.
E. Vari Track (p. 68)
Vari Track is the basic screen you will use when creating a song. Drag and drop samples from
the sample list to arrange them into a song. Samples that are placed in this way are called
“frames.”
F. Frame Properties (p. 74)
Frame Properties lets you modify the settings (volume, pitch, location, etc.) of a frame in the
Vari Track.
G. Scope Editor (p. 76)
Scope Editor is where you edit playback data for the frames that are placed in the Vari Track.
Here you can edit Pitch, Time, Formant, volume (Dynamics), and notes.
To display the Scope Editor, click the [g] (Scope Editor) button located at the bottom of the
screen, or double-click a frame that has been placed in the Vari Track.
The Scope Editor provides two methods of editing.
• If you want to freely modify the melody by editing the notes (pitch) of a phrase:
Phrase Scope
[Edits apply to] .......... Green frames that were placed with the sample list Keyboard Map (p. 60)
set to [P].
• If you want to divide a phrase into events and change the playback order:
Groove Scope
[Edits apply to] .......... Purple frames that were placed with the sample list Keyboard Map (p.
60) set to [G].
17
Names of Things and What They Do
Restoring the factory settings (Factory Reset)
Here’s how to restore the VariOS to the factory-set condition.
1. Press the [MENU] button so it’s lighted. The MENU screen will appear.
*
Initially, the MENU screen will show the most recently selected menu. You need to go to the top level
menu. You can get there by pressing and continuing to hold the [MENU] button for a few moments
(when the [MENU] button is not illuminated), or by pressing the [EXIT] button.
2. Turn the [VALUE] knob to select “Menu 6 Utility,” and press the [VALUE] knob.
3. Turn the [VALUE] knob to select “Menu 6-4 Factory Reset,” and press the [VALUE]
knob.
4. The display will ask “Factory Reset OK?,” so press the [VALUE] knob.
*
*
18
If you press the [EXIT] button, the Factory Reset operation will be cancelled.
This operation will not restore the internal demo song of the VariOS. Please read “Reloading the
VariOS internal demo song” (p. 140).
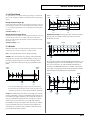
Connections with external devices
Attaching the rackmount adaptors
If you want to install the VariOS in a rack, attach the rackmount adaptors as shown in the
diagram.
fig.angle
1
2
Remove three screws (on each side) from the right and left panels of the VariOS.
Using the screws you removed in step 1, attach the rackmount brackets to the VariOS.
You must use the screws that you removed. Do not use any other screws.
19
Connections with external devices
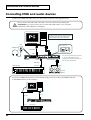
Connecting MIDI and audio devices
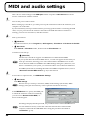
Connect your MIDI and audio devices to the VariOS as shown in the diagram below.
Do not connect the USB cable at this time. You will connect it later during the
“Installation” (p. 21) procedure. (If you connect the USB cable to your computer,
installation of the USB driver will begin.)
fig.02-connect.eps
* To prevent malfunction and/or damage to
speakers or other devices, always turn down
the volume, and turn off the power on all
devices before making any connections.
Front
Set the GAIN switch to LINE, and
adjust the INPUT level.
Audio
outputs
USB connector
Headphones
USB cable
USB
INPUT
*
VariOS
MIDI IN
OUTPUT(MAIN)
You can use the Audio Input Jack setting
(p. 121) to enable/disable the jacks.
Disabling this (Disable) will improve the
S/N ratio of the MAIN OUT.
MIDI cable
MIDI keyboard
INPUT
MIDI OUT
Powered
Speaker
If you have a MIDI interface that you are already using, you may connect your MIDI keyboard
to the MIDI interface as shown below.
fig.02-MIDI.eps
MIDI interface
MIDI IN
USB cable
MIDI cable
VariOS
MIDI OUT
20
MIDI keyboard
USB
Installation
This chapter explains how to install the software and connect the VariOS
with your equipment.
The installation procedure will differ depending on your system. Please
proceed to one of the following sections, depending on the system you use.
• Windows users.....................................................p. 21
• Macintosh users ...................................................p. 35
Windows users
■ Installing V-Producer
If you are using Windows XP Professional/2000, you must log on using a
user name with an administrative account type (e.g., Administrator).
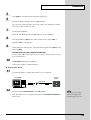
1
Insert the CD-ROM into the CD-ROM drive of your computer.
* Exit all currently running software (applications) before you perform the
installation.
2
3
Click the Windows start menu, and from the menu, select “Run...”. Open
the “Run...” dialog box.
In the dialog box that appears, input the following into the “Open” field,
and click [OK].
The drive name “D:” may
be different for your
system. Specify the drive
name of your CD-ROM
drive. To check the drive
name of your CD-ROM
drive, double-click the My
Computer icon.
D:\ENGLISH\V-Producer\Setup.exe
4
When the Choose Setup Language dialog box appears, make sure that
“English” is selected, and click [OK].
The installer will start up. Follow the on-screen directions to perform the
installation.
* If an earlier version of V-Producer is already installed, you'll be presented with the
“Confirm File Deletion” dialog box. Click [OK] to delete the old version of VProducer.
V-Producer 1.x (for VP-9000) cannot be used simultaneously
with this version of V-Producer.
5
The InstallShield Wizard Complete dialog box will appear.
Next, install the driver.
(->Installing the Driver (p. 22))
21
Installation
■ Installing the Driver
Here's how to install the driver that allows the VariOS to be detected and
handled as a MIDI device and an external storage device (expansion drive)
of your computer.
The installation procedure will differ depending on your system.
Please proceed to one of the following sections, depending on the system
you use.
• Windows XP users ..............................................p. 22
• Windows 2000 users............................................p. 26
• Windows Me users..............................................p. 29
• Windows 98SE users ...........................................p. 31
What is a driver?
A “driver” is software that
transfers data between the
VariOS and application
software running on your
computer, when your
computer and the VariOS
are connected by a USB
cable. The driver sends
data from your application
to the VariOS, and from the
VariOS to your application.
Windows XP users
◆ Preparations for installing the driver
1
With the VariOS disconnected, start up Windows.
You must log on using a user name with an administrative account type
(e.g., Administrator).
2
Open the System Properties dialog box.
1. Click the Windows start menu, and from the menu, select Control
Panel.
2. In “Pick a category”, click “Performance and Maintenance.”
3. In “or pick a Control Panel icon”, click the System icon.
fig.2-1
3
Disconnect all USB cables
except for a USB keyboard
and USB mouse (if used).
Depending on how your
system is set up, the
System icon may be
displayed directly in the
Control Panel (the Classic
view). In this case doubleclick the System icon.
Click the Hardware tab, and then
click [Driver Signing].
Open the Driver Signing Options
dialog box.
4
Make sure that “Driver Signing Options” is set to “Ignore.”
If it is set to “Ignore”, simply click [OK].
If it is not set to “Ignore”, make a note of the current setting (“Warn” or
“Block”). Then change the setting to “Ignore” and click [OK].
22
After installing the driver,
restore the original setting.
Installation
5
6
Click [OK] to close the System Properties dialog box.
Exit all currently running software (applications).
Also close any open windows. If you are using virus checking or similar
software, be sure to exit it as well.
7
Prepare the CD-ROM.
Insert the CD-ROM into the CD-ROM drive of your computer.
8
Click the Windows start menu, and from the menu, select “Run...”.
Open the “Run...” dialog box.
9
In the dialog box that appears, input the following into the “Open” field,
and click [OK].
D:\ENGLISH\Driver\USB_XP2K\SETUPINF.EXE
* The drive name “D:” may be different for your system. Specify the drive name of
your CD-ROM drive.
10
The SetupInf dialog box will appear.
You are now ready to install the driver.
◆ Installing the driver
11
Use the USB cable to connect the VariOS to your computer.
fig.02-USB
VariOS
(Rear)
Computer
USB cable
USB connector
12
Set the VariOS’s power switch to the ON position.
Near the task bar, your computer will indicate “Found New Hardware”.
Please wait.
You must power up the
VariOS according to the
procedure given on p. 49.
23
Installation
13
The Found New Hardware Wizard will appear.
Make sure that the screen indicates “Roland VariOS,” select “Install from
a list or specific location (Advanced),” and click [Next].
fig.2-7_20
14
The screen will indicate “Please
choose your search and installation
options.”
Select “Don’t search. I will choose
the driver to install,” and click [Next].
15
Make sure that the “Model” field
indicates “Roland VariOS,” and click [Next]. Driver installation will begin.
If the “Driver Signing Options” setting was not set to “Ignore”, a “Hardware Installation”
dialog box will appear.
If “Driver Signing Options” is set to “Warn,”
fig.2-5
1. Click [Continue Anyway].
2. Continue the installation.
If “Driver Signing Options” is set to “Block,”
fig.2-5a
1. Click [OK].
2. When the “Found New Hardware Wizard” appears,
click [Finish].
3. Using the procedure described in the
“Troubleshooting” section “Q. Device Manager
shows “?”, “!”, or “USB Composite Device”” (p.
143), delete the data for the VariOS that was wrongly
detected. Then install the driver using the procedure described in
“Installing the Driver” (p. 22). When doing so, set “Driver Signing
Options”in step 4 to "Ignore."
24
Installation
16
The Insert Disk dialog box will appear.
Click [OK].
The Insert Disk dialog may not appear. In that case, proceed to next step.
17
The Files Needed dialog box will appear.
Input the following into the “Copy files from” field, and click [OK].
D:\ENGLISH\Driver\USB_XP2K
18
The drive name “D:” may
be different for your
system. Specify the drive
name of your CD-ROM
drive.
The Found New Hardware Wizard will appear.
Make sure that the display indicated “Roland VariOS,” and click Finish.
Wait until “Found New Hardware” appears near the taskbar.
A “VARIOS_DRV” window will appear. Click the [X] (close) button to close
the “VARIOS_DRV” window.
19
When driver installation has been completed, the System Settings
Change dialog box will appear.
Click [Yes]. Windows will restart automatically.
If you were unable to
(install the VariOS driver as
directed, or if you are
unable to use the VariOS
even after installing the
driver, please delete the
driver.
(->Deleting the driver (p.
154))
You have finished installing the VariOS driver.
Next, proceed to “MIDI and audio settings” (p. 44).
If you changed the driver signature option...
If you changed the driver signature option in step 4, restore the original
setting after Windows restarts. After you have restored the original setting,
proceed to “MIDI and audio settings” (p. 44).
25
Installation
Windows 2000 users
◆ Preparations for installing the driver
1
2
3
With the VariOS disconnected, start up Windows.
Log on to Windows as a user with administrative privileges (such as
Administrator).
Disconnect all USB cables
except for a USB keyboard
and USB mouse (if used).
Open the System Properties dialog box.
Click the Windows start menu, and from the menu, select Settings |
Control Panel.
In Control Panel, double-click the System icon.
fig.05-2e_30
4
Click the Hardware tab, and then click
[Driver Signature].
Open the Driver Signing Options
dialog box.
5
Make sure that “Driver Signing Options” is set to “Ignore.”
If it is set to “Ignore”, simply click [OK].
If it is not set to “Ignore”, make a note of the current setting (“Warn” or
“Block”). Then change the setting to “Ignore” and click [OK].
6
7
Click [OK] to close the System Properties dialog box.
Exit all currently running software (applications).
Also close any open windows. If you are using virus checking or similar
software, be sure to exit it as well.
8
Prepare the CD-ROM.
Insert the CD-ROM into the CD-ROM drive of your computer.
9
Click the Windows start menu, and from the menu, select “Run...”
Open the “Run...” dialog box.
26
After installing the driver,
restore the original setting.
Installation
10
In the dialog box that appears, input the following into the “Open” field,
and click [OK].
D:\ENGLISH\DRIVER\USB_XP2K\SETUPINF.EXE
11
The drive name “D:” may
be different for your
system. Specify the drive
name of your CD-ROM
drive.
The SetupInf dialog box will appear.
You are now ready to install the driver.
◆ Installing the driver
12
Use the USB cable to connect the VariOS to your computer.
fig.02-USB
VariOS
(Rear)
Computer
USB cable
USB connector
13
Set the VariOS’s power switch to the ON position.
You must power up the
VariOS according to the
procedure given on p. 49.
If the “Driver Signing Options” setting was not set to “Ignore”, a “Digital Signature Not
Found” dialog box will appear.
If “Driver Signing Options” is set to “Warn,”
1. Click [Yes].
2. Continue the installation.
If “Driver Signing Options” is set to “Block”
1. Click [OK].
2. When the “Found New Hardware Wizard” appears, click [Finish].
3. Using the procedure described in the “Troubleshooting” section “Q. Device Manager
shows “?”, “!”, or “USB Composite Device”” (p. 143), delete the data for the VariOS
that was wrongly detected. Then install the driver using the procedure described in
“Installing the Driver” (p. 22). When doing so, set “Driver Signing Options”in step 5 to
"Ignore."
27
Installation
14
The Insert Disk dialog box will appear.
Click [OK].
15
The Files Needed dialog box will appear.
Input the following into the “Copy files from” field, and click [OK].
D:\ENGLISH\DRIVER\USB_XP2K
16
The drive name “D:” may
be different for your
system. Specify the drive
name of your CD-ROM
drive.
The “Find New Hardware Wizard” may be displayed.
Verify that “Roland VariOS” is displayed, and click [Finish].
17
The System Settings Change dialog box may appear.
Click [Yes]. Windows will restart automatically.
You have finished installing the VariOS driver.
Next, proceed to “MIDI and audio settings” (p. 44).
If you changed the driver signature option...
If you changed the driver signature option in step 5, restore the original
setting after Windows restarts. After you have restored the original setting,
proceed to “MIDI and audio settings” (p. 44).
28
If you were unable to install
the VariOS driver as
directed, or if you are
unable to use the VariOS
even after installing the
driver, please delete the
driver.
(->Deleting the driver (p.
154))
Installation
Windows Me users
◆ Preparations for installing the driver
1
2
With the VariOS disconnected, start up Windows.
Disconnect all USB cables
other than those for a USB
keyboard or USB mouse.
Exit all currently running software (applications).
Also, close any open windows. If you are using a virus checker or similar
software, be sure to exit this as well.
3
Prepare the CD-ROM.
Insert the CD-ROM into the CD-ROM drive of your computer.
4
Click the Windows start menu, and from the menu, select “Run...”
Open the “Run...” dialog box.
5
In the dialog box that appears, input the following into the “Open” field,
and click [OK].
The drive name “D:” may
be different depending on
your system. Type the
name of your CD-ROM
drive.
D:\ENGLISH\DRIVER\USB_98ME\SETUPINF.EXE
6
Open the SetupInf dialog box.
You are now ready to install the driver.
◆ Installing the driver
7
Use the USB cable to connect the VariOS to your computer.
fig.02-USB
VariOS
(Rear)
Computer
USB cable
USB connector
8
9
Set the VariOS’s power switch to the ON position.
The New Hardware Found dialog box will appear.
Input the following into the “Copy files from” field, and click [OK].
D:\ENGLISH\DRIVER\USB_98ME
You must power up the
VariOS according to the
procedure given on p. 49.
The drive name “D:” may
be different depending on
your system. Type the
name of your CD-ROM
drive.
29
Installation
10
Once the driver has been installed, the New Hardware Found dialog box
will close.
In the SetupInf dialog box, click [OK]. The SetupInf dialog box will close.
You have finished installing the VariOS driver.
Next, proceed to “MIDI and audio settings” (p. 44).
30
If you were unable to
install the VariOS driver as
directed, or if you are
unable to use the VariOS
even after installing the
driver, please delete the
driver.
(->Deleting the driver (p.
154))
Installation
Windows 98SE users
◆ Preparations for installing the driver
1
2
With the VariOS disconnected, start up Windows.
Disconnect all USB cables
other than those for a USB
keyboard or USB mouse.
Exit all currently running software (applications).
Also, close any open windows. If you are using a virus checker or similar
software, be sure to exit this as well.
3
Prepare the CD-ROM.
Insert the CD-ROM into the CD-ROM drive of your computer.
fig.02-98-1
4
Click the Windows Start menu, and from the
menu, select “Run...”
Open the “Run...” dialog box.
5
In the dialog box that appears, input the following into the “Open” field,
and click [OK].
D:\ENGLISH\DRIVER\USB_98ME\SETUPINF.EXE
fig.02-98-2
6
Open the SetupInf dialog box.
The drive name “D:” may
be different depending on
your system. Type the
name of your CD-ROM
drive.
You are now ready to install the driver.
31
Installation
◆ Installing the driver
7
Use the USB cable to connect the VariOS to your computer.
fig.02-USB
VariOS
(Rear)
Computer
USB cable
USB connector
8
9
Set the VariOS’s power switch to the ON position.
You must power up the
VariOS according to the
procedure given on p. 49.
The Add New Hardware Wizard dialog box will appear.
Click [Next].
fig.02-98-3
10
Select “Search for the best driver for
your device,” and click [Next].
fig.02-98-4
11
Check the “Specify a location” box,
input the following into the location field,
and click [Next].
D:\ENGLISH\DRIVER\USB_98ME
12
The screen will indicate “Windows driver
file search for the device: Roland VariOS USB Driver.”
Click [Next].
13
The screen will indicate “Windows has finished installing the software
that your new hardware device requires.”
Click [Finish].
32
The drive name “D:” may
be different depending on
your system. Type the
name of your CD-ROM
drive.
Installation
14
The Insert Disk dialog box will appear.
Click [OK].
fig.02-USB
15
The New Hardware Found dialog box will appear.
Input the following into the Copy files from field, and click [OK].
D:\ENGLISH\DRIVER\USB_98ME
16
The drive name “D:” may
be different depending on
your system. Type the
name of your CD-ROM
drive.
The Add New Hardware Wizard dialog box will appear.
Click [Next].
fig.02-98-3
17
Select “Search for the best driver for
your device,” and click [Next].
fig.02-98-4
18
Check the “Specify a location” box,
input the following into the location field,
and click [Next].
D:\ENGLISH\DRIVER\USB_98ME
19
The drive name “D:” may
be different depending on
your system. Type the
name of your CD-ROM
drive.
The screen will indicate “Windows driver
file search for the device: USB Mass Storage Device.”
Click [Next].
33
Installation
20
The screen will indicate “Windows has finished installing the software
that your new hardware device requires.”
Click [Finish].
In the SetupInf dialog box, click [OK]. The SetupInf dialog box will close.
You have finished installing the VariOS driver.
Next, proceed to “MIDI and audio settings” (p. 44).
34
If you were unable to
install the VariOS driver as
directed, or if you are
unable to use the VariOS
even after installing the
driver, please delete the
driver.
(->Deleting the driver (p.
154))
Installation
Macintosh users
The installation procedure will differ depending on your system.
Please proceed to the appropriate page for your system.
• Mac OS X users ....................................................p. 35
• Mac OS 9 users.....................................................p. 37
■ Mac OS X users
Installing V-Producer
1
2
3
Insert the CD-ROM into the Macintosh CD-ROM drive.
On the CD-ROM, open the English - for OS X - V-Producer 2 folder.
Select the folder that is appropriate for the processor of your Macintosh,
and copy it to the application folder of your Macintosh.
• If your Macintosh has a G4 processor
the V-Producer2(G4) folder
• If your Macintosh has a G3 processor
the V-Producer2(G3) folder
To check which type of
processor is in your
Macintosh, choose the
Apple menu item About
This Mac.
Installing the VariOS USB driver for Mac OS X
Use the following procedure to install the VariOS USB driver for Mac OS X.
* Disconnect the VariOS from your computer before you install the driver.
1
2
3
4
Exit all currently running software (applications).
If you are using a virus
checker or similar software,
be sure to exit this as well.
Insert the CD-ROM into the CD-ROM drive.
On the CD-ROM, navigate to English - for OS X folder - VariOS USB
Driver, and double-click VariOSUSBDriver.
The confirmation dialog box will appear.
In some cases,
VariOSUSBDriver may be
displayed as
VariOSUSBDriver.pkg.
Input the administrator name and password, and click [OK].
35
Installation
5
The screen will indicate “Welcome to Roland VariOS USB Driver
Installation.”
Click [Continue].
6
The screen will indicate “Choose location for installation.”
Click to select the drive in which the system is installed, and then click
[Continue].
7
The screen will indicate “Default installation.”
Click [Install] or [Upgrade].
8
A message like this appears: “If you install this software, you will need
to restart your computer after the installation is complete. ~”
Click [Continue installation].
9
A dialog box informing you that “The software has been installed
successfully” will appear.
Click [Restart] to restart your Macintosh.
This completes the installation.
Proceed to “MIDI and audio settings” (p. 44).
36
Installation
■ Mac OS 9 users
Before installation
● To ensure that V-Producer will operate correctly, please make the following settings on
your Macintosh.
1. Open Control Panels from the Apple menu.
2. Make the following settings:
• In the Memory control panel, turn virtual memory “off.”
* If virtual memory is “on,” the performance of the Preview function will be impaired. V-Producer
will operate regardless of whether virtual memory is turned on or off.
• In the Energy Saver control panel, set “never” as the idle time until the computer
enters power-conserving sleep mode.
• In the Monitors (or Monitors & Sound) control panel, set the Color Depth to “Millions.”
• From the “Apple Menu,” select “Chooser,” and set “Apple Talk” to “Inactive.”
3. If you have installed an antivirus program, use the Extensions Manager
to disable that program.
4. Restart your Macintosh.
● Disconnect the V-Producer from the Macintosh
If the power of the VariOS is turned on, a message like the following will appear when the
Macintosh is started up. Perform the steps described below as appropriate for the message that
is displayed.
• If the screen indicates:
“Driver needed for the USB device “VariOS” are not available. Would you like to
look for these drivers over the Internet?”
> click [Cancel].
• If the screen indicates:
“Software required for using device ‘unknown device’ cannot be found. Please
refer to the manual included with the device, and install the necessary software.”
> click [OK].
37
Installation
■ About the included MIDI drivers
This product contains the following MIDI drivers.
Driver for OMS
This is a driver for using the VariOS with OMS.
Driver for FreeMIDI
This is a driver for using the VariOS with FreeMIDI. In order to use this
driver, you will need to separately obtain version 1.35 or higher of
FreeMIDI.
For instruction on how to install the VariOS Driver and how to make the
FreeMIDI settings, refer to Readme FM-E.HTM file in the English - for OS
9 - Driver - VariOS FreeMIDI Driver-E folder on the CD-ROM.
■ Installing OMS
In order to use V-Producer you must have OMS (Open Music System). OMS
is a MIDI driver that acts as a bridge in conveying data between V-Producer
and the VariOS.
OMS uses an application named OMS Setup to create a document called
“Studio Setup.” The names of your MIDI devices and the state of the actual
connections are registered in this document. Here we will give a brief
explanation on how to install OMS and make settings, but for details please
refer to the manual (OMS_2.3_Mac.pdf) included on the CD-ROM.
You will need the Adobe
Acrobat Reader in order to
view OMS_2.3_Mac.pdf.
The latest version of Adobe
Adrobat Reader can be
downloaded from the
Adobe website. http://
www.adobe.com (This
URL may change without
notice.)
If you are already using OMS, proceed to “Installing V-Producer” (p. 39).
1
2
3
From the English - for OS 9 folder of the CD-ROM, open Driver, then
open OMS2.3.8, and double-click Install OMS 2.3.8.
Click [Install].
When installation is completed, a dialog box will recommend that you
restart your Macintosh. Click [Restart].
You have now finished installing OMS. Next, you will install V-Producer.
38
The driver can be installed
only on a drive on which
the system is installed.
Installation
■ Installing V-Producer
1
2
3
4
5
Exit all currently running software (applications).
If you are using a virus
checker or similar software,
be sure to exit this as well.
Insert the CD-ROM into the CD-ROM drive.
Double-click the V-Producer Installer Installer icon (found in the English
- for OS 9 folder of the CD-ROM) to start up the installer.
Verify the [Install location], and click [Install].
Follow the on-screen instructions to proceed with the installation.
When installation is completed, a message telling you that “Installation is
completed” will appear. Click [Quit].
About memory
The “Memory is full ...” error may appear if you open a large song or run
out of memory while editing a song, or depending on the monitor resolution
and color depth. It will not be possible to load files or edit further. If this
occurs, exit V-Producer. Then, in the Finder, click “V-Producer” to select it.
Next, from the Finder menu, choose File - Get Info - Memory, and under
Memory Requirements, increase the amount of memory used by VProducer.
*If you will be loading samples of the maximum length (150 seconds stereo; 300
seconds monaural), we recommend that you increase the memory allocation to
192 MB or more.
In the Finder, select the VProducer icon. Then, from
the Finder menu, choose
File - Get Info - Memory,
and under Memory
Requirements, Preferred
Size of Memory
Requirements.
39
Installation
■ Connections and OMS setup
Installing the VariOS OMS driver
Use the following procedure to install the VariOS driver.
The included VariOS OMS Driver-E is an add-on module for using the
VariOS with OMS. In order for you to use it, OMS must already be
installed on the hard disk from which you started up.
* Disconnect the VariOS from the Macintosh before you perform the installation.
1
2
3
4
Exit all currently running software (applications).
Insert the CD-ROM into the CD-ROM drive.
Double-click the VariOS OMS Driver-E Installer icon (found in the
English - for OS 9 - Driver - VariOS OMS Driver-E folder of the CDROM) to start up the installer.
Verify the [Install Location], and click [Install].
fig.3-2
5
If a message like the following is
displayed, click [Continue].
The other currently running
applications will exit, and installation
will continue.
6
A dialog box will indicate Installation completed.
Click [Restart] to restart your Macintosh.
40
If you are using a virus
checker or similar software,
be sure to exit this as well.
Installation
OMS settings
Here’s how to make OMS settings. Before you make these settings, make
sure that the MIDI devices connected to your Macintosh and all peripherals
are powered up.
1
Use a USB cable to connect the VariOS to your computer, and turn on the
power of the VariOS.
fig.02-USB
VariOS
(Rear)
Computer
You must power up the
VariOS according to the
procedure given on p. 49.
USB cable
USB connector
Easy method using the sample settings
The "Driver" folder of the CD-ROM contains a sample OMS setup file
named "VariOS OMS Studio." As an easy way to make OMS settings, you
can copy this file into the "Opcode" folder of your hard disk, double-click to
open it, and continue the setup procedure from step 9 of p. 43.
2
3
Within the location (hard disk) to which you installed OMS, go to the
Opcode - OMS Applications folder, and double-click OMS Setup.
In the “Create a New Studio Setup” dialog box, click [OK].
This creates a new studio setup.
fig.02-oms-set-1.eps_30
4
If AppleTalk is on, a dialog
box will appear, asking you
whether to turn it off or
leave it on. We recommend
that you use the Chooser in
the Apple menu to inactive
AppleTalk.
In the OMS Driver Search dialog box,
click [Search] without checking the
check box.
If your MIDI interface is connected to a
serial port, check the port to which it is
connected.
If the “Create a New
Studio Setup” dialog box
does not appear, select the
File menu and click “New
Studio Setup.”
If an error dialog box is
displayed during the setup,
disconnect all MIDI cables
connected to the VariOS,
and make the OMS settings
once again.
fig.02-oms-set-2.eps_30
5
Make sure that the OMS Driver Setup
dialog box correctly indicates VariOS
USB IF.
Only the MIDI devices connected
directly to the Macintosh are displayed
here. Verify that your device(s) are
displayed correctly, and click [OK].
MIDI devices that are not
powered up will not be
detected automatically by
OMS. If a MIDI device that
you thought was connected
is not detected, click
[Troubleshoot] and follow
the on-screen directions.
41
Installation
fig.02-oms-set-3.eps_30
6
The OMS MIDI Device Setup window
will appear.
A problem with the OMS
Setup program causes the
third port to be displayed
as “DX7 II.” Please rename
this port in step 8.
Add a check mark to all of the VariOS
USB IF ports (Port 1, Port 2, DX7 II),
and click [OK].
7
8
In the screen for saving the studio setup, click [Save] to save the setup.
The ports for VariOS USB IF will be displayed. Each port has the following function.
Port name
displayed
Port 1
Port 2
DX7 II
Assign the following port name
Roland VariOS MIDI
Roland VariOS External MIDI
Roland VariOS Sync
Function
Port for the VariOS sound module section
Port for the VariOS rear panel MIDI connector
Macintosh internal synchronization (sync) port
Use the following procedure to specify the MIDI device for each VariOS port.
fig.02-oms-set-4.eps
Double-click "Port 1" for "Roland VariOS." The MIDI device
information dialog box shown below will appear.
Specify "Roland" as
the manufacturer
name.
Select the model. Since the
VariOS does not appear in the
list, select "Other."
Input the device ID number of the
sound module. Click the number
and enter it from the keyboard.
For the VariOS, enter "17."
Assign a name to the sound
module. Click the mouse here,
and enter "Roland VariOS MIDI."
Make transmission and reception
settings for synchronization
messages such as MIDI time
code. Check all of these boxes.
Click the question mark
icon, and in the window
that appears, choose
an icon that you like
and double-click it.
Check "Controller,"
"Multitimbral," and all
"Receive Channels."
Use the same procedure to make settings for the other ports (“Port 2” and “DX7 II”). Input field
as follows.
42
Installation
• Set “Port 2” to “Roland VariOS External MIDI”
• Set “DX7 II” to Roland VariOS Sync”
* For “DX7 II,” you must check all of the items in field
. (By default these are
unchecked.) If these are left unchecked, synchronization will not operate correctly.
fig.02-oms-set-6.eps
* If a dialog box similar to this appears, click
“No More Warnings.”
fig.02-oms-set-5.eps_50
9
10
11
From the Edit menu choose OMS
MIDI Setup. In the dialog box that
appears, check [Run MIDI in the
background], and click [OK].
From the File menu, choose Make
Current. If you are unable to select
Make Current, it has already been
applied, and you may continue to the
next step.
A diamond mark( ) indicated the settings are enabled.
To verify that MIDI transmission and reception are occurring normally,
choose [Test Studio] from the Studio menu.
You will enter MIDI transmission/reception test mode, and the cursor will
change to a shape. When the cursor changes to the shape, click the
"Roland VariOS MIDI (Port 1)" icon you specified earlier. If the “MIDI”
indicator of the VariOS (front panel) blinks, the settings have been made
correctly.
If MIDI transmission cannot be performed, the Macintosh warning sound
will play. Once again, check that all devices are set correctly. Then choose
[Test Studio] from the Studio menu, and exit test mode.
12
From the File menu choose Quit to exit OMS Setup. A dialog box will
suggest that you save, so click [Save]. Basic settings for OMS are now
completed.
You have now finished installing the VariOS driver.
Proceed to “MIDI and audio settings” (p. 44).
43
MIDI and audio settings
Here’s how to make settings for the MIDI port and the computer’s audio device that will be
used to communicate with the VariOS.
1
Turn on the power of the VariOS.
Before starting up V-Producer, you must power up the VariOS and connect the VariOS to your
computer via a USB cable.
If you inadvertently start up V-Producer before powering up the VariOS or connecting the USB
cable, or if you power down the VariOS or disconnect the USB cable while V-Producer is
running, you must exit V-Producer, and then restart it.
2
Start up V-Producer.
•
Windows:
From the start button, choose Programs (or All Programs) - V-Producer - V-Producer for VariOS.
•
Macintosh:
In the Roland - V-Producer folder, double-click the V-Producer2 icon.
V-Producer will start up.
(MacOS 9)
On Mac OS, V-Producer supports two MIDI drivers: OMS and FreeMIDI.
If your system has both of these MIDI drivers, a screen will appear the first time you
start up V-Producer, allowing you to select either OMS or FreeMIDI. You can also
choose between OMS or FreeMIDI in this MIDI Settings dialog box. (However, if no
driver is installed in your system, you will not be able to choose between OMS and
FreeMIDI.) For details on installing the OMS or FreeMIDI compatible drivers, refer to
“About the included MIDI drivers” (p. 38) in this manual.
3
In V-Producer’s Option menu, click MIDI/Audio Settings.
•
Macintosh:
Click MIDI settings.
The first time you start up V-Producer, MIDI/Audio Settings (on the Mac, MIDI
Settings) will open automatically, so this operation will not be necessary.
fig.02-midi01
4
In the MIDI Device area, specify the MIDI port
to which the VariOS is connected. Normally,
you will select “Roland VariOS MIDI,” as
shown in the diagram.
If nothing is displayed in the port field, it is possible that the VariOS USB MIDI driver
was not installed correctly. Check the connection between the VariOS and the
computer, and install the USB MIDI driver using the procedure described in
“Installation” (p. 21).
44
MIDI and audio settings
(OS 9)
MacOS On the Macintosh, the name you assigned in step 8 of “OMS Settings” (p. 42) will
be displayed. Select the port that corresponds to the VariOS sound generator port
(Port 1).
If you will not be using the USB MIDI functionality of the VariOS (i.e., When not using the
USB MIDI functionality of the VariOS (Connecting the VariOS to an external MIDI
interface)), refer to page 139.
About the MIDI Clock field
The MIDI Clock field is an on/off setting for the MIDI Clock (F8) messages transmitted from
the port to the VariOS. The VariOS can receive MIDI Clock messages from V-Producer and
synchronize to the master tempo of V-Producer. Normally, you will leave this field checked.
On some MIDI interfaces, such as Mark Of The Unicorn Corporation’s MIDI Express, or Emagic
Corporation’s amt8, MIDI Clock messages input to one port are output from all ports. This
means that if you have specified one of these MIDI interfaces in the Sync Mode dialog box
([Option] - [MIDI Sync]) as the MIDI Clock output destination, duplicate MIDI Clock (F8)
messages will be sent to the VariOS, causing the tempo to be doubled. In this case, uncheck the
MIDI Clock box so that the VariOS will play back at the correct master tempo.
fig.02-midi02
5
If you are using a MIDI keyboard, set the [MIDI
IN Port (Keyboard)] field to the MIDI input
port to which your MIDI keyboard is connected.
If your MIDI keyboard is connected to the
VariOS, select “Roland VariOS External MIDI”
as shown in the diagram.
(OS 9)
MacOS OS On the Macintosh, the name you assigned in step 8 of “OMS Settings” (p. 42)
will be displayed. Select the port that corresponds to the MIDI connector on the rear
panel of the VariOS (Port 2).
fig.02-midi03
6
(Windows only)
The VariOS Drive field indicates the drive letter
given the VariOS when it was mounted on your
computer. Press [Scan] to select the drive
automatically.
The VariOS Drive may not be detected
automatically for some systems. In this case,
open My Computer and check the drive name
for VariOS (e.g., F:), and then select this for the
VariOS Drive field.
45
MIDI and audio settings
fig.02-midi04
7
(Windows only)
In the Audio Device (Preview) field, select the
audio device that you will use for V-Producer’s
preview function.
OS On the Macintosh version there is no Audio Device (Preview) field. The internal
MacOS sound functionality of the Mac will be selected.
The Preview function lets you use the audio device of your computer to audition
sample data stored on your computer without loading it into the VariOS.
Audio device adjustments
(Windows only)
Here you can make adjustments for the audio device in the Wave Edit screen (p. 65).
• Adjust slider
Adjusts the discrepancy between the Wave Edit screen display and when the audio is heard.
Play back a waveform in the Wave Edit screen. If the cursor (vertical line) is later than the actual
sound, move the slider toward the left. If the cursor (vertical line) is earlier than the actual
sound, move the slider toward the right.
• High CPU Load
Adjusts the CPU load.
If you check this, the CPU load will be heavier, but you will get a faster response when you click
the Wave Edit playback or stop button.
If you experience pops in the sound when you play something back in Wave Edit using USBconnected speakers, un-check this setting.
8
Click [OK].
If a message of “MIDI Offline!” appears, V-Producer and the VariOS are not communicating
correctly. Check the following points.
• Is the VariOS powered up?
• Is the VariOS connected correctly?
You have now completed preparations for using V-Producer.
46
Listening to the demo songs
Loading the demo songs
1
Start up V-Producer.
Before starting up V-Producer, you must power up the VariOS and connect the VariOS to your
computer via a USB cable.
If you inadvertently start up V-Producer before powering up the VariOS or connecting the USB
cable, or if you power down the VariOS or disconnect the USB cable while V-Producer is
running, you must exit V-Producer, and then restart it.
2
In V-Producer, choose Open Song from the File menu. Browse to the [Roland] - [V-Producer]
folder -> Demo Songs folder, and open demo song files (.vpd).
* Loading the samples will require approximately one minute. Please wait until loading is complete.
In some cases when you open a song, a dialog box of “[sample name] Load File
Name” may appear. This will appear if the user has moved a sample file that is used
by the song file, or if V-Producer does not know the location of the sample file. Please
specify the file location of the sample name shown in the dialog box.
47
Listening to the demo songs
Playing the demo song
You will use V-Producer’s Locator to play back the songs.
fig.02-locator
Current time
To beginning
1
Upper value: measure.beat.tick
Lower value: hours:minutes:seconds:frames
Rewind Fast-forward Stop
Tempo
Pitch
Speed
Play
Click the [Play] button in the Locator to play back the song.
When you play the song, the current time will change.
* If the demo song does not play, read “Q. No sound when you play back the demo song” in the
“Troubleshooting” section (p. 148).
• To stop the song
Click the [Stop] button.
• To move the current location a measure at a time
Click the [Fast-forward] or [Rewind] buttons.
• To change the tempo of the song
Master tempo:
Drag the tempo value upward or downward.
Relative tempo: Drag the speed value upward or downward.
* Relative tempo (speed) smoothly adjusts the tempo even while the song is playing. Use this when you
want to make a temporary change in tempo. This will not be saved in the song.
• To transpose the overall playback pitch in semitone steps
Drag the pitch value upward or downward.
To power down the VariOS, you must use the procedure described in "Turning the
VariOS on/off" (p. 49). "Turning the VariOS on/off" (p. 49) contains important
information about handling the VariOS, so please be sure to read it.
About the demo songs
For the song names and other details, refer to Readme.txt (found in the [Roland] - [V-Producer]
- [DemoSongs] folder).
48
Turning the VariOS on/off
* Once the connections have been completed, turn on power to your various devices in the order specified.
By turning on devices in the wrong order, you risk causing malfunction and/or damage to speakers and
other devices.
* This unit is equipped with a protection circuit. A brief interval (a few seconds) after power up is required
before the unit will operate normally.
Turning on the VariOS when connected to a computer
1
2
Start up your computer.
Make sure that the USB cable is connected, and turn on the power of the VariOS.
The power is on when the switch is pressed inward, and off when the switch is in the outward
position.
fig.1-01a
fig.on
Power is on when
switch is depressed
Power is off when
switch is released
Push
3
The computer will detect the VariOS as a drive.
•
Windows 2000/Me/98:
In My Computer or Explorer, the VariOS will be displayed under the name “removable disk.”
•
Windows XP:
In My Computer or Explorer, the VariOS will be displayed under the name “VARIOS_DRV.”
In Windows XP, when you power up the VariOS and it is recognized by your
computer as a USB drive, a “VARIOS_DRV” window will open, but you should click
the [X] (close) button to close the “VARIOS_DRV” window. You must not write files
directly into the VARIOS_DRV window or delete files from it. The system may fail to
operate correctly if you do so.
•
Macintosh:
VariOS will displayed on the desktop as “VARIOS_DRV.”
Your computer will detect the VariOS as a drive (VariOS drive) that can be read or written,
allowing wave files to be transferred to and from it. You must use the dedicated V-Producer
software to transfer files between your computer and the VariOS.
Do not use the Explorer or Finder to directly write or delete files on the mounted
VariOS drive. Doing so may cause the VariOS to malfunction.
* “Mounted” means that your computer has recognized the VariOS drive.
49
Turning the VariOS on/off
Turning off the VariOS when connected to a computer
Use the following procedure to turn off the power of the VariOS. If you fail to use the correct
procedure to turn off the power, your computer may display a warning message.
In Windows Me, powering down the VariOS before unmounting the drive may
cause an error to occur in Windows. You must use the following procedure when
powering down.
1
2
If V-Producer is running, exit the program.
Unmount the VariOS drive that is mounted on your computer.
•
Windows: (This is not necessary for Windows 98.)
In the task tray, double-click the eject icon. Then click the item that indicates the VariOS
drive (this will differ depending on your version of Windows; see below) to unmount the
drive.
fig.02-taskicon
Windows XP, 2000
Windows Me
•
3
USB high-capacity storage device
USB disk
Macintosh:
Drag the VARIOS_DRV on the desktop into the “Trash”.
Turn off the power of the VariOS.
When you power down the VariOS, the entire contents of the VariOS drive
recognized by your computer will be deleted. If you have stored important data in
the VariOS drive, you must save the song in V-Producer (p. 91) before powering
down the VariOS, or save it to the flash ROM or PC card of the VariOS.
50
Operation Guide: Software
(V-Producer)
This chapter explains the basic operation for V-Producer in the order of your actual workflow. Once
you have read through this chapter, you will have mastered its basic operation.
51
An overview of V-Producer
V-Producer is software that controls a sound module (VariOS).
It reads wave files stored on your computer and sends them to the VariOS. At the same time, it also
displays the files on the screen as samples. Simply by placing samples on a screen that corresponds to
the six "parts" of the VariOS, you can automatically control the VariOS, making it sound accordingly.
This lets you easily create a song using multiple tracks on the VariOS.
Since the VariOS uses Vari Phrase technology, there is no need for you to make time-consuming
adjustments to the size of the samples. You can also use your MIDI keyboard to play samples in real
time and record them. In addition, you can make use of a variety of editing features, which allow you
to edit the Time, Pitch, Formant, as well as perform transpositions.
The following diagram shows the actual workflow.
fig.03-01
PC
From audio clip CDs, waveform
editing programs, or
VariPhrase collections (.vpw)
Wave files
VariPhrase format
(.wav, aiff, or SD2)
files (.vpw)
Loaded into V-Producer next time
V-Producer
1 Load Wave Files
Load a wave file
2 Sample List
VariOS
Send samples
(USB)
Make settings for
samples and play them
MIDI control
Samples
3 VariTrack
Create a song
Frame
Frame
Frame
Frame
Frame
Frame
Frame
Frame
Frame
4 ScopeEditor
Edit Frame
5 Save
Save song
Export
wave
V-Producer file
(.vpd)
Load into V-Producer
52
Export
SMF
Wave file
(.wav or aiff)
Load waveform
into other software
SMF file
(.mid)
Use other software
to control the VariOS
via MIDI
An overview of V-Producer
1. Loading wave files (Load Wave Files) (p. 56)
Load wave files (.wav, aiff, or SD2) from your computer into V-Producer.
At this time the following processes will be performed automatically.
• The wave file will be converted into a VariPhrase format file that can be handled as
VariPhrase data (Encoding, p. 55)
• The VariPhrase format file (.vpw) will be sent to the sound module (VariOS) via USB.
• The VariPhrase format file (.vpw) will be saved on the computer’s hard disk.
2. Make settings for samples and play them (Sample List) (p. 58)
The wave files that were loaded in step 1 will be displayed as a list of samples.
You can use your MIDI keyboard to directly play the samples that are shown in the sample list.
You can also place samples in the Vari Track by dragging and dropping them.
In the Sample Edit screen (p. 62) you can edit various sample parameters to specify how the
sample will play.
In the Wave Edit screen (p. 65) you can re-encode the sample (convert the encoding type or modify
the tempo data).
3. Creating a song (Vari Track) (p. 68)
Create a song by dragging and dropping samples from the sample list. A sample that is placed in
this way is called a “frame.” You can also use your MIDI keyboard to play the samples in real time
and record them.
In Frame Properties (p. 74) you can edit the settings (volume, pitch, location, etc.) of each frame
placed in the vari track.
4. Phrase editing (Scope Editor) (p. 76)
Edit the performance data for the frames that you placed in the track. You can edit Pitch, Time,
Format, volume (Dynamics), and notes. In the Scope Editor you can use two methods of editing.
Phrase Scope (p. 77)
The performance data in a frame is interpreted as a phrase. This method is used mainly to edit the
melodic aspect of a phrase. For example, in the case of a vocal sample, you can vary the melody
line, or add harmony to create chords. This type of editing is particularly useful for samples that
contain a monophonic melody, such as vocals.
Groove Scope (p. 87)
The performance data in a frame is interpreted as a rhythm pattern. This method is used mainly
to edit rhythm material.
For example, in the case of a drum pattern sample, each of the slices delineated by events will be
a drum sound, such as bass drum or snare. By changing the time location of the slices you can reconfigure the drum pattern. This type of editing is particularly useful for rhythm samples such as
drum patterns.
5. Saving (p. 91)
Save the results of your editing.
Save song
Export wave
Export SMF
Save a V-Producer file (.vpd). This file can be loaded by V-Producer (p. 91).
Convert the song into a wave file (.wav or aiff) and save it (p. 91)
Convert the song into an SMF (.mid) file and save it. This data (SMF) created by V-Producer can be played back in your MIDI sequencer (p. 138).
53
An overview of V-Producer
What is VariPhrase?
VariPhrase is proprietary Roland technology that uses newly developed encoding methods with
several algorithms to analyze and extract the three elements of sound—pitch, time, and formant (tonal
character)—from the sample, allowing you to control these independently in real time.
fig.vari-E
formant
pitch
value
value
pitch
Original
value
Original
value
time
formant
time
0
Original
sampling key
0
note
number
On a conventional sampler,
pitch, time, and formant
always change together.
Pitch
Original
sampling key
note
number
When you use VariPhrase Solo
encoding, time and formant will
remain fixed, and only the pitch
will vary. This lets a single
sample cover a wider range of
notes.
Pitch
Va
c
"Here comes VariPhrase"
"Heeeeee
Time
Original phrase
Record the words
"Here comes VariPhrase"
sung at a constant pitch.
re
es
om
ri
Ph
rase"
Time
VariPhrase lets you control the
phrase in real time. As shown
here, you can freely and
independently control the pitch,
time, and formant even while the
phrase is playing.
This opens up possibilities for completely new performance expressions and sound design that were
unavailable on previous synthesizers or samplers.
On a conventional sampler, using phrase samples involved the following problems:
• Changing the tempo affected the pitch.
• Changing the pitch of a vocal sample would also change the playback speed (time) and tonal
character (formant).
• The sampled phrase was simply played back, and could not be varied.
• Since one sample could cover a range of only a few keys, you needed samples at multiple pitches
if you wanted to play a wider range.
• If you wanted to play multiple samples in synchronization, the samples had to be at the identical
tempo.
• If you play the keys in a chord at different moments, the sounds are heard out of sync with each
other.
• Changing the pitch or tempo degrades the sound quality.
VariPhrase eliminates all of the above problems.
54
An overview of V-Producer
What is encoding?
In order use VariPhrase to freely control the pitch or time, the sample must be encoded in order to
extract its pitch/time/formant data.
There are three encoding types. Choose the encoding type that is most suitable for each phrase.
● SOLO
This type accurately extracts the pitch, time, and formant data. This encoding type is ideal for singlenote and melodic audio phrases such as vocals or sax, and lets you take full advantage of VariPhrase’s
potential. If you use this encoding type, you will be able to control the formants and use the robot voice
function (refer to “Sample Edit” p. 62). Even if you encode using SOLO, you will still be able to play
polyphonically.
● BACKING
This type extracts pitch and time data. It is the ideal encoding type for percussive phrases, such as
drum or percussion rhythm patterns.
● ENSEMBLE
This type extracts pitch and time data. It is the ideal encoding type for chordal phrases with ambience.
The pitch and time data that is extracted is simply added to the audio file, and the wave data itself is
not processed in any way; i.e., this is a non-destructive process. This means that you can later reencode using a different encoding type, or re-edit the wave.
55
Loading wave files (Load Wave Files)
Here’s how you can load wave files from the hard disk of your computer and send them to the VariOS.
When you execute this command, the Load Wave Files dialog box will appear.
1. Start up V-Producer.
*
Before starting up V-Producer, you must power up the VariOS and connect the VariOS to your
computer via a USB cable. If you inadvertently start up V-Producer before powering up the VariOS
or connecting the USB cable, or if you power down the VariOS or disconnect the USB cable while VProducer is running, you must exit V-Producer, and then restart it.
2. At the bottom of the screen, click the [Sample Info] button (
) to access the Sample
List screen. In Sample List, click the [Load Wave Files] button (or choose File - Load Wave Files
menu).
fig.03-02LoadwavefileButton_50
* V-Producer is able to load wave files in Wave file format (.WAV), AIFF file format (.AIF), SD2 format,
or VariPhrase format (.VPW).
A note about file names
Do not use the following characters in a file name.
If you load a file with a name that includes any of the following characters, V-Producer
may fail to operate correctly.
\
/ : , ; * ? " <
> |
Before loading such a file into V-Producer, you must delete these characters from the
file name.
56
Loading wave files (Load Wave Files)
3. Load the wave file as described in the illustration below.
fig.02-04Loadwavefile
This area shows the wave files that are on your
computer. The wave files within the folder you
selected at the left will be listed at the right.
- Conventional wave files (.wav, .aiff)
- SD2 format files
- VariPhrase format files (.vpw)
In the list at the right, click the wave file that you
want to load into the VariOS.
* By clicking the headings above the list you can
sort the list in various ways.
Specify the type of conversion (encoding *1)
that will be used for loading into the VariOS.
Normally, you will use the "Auto" setting.
In "Auto" mode, the encoding type will be set
to "Backing," and the tempo will be calculated
automatically (*2). (You can change these
settings in step 4.)
These settings are not needed for files that
are already encoded (.vpw).
If you want to manually specify
the encoding type and tempo,
select "Manual."
The options shown at the right
will appear. This is convenient
when you are loading two or
more items of wave data of a
specific tempo.
* Set the encoding type as follows.
SOLO
Single-note vocal or instrumental
phrase (sax, trumpet, etc.)
BACKING
Phrases with a clear attack, such
as rhythm loops or guitar chording
EMSEMBLE Sustained phrases such as choir
or strings
Auditions the selected wave file.
* The sound will be heard from the sound card
of your computer. (Sound will not be
produced from the VariOS.)
Auditions the selected Wav file.
Adds the selected Wav file to the
"Load List" below.
Displays the amount of memory used
within the VariOS.
This area lists the samples that will be loaded into
the VariOS. The file name, encoding type, tempo,
and number of measures are displayed.
- To delete a sample from the list, right-click the
sample (in Mac OS, [Control]-click) and choose
"Delete." (Pressing the [Delete] key will also delete
the sample.)
- You can change the Encode Type and Tempo of
the sample you selected by clicking it.
* Samples that
have already been
encoded are displayed in light blue. In this case you
will not be able to change the Encode Type or Tempo.
Specify the location of the VariPhrase
format file that will be created by encoding.
- Same as original
The VariPhrase format file will be saved in the
same folder as the original wave file.
- Use
The VariPhrase format file will be saved in the
location you specify.
* If the original sample is on a non-rewritable
medium such as CD-ROM, the VariPhrase file
will automatically be saved in the specified "Use"
location.
* Next time you select files for loading into the
VariOS, you can specify the .vpw file that was
saved here, so the encoding process can be
omitted.
Load the wave files of the Load List into
the VariOS.
* Loading will be halted when the memory
of the VariOS becomes full.
* Loading will perform the following
processes automatically:
- Encode wave files
- Save the encoded wave files
- Send the samples to the VariOS
If you click [Cancel], the content you
specified will be discarded and the dialog
box will close.
* What is encoding?
To make it possible for you to make realtime changes in the pitch, time, and formant of the samples used by
the VariOS, the wave data must be "encoded." There are three encoding types.
SOLO
This encoding type is suitable for monophonic vocals or instruments (sax, trumpet, flute, etc.). If you use this encoding type, you
will be able to control the formants and use the robot voice function (refer to "Sample Edit"). Even if you encode using SOLO,
you will still be able to play polyphonically.
BACKING
This encoding type is suitable for decay-type instruments. In particular it is suitable for phrases that contain instruments with a
clear attack (rhythm loops, drums, percussion, guitar chording).
EMSEMBLE
This encoding type is suitable for sustained-type instruments. It is particularly suitable for sounds that contain gradual changes
in tone (such as choir or strings). This encoding type handles the broadest range of sounds.
* If you encode using BACKING or ENSEMBLE, you will not be able to control the formant or use the robot voice function.
* About tempo
"Auto" mode will automatically calculate the tempo of loop audio materials.
Audio material that has been trimmed for looping and has a 4/4 time signature will be automatically calculated in a tempo range of 80--160. If the
automatically set tempo of the sample is double or half what it should be, you can adjust it using the Tempo [x 2] or [x 1/2] button of the "Load List" ( ).
Original tempo
The sample tempo (original tempo) you specify here is the basic tempo used
to synchronize the sample to the master tempo of V-Producer. You must set
this to the correct tempo. Otherwise, the length of the note will not be correct.
[Example: if the original tempo of the sample is =100]
If the master tempo is set to =200, the sample will play
back at double the speed at which it was sampled.
If the master tempo is set to =50, the sample will play back
at half the speed at which it was sampled.
57
Make settings for samples and
play them (Sample List)
At the bottom of the screen, click the [Sample Info] button (
) to access the Sample List
screen.
fig.03-03de
Opens the "Load Wave
Files" dialog box that lets
you load samples
Preview button:
Auditions the
sample
Copies the sample
Deletes the sample from the
VariOS's memory
(the file will not be deleted)
This switches the keyboard map.
Click to switch the setting
Phrase Map:
The sample can be edited in the Phrase Scope,
and can be played at the pitch of each key.
Stereo/mono indication
"Here comes VariPhrase"
Groove Map:
VariOS sample
number
Sample
name
Encode type indication
SOL: Solo
BAC: Backing
ENS: Ensamble
The sample can be edited in the Groove
Scope, and can be divided at event locations
and assigned to each key.
"Here"
"comes"
"Va"
"ri"
"Phrase"
When editing on a monitor with a limited viewing
area (800 x 600 pixels), use the mouse to drag the
boundary to left and right as necessary while you
edit.
VariOS memory
status
Search button
When you click on a frame placed in the Vari Track,
the corresponding sample will be selected.
58
Make settings for samples and play them (Sample List)
Auditioning a sample
1. Use the mouse to select the sample you want to audition.
You can also use the [ ][ ] keys of your computer keyboard to select a sample.
fig.03-03maru
2. Click the [Preview] button shown in the diagram,
or press the [P] key of your computer keyboard to
audition the sample.
• The sound will be heard from the VariOS.
3. You can play your MIDI keyboard to audition the selected sample.
*
*
*
One free part in the Vari Track (p. 68) is required in order to audition the sample. If you have used
all six parts of the Vari Track, you will not be able to audition samples from the sample list while the
song is playing. The part being previewed will be indicated as
in the Vari Track indicator.
While you are auditioning a sample from your MIDI keyboard, you can turn the PITCH/TIME/
FORMANT knobs of the sound module (VariOS) to adjust the pitch, playback speed, and tonal
character (formant).
FORMANT is available only for samples with an encoding type (p. 57) of SOLO.
59
Make settings for samples and play them (Sample List)
Switching the keyboard map
“Keyboard Map” is a parameter that specifies how a sample loaded by V-Producer will be sounded
when it is triggered via MIDI. You can select one of the following two modes.
To switch between modes, press the
button that is shown at the far right of each sample in the
sample list.
■
(Phrase Map)
The sample will be sounded at the pitch corresponding to the note number. When you edit a sample
for which this mode is specified, the Phrase Scope will automatically be used for editing (p. 77).
Samples set to this mode will be displayed as green frames on the Vari Track.
[Example: If the sample is of a voice saying “Here comes VariPhrase,” the pitch will vary
according to the key you play.]
fig.keymap
"Here comes VariPhrase"
■
(Groove Map)
The sample will be divided at event locations, and each slice of the waveform will be assigned to its
own note number (in semitone steps from C3). When you edit a sample for which this mode is
specified, the Groove Scope will automatically be used for editing (p. 87).
Samples set to this mode will be displayed as purple frames on the Vari Track.
[Example: If the sample is of a voice saying “Here comes VariPhrase,” each slice of the
waveform will be played by different semitones starting at C3.]
fig.keymap2
"Here"
"comes"
"Va"
"ri"
"Phrase"
Use your MIDI keyboard to try out each map, and listen to the difference.
60
Make settings for samples and play them (Sample List)
Deleting a sample
To make best use of the memory of the VariOS, here’s how you can delete unwanted samples from
VariOS memory.
1. At the bottom of the screen, click the [Sample Info] button (
list.
) to display the sample
2. Click the sample that you want to delete.
3. Click the [Delete Sample] (
) button.
The selected sample will be deleted from the memory of the VariOS.
*If the sample has already been placed in the Vari Track, the following message will appear: “Since this
sample is being used in the Vari Track, it cannot be deleted. This sample on the Vari Track
will be selected, so press the [Delete] key to delete it.” After this message is displayed, press the
[Delete] key to delete the selected sample from the Vari Track, and then click the [Delete Sample] button
once again.
If you select [Delete All Unused Samples] from the Option menu, all samples not used in
any part of the Vari Track will be deleted in one operation.
Copying a sample
If you want to play the identical sample with different settings, use the following procedure to copy
the sample.
1. At the bottom of the screen, click the [Sample Info] button (
list.
) to display the sample
2. Click the sample that you want to copy.
3. Click the [Copy Sample] (
) button.
The selected sample will be copied within the VariOS.
4. The Save dialog box will appear. Specify a location on your computer in which to save the copied
sample.
61
Editing the sample parameters
(Sample Edit)
fig.sampleedit
In this screen you can edit various parameters for a sample that was sent to the VariOS.
Click the [Sample Info] button (
) located at the bottom of the screen to display this screen.
Here we will explain the basic parameters used to play a sample on the VariOS.
fig.03-06
■ Key Assign mode
The Key Assign mode selects whether the sample will be played polyphonically (POLY) or
monophonically (SOLO). If you want to play a monophonic instrument (such as sax or flute) legato, it
is effective to select SOLO.
Values
Poly:
Solo:
More than one note can be played simultaneously.
Only the last-played note will sound.
Default setting: Poly
62
Editing the sample parameters (Sample Edit)
■ Playback mode
The Playback mode selects how the sample will be played. If you want to use legato (*) playing to play
a melody different than the original sample, choose “Time Sync.” If you want the sample to play back
from the beginning each time you press a key, choose “Retrigger.”
* “Legato” originally means to “play smoothly,” but here it refers to the technique of playing the next key
(note-on) before releasing the previous key (note-off) so that the sound is never halted.
Values:
"Here comes VariPhrase"
key ON
key OFF
"Here comes VariPhrase"
Retrigger:
key ON
key OFF
Each time you press a key, the sample will play back from the beginning. This will produce an effect
like a musical “round.”
"Here comes VariPhrase"
key ON
"Here
comes
key OFF
VariPhra"
key ON
key OFF
"VariPhrase"
key ON
key OFF
● Key Assign: Poly
When you play legato, the playback point (of the newly played
sounds) will be synchronized to
the sound that is playing from the
beginning. As shown in the diagram, you can produce chords
even in the middle of a phrase.
"comes Vari"
key ON
key OFF
Time Sync:
"Here"
key ON key OFF
"VariPhrase"
key ON key OFF
● Key Assign: Solo
If you set the Key Assign mode to
SOLO and play legato, the pitch
will change starting at the playback point of the previously
played note. You can play your
keyboard to produce a melody that
is completely different than the
original phrase.
"comes"
key ON key OFF
Step:
Each time you play a key, the sample will play to the next event (p. 67) and then stop.
Default setting:
In Phrase Scope mode
In Groove Scope mode
Time Sync
Retrigger
If you set a
(Groove Map) sample to anything other than "Retrigger," the sound will be
interrupted and will not play back correctly.
If you set a
legato.
(Phrase Map) sample to anything other than “Time Sync,” you cannot play
63
Editing the sample parameters (Sample Edit)
■ Robot (robot voice switch)
Turn this ON if you want to remove the sense of pitch from the sample (i.e., to ignore the original pitch
of the sample and sound it at the pitch that you play). In the case of a phrase sample, you can use your
keyboard to play a melody that is entirely different than the original sample, in this way using a single
sample to play a variety of melodies.
Values: OFF, ON
Default value: OFF
* This setting is valid only for samples whose Encode Type (p. 57) is set to SOLO.
* If slight pitch changes in the original phrase are an important part of the performance expression, the
Robot Voice function may not produce satisfactory results. The results may also be unsatisfactory if the
key you play is far away from the pitch of the original phrase.
■ Reset
fig.03-08
If you press this button, the values you edited in Sample Edit will return to their default
settings. Try pressing this button if you have been editing the parameters and can no
longer hear any sound, or if you experience similar problems.
64
Re-encoding a sample (Wave Edit)
If you want to change the encoding type of a sample that is already loaded into the VariOS (for
example, if the sample is a solo vocal phrase, and you want to change it from “Backing” to “Solo”), or
if you want to change the original tempo of the sample (for example, if the sample tempo does not
match the song, you can re-encode the sample in the Wave Edit screen).
At the bottom of the screen, click the [Sample Info] button (
) and then click the [Wave
Edit] tab (
) to access the following screen.
fig.03-10
To re-encode, click the [Edit] button (
) to enter edit mode.
* For details on encoding, refer to “What is encoding?” (p. 55) .
■ Waveform preview
Rewind
Moves the cursor location to the beginning of the waveform.
Stop
Stops playback of the waveform.
Play
Plays the waveform starting from the cursor location.
* Waveform playback in the Wave Edit screen will be heard from the sound card of your computer (not from
the VariOS).
Play step
Plays the waveform one slice at a time (i.e., an individual region of the waveform separated
by events)
65
Re-encoding a sample (Wave Edit)
Loop
If you want playback to occur repeatedly, turn looping on.
Display Grid
Switches the display grid.
Zoom tool
Expands or contracts the waveform display.
■ Changing the encoding type
For details on the encoding type, refer to “What is encoding?” (p. 55).
1. At the bottom of the screen, click the [Sample Info] button (
[Wave Edit] tab (
), and then click the
) to access the Wave Edit screen.
2. In the sample list shown at the left, click the sample that you want to edit.
3. Click the [Edit] button (
) to enter Edit mode.
4. Press a button in the diagram to specify the encoding type.
:
Solo encoding
:
Backing encoding
:
Ensemble encoding
5. Finally, click the [Save] button. The sample will be saved, and re-sent to the VariOS. If you click
the [Cancel] button, your changes will be discarded and you will exit Edit mode.
■ Changing the original tempo
If the tempo of the sample does not match the song, you can change the original tempo of the sample.
fig.03-19
1. As described in steps 1–3 of “Changing the encoding type,” enter Edit mode.
2. Adjust the tempo by entering a new value in either the “Tempo” or “Beats” field.
To edit numerically, double-click the value and edit it in the dialog box that appears.
:
Doubles the value
:
Halves the value
3. Finally, click the [Save] button. The sample will be saved, and re-sent to the VariOS. If you click
the [Cancel] button, your changes will be discarded and you will exit Edit mode.
66
Re-encoding a sample (Wave Edit)
■ Changing the location of a event
Events demarcate the notes that you edit in the Scope Editor screens (p. 76). In the Groove Scope (p.
87), you can slice the sample at the locations of the events you specify here, and reassemble the slices
as desired.
Initially, V-Producer will automatically place events in the sample, but you are free to add, delete, or
adjust the location of the events.
1. As described in steps 1–3 of “Changing the encoding type,” enter Edit mode.
2. The events are shown in the event display area.
fig.03-23
3. Click one of the Event Edit tools to select a tool, and edit the events in the event display area.
fig.03-24
Arrow.................... Drag an event to move it
Pen......................... Click to add an event
Eraser .................... Click to delete an event
Slider (Depth) ...... Moving the slider will cause an event to be automatically
assigned wherever a strong attack (a point where the volume
changes suddenly) is detected.
* Try using the play step
button to play individual slices (waveform divided by events).
4. Finally, click the [Save] button. The sample will be saved, and re-sent to the VariOS. If you click
the [Cancel] button, your changes will be discarded and you will exit Edit mode.
67
Creating a song (Vari Track)
Now let’s actually create a song. Songs are created using the Vari Track.
To create a song, you will drag and drop samples from the sample list into the Vari Track. The samples
placed in this way are called “frames.” You can also use your MIDI keyboard to play samples in real
time and record your performance.
fig.03-28E
Auto Scroll button
Grid Snap button
MARKER
TEMPO
METER (time signature) area
Time ruler
Frame
Playback cursor
Zoom tool
Changing the tempo
1. Double-click the TEMPO area
fig.03-29
2. The Add Tempo dialog box will appear. Specify the desired tempo.
* You can also right-click (
Control-click in MacOS) a tempo event you added, and edit or delete
it by choosing [Add Tempo] or [Delete Tempo] from the menu that appears.
Setting the time signature
1. Double-click the METER (time signature) area.
fig.03-30
2. The Add Meter dialog box will appear. Specify the desired time signature.
* You can also right-click (
Control-click in MacOS) a time signature event you added, and edit
or delete it by choosing [Add Meter] or [Delete Meter] from the menu that appears.
68
Creating a song (Vari Track)
Arranging samples
The Vari Track consists of six parts, which correspond to the six parts of the sound module (VariOS).
The time ruler in the upper area of the screen indicates the measure numbers.
Now let’s place some samples in the Vari Track.
1. Drag a sample from the sample list (hold down the mouse button).
2. Continuing to hold the mouse button, move the sample over the Vari Track, and release the
mouse button (i.e., drag and drop the sample).
3. The sample will be placed at the location of the mouse cursor.
fig.03-31E
Drag and drop
69
Creating a song (Vari Track)
Editing a frame
Samples placed in the Vari Track are shown as rectangular bars, which are called “frames.”
You can edit the structure of your song by moving, copying, and pasting frames.
■ Select the frame to edit
First you need to select the frame(s) that you want to edit. There are several ways to do this.
To select one frame
Use the mouse to click the frame
To select multiple frames
Drag the mouse to describe a rectangle that includes the desired frames.
fig.03-32
* To select a rectangle from above a frame, hold
down the [Ctrl] key and [Shift] key of your
computer keyboard while you drag (
On
MacOS, hold down the [
] key and
[Shift] key while you drag). You can hold
down the [Shift] key of your keyboard and
click a frame to add it to your selection.
To select a region of time
Drag the mouse over the time ruler to select the frames that are included in that region.
fig.03-33
If the Grid Snap button (
) is pressed at
this time, the starting point and ending point of
the selected region will be automatically
adjusted to the nearest grid to the left.
* If you select a region of time, the marker,
time signature, and tempo data can also be
selected for copying. In addition, you can
select all parts that are in that region of
time.
70
Creating a song (Vari Track)
■ Moving a frame
1. Select the frame that you want to move. It will be highlighted.
2. Press and hold the mouse button on the selected frame, drag it to the desired destination, and
release the mouse button (“drag and drop”).
* You cannot move multiple frames that were selected as a time region (p. 70).
* If you turn off the Grid Snap button (
the grid size.
* Using the zoom tool (
), you will be able to make precise moves regardless of
) located in the lower right of Vari Track you can expand or
contract the size of the display grid.
■ Changing the length of a frame
1. When you move the mouse near the beginning or end of a frame, the cursor will change shape as
shown in the diagram.
* When dragging the left edge to shorten the frame, it is not possible to move it any further toward the
right than the note data existing in the frame.
fig.03-36
2. Continuing to hold down the mouse button, drag to left or right and then release the mouse
button.
* Extending a frame will not affect the length of the phrase (sample). This means that if you extend a
frame beyond the length of the phrase, the extended portion will be silent.
■ Copying a frame
You can copy a frame any number of times to the desired locations. This is an easy way to create
repeated rhythms, etc.
Here are several ways in which you can copy a frame.
Copy by dragging and dropping
1. Select the frame that you want to copy.
2. Press and hold the mouse button on the selected frame, drag it to the desired location, and release
the mouse button while pressing the [Ctrl] key of your keyboard (
in MacOS, the [Option]
key).
* Two or more frames selected by time region (p. 70) cannot be copied by dragging and dropping.
71
Creating a song (Vari Track)
Copy by using the Copy and Paste commands
1. Select the frame that you want to copy.
2. Use one of the following methods to copy the frame.
• Choose Copy from the Edit menu.
• Right-click (
in MacOS, Control-click) the selected frame, and choose Copy from the
menu that appears.
• Press [Ctrl] + [C] on your keyboard (
in MacOS, [
] + [C]).
3. Click the copy-destination location.
The part you clicked will be highlighted, and the playback cursor (vertical line) will move to the
location you clicked.
4. Use one of the following methods to paste the frame you copied.
• Choose Paste from the Edit menu.
• Right-click (
in MacOS, Control-click), and choose Paste from the menu that appears.
• Press [Ctrl] + [V] on your keyboard (
in MacOS, [
] + [V])
Copy a frame more than once (the Repeat function)
You can use the Repeat function to easily create repeated rhythm patterns.
1. Select the frame that you want to copy.
2. Use one of the following methods to execute the Repeat function.
• Choose Repeat from the Edit menu.
• Right-click the selected frame (
in MacOS, Control-click), and choose Repeat from the
menu that appears.
• Press [Ctrl] + [R] on your keyboard (
in MacOS, [
] + [R]).
3. When the Repeat Copy dialog box appears, specify the number of repetitions.
4. Click OK.
■ Deleting a frame
1. Select the frame that you want to delete.
2. Use one of the following methods to delete the frame.
• Choose Cut or Delete from the Edit menu.
• Right-click the selected frame (
in MacOS, Control-click), and choose Cut or Delete from
the menu that appears.
• Press [Ctrl] + [X] (
in MacOS, [
] + [X]) or the [Delete] key on your keyboard.
* When you use these delete commands to delete a frame, the original location will become a blank, and
the overall length of the song will not change. If you want to shorten the song by deleting measures
(for example if you want to remove two measures from the introduction), use the Delete Measure
command on the Edit menu.
* If you right-click the PART name (
in MacOS, Control-click) and choose “Delete Frames”]
from the menu that appears, all frames will be deleted from that part.
72
Creating a song (Vari Track)
Loop playback
You can use loop playback to listen repeatedly to a specific region.
1. In the locator, turn on the loop button.
fig.03-37
2. The loop markers will be displayed in the time ruler.
fig.03-38_75
3. Drag the loop markers to left or right to specify the start point and end point of the loop.
4. Press the play button, and playback will loop between the loop markers.
■ Using the Quick Loop function to set the loop region
The Quick Loop function sets the selected region as the loop region.
Select a frame in the Vari Track, and click the Quick Loop Position button in the locator. The beginning
and end of the frame will be set as the loop region. If you drag over the time ruler to select a region
and then click the Quick Loop Position button, that region will be set as the loop region.
fig.03-39
73
Creating a song (Vari Track)
Editing the settings of a frame (Frame Properties)
You can edit the frame properties to change the settings (volume, pan, pitch, etc.) of a frame that was
placed on the Vari Track. Click to select the frame you want to edit. (It will be enclosed in a red border.)
Switches the frame properties
between displayed/hidden.
Sample
name
Stereo/mono
indication
Encode type indication
SOLO: Solo
BAC: Backing
ENS: Ensemble
Location of frame as beginning and end (measure:beat:tick)
Edit the numeric values by dragging them up or down with the
mouse.
Adjusts the length of frame to the length of the region actually
sounded by that frame. (The actual sounding locations of the frame
will depend on the locations of the note data within the frame.)
Adjusts the volume (0--127) of the frame
Edit the numeric value by dragging it up or down with the mouse.
Adjusts the panning of the frame (left L63--center 0--right R63)
Edit the numeric value by dragging it up or down with the mouse.
f
i
g
.
0
3
4
0
E
*If you loop the playback as
described in “Loop
playback” (p. 73) while
editing the various frame
property parameters, you
can hear the results of your
edits while you make them.
This makes it easier for you
to get exactly the right
pitch and volume.
Transposes the pitch in semitone steps (-63--0--+63)
Edit the numeric value by dragging it up or down with the mouse.
Selects the Take for realtime recording
Solo/Mute/Volume/Pan settings
The Vari Track contains six parts, and you can make Solo/Mute/Volume/Pan settings for each part.
fig.03-42E
Pan+ (offset pan)
Use this to adjust the panpot setting of each
part. The value you specify here is added to the
panpot value for each frame that you specified in
the frame property area. Edit the numeric value
by dragging it up or down with the mouse.
Vol+ (offset volume)
Use this to adjust the volume setting of each
part. The value you specify here is added to the
volume value for each frame that you specified
in the frame property area. Edit the numeric
value by dragging it up or down with the mouse.
MUTE
Mutes the part. To cancel
muting, click the button
once again.
74
SOLO
Plays only that part. To
cancel solo, click the button
once again.
Creating a song (Vari Track)
Playing your MIDI keyboard and recording
(RealTime Rec)
1. In the sample list, click to select the sample that you want to record.
When you play your MIDI keyboard you will hear the selected sample.
* If you do not hear sound when you play your MIDI keyboard, make sure that your keyboard is
connected as described in “Connecting MIDI and audio devices” (p. 20). Then click the Options
menu item “MIDI/Audio Settings” (
in MacOS, “MIDI Settings”), and make sure that the
port for your MIDI keyboard is selected in the [MIDI IN Ports (Keyboard)” field.
2. In the Vari Track, select the part that you want to record.
* Click a [Rec] (record-part) button
) to select the part that you want to record. The indicator of
that part will change to
(MIDI keyboard is being thru-ed). When the song is played, the
frames placed in this part will not be heard.
* Frames that have already been placed in the part whose [Rec] (record-part) button (
) is clicked
will be overwritten and lost when you record.
• If you do not press a (
) button, recording will occur on an empty part.
• The state of each part is shown by the indicator as follows.
Playback: the part can be played back (normal state)
Muted: the part is muted (the [M] button is pressed, or another part is soloed [S])
Record: the indicator will be in this state when you press the [REC] button and then press the
[
] button
MIDI thru: the MIDI keyboard is being thru-ed. The part for which you press the [REC] button
will be in this state. (During playback, the frames placed in this part will not sound.) If you
have not pressed the [REC] button, MIDI thru will be assigned automatically. When stopped,
part 1 will be selected as the MIDI thru part. While playing, a part containing no frames will
be selected as the MIDI thru part.
3. In the locator, press the record button (
) and then press the play button (
) to begin
recording. Perform by playing your MIDI keyboard and turning the PITCH/TIME/FORMANT
knobs of the VariOS.
* If desired, you can first press the play button (
) to begin playback, and then press the record
button (
). In this case, recording will begin at the moment you press the record button. You may
find it convenient to use loop playback while you practice, and then press the record button when you
are ready to begin recording.
4. In the locator, press the stop button ([
created in the Vari Track.
]) to stop recording. The frame you recorded will be
5. If you recorded repeatedly while using loop-playback, a recorded take will be created for each
repetition of the loop. “Take 1” will be the recording for the first iteration, “take 2” for the second,
and so on. Use the Frame Take field in Frame Properties to select your favorite take.
* As an alternative to the recording method described here, you can use “Modify Recording” (p. 85),
in which you will add data while looping a single frame.
75
Phrase editing (Scope Editor)
The scope editor lets you edit the performance data within a frame. By using the scope editor you can
visually edit pitch, time, and formant data for any location within a phrase.
The scope editor will be either the Phrase Scope or the Groove Scope, depending on the keyboard map
(p. 60) setting in the sample list.
Since you can edit while listening to the playback loop, you can hear the results of your editing while
you work. In addition, it’s easy to restore a phrase to its previous state, so you can repeat cycles of trial
and error as many times as you like.
■ Phrase scope
The Phrase Scope will appear when you edit a frame that was pasted with the sample’s “Keyboard
Map” set to
(Phrase Map). As its name suggests, the Phrase Scope interprets the performance data
within the frame as a phrase, and is used mainly to edit melodic elements of the phrase. For example,
in the case of a vocal sample, you can change the melody line or even add harmony to turn the sound
into a chord. This technique is particularly powerful when applied to single-line samples such as
vocals.
fig.phrase1
■ Groove scope
The Groove Scope will appear when you edit a frame that was pasted with the sample’s “Keyboard
Map” set to
(Groove Map). The Groove Scope interprets the performance data within the frame
as a rhythm pattern, and is used mainly to edit rhythmic elements.
For example, in the case of a drum pattern sample, each slice (a waveform region divided by events)
will be a drum sound such as bass drum, snare, etc., and you can re-configure the drum pattern by
changing the time location of these slices.
This is particularly useful when used on rhythm part samples such as drum patterns.
fig.phrase2
76
Editing in the Phrase Scope
The phrase scope will open when you double-click a green frame that was pasted with the sample’s
“Keyboard Map” (p. 60) set to
(Phrase Map).
fig.03-ps01e
Modify record
Tool buttons
Auto scroll
Grid snap
Quantize
Ruler
Waveform
display area
Note display
area
Curve
select
Reset
curve
Controller
display area
Controller
select
Curve view
Time keep
Sample data
Zoom tool
Time zero input
● Waveform display area
The waveform of the encoded sample is displayed here. When you edit notes or time, the results will
appear in this area. You cannot directly edit the waveform in the waveform display area.
* If the waveform is not displayed, try using the scroll bar located at the right of the waveform display area
to adjust the displayed area (upward or downward).
fig.03-ps02e
Events (blue)
If you play from the middle of a phrase, the sound will be heard starting at the
location of an event (blue line).
About pitches in the waveform display area
•For samples encoded in the SOLO type, the waveform will be displayed at the
positions of the notes.
•Pitches in the waveform display area are only approximate, and may not be
accurate for some samples.
•For samples encoded in a type other than SOLO, the entire waveform will be
displayed at the same pitch.
● Note display area
The notes corresponding to the waveform display area are shown here. You can use these notes to edit
the pitches of the phrase. To edit a note, select a tool from the tool buttons.
● Controller display area
In this area you can edit the PITCH, TIME, FORMANT, DYNAMICS, and VELOCITY parameters. Use
the [Controller select] buttons at the left to select the parameter you want to edit. Edit the selected
parameter by using the mouse to drag the curve directly.
77
Editing in the Phrase Scope
Editing the Pitch/Time/Formant/Dynamics
Here’s how to edit the Pitch/Time/Formant/Dynamics in the specified region of the phrase.
1. Select the parameter that you want to edit.
At the left of the controller display area, press one of the [Controller select] buttons to select the
parameter you want to edit: [PITCH], [TIME], [FORMANT], or [DYNAMICS].
PITCH (Control change number 16)
TIME (control change number 17)
FORMANT (control change number 18)
DYNAMICS (control change number 11 Expression)
Varies the pitch.
Varies the playback speed.
If the sample was encoded as “SOLO,” varies the
tonal character (formant).
Varies the volume.
* You cannot edit the formant if the sample was encoded in a type other than “SOLO.” Even if you press
the FORMANT button, the red line indicating the formant will not be displayed.
2. Use one of the following methods to specify the region that you want to edit.
To select a desired region
To extend the selected region
To select an event
To select multiple events
To cancel your selection
Drag the mouse to left or right in the controller display area. To select a region in grid units, turn on the Grid Snap button.
Hold down the [Shift] key of your keyboard and click in the controller display area.
Click the waveform display area.
Drag the mouse to left or right in the waveform display area.
Click in an unselected part of the controller display area, or click the
border.
3. Use the [Curve select] buttons to select the type of curve.
fig.03-ps03
You can select one of three curves to specify how the parameter will change. Click
either the Flat, Linear, or Rounded curve button.
● Flat
● Linear
78
: The parameter will be increased or decreased equally.
: The parameter will be increased or decreased in a straight line.
Editing in the Phrase Scope
● Rounded
: The parameter will be increased or decreased in a rounded curve.
* You can also right-click (
in MacOS, control-click) the controller display area and choose a
curve from the menu that appears.
● Reset curve
: Resets the curve in the selected region.
4. Hold down the mouse button on the selected region in the controller display area, and drag
upward or downward. When you reach the desired value, release the mouse button.
* If you selected the Linear or Rounded curve, the value will be increased or decreased around the point
at which you pressed the mouse button.
Time Keep function
When editing the time in Curve Edit mode, you can use the Time Keep function. If the Time Keep
function is turned on, the curve will be adjusted when you edit the Time so that the length of the
selected region will stay the same. You can use this when you want to create a slight change in the
Time parameter, but want the overall length to remain unchanged.
Click the [Time Keep] button (
) to switch the Time Keep function on/off.
* This is not valid for Time Zero input.
Time Zero input
If you want to stop (“zero”) time in the Phrase Scope, click the [Time Zero] button (
) to change
the cursor to the Time Zero input tool.
To use this, drag the Time Zero input tool across the Time curve, moving the mouse toward the right
and then releasing it. When you input Zero Time, a Time Zero line (a dark blue line shown at the
bottom of the control area when displaying the Time parameter) will appear, and the waveform
display area will be striped.
If you want to cancel the Time Zero line, click it with the eraser tool.
79
Editing in the Phrase Scope
■ Erasing controller data
There are two ways to erase controller data.
● Using the Reset Curve button
1. Select a region.
2. Click the Reset Curve button (
).
● Using the eraser tool
1. Select the eraser (
) tool button.
2. When you drag the eraser tool over the controller display area to select a region, the controller
data in the selected region will be erased. You can also erase this data by clicking the selected
region of the controller display area.
To delete control data other than Pitch/Time/Formant/Dynamics that you input during realtime
recording, etc., select a region in the control display area, right-click (
in MacOS, control-click), and
choose “Clear Other Controls” to delete the data.
80
Editing in the Phrase Scope
Editing notes
By editing notes you can modify the melody of a phrase or create chords.
By default (when a frame is first pasted), a note is placed at the original pitch of the sample (the key
that will sound the sample at its original pitch). One note will be displayed for each event.
In the phrase scope you can move or add notes to freely play the sample just as if you were controlling
the VariOS from your keyboard. For example, you can create a chorus melody from just a single vocal
melody.
fig.03-ps12
If you want to play legato in the phrase scope, go to the Sample
Edit screen (p. 62) and set the sample Playback mode (p. 63) to
“TIME SYNC.”
If you edit a note with the Playback mode set to “RETRIGGER,” the
beginning of the sample will be played each time the pitch
changes, and you will be unable to play legato.
■ Grid Snap setting
Turn this on if you want to place notes or select regions at intervals of the grid spacing.
When you drag a note to move it, the note will move in units of the grid. For example, if the grid
spacing is set to one measure, a note that was intentionally placed a 1/16th note ahead of the bar line
will move in steps of one measure, maintaining its position 1/16th note ahead of the bar line.
To switch the display grid, drag the numerical value shown at the right of the grid button, and choose
from the pulldown menu that appears.
Values:
BAR
1/2
1/4
1/8
1/8T
1/16
1/16T
1/32
1/32T
1/64
1/64T
1 measure
Half note
Quarter note
Eighth note
Eighth note triplet
16th note
16th note triplet
32nd note
32nd note triplet
64th note
64th note triplet
Default setting: 1/16
■ Selecting multiple notes
1. Choose the arrow (
) from the tool buttons.
2. You can use the following methods to select multiple notes. The selected notes will turn red.
• Use the arrow cursor to drag left or right in the note area to select a region. The notes in that
region will be selected.
• Hold down the [Shift] key of your computer keyboard and click the mouse on each desired note to
select two or more notes.
81
Editing in the Phrase Scope
■ Changing the pitch (fixed movement of the note upward or downward)
1. Choose the arrow (
) from the tool buttons.
2. Use the mouse to drag the note, and then press the [SHIFT] key of your computer.
The mouse cursor will be shown as an up/down arrow.
3. Drag the note upward or downward.
The waveform display area will show how the phrase has changed.
The keyboard shown in the vertical axis of the waveform display area will give you an idea of the
pitch that will sound. The vertical axis of the note area will indicate the note number with which
the phrase will be played.
■ Adjusting the legato timing
A note will be colored light blue to indicate that it is played legato with the adjacent notes.
* Notes colored light blue are the default notes generated when you paste a sample into the Vari Track. In
contrast, the notes you add by recording or by using the pen tool are colored purple. You cannot delete
light blue notes.
fig.03-ps15e
By moving a light blue note to left or right, you can adjust the
note-on and note-off timing while preserving the legato
playback.
Legato
1. Choose the arrow (
) from the tool buttons.
2. Move the mouse near either end of the note.
3. Drag the note to left or right.
The notes at either side of the note you dragged will contract or expand automatically to preserve
the legato playback.
■ Moving a note to another position
You can move a note to a desired position. At this time, light blue notes will preserve the legato
playback.
1. Choose the arrow (
) from the tool buttons.
2. Drag the note upward, downward, left, or right.
* If you want to limit the movement of the note to the vertical direction, hold down the [Shift] key and
drag the note upward or downward.
■ Adding a note
You can add new notes. Notes you add are displayed in purple.
1. Choose the pen (
) from the tool buttons.
2. At the location where you want to add a note, press and hold the mouse button, drag to the right,
and then release the mouse button.
A purple note will be added.
82
Editing in the Phrase Scope
■ Changing the length of a note
You are free to change the length of a purple note.
1. Choose the arrow (
) from the tool buttons.
2. Move the mouse near either end of the note.
3. Drag the note to left or right.
■ Erasing a note
Purple notes can be erased. Light blue notes cannot be erased.
1. Choose the eraser (
) from the tool buttons.
2. Click the mouse on the note that you want to erase.
* By dragging the eraser cursor across the note display area to select a region, you can delete all the
purple notes in that region.
■ Copying a note
Purple notes can be copied. Light blue notes cannot be copied.
1. Select the note that you want to copy.
2. Use one of the following methods to copy the note.
• Choose Copy from the Edit menu.
• Right-click (
that appears.
in MacOS, control-click) the selected note, and choose Copy from the menu
• On your computer keyboard, press [Ctrl] + [C] (
on MacOS, press [
] + [C]).
3. Click the ruler of the phrase scope to move the playback cursor (the vertical line) to the starting
location at which you want to copy the note.
4. Once again click the note display area, and use one of the following methods to paste the note
you copied.
• Choose Paste from the Edit menu.
• Right-click (
in MacOS, control-click) and choose Paste from the menu that appears.
• On your computer keyboard, press [Ctrl] + [V] (
on MacOS, press [
] + [V]).
■ Dividing a note
You can divide a note into two notes. For example, you can divide a note at the point where you want
to modify the melody, and then move the divided notes upward or downward to change the pitch at
the desired timing.
1. Choose the scissors (
) from the tool buttons.
2. Click the mouse at the location where you want to divide the note.
83
Editing in the Phrase Scope
■ Joining two notes
You can join two notes that were divided.
1. Adjust the two notes so that they are horizontally aligned.
2. Choose the bond (
) from the tool buttons.
3. Click between the two notes that you want to join.
■ Editing the velocity
1. Using the [Controller select buttons] located at the left of the controller display area, choose
[VELOCITY].
A graph of the velocities will be displayed.
2. Use the arrow cursor to directly drag the velocity graph upward or downward.
The graph you are editing will turn red.
3. If more than one note exists at the identical timing, click in the note display area on the note that
you want to edit, and the corresponding velocity graph will turn red.
* In the phrase scope, adjacent legato notes are located at the same pitch, the velocity of the second and
subsequent notes will be ignored. Even though you will be able to edit the velocity of the second and
subsequent notes on the screen, the sound produced by the VariOS when you play legato will use the
velocity of the first note located at that pitch.
fig.03VeloE
Legato notes located at the
same pitch
The velocities can be edited
in the screen, but when the
sound module plays these
notes, the second and
subsequent notes will have
the same velocity as the first
note.
84
Editing in the Phrase Scope
Modify Recording
This function lets you modify or edit the selected frame in real time.
Modify Recording differs from conventional realtime recording (p. 75) in that when you loop-record,
the data will be added to the same take. For example, you would use Modify Recording if you want
to record the kick on the first cycle, snare on the second, and hi-hat on the third.
Realtime Recording
Modify Recording
When loop-recording, the first cycle is recorded on take 1, the second as take 2,
and so on. Use the frame property parameter Frame Take to select your favorite
take.
When loop-recording, the data recorded on each cycle is added to the same
take. Events will be added, and Pitch, Time, Formant, and Dynamics data will
be overwritten over the previously recorded data.
1. Loop-playback a frame.
2. Click the Modify Record button shown below.
fig.03-ps20
● Punch-in/out button
fig.03-ps21
When you press the punch-in/out button, the punch-in/out anchors will be displayed at the
beginning and end of the selected region in the time ruler of the scope editor screen. Recording
will apply to the region indicated by the punch-in/out anchors—anything you play outside this
region will not be recorded.
*The location of the punch-in/out anchors will move according to any increases or decreases due
to TIME editing.
3. In the locator area, press the record button (
) and then press the play button (
) to begin
recording. Perform by playing your MIDI keyboard and/or turning the PITCH/TIME/FORMANT
knobs of the VariOS.
* You can also press the play button (
) first, and then press the record button (
). In this case,
recording will begin at the moment you press the record button, so you can practice while the
playback continues looping, and then press the record button when you are ready to record.
4. In the locator area, press the stop button (
) to stop recording.
85
Editing in the Phrase Scope
Quantize
Quantize is a function that adjusts the note locations to left or right so that the notes line up with
intervals of the displayed grid.
1. As described in “Selecting multiple notes” (p. 81), specify the region that you want to quantize.
2. Set the numeric value at the right of the quantize button to specify the quantization rate (the
amount of adjustment).
You can adjust the quantization rate in a range of 0%–100% by dragging the numeric value
upward or downward. With a setting of 100%, the note locations will be aligned precisely with the
grid intervals.
3. Click the quantize button to execute the quantize operation.
fig.03-ps22
If you did not get the result you expected, choose [Undo] from the [Edit] menu, then
try the operation over again using other settings.
If notes are connected by legato, the first note will adhere to the grid, and subsequent notes
will move in parallel with the first.
86
Editing in the Groove Scope
The groove scope will open when you double-click a purple frame that was pasted with the sample’s
“Keyboard Map” (p. 60) set to
(Groove Map).
fig.03-gs01e
Modify record
Tool buttons
Preview
Auto scroll
Grid snap
Quantize
Random
Original
waveform
display area
Ruler
Slice (note)
display area
Curve
select
Reset
Curve
Controller
display area
Controller
select
Curve
View
Sample information
Zoom tool
● Original waveform display area
The sample waveform is divided into slices at event locations, and the slices are displayed in this area.
Slices are numbered sequentially from the beginning.
If you hold down [Shift] and click a slice in the original waveform display area, the slice whose
number you clicked will be added to the original location of the slice display area.
● Slice (note) display area
Here you can edit slices (notes). Slices (waveforms) are displayed in stair-step fashion. The vertical
axis shows the type of slice (arranged in order from the bottom), and the horizontal axis shows the
timing at which each slice will be heard.
fig.03-gs02
Slice name display area
The name of the slice is shown here. You can double-click the slice name to
re-name it.
By right-clicking the slice name (
on MacOS, control-clicking), you
can switch the display between the slice name and the note name.
● Controller display area
Here you can edit the PITCH, TIME, FORMANT, DYNAMICS, and VELOCITY parameters. Use the
[Controller select buttons] at the left to switch parameters. Use the mouse to directly edit the curve.
Basic operation is the same as in the phrase scope.
87
Editing in the Groove Scope
Editing the Pitch/Time/Formant/Dynamics
You can edit the Pitch/Time/Formant/Dynamics in the desired region of the phrase. The procedure
is the same as in the phrase scope, as described in “Editing the Pitch/Time/Formant/Dynamics” (p.
78).
* Unlike the phrase scope, the groove scope does not change the timing of a slice (note) when you edit the
TIME parameter. For this reason, the groove scope does not have the “Time Keep” and “Time zero
input” functions that are provided in the phrase scope. (Moving the TIME curve to the bottom will
produce a zero time.)
Editing a slice (note)
Editing a slice is essentially the same as editing a note in the phrase scope.
fig.03-gs03
When you want to edit slices in the groove scope, go to the Sample Edit
screen (p. 62) and set the playback mode of the sample to “Retrigger” (p.
63). If the playback mode is anything other than “Retrigger,” editing an
event will cause the sound to be interrupted or otherwise fail to play
correctly.
* The groove scope provides a preview function for each slice.
• If the
button is on, you can audition a sample by clicking it.
• If the
button is on, you can audition a sample by moving the mouse cursor over it.
■ Selecting multiple slices
1. Choose the arrow (
) from the tool buttons.
2. You can use the following methods to select multiple slices. Selected slices will turn red.
• Drag the arrow cursor to the left or right in the event display area or controller display area to
specify a region. The slices in the region will be selected.
• Hold down the [Shift] key of your computer and click the mouse on a slice to add it to or remove
it from your selection.
■ Moving a slice
You can freely move a note to another location.
1. Choose the arrow (
) from the tool buttons.
2. Drag the slice up, down, left, or right.
If there is no original waveform corresponding to the slice, the waveform display of the slice will
be a straight line.
* If you want to limit the movement of the slice to the vertical direction, hold down the [Shift] key and
drag the slice upward or downward.
88
Editing in the Groove Scope
■ Adding a slice
Here’s how to add a new slice.
1. Choose the pen (
) from the tool buttons.
2. Hold down the mouse button at the location where you want to add a slice, drag to the right, and
then release the mouse button.
If you extend the slice beyond the length of its original waveform, the waveform display of the
slice will be a straight line.
If you hold down [Shift] and click a slice in the original waveform display area, the slice of the
number you clicked will be added to the original location of the slice display area.
■ Adjusting the length of a slice
1. Choose the arrow (
) from the tool buttons.
2. Move the mouse near either end of the slice.
3. Drag the slice to left or right.
If you extend the slice beyond the length of its original waveform, the waveform display of the
slice will be a straight line.
■ Deleting a slice
1. Choose the eraser (
) from the tool buttons.
2. In the slice display area, click the mouse on the slice you want to delete.
* By dragging the eraser tool across the slice display area to select a region, you can delete the slices
from the corresponding region.
■ Copying a slice by dragging and dropping
1. Select the slice that you want to copy.
2. Press and hold the mouse button on the selected slice, move it to the desired destination, and
then hold down the [Ctrl] key (
in MacOS, the [Option] key) of your keyboard and release the
mouse button (drag and drop).
89
Editing in the Groove Scope
■ Copying a slice with the Copy and Paste commands
1. Select the slice that you want to copy.
2. Use one of the following methods to copy the slice.
• Choose Copy from the Edit menu.
• Right-click (
that appears.
in MacOS, control-click) the selected slice, and choose Copy from the menu
• Press [Ctrl] + [C] (
in MacOS, [
] + [C]) on your keyboard.
3. Click the ruler of the groove scope| to move the playback cursor (the vertical line) to the
location at which you want the pasted slice to begin.
4. Use one of the following methods to paste the copied slice.
• Choose Paste from the Edit menu.
• Right-click (
in MacOS, control-click) and choose Paste from the menu that appears.
• Press [Ctrl] + [V] (
in MacOS, [
] + [V]) on your keyboard.
■ Random
Random is a function that randomly replaces the selected slice with another slice of a different
number. This can create unexpected and interesting beats.
1. As described in “Selecting multiple notes” (p. 81), specify the area to which Random will be
applied.
2. Click the Random button (
).
The Random function will be executed.
If you are not satisfied with the results, choose the menu command [Edit] - [Undo], and then execute
Random again.
Modify Recording
The procedure is the same as for “Modify Recording” (p. 85) in the phrase scope.
Quantize
The procedure is the same as for “Quantize” (p. 86) in the phrase scope.
90
Saving
Saving a song
In the same way as in most programs, you will save your work by choosing [Save Song] or [Save As]
from the File menu. The song will be saved in V-Producer format (in Windows, the file name extension
is .vpd).
In V-Producer, the actual audio data used by a song (.vpw files) is handled separately from the song
file (.vpd file) that uses this audio data. The song file contains only references to these audio files. This
means that if you copy or back up only the song file to another computer, you will be unable to play
back the song.
If you select “Save song with the sample files” when saving, all sample files (.vpw files) used by the
song will be copied to the same folder as the song file. By moving this entire folder, you can move your
song to another computer or create a backup.
About the sample files (.vpw) used by the song
The settings file named “song name + PRM.ini” that is saved in the same folder as the song
file (.vpd) stores the location (absolute path) of the sample files (.vpw) used in the song.
For this reason, if you change the location of the samples used in the song, V-Producer will
lose track of the sample file locations. In this case, the next time you open the song, the
"[sample name] Load File Name" dialog box will appear. Please specify the file location of
the sample name shown in the dialog box.
* The [Export SMF] command on the File menu will save the song in SMF format, so you can load it into
another sequencer and use it to play the VariOS. For details, refer to “Using your MIDI sequencer to
play data (SMF) created by V-Producer” (p. 138).
Exporting a wave file
The [Export Wave File] command on the File menu will export data as a wave file.
Since wave files are a standard format, they can be loaded into virtually any program.
When exporting wave files, you have the following options:
Song
Multiple Part
Export a single wave file for the entire song
Export separate wave files for each part of the song
When you save, the parts that are checked in the “Export Part”
field will be output. Each part will be saved in the folder you've
specified, using this format: “specified file name _ part number.’
* The internal effects of the VariOS (see “Using effects” (p. 93) ) will not be reflected by the wave file
export function.
91
Using the effects of the VariOS (Mixer)
V-Producer has a Mixer window in which you can control the level, pan, etc., of the six parts of the
VariOS, and an Effect window in which you can adjust the effect parameters.
The following diagram shows the effect signal flow.
fig.newmixer_80
Reverb
Master Level
Reverb Send
Level
MAIN
OUT
Reverb
Chorus Rev
Send Level
Chorus Send
Level
Chorus
Master Level
Chorus
OUTPUT
Sound
Generator
Multi-FX Send
Level
MAIN
M-FX
Multi-FX Cho
Send Level
Multi-FX Rev
Send Level
DIGITAL
OUT
Multi-FX
Out Assign
Multi-FX
Multi-FX
Master Level
DIR
DIRECT
OUT
Using the Mixer
fig.04-MIX01
The mixer window will appear when you click the mixer button in the tool bar
of the main window.
fig.04-MIX02E
Output assign
M-FX send level
Adjusts the depth of the multi-effect
Specifies the output
destination of the original
sound
* Valid only when output assign is set to
[M-FX]
Chorus send level
Adjusts the depth of the chorus
* This has no effect if output assign is
set to [DIR]
Reverb send level
Adjusts the depth of the reverb
* This has no effect if output assign is
set to [DIR]
Panpot
Adjusts the stereo position of
each part
Slider (level)
Adjusts the volume of each
92
Effects
Opens the effect window
corresponding to each
button
Using the effects of the VariOS (Mixer)
Using effects
When you press the [MULTI], [REVERB], or [CHORUS] button of the mixer window, the
corresponding effect window will open.
■ MULTI (Multi-effect)
fig.04-MIX03E
ON/OFF switch
Type select button
Multi-FX Master Level
Volume of the multi-effect output
Multi-FX Cho Send Level
Adjusts the chorus depth for
the multi-effect output
Multi-FX Rev Send Level
Adjusts the reverb depth for the
multi-effect output
Multi-FX Out Assign
Specifies the output destination
of the multi-effect
MAIN: output from "MAIN OUT"
DIR: output from "DIRECT OUT"
Displays the list of types
■ CHORUS
fig.04-MIX04E
Chorus Master Level
ON/OFF switch
Volume of the chorus output
Type select button
Chorus Rev Send Level
Adjusts the reverb depth
for the chorus output
Displays the list of types
■ REVERB
fig.04-MIX05E
ON/OFF switch
Type select button
Reverb Master Level
Volume of the reverb output
Displays the list of types
93
Using the effects of the VariOS (Mixer)
■ Switching the effect type
There are 40 types of multi-effect, eight types of chorus, and nine types of reverb.
1. Click the type select buttons (
) located above the displayed effect type name. The effect
type will change.
Alternatively, you can click the TYPE field (
) to view a list of effect types, and directly
select the desired type.
* For details on the parameters of each effect, refer to the Reference Manual (pdf).
94
Taking advantage of the VariOS
Keyboard (VariOS Keyboard)
Using the VariOS Keyboard
fig.toolbar
Click the keyboard button in the toolbar to open the keyboard.
PITCH/TIME/FORMANT knobs
Screen
Part buttons
Velocity fader
Keyboard
Control the pitch/time/formant of the part.
Shows the MIDI messages of the part being auditioned and the
part(s) specified by the MONITOR PART buttons.
Specify the part(s) whose MIDI messages will be displayed in
the screen.
Adjusts the velocity of the notes.
Click the keyboard to listen to the part being auditioned.
fig.1_80
PITCH/TIME/FORMANT knobs
Screen
Part buttons
Velocity
Velocity fader
Keyboard
■ Selecting a part
When you click a Part button, the performance data of the selected part will be reflected by the screen
and keyboard. This is also the part that will be used when you perform using the VariOS keyboard’s
controllers or an external MIDI keyboard. If all of the Part buttons are off, the sample that is selected
in the Sample List will be used.
* If a Part button is on, the sample selected in the Sample List will not sound when you play the VariOS
keyboard or an external MIDI keyboard. The sample that is currently assigned to the selected part will be
sounded.
95
Taking advantage of the VariOS Keyboard (VariOS Keyboard)
■ Turning a note on/off from your computer keyboard
1. Press the [Shift]+[K] keys.
fig.5
If you place the mouse pointer on the
keyboard and right-click (
in
MacOS, control-click), and choose
“Change PC Keyboard” from the
menu that appears, you will be able to
turn notes on/off from the keyboard of
your computer.
fig.trackkey
The keys of your computer keyboard will correspond to notes as shown in
the diagram..
You can use the left/right keys [
][
] to shift the octave.
Once again, press the [Shift]+[K] keys. Alternatively, right-click (
in
MacOS, control-click) and uncheck “Change PC Keyboard” in the menu
that appears to exit this function.
■ Surface controller
fig.6
96
When you double-click in the screen, a
Screen
rectangular frame as shown in the diagram
will appear. By dragging the mouse inside
this frame, you can simultaneously control
both pitch and time. When you click the
parameter name, the parameter indication
will change in the order of PITCH-TIMEFORMANT, and the parameter to be
controlled will be assigned to each axis.
It is possible to specify the same parameter for the X-axis and Y-axis, such as PITCH-PITCH or TIMETIME. However in this case, the X-axis movement will be ignored, and control will occur only on the
Y-axis.
Taking advantage of the VariOS Keyboard (VariOS Keyboard)
■ Resetting PITCH/TIME/FORMANT
When you press the [X] key, any pitch/time/formant values that have been modified by means of the
knobs or Surface controller will be reset to their center values.
■ Inputting TIME zero
TIME zero will be input while you hold down the [Z] key. When you release the key, the time will
return to the center value. This is a convenient way to rhythmically input a TIME zero value to create
the distinctive VariPhrase “buzz.”
■ Note name display
fig.3
fig.2
By pressing the [Shift]+[N] keys, you can
switch the note names of the note-on keys
between displayed and hidden.
By placing the mouse pointer on the
keyboard and right-clicking (
in
MacOS, control-clicking), and choosing
“View Note Name” from the menu that
appears, you can show or hide the note
name display for the note-on keys.
97
Taking advantage of the VariOS Keyboard (VariOS Keyboard)
98
Operation guide:
Sound module (VariOS)
99
An overview of the VariOS
Internal structure of the VariOS
■ “Samples” and “performances”
The VariOS uses two units of sound: “samples” and “performances.”
A “sample” consists of a wave with VariOS sample parameters. Data that assigns samples to the six parts is called a
“performance.” The internal memory of the VariOS can contain only one performance. A performance has six parts, and
can use up to a total of 128 samples. By assigning samples to the six parts and sending MIDI messages to each part, you
can play multiple samples simultaneously. The six parts in V-Producer’s Vari Track (p. 68) correspond to the six parts of
the performance.
■ To play sounds
The VariOS is not ready to produce sound immediately after you turn on the power. Samples must first be loaded into
internal memory. Connect the VariOS to your computer via a USB cable, and use the V-Producer’s “Load Wave Files”
command (p. 56) to send wave files (WAV or AIFF) or Vari Phrase format files (VPW) from your computer to the VariOS.
At this time, V-Producer will convert (encode) (p. 55) the wave files into Vari Phrase format. If you want to re-encode a
previously loaded sample in a different format, use V-Producer’s “Wave Edit” command (p. 65).
■ Saving sounds
The samples that are loaded into the VariOS can be saved in the internal flash ROM of the VariOS, or on a PC card
inserted into its card slot.
When you save a performance (p. 122), not only the performance settings but also all samples in internal memory will
be saved (excluding samples for which there is no wave data, or samples that cannot be saved). In other words, a
“performance” contains all the data necessary for playing one song.
When you load a performance into the VariOS, the samples that were saved with it will also be loaded. You can also save
or load samples individually (p. 121).
■ What is “keyboard map”?
The VariOS has a “Keyboard Map”(p. 115) parameter that describes the state of the keyboard. This parameter is set
separately for each part, and has two states.
If keyboard map is set to “Phrase Map,” the sample assigned to the part can be played at the pitch of each key.
If keyboard map is set to “Groove Map,” the sample assigned to a part is divided at events (p. 67), and assigned to each
key. This means that you can randomly play different sections of the sample from different keys without regard to their
original order within the sample. If you turn on the Loop switch (p. 114), you can repeatedly play a section within the
sample.
■ Sample playback
Samples will normally play from the beginning of the wave. You cannot play a sample from some arbitrary point.
If you want to play a sample from some point in the middle, set the keyboard map to “Groove Map.” Alternatively, you
can set the playback mode (p. 113) to “STEP” so that each press of the keyboard will sound successive slices (regions
between events) of the sample. When playing a sample from the middle in this way, playback will be in units (slices)
divided by events (p. 67).
■ Maximum sample time
The maximum sample length is 2 minutes 30 seconds stereo, or 5 minutes monaural. Samples longer than this cannot be
loaded. Also, the total time of all samples in the internal memory of the VariOS cannot exceed this amount.
■ Maximum polyphony
The maximum polyphony is 14 notes (voices). If the VariOS receives data attempting to play more than this number of
voices simultaneously, notes will be omitted. If the number of requested voices exceeds 14, the VariOS will give priority
to the most recently played sounds, and will begin turning off older notes.
A stereo sample will use up two notes (voices) for each sound.
100
An overview of the VariOS
fig.041-VariOSGaiyou-E
Computer
Wave file (WAV)
Encode
Wave file (AIFF)
Vari Phrase format
file (VPW)
Re-encode
Send samples
Internal memory
Save samples
No. (PC#)
001
002
003
:
016
:
128
Name
SAMPLE 1
SAMPLE 2
SAMPLE 3
:
SAMPLE 16
:
NO WAVE DATA
Save performance
Internal flash ROM
Part
1
2
3
4
5
6
Sample No. (PC#)
002
002
001
003
016
003
Load samples
Load performance
PC card
SAMPLE 1
SAMPLE 1
SAMPLE 2
SAMPLE 2
SAMPLE 2
SAMPLE 1
SAMPLE 2
SAMPLE 3
SAMPLE 16
Perform
SAMPLE 9
SAMPLE 3
SAMPLE 3
SAMPLE 16
SAMPLE 15
101
Basic operation of the VariOS
The screen and basic operation
The VariOS has the following two modes.
Sample select mode (MENU button dark)
In this screen you can select a sample to play.
Here you can also select parts and adjust the tempo of the sample.
MENU mode (MENU button lit)
Here you can make various settings for the VariOS.
Switching the screen
fig.042-002
Sample select switch
Press the [MENU] button so it's not lighted, and
the sample select screen wil0l appear.
Tempo adjustment screen
In the "sample select screen," press the [VALUE]
knob and the tempo adjustment screen will appear.
To return to the "sample select screen," once again
press the [Volume] knob or press the [EXIT] button.
MENU screen
Press the [MENU] button so it's lighted, and the
MENU screen will appear. (Initially, the MENU
screen will show the menu that you last selected.)
To see the top menu, press and hold the [MENU]
button.
Moving to a lower level
Turn the [VALUE] knob to
select a menu, and then
press the [VALUE] knob.
Moving to a higher level
Press the [EXIT] button.
102
Basic operation of the VariOS
Editing a value
fig.042-003
Moving the cursor
Use the [CURSOR] buttons to move the cursor to the value you want to edit.
* If the screen contains only one value that can be edited, the cursor will not
move.
Cursor (underline)
Editing the value
Turn the [VALUE] knob to edit the value.
If you press in on the [VALUE] knob while you turn it, the value will change in
larger steps.
103
Basic operation of the VariOS
Assigning a name
Several screens of the VariOS allow you to assign a name. (For example, Menu 6-2 Sample Rename or
8-2 Save.)
Regardless of the type of name you are assigning, the procedure is the same.
Performance:
Sample:
Folder:
Volume label:
up to 16 characters
up to 12 characters
up to 16 characters
up to 11 characters
Access the screen in which you want to assign a name, and use the following procedure.
1. Use the [CURSOR] buttons to move the cursor to the location where you want to enter a
character.
fig.042-0031
Cursor (underline)
2. Turn the [VALUE] knob to specify the desired character.
You can use the following characters and symbols.
For a performance, sample, or folder
For a volume label
A--Z a--z 0--9 ! # $ % & ' ( ) + - = @ [ ] ^ _ ` { } space
A--Z 0--9 $ % ' - _ @ ! ` ( ) ~
By turning the [VALUE] knob while pressing it, you can conveniently shift between
uppercase characters, lowercase characters, numerals, symbols, and spaces. (Lowercase
characters will not be displayed for a volume label.)
3. Press the [VALUE] knob, and the display will ask “Are You Sure?” Press the [VALUE] knob
once again to finalize the name.
If you press the [EXIT] button you’re returned to the name entry screen.
In any of the name entry screens, you can press the [EXIT] button to discard the currently edited
name and return to the previous screen.
fig.042-0032
104
Basic operation of the VariOS
Selecting a sample
* When the VariOS has just been powered up, it is not ready to produce sound. You must load samples into
its internal memory. Before you continue with the following procedure, you must use the V-Producer’s
“Load Wave Files” command to send samples to the VariOS (p. 56).
1. Press the [MENU] button so it’s not lighted. The sample select screen will appear.
fig.042-004
Sample number
Cursor (underline)
Part number
Dark
Sample name
2. Make sure that the cursor is located at the sample number, and turn the [VALUE] knob to select
the desired sample.
fig.042-0042
Sample number
Cursor (underline)
3. You can press the [VOLUME] knob to preview (audition) the selected sample.
* If there is no sample, the display will indicate “NO WAVE DATA,” and no sound will be heard.
fig.042-043
4. To select a different part, use the [CURSOR] buttons to move the cursor to the part number, and
turn the [VALUE] knob to select a part.
fig.042-0044
Cursor (underline)
105
Basic operation of the VariOS
Changing the tempo of a sample
1. Press the [MENU] button so it’s not lighted. Access the sample select screen, and then press the
[VALUE] knob to access the tempo change screen.
fig.042-005
Tempo
Clock source
Dark
Cursor (underline)
2. Move the cursor to ClockSrc (clock source), and use the [VALUE] knob to select either INT or
MIDI.
Clock Src (clock source) specifies whether the tempo clock of the VariOS will use its own internal
clock (INT) or an external clock (MIDI).
If you are using the VariOS by itself, select INT.
If you are using the VariOS in synchronization with a sequencer or other device, select MIDI. For
details, refer to “Controlling the VariOS from your MIDI sequencer” (p. 137).
fig.042-052
Clock source
Cursor (underline)
When you are using V-Producer, V-Producer will automatically set the clock source to
“MIDI.” This will cause the VariOS to synchronize to the tempo of V-Producer.
3. Move the cursor to Tempo (master tempo), and turn the [VALUE] knob to adjust the tempo in
steps of 0.1. If you turn [VALUE] knob while pressing it, the tempo will change in steps of 1.
Master Tempo specifies the master tempo of the VariOS.
If the Clock Src parameter is set to MIDI, the master tempo will be displayed as “—.-.”
Available Settings: 20.0–250.0
fig.042-053
Tempo
Cursor (underline)
f
ig.042-054
The tempo indicator on the front panel of the VariOS will blink to indicate
the tempo.
* If the tempo does not change when you adjust the master tempo, make sure
that the “Tempo sync setting” (p. 107) explained on the next page is
turned on.
106
Basic operation of the VariOS
■ Tempo sync setting
If you want to play back the sample at its original tempo, turn off Tempo Sync (this is a part
parameter).
Tempo Sync specifies whether the playback speed of the sample assigned to each part will
synchronize to the master tempo or external clock (ON), or will not synchronize (OFF).
Procedure:
1. Press the [MENU] button so it’s lighted, and access the MENU screen.
fig.042-006
light
Menu name
* The MENU screen displays the menu that you selected most recently. You need to go to the top level
menu. You can get there by pressing and continuing to hold the [MENU] button for a few moments
(when the [MENU] button is not illuminated), or by pressing the [EXIT] button.
2. Turn the [VALUE] knob to select “MENU2 Part Edit,” and press the [VALUE] knob.
fig.042-0062
3. Turn the [VALUE] knob to select “Menu2-3 Tempo Sync,” and press the [VALUE] knob.
fig.042-0063
4. Use the [CURSOR] buttons to move the cursor to the part number, and turn the [VALUE] knob to
select a part.
fig.042-0064
5. Use the [CURSOR] buttons to move the cursor to the “ON” (or OFF) location, and turn the
[VALUE] knob to switch the setting ON/OFF.
fig.042-0065
While V-Producer is being used, V-Producer will automatically turn tempo sync “ON”
for all parts. This will cause the VariOS to synchronize to the tempo of V-Producer.
* If the master tempo is set to a value four times or more of the original tempo of the sample (p. 57), it will
not be possible to synchronize the sample to the master tempo.
107
Basic operation of the VariOS
Playing the VariOS from a connected keyboard
(MIDI Mode)
You can connect your MIDI keyboard to the VariOS. In this case, you can change the MIDI routing in
the following ways.
■ PC mode
When using a USB connection, the MIDI connectors on the rear panel of the VariOS will function as a
USB MIDI interface (Roland VariOS External MIDI). When USB is not connected (and when your
computer is not powered up), the MIDI connectors on the rear panel of the VariOS are connected
directly to the sound generator section.
fig.042-007
Computer
When USB is
connected
Sequencer software
VariOS
Sound generator
section
When USB is
not connected
VariOS
Sound generator
section
■ Internal mode
The MIDI connectors of the rear panel of the VariOS are connected directly to the sound generator
section.
fig.042-007a
Computer
Sequencer software
VariOS
Sound generator
section
108
Basic operation of the VariOS
Procedure:
1. Press the [MENU] button so it’s lighted, and access the MENU screen.
* The MENU screen displays the menu that you selected most recently. You need to go to the top level
menu. You can get there by pressing and continuing to hold the [MENU] button for a few moments
(when the [MENU] button is not illuminated), or by pressing the [EXIT] button.
2. Turn the [VALUE] knob to select “Menu7 System,” and press the [VALUE] knob.
3. Turn the [VALUE] knob to select “Menu7-3 MIDI Mode,” and press the [VALUE] knob.
4. Turn the [VALUE] knob to switch the setting between “Internal” or “PC.”
fig.042-0054+_75
The “PC indicator” on the front panel of the VariOS shows the current MIDI Mode
status. When this is lit, “PC” mode is selected. When dark, “Internal” mode is
selected.
109
Basic operation of the VariOS
Changing how the sounds are produced
Parameters determining how the sound is produced, such as keyboard map (p. 115), key assign mode
(p. 113), and playback mode (p. 113), which you set using V-Producer, can also be set from the front
panel of the VariOS itself.
■ Changing the Keyboard Map setting
* For details on the Keyboard Map parameter, refer to “2-1 Keyboard Map” (p. 115).
Procedure:
1. Press the [MENU] button so it’s lighted, and access the MENU screen.
* The MENU screen displays the menu that you selected most recently. You need to go to the top level
menu. You can get there by pressing and continuing to hold the [MENU] button for a few moments
(when the [MENU] button is not illuminated), or by pressing the [EXIT] button.
2. Turn the [VALUE] knob to select “Menu2 Part Edit,” and press the [VALUE] knob.
3. Turn the [VALUE] knob to select “Menu2-1 Keyboard Map,” and press the [VALUE] knob.
4. Use the [CURSOR] buttons to move the cursor to the part number, and turn the [VALUE] knob to
select the desired part.
5. Use the [CURSOR] buttons to move the cursor to the right, and turn the [VALUE] knob to switch
the keyboard map setting.
Available Settings: Phrase Map/Groove Map
■ Changing the Key Assign Mode
* For details on the Key Assign Mode, refer to “1-1 Key Assign mode” (p. 113).
Procedure:
1. Press the [MENU] button so it’s lighted, and access the MENU screen.
2. The MENU screen displays the menu that you selected most recently. You need to go to the top
level menu. You can get there by pressing and continuing to hold the [MENU] button for a few
moments (when the [MENU] button is not illuminated), or by pressing the [EXIT] button.
3. Turn the [VALUE] knob to select “Menu1 Sample Edit,” and press the [VALUE] knob.
4. Turn the [VALUE] knob to select “Menu1-1 Key Assign,” and press the [VALUE] knob.
5. Turn the [VALUE] knob to change the key assign mode.
Available Settings: Poly/Mono
110
Basic operation of the VariOS
■ Changing the Playback Mode
* For details on the Playback Mode, refer to “1-2 Playback Mode” (p. 113)).
Procedure:
1. Press the [MENU] button so it’s lighted, and access the MENU screen.
* The MENU screen displays the menu that you selected most recently. You need to go to the top level
menu. You can get there by pressing and continuing to hold the [MENU] button for a few moments
(when the [MENU] button is not illuminated), or by pressing the [EXIT] button.
2. Turn the [VALUE] knob to select “Menu1 Sample Edit,” and press the [VALUE] knob.
3. Turn the [VALUE] knob to select “Menu1-2 Playback Mode,” and press the [VALUE] knob.
4. Turn the [VALUE] knob to change the playback mode.
Available Settings: RETRIGGER/TIME SYNC (LEGATO)/STEP
Loading and saving
You can save performance or sample data into the internal flash ROM or on a PC card, or load this
data back into memory. For the procedure, refer to the following pages.
• Loading: “8-1 Load” (p. 121)
• Saving: “8-2 Save” (p. 122)
111
VariOS Menu Reference
* For details on how to switch between the screens of MENU mode and how to edit the settings, refer to “Basic operation of the VariOS” (p. 102).
Menu structure
112
Menu1 Sample Edit
1-1
Key Assign Mode
1-2
Playback Mode
1-3
Trigger Mode
1-4
Loop Switch
1-5
Robot Voice
1-6
Wave Gain
1-7
Fade In/Out
Sample settings
Solo/poly selection (p. 113)
How a sample is played (p. 113)
How a key is sounded (p. 114)
Loop on/off (p. 114)
Robot Voice on/off (p. 114)
Sample volume (p. 114)
Fade in/out (p. 114)
Menu2 Part Edit
2-1
Keyboard Map
2-2
Voice Reserve
2-3
Tempo Sync
2-4
Pitch Sync
2-5
Level/Pan
2-6
Tune
2-7
Key Range
2-8
Receive Channel
Part settings
Keyboard map selection (p. 115)
Voice allocation setting (p. 115)
Master tempo synchronization on/off (p. 115)
Tuning enable on/off (p. 115)
Part volume and pan (p. 115)
Part tuning (coarse, fine) and octave shift (p. 115)
Key range setting (p. 115)
Receive MIDI channel (p. 115)
Menu3 Controller Edit
3-1
CTRL Setting
3-2
Knob Assign
3-3
Knob Output Mode
3-4
Knob Control
Controller settings
Range of parameter change (p. 116)
CC: numbers transmitted by knobs (p. 118)
MIDI output destination of knobs (p. 118)
Parts for which knobs are enabled (p. 118)
Menu4 Effect Edit
4-1
Effect Switch
4-2
Part Routing
4-3
Effect Type MFX
4-4
Effect Type Cho
4-5
Effect Type Rev
4-6
Common Routing
Effect settings
Effect on/off (p. 119)
Settings for each part (p. 119)
Multi-effect type (p. 119)
Chorus type (p. 119)
Reverb type (p. 119)
Settings for the entire performance (p. 119)
Menu5 Tune
5-1
Master Tune
5-2
Master Coarse/Fine Tune
5-3
Transpose
5-4
Octave Shift
Tuning settings
Tuning of the entire VariOS (p. 120)
Coarse tune and fine tune of the entire VariOS (p. 120)
Pitch adjustment in semitone units (p. 120)
Pitch adjustment in octave units (p. 120)
Menu6 Utility
6-1
Sample Delete
6-2
Sample Rename
6-3
Sample Swap
6-4
Factory Reset
Utility
Delete a sample (p. 120)
Rename a sample (p. 120)
Move a sample (p. 120)
Restore the factory settings (p. 120)
Menu7 System
7-1
Control Channel
7-2
Audio Input Jack
7-3
MIDI Mode
7-4
Panic Key
7-5
LCD Contrast
7-6
M.Attenuation
System
MIDI settings that control all parts (p. 121)
Settings for the rear panel audio input jacks (p. 121)
Rear panel MIDI connector setting (p. 121)
Panic key setting (p. 121)
LCD contrast setting (p. 121)
Output level setting (p. 121)
Menu8 DISK
8-1
Load
8-2
Save
8-3
Delete
8-4
Rename
8-5
Format
Disk
Load (p. 121)
Save (p. 122)
Delete (p. 122)
Rename (p. 123)
Load (p. 123)
VariOS Menu Reference
Menu 1 Sample Edit (sample settings)
1-1 Key Assign mode
Selects whether a sample will be played polyphonically (POLY) or monophonically (MONO). It is effective to select SOLO when you want to play
a monophonic instrument (such as sax or flute) legato.
Available Settings:
Poly:
Solo:
Multiple notes can be played simultaneously.
Only the last-played note will be sounded, one note at a time.
1-2 Playback Mode
Selects how the sample will be played. Select “Time Sync” if you want to use legato playing (*) to play the sample phrase in a different melody than
it originally had. Select “Retrigger” if you want the sample to play back from the beginning each time you press a key.
* “Legato playing” normally means “to play smoothly,” but here it is used in the special sense of playing the next key (note-on) before releasing the previous key
(note-off).
Available Settings:
"Here comes VariPhrase"
key ON
key OFF
"Here comes VariPhrase"
Retrigger:
key ON
The sample will play back from the beginning each
time you press a key. This can be used to produce the
effect of a “musical round” as shown in the diagram.
key OFF
"Here comes VariPhrase"
key ON
"Here
comes
key OFF
VariPhra"
key ON
key OFF
"VariPhrase"
key ON
key OFF
● Key Assign: Poly
When you play legato, the second and subsequently
played keys will synchronize their playback point to
the first-played key. This lets you produce chords in
the middle of a phrase, as shown in the diagram.
"comes Vari"
key ON
key OFF
Time Sync:
"Here"
key ON key OFF
"VariPhrase"
key ON key OFF
"comes"
● Key Assign: Solo
When you play legato, the pitch will be changed
from the current playback point of the previous
sound. You can play the keyboard to produce a melody that is completely different than that of the original phrase.
key ON key OFF
Step:
Each time you press a key, the sample will play back to the next event (p. 67) and then stop.
113
VariOS Menu Reference
1-3 Trigger mode
1-7 Fade In/Out
Specifies how the sample will be triggered when you press a key.
Available Settings:
Fade-in gradually increases the volume of the sample from the
moment of note-on. Set the time over which the volume will rise from
zero up to the specified volume.
Available Settings: 0.00–2.00 [sec]
GATE:
TRIGGER:
DRUM:
The sample will sound only while you continue holding down the key. In other
words, the sample will begin sounding
when a note-on is received, and will stop
sounding when a note-off is received.
Each time you press the key, the sample will
begin sounding or will stop. In other words,
the sample will begin sounding when a
note-on is received, and will stop sounding
when the next note-on is received.
When you press the key, the sample will
continue sounding. In other words, the
sample will begin sounding when a note-on
is received. If you use this setting on decaytype sounds (such as cymbals), you will not
need to continue holding down the key.
* When using the TRIGGER setting, you may forget which keys have been
pressed, so that samples continue sounding. Or, if you are playing the
VariOS from a sequencer, samples may continue sounding even after the
sequencer has stopped. In such cases, play the key that you have assigned
as the Panic Key (p. 121). This will stop all currently sounding notes.
1-4 Loop Switch
Turn this ON if you want a sample to play as a loop. The region
enclosed by the Loop Start and Loop End you specified in VProducer’s Wave Edit screen (p. 65) will continue playing as a loop.
Available Settings: OFF, ON
* If Trigger = Drum, the Loop setting will be ignored, and loop playback will
not occur.
* If Trigger = Gate, loop playback will continue as long as the note remains
on. If Trigger = Trigger, loop playback will start at the first note-on, and
end at the second note-on.
* If you want to adjust the Loop Start and Loop End locations, refer to p. 65.
1-5 Robot Voice switch
Turn this ON if you want to remove the sense of pitch from the
sample. (The original pitch of the sample will be ignored, allowing
you to play it at the pitches of your keyboard.) If this is used with a
phrase sample, you can use your keyboard to play a completely
different melody than the original phrase, producing a variety of
melodies.
Available Settings: OFF, ON
* This function can be used only for samples whose Encode Type (p. 55) is
SOLO.
* If subtle pitch changes in the original phrase are an important element of
what is to be expressed during performance, the Robot Voice function may
not produce good results. It may also be impossible to obtain good results
if the keys you play are distant from the pitch of the original phrase.
1-6 Wave Gain
Specifies the gain (boost) of the waveform. A 6 dB (decibel) increase
will double the gain.
Available Settings: 0–+18 [dB]
114
Fade-out gradually decreases the volume of the sample from the
moment of note-off. Set the time over which the volume will decrease
from the specified volume down to zero.
Available Settings: 0.00–6.00 [sec]
VariOS Menu Reference
Menu 2 Part Edit
(part settings)
2-1 Keyboard Map
Specifies the keyboard status of each part. When you play a sample
via MIDI, this parameter will determine how the sample is sounded.
Available Settings:
Phrase Map
The sample will be sounded at a pitch that corresponds to the note
number.
Example: When using a vocal sample of “Here comes VariPhrase,”
the pitch will change depending on the key that you play.
fig.keymap
"Here comes VariPhrase"
Groove Map
The sample will be divided into musical segments at the location of
events, and each segment (“slice”) of the waveform is assigned to
successive note numbers (semitone steps beginning at C3) for
playing.
Example: When using a vocal sample of “Here comes VariPhrase,”
separate slices will be played by the keys C3 and above.
fig.keymap2
"Here"
"comes"
"Va"
"ri"
"Phrase"
2-2 Voice Reserve
Specifies the number of voices that will be reserved for each part if the
maximum polyphony of the VariOS (14 voices) is exceeded.
Available Settings: 0–14
* It is not possible for the total values of all parts to exceed 14.
2-3 Tempo Sync
Specifies whether the playback speed of the samples assigned to each
part will be synchronized to the master tempo or external clock (ON),
or not synchronized (OFF).
Available Settings: OFF, ON
If the master tempo (p. 57) is set to more than four times greater than
the original tempo of the sample, the sample cannot be synchronized
to the master tempo.
2-5 Level/Pan
Level sets the volume of each part. Use this to adjust the volume
balance between parts.
Available Settings: 0–127
Pan sets the stereo position (panpot) of each part. L64 is far left, 0 is
center, and R63 is far right.
Value: L64–R63
2-6 Tune
These parameters adjust the tuning (coarse and fine) and octave shift
of each part.
2-6-1 Coarse Tune
Adjusts the basic pitch of each part in semitone steps over a range of
+/-1 octave.
Available Settings: -12–+12
2-6-2 Fine Tune
Relative to the Coarse Tune pitch setting, adjusts the pitch in one-cent
steps over a range of half a semitone upward or downward.
Available Settings: -5—+50
2-6-3 Octave Shift
Adjusts the pitch of each part in one-octave units.
Available Settings: -3–+3
2-7 Key Range
These parameters specify the key range of each part. Make these
settings when you want to play different samples from different
ranges of your keyboard.
Lwr (key range lower)
Specifies the lower limit of the key range.
Available Settings: C-1–Upper
Upr (Key range upper)
Specifies the upper limit of the key range.
2-8 Receive Channel
(Receive MIDI channel)
Specifies the MIDI receive channel for each part.
Available Settings: 1–16
If the MIDI receive channel of a part has the same setting as the
control channel (p. 121), the control channel setting will take priority.
2-4 Pitch Sync
Specifies whether the master coarse tune and master fine tune (p. 120)
of the VariOS performance will be enabled for each part (ON) or
disabled (OFF). For example, if you want to adjust the tuning of the
entire song, but do not want to change the pitch of the rhythm part,
you can turn pitch sync “OFF” for the rhythm part.
Available Settings: OFF, ON
115
VariOS Menu Reference
Menu 3 Controller Edit
(Controller settings)
3-1 CTRL Setting
Here you can specify the amount of change produced by the three
knobs or by external MIDI controllers.
Turn the [VALUE] knob to access the desired screen. When you press
the [VALUE] knob, the setting can be edited. Use the [CURSOR]
buttons (left/right) to select the item that you want to edit.
3-1-1 C1:
3-1-2 C2:
3-1-3 C3:
3-1-4 VC:
3-1-5
Modulation:
3-1-6
Pitch Bend:
3-1-7
Aftertouch:
3-1-8 Hold:
The parameter controlled by the C1
knob
The parameter controlled by the C2
knob
The parameter controlled by the C3
knob
The parameter controlled when the
controller number specified by VC Assign is received
The parameter controlled when a
modulation message is received.
The parameter controlled when a
pitch bend message is received.
The parameter controlled when an aftertouch message is received.
The function that will occur when a
hold message is received.
* Larger values in the positive (+) or negative (-) direction will allow a
correspondingly greater change to occur.
* Changes you make to the sound using the controllers are temporary. They
do not rewrite the parameter values.
Pitch (Pitch depth)
Specifies the range of control over pitch. When using a knob, positive
(+) settings of this parameter allow you to raise the pitch by turning
the knob toward the right. With negative (-) settings, the pitch will fall
as you turn the knob toward the right.
Available Settings: -64–+63
* In order to vary the pitch in this way, you must turn on the pitch control
switch for the sample in V-Producer’s Sample Edit screen (p. 62) in
addition to setting the depth here.
* The pitch bend change settings do not contain this parameter.
Time (Time depth)
Specifies the range of control over playback speed (time). When using
a knob, positive (+) settings of this parameter allow you to speed up
the playback by turning the knob toward the right. With negative (-)
settings, the playback will slow down as you turn the knob toward the
right.
Available Settings: -64–+63
* In order to vary the time in this way, you must turn on the time control
switch for the sample in V-Producer’s Sample Edit screen (p. 62) in
addition to setting the depth here.
116
Formant (Formant depth)
Specifies the range of control over timbral character (formant). When
using a knob, positive (+) settings of this parameter allow you to
modify the timbral character so it approaches a “duck-like voice”
(smaller vocal cords) by turning the knob toward the right. With
negative (-) settings, the character will change toward a “giant-like
voice” (larger vocal cords) as you turn the knob toward the right.
Available Settings: -64–+63
* The formant can be controlled only for a sample whose encoding type (p.
55) is SOLO.
* In order to control the formant in this way, you must turn on the formant
control switch (p. 62) for the sample in addition to setting the depth here.
Level (Level depth)
Specifies the range of control over volume. When using a knob,
positive (+) settings of this parameter allow you to increase the
volume by turning the knob toward the right. With negative (-)
settings, the volume will decrease as you turn the knob toward the
right.
Available Settings: -64–+63
Default: 0
LFO Rate (LFO rate depth)
Specifies the range of control over LFO rate. When using a knob,
positive (+) settings of this parameter allow you to speed up the rate
by turning the knob toward the right. With negative (-) settings, the
rate will slow down as you turn the knob toward the right.
Available Settings: -64–+63
Default: 0
LFO Pitch (LFO pitch depth)
Specifies the range of control over how the LFO will affect the pitch
(Pitch LFO Depth). When using a knob, positive (+) settings of this
parameter allow you to change the Pitch LFO Depth in the positive (+)
direction by turning the knob toward the right. With negative (-)
settings, the Pitch LFO Depth will change in the negative (-) direction
as you turn the knob toward the right.
Available Settings: -64–+63
Default: 0
LFO Formant (LFO formant depth)
Specifies the range of control over how the LFO will affect the formant
(Formant LFO Depth). When using a knob, positive (+) settings of this
parameter allow you to change the Formant LFO Depth in the
positive (+) direction by turning the knob toward the right. With
negative (-) settings, the Formant LFO Depth will change in the
negative (-) direction as you turn the knob toward the right.
Available Settings: -64–+63
Default: 0
LFO Pan (LFO pan depth)
Specifies the range of control over how the LFO will affect the pan
(LFO Pan Depth). When using a knob, positive (+) settings of this
parameter allow you to change the LFO Pan Depth in the positive (+)
direction by turning the knob toward the right. With negative (-)
settings, the LFO Pan Depth will change in the negative (-) direction
as you turn the knob toward the right.
Available Settings: -64–+63
Default: 0
VariOS Menu Reference
3-1-6 Pitch Bend
fig.R05-031-exp
For pitch bend, you can set the bend range (the range over which the
pitch can be changed) in addition to the items listed in the preceding
section.
Wave
start
Loop
Start
Loop
End
Wave
end
Range U (bend range up)
Specify how far the pitch will rise when the pitch bend lever is moved
to the far right (or in the case of a wheel, fully upward). With a setting
of +12, moving the pitch bend lever to the far right will raise the pitch
one octave.
Available Settings: 0–+12
Range D (bend range down)
Specify how far the pitch will rise when the pitch bend lever is moved
to the far left (or in the case of a wheel, fully downward). With a
setting of -48, moving the pitch bend lever to the far left will lower the
pitch four octaves.
Available Settings: -48–0
Hold
on
Hold
off
EVENT (event step): Pressing the pedal while the sample is
playing will cause playback to jump to the next section
divided by an event.
fig.R05-032-exp
Wave
start
Wave
end
Event
3-1-8 Hold
MIDI messages Hold 1 (controller number 64) and Hold 2 (controller
number 69) can be used to change how a sample sounds.
OFF: Pressing the pedal will not change anything.
PAUSE: The waveform that was playing at the instant that
the pedal was pressed will continue playing as long as you
hold down the pedal. Even if you take your finger off the
key, the sound will continue as long as you hold down the
pedal.
fig.R05-030-exp
Wave
start
Wave
end
Hold
on
By using this together with the STEPD explained below, you
can jump to the previous section divided by an event, and
play it. For example, you could set Hold1 Destination to
“EVENT” and Hold2 Destination to “STEPD.” Then while
the sample was playing, hold down the pedal that transmits
Hold2 and press the pedal that transmits Hold1.
fig.R05-033-exp
Wave
start
Hold
on
Wave
end
Hold
off
* Since this repeatedly plays a single cycle of the waveform at
the point where the pedal was pressed, it may not produce the
result that you expect, or may sound like oscillation (feedback).
LOOP: The sound from Loop Start to Loop End will continue
playing repeatedly as long as you hold down the pedal. Even
if you take your finger off the key, the sound will continue as
long as you hold down the pedal. For example if you had a
drum loop of several measures, you could make settings
beforehand to set the loop range as the measure you wanted
to play repeatedly. Then you would press the pedal at the
section that you wanted to play, and allow that measure to
play the desired number of times.
Hold2
on
Hold1
on
Hold1
on
117
VariOS Menu Reference
STEPD (step direction): This function reverses the direction
of the step. When using this, set the Playback Mode (p. 63, p.
113) to STEP. As long as you do not press the pedal, each key
you play (each note-on that is received) will cause playback
to continue to the next event, and then stop. If you play a key
while holding down the pedal, the previous region divided
by events will sound. If you hold down the pedal from the
beginning and play a note, the sound will begin from the last
region of the sample.
3-3 Knob Output Mode
Specifies the destination(s) to which control change messages will be
sent when you turn the C1–C3 knobs.
Available Settings:
OFF:
INT:
MIDI:
fig.R05-034-exp
Wave
start
INT&MIDI:
Wave
end
Control changes will not be sent; the
knobs will have no effect.
Control changes will be sent only to
the internal sound generator.
Control changes will be sent only to
the MIDI OUT connector.
Control changes will be sent both to
the internal sound generator and to
the MIDI OUT connector.
3-4 Knob Control
Specifies the part(s) that will be affected when you turn the C1–C3
knobs.
Available Settings:
MULTI PART:
4
1
5
3
.......
2
6
1
5
When you press
the hold pedal:
2
6
3
.......
4
When you don't press
the hold pedal:
This can also be used together with EVENT. For details refer
to the explanation of EVENT.
PO/SO (poly/solo): The Key Assign Mode (p. 62, p. 113)
setting will be switched temporarily as long as you continue
holding down the pedal. For example if you are playing a
vocal sample in solo mode, you can hold down the pedal to
play a chord.
LOCKL (lock legato): Regardless of how you are playing the
keyboard, notes will be sounded as legato while you hold
down the pedal. This means that you can use this function to
play legato chords.
* You can play legato chords even if the Playback Mode (p. 63,
p. 113) is set to RETRIGGER.
3-2 Knob Assign
C1–C3
Here you can specify the controller numbers that will be output when
you turn the C1–C3 knobs. If the controller numbers you specify here
are received at the MIDI IN connector, the result will be the same as
when the corresponding knob is turned.
Available Settings: CC02–CC05, CC07–CC31, CC64–CC95
VC
This parameter lets you use an external MIDI controller as a fourth
knob. When the controller number you specify here is received at the
MIDI IN connector, the function you assigned in 3-1-4 VC will be
controlled.
Available Settings: CC02–CC05, CC07–CC31, CC64–CC95
* VC stands for Virtual Controller.
118
CURRENT PART:
All six parts will be affected.
Only the currently selected part
(the “current part”) will be affected.
VariOS Menu Reference
Menu 4 Effect Edit
(Effect settings)
Producer.
* For details on each effect, refer to “The effects of the sound generator
section” in the reference manual (PDF).
4-5 Effect Type Rev
4-1 Effect Switch
Switches the effects on/off.
Switch the multi-effect (MULTI), chorus (CHORUS), and reverb
(REVERB) on/off. It is useful to switch this off when you want to edit
while listening to the unprocessed sound, or if you want to use an
external effects processor instead of the internal effects.
The multi-effect, chorus, and reverb on/off setting is remembered
even when you turn off the power.
Available Settings: ON/OFF
Selects the type of reverb.
* The parameters of the effect cannot be edited on the VariOS itself. To edit
the effect parameters, you need to use the Mixer screen (p. 92) in VProducer.
* For details on each effect, refer to “The effects of the sound generator
section” in the reference manual (PDF).
4-6 Common Routing
These parameters specify the effect routing for the entire
performance. (These settings apply to all parts.)
fig.newmixer3
4-2 Part Routing (settings for each part)
Here you can specify the effect routing for each part.
Effect Mstr Lvl
Rev
Part Effect Send
Rev
Reverb
fig.newmixer2
Effect Mstr Lvl
Rev
Part Effect Send
Rev
Reverb
Part Effect Send
Cho
Output
Assign
Sound
generator
MAIN
M-FX
Sound
generator
Effect Mstr Lvl
Cho
MFX Cho/Rev
Send Rev
DIGITAL
OUT
Effect Mstr Lvl
MFX
DIRECT
OUT
Specifies the output destination of the unprocessed sound.
Available Settings:
DIR:
Effect Mstr Lvl
Cho
M-FX
DIR
MFX Cho/Rev
Send Rev
DIGITAL
OUT
MFX
Out Assign
Multi-FX
Effect Mstr Lvl
MFX
MFX
Out Assign
4-2-1 Output Assign
M-FX:
MAIN
MFX Cho/Rev
Part Effect Send Send Cho
MFX
DIRECT
OUT
Multi-FX
DIR
MAIN:
Output
Assign
MAIN
OUT
Chorus Rev
Send
Chorus
MAIN
OUT
Chorus Rev
Send
Chorus
MFX Cho/Rev
Part Effect Send Send Cho
MFX
Part Effect Send
Cho
The sound will be output to reverb, chorus,
and the “MAIN OUT” output jacks. Choose
this setting if you want to use reverb and
chorus, but not the multi-effect.
The sound will be output to reverb, chorus,
and multi-effect. Choose this setting if you
want to use reverb, chorus, and multi-effect.
The sound will be output to the “DIRECT
OUT” output jacks. Choose this setting if
you want to use an external effects processor
instead of the VariOS’s internal effects.
4-6-1 MFX Out Assign (Multi-effect output assign)
Specifies how the sound that has been processed through the multieffect will be output.
Available Settings:
MAIN
DIR
Output from the “MAIN OUT” output
jacks
Output from the “DIRECT” output
jacks
4-6-2 EFX Master Level (Effect master level)
Specifies the volume of the sound that has been processed through
each effect.
Available Settings: 0–127
MFX
Cho
Rev
Specify the volume of the multi-effect
sound
Specify the volume of the chorus sound
Specify the volume of the reverb sound
4-2-2 Part Effect Send
Specifies the effect depth of each part.
Available Settings: 0–127
MFX
Cho
Rev
Specifies the multi-effect depth
Specifies the chorus depth
Specifies the reverb depth
4-3 Effect Type MFX
Selects the type of multi-effect.
* The parameters of the effect cannot be edited on the VariOS itself. To edit
the effect parameters, you need to use the Mixer screen (p. 92) in VProducer.
* For details on each effect, refer to “The effects of the sound generator
section” in the reference manual (PDF).
4-6-3 MFX Cho/Rev Send
(Multi-effect chorus/reverb send)
Specify the depth of chorus or reverb that will be applied to the sound
processed by the multi-effect.
Available Settings: 0–127
Cho
Rev
Specify the depth of chorus that will be applied
to the sound processed by the multi-effect.
Specify the depth of reverb that will be applied
to the sound processed by the multi-effect.
4-6-4 Chorus Rev Send (Chorus reverb send)
Specify the depth of reverb that will be applied to the sound
processed by the chorus.
Available Settings: 0–127
4-4 Effect Type Cho
Selects the type of chorus.
* The parameters of the effect cannot be edited on the VariOS itself. To edit
the effect parameters, you need to use the Mixer screen (p. 92) in V-
119
VariOS Menu Reference
Menu 5 Tune
(Tuning settings)
5-1 Master Tune
Adjusts the tuning of the entire VariOS. The displayed value is the
frequency of the A4 key.
Available Settings: 427.4–452.6 [Hz]
* This value is remembered even when the power is turned off.
5-2 Master Coarse/Fine Tune
Coarse adjusts the basic pitch of the performance in semitone steps
over a +/-1 octave range.
Available Settings: -12–+12
Fine adjusts the pitch specified by Coarse in one-cent steps (1/100th
of a semitone) over a range of one-half semitone upward or
downward.
Available Settings: -50–+50
* Since this value is saved for each performance, it will change if you load
another performance or turn off the power.
5-3 Transpose (System transpose)
Adjusts the pitch in semitone steps. Incoming note numbers will be
converted by this transpose setting.
Available Settings: -5–+6
* This value is saved even when the power is turned off.
5-4 Octave Shift (System octave shift)
Adjusts the pitch in steps of one octave. Incoming note numbers will
be converted by this octave shift setting.
Available Settings: -3–+3
* This value is saved even when the power is turned off.
Menu 6 Utility
6-1 Sample Delete
In order to make efficient use of memory, samples that you no longer
need should be deleted from internal memory.
When you delete a sample, its number will appear as “NO WAVE
DATA.”
1.
As described in “Switching the screen” (p. 102), access MENU
“6-1 Sample Delete” and press the [VALUE] knob.
2.
Turn the [VALUE] knob to select the sample that you
want to delete, and press the [VALUE] knob.
3.
The display will ask “Are You Sure?” Press the
[VALUE] knob once again to delete the sample. If you
press the [EXIT] button you will return to the previous
screen.
When the deletion is completed, the display will indicate
“Completed!”
6-2 Sample Rename
Here’s how to rename a sample.
1.
As described in “Switching the screen” (p. 102), access MENU
“6-2 Sample Rename,” and press the [VALUE] knob.
2.
Turn the [VALUE] knob to select the sample that you
want to rename, and press the [VALUE] knob.
3.
Assign the name as described in “Assigning a name”
(p. 104).
When the operation is completed, the display will indicate
“Completed!”
6-3 Sample Swap
Here’s how you can change the order of the samples in internal
memory.
The Source Sample and Destination will be exchanged.
If you execute this when the destination contains no sample, the
source number will change to “NO WAVE DATA.”
1.
As described in “Switching the screen” (p. 102), access MENU
“6-3 Sample Swap” and press the [VALUE] knob.
2.
When the display indicates “Source Sample,” turn the
[VALUE] knob to select the move-source sample, and
then press the [VALUE] knob.
3.
When the display indicates “Destination,” turn the
[VALUE] knob to select the move-destination sample,
and then press the [VALUE] knob.
4.
The display will ask “Swap OK?” Press the [VALUE]
knob once again to carry out the move. If you press the
[EXIT] button you will return to the previous screen.
When the operation is completed, the display will indicate
“Completed!”
6-5 Factory Reset (Restoring the factory
settings)
This operation restores the VariOS to the factory-set condition.
In the screen that reads “Factory Reset,” press the [VALUE] knob. A
message of “Factory Reset OK?” will ask you for confirmation. Press
[VALUE] once again to carry out the factory reset operation.
When the operation is completed, the display will indicate
“Completed!”
* If you select [EXIT] the factory reset operation will not be executed.
* This operation will not restore the demo song. If you want to restore the
demo song, refer to “Reloading the internal demo song into the
VariOS” (p. 140).
120
VariOS Menu Reference
Menu 7 System
Menu 8 DISK
7-1 Control Channel
8-1 Load
This specifies the channel on which MIDI messages from an external
device will simultaneously control all parts of the VariOS. If you do
not need to control all parts simultaneously, turn this setting “OFF.”
Available Settings: 1–16, OFF
Here you can load performances or samples that you saved in internal
flash ROM or on a PC card.
* When you load a performance, the samples that were saved at the same
time as the program will also be loaded.
* When you load a performance, the performance that had previously been
in internal memory will be overwritten.
* Due to the amount of wave memory in the VariOS, the samples that can
be loaded are limited to a total of 2 minutes 30 seconds in stereo, or a total
of 5 minutes in monaural. Samples that exceed this amount cannot be
loaded.
* The VariOS can load only performances and samples that were saved by
the VariOS itself. Wave files (.WAV) or Vari-format files (.VPW) that
you copied from your computer onto a PC card cannot be loaded correctly.
If the MIDI receive channel of an individual part (p. 115) is the same
as the control channel, the control channel setting will take priority.
You should avoid setting the control channel to the same setting as the
MIDI receive channel of an individual part.
7-2 Audio Input Jack
This enables or disables the audio input jacks of the rear panel.
Available Settings: Enable, Disable
You can improve the S/N ratio of the VariOS by setting this to
Disable.
1.
As described in “Switching the screen” (p. 102), access MENU
“8-1 Load” and press the [VALUE] knob.
2.
When the display indicates “Select Media,” turn the
[VALUE] knob to select the media from which you want
to load, and then press the [VALUE] knob.
7-3 MIDI Mode
This setting changes the routing of the MIDI connectors on the rear
panel of the VariOS. For details, refer to “Playing the VariOS from a
connected keyboard (MIDI Mode)” (p. 108).
You can select either internal flash ROM (Flash ROM) or PC card (PC
Card).
3.
When the display indicates “Select Folder,” turn the
[VALUE] knob to select the folder from which you want
to load, and press the [VALUE] knob.
4.
When the display indicates “Select Type,” turn the
[VALUE] dial to select either Performance or Sample,
and press the [VALUE] knob.
5.
The performances or samples in the selected folder will
be displayed. Turn the [VALUE] knob to select the data
that you want to load, and press the [VALUE] knob.
7-4 Panic Key
When the VariOS receives the note message that you specify as the
Panic Key, it will stop the sound of all parts regardless of the channel,
and will reset each controller. This gives you a convenient way to stop
“stuck notes” in cases such as when the trigger mode (p. 114) is set to
TRIGGER, and you have forgotten which keys have been played.
Available Settings: OFF, C-1–G9
7-5 LCD Contrast
Adjusts the contrast (brightness) of the display. Increasing this value
will darken the display.
Available Settings: 1–8
The display will indicate “Now Loading...” while the data is being
loaded, and will indicate “Completed!” when loading is completed.
7-6 M. Attenuation (Master attenuation)
Adjust this setting if the output level from the four OUTPUT jacks is
too loud. With a setting of -60 dB, the output level will be at its
minimum setting.
Available Settings: -60–0 [dB]
* This parameter will also reduce the output level of the DIGITAL AUDIO
output jacks (OPTICAL and COAXIAL).
121
VariOS Menu Reference
8-2 Save
8-3 Delete
When you save a performance, all samples in internal memory at that
time will be saved along with the performance. Since you can create a
folder when you save a performance, we recommend that you save a
performance in its own folder. If you do so, it will be easy to see which
samples belong to which performance when you look at the contents
of the disk.
* A sample for which there is no wave cannot be saved.
* You cannot use the following names for saving:
Here’s how to delete a file or folder.
Performance
• “NEW PERFORMANCE” (case of letters is irrelevant)
• All spaces
1.
As described in “Switching the screen” (p. 102), access MENU
“8-3 Delete,” and press the [VALUE] knob.
2.
When the display indicates “Select Media,” turn the
[VALUE] knob to select the media that contains the file
(or folder) you want to delete, and press the [VALUE]
knob.
You can select internal flash ROM (Flash ROM) or PC card (PC Card).
3.
Samples
When the display indicates “Select Type,” turn the
[VALUE] knob to select Performance, Sample, or Folder,
and then press the [VALUE] knob.
• “NO WAVE DATA” (case of letters is irrelevant)
• All spaces
Deleting a performance or sample
1.
As described in “Switching the screen” (p. 102), access MENU
“8-2 Save,” and press the [VALUE] knob.
4.
2.
When the display indicates “Select Media,” turn the
[VALUE] knob to select the save-destination media, and
press the [VALUE] knob.
When the display indicates “Select Folder,” turn the
[VALUE] knob to select the folder that contains the file
you want to delete, and then press the [VALUE] knob.
5.
The display will show the name of the file to be deleted
and “Delete OK?” Turn the [VALUE] knob to select the
file that you want to delete, and press the [VALUE]
knob.
6.
The display will ask “Are You Sure?” Press the
[VALUE] knob once again to carry out the deletion. If
you press the [EXIT] button you will return to the
previous screen.
You can select internal flash ROM (Flash ROM) or PC card (PC Card).
3.
When the display indicates “Select Folder,” turn the
[VALUE] knob to select the save-destination folder, and
press the [VALUE] knob.
Creating a new folder
If you turn the [VALUE] knob all the way to the right in
step 3, the display will indicate “Make New Folder” in the
folder name field, allowing you to create a new folder.
When the display indicates “Make New Folder,” press the
[VALUE] knob and assign a folder name as described in
“Assigning a name” (p. 104).
4.
When the display indicates “Select Type,” turn the
[VALUE] knob to select either Performance or Sample,
and press the [VALUE] knob.
When saving a performance:
5.
The display will indicate “File Name,” so assign a file
name as described in “Assigning a name” (p. 104).
6.
The display will ask “Are You Sure?” Press the
[VALUE] knob once again to carry out the save
operation. If you press the [EXIT] button you will return
to the previous screen.
The display will indicate “Now saving...” while the data is being
saved, and “Completed!” when saving is completed.
When saving a sample:
7.
The display will indicate the name of the sample being
saved and “Are You Sure?” Turn the [VALUE] knob to
select the sample that you want to save, and then press
the [VALUE] knob to execute the save operation. If you
press the [EXIT] button you will return to the previous
screen.
The display will indicate “Now saving...” while the data is being
saved, and “Completed!” when saving is completed.
122
When the deletion is completed the display will indicate
“Completed!”
* Even if you delete a performance file, the samples used by that performance
will not be deleted.
Deleting a folder
4.
When the display indicates “Select Folder,” turn the
[VALUE] knob to select the folder that you want to
delete, and press the [VALUE] knob.
5.
The display will ask “Are You Sure? Delete OK?” Press
the [VALUE] knob once again to carry out the deletion.
If you press the [EXIT] button you will return to the
previous screen.
When the deletion is completed the display will indicate
“Completed!”
VariOS Menu Reference
8-4 Rename
8-5 Format
Here’s how to rename a file or folder.
Here’s how to format (initialize) the internal flash ROM or a PC card.
A PC card must be formatted for use by the VariOS before it can be
used.
1.
As described in “Switching the screen” (p. 102), access MENU
“8-4 Rename,” and press the [VALUE] knob.
2.
When the display indicates “Select Media,” turn the
[VALUE] knob to select the media that contains the file
(or folder) you want to rename, and press the [VALUE]
knob.
1.
As described in“Switching the screen” (p. 102), access MENU
“8-5 Format,” and press the [VALUE] knob.
2.
When the display indicates “Select Media,” turn the
[VALUE] knob to select the media that you want to
format, and press the [VALUE] knob.
You can select internal flash ROM (Flash ROM) or PC card (PC Card).
3.
When the display indicates “Select Type,” turn the
[VALUE] knob to select Performance, Sample, or Folder,
and then press the [VALUE] knob.
Renaming a performance or sample
4.
When the display indicates “Select Folder,” turn the
[VALUE] knob to select the folder that contains the file
you want to rename, and then press the [VALUE] knob.
5.
The display will indicate “Select File.” Turn the
[VALUE] knob to select the file that you want to
rename, and press the [VALUE] knob.
6.
The display will indicate “File Name.” Assign the
desired file name as described in “Assigning a name”
(p. 104).
7.
The display will ask “Are You Sure? Rename OK?”
Press the [VALUE] knob once again to carry out the
rename operation. If you press the [EXIT] button you
will return to the previous screen.
You can select internal flash ROM (Flash ROM) or PC card (PC Card).
3.
Only if you are formatting a PC card, the display will
indicate “Volume Label.” Assign a volume label as
described in “Assigning a name” (p. 104).
4.
The display will ask “Are You Sure? Format OK?” Press
the [VALUE] knob once again to carry out the format
operation. If you press the [EXIT] button you will return
to the previous screen.
While formatting is in progress the display will indicate “Now
Processing...,” and will indicate “Completed!” when formatting is
completed.
* Since the demo song inside the VariOS is saved in the internal flash ROM
of the VariOS, it will not play back correctly if you format the internal
flash ROM of the VariOS or if you delete the demo song data. Reload the
demo song using the procedure described in “Reloading the internal
demo song into the VariOS” (p. 140).
When the rename operation is completed the display will indicate
“Completed!”
Renaming a folder
4.
When the display indicates “Select Folder,” turn the
[VALUE] knob to select the folder that you want to
rename, and press the [VALUE] knob.
5.
The display will ask “Folder Name.” Assign the desired
folder name as described in “Assigning a name” (p.
104).
6.
The display will ask “Are You Sure? Rename OK?”
Press the [VALUE] knob once again to carry out the
rename operation. If you press the [EXIT] button you
will return to the previous screen.
When the rename operation is completed the display will indicate
“Completed!”
123
VariOS Menu Reference
124
Appendix
125
Synchronization settings
V-Producer can use MIDI Clock or MTC (MIDI Time Code) to synchronize with a variety of other
software. This section explains various methods of synchronization.
Synchronizing as a slave (MIDI Clock)
If you want to synchronize V-Producer to a MIDI sequencer (ProTools, Logic, Cubase, Digital
Performer, etc.) installed in the same computer, using MIDI Clock for synchronization is the simplest,
so it is the recommended method. When synchronizing with MIDI Clock, V-Producer will play
according to the tempo of the master sequencer program.
If you want to synchronize with a MIDI sequencer that is running on the same computer, select the
MIDI device as “Roland VariOS Sync” (the dedicated synchronization port for the VariOS). Here we
will describe settings for some typical MIDI sequencers.
126
Synchronization settings
V-Producer synchronization settings
Make the following settings so that V-Producer will operate (as a slave)
according to the MIDI clock of your MIDI sequencer.
1
Choose Option - MIDI Sync.
fig.05sync02
2
In the Sync IN area of the Sync Mode dialog box, set the IN field to the
MIDI device you are using as the synchronization input.
* If you are synchronizing with a MIDI sequencer that is running on the same
computer, select “Roland VariOS Sync” as the MIDI device.
fig.05sync03
3
Set the Type of sync field to “MIDI Clock.”
* You can also switch the Sync mode by using the Sync buttons in the locator.
fig.05sync01
4
Click [OK].
V-Producer will now synchronize to the playback of the master program.
* If V-Producer’s loop mode is on, V-Producer will give priority to its own looping
rather than to the playback location of the master MIDI sequencer.
* If Sync mode is [MIDI], you cannot use the controls of the locator section to start
playback or control the tempo. If you want to control playback from the locator, set
the Sync mode to [INT].
Most sequencers do not retransmit playback position
data at the beginning of a
loop. Thus, if your master
sequencer is set to loop the
playback, V-Producer will
ignore the looping of the
sequencer, and will simply
continue playing as it had
been. To avoid this
problem, set V-Producer to
the same loop region as the
loop region in your master
sequencer, and turn on
loop mode.
127
Synchronization settings
ProTools
1
The explanation in this
manual uses Pro Tools LE
5.0.1 for MacOS. Please be
aware that some screens
and menu names may
differ in other versions.
Choose MIDI - MIDI Beat clock.
fig.05syncProTools.eps
2
3
Check the “Enable MIDI Beat
Clock” and “Roland VariOS
Sync” check boxes.
If you are running ProTools
and V-Producer on the
same computer and
synchronizing them, you
must first start up ProTools
and then V-Producer. If an
application that uses OMS
(such as V-Producer) is
already running, ProTools
may fail to start up.
Click [OK].
Logic Audio
1
Choose [Options] - [Song Settings] - [Synchronization Settings...].
fig.05synclogicE
2
Roland VariOS Sync
Click the [MIDI]
tab, check the
“Transmit MIDI
Clock” option,
and choose
“Roland VariOS
Sync” as the
output destination.
Uncheck “Allow Song Position Pointer while playing.”
If you are not using OMS
with Logic, check “Use
OMS if available” in
[Options] - [Preferences] [MIDI Interface
Communication...].
fig.05synclogicE2
3
Click the [General]
tab, and uncheck
“Auto enable
external Sync.”
Uncheck
MIDI Clock loop happened inside Logic may freeze the programs if you do not
make this setting.
4
128
Close the dialog box.
The explanation in this
manual is for Logic Audio
5.2.0. Please be aware that
differences in the software
version may mean that the
windows or menu items
may be slightly different.
Synchronization settings
MacOS
1
2
If you are using Logic for Mac, and you experience hangups even after
making the settings on the preceding page, please try making the
following settings.
Choose [Options] - [Preferences] - [OMS Preferences] - [Input
Mapping...].
Uncheck the “Connect all Real OMS Input Instruments with Logic”
check box.
Do not select “Roland VariOS Sync” for “Input Connections.”
Uncheck
3
Close the dialog box.
Cubase VST
1
2
Choose Options - Synchronization.
In the Sync Out area of the Synchronization dialog box, select “Roland
VariOS Sync” for the MIDI Clock field, and turn it “On” as shown below.
The explanation in this
manual uses Cubase VST
5.0 for MacOS. Please be
aware that some screens
and menu names may
differ in other versions.
fig.05syncCubase
Roland VariOS Sync
3
If you are not using OMS in
Cubase, go to Options MIDI Setup - System, and
change the OMS
Compatibility setting from
“No OMS” to “IN & OUT.”
Then re-start Cubase.
Click [OK].
129
Synchronization settings
Digital Performer
FreeMIDI settings for using the VariOS
1
Create the following FreeMIDI Configuration for the VariOS.
fig.05syncDigiPfm01
The explanation in this
manual uses Digital
Performer 3.0. Please be
aware that some screens or
menu names may differ in
other versions.
For details on installing the
FreeMIDI driver for VariOS
and on making FreeMIDI
Configuration settings,
refer to [ReadmeFME.HTM] located in the
[VariOS FreeMIDI DriverE] folder on the CD-ROM.
V-Producer synchronization settings
Select FreeMIDI as the MIDI driver that V-Producer will use.
fig.05syncDigiPfm02
2
3
From V-Producer’s [Option] menu, choose “MIDI
Settings...”
In the FreeMIDI MIDI Settings dialog box, set MIDI Driver to “FreeMIDI
Driver.”
fig.05syncDigiPfm03
4
130
Click [OK] to close the FreeMIDI MIDI Settings dialog box.
Synchronization settings
Next, make settings so that V-Producer will synchronize to the MIDI clock
data transmitted from Digital Performer.
fig.05syncDigiPfm04
5
6
From V-Producer’s [Option] menu, choose “MIDI
Sync...”
In the Sync Mode dialog box, set the Sync IN “IN” field to “Roland
VariOS Sync” as shown below.
fig.05syncDigiPfm05
Select Roland VariOS Sync
7
8
In the Sync IN “Type of sync” field, select “MIDI Clock.”
Click [OK] to close the Sync Mode dialog box.
fig.05syncDigiPfm02
9
10
From V-Producer’s [Option] menu, choose “MIDI
Settings...”
In the FreeMIDI MIDI Settings dialog box, uncheck
the “MIDI Clock” box.
fig.05syncDigiPfm07
Important!! Uncheck this box.
11
Step 10 is a special setting
used when you want to
synchronize V-Producer
and Digital Performer. If
you fail to uncheck this
box, V-Producer will play
at double speed when
synchronized. If you want
to play V-Producer in
Internal Mode, check this
box once again.
Click [OK] to close the FreeMIDI MIDI Settings dialog box.
131
Synchronization settings
Digital Performer settings
fig.05syncDigiPfm08
12
13
From Digital Performer’s [Basics] menu, choose
“Transmit Sync...”
In the Transmit dialog box, set the “Transmit beat clocks via port(s)”
field to “VariOS Port.”
fig.05syncDigiPfm09
14
132
Click [OK] to close the Transmit dialog box.
Synchronization settings
SONAR 2.0
1
2
Choose Options - MIDI Devices.
In the MIDI Device dialog box, choose “Roland VariOS Sync” in the
Output Devices field. At this time, make a note of the port number for
Roland VariOS Sync.
The top MIDI device that is selected in the list of output devices is assigned
to MIDI output port 1, and the next MIDI device is assigned to MIDI output
port 2, and so on.
3
4
5
The explanation in this
manual uses SONAR 2.0.
Please be aware that some
screens and menu names
may differ in other
versions.
Depending on the MIDI
interface you are using, you
may be unable to hear the
sound from the VariOS if
you first start SONAR 2.0
and then start V-Producer.
If this occurs, start VProducer first, and then
start SONAR 2.0.
Click [OK].
Choose Options - Project.
In the Project Options dialog box, click the [MIDI Out] tab.
Set the “Send MIDI Sync” fields as shown below.
fig.05syncCakewalk2
Set to 30--40
The "Roland VariOS
Sync" MIDI port number
you noted in step 2; in
this example, it is the first
from the top, so you
would enter "1."
* Set the “Locate Delay for SPP Recipient” in the range of 30–40.
* Set the MIDI output port to the Roland VariOS Sync MIDI port number you noted
in step 2.
6
Click [OK].
133
Synchronization settings
Synchronizing as a slave (MTC)
V-Producer can synchronize as a MTC slave.
Use the following procedure to set V-Producer so that it will operate
according to MTC.
1
2
ChooseOption - MIDI Sync.
In the Sync Mode dialog box, set the Sync IN field IN to the MIDI device
that you will use to input the synchronization signal.
* If you are synchronizing to a MIDI sequencer that is running on the same
computer, select “Roland VariOS Sync” as the MIDI device.
fig.05sync02
3
In the Sync IN field Type of sync, choose “MIDI Time Code.”
* You can obtain the same result by pressing the [MTC] button in the locator section.
4
Click [OK]. V-Producer will now synchronize to the master playback.
* If the Sync mode is “MTC,” you will not be able to start playback from the locator
controls. If you want to play back using the locator controls, switch the Sync mode
to “INT.”
* After V-Producer receives MTC clock messages, it requires approximately two
seconds of adjustment time before synchronized playback can begin. If you want to
synchronize V-Producer from the beginning of the song, please insert two or more
seconds of blank space at the beginning of the song on the master device.
Synchronization settings on the master device
For details on how to make MTC master settings in your other software or
external device, refer to the manual for your software or device.
If you are using another program installed in the same computer as the
master, and want to synchronize V-Producer to that program, select
“Roland VariOS Sync” as the MIDI device to which MTC will be
transmitted. This will allow synchronization to occur without having to
send the data through an external MIDI interface.
134
Since V-Producer will
automatically set its
reception SMPTE Frame
Rate to match the
transmitting device, you do
not need to set VProducer’s SMPTE Frame
Rate when synchronizing it
as a slave.
Synchronization settings
Synchronizing as the master (MIDI Clock)
1
2
Choose Option - MIDI Sync.
In the Sync Mode dialog box’s Sync IN area, set Type of sync to
“Internal.”
* You can obtain the same result by pressing the [INT] button of the locator section.
3
4
5
In the Sync OUT area, set the OUT field to the MIDI device that you will
use to output the synchronization data.
In the Sync OUT field, select MIDI Clock.
Click [OK].
Now V-Producer will transmit MIDI clock data as the master.
Synchronization settings on the slave device(s)
For details on how to make settings in your other software or external device
so that it will operate as a MIDI Clock slave, refer to the manual for your
software or device.
135
Synchronization settings
Synchronizing as the master (MTC)
1
2
Choose Option - MIDI Sync.
In the Sync Mode dialog box’s Sync IN area, set Type of sync to
“Internal.”
* You can obtain the same result by pressing th [INT] button of the locator section.
3
4
5
6
7
In the Sync OUT area, set the OUT field to the MIDI device that you will
use to output the synchronization data.
In the Sync OUT field, select MIDI Time Code.
In the SMPTE Offsets field, specify the starting time of the SMPTE time
code that will be transmitted.
In the SMPTE Frame Rate field, specify the MTC frame rate to be
transmitted.
Click [OK]. Now V-Producer will transmit MTC as the master device.
Synchronization settings on the slave device(s)
For details on how to make settings in your other software or external device
so that it will operate as a MTC slave, refer to the manual for your software
or device.
136
For details on setting the
starting time of the SMPTE
time code, refer to “SMPTE
Offsets” within the “MIDI
Sync” section of the
reference manual (PDF).
For details on the SMPTE
Frame Rate, refer to
“SMPTE Frame Rate”
within the “MIDI Sync”
section of the reference
manual (PDF).
Controlling the VariOS from your
MIDI sequencer
When using the VariOS with your MIDI sequencer (ProTools, Logic,
Cubase, Digital Performer, etc.), you can set the VariOS’s clock source to
“MIDI” so that the VariOS’s internal tempo will synchronize to the tempo of
your MIDI sequencer.
1
2
3
4
Turn on the power of the VariOS, and load the samples that you want to
play (p. 121).
Set the VariOS clock source to “MIDI” (p. 106).
When you are using VProducer, V-Producer will
automatically set the clock
source to “MIDI.”
Start up your MIDI sequencer.
Send the MIDI clock of your MIDI sequencer to “Roland VariOS MIDI”
(the port of the VariOS sound generator section).
For details on MIDI clock settings in your software program, refer to the
explanation for each program in “Synchronization settings” (p. 126), but
read any references to “Roland VariOS Sync” as “Roland VariOS MIDI.”
•
•
•
•
•
ProTools (p. 128)
Logic Audio (p. 128)
Cubase VST (p. 129)
Digital Performer (p. 130)
SONAR 2.0 (p. 133)
Now the internal tempo of the VariOS will be synchronized with the tempo
of your MIDI sequencer.
5
Specify Roland VariOS MIDI (the port of the VariOS sound generator
section) as the output port for the tracks of your sequencer, so that it will
control the VariOS.
137
Using your MIDI sequencer to play
data (SMF) created by V-Producer
Here’s how SMF data you’ve exported from V-Producer using the File Export SMF... command can be played on your MIDI sequencer (ProTools,
Logic, Cubase, Digital Performer, etc.).
■ Export SMF data
1
2
In V-Producer, execute File - Export SMF... to export the SMF data.
In the VariOS, save the samples that are used by the SMF (p. 122).
■ Load the SMF data into your MIDI sequencer
1
2
3
4
Set the clock source of the VariOS to “MIDI” (p. 106).
Start up your sequencer, and load the SMF data that you created in VProducer.
Send the MIDI clock output of your MIDI sequencer to “Roland VariOS
MIDI” (the port of the VariOS sound generator section).
•
•
•
•
•
138
A song saved in SMF
format does not contain the
samples and setting data
for the sound module
(VariOS), so you will need
to save this data on the
VariOS itself.
Turn on the power of the VariOS, and load the samples that are used by the
song that you exported as SMF data (p. 121).
For details on MIDI clock settings for your software, refer to the explanation
for each program in “Synchronization settings” (p. 126), but read any
references to “Roland VariOS Sync” as “Roland VariOS MIDI.”
5
Please note that a song
saved in SMF format
cannot be re-loaded back
into V-Producer.
ProTools (p. 128)
Logic Audio (p. 128)
Cubase VST (p. 129)
Digital Performer (p. 130)
SONAR 2.0 (p. 133)
Specify Roland VariOS MIDI (the port of the VariOS sound generator
section) as the output port for the tracks used by the SMF data.
While V-Producer is being
used, it will automatically
set the clock source to
“MIDI.”
When not using the USB MIDI functionality
of the VariOS (Connecting the VariOS to an
external MIDI interface)
Here’s how to make connections and settings when you are not using the USB MIDI functionality of
the VariOS (i.e., when you are connecting the VariOS to an external MIDI interface).
Normally, you will not need to use these connections unless you have problems, such as
the VariOS’s USB MIDI functionality failing to operate reliably on your computer.
Connections
fig.05midiIF
MIDI interface
MIDI IN
MIDI IN
MIDI cable
VariOS
MIDI OUT
MIDI OUT
MIDI cabel
MIDI OUT
MIDI IN
USB
cable
USB
MIDI keyboard
* Since the VariOS uses the USB cable to transfer wave files from the computer, you must use a USB cable
to connect the VariOS and your computer even when you are connecting to a MIDI interface.
MIDI port settings in V-Producer
fig.05midiIFPortE
Port of the MIDI
interface connected
to the VariOS
Port of the MIDI
interface connect to
your MIDI keyboard
MIDI MODE setting on the VariOS
In the procedure for “Playing the VariOS from a connected keyboard (MIDI Mode)” (p. 108), set the
VariOS’s MIDI MODE to “Internal.”
139
Reloading the internal demo song
into the VariOS
Since the demo song inside the VariOS is saved in the internal flash ROM of the VariOS, it will
not play back correctly if you format the internal flash ROM of the VariOS or if you delete the
demo song data. Reload the demo song using the following procedure.
If you execute this procedure, all user data will be erased from the internal flash
ROM. Please re-save the user data to a PC card before you proceed.
1
Start up your computer, and insert the CD-ROM that was included with the VariOS.
If your computer does not contain the VariOS driver, you must first install the VariOS
driver as described in “Installation” (p. 21).
2
3
Use a USB cable to connect the VariOS to your computer, and power up the VariOS.
Windows:
Using Explorer, copy the “VariOS_DemoSong” (located within the “BackUp” folder of the
CD-ROM) into the removable disk (the mounted VariOS drive).
When the copy is finished, double-click the “remove” icon in the task tray, and click the item
that represents the VariOS drive (this will vary depending on your version of Windows) to
unmount the drive.
fig.02taskicon
Windows XP, 2000
Windows Me
USB high-capacity storage device
USB disk
Macintosh:
Use the mouse to drag the “VariOS_DemoSong” (located within the “BackUp” folder of the
CD-ROM in the Finder), and copy it into the “VARIOS_DRV” disk (the mounted VariOS drive)
in the Finder.
When the copy is finished, drag the “VARIOS_DRV” (the VariOS drive) from the desktop into
the recycling bin. Alternatively, you can click VARIOS_DRV on your desktop, and execute
Unmount from the Special menu (shortcut [
] + [E]).
4
Press the [MENU] button of the VariOS so it’s lighted, and the Menu screen is displayed.
* Initially, the Menu screen will show the most recently selected menu. Hold down the [MENU] button for
a time or press the [EXIT] button to move to the top-level menu.
5
6
7
140
Turn the [VALUE] knob to select “MENU8 DISK,” and then press the [VALUE] knob.
Turn the [VALUE] knob to select “Menu8-5 Format,” and then press the [VALUE] knob.
When “Select Media” appears, choose “Flash ROM” and press the [VALUE] knob.
Reloading the internal demo song into the VariOS
8
A message of “Are You Sure? Format OK?” will ask you for confirmation. Press the [VALUE]
knob once again to execute formatting. If you press the [EXIT] button you will return to the
previous screen.
During formatting, the display will indicate “Now Processing...” When formatting is finished,
the display will indicate “Completed!”
The demo song has now been reloaded.
141
Troubleshooting
Problems related to the USB driver (Windows)
●Q. When I start (or restart) my computer with the VariOS connected via USB, it
freezes at the startup screen and fails to work
• Switch off the VariOS and then restart your computer.
It has been found that on some computers, starting (or restarting) the computer while the VariOS is
powered up and USB is connected will cause the computer to freeze at the startup screen and fail to
work. In this case, power down the VariOS and restart your computer.
● Q. When I turned off the power of the VariOS, an error occurred in Windows
• When using Windows Me, powering down the VariOS without unmounting the drive may cause an
error to occur in Windows. You must power down the VariOS using the procedure described on p.
50.
●Q. When I attempt to exit Windows while leaving the VariOS powered up, the computer
does not turn off
On some Windows computers, it has been reported that the computer cannot be powered down if you
exit Windows when the VariOS is still powered up (without unmounting the drive). (The shutdown
process halts before the computer's power is switched off.)
In this case, please use the procedure described on p. 50 to power down the VariOS before you exit
Windows.
●Q. VariOS driver is not mounted in Windows XP
If a network drive is mounted in Windows XP, that drive number may conflict with the VariOS drive,
causing the VariOS drive to not be recognized. If this occurs, change the assignment of the network
drive.
●Q. When I connect the VariOS via USB and wake up my computer from Suspend, it stops
functioning
• Make sure to power down the VariOS before you wake up your computer from Suspend. On some
computers, waking up the computer from the Suspend state while a powered-up VariOS is
connected via USB will cause the computer to freeze. Before you Suspend your computer, power
down the VariOS using the procedure described on p. 50.
142
Troubleshooting
●Q. “Find new hardware wizard” does not execute automatically
●Q. The “Insert Disk” dialog box does not appear
●Q. “Find new hardware wizard” ends before the process is completed
It may take about 15 seconds (or more) after the USB cable is connected for the VariOS to be detected.
• Is the USB cable connected correctly?
Make sure that the VariOS and your computer are correctly connected via a USB cable.
• Is USB enabled on your computer?
Refer to the operation manual for your computer, and make sure that USB is enabled.
• Does your computer meet the USB specifications?
If you are using a computer that does not fulfill the electrical requirements of the USB specifications,
operation may be unstable. In this case, you may be able to solve the problem by connecting a USB
hub.
If the above actions do not solve the problem, it is possible that the VariOS has been incorrectly
detected by the computer.
As described in <Deleting incorrect device information> (p. 143), delete the incorrect device
information, then re-install the driver. (➔“Installing the Driver” (p. 22))
●Q. “Found unknown device” appears even though you installed the driver
If your computer or USB hub has two or more USB connectors, and you connect the VariOS to a USB
connector to which the VariOS has never been connected before, the “Unknown device” dialog box
may appear even on a computer onto which you have already installed the driver.
Refer to “Installing the Driver” (p. 22), and install the driver once again. This is not a malfunction.
If the "Found unknown device" dialog box appears even though the VariOS is connected to the same
USB connector as before, it is possible that the computer has detected the VariOS incorrectly. As
described in <Deleting incorrect device information> (p. 143), delete the incorrect device
information, then re-install the driver. (➔“Installing the Driver” (p. 22))
●Q. An “Unknown driver found” dialog box appears, and you are unable to install the
driver
●Q. Device Manager shows “?”, “!”, or “USB Composite Device”
●Q. Driver is not installed correctly
It is possible that the computer has detected the VariOS incorrectly.
As described in <Deleting incorrect device information> (p. 143), delete the incorrect device
information, then re-install the driver. (➔“Installing the Driver” (p. 22))
<Deleting incorrect device information>
Use the following procedure to re-install the driver.
1. Turn off the power of your computer, and start up Windows with all USB cables disconnected
(except for keyboard and mouse).
2. After Windows restarts, use a USB cable to connect the VariOS to your computer.
3. Turn on the power of VariOS.
143
Troubleshooting
4. Click the Windows Start button, and from the menu that appears, choose Settings | Control
Panel.
5. Double-click the System icon. The System Properties dialog box will appear.
6. Click the Device Manager tab.
In Windows XP, select the System Properties Hardware tab, and click Device Manager.
7. Check whether “Roland VariOS” with an “!” or “?” symbol is displayed below “Other
Devices,” “Sound, Video, and Game Controllers,” or “Universal Serial Bus Controller.” If
you find any such indication, select it and click [Delete].
8. A dialog box will ask you to confirm deletion of the device. Verify the contents of the dialog box,
and then click [OK]. In the same way, delete all occurrences of “Roland VariOS” that have an “!”
or “?” symbol.
9. Check whether “Composite USB Device,” “USB Device,” or “USB Composite Device” with
an “!” or “?” symbol is displayed below “Other Devices," “Sound, Video, and Game
Controllers,” or “Universal Serial Bus Controller.” If you find any such indication, you need to
determine whether it has appeared because the VariOS has been detected incorrectly, or because
there is a problem with some other device. To determine this, switch off the power of the VariOS.
If the “Composite USB Device” (or other) indication disappears when you turn off the power of
the VariOS, then it is the VariOS that has been incorrectly detected. Return to step 2 and continue
the procedure, and when you reach step 8, delete the information that was detected incorrectly. If
the indication does not disappear when you turn off the power of the VariOS, then this indication
refers to a different device. Do not delete it.
“Composite USB Device,” “USB Device,” or “USB Compatible Device” may sometimes
indicate a device other than the VariOS. Be careful not to accidentally delete the registration for
another device. If you delete the registration for another device, you will have to reinstall the
driver for that device.
10.A dialog box will ask you to confirm deletion of the device. Verify the contents of the dialog box,
and click [OK]. Delete each unwanted occurrence of “Composite USB Device,” “USB Device,”
or “USB composite device” indications with an “!” or “?” symbol.
11.Turn off the power of the VariOS, then delete the driver. (➝ Deleting the driver (p. 154))
12.Restart Windows. Then install the driver once again. (➝ Installing the Driver (p. 22)).
* If the problem still occurs after you have taken the above measures, please refer also to the Readme file for
the USB driver. The Readme file is on the CD-ROM.
●Q. Can’t install/delete/use the driver in Windows XP/2000
• Did you log on to Windows as a user with administrative privileges?
In order to install/delete/re-install the driver in Windows XP/2000, you must be logged into
Windows as a user with administrative privileges, such as Administrator. For details, please contact
the system administrator for your computer system.
• Did you make “Driver Signing Options”?
In order to install/re-install the driver, you must make “Driver Signing Options.”
(Windows XP ➝ p. 22, Windows 2000 ➝ p. 26)
144
Troubleshooting
●Q. Windows XP/2000 displays a “Hardware Installation” or “Digital Signature Not Found”
dialog box
• Did you make “Driver Signing Options”?
In order to install/re-install the driver, you must make the settings described in “Driver Signing
Options.” (Windows XP ➝ p. 22, Windows 2000 ➝ p. 26)
Problems related to the USB driver (Macintosh)
●Q. USB indicator on the VariOS's panel is not lit
The USB indicator will not light if the VariOS is not recognized by the computer. Please check the
following items.
• Is the USB cable connected correctly?
Make sure that the VariOS and your computer are correctly connected by a USB cable.
• Did you install the VariOS OMS driver correctly?
Install the VariOS OMS driver using the procedure described in “Installing the VariOS OMS driver”
(p. 40).
• There may be a conflict with the driver (Extension) of another USB device.
Use the "Extensions Manager" control panel to disable unneeded extensions.
From the "Selected Set" popup menu, select "Mac OS Base," and restart your Macintosh. Then install
the VariOS OMS driver once again using the procedure described in “Installing the VariOS OMS
driver” (p. 40).
●Q.
A message of "Drivers needed for the USB device “VariOS” are not available.
Would you like to look for these drivers over the internet?" is displayed
• It is possible that the VariOS's USB MIDI driver has not been correctly installed in your computer.
Correctly install the USB MIDI driver as described in “Installation” ( “Macintosh users” (p. 35)).
• It is possible that there is a conflict with the driver (function extension) of another USB device. We
are aware of a problem that causes the VariOS to not be recognized correctly if a driver for I-O Data
Corporation's USB CD-R drive is installed. In this case, disable “ISD 200 BOTBridge” or other
driver file by moving it out of the Extensions folder, located within the system folder.
●Q.
When the computer returns from the Sleep state, an indication of “MIDI off line!”
appears
• The VariOS's USB MIDI driver does not support the Sleep functionality of Mac OS. Do not use the
Sleep functionality of Mac OS. When you use the VariOS, open the “Energy Saver” control panel and
specify “Never” as the period of inactivity before the system goes to sleep.
145
Troubleshooting
Problems when using the VariOS
●Q. Can’t install
• Make sure that the CD-ROM is inserted correctly.
• If other applications are running, exit all of them before you begin the installation.
• Make sure that your hard disk has enough free space. If it does not have enough free space, delete
unneeded files and then empty the recycle bin.
●Q. Can’t start up V-Producer
• Are numerous applications running?
Sometimes a new application cannot start up if there is not enough memory. Exit other applications
before you start V-Producer. If an error is still displayed, restart you computer.
•
Is OMS installed correctly?
V-Producer will not start on a system in which OMS is not installed. Please re-install OMS correctly.
• Remove unneeded device drivers and/or antivirus software before you start V-Producer.
Before starting up V-Producer, you must power up the VariOS and connect the VariOS to your
computer via a USB cable.
If you inadvertently start up V-Producer before powering up the VariOS or connecting the USB cable,
or if you power down the VariOS or disconnect the USB cable while V-Producer is running, you must
exit V-Producer, and then restart it.
●Q.
A type 3 error occurs when I start up V-Producer
(if ATM 4.6.1 is installed in Mac OS 9.0.4)
It has been reported that if ATM (Adobe Type Manager) 4.6.1 is installed in Mac OS 9.0.4, a type 3 error
can occur when V-Producer is started up. This problem can be avoided by doing either of the
following:
• Update ATM to version 4.6.2.
The ATM update can be found on the Adobe website. (http://www.adobe.com)
• Use the "Extensions Manager" control panel to disable ATM.
146
Troubleshooting
●Q. MIDI device is not displayed in the PORT field of the MIDI/Audio settings (
Macintosh, MIDI Settings) dialog box
on the
Before starting up V-Producer, you must power up the VariOS and connect the VariOS to your
computer via a USB cable.
If you inadvertently start up V-Producer before powering up the VariOS or connecting the USB cable,
or if you power down the VariOS or disconnect the USB cable while V-Producer is running, you must
exit V-Producer, and then restart it.
• It is possible that the VariOS’s USB MIDI driver has not been correctly installed in the computer.
Correctly install the USB MIDI driver as described in “Installing the Driver” (p. 22).
•
•
It is possible that OMS has not been correctly installed in the computer. Correctly install OMS as
described in “Connections and OMS setup” (p. 40).
Make sure that you have a valid OMS Studio Setup (p. 43).
• Check whether the VariOS is powered on, and that it is connected to your computer by a USB cable.
If you have turned on the VariOS, exit V-Producer and then start it up once again.
• Exit all other MIDI software, and re-start V-Producer.
●Q. A message of “MIDI Offline!” appears when you start up V-Producer or while it is
running
Before starting up V-Producer, you must power up the VariOS and connect the VariOS to your
computer via a USB cable.
If you inadvertently start up V-Producer before powering up the VariOS or connecting the USB cable,
or if you power down the VariOS or disconnect the USB cable while V-Producer is running, you must
exit V-Producer, and then restart it.
• Make sure that the VariOS is powered on.
• Make sure that the VariOS is connected correctly. (“Connections with external devices” (p. 19))
• Make sure that MIDI device settings are correct. (“MIDI and audio settings” (p. 44))
• Re-start your computer.
• Exit all other MIDI software, and re-start V-Producer.
• Check whether the VariOS may be in DISK mode (saving or loading).
•
•
●Q.
Make sure that you have a valid OMS Studio Setup (p. 43).
The VariOS's USB MIDI driver does not support the Sleep functionality of Mac OS. Do not use
the Sleep functionality of Mac OS.
When you use the VariOS, open the “Energy Saver” control panel and specify “Never” as the period
of inactivity before the system goes to sleep.
An error of “Memory is full...” appears, and further editing is impossible
• The “Memory is full ...” error may appear if you open a large song or run out of memory while
editing a song, or depending on the monitor resolution and color depth. It will not be possible to
load files or edit further. If this occurs, exit V-Producer. Then, in the Finder, click “V-Producer” to
select it. Next, from the Finder menu, choose File - Get Info - Memory, and under Memory
Requirements, increase the amount of memory used by V-Producer.
* If you will be loading samples of the maximum length (150 seconds stereo; 300 seconds monaural), we
recommend that you increase the memory allocation to 192 MB or more.
147
Troubleshooting
●Q. No sound when you play back the demo song
• Make sure that the VariOS is powered on.
• Make sure that the VariOS is connected correctly. (“Connections with external devices” (p. 19))
• Make sure that MIDI device settings are correct. (“MIDI and audio settings” (p. 44))
• Exit all other MIDI software, and re-start V-Producer.
●Q. The VariOS's output contains noise
• Is something plugged into an audio input on the rear panel of the VariOS?
If the audio output of your computer or some other source is plugged into an audio input connector
on the rear panel of the VariOS, you may hear noise in the VariOS's output. You can eliminate this
noise by setting the VariOS menu item “7-2 Audio Input Jack” (p. 121) to "Disable" so that the audio
input is disabled.
●Q. The volume level of the instrument connected to AUDIO IN is too low
• Could you be using a connection cable that contains a resistor?
Use a connection cable that does not contain a resistor(e.g., Roland PCS series).
●Q. Sound is interrupted
• Has the maximum polyphony of the VariOS been exceeded?
The VariOS can produce a maximum of 14 voices of polyphony (in stereo, 7 voices).
●Q. In the Groove Scope, sound is interrupted, or pops and crackles occur
• When editing events in the Groove Scope, go to the Sample Edit screen (p. 62) and set the Playback
mode of the sample to “RETRIGGER” (p. 63). If you edit an event with the Playback mode set to
anything other than “RETRIGGER,” the event will not play correctly.
●Q. Can’t play legato in the Phrase Scope
●Q. Phrase plays from the beginning when a note is edited in the Phrase Scope
• If you want to play legato in the Phrase Scope, go to the Sample Edit screen (p. 62) and set the
Playback mode of the sample to “TIME SYNC” (p. 63). If you edit a note with the Playback mode
set to “RETRIGGER,” the beginning of the sample will play each time the pitch changes, and you
will be unable to play legato.
●Q. Triggering occurs when you specify a chord in the Phrase Scope
• Has the maximum polyphony of the VariOS been exceeded?
The VariOS can produce a maximum of 14 voices of polyphony (in stereo, 7 voices).
●Q. When you edit a curve in the Phrase Scope, the start and end points of the selected
region are not the same as the location where the curve changes
The control data that is edited exists at 20-tick intervals. In other words, if you edit a region that is
smaller than 20 ticks, the selected region will not match the location of the data that actually changes,
and will be absorbed into 20-tick steps.
148
Troubleshooting
●Q.No sound
• Is the power of the connected equipment turned on?
Make sure that the power of the connected amp/mixer system is turned on.
• Has the volume been lowered?
Check the volume of the VariOS, and the volume of the connected amp/mixer system.
• Are the connections correct?
If there is sound in the headphones, it is possible that theconnection cables are broken, or that your
amp/mixer has malfunctioned. Check the connection cables and your equipment once again.
• Does the transmit channel match the receive channel?
Make sure that the MIDI transmit channel(s) of the connected device matches the receive channel
(Menu 2-8 Receive Channel) of each VariOS part (p. 115).
• Has the level of each part been turned down?
Check the level setting (Menu 2-5 Level/Pan) of each part (p. 115).
• Are the note range settings correct?
Check the key range (Menu 2-7 Key Range) settings of each part (p. 115).
• Are the effect settings correct?
Check settings such as effect on/off (Menu 4-1 Effect Switch) (p. 119), multi-effect send level(Menu 42-2 Part Effect Send) (p. 119), and effect balance and level.
• Are the output destination settings correct?
Check the settings for output assign and multi-effect output assign (p. 119).
• Has the Master Attenuation been turned to a low value?
Set the Master Attenuation (Menu 7-6 M.Attenuation) to a higher value (p. 121).
●Q. Tempo indicator is not blinking (The VariOS does not produce sound)
The Tempo indicator on the VariOS's front panel always blinks in time with the tempo. If the Tempo
indicator does not light, check the following points.
• [If the VariOS is not connected to a computer]
The VariOS's MIDI Source may have been set to "MIDI."
Change the Clock Source to "INT" (p. 106).
• [If the VariOS is connected to a computer]
MIDI Clock data from your sequencer software is not being correctly output to the VariOS port
(Roland VariOS MIDI).
For V-Producer:
In the Options - MIDI/Audio Settings (
in Macintosh, “MIDI Settings”) dialog box, choose
“Roland VariOS MIDI” as the MIDI Device, and check the “MIDI Clock” field.
For other sequencer software:
Using the procedure on p. 142, output the MIDI Clock data from your sequencer software to “Roland
VariOS MIDI.”
●Q.Sound does not play correctly
• If you use SOLO to encode a sound that contains large amounts of reverberation or which has no
sense of pitch, the sound may not play as you expect.
When encoding with the SOLO setting, you should select sounds that have as little reverberation as
possible. If the sound includes reverberation, use ENSEMBLE or BACKING to encode it (p. 57).
149
Troubleshooting
●Q. Notes are stuck
• In the Sample Edit screen (p. 62), the Trigger mode of the sample may be set to “Trigger.”
Set the Trigger mode of the sample to “GATE.” If it is set to TRIGGER, the sample will continue
sounding if you forget the key that you pressed. Sometimes if you are playing the VP-9000 from a
sequencer, the sample may continue sounding even when you stop the sequencer. If this occurs,
choose "Panic" from the Option menu in V-Producer. Alternatively, you can play the key that is
assigned as the Panic Key (p. 121). All sounds will stop.
●Q. Tempo does not synchronize
●Q. The VariOS does not play at the tempo of the song
●Q. Playback timing is slightly skewed between samples
• The Clock Source of the VariOS may be set to INT.
Set the Clock Source to “MIDI” (p. 106).
* If you are playing the VariOS by itself, set Clock Src to INT. If you are synchronizing the VariOS to
an external device, set Clock Src to MIDI.
• Is tempo sync turned off for the applicable part?
Turn on tempo sync for the applicable part (p. 115).
• Was the original tempo set correctly?
Check the setting (p. 57, p. 66).
• Have you used a TIME knob to modify the time?
Return the TIME knob to the center position.
●Q. LFO or effect parameters do not synchronize to tempo
• Has tempo sync been turned off for the corresponding part?
Turn tempo sync on for the part to which the sample is assigned, or for the part to which the effect is
being applied (p. 115).
●Q. The VariOS plays at double-tempo when played by V-Producer’s preview or song
playback
The VariOS synchronizes to the master tempo of V-Producer by receiving MIDI Clock messages
from V-Producer. On some MIDI interfaces, such as Mark Of The Unicorn Corporation’s MIDI
Express or Emagic Corporation’s amt8, MIDI Clock messages that are input to one port are output
from all ports. This means that if in the Sync Mode dialog box (Option - MIDI Sync) you select one of
these interfaces as the MIDI Clock output destination, duplicate MIDI Clock (F8) messages will be sent
to the VariOS, causing the playback tempo to double. If this problem occurs, access the Options MIDI/Audio settings (
“MIDI Settings” on the Macintosh) dialog box, and un-check the MIDI
Clock check box. This will allow the VariOS to play at the correct master tempo.
150
Troubleshooting
●Q. An exported SMF does not play correctly on your sequencer
• An SMF file exported by V-Producer contains song setup data at 1:1:0. This means that if you have
pasted a frame at a timing location of 1:1:0, and export the song using Export SMF, the setup data
and the note-on data will be output at the identical timing. Some sequencers may be unable to play
this correctly. If you want to use Export SMF in such cases, you should paste the frames starting at
measure 2 so that there is sufficient space between the setup data and the note-on data.
• It is possible that the VariOS is not synchronized to the tempo of your sequencer. Set the VariOS's
Clock Source to MIDI, and make settings on your sequencer so that it will transmit MIDI Clock
messages to the VariOS.
• For a song in which a single sample is shared by different keyboard maps (Phrase Map/Groove
Map), the playback may differ slightly depending on the Playback Mode of the sample. In particular
when playing a phrase that is set to Groove Map, you should set the Playback Mode of the sample to
RETRIGGER.
●Q. The VariOS plays at double-tempo when played by a MIDI sequencer
If you use a MIDI sequencer to play the VariOS while V-Producer is running, duplicate MIDI Clock
(F8) messages may be sent to the MIDI port to which the VariOS is connected, causing the VariOS to
play at double-tempo. If this problem occurs, you can either exit V-Producer, or access the Options MIDI/Audio Settings (
“MIDI Settings” on the Macintosh) dialog box and un-check the MIDI
Clock check box. (However, if this box is un-checked, tempo data will not be sent to the VariOS when
it is played by V-Producer alone. If you are using only V-Producer without another sequencer, this
check box should be checked.)
●Q. When you audition a phrase, effects are sometimes applied to the sound
This happens because the part used by the audition function is assigned automatically each time. You
can assign a specific part as the MIDI-thru destination by pressing its [REC] (record-part) button in the
vari-track (p. 75), so do this to specify a part to which effects are not applied.
●Q.Effects do not apply
• Are the various effect settings correct?
If the send level of each effect is set to 0, the effect will not be applied. Check the settings (p. 92).
Even if the send level to each effect is higher than 0, there will be no effect if the master level of each
effect is 0. Check the settings (p. 93).
If output assign is set to MAIN or DIR, the sound of the multi-effect will not be output (p. 92).
●Q. The Undo function does not work as expected
In V-Producer, an Undo function is provided for each screen. In order to use Undo, the appropriate
screen must be active. Be aware that when you close a screen other than the vari-track, the Undo data
will also be cleared.
●Q. When you operate the knobs of the VariOS to edit PITCH/TIME/FORMANT, some
parameters do not reflect your edits
Check the Knob Assign settings of the VariOS. Choose the View - VariOS Performance Editor
command, click the Knob Assign tab, and click the [Reset] button located in the upper right of the
screen.
151
Troubleshooting
●Q. The PITCH, TIME, and FORMANT knobs don't work when using the VariOS by itself
• Could the Knob Output Mode be set to OFF or MIDI?
When V-Producer starts up, it changes the Knob Output Mode to MIDI. When V-Producer shuts
down, it changes this setting to INT&MIDI. If the setting is still MIDI, the knobs will not work when
the VariOS is used by itself. Please change the setting to INT or INT&MIDI.
●Q. You attempted to make MIDI synchronization settings, but don’t see the “Roland
VariOS Sync” that was mentioned in the manual.
• The VariOS USB MIDI driver may not be installed.
Install the driver as described in “Installation” (p. 21).
●Q. When a song exported as SMF is loaded into Cubase, the notes at the beginning of
the song are not played.
• It has been found that when a song created in V-Producer is exported as SMF and loaded into
Cubase, the order of the Program Change and Note On messages at the first beat of the first measure
gets switched around, and as a result, a frame placed at measure one, beat one will fail to sound. If
this occurs, use V-Producer to move that frame to a point after measure one, beat one, and then
export it as an SMF once again.
●Q. Keyboard shortcuts cannot be registered correctly, or fail to operate.
• Some combinations of keys may be used by your system, and therefore cannot be registered or will
not work.
●Q. Can’t open Help or Readme menu
• You will need Adobe Corporation’s Acrobat Reader in order to read the Help (pdf file). Acrobat
Reader can be downloaded from the Adobe Corporation’s website (http://www.adobe.com).
•
You will be unable to open Help or Readme if the name of your hard disk or folder contains a “/”
(slash). Please rename your hard disk or folder.
●Q. Can’t add or move events in some locations in the Wave Editor.
When adding or moving events in the Wave Editor, there must be at least 5 msec between adjacent
events. You cannot add or move events any closer than this.
●Q. Can't load wave. An error is displayed when you attempt to encode.
• An error will be displayed if the WAV file you are attempting to encode is not suitable for the
selected encoding type. In this case, try a different encoding type.
• An error will be displayed if the WAV file you are attempting to encode is too long. In this case, use
a waveform editing program to shorten the WAV file. The maximum sampling time for one sample
is 150 seconds of stereo or 300 seconds of monaural.
●Q. Encode does not finish
• It is possible that the selected encode type is not appropriate for the sample. Try changing the encode
type.
152
Troubleshooting
●Q. Can’t transfer data successfully to the VariOS.
•
If a Zip or similar drive is connected, the drive name of the VariOS will change each time you
start up your system, causing it not to be recognized by V-Producer. In this case, choose Options MIDI/Audio Settings (
“MIDI Settings” on the Macintosh), and re-specify “VariOS Drive.” Press
the [Scan] button to select the drive automatically.
• Make sure that the VariOS is powered on.
• Make sure that the VariOS is connected correctly. (“Connections with external devices” (p. 19))
●Q. No sound when you play a MIDI keyboard. Can’t record.
• Make sure that your MIDI keyboard is connected as described in “Connections with external
devices” (p. 19). Then choose the Options menu, click MIDI/Audio Settings, and make sure that the
port of your MIDI keyboard is selected in the MIDI IN Ports (Keyboard) field.
• If your MIDI keyboard is connected to the MIDI IN on the rear panel of the VariOS, make sure that
the MIDI MODE setting (p. 108) of the VariOS is set to PC mode.
• In the V-Producer locator, is the MIDI Thru switch (
) turned ON?
If this is OFF, playing your MIDI keyboard will not cause the VariOS (sound module) to sound.
●Q. When I play a waveform in the Wave Edit screen (p. 65) there are pops in the sound
• If you hear pops in the sound when you play back in Wave Edit through USB-connected speakers,
uncheck the “High CPU Load” setting in MIDI/Audio Settings (p. 46)
•
On the Macintosh, open the “Memory” control panel, and turn off “Virtual Memory.”
●Q. When I play a waveform in the Wave Edit screen (p. 65) there is a discrepancy
between the display and the playback
Adjust the “Adjust” slider in MIDI/Audio Settings (p. 46). The “Adjust” slider adjusts the difference
between the Wave Edit screen display and the audio that is heard. Play back the waveform in the
Wave Edit screen, and move the slider toward the left if the cursor (vertical line) is displayed later than
the actual sound, or toward the right if it is displayed before the actual sound.
153
Troubleshooting
Deleting the driver
If you were unable to install the driver according to the procedure given, the VariOS may not be
recognized correctly by the computer. In this case, use the following procedure to delete the driver,
and then follow the procedure in Installing the Driver (Windows, p. 22; Macintosh, p. 35) to install
the driver once again.
Windows XP/2000 users
In order to delete (uninstall) the driver, a user with administrative privileges such as Administrator
must be logged onto Windows. For details, contact the system administrator of your computer.
1. With all USB cables disconnected, start Windows. (USB keyboard and USB mouse excepted)
2. Log on to Windows under a user name belonging to the Administrator group, such as
“Administrator.”
3. After connecting the VariOS to your computer via a USB cable, turn on the power of the VariOS.
4. Exit all applications before deleting the driver.
5. Open the Control Panel, and double-click System.
* In Windows XP, click "Switch to classic view" to switch the display to the classic view. Roland
VariOS will not be displayed unless the classic view is selected.
6. Click the Hardware tab, and in the “Device Manager” area, click [Device Manager].
7. Double-click “Sound, Video, and Game Controllers” to view the list of devices.
8. From the list, click “Roland VariOS” to select it. Then right-click, and from the menu that
appears, select “Delete.”
* If “Roland VariOS” does not appear in the list, refer to the “Q. Can’t install/delete/use the
driver in Windows XP/2000” (p. 144) section in “Troubleshooting.”
9. A dialog box will ask you to confirm that you want to delete the device. Verify the contents of the
dialog box, and click [OK].
10.Close the Device Manager window, and click [OK] in System Properties.
11.Disconnect the USB cable from the VariOS.
12.Restart Windows.
154
Troubleshooting
Windows Me/98 users
1. With all USB cables disconnected, start up Windows. (USB keyboard and USB mouse excepted)
2. After connecting the VariOS to your computer via a USB cable, turn on the power of the VariOS.
3. Exit all applications before deleting the driver.
4. Open the Control Panel, and double-click System.
* Depending on the state of your computer, System may not appear in the Control Panel. In this
case, click “Show all control panel options.”
5. Click the Device Manager tab.
6. Double-click “Sound, video, and game controllers” to see the list of devices.
7. From the list, click “Roland VariOS” to select it, and click [Remove].
8. A dialog box will appear, asking you to confirm that you want to delete the driver. Verify the
contents, and click [OK].
9. Click [Close] to close System Properties.
10.Disconnect the USB cable from the VariOS.
11.Click Folder Options in the Control Panel (in Windows 98, Start ➝ Settings ➝ Folder
Options), and click the View tab.
12.In Advanced settings of the View tab, remove the check mark for “Hide protected operating
system files” (for Windows 98, “Hide file extensions for known file types”), click “Show
hidden files and folders” (for Windows 98, “Show all files”), and then click [OK].Click Start ➝
Find ➝ Files or folders.
13.In “Search location,” select “Local hard drive.” Then in “Name of file or folder,” type
“*0026.*” and click [Begin search].
14.Of the files that are found, delete the four files Rddp0026.dat, Rddv0026.drv, Rdvx0026.vxd,
and Rdwm0026.sys. If the list shows Rdas0026.dll, Rdif0026.inf or RolandRDIF0026.INF,
delete these files as well.
* Never delete any file other then the files specified here.
15.Restart Windows.
Macintosh (MacOS 9) users
1. Disconnect the USB cable (by which the VariOS is connected) from your Macintosh.
2. From the system extensions folder, drag “USB VariOS Driver” into the trash to delete it.
3. Delete VariOS from the OMS Folder inside the System folder.
4. Restart the Macintosh.
155
List of messages
Error messages displayed by V-Producer
● VariOS (sound module) related errors
<VariOS> USB communication with VariOS (sound module) is not possible. Please exit Disk mode on the
VariOS.
This will appear if USB communication with the VariOS (sound module) is not possible. Check the connection between the
VariOS and your computer. This error may also appear if a Disk mode operation is being performed on the VariOS. In this
case, please exit Disk mode.
<VariOS> Can’t close the USB port of VariOS (sound module).
<VariOS> Initialization of VariOS (sound module) failed.
<VariOS> Transfer to VariOS (sound module) was interrupted.
<VariOS> Transfer to VariOS (sound module) failed.
<VariOS> VariOS (sound module) failed to load the sample.
Check the connection between the VariOS and your computer.
<VariOS> Sample number loaded by VariOS (sound module) is incorrect.
This will be displayed if the sample number loaded by the VariOS is incorrect. Save the data, exit V-Producer, and then restart
it.
<VariOS> VariOS (sound module) CPU memory is full.
This will be displayed if the CPU memory of the VariOS is full. Save the data, exit V-Producer, and then switch the power of
the VariOS off, then on again.
<VariOS> VariOS (sound module) cannot load the sample because the wave format is incorrect.
<VariOS> VariOS (sound module) cannot load the sample because the PCM wave format is incorrect.
<VariOS> VariOS (sound module) cannot load the sample because it contains three or more channels
(more than stereo).
<VariOS> VariOS (sound module) cannot load the sample because the sampling frequency is incorrect.
<VariOS> VariOS (sound module) cannot load the sample because the RDAC format is incorrect.
These messages will be displayed if the wave data being loaded into the VariOS is incorrect. The wave file you attempted to
load may be damaged.
<VariOS> Undefined error occurred on the VariOS (sound module).
<VariOS> VariOS (sound module) has timed-out.
These messages will be displayed if the VariOS is not operating correctly, or if the connection is broken. Please check the connection. If this does not solve the problem, save the data, exit V-Producer, and turn the power of the VariOS off, then on again.
● V-Producer errors
MIDI Offline! Cannot access VariOS (sound module).
Check the connection with the VariOS. Choose “Option - MIDI/Audio Settings,” and make the correct MIDI
Device setting for the VariOS.
MIDI connections have not been made correctly. Refer to “C Q. The ‘MIDI Offline!’ message appears when V-Producer starts
up or while using it,” in the Troubleshooting section (p. 133).
Disk full error.
The computer’s hard disk is full. Please delete unneeded files.
Memory is full, and further operation is not possible. Save the song and exit V-Producer.
This will be displayed if the computer memory is full and further operation is not possible. Save the song, and then exit VProducer.
Access was denied.
Disk access error.
Disk error.
These are errors produced by your computer’s hard disk.
This wave (vpd) file cannot be loaded since it was not created by V-Producer or has been damaged.
This will be displayed if an illegal file is selected when loading a song or adding a sample file in the Load Wave File dialog
box. The wave (vpd) file has been damaged. Please re-encode it from the original wave file.
Input the Tempo value in a range of 20.0000 –> 250.0000.
An incorrect Tempo value has been input. Please input a value in the correct range (20.0000 –> 250.0000).
Can’t write! Select a different directory.
This will be displayed if the “Use” directory you selected in the Load Wave File dialog box does not allow writing (for example if you have selected a CD-ROM). Please select different media (directory).
Input a Velocity value in the range of 0 -> 127.
An incorrect Velocity value has been input. Please input a value in the correct range (0 -> 127).
Delete samples from the VariOS (sound module)?
When you execute Song New, this message asks whether the samples within the VariOS will be left or deleted.
156
List of messages
Discard edits?
When you cancel your editing in the Wave Edit screen, this message asks whether you want to discard the changes made by
your editing.
Save the sample by overwriting it?
After you perform editing in the Wave Edit screen, this message asks whether you want to save the sample.
Since this sample is being used in the Vari Track, it cannot be deleted. This sample on the Vari Track will
be selected, so press the [Delete] key to delete it.
When you delete a sample in the Sample List, this message will appear if that sample is being used in the Vari Track. As the
message directs, press the [Delete] key to delete the sample from the Vari Track.
Since this sample is being used in the Wave Edit, it cannot be deleted.
When you delete a sample in the Sample List, this message will appear if that sample is being edited in Wave Edit. Exit the
Wave Edit screen, and then delete the sample.
Failed to delete the sample.
When you attempt to delete a sample in the Sample List, this message will appear if that sample cannot be deleted (for unknown reasons).
“Destination Directory” selection “Same as original” is not writable. (You cannot write to CD, etc.) Change
the “Destination Directory” to “use.”
This message will appear if the Original Directory selected in the Load Wave File dialog box is not writable. The switch will
be forcibly set to “Use” (for example, when reading files from a CD).
This sample has already been loaded.
When adding a sample in the Load Wave File dialog box, this message will appear if an identically named sample has already
been loaded.
sample has already been added.
When adding a sample in the Load Wave File dialog box, this message will appear if an identically named sample has already
been added.
The destination directory “Same as original” is not writable. (You cannot write to CD, etc.) ***.vpw will be
saved in the “use” directory.
When loading in the Load Wave File dialog box, this message will appear if the Original Directory is not writable. The destination will forcibly be changed to Use Directory.
***.vpw already exists. Overwrite?
When loading in the Load Wave File dialog box, this message will appear if an identically named ***.vpw file already exists
at the save destination.
VARIOS_DRV (the mounted VariOS USB drive) cannot be found. Exit V-Producer, and check the connection between your computer and the VariOS.
Windows: This will be displayed when you execute MIDI/Audio Settings [Scan] if the removable disk (the mounted VariOS
drive) was not found. (This is checked each time V-Producer starts up.) Exit V-Producer, power up the VariOS, and check the
connection with your computer.
Macintosh: This will be displayed if the “VARIOS_DRV” disk (the mounted VariOS drive) in the MIDI Settings field VariOS
Drive was not found. (This is checked each time V-Producer starts up.) Exit V-Producer, power up the VariOS, and check the
connection with your computer.
Encoding Error! Sample is too short.
This will be displayed if the sample is too short (less than 50 ms).
Encoding Error! Sample is too long.
This will be displayed if the sample is too long (more than approximately 300 seconds monaural or approximately 150 seconds
stereo).
Encoding Error! Memory is full, and further operation is not possible. Save the song, and exit V-Producer.
This will be displayed if computer memory fills up during encoding, and further operation is not possible. Save the song, and
then exit V-Producer.
Encoding Error!
This will be displayed if encoding fails.
"Save by overwriting?
* If this sample is being used in a song, it is possible that your edits in the Scope Editor may be ignored."
This message will appear when you use the Wave Editor to edit a sample that is being used in the Vari Track. If you use the
Wave Editor to edit a sample that is being used in the Vari Track, the event location and the waveform length can change,
which means that in some cases your edits in the Scope Editor may be ignored or may not sound correctly. In this case, repaste the Vari Track frame once again.
"The file type of ~.vpw is old. OK to re-encode it and save it to .\..\~.vpw ?"
This message will appear if you attempt to load a vari-file (VPW) of an old version or an otherwise invalid data format. To
save the file and have it be re-encoded in the correct data format, click [OK].
"Can't save. Media is not writable."
This message will appear if you attempt to execute the Save operation after loading a vari-phrase format file (VPW) from a
non-writable medium such as CD. In this case, copy the vari-phrase format file (VPW) from the CD to the hard disk of your
computer, then try saving it again.
"Can't open Help. Please install Acrobat Reader."
Adobe Corporation’s Acrobat Reader is required in order to read the Help file. You can download Acrobat Reader from the
Adobe website (http://www.adobe.com/). This address may change without notice.
157
List of messages
Errors displayed by the VariOS (sound module)
● MIDI-related
MIDI OFFLINE!
This will be displayed if there is a problem with the MIDI cable connected to MIDI IN, or if the connected MIDI cable was disconnected.
MIDI BUFFER FULL!
This will be displayed if an extremely large amount of MIDI data was received.
MIDI Error!
This will be displayed if a problem occurs in the hardware that transmits and receives MIDI data.
● Hardware-related
EEPROM Error!
This will be displayed if there is a problem with the memory that stores system settings. Please contact the dealer from whom you
purchased the product, or have the product serviced as described in Information on the back cover of this manual.
● Disk and file-related
No Media Found
This will be displayed if you attempt to access a PC card when no PC card is inserted. Please insert a PC card.
PhysicalUnformat
This will be displayed if the media has not been physically formatted. Please format the media.
Logical Unformat
This will be displayed if the media has not been logically formatted. Please format the media.
Write Protected
This will be displayed if the media is write-protected. Please format the media.
Read Error
This will be displayed if the data on the media is unreadable because it has been damaged. Do not use this file.
Write Error
This will be displayed if data cannot be written because the media is of an unsupported format. Please use media of a format that
can be written.
Too Many Files
This will be displayed if the maximum number of files that can be created in a folder has been exceeded. Please delete unneeded
files.
Too Many Folders
This will be displayed if the maximum number of folders that can be created has been exceeded. Please delete unneeded folders.
Max Folder Depth
This will be displayed if the folder hierarchy you attempted to create is too deep. Please delete unneeded folders.
Too Many Path! –> Path Too Long!
This will be displayed if the path name is too long. Either shorten the path name, or move the file to a higher level.
* The “path” indicates the location of the file. It is given as a series of folder names.
End Of File
This will be displayed if the loaded file is missing the “EOF” that indicates the end of the file. This file cannot be used.
Illegal Format
This will be displayed if the file is in an incorrect format. Do not use this file.
RolandMasterDisk
This will be displayed if you attempt to write to a PC card that Roland produced and which must not be modified. You cannot
write to the card that produced this error.
Status Error
This will be displayed if the file cannot be accessed normally. This file cannot be used.
Access Denied
This will be displayed while files are being written or read by V-Producer. If you want to select the Disk menu, please wait until
V-Producer has finished writing or reading.
Bad File Number
This will be displayed if an incorrect file number was specified when accessing a file.
Permission Deny
This will be displayed if you attempt to overwrite a file that has a read-only attribute. Please change the name before you save the
file.
Same File/Folder
This will be displayed if you attempt to create an identically named file or folder. Please assign a different name.
Not File
This will be displayed if the file cannot be opened because the selected name is not a file. Please select the correct file name.
Filename Long
This will be displayed if the filename is too long. Please shorten the filename.
158
List of messages
No File/Folder
This will be displayed if the specified file is not in the folder, or if the folder does not exist. Please specify the correct file.
Media Full
This will be displayed if writing is not possible because the media is full. Either delete unneeded files, or write the data to different
media (PC card).
Not Save Sample
Since it has no wave data, this sample cannot be saved.
Memory Full
Since the wave memory has become full, the operation was halted.
Not Sample Empty –> No Sample Space
This will be displayed if no more samples can be loaded. Please delete unneeded samples.
Not Folder
This will be displayed if you cannot move to the next lower level because the selected name is not a folder. Please select the correct
folder name.
Folder Not Empty
When deleting a folder, this message will be displayed if the file contains extraneous files (files other than samples or performances). Use your computer to delete files other than samples and performances.
Are You Sure?
Delete OK? (Push)
This message asks you for confirmation when deleting a file. Press [Enter] to execute the deletion, or [Exit] to cancel.
Are You Sure?
Rename OK? (Push)
This message asks you for confirmation when renaming a file. Press [Enter] to execute, or [Exit] to cancel.
Are You Sure?
Swap OK? (Push)
This message asks you for confirmation when exchanging sample files. Press [Enter] to execute, or [Exit] to cancel.
Sample Edited
Continue? (Push)
This message asks you for confirmation that you want to continue file operations even though the sample file has been edited.
Press [Enter] to execute, or [Exit] to cancel.
Pfm Edited
Continue?(Push)
This message asks you for confirmation that you want to continue file operations even though the performance file has been edited. Press [Enter] to execute, or [Exit] to cancel.
Are You Sure?
Overwrite? (Push)
This message asks you for confirmation that you want to save by overwriting. Press [Enter] to execute, or [Exit] to cancel.
Are You Sure?
Save OK? (Push)
This message asks you to confirm that you want to proceed with the save.Press [Enter] to execute, or [Exit] to cancel.
Are You Sure?
Format OK? (Push)
This message asks you to confirm that you want to proceed with formatting. Press [Enter] to execute, or [Exit] to cancel.
Are You Sure?
Delete OK?(Push)
This message asks you to confirm that you want to proceed with the deletion. Press [Enter] to execute, or [Exit] to cancel.
Reserved Name
This message is asking you to specify a name other than Make New Folder (for a folder name), NEW PERFORMANCE (for a performance name), or NO WAVE DATA (for a sample name).
Now Loading...
This message is displayed while a file is being loaded.
Now Saving...
This message is displayed while a file is being saved.
Now Processing...
This message is displayed while a file is being deleted, or while formatting is taking place.
Writing...
This message is displayed while a file is being renamed.
Completed!!
This message is displayed when processing is completed.
No Demo Data
This message is displayed when you attempt to play a demo song if flash ROM does not contain demo data, or if the data is damaged.
System Error
An error of unknown causes has occurred. Contact your dealer or a nearby Roland servicecenter for service.
159
List of shortcuts
Command
160
Windows
New
[Ctrl] + N
Open Song
[Ctrl] + O
Save Song
[Ctrl] + S
Load WaveFiles...
[Ctrl] + 1
Macintosh
[
]+N
[
]+O
[
]+S
[
]+1
Quit
[
]+Q
Close Window
[
]+W
[
]+Z
[
]+X
[
]+C
Undo
[Ctrl] + Z
Cut
[Ctrl] + X
Copy
[Ctrl] + C
Paste
[Ctrl] + V
Delete
Select All
[Del]
[Ctrl] + A
Repeat...
[Ctrl] + R
Quantize
[Shift] + Q
Play & Stop
Rewind
Song End
Rec Standby
Move Current Position
Prev Marker
[Space]
[Home]
[End]
*
J
[Ctrl] + [Page Up]
Next Marker
[Ctrl] + [Page Down]
Prev Measure
Next Measure
[Page Up]
[Page Down]
MIDI Thru
Loop On
T
[Ctrl] + L
Quick Loop Position
GridSnap
AutoScroll
L
G
[Shift] + S
[View] Sample Editor
[Ctrl] + 2
[View] Wave Editor
[Ctrl] + 3
[View] Vari Track
[Ctrl] + 4
[View] Scope Editor
[Ctrl] + 5
[View] SMPTE Display
[Ctrl] + 6
[View] VariOS Performance Editor
[Ctrl] + 7
[View] VariOS Keyboard
[Ctrl] + 8
[View] Part Property
[Ctrl] + 9
[View] Frame Property
[Ctrl] + 0
[View] VariOS Mixer
[Ctrl] + M
[View] Tempo List
[Ctrl] + [Shift] + T
[View] Marker List
[Ctrl] + [Shift] + M
[View] Meter List
[Ctrl] + [Shift] + C
[
]+V
[delete]
[
]+A
[
]+R
[Shift] + Q
[Space]
[Home]
[clear]
*
J
[
] + [Page Up]
[
] + [Page Down]
[Page Up]
[Page Down]
T
[
]+L
L
G
[Shift] + S
[
]+2
[
]+3
[
]+4
[
]+5
[
]+6
[
]+7
[
]+8
[
]+9
[
]+0
[
]+M
[
] + [Shift] + T
[
] + [Shift] + M
[
] + [Shift] + C
List of shortcuts
Command
Windows
Macintosh
Help
[F1]
[help]
Solo Current Part
Show Current PhraseEditor
[SampleList] Preview
[SampleList] Select Prev Phrase
[SampleList] Select Next Phrase
S
[Enter]
P
[Up]
[Down]
S
[Return]
P
[Up]
[Down]
161
Specifications
VariOS: Open System Module
●Sound Generator
VariPhrase
●Parts
1 to 6
●Maximum Polyphony
14 voices
●Internal Memory
Performance: 1
Samples: 128
Wave memory (RAM): 46 M bytes
Backup memory (FLASH): 32 M bytes
●External Storage Device
PC CARD slot
(Microdrive, SmartMedia or CompactFlash
can be used with PC card adapter.)
●Sampling Frequency
44.1 kHz (Internal)
●Data Format
16-bit linear
●Signal Processing
AD Conversion: 24 bits
DA Conversion: 24 bits
Internal processing
(sound generating section): 32 bits (floating point)
(effects section): 24 bits (fixed point)
●Nominal Input Level
INPUT (LINE): -18 dBu
INPUT (MIC): -43 dBu
●Nominal Output Level
MAIN OUT: +4 dBu
DIRECT OUT: +4 dBu
●Display
16 characters, 2 lines (backlit LCD)
●Connectors
USB Connector
Headphones Jack
Main Output Jacks (L/MONO, R)
Direct Output Jacks (L, R)
Input Jacks (L, R)
MIDI Connectors (IN, OUT)
Digital Audio Output:
S/P DIF Connectors
(COAXIAL, OPTICAL)
(24-bit, 44.1 kHz)
AC Inlet
●Power Supply
AC 117 V, AC 230 V, AC 240 V
●Power Consumption
10 W (AC 117 V)
12 W (AC 230 V, AC 240 V)
●Dimensions
430 (W) x 222 (D) x 44 (H) mm
16-15/16 (W) x 8-3/4 (D) x 1-3/4 (H) inches
(EIA-1U Rack Mount Type)
●Weight
2.2 kg
4 lbs 14 oz
●Accessories
Owner's Manual
CD-ROM (V-Producer, Driver)
Power Cord
USB Cable
Rackmount adapter (two pcs.)
●Effects
Reverb: 9 sets
Chorus: 1 set (8 types)
Multi: 40 sets
(0 dBu = 0.775 V rms)
* In the interest of product improvement, the specifications, appearance of this unit and/or contents of this
package are subject to change without prior notice.
162
INDEX
A
AC cable .......................................................................... 12
AC Inlet ........................................................................... 15
Add Meter ...................................................................... 68
Adjust slider ................................................................... 46
Arrow .............................................................................. 67
audio device ................................................................... 44
Audio Device (Preview) ............................................... 46
audio devices ................................................................. 20
AUDIO IN Jacks ............................................................ 15
Audio Input Jack ......................................................... 121
Auditioning .................................................................... 59
B
BACKING ....................................................................... 55
Beats ................................................................................ 66
C
Change PC Keyboard ................................................... 96
Clear Other Controls ..................................................... 80
Coarse Tune ................................................................. 115
Common Routing ........................................................ 119
Control Channel .......................................................... 121
Controller ....................................................................... 77
Controller display area ................................................. 87
Controller Edit ............................................................. 116
Controller select ....................................................... 77–78
Controller select buttons ........................................ 84, 87
Copy ................................................................................ 72
Copy Sample .................................................................. 61
Copying .......................................................................... 61
CTRL Setting ................................................................ 116
Cubase VST .................................................................. 129
CURSOR Buttons .......................................................... 14
Curve select .................................................................... 78
D
Delete ............................................................................ 122
Delete Meter ................................................................... 68
Delete Sample ................................................................ 61
Deleting ........................................................................... 61
demo song .................................................................... 140
demo songs .................................................................... 47
Depth ............................................................................... 67
DIGITAL OUT ............................................................... 15
Digital Performer ........................................................ 130
DIRECT OUT Jacks ....................................................... 15
DISK .............................................................................. 121
Display ............................................................................ 14
Driver .............................................................................. 22
DRUM ........................................................................... 114
DYNAMICS ................................................................... 78
Dynamics ........................................................................ 88
E
Edit ............................................................................ 65–66
Effect Edit ..................................................................... 119
Effect Switch ................................................................. 119
effect type ....................................................................... 94
Effect Type Cho ........................................................... 119
Effect Type MFX .......................................................... 119
Effect Type Rev ............................................................ 119
effects ............................................................................... 93
EFX Master Level ........................................................ 119
encoding ......................................................................... 55
encoding type ................................................................. 66
ENSEMBLE .................................................................... 55
Eraser ............................................................................... 67
eraser tool ....................................................................... 80
Error messages ............................................................. 156
EXIT Button .................................................................... 14
Export SMF ....................................................... 53, 91, 138
Export wave ................................................................... 53
F
Factory Reset .......................................................... 18, 120
Fade In/Out ................................................................. 114
Fast-forward ................................................................... 48
Fine Tune .............................................................. 115, 120
Flat ................................................................................... 78
Folder ............................................................................ 104
FORMANT ..................................................................... 78
Formant ................................................................... 88, 116
FORMANT (C3) Knob .................................................. 14
Format ........................................................................... 123
frame ......................................................................... 70–71
Frame Properties ..................................................... 17, 74
frames .............................................................................. 17
Front Panel ..................................................................... 14
G
GAIN switch .................................................................. 15
GATE ............................................................................. 114
Grid Snap ........................................................................ 81
Groove Map ........................................................... 60, 115
Groove Scope ........................................................... 17, 87
Groove scope .................................................................. 76
Grounding Terminal ..................................................... 15
H
High CPU Load ............................................................. 46
Hold ............................................................................... 117
I
IN ..................................................................................... 15
Indicators ........................................................................ 14
INPUT ............................................................................. 15
Internal mode ............................................................... 108
K
Key Assign ...................................................................... 63
Key Assign Mode ........................................................ 110
Key Assign mode .................................................. 62, 113
Key Range ..................................................................... 115
Keyboard ........................................................................ 95
Keyboard Map ............................................... 76, 110, 115
163
INDEX
keyboard map ........................................................ 60, 100
Knob Assign ................................................................. 118
Knob Control ............................................................... 118
Knob Output Mode ..................................................... 118
L
LCD Contrast ............................................................... 121
legato ............................................................................... 82
length .............................................................................. 71
Level ...................................................................... 115–116
LEVEL Knob .................................................................. 15
LFO Formant ................................................................ 116
LFO Pan ........................................................................ 116
LFO Pitch ...................................................................... 116
LFO Rate ....................................................................... 116
Linear .............................................................................. 78
Load Wave Files ............................................................ 56
location ............................................................................ 67
Locator ............................................................................ 16
locator ............................................................................. 85
Logic Audio .................................................................. 128
Loop .......................................................................... 66, 73
Loop Switch ................................................................. 114
M
M. Attenuation ............................................................ 121
Macintosh ....................................................................... 35
MAIN OUT Jacks .......................................................... 15
Master Coarse .............................................................. 120
Master Tempo .............................................................. 106
Master tempo ................................................................. 48
Master Tune ................................................................. 120
memory ............................................................... 39, 41, 48
MENU Button ................................................................ 14
MENU mode ................................................................ 102
METER ............................................................................ 68
MFX Cho/Rev Send .................................................... 119
MFX Out Assign .......................................................... 119
MIDI .......................................................................... 14, 20
MIDI Clock ..................................................... 45, 126, 135
MIDI Connectors ........................................................... 15
MIDI Device ................................................................... 44
MIDI IN Port (Keyboard) ............................................. 45
MIDI keyboard .............................................................. 75
MIDI MODE ................................................................. 139
MIDI Mode ........................................................... 108, 121
MIDI Offline ................................................................... 46
MIDI port ................................................................ 44, 139
MIDI sequencer ........................................................... 137
MIDI thru ....................................................................... 75
Mixer ............................................................................... 92
Modify ...................................................................... 85, 90
Modify Recording ......................................................... 85
Mounted ......................................................................... 49
MTC ............................................................... 126, 134, 136
Multi-effect ..................................................................... 93
multiple notes ................................................................ 81
Multiple Part .................................................................. 91
164
Mute ................................................................................ 74
Muted .............................................................................. 75
N
name .............................................................................. 104
Note ................................................................................. 77
note ............................................................................ 82, 88
notes ................................................................................ 81
O
Octave Shift .......................................................... 115, 120
OMS ........................................................................... 38, 40
OUT ................................................................................. 15
OUTPUT ......................................................................... 15
Output Assign .............................................................. 119
P
Pan ........................................................................... 74, 115
Panic Key ...................................................................... 121
Part buttons .................................................................... 95
Part Edit ........................................................................ 115
Part Effect Send ............................................................ 119
Part Routing ................................................................. 119
Paste ................................................................................ 72
PC ..................................................................................... 14
PC Card Slot ................................................................... 14
PC mode ....................................................................... 108
Pen ................................................................................... 67
Performance ................................................................. 104
performances ................................................................ 100
PHONES Jack ................................................................. 14
Phrase Map ............................................................. 60, 115
Phrase Scope ............................................................ 17, 77
Phrase scope ................................................................... 76
phrase scope ................................................................... 81
PITCH ............................................................................. 78
Pitch ......................................................................... 88, 116
pitch ................................................................................. 82
PITCH (C1) Knob .......................................................... 14
Pitch Bend ..................................................................... 117
Pitch Sync ..................................................................... 115
PITCH/TIME/FORMANT knobs ........................ 85, 95
Play ............................................................................ 48, 65
Play step .......................................................................... 65
Playback .......................................................................... 75
Playback Mode .................................................... 111, 113
Playback mode ......................................................... 63, 81
Poly .................................................................................. 62
polyphony .................................................................... 100
POWER Switch .............................................................. 14
Preview ........................................................................... 59
ProTools ........................................................................ 128
punch-in/out anchors ................................................... 85
Punch-in/out button ..................................................... 85
Q
Quantize .................................................................... 86, 90
Quick Loop ..................................................................... 73
INDEX
R
Rackmount adaptor ...................................................... 12
rackmount adaptors ...................................................... 19
RealTime Rec ................................................................. 75
Realtime Recording ....................................................... 85
Rear Panel ....................................................................... 15
Receive Channel .......................................................... 115
Record ............................................................................. 75
Relative tempo ............................................................... 48
removable disk .............................................................. 49
Rename ......................................................................... 123
Repeat ............................................................................. 72
Reset ................................................................................ 64
Reset curve ..................................................................... 79
Reset Curve button ....................................................... 80
RETRIGGER ................................................................... 81
Retrigger ................................................................. 63, 113
Rewind ...................................................................... 48, 65
Robot ............................................................................... 64
Robot Voice switch ...................................................... 114
robot voice switch ......................................................... 64
Roland VariOS External MIDI ............................... 42, 45
Roland VariOS MIDI ...................................... 42, 44, 137
Roland VariOS Sync ...................................................... 42
Rounded ......................................................................... 79
S
Sample ................................................................... 100, 104
sample ........................................................................... 105
Sample Delete .............................................................. 120
Sample Edit ...................................................... 16, 62, 113
Sample Info ............................................ 56, 61–62, 65–66
Sample List ............................................................... 16, 58
Sample Rename ........................................................... 120
Sample select mode ..................................................... 102
Sample Swap ................................................................ 120
Samples ......................................................................... 100
samples ........................................................................... 69
Save ......................................................................... 67, 122
Save As ............................................................................ 91
Save Song ........................................................................ 91
Save song ........................................................................ 53
Saving .............................................................................. 91
Scope Editor ............................................................. 17, 76
Screen .............................................................................. 95
screen ............................................................................ 102
shortcuts ....................................................................... 160
slave ............................................................................... 134
Slice .................................................................................. 87
slice .................................................................................. 88
Slider ............................................................................... 67
SMF ................................................................................ 138
SOLO ............................................................................... 55
Solo ............................................................................ 62, 74
SONAR ......................................................................... 133
Song ................................................................................. 91
Step .......................................................................... 63, 113
Stop ............................................................................ 48, 65
Surface ............................................................................. 96
Sync IN .......................................................................... 127
Sync Mode .................................................................... 127
Sync mode .................................................................... 127
Synchronization ........................................................... 126
System ........................................................................... 121
T
TEMPO ...................................................................... 14, 68
Tempo ............................................................................. 66
tempo ............................................................................ 106
Tempo Sync .................................................................. 115
Tempo sync .................................................................. 107
TIME ................................................................................ 78
Time ......................................................................... 88, 116
time .................................................................................. 70
TIME (C2) Knob ............................................................. 14
Time Keep ....................................................................... 79
Time Sync ............................................................... 63, 113
Time Zero ....................................................................... 79
Transpose ...................................................................... 120
TRIGGER ...................................................................... 114
Trigger mode ................................................................ 114
Tune ....................................................................... 115, 120
U
USB .................................................................................. 14
USB Connector ............................................................... 15
USB disk .................................................................. 50, 140
USB high-capacity storage device ....................... 50, 140
Utility ............................................................................ 120
V
VALUE Dial ................................................................... 14
Vari Track ................................................................. 17, 68
VariOS Drive .................................................................. 45
VariOS Keyboard .......................................................... 95
VariOS_DemoSong ..................................................... 140
VARIOS_DRV ................................................................ 49
VariPhrase ...................................................................... 54
VC .................................................................................. 118
velocity ............................................................................ 84
Velocity fader ................................................................. 95
Voice Reserve ............................................................... 115
Volume ............................................................................ 74
VOLUME Knob ............................................................. 14
Volume label ................................................................ 104
V-Producer ......................................................... 21, 39, 52
W
Wave Edit ........................................................... 17, 65–66
wave file .......................................................................... 91
Wave Gain .................................................................... 114
Waveform ....................................................................... 77
Windows ......................................................................... 21
Z
Zoom too ......................................................................... 66
165
IMPORTANT SAFETY INSTRUCTIONS
CAUTION
RISK OF ELECTRIC SHOCK
DO NOT OPEN
ATTENTION: RISQUE DE CHOC ELECTRIQUE NE PAS OUVRIR
CAUTION: TO REDUCE THE RISK OF ELECTRIC SHOCK,
DO NOT REMOVE COVER (OR BACK).
NO USER-SERVICEABLE PARTS INSIDE.
REFER SERVICING TO QUALIFIED SERVICE PERSONNEL.
The lightning flash with arrowhead symbol, within an
equilateral triangle, is intended to alert the user to the
presence of uninsulated “dangerous voltage” within the
product’s enclosure that may be of sufficient magnitude to
constitute a risk of electric shock to persons.
The exclamation point within an equilateral triangle is
intended to alert the user to the presence of important
operating and maintenance (servicing) instructions in the
literature accompanying the product.
INSTRUCTIONS PERTAINING TO A RISK OF FIRE, ELECTRIC SHOCK, OR INJURY TO PERSONS.
IMPORTANT SAFETY INSTRUCTIONS
SAVE THESE INSTRUCTIONS
WARNING - When using electric products, basic precautions should always be followed, including the following:
1.
2.
3.
4.
5.
6.
7.
8.
9.
Read these instructions.
Keep these instructions.
Heed all warnings.
Follow all instructions.
Do not use this apparatus near water.
Clean only with a dry cloth.
Do not block any of the ventilation openings. Install in
accordance with the manufacturers instructions.
Do not install near any heat sources such as radiators,
heat registers, stoves, or other apparatus (including
amplifiers) that produce heat.
Do not defeat the safety purpose of the polarized or
grounding-type plug. A polarized plug has two blades with
one wider than the other. A grounding type plug has two
blades and a third grounding prong. The wide blade or the
third prong are provided for your safety. When the provided
plug does not fit into your outlet, consult an electrician for
replacement of the obsolete outlet.
10. Protect the power cord from being walked on or pinched
particularly at plugs, convenience receptacles, and the
point where they exit from the apparatus.
11. Only use attachments/accessories specified by the
manufacturer.
12. Never use with a cart, stand, tripod, bracket,
or table except as specified by the
manufacturer, or sold with the apparatus.
When a cart is used, use caution when
moving the cart/apparatus combination to
avoid injury from tip-over.
13. Unplug this apparatus during lightning storms or when
unused for long periods of time.
14. Refer all servicing to qualified service personnel. Servicing
is required when the apparatus has been damaged in any
way, such as power-supply cord or plug is damaged, liquid
has been spilled or objects have fallen into the apparatus,
the apparatus has been exposed to rain or moisture, does
not operate normally, or has been dropped.
For the U.K.
IMPORTANT: THE WIRES IN THIS MAINS LEAD ARE COLOURED IN ACCORDANCE WITH THE FOLLOWING CODE.
BLUE:
NEUTRAL
BROWN: LIVE
As the colours of the wires in the mains lead of this apparatus may not correspond with the coloured markings identifying
the terminals in your plug, proceed as follows:
The wire which is coloured BLUE must be connected to the terminal which is marked with the letter N or coloured BLACK.
The wire which is coloured BROWN must be connected to the terminal which is marked with the letter L or coloured RED.
Under no circumstances must either of the above wires be connected to the earth terminal of a three pin plug.
166
To resize thickness, move all items on the front cover
and center registration marks to left or right.
For EU Countries
USING THE UNIT SAFELY
This product complies with the requirements of European Directives EMC 89/336/EEC and LVD 73/23/EEC.
For the USA
The
symbol alerts the user to important instructions
or warnings.The specific meaning of the symbol is
determined by the design contained within the
triangle. In the case of the symbol at left, it is used for
general cautions, warnings, or alerts to danger.
Used for instructions intended to alert
the user to the risk of death or severe
injury should the unit be used
improperly.
Used for instructions intended to alert
the user to the risk of injury or material
damage should the unit be used
improperly.
* Material damage refers
other adverse effects
respect to the home
furnishings, as well
animals or pets.
The
symbol alerts the user to items that must never
be carried out (are forbidden). The specific thing that
must not be done is indicated by the design contained
within the circle. In the case of the symbol at left, it
means that the unit must never be disassembled.
to damage or
caused with
and all its
to domestic
The ● symbol alerts the user to things that must be
carried out. The specific thing that must be done is
indicated by the design contained within the circle. In
the case of the symbol at left, it means that the powercord plug must be unplugged from the outlet.
FEDERAL COMMUNICATIONS COMMISSION
RADIO FREQUENCY INTERFERENCE STATEMENT
This equipment has been tested and found to comply with the limits for a Class B digital device, pursuant to Part 15 of the
FCC Rules. These limits are designed to provide reasonable protection against harmful interference in a residential
installation. This equipment generates, uses, and can radiate radio frequency energy and, if not installed and used in
accordance with the instructions, may cause harmful interference to radio communications. However, there is no guarantee
that interference will not occur in a particular installation. If this equipment does cause harmful interference to radio or
television reception, which can be determined by turning the equipment off and on, the user is encouraged to try to correct the
interference by one or more of the following measures:
– Reorient or relocate the receiving antenna.
– Increase the separation between the equipment and receiver.
– Connect the equipment into an outlet on a circuit different from that to which the receiver is connected.
– Consult the dealer or an experienced radio/TV technician for help.
This device complies with Part 15 of the FCC Rules. Operation is subject to the following two conditions:
(1) This device may not cause harmful interference, and
(2) This device must accept any interference received, including interference that may cause undesired operation.
Tested To Comply With FCC Standards
008a
001
• Before using this unit, make sure to read the
instructions below, and the Owner’s Manual.
..........................................................................................................
002a
• Do not open or perform any internal modifications on the unit.
• The unit should be connected to a power supply
only of the type described in the operating instructions, or as marked on the side of unit.
..........................................................................................................
008ey
..........................................................................................................
..........................................................................................................
009
004
• Never use or store the unit in places that are:
• Subject to temperature extremes (e.g., direct
sunlight in an enclosed vehicle, near a heating
duct, on top of heat-generating equipment); or
are
• Damp (e.g., baths, washrooms, on wet floors);
or are
• Humid; or are
• Exposed to rain; or are
• Dusty; or are
• Subject to high levels of vibration.
..........................................................................................................
• Do not excessively twist or bend the power cord,
nor place heavy objects on it. Doing so can
damage the cord, producing severed elements and
short circuits. Damaged cords are fire and shock
hazards!
..........................................................................................................
..........................................................................................................
006
• When using the unit with a rack or stand recommended by Roland, the rack or stand must be
carefully placed so it is level and sure to remain
stable. If not using a rack or stand, you still need
to make sure that any location you choose for
placing the unit provides a level surface that will
properly support the unit, and keep it from
wobbling.
..........................................................................................................
2
For Canada
NOTICE
This Class B digital apparatus meets all requirements of the Canadian Interference-Causing Equipment Regulations.
AVIS
Cet appareil numérique de la classe B respecte toutes les exigences du Règlement sur le matériel brouilleur du Canada.
010
• This unit, either alone or in combination with an
amplifier and headphones or speakers, may be
capable of producing sound levels that could
cause permanent hearing loss. Do not operate for
a long period of time at a high volume level, or at
a level that is uncomfortable. If you experience
any hearing loss or ringing in the ears, you should
immediately stop using the unit, and consult an
audiologist.
..........................................................................................................
011
• Do not allow any objects (e.g., flammable material,
coins, pins); or liquids of any kind (water, soft
drinks, etc.) to penetrate the unit.
005
• This unit should be used only with a rack or stand
that is recommended by Roland.
Unauthorized changes or modification to this system can void the users authority to operate this equipment.
This equipment requires shielded interface cables in order to meet FCC class B Limit.
• Use only the attached power-supply cord.
003
• Do not attempt to repair the unit, or replace parts
within it (except when this manual provides
specific instructions directing you to do so). Refer
all servicing to your retailer, the nearest Roland
Service Center, or an authorized Roland
distributor, as listed on the "Information" page.
..........................................................................................................
FOR HOME OR OFFICE USE
..........................................................................................................
013
• In households with small children, an adult
should provide supervision until the child is
capable of following all the rules essential for the
safe operation of the unit.
..........................................................................................................
014
• Protect the unit from strong impact.
(Do not drop it!)
..........................................................................................................
For the USA
DECLARATION OF CONFORMITY
Compliance Information Statement
Model Name :
Type of Equipment :
Responsible Party :
Address :
Telephone :
VariOS
Sound Module
Roland Corporation U.S.
5100 S.Eastern Avenue, Los Angeles, CA 90040-2938
(323)890-3700
To resize thickness, move all items on the front cover
and center registration marks to left or right
Information
When you need repair service, call your nearest Roland Service Center or authorized Roland distributor in your country as
shown below.
AFRICA
EGYPT
Al Fanny Trading Office
9, EBN Hagar A1 Askalany Street,
ARD E1 Golf, Heliopolis,
Cairo 11341, EGYPT
TEL: 20-2-417-1828
REUNION
Maison FO - YAM Marcel
25 Rue Jules Hermann,
Chaudron - BP79 97 491
Ste Clotilde Cedex,
REUNION ISLAND
TEL: (0262) 218-429
PANAMA
ITALY
ISRAEL
SUPRO MUNDIAL, S.A.
Roland Italy S. p. A.
150 Sims Drive,
SINGAPORE 387381
TEL: 6846-3676
Boulevard Andrews, Albrook,
Panama City, REP. DE PANAMA
TEL: 315-0101
Viale delle Industrie 8,
20020 Arese, Milano, ITALY
TEL: (02) 937-78300
Halilit P. Greenspoon &
Sons Ltd.
CRISTOFORI MUSIC PTE
LTD
PARAGUAY
NORWAY
SINGAPORE
Swee Lee Company
Blk 3014, Bedok Industrial Park E,
#02-2148, SINGAPORE 489980
TEL: 6243-9555
245 Prince Mohammad St.,
Amman 1118, JORDAN
TEL: (06) 464-1200
URUGUAY
POLAND
Easa Husain Al Yousifi Est.
Todo Musica S.A.
P. P. H. Brzostowicz
Francisco Acuna de Figueroa 1771
C.P.: 11.800
Montevideo, URUGUAY
TEL: (02) 924-2335
UL. Gibraltarska 4.
PL-03664 Warszawa POLAND
TEL: (022) 679 44 19
Theera Music Co. , Ltd.
VENEZUELA
330 Verng NakornKasem, Soi 2,
Bangkok 10100, THAILAND
TEL: (02) 2248821
Musicland Digital C.A.
Tecnologias Musica e Audio,
Roland Portugal, S.A.
TAIWAN
ROLAND TAIWAN
ENTERPRISE CO., LTD.
THAILAND
17 Werdmuller Centre,
Main Road, Claremont 7708
SOUTH AFRICA
P.O.BOX 23032, Claremont 7735,
SOUTH AFRICA
TEL: (021) 674 4030
ASIA
CHINA
Roland Shanghai Electronics
Co.,Ltd.
5F. No.1500 Pingliang Road
Shanghai, CHINA
TEL: (021) 5580-0800
Roland Shanghai Electronics
Co.,Ltd.
(BEIJING OFFICE)
10F. No.18 Anhuaxili
Chaoyang District, Beijing,
CHINA
TEL: (010) 6426-5050
HONG KONG
Tom Lee Music Co., Ltd.
Service Division
22-32 Pun Shan Street, Tsuen
Wan, New Territories,
HONG KONG
TEL: 2415 0911
INDIA
Rivera Digitec (India) Pvt. Ltd.
409, Nirman Kendra Mahalaxmi
Flats Compound Off. Dr. Edwin
Moses Road, Mumbai-400011,
INDIA
TEL: (022) 2493 9051
INDONESIA
VIETNAM
Saigon Music
138 Tran Quang Khai St.,
District 1
Ho Chi Minh City
VIETNAM
TEL: (08) 844-4068
AUSTRALIA/
NEW ZEALAND
AUSTRALIA
Roland Corporation
Australia Pty., Ltd.
38 Campbell Avenue
Dee Why West. NSW 2099
AUSTRALIA
TEL: (02) 9982 8266
NEW ZEALAND
Roland Corporation Ltd.
32 Shaddock Street, Mount Eden,
Auckland, NEW ZEALAND
TEL: (09) 3098 715
CENTRAL/LATIN
AMERICA
ARGENTINA
Instrumentos Musicales S.A.
Av.Santa Fe 2055
(1123) Buenos Aires
ARGENTINA
TEL: (011) 4508-2700
Rua San Jose, 780 Sala B
Parque Industrial San Jose
Cotia - Sao Paulo - SP, BRAZIL
TEL: (011) 4615 5666
JUAN Bansbach
Instrumentos Musicales
Ave.1. Calle 11, Apartado 10237,
San Jose, COSTA RICA
TEL: 258-0211
Cosmos Corporation
CHILE
1461-9, Seocho-Dong,
Seocho Ku, Seoul, KOREA
TEL: (02) 3486-8855
Comercial Fancy
140 & 142, Jalan Bukit Bintang
55100 Kuala Lumpur,MALAYSIA
TEL: (03) 2144-3333
PHILIPPINES
G.A. Yupangco & Co. Inc.
339 Gil J. Puyat Avenue
Makati, Metro Manila 1200,
PHILIPPINES
TEL: (02) 899 9801
S.A.
Rut.: 96.919.420-1
Nataniel Cox #739, 4th Floor
Santiago - Centro, CHILE
TEL: (02) 688-9540
EL SALVADOR
OMNI MUSIC
75 Avenida Norte y Final
Alameda Juan Pablo ,
Edificio No.4010 San Salvador,
EL SALVADOR
TEL: 262-0788
MEXICO
Casa Veerkamp, s.a. de c.v.
Av. Toluca No. 323, Col. Olivar
de los Padres 01780 Mexico D.F.
MEXICO
TEL: (55) 5668-6699
Al Emadi Co. (Badie Studio
& Stores)
FBS LINES
Piata Libertatii 1,
RO-4200 Gheorghehi
TEL: (095) 169-5043
MuTek
DENMARK
Roland Scandinavia A/S
Nordhavnsvej 7, Postbox 880,
DK-2100 Copenhagen
DENMARK
TEL: 3916 6200
FRANCE
Roland France SA
4, Rue Paul Henri SPAAK,
Parc de l'Esplanade, F 77 462 St.
Thibault, Lagny Cedex FRANCE
TEL: 01 600 73 500
FINLAND
GERMANY
Roland Elektronische
Musikinstrumente HmbH.
Oststrasse 96, 22844 Norderstedt,
GERMANY
TEL: (040) 52 60090
GREECE
STOLLAS S.A.
Music Sound Light
155, New National Road
Patras 26442, GREECE
TEL: 2610 435400
HUNGARY
3-Bogatyrskaya Str. 1.k.l
107 564 Moscow, RUSSIA
TEL: (095) 169 5043
SPAIN
Roland Electronics
de España, S. A.
Calle Bolivia 239, 08020
Barcelona, SPAIN
TEL: (93) 308 1000
SWEDEN
Roland Scandinavia A/S
SWEDISH SALES OFFICE
UKRAINE
TIC-TAC
Mira Str. 19/108
P.O. Box 180
295400 Munkachevo, UKRAINE
TEL: (03131) 414-40
UNITED KINGDOM
Roland (U.K.) Ltd.
Atlantic Close, Swansea
Enterprise Park, SWANSEA
SA7 9FJ,
UNITED KINGDOM
TEL: (01792) 702701
MIDDLE EAST
BAHRAIN
Moon Stores
IRELAND
CYPRUS
Audio House, Belmont Court,
Donnybrook, Dublin 4.
Republic of IRELAND
TEL: (01) 2603501
Adobe Corporation’s Acrobat Reader is required in order to read the PDF
file. You can download Acrobat Reader from the Adobe website (http://
www.adobe.com/). This address may change without notice.
Corniche Road, Aldossary Bldg.,
1st Floor, Alkhobar,
SAUDI ARABIA
P.O.Box 2154, Alkhobar 31952
SAUDI ARABIA
TEL: (03) 898 2081
SYRIA
Technical Light & Sound
Center
Khaled Ebn Al Walid St.
Bldg. No. 47, P.O.BOX 13520,
Damascus, SYRIA
TEL: (011) 223-5384
SWITZERLAND
Warehouse Area ‘DEPO’ Pf.83
H-2046 Torokbalint, HUNGARY
TEL: (23) 511011
Roland Ireland
aDawliah Universal
Electronics APL
Barkat muzik aletleri ithalat
ve ihracat Ltd Sti
Landstrasse 5, Postfach,
CH-4452 Itingen,
SWITZERLAND
TEL: (061) 927-8383
Radex Sound Equipment Ltd.
17, Diagorou Street, Nicosia,
CYPRUS
TEL: (022) 66-9426
For details on all functions and screens of the VariOS, refer to “VariOS Reference Manual” (VariOS_Reference_E.pdf), found in the English – Manual (PDF) folder of the CDROM. This manual can also be viewed by using the V-Producer “Help” command. This
manual also contains information such as a MIDI implementation chart for the VariOS.
SAUDI ARABIA
TURKEY
Roland (Switzerland) AG
User Guide
P.O. Box 62,
Doha, QATAR
TEL: 4423-554
Danvik Center 28, 2 tr.
S-131 30 Nacka SWEDEN
TEL: (0)8 702 00 20
No.16, Bab Al Bahrain Avenue,
P.O.Box 247, Manama 304,
State of BAHRAIN
TEL: 211 005
Roland East Europe Ltd.
Chahine S.A.L.
Gerge Zeidan St., Chahine Bldg.,
Achrafieh, P.O.Box: 16-5857
Beirut, LEBANON
TEL: (01) 20-1441
ROMANIA
Siemensstrasse 4, P.O. Box 74,
A-6063 RUM, AUSTRIA
TEL: (0512) 26 44 260
Houtstraat 3, B-2260, Oevel
(Westerlo) BELGIUM
TEL: (014) 575811
LEBANON
QATAR
RUSSIA
BELGIUM/HOLLAND/
LUXEMBOURG
Roland Benelux N. V.
Abdullah Salem Street,
Safat, KUWAIT
TEL: 243-6399
Cais Das Pedras, 8/9-1 Dto
4050-465 PORTO
PORTUGAL
TEL: (022) 608 00 60
Roland Austria GES.M.B.H.
Roland Brasil Ltda
COSTA RICA
BENTLEY MUSIC SDN BHD
AUSTRIA
Elannontie 5
FIN-01510 Vantaa, FINLAND
TEL: (0)9 68 24 020
BRAZIL
J1. Cideng Timur No. 15J-150
Jakarta Pusat
INDONESIA
TEL: (021) 6324170
MALAYSIA
EUROPE
Roland Scandinavia As,
Filial Finland
PT Citra IntiRama
KOREA
Av. Francisco de Miranda,
Centro Parque de Cristal, Nivel
C2 Local 20 Caracas
VENEZUELA
TEL: (212) 285-8586
PORTUGAL
KUWAIT
User Guide
That Other Music Shop
(PTY) Ltd.
Paul Bothner (PTY) Ltd.
JORDAN
AMMAN Trading Agency
Lilleakerveien 2 Postboks 95
Lilleaker N-0216 Oslo
NORWAY
TEL: 2273 0074
SOUTH AFRICA
P.O.Box 32918, Braamfontein 2017
Johannesbourg, SOUTH AFRICA
TEL: (011) 403 4105
Roland Scandinavia Avd.
Kontor Norge
J.E. Olear y ESQ. Manduvira
Asuncion PARAGUAY
TEL: (021) 492-124
Room 5, 9fl. No. 112 Chung Shan
N.Road Sec.2, Taipei, TAIWAN,
R.O.C.
TEL: (02) 2561 3339
11 Melle St., Braamfontein,
Johannesbourg, SOUTH AFRICA
Distribuidora De
Instrumentos Musicales
8 Retzif Ha'aliya Hashnya St.
Tel-Aviv-Yafo ISRAEL
TEL: (03) 6823666
Listening to the demo song
fig.Cover
Siraselviler Caddesi Siraselviler
Pasaji No:74/20
Taksim - Istanbul, TURKEY
TEL: (0212) 2499324
4
1
U.A.E.
Zak Electronics & Musical
Instruments Co. L.L.C.
Zabeel Road, Al Sherooq Bldg.,
No. 14, Grand Floor, Dubai, U.A.E.
TEL: (04) 3360715
3
1. Hold down the [EXIT] button and press the [> (CURSOR)] button.
The demo play screen will appear.
NORTH AMERICA
2. Press the [VALUE] dial ([ENTER]) to start playback.
CANADA
3. Turn the [PITCH]/[TIME]/[FORMANT] knobs to adjust these parameters.
Roland Canada Music Ltd.
(Head Office)
5480 Parkwood Way Richmond
B. C., V6V 2M4 CANADA
TEL: (604) 270 6626
Roland Canada Music Ltd.
(Toronto Office)
170 Admiral Boulevard
Mississauga On L5T 2N6
CANADA
TEL: (905) 362 9707
U. S. A.
Roland Corporation U.S.
5100 S. Eastern Avenue
Los Angeles, CA 90040-2938,
U. S. A.
TEL: (323) 890 3700
IRAN
MOCO, INC.
No.41 Nike St., Dr.Shariyati Ave.,
Roberoye Cerahe Mirdamad
Tehran, IRAN
TEL: (021) 285-4169
As of April 1, 2003 (Roland)
03342356
2
’03-5-1N
Before using this unit, carefully read the sections entitled: “IMPORTANT SAFETY
INSTRUCTIONS” (p. 166),
“USING THE UNIT SAFELY” (pp. 2–3), and “IMPORTANT NOTES” (pp. 4–5).
These sections provide important information concerning the proper operation of
the unit. Additionally, in order to feel assured that you
have gained a good grasp of
every feature provided by
your new unit, User Guide
should be read in its entirety.
The manual should be saved
and kept on hand as a convenient reference.
4. Press the [ENTER] button to stop playback.
If you press the [EXIT] button, you're returned to the demo play screen.
*
In addition to the VariOS demo song described here, you can also listen to V-Producer demo songs (p. 47).
*
Since the demo song is stored in internal memory, it will not play if you have deleted the demo song data
from internal memory. In this case, refer to “Reloading the internal demo song into the VariOS”(p. 140).
*
Use of the song data supplied with this product for any purpose other than private, personal enjoyment
without the permission of the copyright holder is prohibited by law. Additionally, this data must not be
copied, nor used in a secondary copyrighted work without the permission of the copyright holder.
Copyright © 2002 ROLAND CORPORATION
All rights reserved. No part of this publication may be reproduced in any form without the
written permission of ROLAND CORPORATION.
About the VariOS Trial Applications
The included CD contains two trial applications (VariOS-8 and VariOS 303), which let you experience the
open system architecture of the VariOS.
If you install these trial application programs into the internal flash ROM of the VariOS, you will be able
to start up the VariOS as a synthesizer module by pressing a few buttons. Since the core program of the
VariOS will remain as it was, you will still be able to start it up as a normal VariOS instrument by
powering up in the usual way. Dedicated control software is also included, allowing you to create a broad
variety of original sounds using your personal computer.
For details on installation and use, refer to the PDF manuals found in
the VariOS-8 and VariOS 303 folders located in the ENGLISH –
VariOS Trial Applications folder on the VariOS CD-ROM.
■ VariOS-8
Screen of the control software for the
“VariOS-8” Two-Oscillator Analog
Modeling Synthesizer
■ VariOS 303
Screen of the control software for the
“VariOS 303” Analog Modeling Bass Synth
with Step Sequencer
■ System requirements (Windows)
● Operating system: Microsoft® Windows® XP Home/XP Professional/2000 Professional/Me/98
● CPU: Pentium®/Celeron™ or compatible processor, 400 MHz or better (Pentium® III 500 MHz or better is recommended)
● RAM: 128 MB or more (256 MB or more is recommended) ● Free space required on hard disk: 15 MB or more
● Display resolution/Color depth: 800 x 600 pixels, 65,536 colors (16-bit High Color) or better
■ System requirements (Macintosh)
● Operating system: Mac OS 9.0.4 or later (Mac OS X is excepted) ● CPU: PowerPC G3, 233 MHz or better
● RAM: 128 MB or more (256 MB or more is recommended) ● Free space required on hard disk: 15 MB or more
● Display resolution/Color depth: 800 x 600 pixels, 32,000 colors or better ● Other: OMS support
40562934
’03-5-1N
1
New functionality added to the V-Producer
VariOS Keyboard
HOLD button
fig
Owner’s Manual p.95
The design of the VariOS Keyboard has been revised, and a new
arpeggiator function has been added.
fig
(Click this icon to) Start up the VariOS Keyboard.
By clicking this button, you can have arpeggios continue even after
you've released your fingers from the keyboard. If you play a different
chord or notes while an arpeggio is being held, the arpeggio will
change accordingly. To cancel Arpeggio Hold, press [HOLD] again.
TIMING knob
fig
fig
The arpeggios are synchronized to the tempo of V-Producer. This
knob specifies the note value (note timing step) for each note of the
arpeggiator when synchronized.
OCTAVE
RANGE buttons
fig
Open/Close buttons
fig
Close the MIDI Monitor screen or Arpeggiator screen.
MIDI Monitor Screen
fig
Displays the MIDI messages of the part(s) specified by the part buttons.
Sets the key range in octaves over which arpeggios will be produced.
If you want the arpeggio to sound using only the notes that you
actually play, set this parameter to "0." To have the arpeggio sound
using the notes you play and notes one octave higher, set this
parameter to "+1." A setting of "-1" will cause the arpeggio to sound
using the notes you play and notes one octave lower.
ARPEGGIO MODE buttons
fig
Monitor Part buttons
fig
Sets the order in which notes of the chord will sound.
When you click a Part button, the performance data of the selected
part will be reflected by the screen and keyboard.
ARPEGGIO switch
fig
NOTE ORDER: Notes will be sounded in the order in which you press them.
UP: Notes you press will be sounded upward, from low to high.
DW: Notes you press will be sounded downward, from high to low.
U&D: Notes you press will first be sounded upward, from low to
high, and then back downward, from high to low.
RND: Notes you press will be sounded in random order.
GATE TIME knob
fig
Switches the Arpeggio function on/off.
Specifies the gate time of each arpeggiated note as a percentage of its
timing value.
1
LEGATO button
Target Part button
fig
fig
If this button is ON, each note of the arpeggio will be played legato;
the gate time knob setting will be ignored. You can use this to
produce a distinctive arpeggio effect that occupies the entire phrase.
Keyboard
fig
When you click the Part button, VariOS Pad control data will be sent
to the selected part. Pitch, time, and formant data for the selected part
will be reflected by the Surface controller and knobs. If all part
buttons are off, the sample selected in the Sample List will be
controlled.
* If you use the VariOS Pad to control the selected part while you
perform, the pitch, time, and formant data originally stored in the frame
of the part will be ignored; the control data from the VariOS Pad will
take priority. If the part button is off, the pitch, time, and formant data
stored in the frame of the part will be used.
You can click the keyboard area to audition the sample selected in the
Sample List. At this time, the keys will light yellow according to the
note you clicked. The keys will also light yellow in response to noteon messages from an external MIDI keyboard, or note-on data from a
playing part specified by the part buttons.
* When you specify the target part, knob operations on the VariOS itself
will also apply to the part you select here.
VIEW NOTE NAME button
Surface controller
fig
fig
By pressing this button you can switch the note names of the note-on
keys between displayed and hidden.
By dragging the mouse inside this
frame, you can simultaneously
control both pitch and time.
USE PC KEY button
By clicking an ASSIGN button you
can assign the [P] pitch, [T] time,
and [F] formant parameters to each
axis.
fig
After pressing this button, you will be able to turn notes on/off from
the keyboard of your computer.
fig
The keys of your computer keyboard
will correspond to notes as shown in
the diagram.
ASSIGN buttons
fig
However, in this case, the X-axis
movement will be ignored, and
control will occur only on the Yaxis.
Use the left/right keys to shift the
octave. To exit this function, press this
button again.
VariOS Pad
It is possible to specify the same
parameter for the X-axis and Y-axis;
e.g., PITCH-PITCH or TIME-TIME.
PITCH/TIME/FORMANT knobs
fig
Owner’s Manual p.96
The VariOS Keyboard's Surface controller is now independent, and a
new VariOS Pad screen has been added.
fig
You can drag these knobs to control the pitch/time/formant.
(Click this icon to) Start up VariOS Pad.
These knobs are linked with the Surface controller.
Resetting PITCH/TIME/FORMANT
fig
When you press the [X] key, any pitch/time/formant values that
have been modified by means of the knobs or Surface controller will
be reset to their center values.
Inputting TIME zero
TIME zero will be input while you hold down the [Z] key. When you
release the key, the time will return to the center value. This is a
convenient way to rhythmically input a TIME zero value to create the
distinctive VariPhrase "buzz."
2
Editing in the Phrase Scope:
Waveform display area
Owner’s Manual p.77
You can now use your mouse to directly edit the waveform area of
the PhraseScope.
In the waveform display area you can use the Arrow button, Scissors
button, and Bond button.
Arrow button
fig
• To select a region in units of events, click and drag in an area that
does not contain a waveform.
• To edit the pitch of a selected region, drag upward or downward
on the waveform. When you edit the pitch in this way, the
corresponding note will also move.
• To edit the timing of the selected region, drag left or right on the
waveform. You can also edit the timing of an event (blue line) by
dragging it left or right. When you edit the timing in this way, the
Time parameter in the controller display area will also change.
For example, you can make approximate timing adjustments in
the waveform display area, and directly edit the Time curve to
make fine changes. You can reset the Time curve to restore the
settings to their original state.
Differences between editing in the Waveform
display area and the Note display area
The difference between moving a waveform left/right and moving a
note left/right is that in the former the Time parameter is used to
stretch/shrink the waveform, while in the latter, the legato timing or
trigger timing of the note is controlled, so the waveform is not
stretched or shrunk. Another difference is that you can add or delete
notes in the Note display area, but cannot add or delete waveforms in
the Waveform display area.
PhraseScope: Harmony function
Owner’s Manual p.77
A Harmony function has been added to the PhraseScope.
Harmony is a function that generates chords with the selected note as
the root. This is an easy way to create harmonies.
1. Click the note from which you want to create a chord.
2. Click the Harmony button (
), and choose the desired
chord from the list of chord types.
The Harmony function applies to each note that you have
selected. For example, if you select several notes that already
form a chord, and apply this function, a chord will be generated
from each note, producing an unexpectedly large number of
notes. Be sure to select only the root note.
Also, if notes already exist at the same time-axis location,
executing the Harmony function will automatically delete these
notes, replacing them with the newly generated notes.
* If you want to limit the movement of the waveform to the vertical
direction, hold down the [Shift] key and drag the waveform upward or
downward.
* If the Grid button is on, the waveform will "stick to" the grid lines as
you move it.
* If the Time parameter reaches the maximum or minimum limits of its
value, you will not be able to move the waveform any further to left or
right.
Scissors button
Inversion button
You can press the Inversion button to move the lowest (highest) of
the selected notes one octave upward (downward). By selecting notes
in the chord and clicking the Inversion button you can create inverted
forms of the chord.
fig
Export Wave File
This lets you divide the waveform into two. As with the original
waveform, you can move the divided waveform up, down, left, or
right. The dividing point is shown in light blue, and can be moved
left/right in the same way as an event (blue line). For example, you
can divide the waveform at breaks in the song lyrics, and change the
melody or timing of the vocal notes. When you divide the waveform,
the note will also be divided at the corresponding location. When you
move the divided notes to left/right, the dividing points of the
waveform will also move. However, the location of the event (blue
line) is fixed in relation to the waveform; moving the note will not
move the event.
Bond button
fig
This lets you re-join waveforms that were divided by the Scissors
button. To join two waveforms, place them on the same horizontal
level, and click the point where they join (light blue line).
Owner’s Manual p.91
When you use the File menu command [Export Wave File] to export a
wave file, the VariOS's internal effect will now be applied to the wave
file.
Also, a new [Selected Frames] option has been added in addition to
[Stereo Wave File] and [Multiple Wave Files].
Selected Frames: Export the frames selected in the Vari Track as a
single Wave file.
Dry checkbox
The dialog boxes of the Export Wave File command have a [Dry]
check box. If [Dry] is checked, the VariOS's internal effects will not be
applied to the Wave file that is exported.
fig
3
Even if the sound does not clip (distort) when played back by the
VariOS's sound generator, there may be cases in which clipping
(distortion) is present in the exported sample. If this occurs, use
the mixer to lower the overall level, or lower the Master Level of
the effect.
If you use an effect of a type that varies cyclically, the sound will
be slightly different each time you play something back. In such
cases, the exported Wave file may sound different than what you
hear from the VariOS's sound generator. Also, the exported Wave
file may not perfectly match the sound you hear from the
VariOS's sound generator.
Wave Edit: Solo Encode Option
Owner’s Manual p.66
fig
A [Solo Enc Option] button has been added to the Edit mode in the
Wave Edit screen.
Export to SampleList
If you have selected Solo as the Encode Type, you can make detailed
encoding settings in the Solo Encode Option dialog box.
Owner’s Manual p.68, 91
An [Export to Sample List] command has been added to the File
menu. Also, an [Export to SampleList] button (
If you use an effect of a type that varies cyclically, the sound will
be slightly different each time you play something back. In such
cases, the exported Wave file may sound different than what you
hear from the VariOS's sound generator. Also, the exported Wave
file may not perfectly match the sound you hear from the
VariOS's sound generator.
) has been
added to the Vari Track screens.
You will find that this option comes in handy if you experience
problems, such as noisy or distorted sound, when encoding in Solo
mode. In most cases, these problems are due to incorrect pitch
detection when encoding. In the Solo Encode Option dialog box you
can avoid pitch detection mistakes by specifying a frequency that is
as close as possible to the pitch of that waveform.
fig
Export to SampleList exports the selected frame to a single file (.vpw),
and automatically encodes it and sends it to the VariOS. The exported
file is registered in the Sample List.
1. Select a frame, and click the Export to SampleList button.
* This is not available during playback, or if no frame is selected in the
VariTrack.
2. The Save File dialog box will appear. Specify the name and
save destination for the file (.vpw) to be exported.
3. The data will be exported as a Wave file, encoded, and sent to
the VariOS itself. When this processing is completed, the
exported file will be registered in the Sample List.
Dry checkbox
If [Dry] is checked, the VariOS's internal effects will not be applied to
the Wave file that is exported.
fig
Sample Type: Selects one of the following templates to specify the
lower and upper frequency limits.
• General (30--2000 Hz): This is the typical setting. If you are not
successful using this setting, try a different template.
• Bass (22--600 Hz): Setting for low-range sounds such as bass
• Tenor (60--1000 Hz): Setting for midrange sounds
• Alto (100--2000 Hz): Setting for upper-midrange sounds
• Soprano (200--3000 Hz): Setting for high-range sounds
Min Frequency: Specifies the lower frequency limit for pitch
detection.
The Export to SampleList function automatically adjusts the gain
of the exported file so that the perceptual loudness will be the
same whether you play the corresponding frame, or export it to a
file and load the exported file back into the VariOS and play it.
This means that in cases where you are mixing multiple parts
(frames) to a single file, it is possible that the exported sample
may be distorted even if it does not distort when played back by
the VariOS sound generator. If this occurs, either use the mixer to
lower the level of each part, or use the [Load Wave Files] dialog
box to load the Wave file that was exported by the File menu
[Export Wave File] command into the VariOS.
Max Frequency: Specifies the upper frequency limit for pitch
detection.
* The best results will be obtained if you specify values that are close to the
waveform you are processing.
40564467
4
03’-8-1N