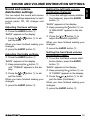
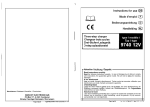
1
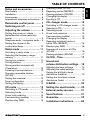
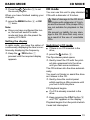
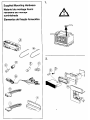
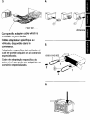
Radio / CD
Miami Beach CD51
Tampa Bay CD51
Operating instructions
Open here
Ouvrir s.v.p.
Por favor, abrir
Favor abrir
2
1
4
3
5
16 15
7
14
13
8
9
PORTUGUÊS
2
ESPAÑOL
6
12 11 10
3
FRANÇAIS
ENGLISH
CONTROLS
1
2
3
4
5
6
7
8
9
:
4
button – to unlock the
removable control panel (release
panel)
Volume control
Button – switches the unit on/off,
volume mute
FM button – selects the radio
mode source,
selects the FM memory levels
AM button – selects the radio
mode source,
selects the AM frequency range
Display
button – displays the time,
DIS – changes the display content
MENU button – opens the basic
settings menu
button – opens the fliprelease panel
Arrow buttons
;
<
=
>
?
@
OK button – confirms menu
entries and starts the scan function
X-BASS button – to set the
X-Bass feature
AUDIO button (audio) – adjusts
the bass, treble, balance and
fader
Keys 1 - 6
TS button – starts the Travelstore function
CD•C button – to switch between CD, CD changer (if connected) and AUX sources
Setting the power-on volume ........... 9
Instantaneous volume reduction
(mute) ............................................. 9
Telephone audio / navigation audio .. 9
Setting the volume of the
confirmation beep .......................... 10
Radio mode ............................ 11
Switching to radio mode ................ 11
Selecting the frequency range /
memory ......................................... 11
Tuning into a station ....................... 11
Storing stations ............................. 11
Storing stations automatically
(Travelstore) .................................. 12
Listening to preset stations ............ 12
Scanning receivable stations
(SCAN) ......................................... 12
Setting the scantime ...................... 12
Tuner configuration ........................ 12
Setting the display ......................... 13
CD mode ................................ 13
Switching to CD mode .................. 13
Selecting tracks ............................ 14
Quick track selection ..................... 14
Fast searching (audible) ................ 14
Random play (MIX) ........................ 14
CD changer mode .................. 15
Switching to CD changer mode ..... 15
Selecting a CD .............................. 15
Selecting tracks ............................ 15
Quick track selection ..................... 15
Fast searching (audible) ................ 15
Changing the display ..................... 16
Repeating individual tracks or
whole CDs (REPEAT) .................... 16
Random play (MIX) ........................ 16
Scanning all tracks on all CDs
(SCAN) ......................................... 16
Pausing playback (PAUSE)............ 17
CLOCK - Time ........................ 17
Sound and
volume distribution settings .. 19
Adjusting the bass settings ............ 19
Adjusting the treble settings ........... 19
Setting the left/right volume
distribution (balance) ..................... 19
Setting the front/back volume
distribution (fader) ......................... 19
X-BASS .................................. 20
Setting the spectrometer ....... 20
External audio sources .......... 21
Specifications ........................ 21
Guarantee .............................. 22
Installation instructions .......... 80
5
FRANÇAIS
Removable control panel ......... 7
Switching on/off ...................... 8
Adjusting the volume ............... 9
Scanning tracks (SCAN) ............... 14
Repeating tracks (REPEAT) ........... 14
Pausing playback (PAUSE)............ 14
Changing the display ..................... 15
Ejecting a CD ................................ 15
ESPAÑOL
Road safety ..................................... 6
Installation ....................................... 6
Accessories .................................... 6
International telephone information ... 6
PORTUGUÊS
Notes and accessories ............ 6
ENGLISH
TABLE OF CONTENTS
NOTES AND ACCESSORIES
Thank you for deciding to purchase a
Blaupunkt product. We hope you enjoy
using this new piece of equipment.
Before using the device for the first time,
please read these instructions carefully. The Blaupunkt editors are constantly working on making the operating instructions clearer and easier to understand. However, if you still have any
questions on how to operate the unit
please contact your dealer or the telephone hotline for your country. You will
find the hotline telephone numbers printed at the back of this booklet.
Road safety
Road safety has absolute priority. Only operate your car radio if the
road and traffic conditions allow you
to do so. Familiarise yourself with the
unit before setting off on your journey.
You should always be able to hear
police, fire and ambulance sirens
from afar. For this reason, set the
volume of whatever you are listening to to a reasonable level.
Installation
If you want to install your car radio yourself, please read the installation and
connection instructions that follow these
operating instructions.
6
Accessories
Only use accessories approved by Blaupunkt.
Remote control
The optional RC08 or RC10 remote
controls allow you to safely and conveniently access the most important functions of your car radio from your steering wheel.
The RC 06 H remote control is supplied
with the Tampa Bay CD51.
Amplifier
All Blaupunkt amplifiers can be used.
CD changer
You can connect the following Blaupunkt
CD changers:
CDC A 06, CDC A 08, CDC A 072 and
IDC A 09.
You can also connect the CDC A 05 and
CDC A 071 CD changers by using an
adapter cable (Blaupunkt no.: 7 607 889
093).
International telephone
information
If you have any questions regarding the
operation of your car radio or if you require further information, please do not
hesitate to call us!
The information hotline numbers are
printed on the last page of these instructions.
button 1.
Removable control panel
➮ Press the
Theft protection
The control panel locking mechanism
opens.
Note:
● Never drop the control panel.
● Never expose the control panel
to direct sunlight or other heat
sources.
● Store the control panel in the supplied case.
● Avoid making direct skin contact
with the control panel’s contacts. If
necessary, clean the contacts with
a lint-free cloth soaked in cleaning
spirits.
Removing the control panel
1
●
●
Attaching the control panel
➮ Slide the control panel from left to
ESPAÑOL
●
off the unit and then out towards
the left.
The unit switches off after the control panel is removed.
All the current settings are saved.
Any CD already inserted in the unit
remains there.
FRANÇAIS
➮ First, pull the control panel straight
PORTUGUÊS
As a way of protecting your car radio
against theft, the unit is equipped with
a removable control panel (flip-release
panel). Without this control panel, the
car radio is worthless to a thief.
Protect your car radio against theft by
taking the control panel with you every
time you leave your vehicle. Do not
leave the control panel in your vehicle not even in a hiding place.
The control panel has been designed
to be easy to use.
ENGLISH
REMOVABLE CONTROL PANEL
right into the unit’s panel locking
mechanism.
➮ Press the left-hand edge of the
control panel into the unit until it
clicks into place.
Note:
● When attaching the control panel,
make sure you do not press the
display.
If the unit was still switched on when
you removed the control panel, the unit
will automatically switch on with the last
settings activated (i.e. radio, CD, CD
changer, or AUX) when the panel is replaced.
7
SWITCHING ON/OFF
Switching on/off
There are various ways of switching the
unit on/off:
Switching on/off using the vehicle
ignition
If the unit is correctly connected to the
vehicle’s ignition and it was not switched
off using button 3, it will switch on/off
simultaneously with the ignition.
You can switch the unit on even if the
ignition is off:
➮ To do so, press button 3.
Note:
● To protect the vehicle battery, the
unit will switch off automatically after one hour if the ignition is off.
Switching on/off using the
removable control panel
➮ Remove the control panel.
The unit switches off.
➮ Attach the control panel again.
The unit switches on. The last settings
(radio, CD, CD changer or AUX) will be
reactivated.
Switching on/off using button 3
➮ To switch the unit on, press button
3.
➮ To switch the unit off, press button
3 for longer than two seconds.
The unit switches off.
8
Switching on by inserting a CD
If the unit is switched off and there is no
CD inserted in the drive,
➮ press the
button 9.
The flip-release panel opens.
➮ Gently insert the CD with the printed side uppermost into the drive
until you feel some resistance.
The CD will be drawn automatically into
the drive.
You must not hinder or assist the drive
as it draws in the CD.
➮ Gently close the control panel
whilst exerting a little pressure until
you feel it click into place.
The unit switches on. CD playback begins.
volume control 2 to the right.
➮ To decrease the volume, turn the
volume control 2 to the left.
This feature allows you to instantaneously reduce (mute) the volume to a
level preset by you.
➮ Briefly press button 3.
“MUTE” appears in the display.
You can set the unit’s default power-on
volume.
Setting the mute level
You can set the unit’s mute volume level.
➮ Press the MENU button 8.
➮ Keep pressing the or button
➮ Press the MENU button 8.
➮ Keep pressing the or button
Setting the power-on volume
: until “ON VOLUME” appears in
the display.
➮ Set the power-on volume using the
and buttons :.
If you change the setting to “0”, the power-on volume will be the same as the
volume level that was set before the unit
was last switched off.
Note:
● To protect your hearing, the poweron volume is limited to a value of
“38”. If the volume level was higher
when the unit was switched off, the
volume will be reset to “38” when
the unit is switched on again.
When you have finished making your
changes,
➮ press the MENU button 8 or OK
; twice.
: until “MUTE LEVEL” appears in
the display.
➮ Set the mute level using the
and
buttons :.
When you have finished making your
changes,
➮ press the MENU button 8 or OK
; twice.
Telephone audio / navigation
audio
If your car radio is connected to a mobile telephone or a navigation system,
the unit’s volume will be muted as soon
as you “pick up” the telephone or as
soon as a navigation announcement is
made. The caller or voice output will
then be heard over the car radio loudspeakers. In order for this to work, the
mobile telephone or navigation system
must be connected to the car radio in
the manner described in the installation
instructions.
9
FRANÇAIS
➮ To increase the volume, turn the
ESPAÑOL
The volume can be adjusted in steps
from 0 (off) to 66 (maximum).
Instantaneous volume reduction
(mute)
PORTUGUÊS
Adjusting the volume
ENGLISH
ADJUSTING THE VOLUME
ADJUSTING THE VOLUME
You can find out from your Blaupunkt
dealer which navigation systems can be
used with your car radio.
You can set the volume level at which
telephone calls and the navigation voice
output will first be heard.
➮ Press the MENU button 8.
➮ Keep pressing the or button
: until “TEL/NAVI VOL” appears
in the display.
➮ Set the required volume using the
and buttons :.
When you have finished making your
changes,
➮ press the MENU button 8 or OK
; twice.
Note:
● Using the volume control 2, you
can directly adjust the volume of
telephone calls and navigation
voice output (whilst they are being
heard).
Setting the volume of the
confirmation beep
For some functions you will hear a confirmation beep if you keep a button
pressed for longer than two seconds.
For instance, after storing a radio station to a station button you will hear a
confirmation beep. You can set the volume of this beep.
➮ Press the MENU button 8.
➮ Keep pressing the or button
: until “BEEP” appears in the display.
10
➮ Set the volume using the
and
buttons :. “0” means beep off, “9”
means maximum beep volume.
When you have finished making your
changes,
➮ press the MENU button 8 or OK
;.
➮ press the FM 4 / AM 5 button
or
➮ keep pressing the CD•C button @
➮ Press the MENU button 8.
➮ Keep pressing the or button
until “RADIO” appears in the display.
: until “SENS HI” or “SENS LO”
appears in the display.
Selecting the frequency range /
memory
“SENS HI” means that the tuner is highly
sensitive. “SENS LO” means it is set to
the lowest sensitivity setting. If “SENS
LO” is selected, “lo” lights up in the display.
This unit can receive programmes
broadcast over the FM and AM frequency ranges. There are three preset memory levels for the FM range and one for
the AM range. Six stations can be stored
on each memory level.
Selecting the FM memory level
➮ Press the FM button 4 to switch
between the FM memory levels
(FM1, FM2 and FMT).
Selecting the AM frequency range
➮ Press the AM button 5 to select
the AM frequency range.
➮ Set the required sensitivity using
the and buttons :.
When you have finished making your
changes,
➮ press the MENU button 8 or OK
;.
Tuning into stations manually
You can also tune into stations manually.
➮ Press the
or
button :.
Storing stations
Tuning into a station
Storing stations manually
There are various ways of tuning into a
station.
➮ Select the required memory level
Automatic seek tuning
or button :.
The unit tunes into the next receivable
station.
➮ Press the
(FM1, FM2 or FMT) or the AM frequency range.
➮ Tune into the station.
➮ Press one of the station buttons 16 > for longer than one second to
store the station to that button.
11
FRANÇAIS
If you are in CD, CD changer or AUX
mode,
ESPAÑOL
Switching to radio mode
Setting the sensitivity for station
seek tuning
You can configure the radio to only tune
into stations with a strong reception or
to also tune into those with a weak reception.
PORTUGUÊS
Radio mode
ENGLISH
RADIO MODE
RADIO MODE
Storing stations automatically
(Travelstore)
Stopping SCAN and continuing
listening to a station
You can automatically store the six stations with the strongest reception in the
region. The stations are stored in the
FMT or AM memory depending on the
selected frequency range.
➮ Press the OK button ;.
Note:
● Stations that were previously
stored in this memory are deleted
in the process.
➮ Briefly press the TS button ?.
The station storing procedure begins.
“TRAVEL-STORE” appears in the display. After the process is completed, the
station that is stored in location 1 of the
respective memory level will be played.
Listening to preset stations
➮ Select the memory level on which
the station was stored.
➮ Press the preset station button 1-6
> of the station you want to listen
to.
Scanning is stopped and the station that
was tuned into last will remain active.
Setting the scantime
➮ Press the MENU button 8.
➮ Keep pressing the or button
: until “SCANTIME” appears in
the display.
➮ Set the required scantime using
the and buttons :.
When you have finished making your
changes,
➮ press the MENU button 8 or OK
; twice.
Note:
● The set scantime also applies to
scanning in CD and CD changer
mode.
Tuner configuration
Starting SCAN
This unit is equipped with a multiband
tuner. The tuner can be configured to
suit the requirements that are specific
to various countries. The countries/regions available are: America, Europe,
Asia and Thailand. The tuner will only
function optimally if it is configured for
the country/region in which the unit is
being operated.
➮ Keep the OK button ; pressed
Configuring the tuner
until the scan process starts.
“SCAN” appears briefly in the display
followed by the current frequency (which
flashes).
➮ Press the MENU button 8.
➮ Keep pressing the or button
Scanning receivable stations
(SCAN)
You can briefly play all the receivable
stations. You can set the scanning time
to between 5 and 30 seconds in the
menu.
12
: until “FM TUNER” appears in
the display.
RADIO MODE
Risk of damage to the CD drive!
CD singles with a diameter of 3 inches and contoured CDs (shape CDs)
are not suitable for playback in this
unit.
We accept no liability for any damage to the CD drive that may occur
as a result of the use of unsuitable
CDs.
➮ press the MENU button 8 or OK
; twice.
Note:
● Once you have configured the tuner, the unit will switch to radio
mode and tune into the preset frequency 87.5 MHz
Setting the display
In radio mode, you have the option of
continuously displaying the time or continuously displaying the frequency.
/ DIS button 7
pressed until the required display
appears.
➮ Keep the
Switching to CD mode
ENGLISH
FRANÇAIS
You can use this unit to play standard
CDs with a diameter of 5 inches.
ESPAÑOL
CD mode
PORTUGUÊS
or button : to set
the country/region.
When you have finished making your
changes,
➮ Press the
CD MODE
If there is no CD inserted in the
drive,
➮ press the button 9.
●
The flip-release panel opens.
➮ Gently insert the CD with the printed side uppermost into the drive
until you feel some resistance.
The CD is drawn into the drive automatically.
You must not hinder or assist the drive
as it draws in the CD.
➮ Gently close the control panel
whilst exerting a little pressure until
you feel it click into place.
CD playback begins.
● If a CD is already inserted in the
drive.
➮ Keep pressing the CD•C button @
until “CD” appears in the display.
Playback begins from the point at which
it was last interrupted.
13
CD MODE
Selecting tracks
➮ Press one of the arrow buttons :
to select the next or previous track.
If you press the or button : once,
the current track will be played again
from the beginning.
Quick track selection
To quickly select tracks backwards or
forwards,
or buttons :
pressed until fast-reverse / fast-forward track selection begins.
➮ keep one of the
Fast searching (audible)
To fast search backwards or forwards,
buttons :
pressed until fast reversing / fast
forwarding begins.
➮ keep one of the
Random play (MIX)
➮ Press button 5 MIX >.
“MIX CD” appears briefly in the display
and the MIX symbol lights up. The next
randomly selected track will then be
played.
Stopping MIX
➮ Press button 5 MIX > again.
Note:
● You can set the scantime. For further details, please read the section entitled “Setting the scantime”
in the “Radio mode” chapter.
Stopping SCAN and continuing
playback
➮ To stop scanning, press the OK
button ;.
The current track will then continue to
be played.
Repeating tracks (REPEAT)
➮ If you want to repeat a track, press
button 4 RPT >.
“REPEAT TRCK” appears briefly in the
display and the RPT symbol lights up.
The track is repeated until you deactivate RPT.
Cancelling repeat
➮ If you want to stop the repeat function, press button 4 RPT > again.
“REPEAT OFF” appears briefly in the
display and the RPT symbol disappears.
Normal playback is then continued.
Pausing playback (PAUSE)
➮ Press button 3 >.
“MIX OFF” appears briefly in the display and the MIX symbol disappears.
“PAUSE” appears in the display.
Scanning tracks (SCAN)
➮ Press button 3
You can briefly play all the tracks on a
CD.
➮ Press the OK button ; for longer
than two seconds. The next track
will then be played briefly.
14
Cancelling pause
> while in
pause mode.
Playback is continued.
Ejecting a CD
➮ Press the button (9).
The flip-release panel opens and the CD
is ejected.
➮ Remove the CD and close the control panel.
Switching to CD changer mode
➮ Keep pressing the CD•C button @
until “CHANGER” appears in the
display.
Playback begins with the first CD that
the CD changer detects.
Selecting a CD
➮ To move up/down from one CD to
another, press the or button
: once or several times.
Selecting tracks
➮ To move up/down from one track to
another on the current CD, press
the or button : once or several times.
Quick track selection
To quickly select tracks backwards or
forwards,
or buttons :
pressed until fast-reverse / fast-forward track selection begins.
➮ keep one of the
Fast searching (audible)
To fast search backwards or forwards,
buttons :
pressed until fast reversing / fast
forwarding begins.
➮ keep one of the
15
ENGLISH
Note:
● Information on handling CDs, inserting CDs and operating the CD
changer can be found in the operating instructions supplied with
your CD changer.
FRANÇAIS
ber and clock display / track number and playing time display, press
/ DIS button 7 once or sevthe
eral times for longer than two seconds until the required display appears.
CD changer mode
ESPAÑOL
Changing the display
➮ To switch between the track num-
CD CHANGER MODE
PORTUGUÊS
CD MODE
CD CHANGER MODE
Changing the display
➮ To switch between the track number and clock display / track number and playing time display / CD
number and track number display,
press the / DIS button 7 once
or several times for longer than two
seconds until the required display
appears.
Repeating individual tracks or
whole CDs (REPEAT)
➮ If you wish to repeat the current
track, briefly press button 4 RPT
>.
“REPEAT TRCK” appears briefly and
RPT lights up in the display.
➮ If you wish to repeat the current
CD, press button 4 RPT > again.
“REPEAT DISC” appears briefly and
RPT lights up in the display.
Cancelling repeat
➮ If you want to stop the repeat function for the current track or CD,
press button 4 RPT > until
“REPEAT OFF” appears briefly in
the display and RPT disappears.
Random play (MIX)
➮ To play all the tracks on the current
CD in random order, briefly press
button 5 MIX >.
“MIX CD” appears briefly and MIX lights
up in the display.
➮ To play the tracks on all the inserted CDs in random order, press button 5 MIX > again.
16
“MIX ALL” appears briefly and MIX lights
up in the display.
Note:
● In the case of the CDC A 08 and
the IDC A 09, all the CDs in the
changer are selected randomly. In
the case of any other changer, all
the tracks on one CD are played
randomly before the next CD in the
changer is played.
Stopping MIX
➮ Press button 5 MIX > until
“MIX OFF” appears briefly in the
display and MIX disappears.
Scanning all tracks on all CDs
(SCAN)
➮ To briefly play all the tracks on all
inserted CDs in ascending order,
press the OK button ; for longer
than two seconds.
“SCAN” appears in the display.
Stopping SCAN
➮ To stop scanning, briefly press the
OK button ;.
The current track will then continue to
be played.
Note:
● You can set the scantime. For further details, please read the section entitled “Setting the scantime”
in the “Radio mode” chapter.
CD CHANGER MODE
> while in
pause mode.
Playback is continued.
➮ Press button 3
the
ENGLISH
/ DIS button 7.
FRANÇAIS
Cancelling pause
Briefly displaying the time
➮ To display the time, briefly press
Setting the time
Setting the time manually
➮ To set the time, press the MENU
button 8.
➮ Keep pressing the
or button
: until “CLOCKSET” appears in
the display.
➮ Press the
button :.
The time appears in the display. The
minutes flash on and off and can be
adjusted.
➮ Adjust the minutes using the
buttons :.
➮ Once you have set the minutes,
press the button :. The hours
start flashing.
➮ Adjust the hours using the
buttons :.
➮ Press the MENU button 8 or OK
; twice.
17
ESPAÑOL
“PAUSE” appears in the display.
CLOCK - Time
PORTUGUÊS
Pausing playback (PAUSE)
➮ Press button 3 >.
CLOCK - TIME
CLOCK - TIME
Selecting 12/24-hour clock
mode
➮ Press the MENU button 8.
“MENU” appears in the display.
➮ Keep pressing the
or button
: until “24 H MODE” or “12 H
MODE” appears in the display.
or button : to
switch between the modes.
When you have finished making your
changes,
➮ Press the
➮ press the MENU button 8 or OK
;.
Displaying the time continuously
when the unit is off and the
ignition is on
To display the time when the unit is off
and the vehicle ignition is on,
➮ press the MENU button 8.
➮ Keep pressing the or button
: until “CLK DISP OFF” or “CLK
DISP ON” appears in the display.
or button : to
switch between the ON/OFF settings.
When you have finished making your
changes,
➮ Press the
➮ press the MENU button 8 or OK
;.
18
Briefly displaying the time when
the unit is switched off
To briefly display the time when the unit
is off,
➮ press the
/ DIS button 7.
The time is displayed for eight seconds.
“BASS” appears in the display.
or button : to adjust the bass.
When you have finished making your
changes,
➮ Press the
➮ press the AUDIO button =.
Adjusting the treble settings
➮ Press the AUDIO button =.
“BASS” appears in the display.
button :
until “TREBLE” appears in the display.
➮ Keep pressing the
or button : to adjust the treble.
When you have finished making your
changes,
➮ Press the
➮ press the AUDIO button =.
button : until “BALANCE” appears in the display.
➮ Keep pressing the
or button : to
adjust the balance (right/left).
When you have finished making your
changes,
➮ Press the
➮ press the AUDIO button =.
Setting the front/back volume
distribution (fader)
➮ To set the front/back volume distribution (fader), press the AUDIO
button =.
“BASS” appears in the display.
button : until “FADER” appears in the display.
➮ Keep pressing the
or button : to adjust the fader (front/back).
When you have finished making your
changes,
➮ Press the
➮ press the AUDIO button =.
19
FRANÇAIS
Adjusting the bass settings
➮ Press the AUDIO button =.
tion (balance), press the AUDIO
button =.
“BASS” appears in the display.
ESPAÑOL
You can adjust the sound and volume
distribution settings separately for each
source (radio, CD, CD changer and
AUX).
Setting the left/right volume
distribution (balance)
➮ To set the left/right volume distribu-
PORTUGUÊS
Sound and volume
distribution settings
ENGLISH
SOUND AND VOLUME DISTRIBUTION SETTINGS
X-BASS
SPECTROMETER
X-BASS
Setting the spectrometer
The X-BASS feature can be used to
boost the bass at low volume levels.
The spectrometer (level display) briefly
provides a symbolic display of the volume and the audio control settings
whilst you are adjusting them.
When you are not changing any settings, the spectrometer displays the car
radio’s output level.
You can set the type of spectrometer in
the menu.
There are two types available.
Adjusting the X-BASS boost
settings
The X-BASS boost can be set in steps
from “X-BASS LOW” to “X-BASS MID”
to “X-BASS HIGH”.
➮ Press the X-BASS button <.
➮ Keep pressing the or button
: until the required setting appears in the display.
When you have finished making your
changes,
“MENU” appears in the display.
➮ press the X-BASS button <.
➮ Keep pressing the
Setting the spectrometer type
➮ Press the MENU button 8.
or button
: until “EQ DISPLAY” appears in
the display.
or button : to
select “SPECTRUM 1”,
“SPECTRUM 2” or “EQ DISP OFF.”
When you have finished making your
changes,
➮ Press the
➮ press the MENU button 8 or OK
; twice.
20
Instead of connecting a CD changer,
you can connect another audio source
equipped with a line output. The audio
source, for example, can be a portable
CD player, MiniDisc player or MP3 player.
The AUX input must be activated in the
menu.
If you want to connect an external audio source, you will need an adapter
cable. You can obtain this adapter cable (BP no.: 7 607 897 093) from your
authorised Blaupunkt dealer.
Amplifier
Switching the AUX input on/off
➮ Press the MENU button 8.
Frequency ranges Asia and Europe:
FM:
87.5 – 108 MHz
AM:
531 – 1602 kHz
Output power:
4 x 25 watts sine in
accordance with
DIN 45 324 at
14.4 V
4 x 50 watts max.
power
Tuner
Frequency ranges US:
FM:
87.5 – 107.9 MHz
AM:
530 – 1710 kHz
“MENU” appears in the display.
➮ Keep pressing the
Frequency ranges Thailand:
FM:
87.5 – 108 MHz
AM:
531 – 1629 kHz
or button : to
switch AUX on/off.
When you have finished making your
changes,
FM mono sensitivity:
17 dbf
or button
: until “AUX-IN-1 OFF” or “AUXIN-1 ON” appears in the display.
➮ Press the
➮ press the MENU button 8 or OK
;.
Note:
● If the AUX input is switched on it
can be selected by pressing the
CD•C button @.
FM frequency response:
35 - 16,000 Hz
CD
Frequency response:
20 - 20,000 Hz
Pre-amp out
4 channels:
3V
Input sensitivity
AUX input:
Tel./Navi input:
2 V / 6 kΩ
10 V/ 1 kΩ
Subject to changes!
21
FRANÇAIS
Specifications
ESPAÑOL
External audio sources
ENGLISH
SPECIFICATIONS
PORTUGUÊS
EXTERNAL AUDIO SOURCES
GUARANTEE
Guarantee
The scope of the guarantee is orientated around the regulations in force within the country in which the unit was purchased.
If your unit develops a fault, please contact your dealer and present the purchase receipt.
If the statutory guarantee period in your
country is less than 12 months, Blaupunkt will grant a 12-month manufacturer’s guarantee. This guarantee does
not cover damage due to wear, incorrect usage or commercial use.
If you wish to enforce a claim under the
manufacturer’s guarantee that is provided by Blaupunkt, please send the faulty
unit together with the purchase receipt
to the Blaupunkt customer service centre in your country. You can find out
which address is closest to you by contacting the telephone hotline listed on
the back page of this booklet. Blaupunkt
retains the right to rectify defects or supply a replacement.
22
Installation
lnstrucciones
@ A
instructions
l Notice
de montage
l
de instalacibn
l Instru@es
de montagem
Safetv instructions
When carrying out installation
work
and making connections
please
observe the following safety
instructions:
- Disconnect the negative terminal of
the battery! When doing so, please
observe the vehicle manufacturers
safety instructions.
- Make sure you do not damage vehicle components when drilling any
holes.
- The cross sections of the positive
and negative cables must not be
less than 1.5 mm*.
- Do not connect the vehicle’s
plug connectors
to the radio!
- You can obtain the adapter cable
required for your vehicle type from
any BLAUPUNKT
dealer.
- Depending on the model, your vehicle may differ from the description provided here. We accept no responsibility for any damages due to
incorrect installation or connection
or for any consequential
damages.
If the information provided here is
not suitable for your specific installation requirements, please contact
your Blaupunkt dealer, your vehicle
manufacturer or our telephone hotline.
0
A
Consianes
de skuritk
Respecter les consignes de &curit&
suivantes pendant la duree du
montage et du branchement.
Debrancher le pole (-) de la batterie ! Respecter les consignes de
securite du constructeur automobile !
Veiller a n’endommager
aucune
piece du vehicule en percant des
trous.
La section du cable (+) et (-) ne
doit pas depasser 1,5 mm*.
Ne pas brancher les connecteurs du v6hicule sur la radio !
Les cables d’adaptation necessaires pour le type de vehicule sont
disponibles aupres des revendeurs
BLAUPUNKT.
En fonction du mod&e, votre vehicule peut differer de cette description. Nous declinerons toute responsabilite en cas de dommages
causes par des erreurs de montage ou de connexion et en cas de
dommages consecutifs.
Si les indications d&rites ici ne
s’appliquent au montage que vous
voulez effectuer, adressez-vous
a
votre revendeur Blaupunkt, votre
constructeur automobile ou notre
service d’assistance telephonique.
1.
Supplied
Mounting
Hardware
Materiel
de montage
fourni
A!
Ferreteria de montaje
suministrada
Elementos
de fixa@o
fornecidos.
2.
7607
621...
Car-specific adapter cable which is
available at your dealer.
Cable adaptateur specifique au
vehicule, disponible dans le
commerce.
Adaptador especffico del vehfculo, el
cual se puede adquirir en el comercio
especializado.
Cabo de adaptacao especffico do
automovel que pode ser adquirido no
comercio especializado.
6.
l- -
A
nc
Radio
1
Mute
nc
Permanent
+12V
Aut. antenna
illumination
KI.1 S/ignition
Ground
1
B
2
3
4
5
6
7
8
-
Speaker
Speaker
Speaker
Speaker
Speaker
Speaker
Speaker
Speaker
out
out
out
out
out
out
out
out
D
RR+
RRRF+
RFLF+
LFLR+
LR-
C
Cl
Lltw out
Line Out
Line Out Masse
Line Out
Line Out
/,
c12V
-r=---
c2
LR
RR
I Ground
LF
RF
Amplifier
7
8
9
10
11
12
Telefon / Navi NF in +
Telefon I Navi NF in Radio I Navi Mute
/,
FB +12V I RC +12V
Fernbedienung I Remote Control
FE - Masse / RC - GND
Remote
Control
13
14
15
16
17
18
19
20
Bus - In
Bus - Out
Permanent +12V
I,
+12v
Bus - Masse I GND
AF - Masse I GND
Line In - L
Line In - R
CD-Changer
8.
/
Radio
Mute
(low)
This information is subject to change without notice!
Sous r&erve de modifications!
Modificaciones reservadas!
Sob reserva de alteracaes!
Service numbers / Num&os du service aprh-vente
Nlimeros de servicio / Nrimero de servip
Deutschland
Belgique / Belgie
France
Nederland
Great Britain
Ireland
Danmark
Sverige
Norge
Suomi
dsterreich
EIJ&
USA
Singapore
Slovensko
Tel.:
Fax:
01805000225
02.525.54.44
0140107007
0235656348
01 a 958 383 66
(01) 4wQ@Q
051 21 494002
02.525.54.48
014 010 73 20
0235656331
01 a 958 383 94
(01) 4598830
44898644
750 la IO
66 87 71 57
0943599236
01 61039391
015 769 47a
026 130 05 14
708~6al 71
006 535 053 12
042 175 873 229
66 al 70 00
09435991
01 610390
042 IW 873 212
Blaupunkt
03/01
GmbH
K7NKD 8 622 402 730
/
CC
Limited
Warranty
(United States)
Robert Bosch Corporation warrants new Blaupunkt car audio products it distributes in the United States through
authorized Blaupunkt dealers, or which are imported as original vehicle equipment by the automobile manufacturer, to be
free from defects in material and workmanship, in accordance with the following:
For twelve (12) months after delivery to you, the original consumer purchaser, we will repair or at our option replace at no
charge to you any car audio product which, under normal conditions of use and service, proves to be defective in
materials or workmanship. However, this warranty does not cover expenses incurred in the removal or reinstallation of
any car audio product, whether or not proven defective, and does not cover products not purchased from an authorized
Blaupunkt dealer. This warranty is limited to the original consumer purchaser and is not transferable. Repaired and
replacement car audio products shall assume the identity of the original for purpose of this warranty and this warranty
shall not be extended with respect to such products.
To obtain performance of this warranty, contact the nearest Blaupunkt authorized repair facility or our nearest office. A
dated purchase receipt or other proof that the product is within the warranty period will be required in order to honor your
claim. Carefully pack the unit and ship prepaid to the servicing location. For further information, write to the Robert Bosch
Corporation, 2800 South 25th Avenue, Broadview, Illinois, 60153, attention Blaupunkt Customer Service Department or
call l-800-266-2528.
Specifically excluded from this warranty are failures caused by misuse, neglect, abuse, improper operation or installation,
dropping or damaging a radio faceplate, unauthorized service or parts, or failure to follow maintenance instructions or
perform normal maintenance activities. Normal maintenance activities for car audio products include but are not limited
to cleaning, such as cleaning radio faceplate connectors and tape heads, tape player head demagnetization and tape
player lubrication, compact disc and lens cleaning, and other minor maintenance activities and adjustments that are
outlined in the owner’s manual or that are normally required for continued proper operation. Also excluded from this
warranty is the correction of improper installation and the elimination of any external electromagnetic interference.
This warranty sets forth your exclusive remedies with respect to the products covered by it. We shall not be liable for any
incidental, consequential, special or punitive damages arising from the sale or use of any Blaupunkt car audio products,
whether such claim is in contract or tort. No attempt to alter, modify, or amend this warranty shall be effective unless
authorized in writing by an officer of Robert Bosch Corporation.
THIS WARRANTY IS IN LIEU OF ALL OTHER WARRANTIES OR REPRESENTATIONS, EXPRESS OR IMPLIED,
INCLUDING
ANY WARRANTY IMPLIED BY LAW, WHETHER FOR MERCHANTABILITY
OR FITNESS FOR A
PARTICULAR PURPOSE OR OTHERWISE AND SHALL BE EFFECTIVE ONLY FOR THE PERIOD THAT THIS EXPRESS
WARRANTY IS EFFECTIVE.
In the event any provision, or any part or portion of this warranty shall be held invalid, void or otherwise unenforceable,
such holding shall not affect the remaining part or portions of that provision or any other provision hereof.
NOTICE TO CALIFORNIA
OWNERS
If your Blaupunkt car audio product needs warranty repair service and there is no authorized service center reasonably
close to you, you can return the defective unit to the dealer from whom you purchased it, or you can return it to any
dealer who sells Blaupunkt car audio products. The dealer may, at the dealer’s option, replace, repair or refund the
purchase price for any Blaupunkt car audio products which prove defective under conditions of normal use. If the dealer
fails to repair, replace, or partially refund your money, you may take your Blaupunkt car audio product to any repair shop
and they can repair your unit at our expense unless the repair cost exceeds the depreciated value of the unit, but you
must contact Blaupunkt to receive authorization to do this before your car audio product is repaired.
ROBERT BOSCH CORPORATION
BLAUPUNKT CUSTOMER SERVICE
2800 SOUTH 25TH AVENUE
BROADVIEW, IL 60153
TEL: l-800-266-2528
BENEFITS
REGISTRATION
l /flSUiW7Ce&feI’I’U/
- We will keep the model number, warranty (serial)
number, and date of purchase of your new Blaupunkt radio on file to help you refer
to this information in the event of an insurance claim, such as if the car is stolen.
0 Warranty Confirmation
- Your prompt registration confirms your
rights to the protection available under the terms and conditions of your Blaupunkt
warranty.
0 Ownership Registration
guarantee that you will be notified
concerning this product.
- Returning this card is your only way to
by Blaupunkt of any issues that arise
Thank You For Buying a
0 BLAUPUNKI:
Radio!
To provide
you with these important
this card and mail within
benefits,
you must complete
10 days of purchase.
d
Insurance Referral
d
Warranty Confirmation
d
Ownership Registration
Your responses
will also help us refine and enhance
our products
and
marketing
programs.
We greatly appreciate
and value your input, and ore
pleased
to provide you with the above benefits.
Warrantv
Details
Robert
Blaupunkt
- Refer
to your
radio’s
Bosch Corporation
Sales
- Mobile Communications
2800 S. 25th Ave.
Broadview,
IL 60153
warranty.
Group
Division
Service
information
- Please
contact
us at:
l-800-266-2528
PLEASE DETACH HERE AND KEEP FOR YOUR RECORDS.
8 622 400 6711
PLEASE DETACH HERE AND KEEP FOR YOUR RECORDS.
1 1. Mr.
A
Cl
2. Mrs.
0
3. Ms. 0
4. Miss
First Name:
I
I
/
(Number
I!
Phone#:/
Last Name:
,
li
I
’
-
I-1
I
/,
1
, I,
I1
,
, ,
II/II/
,
,
AIlI
,
I
,I
3DateofPurchase:l
,
I1
Mash
Store
Name:
I
,
1
l.-IImi-iLm
Where did you make your purchase?
3. Cl Superstore
1. Cl Car audio store
2. Cl Automobile
dealer
4. 0 Department
7
9
10
11
12
/
store
I
I
:
,
,
thy
/
/
Year
~-
5. Cl Catalogue/mail
6. Cl Other
,
,
i / , I Model: 1 ,
example: Ford
How did you first learn about Blaupunkt?
15
1.Cl Friend/relative
5. Cl Radio ad
6. Cl Newspaper
ad
2.0 Salesperson
3.0 Magazine article 7. Cl Magazine ad
4.0 In-store display
8. Cl Not sure
16
When did you make your decision on which
model to buy?
1. 0 Before coming to the store
2. 0 At the store
What brand was your second choice?
1. Cl Alpine
6. Cl JVC
11.0 Sony
2.0 Audiovox
7.0 Kenwood
12. 0 Other
3. 0 Clarion
8.0 Panasouic
13. 0 None
4. 0 Eclipse
9.0 Pioneer
17
10.0 Rockford-Fosgate
5. Cl Jensen
Who installed this product?
1.O Store where the product was purchased
4. 0 Independent installer
2.0 I did it myself
3.0 Friend or relative
5. 0 Other
Which of these nroducts
do vou ulan to bur
in the future?
&heck all that gppl,)
4.0 Amplifier
6.0 Eqd
‘9
1.0 None
2.0 Front speakers 5. Cl Subwoofer 7. 0 CD changer
3.0 Rear speakers
Speakers
order
,
,
, , I , I
example: Mustang
1 ;
Year:
, / / 1
example: 1965
Including
yourself,
what is the U
people living in your household?
1
NOT
a
,
J
number
(EXAMPLES: 01,02,03,04
of
.....I
including
yourself,
what are the AGES
people living in your household?
j
,
, ,,
, 1
Day
Year
Education
(Please check which category applies):
1. q High School
3. 0 Completed
College
2. 0 Some College
4. 0 Graduate School
Month
Comments:
Ji
of
Ape (in vearsl
Male:
.-
Fakde:
III
Marital
JiLJLL!Ld
Status:
Ii
L--J
1.0
Married
L Ed
2.0
Single
28 Whichbestdesc&csyourt%milyiucome?
13 Dateof~birth:
14
A
I
I
Check the two (2) most important
reasons you chose Blaupunkt
over the competition:
11. Cl Blaupunkt
Reputation
I .Cl Friend/Family
recommendation
6. Cl Styling/Appearance
7. 0 Tuner quality/features
12. Cl Detachable
Face
2.0 Salesperson
recommendation
3.0 Tape player quality/features
8. 0 Blaupunkt
warranty
13. Cl Magazine review
14. Cl Value for price
4.0 CD player quality/features
9. 0 Convenient
installation
15. 0 other (Describe in comments)
5.0 Ease of use/location
of controls
10. Cl Sound quality
In what vehicle will this Blaupunkt
product
be installed?
Make:
8
J
i
Apt. #:
and Street)
//I,
-
‘74A
Initial:
1
Address:
0
0 622 400 67116
1.0
2.0
3.0
4.0
Under $l5,000
515,000-$24,999
525,G00-534,999
$35,~549,999
5. Cl
6. 0
7. 0
8.0
$5O,oG0-574,999
575,ooo-599,999
$lOO,OOO-149,999
Over 5150,ooO
In the last six(6) months have you or your spouse:
1.O Purchased clothes through tbe mail?
2.0 Purchased gifts through the mail?
3.0 Worked in your garden?
4.0 Traveled on vacation?
5.0 Purchased a PC or PC software?
6.0 Purchased two or more books?
7.0 Purchased cassettes/CDs?
8.0 Donated to wildlife/environmental
causes?
9.0 Donated to charities
l BLAUPUNKT
Bosch
Group
Please send other correspondence to:
Robert Bosch Corporation
Sales Group
Blaupunkt
- Mobile Communications
Division
2800-S. 25th Ave.
Broadview,
IL 60153
Bosch
Group
BENEFITS REGISTRATION
PO BOX 1265
DENVER CO 80201-1265
DEPARTMENT
II,,I,II ,,,11111111,1,,,II,,,ll,,l,l,ll,,,l,l,,ll,,,l,l,,l,,ll