1
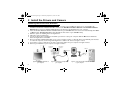
WC NX Ultra Eng.fm Page 1 Wednesday, September 3, 2003 2:45 PM
1 About Your Camera
Front View
English
Side View
1
1. Snapshot button
Press this button to launch
PC-CAM Center or capture images
2
3
2. Focus ring
Adjusts the view focus. Point the
lens towards your subject and then
rotate this ring in a clockwise or
counterclockwise motion until the
image is in focus.
4
3. USB cable
4. Hinged lever for mounting
camera on LCD panel
1
WC NX Ultra Eng.fm Page 2 Wednesday, September 3, 2003 2:45 PM
2 Install the Drivers and Camera
Installing the Drivers and Software
DO NOT connect the camera to your computer yet!
1. Do not connect Creative WebCam NX Ultra to your computer before installing the drivers. If you accidentally begin
installation with Creative WebCam NX Ultra connected, the Add New Hardware Wizard or Found New Hardware
Wizard dialog box appears. Click the Cancel button and disconnect the WebCam from your computer.
2. Insert the Creative WebCam NX Ultra Installation CD into your CD-ROM drive. If it does not run automatically, click Start
-> Run and type d:\ctrun\ctrun.exe (replace d:\ with the drive letter of your CD-ROM drive).
3. Click the options for installing drivers and applications.
4. Follow the onscreen instructions.
5. You may be asked, after an application is installed, if you want to restart your computer. Click the No button until all the
drivers and applications are installed.
6. Place your Creative WebCam NX Ultra on top of your computer monitor or other flat surface. For LCD flat panel monitors
or notebook computers, use the integrated hinged lever to balance the camera. See Figure 1 below.
7. If you want to connect a microphone for video conferencing, plug it into your computer. See Figure 2 below.
8. Connect your WebCam to your computer. See Figure 3 below.
Headphones
connector
Microphone
connector
USB port
Microphone
Hinged
lever
Figure 1: Placing your WebCam on
your computer
2
Figure 2: Connecting a microphone to
your computer
Figure 3: Connecting Creative WebCam NX Ultra
to your computer
WC NX Ultra Eng.fm Page 3 Wednesday, September 3, 2003 2:45 PM
For Windows XP only
9. After connecting your camera, Windows automatically detects the device.
10. When the Found New Hardware Wizard dialog box appears, click the Install the software automatically
(Recommended) option, and then click the Next button.
11. Check the image in the Video preview pane of the Creative WebCam NX Ultra Camera Configuration dialog box. If
it flickers or displays a series of dark bands, click the Cancel Flicker button.
12. Click the Finish button, and then restart your computer if you are prompted to do so.
For Windows 2000 only
9. When a Digital Signature Not Found dialog box appears, telling you that Creative WebCam NX Ultra has been detected,
click the Yes button.
10. Check the image in the Video preview pane of the Creative WebCam NX Ultra Camera Configuration dialog box. If
it flickers or displays a series of dark bands, click the Cancel Flicker button.
11. Click the Finish button, and then restart your computer if you are prompted to do so.
For Windows Me and Windows 98/98 SE only
9. After connecting your camera, Windows automatically detects the device.
i. If you are prompted to insert the Windows 98 or Windows Me CD, replace the Creative WebCam NX Ultra Installation
CD with the appropriate CD. Some computers may be supplied without the Windows CD, but have the necessary files
stored in c:\windows\options\cabs (replace c:\ with the drive letter your Windows has been installed on).
Note: Windows 98 is available in various editions. Be sure to use the correct edition for your system.
ii.In the Insert Disk dialog box, click the OK button.
iii.Follow the onscreen instructions.
10. Check the image in the Video preview pane of the Creative WebCam NX Ultra Camera Configuration dialog box. If
it flickers or displays a series of dark bands, click the Cancel Flicker button.
11. Click the Finish button, and then restart your computer if you are prompted to do so.
3
WC NX Ultra Eng.fm Page 4 Wednesday, September 3, 2003 2:45 PM
3 Capturing Images and Video
Taking a photo
To take a photo:
1. Click Start -> Programs -> Creative -> Creative WebCam -> Creative PC-CAM Center.
2. In the PC-CAM Center window, click the Live Video button
. The current camera view is displayed in the Viewing
window.
3. In the Save photo in box, select the destination album for your photo.
4. To capture the image shown in the viewing window, click the Snap an image button
at the bottom of the window. By
default, the photo is saved automatically and added to the destination album.
To preview a photo:
1. Click the Save automatically check box to clear it, if you want to preview each photo before deciding whether to save it to
the destination album.
2. Click the Snap an image button
to take a photo. A preview of the photo is shown at the bottom-left corner of the
Live Video window.
3. Click the Save button
if you wish to store it in the destination album.
Recording a video
To record a video:
1. Click Start -> Programs -> Creative -> Creative WebCam -> Creative PC-CAM Center.
2. In the PC-CAM Center window, click the Live Video button
. The current camera view is displayed in the Viewing
window.
3. In the Video size box, select a suitable resolution.
4. In the Save video in box, select a destination album for your video.
5. To start recording a video, click the Record video button
. The button starts blinking to indicate that recording is now
in progress.
6. To stop the recording, click the button again. The button stops blinking. By default, the video is saved automatically and added
to the destination album.
4
WC NX Ultra Eng.fm Page 5 Wednesday, September 3, 2003 2:45 PM
To preview a video:
1. Click the Save automatically check box to clear it, if you want to preview each video before deciding whether to save it to
the destination album.
2. Click the Record video button
to start recording.
3. After you stop recording, click the Play button
on the bottom left-hand corner of the Live Video window to preview the
video.
4. If you wish to store it in the destination album, click the Save button
after previewing the video.
Viewing a photo
1. Click the My Album button
. PC-CAM Center is now in My Album mode.
2. In the My Album box, click the My Photo folder and then click the album that contains the photos that you want to view.
Thumbnails of photos in the album are displayed in the Thumbnails window.
3. Double-click the thumbnail of the photo displayed in the Thumbnails window. The photo is displayed in the PC-CAM
Center Viewing window.
If you are not satisfied with the result, you can select a higher resolution, and then capture the image again.
Viewing a video
1. Click the My Album button
. PC-CAM Center is now in My Album mode.
2. In the My Album box, click the My Video folder and then click the album that contains the video that you want to view.
Thumbnails of videos in the album are displayed in the Thumbnails window.
3. Double-click the thumbnail of the video you want to view. The video plays in the Viewing window.
If you are not satisfied with the result, you can select a higher resolution, and then capture the video again.
Starting PC-CAM Center Help
This Help file contains instructions on how to use PC-CAM Center to take photos and record videos. It also teaches you how to
optimize settings to take high quality photos and videos.
To start the Help file:
1. Click the PC-Cam Center logo at the top left corner of PC-CAM Center’s main window.
2. From the PC-CAM Center menu, click Help.
5
WC NX Ultra Eng.fm Page 6 Wednesday, September 3, 2003 2:45 PM
4 Other Information
User’s Guide
For more details on using your camera, read the User’s Guide (on CD): d:\manual\<english>\manual.pdf
Product Registration
Enjoy a host of benefits by registering your product during installation, or at http://www.creative.com/register.
Benefits include:
• Service and product support from Creative
• Exclusive updates on promotions and events
Technical Support and Warranty
Creative Knowledgebase
Resolve and troubleshoot technical queries at Creative’s
24-hour self-help Knowledgebase. Go to
http://www.creative.com and select your region.
For Technical Support information, go to d:\support\<language>\support.pdf
For Warranty information, go to d:\warranty\<region>\<language>\warranty.pdf
Please keep your Proof of Purchase for the duration of the warranty period.
(replace d:\ with the drive letter of your CD-ROM drive, <region> with the region that you are in, and <language> with the
language that your document is in)
Copyright © 2003 Creative Technology Ltd. All rights reserved. Microsoft and Windows are registered trademarks of Microsoft Corporation. All other brand and
product names are trademarks or registered trademarks of their respective holders and are hereby recognized as such.
6