1
New Features in Digital Performer 7.24
OVERVIEW
This document provides information about new features in
Digital Performer 7 and late-breaking information not
covered in the Digital Performer User Guide.
System requirements . . . . . . . . . . . . . . . . . . . . . . . . . . . . . . . . . . . . . . . . . . . . . 1
Users of previous versions of Digital Performer . . . . . . . . . . . . . . . . . . . 1
Enhancements in version 7.24 . . . . . . . . . . . . . . . . . . . . . . . . . . . . . . . . . . . . 2
Enhancements in version 7.23 . . . . . . . . . . . . . . . . . . . . . . . . . . . . . . . . . . . . 2
Enhancements in version 7.22 . . . . . . . . . . . . . . . . . . . . . . . . . . . . . . . . . . . . 2
Enhancements in version 7.21 . . . . . . . . . . . . . . . . . . . . . . . . . . . . . . . . . . . . 2
New features in version 7.2 . . . . . . . . . . . . . . . . . . . . . . . . . . . . . . . . . . . . . . . 3
Enhancements in version 7.12 . . . . . . . . . . . . . . . . . . . . . . . . . . . . . . . . . . . . 5
Enhancements in version 7.11 . . . . . . . . . . . . . . . . . . . . . . . . . . . . . . . . . . . . 6
New features in version 7.1 . . . . . . . . . . . . . . . . . . . . . . . . . . . . . . . . . . . . . . . 7
Enhancements in version 7.02 . . . . . . . . . . . . . . . . . . . . . . . . . . . . . . . . . . 14
Enhancements in version 7.01 . . . . . . . . . . . . . . . . . . . . . . . . . . . . . . . . . . 14
New features in version 7.0 . . . . . . . . . . . . . . . . . . . . . . . . . . . . . . . . . . . . . 15
SYSTEM REQUIREMENTS
Minimum requirements
Digital Performer 7.24 requires:
■ PowerPC G4 CPU 1 GHz or faster (including PowerPC G5
CPUs and all Intel processor Macs)
■
1 GB RAM or more
■
Mac OS X version 10.5 or 10.6; v10.5.8 or later is required
■
A display with 1024 x 768 resolution or higher
Computer recommendations
The recommended system for Digital Performer 7.21 is:
■ PowerPC G5 or Intel CPU, with multi-core processor or
multiple processors
■
2 GB RAM or more
■
A display with 1280 x 1024 resolution or higher
Pro Tools | HD system requirements
Digital Performer supports DAE version 8.0–8.0.3 with the
following Digidesign Pro Tools systems:
■
Pro Tools | HD (1, 2 or 3)
■
Pro Tools | HD Accel
Pro Tools version 8.0 cs3 or later is strongly recommended.
☛
Support for Pro Tools 8.0.3 requires that Pro Tools is
installed before installing Digital Performer 7.1 or later. If
Pro Tools 8.0.3 is installed after Digital Performer 7.1 or later,
the Digital Performer installer must be run again for DAE to
function properly.
☛
Avid has announced the end of support for DAE mode
in third-party applications such as Digital Performer and
Logic. Digital Performer 7.24 is anticipated to be the final
version of Digital Performer to support the use of DAE as the
audio engine. For more information, please refer to
“Supported Pro Tools systems” on page 2 in the Digital
Performer DAE Guide (Help menu).
While Avid is bringing third-party DAE support to a close,
they have opened third-party support for their Pro Tools|HD
Native system. This allows you to run Digital Performer as a
complete software front end for the Pro Tools|HD Native
system and its audio interfaces. For more information, please
refer to“DAE versus MAS” on page 1 in the Digital Performer
DAE Guide.
USERS OF PREVIOUS VERSIONS OF DIGITAL
PERFORMER
If you are familiar with Digital Performer version 5 or earlier,
please note that some user interface elements have changed
in Digital Performer version 6 and later. For information on
these changes, please refer to the “Users of previous versions
of Digital Performer” page in DP’s online help files (Help
menu > Digital Performer Help).
The faster the Mac, and the more RAM installed in it, the
more responsive Digital Performer is. Scrolling during
playback is smoother, the counter updates regularly, and
actions that you take with the program are faster —
especially during playback.
1
NEW FEATURES IN DIGITAL PERFORMER 7.24
ENHANCEMENTS IN VERSION 7.24
ENHANCEMENTS IN VERSION 7.21
Improvements, optimizations, and refinements can be found
in the following areas:
Audio pitch automation reference . . . . . . . . . . . . . . . . . . . . . . . . . . . . . . . 2
Other changes . . . . . . . . . . . . . . . . . . . . . . . . . . . . . . . . . . . . . . . . . . . . . . . . . . . 2
■
Mac OS X 10.7 (Lion) support: Digital Performer 7.24 is
compatible with Lion.
■
Other enhancements: various additional improvements.
ENHANCEMENTS IN VERSION 7.23
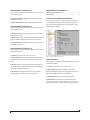
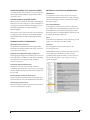
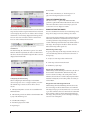
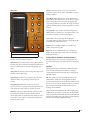
AUDIO PITCH AUTOMATION REFERENCE
There is now a preference to adjust the reference frequency
for audio pitch automation in the Data Display preference
pane. This preference defines the A above middle C, with a
default setting of 440 Hz.
Improvements, optimizations, and refinements can be found
in the following areas:
■ Transport: starting and stopping playback when virtual
instruments are used.
Plug-ins: impulse reponse management in ProVerb; initial
playback in MasterWorks EQ when transport is started.
■
Import & Export: reading audio files from a CD; opening
Performer project files.
■
ENHANCEMENTS IN VERSION 7.22
Improvements, optimizations, and refinements can be found
in the following areas:
■
Analysis: waveform overview construction.
■
Import & Export: interchanging AIFF files with Pro Tools;
Figure 1: Audio pitch automation reference
importing bundles during Load operations; saving project
files.
Plug-ins: impulse reponse management in ProVerb; state
saving and loading in MasterWorks Leveler; Shift-dragging
graph points in MasterWorks EQ.
■
OTHER CHANGES
Improvements, optimizations, and refinements can be found
in the following areas:
■
Analysis: waveform overview construction.
Import & Export: importing CAF files; importing
Broadcast WAVE files with timestamps; attempting to export
MP3 when LAME.framework is not installed.
■
■
Miscellaneous: managing sidechain output bundles;
bringing application into focus when not in front.
■
Mixing Board: drag and drop of effects clippings.
■ Miscellaneous: consistency of commands and menu
items; closing a project with the Preferences window open;
reporting of missing soundbites when opening old projects.
2
NEW FEATURES IN DIGITAL PERFORMER 7.24
NEW FEATURES IN VERSION 7.2
Contextual menus . . . . . . . . . . . . . . . . . . . . . . . . . . . . . . . . . . . . . . . . . . . . . . . . 3
Themes . . . . . . . . . . . . . . . . . . . . . . . . . . . . . . . . . . . . . . . . . . . . . . . . . . . . . . . . . . . 4
Open Sound Control (OSC) . . . . . . . . . . . . . . . . . . . . . . . . . . . . . . . . . . . . . . . 4
Live search. . . . . . . . . . . . . . . . . . . . . . . . . . . . . . . . . . . . . . . . . . . . . . . . . . . . . . . . 5
Other changes . . . . . . . . . . . . . . . . . . . . . . . . . . . . . . . . . . . . . . . . . . . . . . . . . . . . 5
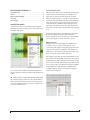
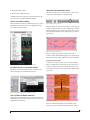
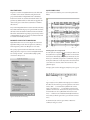
CONTEXTUAL MENUS
Contextual menus have been added throughout Digital
Performer to provide convenient access to frequently used
commands and options.
Contextual menu items
The menu items shown in the contextual menu will depend
on the context, as the name implies. For example, if you
right-click on a selection of audio data in the Sequence
Editor (as shown in Figure 2), you will see contextual menu
items for moving and editing audio data, opening the data in
other windows, and Sequence Editor track options. Some
menu items may be unavailable temporarily (grayed out)
depending on the kind of selection you have made, which
layer is active, whether there is any data on the clipboard, and
so on.
All items that appear in the contextual menus are available
elsewhere as regular menu items, mini-menu items,
keyboard shortcuts, and so on. That is, the contextual menu
is never the only place to find a command or option.
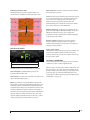
Object selections
When there is object-selected data (such as MIDI notes,
soundbites, and so on), right-clicking directly on the
selected items will open the contextual menu for those items.
However, in cases where it is difficult to click directly on a
small object, so you may also right-click in the empty space
above or below the selection in the same track.
Figure 2: The contextual menu for an audio selection in the Sequence Editor
To access the contextual menu, click with the right mouse
button or hold the Control key and click with the left mouse
button.
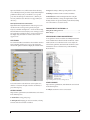
For example, say you have selected multiple MIDI notes, the
first of which starts at 13|1|000 and the last of which ends at
16|3|240 (Figure 3). The contextual menu for those selected
notes can be invoked by right-clicking on any of the selected
notes, or in any empty space in that track between 13|1|000
and 16|3|240. If you right-click before 13|1|000 or after
16|3|240, or directly on an unselected note, the original
selection will be deselected.
☛
Existing behaviors which utilize clicking while holding
the Control key take precedence over the contextual menu.
That is, when Control-click is already used in a particular
context for a different function, you must use right-click to
access the contextual menu.
Figure 3: Opening the contextual menu for a selection of MIDI notes
3
NEW FEATURES IN DIGITAL PERFORMER 7.24
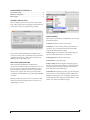
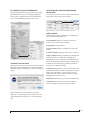
THEMES
Digital Performer’s user interface can now be changed with
themes. A Themes preference panel has been added to the
Preferences window (Digital Performer menu).
Selection Color
Selection color can also be further customized.
Option
Where the color is defined
Use Theme’s Selection Color
The theme
Use A Custom Selection Color
The single color picker
Use the System Selection Color
The Highlight Color setting in
System Preferences > Appearance
Examples are shown for each of the selection color options.
Managing theme files
Themes are installed in the following location:
/Library/Application Support/MOTU/Digital Performer/
Themes/
Press the Open button (Figure 4 on page 4) to open a Finder
window to the folder on disk which contains your theme
files. There, you can rename, copy, delete, etc. your theme
files.
OPEN SOUND CONTROL (OSC)
Figure 4: Themes preferences
A variety of themes are included. To change the theme, select
a theme in the list and press the Choose button.
The DP Version column displays the compatible versions of
Digital Performer for each theme. If a theme does not
support the current version of Digital Performer, the theme
will be unavailable (grayed out).
A text description and preview image of the selected theme is
displayed in the bottom portion of the Preferences window.
Meter Color
Meter color can be further customized.
Option
Where the color is defined
Use Theme’s Meter Color
The theme
Use A Custom Color
The single color picker
Use A Custom Color Gradient
The three color pickers, for the bottom,
middle, and peak ranges, respectively
Digital Performer now supports the Open Sound Control
(OSC) protocol via a control surface plug-in. OSC is used in
a variety of software and hardware devices, such as
Max/MSP, Pure Data, CSound, TouchOSC, Monome 40h,
and more. For information on the OSC protocol, please see
http://opensoundcontrol.org.
OSC plug-in installation
The Open Sound Control plug-in is placed by the
Digital Performer installer into the standard location for
Digital Performer control surface plug-ins:
/Library/Audio/Plug-ins/MOTU Control Surface/
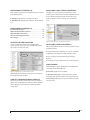
Configuring an OSC device
To use an OSC device with Digital Performer, choose Setup
menu > Control Surface Setup. Click the + button to add a
control surface, then choose “Open Sound Control” from the
Driver menu, as shown in Figure 5.
Animated examples are shown for each of the meter color
options.
Figure 5: Configuring an OSC device
4
NEW FEATURES IN DIGITAL PERFORMER 7.24
Input Port defaults to zero, which means that an arbitrary,
non-conflicting network port will be assigned internally and
published via Bonjour. If you would like to use a specific
port, enter the desired port instead of zero. (This may be
necessary when the OSC client does not support Bonjour
discovery.)
OSC implementation documentation
Digital Performer’s implementation of the OSC protocol is
described in the OSC Programming Guide for Digital
Performer, available via Help menu > Control Surfaces Help.
This information is needed only if you are creating your own
OSC application or hardware device; it is not needed if you
are simply using a hardware or software device which
supports OSC.
LIVE SEARCH
Live search fields have been added to the Soundbites window
and Commands window. As you type a search term, the
window will update in realtime to display the relevant results.
■
Export: bouncing as MP3; exporting Search results.
■
Editing: boundaries of time-stretched soundbites.
■ Miscellaneous: window management when using the
Consolidated Window; soloing the Graphic Editor when
floating windows are present; floating Control Panel; adding
new control items to a Custom Console.
ENHANCEMENTS IN VERSION 7.12
Mixing Board scrolling preference . . . . . . . . . . . . . . . . . . . . . . . . . . . . . . . 5
Other changes . . . . . . . . . . . . . . . . . . . . . . . . . . . . . . . . . . . . . . . . . . . . . . . . . . . 5
MIXING BOARD SCROLLING PREFERENCE
A new preference has been added to the Mixing Board minimenu: “Enable Mouse Wheel for Sliders and Knobs”. When
enabled, the mouse scroll wheel can be used to adjust the
volume fader, pan knob, and other sliders and knobs; when
disabled, the mouse scroll wheel only scrolls the Mixing
Board window.
Figure 7: Mixing Board mouse wheel scrolling preference
Figure 6: Live search in the Commands window
To clear the search results and return to the regular view,
click the “x” button at the right side of the search field, or
press the Escape key.
OTHER CHANGES
OTHER CHANGES
Improvements, optimizations, and refinements can be found
in the following areas:
■
Analysis: waveform overview construction.
Improvements, optimizations, and refinements can be found
in the following areas:
■
Drum Editor: saving pitch groups.
■
Mixing Board: changing pan value via readout; selecting
an insert when Show V-Racks is enabled.
5
NEW FEATURES IN DIGITAL PERFORMER 7.24
ENHANCEMENTS IN VERSION 7.11
Control Surface Setup . . . . . . . . . . . . . . . . . . . . . . . . . . . . . . . . . . . . . . . . . . . . 6
MIDI device configuration . . . . . . . . . . . . . . . . . . . . . . . . . . . . . . . . . . . . . . . . 6
Other changes . . . . . . . . . . . . . . . . . . . . . . . . . . . . . . . . . . . . . . . . . . . . . . . . . . . . 6
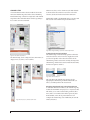
CONTROL SURFACE SETUP
When configuring control surfaces in the Control Surface
Setup dialog (Setup menu), the Input Port and Output Port
of each device can now be specified independently.
Figure 9: MIDI output selection
OTHER CHANGES
Improvements, optimizations, and refinements can be found
in the following areas:
Figure 8: Input and Output Port selection in Control Surface Setup
This provides additional flexibility when making device
connections, and provides compatibility with certain kinds
of hardware and software control surfaces which specify
different ports for input and output.
MIDI DEVICE CONFIGURATION
Menus which display MIDI input or MIDI output
connections now display all ports, even if the port does not
have a connection to a device in Audio MIDI Setup. This
provides quicker configuration of devices which connect
directly to the computer and do not require any further
configuration in Audio MIDI Setup, such as many USB MIDI
controllers.
MIDI ports which do not have a device connected to them
will be listed in the “Unconfigured Ports” sub-menu (see
example Figure 9, below).
■
Analysis: waveform overview construction.
■
Editing: bite volume editing; Chord Symbol and Lyrics
operations; sync point editing in Event List; Audio Mute
event editing; Poly Aftertouch editing.
■ Effects: display of automation events for MAS plug-ins;
response of MAS instruments to received notes.
■
Mixing Board: indication of record status.
■
Drum Editor: saving pitch groups.
Import & Export: saving templates; dragging clippings
into the Conductor track; certain Bounce to Disk operations;
saving Selection time format; population of Recent Files
menu; drag and drop audio file export.
■
■ Miscellaneous: checking for updates; operations involving
read-only files or volumes; Information Bar configuration;
handling of missing fonts; Auto-Scrolling; responsiveness of
controls and value fields; playback of ReWire slaves; recall of
window sets; instrument sidechain outputs.
6
NEW FEATURES IN DIGITAL PERFORMER 7.24
NEW FEATURES IN VERSION 7.1
Folder contents overview. . . . . . . . . . . . . . . . . . . . . . . . . . . . . . . . . . . . . . . . . 7
Automatic addition of inserts. . . . . . . . . . . . . . . . . . . . . . . . . . . . . . . . . . . . . 7
Insert Settings presets . . . . . . . . . . . . . . . . . . . . . . . . . . . . . . . . . . . . . . . . . . . . 7
EQ and Dynamics Bypass shortcut. . . . . . . . . . . . . . . . . . . . . . . . . . . . . . . . 8
Open Instrument shortcut . . . . . . . . . . . . . . . . . . . . . . . . . . . . . . . . . . . . . . . . 8
Track type icons in menus . . . . . . . . . . . . . . . . . . . . . . . . . . . . . . . . . . . . . . . . 9
Occupied inserts in the Inserts menu . . . . . . . . . . . . . . . . . . . . . . . . . . . . . 9
Fine control keyboard modifier. . . . . . . . . . . . . . . . . . . . . . . . . . . . . . . . . . . 9
Trim tool for Continuous Data . . . . . . . . . . . . . . . . . . . . . . . . . . . . . . . . . . . . 9
New plug-in: Tuner. . . . . . . . . . . . . . . . . . . . . . . . . . . . . . . . . . . . . . . . . . . . . . 10
Custom ’59: Power Amp . . . . . . . . . . . . . . . . . . . . . . . . . . . . . . . . . . . . . . . . 10
More plug-in presets. . . . . . . . . . . . . . . . . . . . . . . . . . . . . . . . . . . . . . . . . . . . 11
Bundles improvements . . . . . . . . . . . . . . . . . . . . . . . . . . . . . . . . . . . . . . . . . 11
Indication of multiple takes. . . . . . . . . . . . . . . . . . . . . . . . . . . . . . . . . . . . . 11
Core Audio Format (CAF) audio file import . . . . . . . . . . . . . . . . . . . . . 12
Aliased folder as Clipping folder . . . . . . . . . . . . . . . . . . . . . . . . . . . . . . . . 12
Keyboard shortcut improvements. . . . . . . . . . . . . . . . . . . . . . . . . . . . . . 12
Preferences additions and improvements . . . . . . . . . . . . . . . . . . . . . . 12
Customizing Selection Information. . . . . . . . . . . . . . . . . . . . . . . . . . . . . 13
Automatic update check. . . . . . . . . . . . . . . . . . . . . . . . . . . . . . . . . . . . . . . . 13
Custom Console creation from Window Target menu . . . . . . . . . . 13
Other changes . . . . . . . . . . . . . . . . . . . . . . . . . . . . . . . . . . . . . . . . . . . . . . . . . . 13
FOLDER CONTENTS OVERVIEW
Folders now show an overview of their contents in the Tracks
Window. When the folder is collapsed, the overview reflects
the colors of the individual tracks contained in the folder;
when the folder is expanded, the overview is grayscale (see
Figure 10 below).
Folder selections
In the Tracks Overview, a time range selection can be made
in collapsed or expanded folders, making a selection across
all of the tracks in the folder. The selected data can then be
copied, pasted, and otherwise edited like any other selection.
☛
The Edit Tracks in Closed Folders option, previously
found in the Tracks Window’s mini-menu, has been
removed. If you make a selection which includes a closed
folder but do not wish to edit a folder’s contents, deselect the
folder by Command-clicking its name in the Tracks List.
Dragging data into folders
When a selection of data in the Tracks Overview is dragged
into a folder, a new track will be created inside the folder for
the dragged data.
Track controls on folders
Folders now have track controls, such as Play-enable, Solo
Exempt, and Lock, which toggle the corresponding settings
on the tracks inside the folder.
AUTOMATIC ADDITION OF INSERTS
In the Mixing Board, another row of empty inserts will be
added automatically when the bottommost insert in any
track is filled. Inserts will be added one row at a time, until
the maximum is reached (20 inserts).
If you load an effects clipping or Insert Settings preset (see
below) and there are more inserts in the clipping than are
currently displayed in the Mixing Board, additional inserts
will be added automatically to accommodate it.
INSERT SETTINGS PRESETS
Chains of inserts can be saved and recalled with the new
Insert Settings menu found at the top of the Inserts section in
the Mixing Board and Channel Strip. A variety of factory
presets are included, and you can edit, save, and recall your
own presets.
In the Tracks List, selecting the folder name selects all of the
tracks in the folder.
Figure 10: Folder contents overview in the Tracks Overview
7
NEW FEATURES IN DIGITAL PERFORMER 7.24
/Library/Application Support/MOTU/Digital Performer/
Insert Settings Presets
For more information on Clippings, see “Aliased folder as
Clipping folder” on page 12 of this document and chapter 59,
“Clippings” (page 719) in the DP User Guide.
Bypass toggle
Option-click the Insert Settings menu to toggle Bypass of all
inserts on that track at once.
Figure 11: Insert Settings presets menu in the Mixing Board
These presets affect only the inserts; other track settings,
such as the fader or pan knob, are not affected.
Insert Settings presets in insert slots
Insert Settings presets can also be loaded from individual
insert slots. In any insert pop-up menu in the Mixing Board
and Effects window, Insert Settings presets can be loaded
from the Insert Settings submenu. In this case, the Insert
Settings preset will be spliced in starting at the chosen slot.
Other inserts that are already loaded on that track will not be
removed; if necessary, existing inserts will be moved to lower
slots to allow room for the new inserts.
Insert Settings menu commands
Save Insert Settings: saves a new insert settings file.
Delete Insert Settings: deletes the current insert settings file
and clears the inserts. You will be warned that the action
cannot be undone.
Restore Last Insert Settings: reloads the preset which was
most recently loaded.
Open Insert Settings Folder: opens a Finder window
revealing the insert settings files. There, you can rename,
copy, delete, and move your files.
Clear Inserts: removes all effects inserts. On instrument
tracks, this command removes only the effects inserts; the
instrument insert is unaffected.
Common folder
Presets for each track type (MIDI, Audio, Aux, and so on) are
saved in separate folders. However, if you would like a preset
to appear in the Insert Settings menu for all types of tracks
that use audio effects plug-ins (Audio, Aux, Instrument, and
Master Fader), save the preset in the Common folder.
Common presets appear at the bottom of the Insert Settings
menu on audio tracks.
Insert Settings are clippings
Insert Settings preset files are actually clipping files, so they
can be used with all of the usual clippings operations. The
insert settings files are located in:
Figure 12: Loading an Insert Settings presets in a insert slot will move existing
inserts if necessary
Insert Settings presets when adding instrument tracks
Insert Settings presets are also available when adding an
instrument track via Project menu > Add Track > Instrument
Track or Project menu > Add Track > Add Instruments.
EQ AND DYNAMICS BYPASS SHORTCUT
The EQ and Dynamics Graphs can now be Option-clicked to
toggle the associated plug-in’s Bypass.
OPEN INSTRUMENT SHORTCUT
For instrument tracks and MIDI tracks assigned to virtual
instruments, an Open Instrument shortcut has been added to
open the instrument plug-in window. This shortcut is
available in a number of ways:
■
keyboard shortcut
■
Sequence Editor track menu
8
NEW FEATURES IN DIGITAL PERFORMER 7.24
■
Mixing Board track menu
TRIM TOOL FOR CONTINUOUS DATA
■
Track Inspector/Info Bar button
The Trim tool can now be used on continuous data, such as
audio track volume, MIDI CCs, and pitch bend.
If a MIDI track is not assigned to a virtual instrument, the
Open Instrument command will be unavailable.
TRACK TYPE ICONS IN MENUS
Menus which show a mixture of different track types, such as
the Effects window’s Track menu, now display track type
icons next to each track name.
Figure 15: Trim tool in the Tool palette
When the Trim tool is chosen and the mouse is directly over
continuous data, the Trim tool cursor will change to a hand
with a pointed finger. You can click on a data point, or on the
line segment between data points, and drag it up or down to
trim its value.
Figure 16: Trimming continuous data
If there is a time range selection or object selection of
continuous data, clicking and dragging on one of the selected
line segments or data points will move all of the selected data.
Figure 13: Track type icons in the Effects window’s Track menu
OCCUPIED INSERTS IN THE INSERTS MENU
The Inserts menu in the Effects window now displays the
names of the plug-ins instantiated in each slot.
Scaling continuous data
A selection of continuous data can also be scaled with the
Trim tool. When there is a time range or object selection of
continuous data, move the cursor within the selection (but
not directly over a point or line segment) then click and drag
up or down.
\
Figure 14: Occupied inserts in the Effects window’s Insert menu
FINE CONTROL KEYBOARD MODIFIER
Many controls in Digital Performer, such as volume faders in
the Mixing Board, can now be adjusted with finer control by
holding the Command key.
Figure 17: Scaling continuous data
Points are automatically added at the boundaries of the
selection to preserve the data before and after the selection.
9
NEW FEATURES IN DIGITAL PERFORMER 7.24
Flattening continuous data
Holding the Option key while using the Trim tool as
described above will flatten the data rather than scale it.
Meter value: difference between the detected note and the
detected frequency, in cents.
Arrows: the direction in which the detected frequency needs
to move to match the frequency of the detected note. The
color of the arrows changes progressively in the same
manner as the meter segments. When the detected
fundamental frequency matches the detected note within
three cents, both arrows will be illuminated.
Reference frequency: sets the frequency reference for the
pitch A4, between 400 and 480 Hz. The default frequency is
440 Hz.The reference frequency can be adjusted in
increments as small as 0.01 Hz when Command-dragging
on the bar below the number.
Reference generator: generates a tone at the reference
frequency. Click the tuning fork button to toggle the
generator. Click and drag on the bar below it to adjust the
output level of the generator.
Figure 18: Flattening continuous data
NEW PLUG-IN: TUNER
Tuning stereo signals
When tuning a stereo signal, the Tuner plug-in analyzes the
sum of the two channels. If the channels are not phase
coherent, the Tuner plug-in may not be able to measure the
frequency of the signal.
CUSTOM ’59: POWER AMP
M-M
M-S
M-n
S-S
S-n
n-n
yes
yes
no
yes
no
no
The Tuner plug-in is an accurate and easy to use tuner.
Detected frequency: fundamental frequency of the
incoming signal, in Hertz (Hz).
Detected note: note name and octave that correspond to the
A Power Amp stage has been added to Custom ’59, which
contributes to a more realistic amplifier model.
When Preamp is selected in the new Power Amp menu, only
the pre-amp stage of Custom ’59 is activated. When one of
the other settings is chosen, both the pre-amp stage and the
power amp stage are activated. Additionally, the Presence
control appears, which controls a progressive high frequency
shelf (Figure 19 on page 11).
detected fundamental frequency.
Meter: representation of the pitch difference between the
detected note and the detected fundamental frequency. The
horizontal position of the illuminated segments indicates
how far the detected frequency is from the detected note. The
number of illuminated segments indicates uncertainty or
inharmonicity in the signal; a greater number of illuminated
segments represents greater uncertainty. The color of the
segments changes gradually from green (in tune) to yellow,
orange, and red (progressively further out of tune).
10
NEW FEATURES IN DIGITAL PERFORMER 7.24
BUNDLES IMPROVEMENTS
Bundles are bolded when in use
Bundles which are already in use are now bolded in input and
output assignment menus.
Figure 20: Bundles which are already in use are bolded
Figure 19: Custom ’59 Power Amp settings
Power Amp models
Each Power Amp model has different characteristics.
Row and column highlighting in Bundles window
The names of the row and column under the mouse cursor
are now highlighted, making it easier to determine which
row and column you are currently in.
Preamp: clean, high-fidelity solid-state power stage (no
post-processing of pre-amp model beyond a simple gain
control).
Vintage: spongy, touch-sensitive and loose to the point of
sounding “flabby” at high distortion levels.
Classic: still touch-sensitive but with a more defined
overdrive character.
Modern: tighter, sacrificing some touch-sensitivity for
increased definition at maximum drive levels.
MORE PLUG-IN PRESETS
A number of Digital Performer’s included plug-ins have
additional factory presets.
Figure 21: Highlighting in the Bundles window
Clear and Import Bundles command
The Bundles window mini-menu now contains a Clear and
Import Bundles command. This command is similar to the
existing Import Bundles command, except that it clears the
existing bundles before importing bundles.
INDICATION OF MULTIPLE TAKES
When a track contains multiple takes, a bullet (•) is displayed
to the right of the take name.
Figure 22: Indication of multiple takes
11
NEW FEATURES IN DIGITAL PERFORMER 7.24
CORE AUDIO FORMAT (CAF) AUDIO FILE IMPORT
Core Audio Format (CAF) audio files can now be imported.
When multi-channel CAF files are imported, they will be
converted to stereo.
ALIASED FOLDER AS CLIPPING FOLDER
Folders can now be aliased into any location where clipping
folders are located. For example, you could create an alias to
your Apple Loops folder (/Library/Audio/Apple Loops) in
the global clippings folder (~/Library/Preferences/
MOTU Clippings).
This provides a way to treat any location on your hard drive
as a clipping window, making its content readily available
within Digital Performer without duplicating the folder’s
contents.
KEYBOARD SHORTCUT IMPROVEMENTS
Quick Filter keyboard shortcut
The Quick Filter command, found in the Graphic Editor,
Drum Editor, and Notation Editor mini-menus, can now be
assigned a keyboard shortcut.
Nudge Up and Nudge Down keyboard shortcuts
The Nudge Up and Nudge Down commands can now be used
in the edit windows on MIDI notes. The default assignments
are Command–Control–Up Arrow and Command–
Control–Down Arrow.
PREFERENCES ADDITIONS AND IMPROVEMENTS
Edit Windows
A new preference, Show tempo mismatch lines, has been
added to the Edit Windows preferences to toggle the display
of red lines which appear when a soundbite doesn’t match
the sequence tempo.
Consolidated Windows
A new preference, Maximum rows to add in a sidebar, has
been added to the Consolidated Windows preferences. After
the maximum has been reached, when opening a window
that will open in the Consolidated Window sidebar, tabs will
be added to the existing sidebar cells.
Colors
A button has been added to the Colors preference to provide
quick access to the Edit Color Schemes dialog.
Document
The Startup preferences have been renamed as the
Document preferences.
Additionally, an Auto Save section has been added. Auto Save
can be toggled on or off, and the save interval can be
specified in minutes from one minute to one hour. You can
Auto Save the current file, or Save A Copy As to save as a
separate backup file.
Zoom All The Way Out Horizontally
The Zoom All The Way Out Horizontally command
(Command–Option–Left Arrow) now zooms out to display
the entire length of the sequence, rather than zooming out as
far as possible.
Reveal In Finder command in Audio menu
The Reveal in Finder command, previously available only as
a keyboard shortcut, is now also available in the Audio menu.
Searching the Commands list
When the Commands window is opened, the Search field is
now focused and ready for text input.
Figure 23: Auto Save preferences
12
NEW FEATURES IN DIGITAL PERFORMER 7.24
CUSTOMIZING SELECTION INFORMATION
The Selection Information window, and its corresponding
Information Bar section, can now display multiple time
formats. This is configured in the Selection Information
section of the Time Formats window (Setup menu).
CUSTOM CONSOLE CREATION FROM WINDOW
TARGET MENU
A new Custom Console can now be created via the Window
Target menu of any Custom Console window.
Figure 26: Creating a new Custom Console via the Window Target menu
OTHER CHANGES
Additional improvements, optimizations, and refinements
can be found in the following areas:
■ Tracks Window: gliding over controls in Tracks List;
consistency of Sequence menu commands.
■
Drum Editor: saving drum kits.
■
Sequence Editor: display of soundbite time when edge
editing.
■
QuickScribe Editor: grouping of mini-menu commands.
Import & Export: REX import; MP3 import; management
of Recent Files menu; canceling while opening project;
managing file extensions of imported audio files which must
be converted; replacing existing files when saving; importing
audio files and converting tempo; notifications when CD
burning does not finish successfully.
■
Figure 24: Customizing the Selection Information display
AUTOMATIC UPDATE CHECK
Digital Performer can now check for new versions of Digital
Performer automatically. When a new version is available, a
dialog will prompt you with options to download or skip the
update.
Mixing Board: appearance of sequence and V-Rack tracks
with differing numbers of inserts; moving tracks in a V-Rack
which is shown alongside a sequence; moving aux and
master fader tracks which contain automation to V-Racks;
dragging plug-ins between inserts.
■
■
Playback: starting from sequence start with ReWire slave.
■
Miscellaneous: placement of scroll arrows; Help tags;
window zooming; reporting of key binding conflicts.
Figure 25: Automatic update check
This automatic check can be disabled by deselecting
Help menu > Check for Updates Automatically. To check for
updates manually, choose Help menu > Check for Updates
Now.
13
NEW FEATURES IN DIGITAL PERFORMER 7.24
ENHANCEMENTS IN VERSION 7.02
QUICKSCRIBE: CHORD SYMBOLS PREFERENCES
Improvements, optimizations, and refinements can be found
in the following areas:
An Apply To Score button has been added to the Chord
Symbols pane in the Preferences window (Digital Performer
menu). This button applies changes made in the Chord
Symbol preferences to the current project’s QuickScribe
score.
■
Transport: responsiveness of transport controls.
■
Miscellaneous: changing audio hardware driver’s sample
rate.
ENHANCEMENTS IN VERSION 7.01
Countoff: Follow Conductor . . . . . . . . . . . . . . . . . . . . . . . . . . . . . . . . . . . .
QuickScribe: Chord Symbols preferences . . . . . . . . . . . . . . . . . . . . . . .
QuickScribe: Other enhancements . . . . . . . . . . . . . . . . . . . . . . . . . . . . .
Shortcuts window keyboard shortcut . . . . . . . . . . . . . . . . . . . . . . . . . .
Other changes . . . . . . . . . . . . . . . . . . . . . . . . . . . . . . . . . . . . . . . . . . . . . . . . . .
14
14
14
14
14
COUNTOFF: FOLLOW CONDUCTOR
A new Countoff click option has been added: Follow
Conductor. This option causes the Countoff click to follow
the Conductor track’s click mode.
Figure 28: Chord symbol preferences’ Apply To Score button
QUICKSCRIBE: OTHER ENHANCEMENTS
Various enhancements have been made to operations in the
QuickScribe Editor:
■ Lyric placement when changing score options, and when
nudging lyrics when they may collide with other lyrics.
■ Lyric operations with international text, including
Japanese.
■
Switching out of pop-edited text boxes or chord symbols.
OTHER CHANGES
Additional improvements, optimizations, and refinements
can be found in the following areas:
Figure 27: Countoff preferences’ Follow Conductor option
■
Event List: display of chord symbols.
Additionally, the Default mode from previous versions has
been renamed Default for Meter.
■
SHORTCUTS WINDOW KEYBOARD SHORTCUT
■
The Shortcuts window (Studio menu) has been assigned
Option-X as its default keyboard shortcut. This assignment
can be changed or removed in the Commands window
(Setup menu).
save operations.
Automatic Conversions: converting interleave format;
converting other attributes without converting sample rate.
File saving: recalling previously used location for certain
14
NEW FEATURES IN DIGITAL PERFORMER 7.24
NEW FEATURES IN VERSION 7.0
EQ & Dynamics in Mixing Board . . . . . . . . . . . . . . . . . . . . . . . . . . . . . . . .
V-Rack Edit button in Mixing Board. . . . . . . . . . . . . . . . . . . . . . . . . . . . .
Show V-Racks in Mixing Board. . . . . . . . . . . . . . . . . . . . . . . . . . . . . . . . . .
Channel Strip . . . . . . . . . . . . . . . . . . . . . . . . . . . . . . . . . . . . . . . . . . . . . . . . . . .
Two line Information Bar. . . . . . . . . . . . . . . . . . . . . . . . . . . . . . . . . . . . . . . .
Range automation modes . . . . . . . . . . . . . . . . . . . . . . . . . . . . . . . . . . . . . .
New effects plug-ins . . . . . . . . . . . . . . . . . . . . . . . . . . . . . . . . . . . . . . . . . . . .
Audio Unit instrument sidechain inputs . . . . . . . . . . . . . . . . . . . . . . . .
Wave64 . . . . . . . . . . . . . . . . . . . . . . . . . . . . . . . . . . . . . . . . . . . . . . . . . . . . . . . . .
Realtime Fades . . . . . . . . . . . . . . . . . . . . . . . . . . . . . . . . . . . . . . . . . . . . . . . . .
Improved sample rate conversion . . . . . . . . . . . . . . . . . . . . . . . . . . . . . .
QuickScribe: Lyrics . . . . . . . . . . . . . . . . . . . . . . . . . . . . . . . . . . . . . . . . . . . . . .
QuickScribe: Chord Symbols. . . . . . . . . . . . . . . . . . . . . . . . . . . . . . . . . . . .
QuickScribe: Other enhancements . . . . . . . . . . . . . . . . . . . . . . . . . . . . .
Merge Soundbites enhancement. . . . . . . . . . . . . . . . . . . . . . . . . . . . . . .
Improved phrase parsing in Tracks Overview . . . . . . . . . . . . . . . . . . .
Marker counter . . . . . . . . . . . . . . . . . . . . . . . . . . . . . . . . . . . . . . . . . . . . . . . . .
Resizable Counter window . . . . . . . . . . . . . . . . . . . . . . . . . . . . . . . . . . . . .
Copy & paste counter values. . . . . . . . . . . . . . . . . . . . . . . . . . . . . . . . . . . .
Counter Round on Entry . . . . . . . . . . . . . . . . . . . . . . . . . . . . . . . . . . . . . . . .
15
17
18
19
20
20
21
28
28
29
29
29
32
33
34
34
34
34
34
34
Each section has two components: a group of controls for
configuring and editing the plug-in, and a graph displaying a
visual representation of the plug-in settings.
The controls which edit the plug-in settings work in the same
manner as they do in the regular plug-in window, but there
are a few additional controls in the channel strip for
managing the EQ and Dynamics sections in the Mixing
Board.
as
Effect toggle button
Select Insert/Default menu
Open EQ
plug-in
controls
button
Figure 30: EQ and Dynamics controls
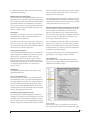
Effect toggle button: When the section is empty, this button
EQ & DYNAMICS IN MIXING BOARD
Two new sections, EQ and Dynamics, have been added to the
Mixing Board, which provide visual feedback and quickaccess control of each track’s EQ and dynamics plug-ins.
instantiates the default EQ or Dynamics plug-in (as chosen
in the Select Insert/Default menu, below). When a plug-in is
already present, clicking this button toggles the plug-in’s
bypass.
Open plug-in button: Clicking this button opens the Effects
as
window for the associated EQ or Dynamics plug-in.
Select Insert/Default menu: The top portion of this menu
chooses the insert assigned to the section; the bottom
portion chooses the default type of EQ or Dynamics plug-in.
EQ Graph
EQ Controls
controls
Compatible plug-ins
The EQ and Dynamics sections are compatible with all of
Digital Performer’s included EQ and dynamics plug-ins:
■
MasterWorks EQ
■
ParaEQ (2-, 4-, or 8-band)
■
Dynamics
■
MasterWorks Compressor
■
MasterWorks Gate
■
MasterWorks Leveler
■
MasterWorks Limiter
Dynamics Graph
Dynamics
Controls
Figure 29: The EQ and Dynamics sections in the Mixing Board
15
NEW FEATURES IN DIGITAL PERFORMER 7.24
Selecting a plug-in
To select a plug-in for the EQ or Dynamics section when the
section is empty, choose the desired plug-in from the bottom
portion of the Select Insert/Default menu. You can also
instantiate the default (checked) plug-in by pressing the
Effect toggle button or by double-clicking the graph.
Dynamics
as
Input Gain
Ratio
(Compressor or
Expander mode only)
as
Effect
toggle
button
Select Insert
section
Default section
Figure 31: Select Insert/Default menu
Output Gain
EQ Threshold
controls
Dynamics mode
Figure 33: Dynamics controls for Dynamics plug-in
For more information, see “Dynamics” on page 880 in the
Digital Performer Users Guide.
MasterWorks Compressor
Alternatively, you can associate the EQ or Dynamics sections
with any compatible EQ or Dynamics plug-ins which are
already instantiated. Use the top portion of the Select Insert/
Default menu to choose an existing instance.
as
Input Gain
Ratio
EQ Threshold
controls
When opening projects from previous versions of Digital
Performer, the EQ and Dynamics sections will automatically
display the first compatible EQ and Dynamics plug-ins. If
you have multiple EQ or Dynamics plug-ins instantiated on a
track, use the top portion of the Select Insert/Default menu
to change which plug-in’s controls appear in the EQ or
Dynamics section, as described above.
Makeup Gain
Band selection
Figure 34: Dynamics controls for MasterWorks compressor
For more information, see “MasterWorks Compressor” on
page 887 in the Digital Performer Users Guide.
MasterWorks Gate
EQ Controls
The EQ controls display the settings for the EQ band chosen
under the Band Selection menu.
as
Input Gain
as
EQ Threshold
controls
Range
Gain
EQFrequency
controls
Q
Channel selection
(stereo only)
Band toggle
Band type/slope
EQ controls
Figure 35: Dynamics controls for MasterWorks Gate
Band selection
For more information, see “MasterWorks Gate” on page 897
in the Digital Performer Users Guide.
Figure 32: EQ controls
The controls in the EQ section work similarly when using
MasterWorks EQ or ParaEQ. For more information on each
plug-in, see “MasterWorks EQ” on page 890 and
“Parametric EQ” on page 907 in the Digital Performer Users
Guide.
MasterWorks Leveler
as
Gain Reduction
Makeup
EQ controls
Gain
Response
Dynamics Controls
The controls shown in the Dynamics section vary according
to the plug-in you have chosen.
Meter mode
Opto-coupler model
Compress/limit
Figure 36: Dynamics controls for MasterWorks Leveler
For more information, see “MasterWorks Leveler” on
page 899 in the Digital Performer Users Guide.
16
NEW FEATURES IN DIGITAL PERFORMER 7.24
MasterWorks Limiter
Pre-rendering
Showing the EQ and Dynamics sections in the Mixing Board
causes any associated plug-ins to be processed in real-time,
i.e. not pre-rendered.
as
Input Gain
Right Input Gain
(stereo only)
EQ Threshold
controls
Ceiling
Figure 37: Dynamics controls for MasterWorks Limiter
For more information, see “MasterWorks Limiter” on
page 901 in the Digital Performer Users Guide.
Graphs
The EQ and Dynamics graphs provide a visual representation of the plug-in’s settings. The graphs are customized for
each plug-in so the most relevant settings are displayed. Two
example graphs are shown below:
Hiding the EQ and Dynamics sections
The EQ and Dynamics sections can be shown or hidden by
toggling them in the Mixing Board mini-menu. The EQ
Controls, EQ Graph, Dynamics Controls, and Dynamics
Graph can all be hidden or shown independently.
V-RACK EDIT BUTTON IN MIXING BOARD
The V-Rack (V) button in the lower left corner of the Mixing
Board window toggles between the last-viewed sequence and
the last-viewed V-Rack. Option-clicking the V-Rack button
toggles the “Show V-Racks” option, discussed below.
as
as
EQEQcontrols
graph
(MasterWorks EQ)
Dynamics graph
(Dynamics plug-in)
Figure 39: The V-Rack button
Figure 38: EQ and Dynamics graphs
The graphs are for display purposes only — controls shown
in the graphs cannot be edited directly. To edit the plug-in
settings, use the EQ or Dynamics controls beneath the
graphs, or double-click a graph to open the Effects window.
17
NEW FEATURES IN DIGITAL PERFORMER 7.24
SHOW V-RACKS IN MIXING BOARD
as
V-Racks can now be displayed alongside your sequence
tracks in the Mixing Board with the “Show V-Racks” option
in the Mixing Board mini-menu.
When enabled, the V-Rack tracks will be displayed to the
right of your sequence tracks (Figure 40) and each V-Rack is
displayed as a track folder in the Mixing Board’s track
selector (Figure 41)
To hide individual tracks from the V-Racks, deselect their
name in the track selector; to hide entire V-Racks, deselect
the V-Rack’s folder by clicking on its name, or collapse the
folder by clicking its disclosure triangle.
V-Rack tracks are separated from sequence tracks by divider
lines before and after the first and last tracks in each V-Rack.
One corner is also rounded on the first and last tracks in a
sequence or V-Rack to help visually group the related tracks.
Additionally, each sequence and V-Rack has a label with its
name above their associated tracks.
Figure 41: V-Rack tracks in the Mixing Board track selector
Figure 40: V-Rack tracks alongside sequence tracks in the Mixing Board
18
NEW FEATURES IN DIGITAL PERFORMER 7.24
CHANNEL STRIP
A new information window has been added to the Studio
menu: the Channel Strip. This window shows the Mixing
Board channel strip controls for a single track. The Channel
Strip behaves like other Information windows, updating to
focus on the current track at hand.
When in two, three, or four column view, the fader defaults
to the left side of the window. To reverse the order of the
columns, deselect the “Fader on left” mini-menu item.
Additionally, similar to the Mixing Board, you can show and
hide sections of the Channel Strip via the mini-menu:
as
as
Figure 44: Showing and hiding sections in the Channel Strip window
Figure 42: The Channel Strip window
The Channel Strip can be configured (via its mini-menu) to
display in one, two, three, or four columns:
a
Locking the Channel Strip window
The Channel Strip window normally updates to follow the
selected track, but it can be “locked” to display the track of
your choice regardless of the selected track. To lock the
Channel Strip window to the track currently showing in the
Channel Strip, click the lock button beneath the track name;
click the icon again to unlock it.
Figure 45: The Channel Strip lock
This only affects the Channel Strip window; if you’re
displaying the Channel Strip in the Information Bar (see
below), it will always follow the selected track.
Figure 43: One, two, three, and four column views
Displaying the Channel Strip in the Information Bar
As with other Information windows, the Channel Strip may
be added to the Info Bar using Preferences > Information Bar.
This allows you to control a track’s fader, pan knob, effect
insert, and so on in windows that did not previously have
them available, such as the Sequence Editor. You can
configure the Channel Strip section differently in each edit
window, if desired.
19
NEW FEATURES IN DIGITAL PERFORMER 7.24
■
Track name
☛
For more information, see “Track Inspector” on
page 311 in the Digital Performer User Guide.
TWO LINE INFORMATION BAR
Figure 46: The Channel Strip in the Information Bar
The controls function in the same manner as in the Channel
Strip window, with the exception that the Inserts and Sends
sections display only one insert or send at a time. To change
which insert or send is being displayed, click the up/down
arrows in each section. A label is shown to the left of the
insert or send to indicate which is shown.
Figure 47: These controls change which insert or send is shown
Small menus
The Channel Strip has a mini-menu option to “Use Small
Menus in Info Bar”. By default, this item is unchecked and
the menus shown in the Channel Strip’s Info Bar section are
displayed at their full width.
The “Use two lines…” option in the Information Bar
preferences splits the Information Bar elements into two lines
when more than three sections are showing to give each
section more room to display its contents.
RANGE AUTOMATION MODES
Four new automation modes have been added: Range Latch,
Range Touch, Range Trim Latch, and Range Trim Touch.
The new modes behave similarly to the regular Latch, Touch,
Trim Latch, and Trim Touch automation modes, but when
recording automation using the Range modes, moving
controls will change automation data only within a defined
time range. The settings for the data on either side of the
affected time range will be preserved.
Determining a time range
To specify a time range for the range automation modes, use
one of the following methods, which are listed in order of
their priority:
1 an object or time range selection in the track
2 a time range selection in another track
3 the Memory-Cycle range
Figure 48: The Channel Strip using small menus
Configuring the Channel Strip
When configuring the Channel Strip for the Info Bar
(Channel Strip mini-menu > Configure Info Bar), not all of
the Channel Strip’s controls are shown. This is for two
reasons:
1 The EQ and Dynamics sections are not available in the
Information Bar.
2 The following controls are added to the Information Bar
by way of the Track Inspector:
■
Solo/Mute/Record/Input
■
Automation play/record-enable
■
Input/Output
Range Latch and Range Touch
With the Range Latch and Range Touch modes, the value of
the automation data within the defined time range will
become constant according to the setting of the control.
Therefore, these modes are useful for adjusting automation
data that is already flat, or for leveling a data curve that you
wish to flatten.
Range Trim Latch and Range Trim Touch
With the Range Trim latch and Range Trim Touch modes,
the current shape of the automation data curve within the
time range (if any) is preserved, and the entire curve is moved
up or down. Therefore, these two trim modes are ideal when
there is already a shape to the automation data within the
time range, and you wish to preserve that shape and simply
raise it or lower it altogether.
20
NEW FEATURES IN DIGITAL PERFORMER 7.24
Using the range automation modes
All four range automation modes are useful when mixing
groups of tracks, such as background vocals or horn
sections, within a specific time range, where you want to
jump in and change the mix just for that range without
changing it before or after.
Analog Chorus
These modes provide the following additional benefits:
■ The range automation modes allow you to use the same
control for modifying the data as you did for entering it. For
example, if you automated a plug-in filter sweep using the
knob in the plug-in window, you can use that same knob to
adjust your original sweep, without having to do by some
other means (such as editing the automation data in the
track).
■ The range automation modes allow you to make changes
to automation data without having to switch edit windows to
display the automation data. Instead, you can continue
viewing the data you are currently viewing, such as
soundbites (or automation data of another type).
NEW EFFECTS PLUG-INS
Ten new effects plug-ins have been added, providing faithful
emulations of classic effects useful for guitars, basses, and
other audio sources alike.
Channel configurations
The following shorthand is used to describe the available
channel configurations:
mono to mono
mono to stereo
mono to n-channels
M-M
M-S
M-n
stereo to stereo
stereo to n-channels
n-channels to n-channels
S-S
S-n
n-n
M-M
M-S
M-n
S-S
S-n
n-n
yes
yes
no
yes
no
no
Analog Chorus emulates the popular Boss CE™ series of
effects pedals from the early ’80s.
Rate: sets the rate of the LFO, in Hertz (Hz), between
approximately 0.2 Hz and 3.7 Hz.
Depth: sets the depth of the LFO.
Mix (mono-to-mono and stereo-to-stereo): controls the wet
signal level. In stereo-to-stereo mode, the colored “dry”
signals are passed directly to the output (L to L and R to R),
while the “wet” signals are crossed (L to R and R to L).
Mode (mono-to-stereo): selects the stereo output mode.
Mode I outputs the dry signal minus the wet signal in the left
channel and the dry signal plus the wet signal in the right
channel; mode II outputs the dry signal in the left channel
and the wet signal in the right channel.
Status light: displays the bypass state; when lit, the effect is
active.
Pedal: bypasses or enables the effect. This works the same as
the Effects window’s Bypass button.
21
NEW FEATURES IN DIGITAL PERFORMER 7.24
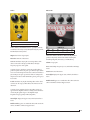
Custom ’59
M-M
M-S
M-n
S-S
S-n
n-n
yes
yes
no
yes
no
no
Custom ’59 is an amp modeling plug-in that lets you mix and
match preamp tubes and circuits on-the-fly, with complete
automation of all parameters.
Modeled amps
Custom ’59 models three renowned guitar amps: the original
Fender® Bassman®, the Marshall® JTM45® and the
Marshall® JCM800-2203®.
Fender® Bassman®
Originally designed for the Fender Precision Bass®, the
Fender Bassman amp was quickly adopted by guitarists and
eventually became perhaps the most famous and sought after
guitar amp of all time. With its classic 4x10 design (four teninch speakers) and classic lacquered tweed cover, the
Bassman sound is a bona fide icon among guitar tones and a
must-have for any tone aficionado.
Marshall® JTM45®
Introduced in the early 1960’s, the Marshall JTM45 was
essentially a clone of the Fender Bassman. Made popular by
Eric Clapton, the so-called “Bluesbreaker” amp is named
after Clapton’s band at the time, in which he popularized the
now signature sound of playing a Les Paul through the
heavily distorted JTM45. Ever since, the JTM45 has been
ensconced in the pantheon of world-famous guitar
amplifiers.
Create your own amp
Custom ’59™ lets you play an extremely accurate
reproduction of the sound of each of these three famous
amps. But you can also mix and match the preamp tube,
preamp circuit and tone stack from each model to create
your own custom amp.
Input jacks: selects the input channel and impedance.
Channel I and Channel II each have a high-Z input (1) and a
low-Z input (2).
Vol I, Vol II: volume controls for each channel.
3-band EQ: cuts or boosts for low, mid, and high frequencies.
Master: output level.
Preamp Tube: selects a tube for the input stage. This
determines headroom, first-stage gain, distortion characteristics and to some extent the frequency response of the
volume control circuits.
Preamp Circuit: selects the volume control circuit model for
the indicated amp.
Tone Stack: selects the tone control circuit model for the
indicated amp.
Marshall® JCM800-2203®
By the early ’80s, Marshall had developed the JCM800, with
higher power tubes and a power boost from 50 to 100 watts.
This amp produces perhaps the most widely recognized
guitar tones of all time.
22
NEW FEATURES IN DIGITAL PERFORMER 7.24
D Plus
Delta Fuzz
M-M
M-S
M-n
S-S
S-n
n-n
yes
yes
no
yes
no
no
D Plus emulates the MXR Distortion+™ pedal; its crunchy
sound has been widely used by Randy Rhoads, Jerry Garcia,
Bob Mould, and many others.
Output: level of the output signal.
Distortion: amount of distortion.
Source Z: simulates varying the source impedance of the
device connected to the input, which affects the highfrequency response of the pedal.
A setting of zero is similar to connecting a well-buffered
pedal or a guitar with active pick-ups to D Plus’s input. When
Source Z is in the range between about 3 and 5, it simulates a
guitar with passive pick-ups at full volume. A setting in the
range between about 6 and 10 simulates passive pick-ups at a
lower value.
Load Z: simulates varying the load impedance of the device
M-M
M-S
M-n
S-S
S-n
n-n
yes
yes
no
yes
no
no
Delta Fuzz emulates the Electro-Harmonix Big Muff π™
pedal, used by many ’80s and ’90s bands including the
Smashing Pumpkins, Dinosaur Jr., and Mudhoney.
Volume: output gain.
Tone: variable high-frequency boost, with shallow midrange
notch.
Sustain: amount of distortion.
Status light: displays the bypass state; when lit, the effect is
active.
Enable switch: bypasses or enables the effect. This works the
same as the Effects window’s Bypass button.
connected to the output, which affects the character of the
distortion.
A setting of zero simulates the low-impedance input of a
typical combo amplifier, whereas a setting of 10 is similar to
connecting the pedal output to an amplifier’s high
impedance input, typically 1 MΩ (megaohm).
Status light: displays the bypass state; when lit, the effect is
active.
Enable switch: bypasses or enables the effect. This works the
same as the Effects window’s Bypass button.
23
NEW FEATURES IN DIGITAL PERFORMER 7.24
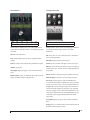
Diamond Drive
Intelligent Noise Gate
M-M
M-S
M-n
S-S
S-n
n-n
M-M
M-S
M-n
S-S
S-n
n-n
yes
yes
no
yes
no
no
yes
yes
no
yes
no
no
Diamond Drive emulates the Voodoo Lab Sparkle Drive™
pedal, which is itself an Ibanez TS9™ clone with a dirty/clean
crossfader.
Intelligent Noise Gate is a noise gate designed specifically for
recording instruments that are prone to AC mains
interference.
Gain: amount of distortion.
☛
Tone: variable high-frequency roll-off, with peak at high
In the stereo-to-stereo variant, the stereo channels are
processed independently.
settings.
Threshold: trigger level that opens the gate.
Clean: crossfades between distorted signal and clean signal.
Attack: rise time constant of the gate, in microseconds (µs).
Volume: output gain.
Hold: amount of time the gate will stay open once triggered,
in milliseconds (ms). Decrease if noise overhanging the note
is a problem.
Status light: displays the bypass state; when lit, the effect is
active.
Release: fall time constant of the gate, in milliseconds (ms).
Enable switch: bypasses or enables the effect. This works the
same as the Effects window’s Bypass button.
Mains Frequency: tune this to your national power grid.
Noise Type: sets the plug-in to gate the dominant noise
source in the input signal. AC interference noise is generally
caused by one of two sources: “hum” is generated inside an
amplifier that uses AC-heated pre-amp tubes, and “buzz” is
caused by unstable voltages produced by poorly-regulated
DC power supplies such as “wall wart” transformers for old
stomp boxes. In North America, the fundamental frequency
of the hum or buzz is approximately 60 Hz and 120 Hz,
respectively.
Status light: displays the bypass state; when lit, the effect is
active.
Pedal: bypasses or enables the effect. This works the same as
the Effects window’s Bypass button.
24
NEW FEATURES IN DIGITAL PERFORMER 7.24
Mic: selects the microphone type and position. Channels 1
Live Room G
M-M
M-S
M-n
S-S
S-n
n-n
yes
yes
no
yes
no
no
Live Room G models a loudspeaker cabinet in a physical
space.
Live Room G requires a library file containing data about
these physical models. This file is placed by the Digital
Performer installer here:
and 2 can be set to one of five options: On Axis, Off Axis,
Near, Rear, or Far Omni. Channels 3 and 4 can be set to one
of four options: XY, ORTF, Blumlein, or Wide Omni.
Pre-delay: advances or delays the signal to compensate for
the time it takes for a signal to reach a microphone.
3-band EQ: cuts or boosts up to 15 dB for low, mid, and high
frequencies.
/Library/Application Support/MOTU/LiveRoomG/
LiveRoomG Data.bundle
Pan (channels 1 and 2, stereo only): controls the placement
Controls
Blend (channels 3 and 4, mono only): controls the width of
Cabinet Drive: amount of distortion provided by the cabinet.
the stereo signal.
Output Gain: output level.
of the mono source in the stereo output signal.
Width (channels 3 and 4, stereo only): controls the width of
the stereo signal.
Cab: selects the cabinet model. See “Cabinet models” on
page 26.
Solo and Mute: soloes or mutes the channel.
Damping: controls the high-frequency roll-off of the room,
similar to hanging curtains or setting up gobos.
Fader: output gain.
Display area: graphical representation of the cabinet
selection, mic types, and mic positions.This is for display
purposes only; the graphic cannot be edited directly.
Microphone mixer
There are four microphone channels, two mono (channels 1
and 2) and one stereo (channels 3 and 4), each with its own
set of the following controls:
Side chain outputs
Live Room G provides a side chain output for each of its four
channels. The side chain output signals are split before Live
Room G’s EQ, solo/mute, pan, fader, and output gain
controls. This enables you to take advantage of Digital
Performer’s full mixing environment for each microphone
channel, including plug-ins and automation.
25
NEW FEATURES IN DIGITAL PERFORMER 7.24
These side chain outputs are configured in the same manner
as multiple outputs from a virtual instrument — see
“Multiple audio outputs” on page 279 in the Digital
Performer User Guide.
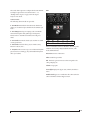
RXT
Cabinet models
The following cabinet models are provided:
■ 4x12 Modern: Intended for ultra-distorted chunks and
sludge, yet versatile enough to handle smooth Santana-style
leads.
■
4x12 Vintage: Based upon an aging, road-worn British
monster held together with gaffer’s tape and AquaNet.
Perfect for those ’80s hair-band tributes and ’70s protometal.
■
2x12 Combo: For Muscle Shoals-style southern-rock and
country guitar tones.
■
M-M
M-S
M-n
S-S
S-n
n-n
yes
yes
no
yes
no
no
4x10 Combo: Tuned for blues, jazz, rock and country.
Based on a classic, man …
■ 1x8 Junior: This one was set up to record distorted rhythm
guitar tones for rock and pop. If you like Eddie Money then
this is your cabinet.
RXT is an emulation of ProCo’s The Rat™ distortion pedal,
which has been used by many bands like Nirvana, Sonic
Youth, and Radiohead.
Distortion: amount of distortion.
Filter: variable lowpass filter.
☛
This knob operates in reverse when compared to the
other pedal plug-ins.
Volume: output gain.
Status light: displays the bypass state; when lit, the effect is
active.
Enable switch: bypasses or enables the effect. This works the
same as the Effects window’s Bypass button.
26
NEW FEATURES IN DIGITAL PERFORMER 7.24
Tube Wailer
Über Tube
M-M
M-S
M-n
S-S
S-n
n-n
M-M
M-S
M-n
S-S
S-n
n-n
yes
yes
no
yes
no
no
yes
yes
no
yes
no
no
Tube Wailer is an emulation of the venerated Ibanez TS-9
Tube Screamer™ overdrive pedal.
Über Tube is an emulation of the Ibanez Super Tube™
overdrive pedal, a close but rare cousin of the Ibanez Tube
Screamer™.
Drive: amount of distortion.
Drive: amount of distortion.
Tone: variable high-frequency roll-off, with upper midrange
peak at high settings.
Bite: variable frequency mid-boost, like a “parked wah”
mixed with the signal.
Level: output gain.
Level: output gain.
Diodes: simulates replacing the stock silicon clipper diodes
with germanium diodes. This reduces distortion level but
extends bandwidth.
Bright: variable high-frequency roll-off, with upper
Status light: displays the bypass state; when lit, the effect is
Diodes: simulates replacing the stock silicon clipper diodes
with germanium diodes. This reduces distortion level but
extends bandwidth.
active.
midrange peak at high settings.
Pedal: bypasses or enables the effect. This works the same as
the Effects window’s Bypass button.
Status light: displays the bypass state; when lit, the effect is
active.
Pedal: bypasses or enables the effect. This works the same as
the Effects window’s Bypass button.
27
NEW FEATURES IN DIGITAL PERFORMER 7.24
Voicing: selects the frequency response model. “V846”
Wah Pedal
represents a vintage ‘70s Vox 846™, “WhineBaby” a modern
Dunlop CryBaby™.
Sweep Mode (stereo only): chooses which channels are in
phase with the effect: left, right or both. For the out-of-phase
channel, the pedal position is inverted after applying the
sweep range modifications but before the sweep curvature is
applied to simulate playing an identical pedal that is “turned
around.”
Sweep Control: selects whether automation ramp data or
MIDI continuous controller (CC) messages should be used
to automate the pedal position and effect bypass.
When MIDI is chosen, any ramp data in the track is
overridden, and the pedal position knob and pedal graphic
do not affect the pedal position value.
Pedal CC: selects the MIDI continuous controller (CC)
number assigned to the pedal.
Bypass CC: selects the MIDI continuous controller (CC)
M-M
M-S
M-n
S-S
S-n
n-n
yes
yes
no
yes
no
no
The Wah Pedal plug-in simulates “wah-wah” pedals used by
guitarists, bassists and keyboard players.
Pedal Position: the position of the rocker pedal in percent of
forward sweep. This can be adjusted with the Pedal Position
knob, or by clicking the rocker pedal and dragging up or
down.
Sweep Start: the starting position of the pedal relative to the
full range of the pedal’s sweep.
Sweep Range: specifies the sweep range as a percent of the
distance from the sweep starting position to the end
position.
Sweep Exponent: defines the curvature of the sweep
response over the sweep range. This greatly affects the “feel”
of the pedal. Most wah pedals use a negative exponent.
Character: controls the relative amount of distortion, with
zero being perfectly linear. Classic wah-wah pedals are
discrete designs that use feedback, but the simplicity of the
circuit allows some weak low-order harmonic distortion to
find its way to the output.
number assigned the bypass switch. Values 63 and higher
will bypass the effect.
AUDIO UNIT INSTRUMENT SIDECHAIN INPUTS
Sidechain inputs are now supported on Audio Unit (AU)
virtual instrument plug-ins as well as MAS instrument plugins.
WAVE64
The Wave64 extension to the Broadcast WAVE file format
allows for audio files larger than 4 GB. If you anticipate
creating audio files larger than 4 GB, choose the Broadcast
WAVE file format.
☛
How quickly you create a 4 GB file depends on the
channelization, sample rate, and sample format. When
recording as an interleaved stereo 16 bit 44.1 kHz file, it takes
about 6.7 hours to create a 4 GB file, but only about 7 minutes
when recording as an interleaved 10.2 surround 32 bit
floating point 192 kHz file.
When using Broadcast WAVE, if a file will be smaller than
4 GB at the end of an audio recording pass, the resulting file
will be a regular Broadcast WAVE file. If the resulting file will
be larger than 4 GB, it will use the industry standard Wave64
extension to the Broadcast WAVE file format.
28
NEW FEATURES IN DIGITAL PERFORMER 7.24
REALTIME FADES
QUICKSCRIBE: LYRICS
In previous versions of Digital Performer, audio fades and
crossfades were created as audio files and placed in the
project’s Fades folder. In Digital Performer 7.0 and later,
fades and crossfades are calculated in realtime and do not
generate any additional files on disk. Fades are applied nondestructively, just as with volume automation or realtime
effect inserts.
Lyrics can now be added to your score in the QuickScribe
Editor.
Projects from Digital Performer version 6.02 and earlier may
have a Fades Folder. If the project is opened in DP 7.0 or later,
the fades will be calculated in realtime and the unused fade
files will be deleted. When exporting a project for any version
of Digital Performer prior to version 7.0, a Fades folder will
be created automatically if needed.
IMPROVED SAMPLE RATE CONVERSION
Digital Performer now uses a new sample rate conversion
algorithm which provides increased precision, efficiency,
and transparency, with a 138 dB signal-to-noise ratio.
Figure 50: Lyrics in the QuickScribe Editor
The Quality options found in the Audio File Conversion
dialog (Figure 49) in previous versions of Digital Performer
are no longer needed — the same efficient, high quality
conversion is always used.
Entering lyrics for a single track
To enter lyrics for a single track, choose the Lyric Text tool in
the QuickScribe tool palette (
) then click on or below the
desired note. Alternatively, assign a keyboard shortcut to the
Enter Lyric command (Setup menu> Commands) and press
the keyboard shortcut to enter a lyric below the selected note
(or, if there is no selection, below the note nearest to the
playback wiper).
An empty lyric text box will appear, ready for you to type in:
Figure 51: An empty lyric text box
Figure 49: The Audio File Conversion dialog
Type a single word or syllable in the empty box. To advance
the edit box to the next note, press the spacebar to start a new
word, a dash ( - ) to enter another syllable in the current
word, or an underscore ( _ ) to extend the current word or
syllable to the next note. (Note, however, that you don’t have
to add underscores for a syllable that extends across tied
notes — underscores are added automatically beneath tied
notes when you hit the space bar to go to the next non-tied
note.)
To dismiss the lyric text box, press Enter or Return to
confirm, or Escape to cancel.
29
NEW FEATURES IN DIGITAL PERFORMER 7.24
Entering lyrics shared by multiple tracks
Lyrics can be associated with two or more tracks. For
example, in a SATB choral score (Soprano, Alto, Tenor and
Bass), you might have lyrics that are shared among the Tenor
and Bass parts (tracks) for a portion of the score, or perhaps
shared by all four parts. You can freely choose which parts
the lyrics are associated with, at any time. For example, the
four SATB parts might have individual lyrics for some
sections of the score and shared lyrics for other sections of
the score. You have complete control over which parts
(tracks) the lyrics are associated with.
you already have lyric text from another source (such as a
word processor or email) and would like to add them to your
score all at once using the Auto Flow command.
If you wish to associate lyrics for multiple tracks when first
entering the text, simply select a note in each track at the
location where you want the shared lyric text to begin, and
then either click with the Lyric Text tool or press the Enter
Lyric command keyboard shortcut, as usual. An empty lyric
text box will appear, but its vertical position below (or
between) the shared staves will be governed by the Lyrics
Preferences. See “Lyrics placement” on page 32.
Working with shared lyrics
Lyric text that is shared among several staves, will appear
with each staff that it is linked with, whether the staff is
displayed by itself or together with shared tracks.
If you have existing lyric text on the page, and you would like
to see which tracks it is linked with, click the lyric text box
with the Arrow cursor to select it and choose Text menu>
Display> On These Parts Only. Tracks with check marks next
to their names are linked to the lyric. Choose any track from
this sub-menu to toggle its checked/unchecked status. Doing
so will link/unlink the track to the lyric text, respectively.
You can freely assign and unassign lyric text to any track or
tracks using the On These Parts Only sub-menu as explained
above.
Editing lyric text
To edit existing lyric text, double-click the lyric. While the
lyric text box is pop-edited, you can press Tab or Shift-Tab to
advance to the next/previous lyric. Tabbing will go to the
next or previous lyric that is linked with that same track or
tracks. Be sure to keep this in mind when you are working on
a section of a score that has lyrics linked to different tracks, as
tabbing may not necessarily jump to the very next, adjacent
lyric text box if it is not linked to the same track(s) as the
current text box.
The Lyrics window
The Lyrics window (Project menu) allows you to enter and
edit lyrics into your score via a conventional text editor
environment. The Lyrics window is particularly useful when
Figure 52: The Lyrics window
Auto Flowing lyrics
Follow these steps to Auto Flow lyrics into your score:
1 Open the Lyrics window and type or paste text.
2 Format the text so that it will flow properly onto the
QuickScribe page, using spaces, dashes, and underscores as
described in “Entering lyrics for a single track”, above.
3 Select the portion of the text in the Lyrics window that you
want to flow onto the QuickScribe page.
If you place the insert cursor anywhere in the Lyrics window,
only the text after the insert cursor will be flowed. If you
make a selection in the Lyrics window, only the selected text
will be flowed. If you wish to flow all of the text in the Lyrics
window, either place the insert cursor at the very top of the
window, or select all the text in the window.
4 Select the track(s) that you want to associate with the
flowed lyrics.
If you don’t make a track selection, then the lyrics will flow
into the first visible track in the score, beginning at the first
note at or after the playback wiper location. If you select a
note in a track, the lyric will flow over the notes in that track
only, beginning at the selected note. If you select notes in
multiple tracks, the lyric will be “shared” by all of those
tracks, and will flow over the combined notes in all of the
selected tracks. See “Lyrics preferences” below for settings
that control how lyrics are displayed for multiple tracks.
30
NEW FEATURES IN DIGITAL PERFORMER 7.24
5 Click on the Auto Flow button to flow the selected lyric
text into the selected tracks.
Reflowing text after making edits
The Lyrics window is not dynamically linked to the text in
the QuickScribe score. Therefore, if you make changes in the
Lyrics window, you will need to reflow the text afterwards to
update the QuickScribe score. Remember, you can reflow
just a portion of the lyrics by selecting just the edited text in
the Lyrics window and then selecting the note in the score
where you want it to reflow.
Erasing lyrics
To erase lyrics, use the Arrow tool to select the desired lyrics
in the QuickScribe window and press the Delete key or
choose Erase from the Edit menu.
To quickly erase a large section of lyrics, select a note in the
part(s) whose lyrics you want to erase and press the Erase in
Track button in the Lyrics window. This will erase all lyrics in
the selected part(s) after the selected note.
Copying and pasting lyrics
Lyrics are not MIDI events; rather, they are a special kind of
QuickScribe page text. Therefore, they will not copy along
with notes if you cut and paste sections of the notes
themselves. You can, however, easily recapture the lyrics
from the copied section to the Lyrics window and then reflow them into the QuickScribe score at the pasted location;
see “Recapturing lyrics from the score into the Lyrics
window”, below.
The text from each text object will appear on a line by itself in
the Lyrics window, and all instances of two or more spaces
will be reduced to a single space.
Once all of the page text is in the Lyrics window, you can edit
it to add syllable breaks and extensions. Delete the old page
text from the score and use the Auto Flow process to flow all
of the text back onto the score as lyric text.
Recapturing lyrics from the score into the Lyrics window
The Lyrics window is not dynamically linked to the text in
the QuickScribe score. Therefore, if you add new lyrics
directly to the QuickScribe score or make edits directly on
the score, these changes will not be automatically reflected in
the Lyrics window. To update the Lyrics window text, you
must recapture the lyrics from the score.
If you would like to send lyric text from the score to the Lyrics
window, choose Capture Lyric Text from the Lyrics window
mini-menu. This captures the lyric text for the tracks shown
in the QuickScribe score; if there is a selection, only the lyrics
in that time range will be captured.
To capture all text from the score (excluding date/time and
page numbers), use the Capture All Text command.
Lyrics preferences
The Preferences window (Digital Performer menu) has a
Lyrics pane to specify the default text style, placement, and
syllable extension behavior of lyrics.
Hiding lyrics
To temporarily hide lyrics, deselect “Show Lyrics” in the
QuickScribe mini-menu.
Lyrics in an arranged score
You can enter lyrics into a linear score and then arrange it.
Once arranged, lyrics for verses will automatically stack on
top of each other in verse sections. You can also arrange the
score first, and then Auto Flow into the arranged score. In
that case, the Auto Flow algorithm still flows the lyrics into
each linear measure in turn, stacking the lyrics as needed in
each pass through the repeated sections.
Converting regular page text into lyrics
If you have projects containing regular page text that you
would like to convert to lyric text, the Capture Non-Lyric Text
command (Lyrics window mini-menu) pulls the text from
page text objects in the score (excluding date/time and page
numbers) and puts the resulting text into the Lyrics window.
Figure 53: Lyrics preferences
Lyric text style
Options are provided to specify the font, size, and style of
lyric text in the Lyrics window and on the QuickScribe page.
31
NEW FEATURES IN DIGITAL PERFORMER 7.24
Lyrics placement
Various options specify the placement of lyric text on the
QuickScribe page.
Type the desired chord symbol in the empty box. The first
character, the root note, must be a letter A–G ; after that, you
may use any of the following symbols:
☛
Symbol
When specifying a vertical offset between two staves or
tracks, the offset is the distance beneath the top staff or track.
Syllable extensions
By default, syllables are extended by underlining, but you can
alternatively put a dash under each note.
Apply To Score
The Apply To Score button applies changes made in the Lyrics
preferences to the current project’s QuickScribe score.
Description
What to type
sharp
pound sign ( # )
flat
B
minor sign
hyphen (-)
°
diminished symbol
Shift-Option-8
ø
half diminished symbol
Option-O
Δ
major 7th triangle
Option-J
6/9 chord suffix
6/9
diagonal slash for hybrid chord,
inversion, or altered bass
slash ( / )
horizontal slash for a poly chord
underline ( _ )
any other text
the text itself
QUICKSCRIBE: CHORD SYMBOLS
Chord symbols can now be added to your score in the
QuickScribe Editor. Chord symbols are MIDI track events,
and can be transposed along with MIDI notes.
Entering chord symbols
To enter a chord symbol, choose the Chord Symbol tool in
the QuickScribe tool palette (
) and click on or above the
desired note. Alternatively, assign a keyboard shortcut to the
Enter Chord Symbol command (Setup menu> Commands)
and press the keyboard shortcut to enter a chord symbol
above the selected note (or if there is no selection, above the
playback wiper).
An empty chord symbol edit box will appear, ready for you
to type in the symbol:
Figure 54: An empty chord symbol edit box
For chord suffixes, type the opening character, the desired
suffix, then the closing character. Use these opening and
closing characters:
Symbol
Description
What to type
stacked suffix with parentheses
Left parenthesis,
Right parenthesis
stacked suffix with braces
Left Braces ( { ),
Right Braces ( } )
stacked suffix with brackets
Left Bracket ( [ ),
Right Bracket ( ] )
stacked suffix with no braces or
brackets
Option-Backslash ( « ),
Shift-Option-Backslash
( »)
For example, to create this chord symbol:
…type “C7(#9b13)”.
After typing a chord symbol, press Enter or Return to
confirm.
To enter additional chord symbols, press Tab or Shift-Tab to
advance to the next/previous metric position in the measure
(as determined by the “Tab key advances” preference
explained below) or Option-Tab or Shift-Option-Tab to
jump to the next/previous measure. If a chord symbol
already exists at or before the next position that you will Tab
or Shift-Tab to, the chord symbol will be pop-edited for
editing.
32
NEW FEATURES IN DIGITAL PERFORMER 7.24
Transposing chord symbols
Chord Symbols are transposable along with other MIDI
data. Select the desired chord symbols, with or without a
MIDI note selection, and choose Region menu > Transpose.
Select the “Transpose chord symbols” checkbox, choose the
desired transpose options, and Apply.
Chord symbols in the Event List
Chord symbols are also displayed in the Event List. This is for
display purposes only — chord symbols cannot be edited in
the Event List. To edit chord symbols, use the QuickScribe
Editor.
■
To the next note
Setting preferences from existing chord symbol
The Commands window (Setup menu) includes a Use Chord
Symbol Settings as Prefs command. If you select a chord
symbol and invoke this command, the font, size, style and
vertical offset settings for the selected chord symbol are
copied into the Chord Symbol preferences for use by all new
chord symbols.
☛
This command is available only when you have a single
chord symbol selected.
Setting preferences on-the-fly
Hold down the Control key while dragging a chord symbol
to set the resulting vertical offset of the chord symbol in the
Chord Symbol preferences, which will be used by all new
chord symbols.
QUICKSCRIBE: OTHER ENHANCEMENTS
Various enhancements have been made to operations in the
QuickScribe Editor:
Figure 55: Chord symbol in the Event List
Hiding chord symbols
To temporarily hide chord symbols, deselect “Chord
Symbols” in the View Filter (Setup menu).
Chord symbols preferences
The Preferences window (Digital Performer menu) has a
Chord Symbols pane to specify the default text style and
tabbing behavior.
■ All page text, including chord symbols, can now be
horizontally or vertically constrained while dragging by
holding the Shift key.
■ You can now use the arrow keys to nudge all selected page
text up, down, left, or right.
You can now select multiple page text objects and drag,
nudge, or delete them all at once, or change their text
attributes using the Text menu.
■
■ The Text menu now puts a checkmark next to an attribute
only if all selected page text objects have that same setting.
For example, if one selected page text object is 10 pt and
another 12 pt, nothing will be checked in the Text menu >
Size submenu.
Figure 56: Chord symbol preferences
You can now associate a page text object with more than
one track so that it will appear on the QuickScribe page when
any of its associated tracks are visible. The track association
is controlled by a submenu of track choices under Text menu
> Display > On These Parts Only, where you can choose as
many tracks as you wish.
Text style
These options specify the default font, size, style, and vertical
positioning of chord symbols.
■ Dynamics Symbols now have a separate option in the View
Filter, so they no longer disappear when you filter out System
exclusive (SysEx) data.
■
Tab key advances
The options for Tab are to advance in one of three ways:
■
To the next beat or the next note, whichever comes first
■
To the next beat
■ The View Filter now has options for Normal, Display-only
and Playback-only notes. These View Filter options make it
possible to edit Display-only and Playback-only notes in
other edit windows besides the QuickScribe Editor, such as
the Graphic Editor and Event List.
33
NEW FEATURES IN DIGITAL PERFORMER 7.24
■ The Measure Spacing dialog now updates the QuickScribe
page in realtime as you drag the slider.
MERGE SOUNDBITES ENHANCEMENT
When there is a time range selection that extends beyond the
selected soundbite(s), the Merge Soundbites command
(Audio menu) now extends the beginning and end of the
resulting soundbite to the entire selection range.
You can also type in the pop-edited field. As you type, the
drop-down menu will narrow the list to show only the
markers containing the character(s) that you’ve typed. In the
example shown in Figure 59, typing “ver” would narrow the
list to Pre-Verse 1, Verse 1, and Verse 2, while typing “2”
would narrow the list to Verse 2 and Chorus 2. The up/down
arrow keys can be used to navigate the list.
RESIZABLE COUNTER WINDOW
IMPROVED PHRASE PARSING IN TRACKS OVERVIEW
Phrase parsing in the Tracks Overview has been improved.
In most cases Digital Performer will automatically and
intelligently creates phrases of data of the most appropriate
length, but phrase parsing can be further customized with a
new setting in the Tracks Overview preference: Break phrases
longer than _ measures into _ measure phrases.
The Counter window (Studio menu) is now freely resizable,
and the text size scales along with the window size. At larger
sizes, the Counter window is easily visible from across the
studio or across the stage.
COPY & PASTE COUNTER VALUES
Counter values can now be copied and pasted to easily move
time values from one field to another. This works in nearly
any field where a counter value is displayed: the main
counter, aux counter, Information Bar, and so on.
1 Click in any counter field so that it becomes pop-edited.
2 Press Command-C or choose Edit menu > Copy.
Figure 57: Phrase Settings preferences
This setting is used to optionally break long phrases into
smaller phrases. You can specify one to eight measures for
either field in this setting.
3 Click in the main or aux counter field to highlight it.
MARKER COUNTER
COUNTER ROUND ON ENTRY
4 Press Command-V or choose Edit menu > Paste.
By default, the Counter’s “Round on Entry” option, found
under the Time Format menu (Figure 60), is enabled and
edits to larger time fields will clear smaller time fields. When
the “Round on Entry” is disabled, smaller time fields are
preserved when editing larger fields.
Figure 58: The Markers counter
The Markers counter type displays the most recent marker in
the counter. This counter type can be used in either counter
in the Control Panel, or the Counter window.
as
The Markers counter can also be used to locate to a marker.
Click on the marker name to pop-edit the field and display a
drop-down menu, then choose a marker by clicking on it or
pressing Return or Enter to choose the highlighted marker.
Figure 60: The “Round on Entry” option
For example, locate to 3|2|017, then select the counter’s bars
field and drag it upward. With “Round on Entry” enabled,
the counter value will become 4|1|000, 5|1|000, 6|1|000, and
so on.; with “Round on Entry” disabled, the counter value
will become 4|2|017, 5|2|017, 6|2|017, and so on.
Figure 59: The Markers counter, pop-edited
34
NEW FEATURES IN DIGITAL PERFORMER 7.24
©2011 MOTU, INC.