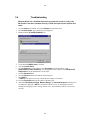
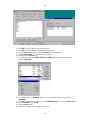
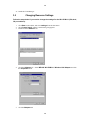
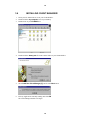
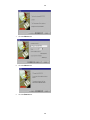
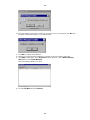
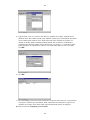
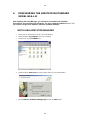
1
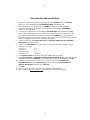
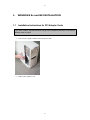
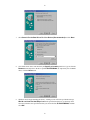
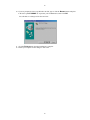
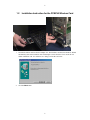
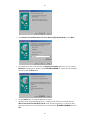
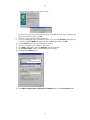
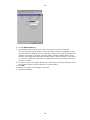
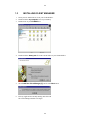
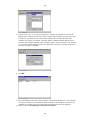
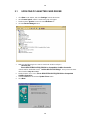
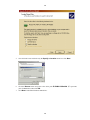
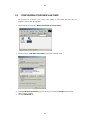
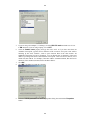
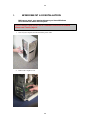
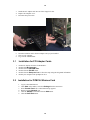
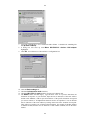
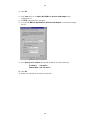
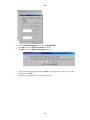
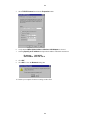
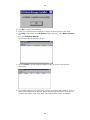
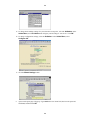
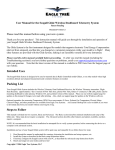
BUFFALO TECHNOLOGY AIR STATION
INSTALLATION GUIDES
Address:
4030 W. Braker Ln.
Suite 350
Austin, TX. 78759
Website:
www.buffalotech.com
Email:
Sales - [email protected]
Technical Support - [email protected]
Phone:
Sales Tel - 512-794-8533
Sales Tel - 800-688-7466
Sales Fax - 512-794-8520
Tech Support Line - 800.934.2471
1
TABLE OF CONTENTS
SECTION
Page
OVERVIEW FOR ADVANCED USERS…………….…………………………………….…….2
1.
WINDOWS 9x and ME INSTALLATION………………………………………….……….…..3
1.1
Installation Instructions for PCI-Adapter card.………………………..……..……….3
1.2
Installation Instructions for PMCIA wireless Card.…….……………….……………7
1.3
Installation Instructions for Client Manager………..………………………….. ……11
2.
WINDOWS 2000 INSTALLATION………………………………………………………. . …..15
2.1
Updating the PCI-Adapter card driver……….………………………………… …….16
2.2
Installation Instructions for PMCIA card.………….……….…………...………...….18
2.3
Configuring Your New Lan card………………….……………………………….. ….21
2.4
Installation Instructions for Client Manager……….………………..….……………..25
3.
WINDOWS NT INSTALLATION….………………………………………………………..….29
3.1
Installation Instructions for PCI-Adapter card…………………………………..…..30
3.2
Installation Instructions for PMCIA wireless card……………….……….………….30
3.3
Installing the ESS-ID settings driver………..……………………………….……….. 33
3.4
Troubleshooting………………………..…………………………………..……….…...34
3.5
Changing Resource Settings…………….…………………………….………….....….36
3.6
Installation Instructions for Client Manager……….………………….………….…..38
4.
CONFIGURING THE AIRSTATION STANDARD MODEL WLA-L11………………....…42
5.
CONFIGURING THE AIRSTATION ROUTER MODEL WLAR-L11………….…… …..46
5.1
Changing TCP-IP settings in Windows 9x or me…..……………………..……....…46
5.2
Changing TCP-IP settings in Windows 2000….……………………………..………49
5.3
Changing TCP-IP settings in Windows NT 4.0….....……………………….….……51
5.4
Installation Instructions for AirStation Manager…………...……………….….…..53
6.
CONFIGURING THE AIRSTATION LOCAL ROUTER MODEL WLAR-L11-L…..……..58
6.1
Changing TCP-IP settings in Windows 9x or me...………………………..…………58
6.2
Changing TCP-IP settings in Windows 2000….…….………………………..………61
6.3
Changing TCP-IP settings in Windows NT 4.0......….……………………….………63
6.4
Installation Instructions for AirStation Manager…….…………….………………..65
6.5
Instructions for PPTP setup…..…………………..….………………………………..69
6.6
Instructions for PPPoE setup……………………..….………………………………..71
6.7
Glossary of Terms used in PPPoE settings…….………….…...……………….……..73
7.
CONFIGURING THE AIRSTATION ANALOG MODEM MODEL WLAR-L11-M……....74
8.
APPLE INSTALLATION………………..………….……………………….….…….….……….76
1
2
Overview for Advanced Users
1.
2.
3.
4.
5.
6.
7.
8.
9.
10.
11.
12.
13.
Upgrade or install the PCI adapter (for desktops) driver to “Buffalo” from the “\PCIOP”
directory on your CD-ROM. Run “\PCIOP\SETUP.EXE” for Windows NT
Install the PCMCIA card drivers from the “\PCML11” directory on your CD-ROM .
Install the ESS-ID driver for Windows NT and Windows 2000 from the “\ESSIDDRV”
directory on your CD-ROM.
Connect to the Airstation Access Point through Client Manager with the ESS-ID of “any”
under 11mbps communication over Airstation. You can also use the last six characters of the
MAC address (on the back of the AirStation) with the word “GROUP” e.g. 8A909GROUP
Install the TCP/IP protocol on your Computer if it has not yet been installed and assign a static IP
address accordingly to connect to the Airstation Accesspoint
Activate your browser and disable the proxy or add the IP address of the Airstation
Accesspoint into the exceptions.
Connect to the Web Admin screen through the browser with the default IP address of your
Airstation Accesspoint.
- WLA-L11
1.1.1.1
- WLAR-L11
1.1.1.1
- WLAR-L11-M
1.1.1.1
- WLAR-L11-L
192.168.0.1
Click Custom setup and input the User Name “root” with no password.
Under Basic Setting use Automatic IP Assignment by DHCP Server if your ISP provided
a Dynamic address or use MANUAL if your ISP provided a Static address and then click Set
In order to set the Airstation Accesspoint to be a DHCP Server click Automatic IP
Assignment Setup under Custom setup on the left and select Use Automatic IP
Address Assignment, otherwise select Not Use
Click Set
Please use the setup guide or manual for any additional setup information
Visit our website at www.buffalotech.com for latest driver and firmware updates
2
3
1.
WINDOWS 9x and ME INSTALLATION
1.1
Installation Instructions for PCI Adapter Cards
If you have a laptop, skip this instruction and go to the Installation Instruction for the PMCIA
Wireless Card on page 6
1.
Turn off your computer and disconnect the power cable.
2.
Remove the computer cover.
3
4
3.
4.
5.
Install the PCI Adapter card into one of the empty PCI slots.
Replace the computer cover.
Turn on your computer.
The Windows 98 Add New Hardware Wizard automatically detects the PCI-Adapter card and
attempts to locate the driver media provided by the manufacturer. Insert the AirStation
installation CD. You will see a dialog box like the one below.
6.
Click the Next Button.
4
5
7.
Select Search For the Best Driver For Your Device (Recommended) and click Next.
8.
Clear all the check boxes and check only the Specify a Location check box. Type or click the
Browse button and point to the driver path: E:\PCIOP\WIN98. (E: represents your CD-ROM
drive). Click the Next button.
9.
Windows 98 will begin installing the drivers. A dialog screen will come up with the message
Win 98 could not find the WLIpci.vxd. In the specified location box, use the drop down
arrow and select the same specified location you selected before (E:\PCIOP\WIN98) and then
Click OK.
5
6
10. If you are prompted to insert your Windows 98 disk, type or click the Browse button and point
to the driver path: E:\WIN98. (E: represents your CD-ROM drive) then Click OK.
You will then see a dialog box like the one below.
11. Click the Finish Button when the installation is complete.
12. Restart your computer for the changes to take effect.
6
7
1.2
Installation Instruction for the PCMCIA Wireless Card
1.
Insert the PCMCIA card into the PCI adapter slot. The Windows 98 Add New Hardware Wizard
automatically detects the PCMCIA card and attempts to locate the driver for it. Insert the Air
Station installation CD. You will then see a dialog box like the one below.
2.
Click the Next button.
7
8
3.
Select Search For the Best Driver For Your Device (Recommended) and click Next
4.
Clear all the check boxes and check only the Specify a Location check box. Type or click the
Browse button and point to the driver path: E:\PCML11\WIN98. (E: represents your CD-ROM
drive) then click the Next button.
5.
6.
Click the Next button to install the Windows 98 drivers.
Windows 98 will begin installing the drivers. A dialog screen will come up with the message
Win 98 could not find the WLI11ins.dll. In the specified location box, use the drop down
arrow and select the same specified location you selected before (E:\PCML11\WIN98) then click
OK.
8
9
You will then see a dialog box like the one below.
7.
8.
9.
10.
11.
12.
13.
14.
If you are using the WLI-PCI-OP together (desktop), click Yes. If your system is a laptop or you
use the WLI-ISA-OP together, click No.
Windows 98 will complete installing the Drivers.
If you are prompted to insert your Windows 98 disk, type or click the Browse button and point
to the driver path: E:\WIN98. (E: represents your CD-ROM drive) then click OK.
Click the Finish button when the installation is complete.
Restart your computer for the changes to take effect.
Click Start on the taskbar, and select Settings from the Start menu
Select Control panel, and the Control Panel group will appear
Double-click the Network Icon.
15. Select MELCO WLI-PCM-L11 Wireless LAN Adapter and Click the Properties button
9
10
16. Click the Basic Setting tab.
17. In the ESS ID Textbox, type the word “ANY” or if you have more than one Airstation
Accesspoint, input the last six characters of the MAC address and the word “GROUP”, with no
space between them. The Media Access Control (MAC) address can be found on the back of the
Airstation Accesspoint. For example, if the Mac Address is 004026 8A9090, then the last six
characters of this number (8A9090) will be the MAC address. Please note that it is case sensitive,
i.e. it must have capital letters where there are capital letters, and lower case letters where there
are lower case letters.
18. If you have a laptop, verify that the WLI-PCI-L11 mode checkbox is unchecked otherwise if you
have a desktop computer, check the WLI-PCI-L11 mode checkbox
19. Click OK
20. Restart your computer for the changes to take effect.
21. Install Client Manager.
10
11
1.3
INSTALLING CLIENT MANAGER
1.
2.
3.
Insert your Air Station Driver CD in your CD-ROM drive.
Double-click the my computer icon on your desktop.
Double-click on your CD-ROM drive.
4.
Double-click the wleasy.exe file in the current folder on your CD-ROM drive.
5.
Select Install the Client Manager.[C] and click the Next button.
6.
Exit any Applications currently running and Click OK
The Client Manager Installer will begin.
11
12
7.
Click the Next Button.
8.
Click the Next Button.
9.
Click the Start Button.
12
13
10. The Client Manager Files will be installed on Your System. We recommend you click No when
prompted to add Client Manager to your Startup Menu.
11. Click OK to complete the installation.
12. Restart your system when the installation is complete for the new settings to take effect.
13. Click Start on the taskbar. Select Programs from the Start menu. Select Melco Wireless
LAN and then select Client Manager.
The Client Manager Window will open.
14. Click the file Menu and Select Manual
13
14
15. Type the word “ANY” or if you have more than one Airstation Accesspoint on your network,
input the last six characters of the MAC address of the specific Airstation Accesspoint you want
to connect to . The Media Access Control (MAC) address can be found on the back of the
Airstation Accesspoint. For example, if the Mac Address is 004026 8A9090, then the last six
characters of this number (8A9090) will be the MAC address. Please note that it is case sensitive,
i.e. it must have capital letters where there are capital letters, and lower case letters where there
are lower case letters. Click OK
16. Click OK
17. The Client Manager will search for the Airstation Accesspoint on the Network. Your Airstation
Accesspoint will show up in the Window. When connected to the Airstation Accesspoint , the
Airstation Accesspoint Name will be black and an antenna mark will also be displayed.
18. Refer to section on Configuring your Airstation Accesspoint .
14
15
2.
WINDOWS 2000 INSTALLATION
Before you start, we recommend you install the latest service pack.
1.
Turn off your computer and disconnect the power cable.
2.
Remove the computer cover.
3.
4.
5.
6.
7.
Install the PCI Adapter card into one of the empty PCI slots.
Replace the computer cover.
Reconnect the power cable.
Turn on your computer
Log on as the Administrator
15
16
2.1
UPDATING PCI-ADAPTER CARD DRIVER
1.
2.
3.
4.
Click Start on the taskbar, and select Settings from the Start menu
Select Control panel, and the Control Panel group will appear
Double-click the System icon and click the Hardware tab
Click the Device Manager button.
5.
Make sure the following device name is listed in the PCMCIA Adaptors.
WLI-PCI-OP:
Ricoh R/RL/RT/RC/5C475(II),R5C520 or Compatible CardBus Controller.
If the PCMCIA ADAPTER listed is “buffalo WLI-PCI-OP Bridge” then you have the latest
driver installed. Skip this section.
Double-click the device name. (Ricoh R/RL/RT/RC/5C475(II),R5C520 or Compatible
CardBus Controller)
Select the Driver tab and click the Update Driver button.
Click Next.
6.
7.
8.
16
17
9. Select Search for The Best Driver For Your Device (Recommended) option and click
Next.
10. Type or click the Browse button and point to the driver path: E:\PCIOP\WIN2000. (E:
represents your CD-ROM drive) and then click Next.
11. Select Install one of the other drivers and then click Next.
12. Select BUFFALO WLI-PCI-OP Bridge.
13. Click the Next button to install the driver.
14. Click the Finish button when the installation is complete.
15. Click the Close button.
16. Restart your computer for the new settings to take effect.
17
18
2.2
1.
2.
3.
4.
INSTALLATION INSTRUCTIONS FOR PCMCIA CARD
Insert the PCMCIA card into the Adapter card you just installed. If this is a laptop computer,
insert the PMCIA card into an available slot.
Log on as the Administrator.
The Windows 2000 Add New Hardware Wizard automatically detects the Adapter card and
attempts to locate the driver media provided by the manufacturer. Insert the installation disk and
click Next.
Select Search for The Best Driver For Your Device (Recommended) option and click
Next.
18
19
5.
Clear all check boxes and check only the Specify a Location check box. Click Next.
6.
Click the Browse button and point to the driver path E:\PCML11\Win2000. (E: represents
your CD-ROM drive) then click OK.
Click Next to install the Windows 2000 drivers.
7.
19
20
8.
9.
This dialogue box will appear. Answer the question Do you want to continue the
installation? by clicking Yes.
Click the Finish button when the installation is complete.
20
21
2.3
CONFIGURING YOUR NEW LAN CARD
You will now see an Icon in your systray at the bottom of your taskbar that looks like two
computers with a red X through them.
1.
Right-click the icon and select Network and Dial Up Connections.
2.
Double-click the Local Area Connection for the Melco Wireless LAN.
3. In the Local Area Connection properties dialog box, click the Configure button for the
Melco Wireless Adapter.
4. Click the Advanced tab.
21
22
5.
6.
7.
8.
9.
If you are using a PCI-adapter (i.e. Desktop), select the WLI-PCI mode and make sure it is set
to ON otherwise if you are using a laptop, set it to OFF.
Select the Station name property and type the word “ANY” or if you have more than one
Airstation Accesspoint , type the last six characters of the Airstation Accesspoint MAC address
following by the word “GROUP”, with no space between them in the value textbox. All
alphabetical characters need to be capitalized. You can find the last six characters of the MAC
address by looking at the back of the AirStation Accesspoint. There will be two stickers, one of
which will start with 00. For example, if the Mac Address is 004026 8A9090, then the last six
characters of this number (8A9090) will be the MAC address.
Click OK.
Click NO if prompted to restart the computer.
Select the TCP/IP protocol in the Network properties dialog box and click the Properties
button.
22
23
10. Configure your TCP/IP protocol for your LAN setup. If you do not know your LAN setup,
consult your users manual or system administrator.
11. Click OK.
12. Click the install button.
13. Select Service and click the Add button.
14. Click Have disk. Type or click the Browse button and point to the driver path:
E:\ESSIDDRV\WIN2000. (E: represents your CD-ROM drive)
15. Click OK.
16. If you are prompted to Click the Network Service that you want to install.
23
24
17. Click on the Melco Essid service and then click OK.
18. Restart your computer for the new settings to take effect.
19. Install the Client Manager.
24
25
2.4
INSTALLING CLIENT MANAGER
1.
2.
3.
Insert your Air Station Driver CD in your CD-ROM drive.
Double-click the my computer icon on your desktop.
Double-click on your CD-ROM drive.
4.
Double-click the wleasy.exe file in the current folder on your CD-ROM drive.
5.
Select Install the Client Manager.[C] and click the Next button.
6.
Exit any Applications currently running and Click OK.
The Client Manager Installer will begin.
25
26
7.
Click the Next Button.
8.
Click the Next Button.
9.
Click the Start Button.
26
27
10. The Client Manager Files will be installed on Your System. We recommend you click No when
prompted to add Client Manager to your Startup Menu.
11. Click OK to complete the installation.
12. Restart your system when the installation is complete for the new settings to take effect.
13. Click Start on the taskbar. Select Programs from the Start menu. Select Melco Wireless
LAN and then select Client Manager.
The Client Manager Window will open.
14. Click the file Menu and Select Manual
27
28
15. Type the word “ANY” or if you have more than one Airstation Accesspoint on your network,
input the last six characters of the MAC address of the specific Airstation Accesspoint you want
to connect to. The Media Access Control (MAC) address can be found on the back of the
Airstation Accesspoint. For example, if the Mac Address is 004026 8A9090, then the last six
characters of this number (8A9090) will be the MAC address. Please note that it is case sensitive,
i.e. it must have capital letters where there are capital letters, and lower case letters where there
are lower case letters. Click OK
16. Click OK
17. The Client Manager will search for the Airstation Accesspoint on the Network. Your Airstation
Accesspoint will show up in the Window. When connected to the Airstation Accesspoint , the
Airstation Accesspoint Name will be black and an antenna mark will also be displayed.
18. Refer to section on Configuring your Airstation.
28
29
WINDOWS NT 4.0 INSTALLATION
3.
Before you start, you must make sure you have Windows
NT 4.0 with the latest service pack.
If you are using a Laptop, please refer to “Installation instructions for PCMCIA
wireless card” section, page 19.
1.
Turn off your computer, and disconnect the power cable.
2.
Remove the computer cover.
29
30
3.
4.
5.
Install the PCI Adapter card into one of the empty PCI slots.
Replace the computer cover.
Reconnect the power cable.
6.
7.
8.
Insert the PCMCIA card in the PCI Adapter card you just installed.
Turn on your computer.
Log on as the Administrator.
3.1
Installation for PCI Adapter Cards
1.
2.
3.
4.
5.
6.
3.2
Put the Air Station CD in the CD-ROM drive.
Double-click My Computer.
Double-click the CD-ROM drive.
Double-click the PCI-OP folder.
Double-click the Setup.exe icon. Follow the setup using the designated information.
Restart your computer when prompted to do so.
Installation for PCMCIA Wireless Card
1.
2.
3.
4.
5.
6.
Log in as the Administrator.
Click Start on the taskbar, and select Settings from the Start menu.
Select Control Panel. The Control Panel Group appears.
Double-click the Network icon.
Click the Adapter tab and then click the Add button.
Click the Have Disk button.
30
31
7.
8.
9.
10.
11.
12.
13.
Type your CD-ROM drive letter and then PCML11\Winnt. It should look something like
this (E:\PCIL11\Winnt).
A dialog box will come up with Melco WLI-PCM-L11 wireless LAN adapter
highlighted.
Click OK. You will then see a WLI-PCM-L11 configuration box.
Click the Basic settings tab.
Check the infrastructure mode checkbox.
Check the WLI-PCI-L11 mode checkbox if using a PCI-adapter card.
The ESSID textbox will then ungray. Type the word “ANY” or if you have more than one
Airstation Accesspoint on your network, input the last six characters of the MAC address
and the word “GROUP”, with no space between them of the specific Airstation Accesspoint
you want to connect to. All alphabetical characters need to be capitalized. You can find the
last six characters of the MAC address by looking on the back of the Airstation Accesspoint.
There will be two stickers, one of which will start with 00. For example, if the Mac Address
is 004026 8A9090, then the last six characters of this number (8A9090) will be the MAC
address.
31
32
14. Click OK.
15. Click close when you see Melco WLI-PCM-L11 wireless LAN adapter in the
configuration box.
16. A TCP/IP configuration box will appear.
17. Verify that the MELCO WLI-PCM-L11 Wireless LAN Adapter is selected in the adapter
text box.
18. Select Specify an IP address and input the IP address and subnet mask below.
IP address:
192.168.0.2
Subnet Mask: 255. 255. 255. 0
19. Click OK.
20. Restart your computer for the changes to take effect
32
33
3.3
1.
2.
3.
4.
5.
6.
7.
8.
9.
Installing the ESS-ID Settings Driver
Click Start on the taskbar, and select settings from the Start menu.
Select Control panel, and the Control Panel group appears.
Double-click the Network icon.
In the Network dialog box, Select Service and click the Add button.
Click Have Disk and in the specified location area type in your CD-ROM drive letter followed
by a colon and ESSIDDRV\WINNT. You should have E:\ESSIDDRV\WINNT where E
represents your drive letter.
Click OK.
When Windows NT has completed installing the ESSID driver, it will show in the network
properties dialog box.
Click OK to complete installation.
Restart your computer for the new settings to take effect.
33
34
3.4
Troubleshooting
Windows NT4.0 has a standard diagnostics program that checks to verify if the
WLI-PCM-L11 has been installed correctly. Follow the steps below to perform this
check.
1.
2.
3.
Click the Start on the taskbar, and select Settings from the Start menu.
Select Control Panel. The Control Panel group appears.
Double-click the PC CARD [PCMCIA] icon.
Verify that the PCMCIA Card is installed.
Close the Control Panel.
Click the Start button on the taskbar, select Programs from the start menu, select
Administrative Tools (Common) from the programs menu and then select Windows NT
Diagnostics from the Administrative Tools menu.
7. Click the Resources tab.
8. Click the Devices button at the bottom of the dialog box.
9. Select Wlil11 .
If Wlil11 is not on the Device list, reinstall the PCI adapter card software.
10. Click the Properties button at the bottom of the dialog box.
11. Check that Input/Output Range, Memory Range, and Interrupt Request are displayed. If
no settings are displayed or Wlil11 is not listed in the Device list, try changing the resource
settings (See Changing resource settings section). Also, check that the PCMCIA Card is insert
correctly.
4.
5.
6.
34
35
12.
13.
14.
15.
16.
17.
Click OK to close the WliL11 properties dialog box.
Click OK to close the Windows NT Diagnostics Dialog box.
Click the Start on the taskbar, and select Settings from the Start menu.
Select Control Panel. The Control Panel group appears.
Double-click the Devices icon.
Verify that the status for the MELCO Wireless LAN Card is started and that the Startup
setting is Automatic.
18. Verify that the status for PCMCIA under devices is started and that the startup setting is
Automatic.
19. If the status is not started, (see above) select the PCMCIA Device and click the Startup Button.
20. Select Automatic and click OK.
21. Click the Close button.
22. Restart your computer for the changes to take effect.
35
36
23. Install the Client Manager.
3.5
Changing Resource Settings
Follow the steps below if you need to change the settings for the WLI-PCM-L11 (IRQ level,
I/O port address).
1.
2.
3.
Click Start on the taskbar, and select settings from the Start menu.
Select Control panel, and the Control Panel group appears.
Double-click the Network icon.
4.
Click the Adapters tab. Select MELCO WLI-PCM-L11 Wireless LAN Adapter and click
the Properties button.
5.
Click the Adapters tab.
36
37
6.
7.
The current settings for the WLI-PCM (IRQ level, I/O port address) are displayed. Change the
settings as required and click the OK button. Refer to your users manual for which parameters to
change.
Restart the computer so that the new settings will take effect.
37
38
3.6
INSTALLING CLIENT MANAGER
1.
2.
3.
Insert your Air Station Driver CD in your CD-ROM drive.
Double-click the my computer icon on your desktop.
Double-click on your CD-ROM drive.
4.
Double-click the wleasy.exe file in the current folder on your CD-ROM drive.
5.
Select Install the Client Manager.[C] and click the Next button.
6.
Exit any Applications currently running and Click OK
The Client Manager Installer will begin.
38
39
7.
Click the Next Button.
8.
Click the Next Button.
9.
Click the Start Button.
39
40
10. The Client Manager Files will be installed on Your System. We recommend you click No when
prompted to add Client Manager to your Startup Menu.
11. Click OK to complete the installation.
12. Restart your system when the installation is complete for the new settings to take effect.
13. Click Start on the taskbar. Select Programs from the Start menu. Select Melco Wireless
LAN and then select Client Manager.
The Client Manager Window will open.
14. Click the file Menu and Select Manual
40
41
15. Type the word “ANY” or if you have more than one Airstation Accesspoint , input the last six
characters of the MAC address and the word “GROUP”, with no space between them. The Media
Access Control (MAC) address can be found on the back of the Airstation Accesspoint. For
example, if the Mac Address is 004026 8A9090, then the last six characters of this number
(8A9090) will be the MAC address. Please note that it is case sensitive, i.e. it must have capital
letters where there are capital letters, and lower case letters where there are lower case letters.
Click OK
16. Click OK
17. The Client Manager will search for the Airstation Accesspoint on the Network. Your Airstation
Accesspoint will show up in the Window. When connected to the Airstation Accesspoint , the
Airstation Accesspoint Name will be black and an antenna mark will also be displayed.
18. Refer to section on Configuring your Airstation.
41
42
4.
CONFIGURING THE AIRSTATION STANDARD
MODEL WLA-L11
After installing the Client Manager, you should be connected to the Airstation
Accesspoint and should be fully functional. You have a default IP address of 1.1.1.1. If
you need to change the IP address, install the Airstation Manager.
INSTALLING AIRSTATION MANAGER
1.
2.
3.
Insert your Air Station Driver CD in your CD-ROM drive.
Double-click the my computer icon on your desktop.
Double-click on your CD-ROM drive.
4.
Double-click the wleasy.exe file in the current folder on your CD-ROM drive.
5.
Select Install the AirStation Manager.[A] and click the Next button.
42
43
6.
Exit any applications you have running and then Click OK.
The AirStation Manager Installer will begin.
7.
Click the Next Button.
8.
Click the Next Button
9.
Click the Start button.
43
44
The AirStation Manager Files will be installed on your system.
10. Click OK to complete the installation.
11. Restart your system when the installation is complete for the new settings to take effect.
12. Click Start on the taskbar. Select Programs from the Start menu. Select Melco Airstation
and
then select AirStation Manager.
The AirStation Manager Window will open.
13. Click the search icon on your toolbar.
14. The AirStation Manager will search for the Airstation Accesspoint on the Network. Your
Airstation Accesspoint will show up in the Window. When connected to the Airstation
Accesspoint, the Airstation Accesspoint Name will be black and an antenna mark will also be
displayed.
44
45
15. To change the IP Address settings for your Airstation Accesspoint, select the AirStation. In the
Admin Menu, select IP Address and change it accordingly. Click OK.
45
46
5.
CONFIGURING THE AIRSTATION ROUTER
MODEL WLAR-L11
5.1
CHANGING TCI/IP SETTINGS IN WINDOWS 98 OR ME
Your Airstation Accesspoint is a Bridge with an IP Address of 1.1.1.1 by default. In
order for you to connect to the Airstation Accesspoint and convert it to a Router, we
recommend that you change your computer’s TCP/IP settings to the static Address
192.168.0.2 and that you configure the Router’s IP Address to 192.168.0.1.
1.
2.
3.
4.
Click Start on the taskbar, and select Settings from the Start menu.
Select Control panel, and the Control Panel group appears.
Double-click the Network Icon.
Select the Configuration tab.
1.
Select the TCP/IP for MELCO WLI-PCM-L11 adapter and click the Properties button.
46
47
2.
Select Specify an IP address and input the IP address and subnet mask below.
IP address:
192.168.0.2
Subnet Mask: 255. 255. 255. 0
3.
Select the Gateway tab and remove all the installed gateways if there are any.
47
48
4.
5.
6.
Select the DNS Configuration tab and select Disable DNS.
Click OK to close the TCP/IP Properties dialog box.
Click OK to close the Network Properties dialog box.
7.
If you are using the WLI-PCI-OP, then click Yes. If your computer is a laptop or you use the
WLI-ISA-OP, click No.
Restart your Computer for the new settings to take effect
8.
48
49
5.2
CHANGING TCI/IP SETTINGS IN WINDOWS 2000
Your Airstation Accesspoint is a Bridge with an IP Address of 1.1.1.1 by default. In order
for you to connect to the Airstation Accesspoint and convert it to a Router, we
recommend that you change your computer’s TCP/IP settings to the static Address
192.168.0.2 and that you configure the Router’s IP Address to 192.168.0.1.
1. Click Start on the taskbar, and select Settings from the Start menu.
2. Select Control panel, and the Control Panel group appears.
3. Double-click the Network and Dial-up Connection Icon.
4.
Double-click the Local Area Connection Icon
5.
Click the Properties Button
49
50
6.
Select Internet Protocol (TCP/IP) and then click the Properties button.
7.
Select Specify an IP address and input the IP address and subnet mask below.
IP address:
192.168.0.2
Subnet Mask: 255. 255. 255. 0
8.
9.
10.
11.
Click OK to close the Internet Protocol (TCP/IP) Properties dialog box
Click OK to close the Local Area Connection Properties dialog box
Click the Close Button to close the Local Area Connection Status Dialog Box
Restart your computer for the new settings to take effect.
50
51
5.3
CHANGING TCI/IP SETTINGS IN WINDOWS NT 4.0
Your Airstation Accesspoint is a Bridge with an IP Address of 1.1.1.1 by default. In order
for you to connect to the Airstation Accesspoint and convert it to a Router, we
recommend that you change your computer’s TCP/IP settings to the static Address
192.168.0.2 and that you configure the Router’s IP Address to 192.168.0.1.
1.
2.
3.
Click Start on the taskbar, and select Settings from the Start menu.
Select Control panel, and the Control Panel group appears.
Double-click the Network Icon.
4.
Click the Protocols Tab
51
52
5.
Select TCP/IP Protocol and click the Properties button.
6.
7.
Verify that the MELCO WLI-PCM-L11 Wireless LAN Adapter is selected.
Selecting Specify an IP address and input the IP address and subnet mask below.
IP address:
192.168.0.2
Subnet Mask: 255. 255. 255. 0
8.
9.
Click OK
Click OK to Close the Network Dialog Box
10. Restart your computer for the new settings to take effect.
52
53
5.4
INSTALLING AIRSTATION MANAGER
1.
2.
3.
Insert your Air Station Driver CD in your CD-ROM drive.
Double-click the my computer icon on your desktop.
Double-click on your CD-ROM drive.
4.
Double-click the wleasy.exe file in the current folder on your CD-ROM drive.
5.
Select Install the AirStation Manager.[A] and click the Next button.
6.
Exit any applications you have running and then Click OK.
The AirStation Manager Installer will begin.
53
54
7.
Click the Next Button.
8.
Click the Next Button
9.
Click the Start button.
The AirStation Manager Files will be installed on your system.
54
55
10. Click OK to complete the installation.
11. Restart your system when the installation is complete for the new settings to take effect.
12. Click Start on the taskbar. Select Programs from the Start menu. Select Melco Airstation
and
then select AirStation Manager.
The AirStation Manager Window will open.
13. Click the search icon in the AirStation Manager toolbar to connect to the Airstation
Accesspoint.
14. The AirStation Manager will search for the Airstation Accesspoint on the Network. Your Air
station will be displayed in the Window. When connected to the Airstation Accesspoint , the
Airstation Accesspoint Name will be black and an antenna mark will also be displayed.
55
56
15. To change the IP Address settings for your Airstation Accesspoint , select the AirStation. In the
Admin Menu, select IP Address and configure your IP settings to 192.168.0.1. Click OK.
16. To change configuration settings, select the AirStation. In the Admin Menu, select
Configure AS.
17. Click the Wizard Settings button.
9.
A password request page will pop up. Type root in the User Name field, but leave the password
field blank, and then click OK.
56
57
10. Select Connect to CATV Internet and click the Next Setup Menu Button.
11.
12.
13.
14.
Select Automatic IP Assignment by DHCP Server and click the set button.
Click the set button.
Setting completed will be displayed. Close the Web browser.
You then need to change your computers TCP/IP settings back to “Obtain an IP Address
automatically”.
For any additional wireless workstations, you only need to install the Client Manager
and configure the IP address to be assigned automatically by DHCP.
57
58
6.
CONFIGURING THE AIRSTATION LOCAL
ROUTER MODEL WLAR-L11-L
6.1
CHANGING TCI/IP SETTINGS IN WINDOWS 98 OR ME
Your Airstation Accesspoint is a Router with an IP Address of 192.168.0.1 by default. In
order for you to connect to your Airstation Accesspoint, we recommend that you change
your computer’s TCP/IP settings to the static address 192.168.0.2.
1.
2.
3.
4.
Click Start on the taskbar, and select Settings from the Start menu.
Select Control panel, and the Control Panel group appears.
Double-click the Network Icon.
Select the Configuration tab.
5.
Select the TCP/IP for MELCO WLI-PCM-L11 adapter and click the Properties button.
58
59
6.
Select Specify an IP address and input the IP address and subnet mask below.
IP address:
192.168.0.2
Subnet Mask: 255. 255. 255. 0
7.
Select the Gateway tab and remove all the installed gateways if there are any.
59
60
8. Select the DNS Configuration tab and select Disable DNS.
9. Click OK to close the TCP/IP Properties dialog box.
10. Click OK to close the Network Properties dialog box.
11. If you are using the WLI-PCI-OP, then click Yes. If your computer is a laptop or you use the
WLI-ISA-OP, click No.
12. Restart your Computer for the new settings to take effect
60
61
6.2
CHANGING TCI/IP SETTINGS IN WINDOWS 2000
Your Airstation Accesspoint is a Router with an IP Address of 192.168.0.1 by default. In
order for you to connect to your Airstation Accesspoint, we recommend that you change
your computer’s TCP/IP settings to the static address 192.168.0.2.
1. Click Start on the taskbar, and select Settings from the Start menu.
2. Select Control panel, and the Control Panel group appears.
3. Double-click the Network and Dial-up Connection Icon.
4.
Double-click the Local Area Connection Icon
5.
Click the Properties Button
61
62
6.
Select Internet Protocol (TCP/IP) and then click the Properties button.
7.
Select Specify an IP address and input the IP address and subnet mask below.
IP address:
192.168.0.2
Subnet Mask: 255. 255. 255. 0
8.
9.
10.
11.
Click OK to close the Internet Protocol (TCP/IP) Properties dialog box
Click OK to close the Local Area Connection Properties dialog box
Click the Close Button to close the Local Area Connection Status Dialog Box
Restart your computer for the new settings to take effect.
62
63
6.3
CHANGING TCI/IP SETTINGS IN WINDOWS NT 4.0
Your Airstation Accesspoint is a Router with an IP Address of 192.168.0.1 by default. In
order for you to connect to your Airstation Accesspoint, we recommend that you change
your computer’s TCP/IP settings to the static address 192.168.0.2.
1.
2.
3.
Click Start on the taskbar, and select Settings from the Start menu.
Select Control panel, and the Control Panel group appears.
Double-click the Network Icon.
4.
Click the Protocols Tab
5.
Select TCP/IP Protocol and click the Properties button
63
64
6.
7.
Verify that the MELCO WLI-PCM-L11 Wireless LAN Adapter is selected.
Select Specify an IP address and input the IP address and subnet mask below.
IP address:
192.168.0.2
Subnet Mask: 255. 255. 255. 0
8.
9.
Click OK
Click OK to Close the Network Dialog Box
10. Restart your computer for the new settings to take effect.
64
65
6.4
INSTALLING AIRSTATION MANAGER
1.
2.
3.
Insert your Air Station Driver CD in your CD-ROM drive.
Double-click the my computer icon on your desktop.
Double-click on your CD-ROM drive.
4.
Double-click the wleasy.exe file in the current folder on your CD-ROM drive.
5.
Select Install the AirStation Manager.[A] and click the Next button.
6.
Exit any applications you have running and then Click OK.
The AirStation Manager Installer will begin.
65
66
7.
Click the Next Button.
8.
Click the Next Button
9.
Click the Start button.
The AirStation Manager Files will be installed on your system.
66
67
10. Click OK to complete the installation.
11. Restart your system when the installation is complete for the new settings to take effect.
12. Click Start on the taskbar. Select Programs from the Start menu. Select Melco Airstation
and
then select AirStation Manager.
The AirStation Manager Window will open.
13. Click the search icon in the Airstation Manager toolbar to connect to the Airstation
Accesspoint.
14. The AirStation Manager will search for the Airstation Accesspoint on the Network. Your Air
station Accesspoint will show up in the Window. When connected to the Airstation Accesspoint ,
the Airstation Accesspoint Name will be black and an antenna mark will also be displayed.
67
68
15. To change the IP Address settings for your Airstation Accesspoint , select the AirStation. In the
Admin Menu, select IP Address and configure your IP settings to 192.168.0.1. Click OK.
16. To change configuration settings, select the AirStation. In the Admin Menu, select
Configure AS.
17.
18.
19.
20.
15.
Click the Standard Setup button.
Select Automatic IP Assignment by DHCP Server
Select Use automatic IP address assignment for LAN and then click the set button.
Setting completed will be displayed. Close the Web browser.
You then need to change your computers TCP/IP settings back to “Obtain an IP Address
automatically”.
For any additional wireless workstations, you only need to install the Client Manager
and configure the IP address to be assigned automatically by DHCP.
68
69
6.5
PPTP SETUP For WLAR-L11-L model
If you do not see the [Protocol Number] option, please visit our web site at
www.buffalotech.com for free firmware upgrade
PPTP (Point-to-Point Tunneling Protocol) is a protocol (set of communication rules) that allows
corporations to extend their own corporate network through private "tunnels" over the Internet.
Effectively, a corporation uses a wide-area network as a single large local area network. A company no
longer needs to lease its own lines for wide-area communication but can securely use the public networks.
This kind of interconnection is known as a virtual private network.
Since PPTP is based on Point-to-Point Protocol, only one computer in your LAN can access the VPN
server at a time.
Setting Procedure
1.
Follow the installation guide to connect to the HTTP Admin console thru your browser. The
default address is 192.168.0.1.
2.
Click Custom setup and input “root” as the username with no password
3.
Click Address Translation on the bottom in the left column.
4.
Input the IP address of LAN computer that needs VPN (PPTP) connection under IP address of
LAN and then click Add to NAT table.
69
70
5.
Click Return and verify that the NAT Table address for IP address of LAN appears to be the
IP address of the LAN computer.
6.
Your Airstation AccessPoint is now set to allow all Protocols to pass through for your computer.
7.
If you prefer to limit the access of Protocols to pass through, please select Specify IP Protocol
number from Port setting and specify the Protocol Number
For example:
ICMP:
IGMP:
TCP:
UDP:
GRE3 (PPTP):
Protocol Number 1
Protocol Number 2
Protocol Number 6
Protocol Number 17
Protocol Number 47
The Generic Route Encapsulation (GRE) protocol is used in conjunction with Point-to
Point Tunneling Protocol (PPTP) to create virtual private networks (VPNs) between clients
or between clients and servers.
70
71
6.6
PPPoE SETUP FOR WLAR-L11-L MODEL
If you do not see the PPPoE option, please visit our web site at www.buffalotech.com for
a free firmware upgrade
The Point-to-Point Protocol over Ethernet ( PPPoE), is a peer-to-peer protocol used on an Ethernet
Network, instead of a regular phone line. Some ISPs require PPPoE in order for customers to connect to
the Internet. Please consult your Internet service provider to determine your requirement. If PPPoE is
necessary, the parameters will be set in the AirStation admin console instead of your computer. For
example: Instead of inputting the User Name and Password in your computer, input this information in
the AirStation Admin console.
Setup Procedure
8.
Follow the installation guide to connect to the HTTP Admin console through your browser. The
Default IP address is 192.168.0.1.
9.
Click Custom setup and input “root” as the username with no password
10. Click PPPoE in the left column bottom.
71
72
11. Input the “User Name” and “password” given by your Internet service provider. Reenter the
“password” in the “confirm” textbox and then click Set.
12. Click Return and then Click Basic. The basic setting screen will be shown.
13. Select use the PPPoE client function for the WAN-side IP address acquisition method, and
then click set.
The Setting will be completed and the Airstation Accesspoint will be rebooted.
14. After closing the web browser, it is recommended to recheck the setting parameters again.
15. If PPPoE Status appears in the screen, the setting is completed successfully.
72
73
6.7
Glossary of Terms Used in the PPPoE settings
User Name – This is the user specified name that is to be recognized by your Internet service provider.
Up to 64 letters are permissible.
Password - This is the user specified password that is to be recognized by your Internet service provider.
Use the same password in the “confirm” box. Up to 64 letters are permissible.
Service Name - If more than 2 PPPoE servers exist in the system, a specific server can be selected for
providing your PPPoE service. If a specific server is not selected (you leave the box blank), the Airstation
Accesspoint will pick a server and connect to the server automatically. If your Internet service provider
specifies nothing, leave it blank.
Connection Method – Set the specific timing that enables connecting to the PPPoE server.
Continuous connection – Connecting to the PPPoE server as soon as the device is up and keeping
that connection. The system will re-connect automatically even the user tries to disconnect manually from
the screen.
On demand connection – The system connects to the PPPoE server only when the user wants to
connect to the Internet.
Manual connection - The system connects to the PPPoE server only when the user clicks the connect
button on the setting screen.
Cut off period - The user can set the cut off period that disconnects the connection automatically after
the communication becomes inactive. If the user selects the continuous connection in the connection
method, the cut off period will be ignored. If the user wishes not to cut off, the user can input [0] in the
box.
73
74
7.
CONFIGURING THE AIRSTATION ANALOG
MODEM MODEL WLAR-L11-M
Your Airstation Accesspoint has an IP address of 1.1.1.1 by default. In order for you to
connect to the Airstation Accesspoint, we recommend that you change your computer’s
TCP/IP settings to the static address 192.168.0.2 and configure your Airstation’s IP
address to 192.168.0.1.
1.
Please follow the WLAR-L11 instruction until you see the Admin Menu below and following
the rest of the instructions on this page.
2. Click the Wizard Settings button.
3. A password request page will pop up. Type root in the User Name field, but leave the password
field blank, and then click OK.
74
75
4.
Select Connecting to the Internet via Internal modem and click the Next Setup Menu Button.
5. Input the necessary items and click Set Button.
For any additional wireless workstation, you only need to install the Client Manager and
configure the IP address to be assigned automatically by DHCP.
75
76
8.
Apple Installation
Your Apple Computer must either have an Airport card or PCMCIA wirelesses card that is
802.11b compliant installed.
1.
Turn on your Computer.
2.
Click the Apple icon on your toolbar and Select Airport.
3.
In the Airport Network window, select Network area.
4.
Find a 6-character ID number with the word GROUP attached to it and click it.
5.
Click the Apple icon on your toolbar. Select Control Panel, and then click TCP/IP.
6.
Verify that it says, Connect via Airport at the top.
7.
Set the configuration to Manual. Set the IP address to 1.1.1.2, the subnet mask to 255.255.255.0.
and leave the router address Blank. For the Local Router, use IP Address 192.168.0.2
8.
Open up a Web Browser to connect to the Airstation Accesspoint through IP Address and follow the
wizard setup. Use 1.1.1.1 for the Router and 192.168.0.1 for the Local Router.
9.
Follow the instructions to set up the Airstation Accesspoint from the Router or Local Router section.
10. Click the Apple icon in your toolbar. Select Control Panel, and then click on TCP/IP.
11. Change the configuration to DHCP if you have a DHCP server on your LAN or leave it on the
manual setting and configure it to your LAN settings.
12. Close the TCP/IP window and save when prompted to.
13. This should give you connection to your Internet and/or your wired LAN.
76
77
Address:
1977 W. 190th Street
Suite 100
Torrance, CA 90504
Website:
www.buffalotech.com
Email:
Sales - [email protected]
Technical Support - [email protected]
Phone:
Sale Tel - 310-965-0448
Sale Tel - 800-508-1110
Sale Fax - 310-965-0497
Tech Support Line - 800.934.2471
77
78
78