1
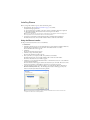
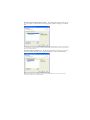
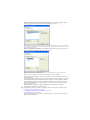
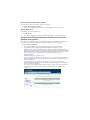
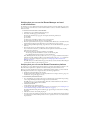
Installation Guide
Trademarks
Add Life to the Web, Afterburner, Aftershock, Andromedia, Allaire, Animation PowerPack, Aria, Attain, Authorware,
Authorware Star, Backstage, Bright Tiger, Clustercats, ColdFusion, Contribute, Design In Motion, Director, Dream
Templates, Dreamweaver, Drumbeat 2000, EDJE, EJIPT, Extreme 3D, Fireworks, Flash, Fontographer, FreeHand,
Generator, HomeSite, JFusion, JRun, Kawa, Know Your Site, Knowledge Objects, Knowledge Stream, Knowledge
Track, LikeMinds, Lingo, Live Effects, MacRecorder Logo and Design, Macromedia, Macromedia Action!, Macromedia
Breeze, Macromedia Contribute, Macromedia Flash, Macromedia M Logo and Design, Macromedia Spectra,
Macromedia xRes Logo and Design, MacroModel, Made with Macromedia, Made with Macromedia Logo and Design,
MAGIC Logo and Design, Mediamaker, Movie Critic, Open Sesame!, Roundtrip, Roundtrip HTML, Shockwave,
Sitespring, SoundEdit, Titlemaker, UltraDev, Web Design 101, what the web can be, and Xtra are either registered
trademarks or trademarks of Macromedia, Inc. and may be registered in the United States or in other jurisdictions
including internationally. Other product names, logos, designs, titles, words, or phrases mentioned within this
publication may be trademarks, service marks, or trade names of Macromedia, Inc. or other entities and may be
registered in certain jurisdictions including internationally.
Third-Party Information
This guide contains links to third-party websites that are not under the control of Macromedia, and Macromedia is not
responsible for the content on any linked site. If you access a third-party website mentioned in this guide, then you do so
at your own risk. Macromedia provides these links only as a convenience, and the inclusion of the link does not imply
that Macromedia endorses or accepts any responsibility for the content on those third-party sites.
The following are trademarks of Microsoft®: Microsoft Windows®, Microsoft PowerPoint® XP, Windows 2000®,
Windows Server 2003®, Microsoft SQL Server™ 2000.
Copyright © 2004 Macromedia, Inc. All rights reserved. This manual may not be copied, photocopied,
reproduced, translated, or converted to any electronic or machine-readable form in whole or in part without prior
written approval of Macromedia, Inc. Part Number ZBP40M100
Acknowledgments
Director: Erick Vera
Project Management: Stephanie Gowin
Writing: Stephanie Gowin
Editing: Mary Ferguson, Mary Kraemer, Lisa Stanziano
Production Management: Patrice O’Neill
Managing Editor: Rosana Francescato
Media Design and Production: Adam Barnett, Christopher Basmajian
First Edition: March 2004
Macromedia, Inc.
600 Townsend St.
San Francisco, CA 94103
CONTENTS
Resources for a Successful Breeze Deployment .
...........................5
Guide to documentation and additional resources . . . . . . . . . . . . . . . . . . . . . . . . . . 5
About the electronic manuals and online help . . . . . . . . . . . . . . . . . . . . . . . . . . 5
Information about specialized topics. . . . . . . . . . . . . . . . . . . . . . . . . . . . . . . . . . 6
Additional resources . . . . . . . . . . . . . . . . . . . . . . . . . . . . . . . . . . . . . . . . . . . . . . 6
Troubleshooting . . . . . . . . . . . . . . . . . . . . . . . . . . . . . . . . . . . . . . . . . . . . . . . . . . . 6
Before You Install
....................................................7
Configurations available for installation. . . . . . . . . . . . . . . . . . . . . . . . . . . . . . . . . . 7
Installation requirements . . . . . . . . . . . . . . . . . . . . . . . . . . . . . . . . . . . . . . . . . . . . . 7
Breeze Presentation platform installation requirements . . . . . . . . . . . . . . . . . . . . 7
Breeze Presentation platform with Breeze Live installation requirements. . . . . . . 9
Breeze Live installation requirements . . . . . . . . . . . . . . . . . . . . . . . . . . . . . . . . . 9
The Breeze database. . . . . . . . . . . . . . . . . . . . . . . . . . . . . . . . . . . . . . . . . . . . . . . . 10
Installing and configuring Macromedia Breeze overview . . . . . . . . . . . . . . . . . . . . 10
Installing Breeze
. . . . . . . . . . . . . . . . . . . . . . . . . . . . . . . . . . . . . . . . . . . . . . . . . . . . 11
Using the Breeze installer. . . . . . . . . . . . . . . . . . . . . . . . . . . . . . . . . . . . . . . . . . . . 11
Completing an aborted installation. . . . . . . . . . . . . . . . . . . . . . . . . . . . . . . . . . 14
Starting and stopping Breeze components . . . . . . . . . . . . . . . . . . . . . . . . . . . . . . . 14
Uninstalling Macromedia Breeze . . . . . . . . . . . . . . . . . . . . . . . . . . . . . . . . . . . . . . 14
Setting Up the Breeze Database
. . . . . . . . . . . . . . . . . . . . . . . . . . . . . . . . . . . . . . . 15
Setting configuration properties for Microsoft SQL Server 2000 . . . . . . . . . . . . . . 15
Changing the Breeze password . . . . . . . . . . . . . . . . . . . . . . . . . . . . . . . . . . . . . 15
Maintenance . . . . . . . . . . . . . . . . . . . . . . . . . . . . . . . . . . . . . . . . . . . . . . . . . . . . . 16
Upgrading Breeze . . . . . . . . . . . . . . . . . . . . . . . . . . . . . . . . . . . . . . . . . . . . . . . . . 16
Configuring the Breeze Presentation Platform . .
Configuring Breeze Live .
. . . . . . . . . . . . . . . . . . . . . . . . . . . 17
. . . . . . . . . . . . . . . . . . . . . . . . . . . . . . . . . . . . . . . . . . . . . 19
Verifying Your Installation .
. . . . . . . . . . . . . . . . . . . . . . . . . . . . . . . . . . . . . . . . . . . . 21
Starting your Breeze components. . . . . . . . . . . . . . . . . . . . . . . . . . . . . . . . . . . . . . 21
Starting the database management system for the Breeze database . . . . . . . . . . 21
Starting the Breeze Presentation platform . . . . . . . . . . . . . . . . . . . . . . . . . . . . . 22
Starting Breeze Live . . . . . . . . . . . . . . . . . . . . . . . . . . . . . . . . . . . . . . . . . . . . . 22
Verifying that the Breeze database and Breeze Presentation platform work together 22
Verifying that you can use the Breeze Manager and send e-mail notifications . . . . 23
Verifying that you can use the Breeze Presentation platform . . . . . . . . . . . . . . . . . 23
Verifying that you can use Breeze Training. . . . . . . . . . . . . . . . . . . . . . . . . . . . . . . 24
Verifying that you can use Breeze Live . . . . . . . . . . . . . . . . . . . . . . . . . . . . . . . . . . 24
Appendix A: Clustering Breeze Presentation Platforms .
. . . . . . . . . . . . . . . . . . . . . 26
Setting up a cluster of Breeze Presentation platforms . . . . . . . . . . . . . . . . . . . . . . . 26
Verifying failover for HTTP requests . . . . . . . . . . . . . . . . . . . . . . . . . . . . . . . . . . . 27
Verifying replication of content across the cluster . . . . . . . . . . . . . . . . . . . . . . . . . 27
Appendix B: Clustering Breeze Live .
. . . . . . . . . . . . . . . . . . . . . . . . . . . . . . . . . . . . 29
Setting up a Breeze Live cluster . . . . . . . . . . . . . . . . . . . . . . . . . . . . . . . . . . . . . . . 29
Verifying failover for Breeze Live . . . . . . . . . . . . . . . . . . . . . . . . . . . . . . . . . . . . . . 30
Resources for a Successful Breeze Deployment
Macromedia Breeze consists of three components: the Breeze Presentation platform, Breeze Training, and
Breeze Live. Depending on the configuration purchased, you may be installing one, two, or all three of the
components. The following are brief descriptions of the components:
Breeze Presentation platform The Breeze Presentation platform makes it possible to quickly create
multimedia presentations that combine audio and video with slides and graphics.
Breeze Training Breeze Training lets you create courses, enroll students, and track and monitor student
and course outcomes.
Breeze Live Breeze Live lets you conduct online real-time meetings in which you can show multimedia
presentations and broadcast live audio and video to participants.
This chapter describes the variety of resources available to ensure successful deployment of the
components within your organization.
Guide to documentation and additional resources
Macromedia Breeze contains a variety of media to help you learn how to use the components quickly.
About the electronic manuals and online help
In addition to this installation guide, the following electronic manuals and online help systems are
available:
Note: The relevance of these guides to users depends on the modules installed on the Breeze Presentation platform,
the type of user (such as meeting content manager, information technology engineer, or course presenter), and the
user’s Breeze account permissions.
• Using the Breeze Manager describes how to use the administration, presentation, and training
components of Breeze. You can access Using the Breeze Manager documentation from the Breeze
Manager Home page, and from the Help link in the Breeze Manager.
• Using the Breeze Plug-In for PowerPoint describes use of the plug-in that allows users to create Breeze
presentations from PowerPoint. You can access Using the Breeze Plug-In for Powerpoint
documentation from the Breeze Manager Home page, and from the Breeze menu in PowerPoint by
selecting Breeze > Help.
• Using the Breeze Publish Wizard includes procedures for publishing Breeze presentations created in
PowerPoint to your Breeze server. You can access Using the Breeze Publish Wizard documentation
from the Breeze Manager Home page, and from the Help button in the Publish Wizard.
• Breeze Live User Guide for Meeting Presenters includes information about using the Breeze web
application to host online real-time meetings. The documentation includes procedures that
demonstrate the simplicity of adding slides, Flash SWF files, images, live audio and video to your
presentation.You can access Breeze Live User Guide documentation from the Breeze Manager
Home page, and from the Help menu within a Breeze Live meeting room (when you enter as a
presenter) by selecting Meeting > Help.
• Breeze Live User Guide for Meeting Participants includes information relevant to users participating
in an online real-time meeting. Breeze Live offers meeting participants a variety of options to make
their experience truly participatory, including the ability to send messages and questions to
presenters and to each other, and the ability to participate through live video and audio. You can
access the Breeze Live User Guide documentation from the Breeze Manager Home page, and from
the Help menu within a Breeze Live meeting room (when you enter as a participant) by selecting
Meeting > Help.
To determine what documentation is relevant to your needs, consult the following table for guidelines:
Breeze user type
Recommended reading
Information technology (IT) engineer
•
•
Breeze Installation Guide.
Review the system requirements in all other user
guides.
Content managers in charge of overall content within
Breeze, and who may add users and permissions
•
•
Using the Breeze Manager
Breeze Live User Guide for Meeting Presenters
Breeze user type
Recommended reading
Content authors and instructional designers who create
presentations and training with the Breeze Plug-In for
PowerPoint
•
•
Using the Breeze Plug-In for PowerPoint
Using the Breeze Publish Wizard
Content authors and instructional designers who create
presentations and training with Breeze Live
•
•
Using the Breeze Manager
Breeze Live User Guide for Meeting Presenters
Meeting administrators who create and manager Breeze
Live meetings
•
•
Using the Breeze Manager
Breeze Live User Guide for Meeting Presenters
End users who attend Breeze Live meetings
•
Breeze Live User Guide for Meeting Participants
Information about specialized topics
This guide primarily provides information for a basic installation of Breeze components in which no more
than one instance of each component is installed. It does not cover specialized topics. For information
about clustered Breeze components, load balancing, and failover, see “Appendix A: Clustering Breeze
Presentation Platforms” on page 26 and “Appendix B: Clustering Breeze Live” on page 29. For
information about specialized topics not discussed in this installation guide, visit the Macromedia Breeze
licensed-support website at www.macromedia.com/go/breeze_licensed_support.
Note: In order to access the licensed support site, you will need information from your Welcome letter, including your
serial key.
The following are among the topics covered at the website:
• Upgrading from an earlier release
• Port numbers used by Macromedia Breeze
• Using and managing the Breeze database engine
• Integrating Macromedia Breeze with a learning management system (LMS)
• Troubleshooting
Additional resources
Additional documentation, white papers, and articles are available at the Breeze Product Center, Breeze
Documentation Center, and Breeze Support Center websites:
Breeze Product Center The Breeze Product Center, at www.macromedia.com/software/breeze, is
updated regularly with the latest information on Breeze, including FAQs, white papers, testimonials,
and tips.
Breeze Documentation Center The Breeze Documentation Center, at www.macromedia.com/go/
breeze_documentation, contains documentation for all Breeze products, answers to frequently asked
questions, articles about specialized topics, and Breeze presentations.
Breeze Support Center The Breeze Support Center, at www.macromedia.com/support/breeze, contains
current support information, including technical notes, helpful Breeze presentations, and support
program details.
Troubleshooting
If you have difficulty installing or configuring Macromedia Breeze, visit the following website for
troubleshooting information: www.macromedia.com/go/breeze_licensed_support.
Before You Install
For a successful installation, you should be aware of the information covered in this chapter. Topics
include the following:
• “Configurations available for installation” on page 7
• “Installation requirements” on page 7
• “The Breeze database” on page 10
• “Installing and configuring Macromedia Breeze overview” on page 10
Configurations available for installation
Your enterprise has multiple configuration options available for installation of Breeze:
• Breeze Presentation platform
• Breeze Presentation platform and Breeze Training
Breeze Training is always installed on the same computer as Breeze Presentation platform.
• Breeze Presentation platform and Breeze Live
• Breeze Presentation platform, Breeze Training, and Breeze Live
• Breeze Live stand-alone configuration
When you install Breeze Live stand-alone configuration, you also need to install the Breeze
application server, which provides necessary functionality that would otherwise be provided by the
Breeze Presentation platform.
Additionally, depending on your organization’s licensing and performance needs, you may choose to
install a multi-server configuration. For more information, see “Appendix A: Clustering Breeze
Presentation Platforms” on page 26 and “Appendix B: Clustering Breeze Live” on page 29.
When you run the Breeze installer, you see only the installation options for the specific components
licensed by your organization.
Installation requirements
This section lists hardware and software requirements for installing the Breeze components. It covers the
following topics:
• “Breeze Presentation platform installation requirements” on page 7
• “Breeze Presentation platform with Breeze Live installation requirements” on page 9
This section discusses installing Breeze Live and the Breeze Presentation platform on the
same computer.
• “Breeze Live installation requirements” on page 9
This section lists requirements for installing Breeze Live on a separate computer from the Breeze
Presentation platform.
• “Additional software requirements” on page 10
If you are installing the Breeze Live stand-alone configuration, all references to installation requirements
for the Breeze Presentation platform in this chapter also apply to the Breeze application server, except
where noted.
Note: For optimal performance, and to ensure the installation is not unnecessarily complicated, Macromedia
recommends that you install Breeze on a dedicated computer.
Breeze Presentation platform installation requirements
The requirements for installing the Breeze Presentation platform alone and installing the Breeze
Presentation platform with Breeze Training are identical. If you have Breeze Live, you can install it on the
same computer as the Breeze Presentation platform or on another computer. For the requirements for
installing Breeze Live on the same computer, see “Breeze Presentation platform with Breeze Live
installation requirements” on page 9.
You can install the Breeze Presentation platform on a computer that meets the requirements described in
the next section.
Hardware requirements for the Breeze Presentation platform
Your computer must meet the following hardware requirements for installing and using the Breeze
Presentation platform:
• A Pentium III, 733 MHz processor
• 512 MB of RAM
• A CD-ROM drive
• A hard disk with the following disk space:
■
1 GB for Macromedia Breeze Presentation platform installation
■
10 GB per 100 presentations
Software requirements for the Breeze Presentation platform
You must have the following software on your computer to install the Breeze Presentation platform:
• One of the following Windows operating systems:
■
Windows XP Professional
■
Windows 2000 Server
■
Windows 2000 Professional
■
Windows 2003 Professional
■
Windows 2003 Server
• A local printer driver
The computer that is going to host the Breeze Presentation platform must have a local printer
driver on it before you install Microsoft PowerPoint or Microsoft Office, or run the Breeze installer.
This requirement applies even if the computer hosting the Breeze Presentation platform does not
connect to a local printer.
If your server hardware platform lacks a local printer (LPT) port, you can install a local printer by
starting the printer spooling service, and then setting it to start automatically.
Note: If you installed PowerPoint or Microsoft Office prior to installing a local printer driver, be sure to install
the printer driver before installing the PowerPoint or Microsoft Office service packs and updates.
•
If there is no local printer driver or you install the printer driver after the Presentation platform is
installed, the Presentation platform cannot convert PowerPoint presentations to Breeze Flash
presentations. For instructions on verifying that a printer driver is installed and installing one if
necessary, see the following procedures.
A local printer driver must be installed before you install Microsoft PowerPoint 2002 or Microsoft
PowerPoint 2003.
Microsoft PowerPoint 2002 or Microsoft PowerPoint 2003
PowerPoint 2002 or PowerPoint 2003 must be installed on the computer that is going to host the
Breeze Presentation platform before you run the Breeze installer. If PowerPoint 2002 or PowerPoint
2003 are not installed, or if you install PowerPoint after the Presentation platform is installed, the
Presentation platform cannot convert PowerPoint presentations to Breeze Flash presentations.
To install PowerPoint 2002 or PowerPoint 2003 for use with the Breeze Presentation platform, you
must copy the contents of the PowerPoint installation CD to the hard disk of the computer you are
installing on, and run the PowerPoint installer from the hard disk. You must follow this procedure
because, in some contexts, Breeze might display a dialog box that requests you to install a
component that is not part of a standard PowerPoint installation but is on the PowerPoint
installation CD. There are cases in which the PowerPoint installer can install such a component
from your hard disk, but not from the installation CD.
To verify that a printer driver is installed:
Select Start > Control Panel > Printers and Faxes.
Printers and Faxes lists the printer drivers installed on the computer.
2 Display the list in Thumbnails view. Select View > Thumbnails.
In Thumbnails view, the following icon for a local printer appears:
1
To install a printer driver if none is installed:
• If no printer drivers are installed, select Add, and then select a local printer driver for installation.
The Windows printer-driver wizard guides you through the process.
Breeze Presentation platform with Breeze Live installation requirements
If your Breeze configuration includes Breeze Live, you can install the Breeze Presentation platform and
Breeze Live on the same computer or on separate computers. This section gives installation requirements
for installing Breeze Live and the Breeze Presentation platform on the same computer. For installation
requirements when you install the Breeze Presentation platform without Breeze Live, see the preceding
section.
Hardware requirements for the Breeze Presentation platform with Breeze
Live
Your computer must meet the following hardware requirements for installing and using Breeze Live and
the Breeze Presentation platform:
• A Pentium 4, 1 GHz processor (dual Pentium 4 or faster recommended)
• 512 MB of RAM
• A CD-ROM drive
• A hard disk with the following disk space:
■
1 GB for Breeze Presentation platform installation
■
10 GB per 100 presentations
This requirement does not apply to the Breeze application server in a Breeze Live stand-alone
configuration.
■
500 MB for Breeze Live installation
■
Initially, 80 GB for Breeze Live meeting files. Disk space requirements increase as more Breeze
Live meetings are stored.
Software requirements for the Breeze Presentation platform with
Breeze Live
The software requirements for installing the Breeze Presentation platform and Breeze Live on a computer
are the same as for installing only the Breeze Presentation platform. For information on Breeze
Presentation platform software requirements, see “Software requirements for the Breeze Presentation
platform” on page 8.
Breeze Live installation requirements
You can install Breeze Live on a computer that meets the following minimum requirements.
Hardware requirements for Breeze Live
Your computer must have the following hardware in order to install and use Breeze Live with the Breeze
application server:
• A Pentium 4, 1-GHz processor (dual Pentium 4 or faster recommended)
• 512 MB of RAM
• A CD-ROM drive
• A hard disk with the following disk space:
■
500 MB for Breeze Live installation
■
Initially, 80 GB for Breeze Live meeting files. Disk space requirements increase as more Breeze
Live meetings are stored.
Software requirements for Breeze Live
You must have one of the following Windows operating systems on your computer to install the Breeze
Presentation platform:
• Windows XP Professional
• Windows 2000 Server
• Windows 2000 Professional
• Windows 2003 Professional
• Windows 2003 Server
Additional software requirements
In addition to specific requirements for the computers hosting the Breeze Presentation platform and
Breeze Live, Macromedia Breeze requires the following software:
• A database management system: either the Breeze database engine or Microsoft SQL Server 2000
The Breeze database engine comes with Macromedia Breeze, but there are restrictions on its use.
For information about choosing between the Breeze database engine and Microsoft SQL Server
2000, see “The Breeze database” on page 10.
• An SMTP e-mail server
The Breeze Presentation platform requires an SMTP e-mail server for sending e-mail notifications.
To use the e-mail server with Breeze, you need to set a configuration property in the Breeze
Presentation platform. For more information, see “Configuring the Breeze Presentation Platform”.
For updated Breeze system requirements and recommendations, see www.macromedia.com/go/
breeze_sysreqs.
The Breeze database
The Breeze Presentation platform requires a database created through either the Breeze database engine or
Microsoft SQL Server 2000.
The Breeze database engine comes with Macromedia Breeze, but it has the following limitations:
• Because of licensing restrictions, you can install the Breeze database engine only on the same
computer as the Breeze Presentation platform.
• Also because of licensing restrictions, you can only install the Breeze database engine on a singleprocessor computer.
• The Breeze database engine has a command-line interface for managing and querying the database,
in contrast to Microsoft SQL Server 2000, which has graphical tools for these uses.
Recommendations:
• Consider installing the Breeze database engine for use in test environments.
• In a production environment, give preference to Microsoft SQL Server 2000 if your database
administrator is not comfortable with command line interfaces.
For information on setting up the Breeze database through Microsoft SQL Server 2000, see “Setting
configuration properties for Microsoft SQL Server 2000” on page 15.
Note: To use a database with Breeze, the database must be set to case insensitive.
Installing and configuring Macromedia Breeze overview
To install and configure Breeze, perform the following steps.
To install and configure Macromedia Breeze:
Make sure that you have met all hardware and software requirements described in this chapter.
Run the Breeze installer to install Breeze components (see “Installing Breeze” on page 11).
Configure the Breeze database (see “Setting Up the Breeze Database” on page 15).
Configure the Breeze Presentation platform (see “Configuring the Breeze Presentation Platform”
on page 17).
5 Configure Breeze Live, if you have installed it on a separate computer from the Breeze Presentation
platform (see “Configuring Breeze Live” on page 19).
For information about starting Macromedia Breeze, see “Starting your Breeze components” on page 21.
1
2
3
4
Installing Breeze
Before you begin the installation process, check the following items:
• All requirements listed in “Before You Install” on page 7 are satisfied.
Verify the following requirements:
■
A local printer driver is installed on the same computer as the Breeze Presentation platform.
■
Microsoft PowerPoint XP is installed on the same computer as the Breeze
Presentation platform.
Note: If you are using Breeze Live stand-alone configuration, the preceding two statements apply to the
Breeze application server rather than the Breeze Presentation platform.
• You have the serial number provided by Macromedia for installing Macromedia Breeze.
The Welcome letter that comes with the installation DVD contains the serial number.
Using the Breeze installer
Use the procedure described in this section to install Breeze.
To install Breeze:
1
2
3
4
5
6
If the Breeze installer does not start automatically when you insert the Breeze installation DVD into
the DVD drive, double-click the setup.exe file in the installation DVD’s root folder.
The installer Welcome window appears.
Click Next.
The License Agreement window appears.
Click Yes to accept the licensing terms.
The Customer Information window appears.
Enter your name, your company’s name, and your Breeze serial number.
The Welcome letter that comes with the installation CD contains the serial number.
The Choose Destination Location window appears.
Click Next to accept the default installation folder, or click the Browse button to select a different
location, and then click Next.
The Select Features window appears and lists the software that you can install. The contents of the
window vary, depending on which Breeze components you are licensed to install.
Select the software you want to install according to one of the following Breeze configurations:
Breeze Presentation platform only The following Select Features window appears if you are
licensed to install only the Breeze Presentation platform:
Note: If you install the Breeze database engine, it must be installed at the same time and on the same
computer as the Breeze Presentation platform.
Breeze Presentation platform and Breeze Training The following Select Features window appears
if you are licensed to install the Breeze Presentation platform and Breeze Training, but not Breeze
Live:
Note: The Breeze Presentation platform and Breeze Training are installed together, on the same computer. If
you install the Breeze database engine, it must be installed at the same time and on the same computer as the
Breeze Presentation platform.
Presentation platform and Breeze Live The following Select Features window appears if you are
licensed to install the Breeze Presentation platform and Breeze Live, but not Breeze Training:
Note: If you install the Breeze database engine, it must be installed at the same time and on the same
computer as the Breeze Presentation platform.
The following Select Features
window appears if you are licensed to install all three Breeze components:
Breeze Presentation platform, Breeze Training, and Breeze Live
Note: The Breeze Presentation platform and Breeze Training are installed together, on the same computer. If
you install the Breeze database engine, it must be installed at the same time and on the same computer as the
Breeze Presentation platform.
Breeze Live stand-alone configuration The following Select Features window appears if you are
licensed to install the Breeze Live stand-alone configuration:
Note: If you install the Breeze database engine, it must be installed at the same time and on the same
computer as the Breeze Presentation platform.
After you select the features you want in the Select Features window, click Next.
The Setup Status window appears and shows the installer’s progress. Installing the software may
take a few minutes.
If you elected to install the Breeze database engine, the installer for the Breeze database engine starts
(the installer identifies itself as the installer for Microsoft SQL Server, Desktop Edition) after the
Macromedia Breeze installation completes. Installing the Breeze database engine may take a few
minutes. The installation proceeds automatically—you do not need to interact with the Breeze
database-engine installer.
When installation is complete, the Breeze installation wizard Complete window appears.
8 Click Finish to exit the Breeze installation wizard.
After you install Breeze software, you need to configure it, which is described in the following section:
• “Setting Up the Breeze Database” on page 15
• “Configuring the Breeze Presentation Platform” on page 17
• “Configuring Breeze Live” on page 19
You need to configure Breeze Live only if you have installed it on a separate computer from the
Breeze Presentation platform.
7
Completing an aborted installation
If the installer aborts during the installation of any Breeze components that include the built-in Breeze
database, use the following procedure to complete the installation.
Note: If you were installing the Microsoft SQL server when the installation aborted, you should uninstall the Microsoft
SQL server before completing the following steps. For more information, see the Breeze TechNote entitled Installer
detects existing installation of SQL Server at www.macromedia.com/go/breeze_uninstall_technote.
To complete an aborted installation:
Reboot the server.
In Windows, open the Control Panel and double-click Add/Remove Programs.
In the Add or Remove Programs dialog box, select Macromedia Breeze Server, and then select
Change or Remove Programs on the left of the dialog box. Click Change/Remove.
4 In the installation wizard, deselect the option to install the Breeze database and follow the steps in
the wizard to finish installing Breeze Live and application server components.
5 When the installation is complete, reboot the server.
1
2
3
Starting and stopping Breeze components
Before you start the Breeze components, you must make sure that they have been properly configured and
that either the Breeze database engine or Microsoft SQL Server is running.
To start the Breeze Presentation platform:
• Select Start > All Programs > Macromedia > Macromedia Breeze 4 > Start Breeze Server.
To stop the Breeze Presentation platform:
• Select Start > All Programs > Macromedia > Macromedia Breeze 4 > Stop Breeze Server.
To start Breeze Live:
• Select Start > All Programs > Macromedia > Macromedia Breeze 4 > Start Breeze Live Server.
To stop Breeze Live:
• Select Start > All Programs > Macromedia > Macromedia Breeze 4 > Stop Breeze Live Server.
Uninstalling Macromedia Breeze
You can uninstall Macromedia Breeze through the Windows Control panel. Before uninstalling, make
sure you stop both the Breeze Presentation platform and Breeze Live, as described in the preceding section.
To uninstall Macromedia Breeze using the Windows Control Panel:
Open the Control panel and double-click Add/Remove Programs. Then select Macromedia Breeze
Server 4.
2 Click Remove.
When you uninstall Macromedia Breeze, it does not uninstall the following elements:
• Breeze database
• Log files
• The Breeze configuration file, custom.ini
• Content files
If you experience any difficulty uninstalling Breeze, refer to TechNotes at the Breeze Licensed Support site:
www.macromedia.com/go/breeze_licensed_support.
1
Setting Up the Breeze Database
Macromedia Breeze requires a database in order to store information about users, content, courses,
meetings, and reports. The database is created through either the Breeze database engine or Microsoft
SQL Server 2000. The Breeze database engine comes with Macromedia Breeze. You can install it at the
same time you install the Breeze Presentation platform.
Note: If you are using the Breeze Live stand-alone configuration, all references to the Breeze Presentation platform in
this chapter also apply to the Breeze application server.
The first time the Breeze Presentation platform runs, it creates the Breeze database. To create the database,
the Breeze Presentation platform uses information in the configuration file, custom.ini, and executes a
SQL script. The script creates the database and all the tables, indexes, and stored procedures that
Macromedia Breeze requires.
If you use the Breeze database engine, the Breeze Presentation platform can use the default values in the
custom.ini configuration file to create and set up the Breeze database. If you use Microsoft SQL Server
2000, you must set configuration properties in the custom.ini file, as described in the next section. To use
a database with Breeze, the database must be set to case insensitive.
Note: Generally, there is no need to change configuration settings for the Breeze database engine. However, if you
want to change any of the default settings for it, visit the following website for more information:
www.macromedia.com/go/breeze_licensed_support.
Setting configuration properties for Microsoft SQL Server
2000
If you use Microsoft SQL Server 2000 for the Breeze database, you must set configuration properties in
the Breeze Presentation platform configuration file, custom.ini.
To set configuration properties for the Breeze database when you use Microsoft SQL Server 2000:
Before you start the Breeze Presentation platform, you must edit the Breeze configuration file. Select
Start > All Programs > Macromedia > Macromedia Breeze 4 > Configure Breeze.
2 Set properties in the Breeze configuration file, as listed in the following table:
1
Property
Default value
Description
DB_HOST
localhost
The name of the Microsoft SQL Server 2000 host computer
DB_NAME
breeze
The name of the Breeze database
DB_USER
sa
The user name for the Breeze Presentation platform to use in creating
and accessing the database
DB_PASSWORD
breeze
The password for the Breeze Presentation platform to use in creating
and accessing the database. To change the password, see “Changing
the Breeze password” on page 15.
To change the default password, which you should do to maintain security, and to see a complete list of
the configuration properties that must be set before you can use Macromedia Breeze, see “Configuring the
Breeze Presentation Platform” on page 17.
Changing the Breeze password
The password for the Breeze Presentation platform allows access to the Breeze database. For the integrity
of your system security, change the default password if you’re using the Breeze database.
Note: Microsoft SQL Server 2000 users usually already have a password that the database administrator has set.
To change the database password:
Open the command prompt window on the computer that is hosting the database and type
osql -U sa -P breeze -d breeze to log in to the Breeze database.
2 Enter the command for the new password, as shown in the following example:
1
sp_password @old=breeze, @new='NewPassword', @loginame = 'sa' go
For additional information about changing the password, see the Microsoft article, “How to Verify and
Change the MSDE System Administrator Password” at: http://support.microsoft.com/
default.aspx?scid=kb;EN-US;322336#3
Maintenance
For proper maintenance, you should back up files on a regular basis.
• To maintain the Microsoft Data Engine Database, see the Microsoft article, “Backing Up and
Restoring Microsoft Data Engine Databases” at: www.microsoft.com/office/ork/2000/five/
75t2_6.htm.
• You should regularly back up the content folder in the following location:
[Boot drive]\Breeze\content.
• Periodically, back up the entire Breeze root directory.
• You should occasionally delete log files in order to conserve disk space.
Upgrading Breeze
For information about upgrading Breeze and the database, see the “Upgrade Guide” at:
www.macromedia.com/go/breeze_4_upgrade.
Configuring the Breeze Presentation Platform
It’s important to configure the Macromedia Breeze Presentation platform by setting property values in the
Breeze configuration file, custom.ini. For example, you should change the default support password to use
the URL of your own enterprise support site. The following procedure and table indicate how to change
settings in the custom.ini file.
Note: If you are using the Breeze Live stand-alone configuration, all references to the Breeze Presentation platform in
this chapter also apply to the Breeze application server.
To open the Breeze configuration file for editing:
• Select Start > All Programs > Macromedia > Macromedia Breeze 4 > Configure Breeze.
The following table lists properties in the order in which they appear in the configuration file:
Property
Default value
Description
ADMIN_HOST
[none]
The host name to use in a URL for accessing Breeze. This is the host
name that users enter directly in their browsers.
For example, for the URL http://aserver.mybreeze.com, you would set
ADMIN_HOST as shown in the following example:
ADMIN_HOST=aserver.mybreeze.com
If you set your web server to use a different port than port 80 for
receiving HTTP messages, you must add the port number to the host
name, as shown in the following example:
ADMIN_HOST=aserver.mybreeze.com:8080
ADMIN_EMAIL
[none]
The login name to use for primary administrative access to the Breeze
Manager. The login name must be the e-mail address of the primary
administrator. The following example shows how you can set this
property.
[email protected]
ADMIN_PASSWORD
[none]
The password to use for primary administrative access to the Breeze
Manager.
SYSTEM_EMAIL
[none]
The e-mail address that users see as the source of notifications sent
by Breeze and to which they can send responses.
You can define the user name in the e-mail address as an alias so that
more than one person receives user responses. The following
example shows how you can set this property.
[email protected]
SUPPORT_EMAIL
*** Support link
not configured.
Please see
installation
guide for
customizing
support links.
***
An e-mail address or URL within your organization to which you want
to direct users when they need technical support or help with using
Breeze. The address or URL you enter is used in Breeze e-mail
notifications. The following examples show how you can set this
property.
SUPPORT_EMAIL=http://www.mydomain.com/breeze/support/
index.html
[email protected]
If you do not change the default value, users see the default text
instead of a support location.
BCC_EMAIL
[none]
A “blind-copy” e-mail address to which all notifications that users
receive are also sent. This property allows administrative tracking of email messages sent through Breeze without exposing an internal email address. The following example shows how you can set this
property.
[email protected]
SMTP_HOST
mail
The name of the outgoing SMTP mail server to use for sending out
Breeze e-mail notifications.
DB_HOST
localhost
The name of the Breeze database’s host computer.
DB_NAME
breeze
The name assigned to the Breeze database.
Property
Default value
Description
DB_USER
sa
The user name for the Breeze Presentation platform to use in
accessing the database.
DB_PASSWORD
breeze
The password for the Breeze Presentation platform, which allows
access to the database. For the integrity of your system security,
change the default password. See “Changing the Breeze password”
on page 15.
HTTP_PORT
80
The port for the web server associated with Breeze to use for
receiving HTTP messages.
#FCS_CONTENT_PATH \\fileserver\bre If you have installed Breeze Live and the Breeze Presentation
ezeshare\cont platform on separate computers, this property is the path to shared
ent\
Breeze Live meeting files. Initially, the property is commented out.
You need to uncomment it for it to take effect, as shown in the
following example:
FCS_CONTENT_PATH=\\fileserver1\breeze\live_meetings
For more information on Breeze Live shared files, see “Configuring
Breeze Live” on page 19.
Configuring Breeze Live
If you install Macromedia Breeze Live on the same computer as the Breeze Presentation platform, no
additional configuration of Breeze Live is necessary. If you install Breeze Live on a separate computer from
the Breeze Presentation, you need to perform the configuration steps described in this chapter.
Note: If you are using the Breeze Live stand-alone configuration, all references to the Breeze Presentation platform in
this chapter also apply to the Breeze application server.
Breeze Live creates files that need to be shared with the Breeze Presentation platform. If Breeze Live is not
on the same computer as the Breeze Presentation platform, you need to set up the shared access to these
files and copy the custom.ini configuration file used by the Breeze Presentation platform to the Breeze Live
host computer.
To configure Breeze Live on a separate computer from the Breeze Presentation platform:
1
2
3
4
5
Create a user account on the domain that contains the Breeze Live and Breeze Presentation platform
host computers, and give the account administrative privileges to both computers.
This is the Breeze user account. Breeze Live and the Breeze Presentation platform will use this
account to run as Windows services.
Immediately under the Breeze Live installation folder, create a folder called “content” for the files
that Breeze Live and the Breeze Presentation platform need to share.
Share the Breeze Live installation folder so that Breeze Live and the Breeze Presentation platform
have access to it.
Set permissions on the Breeze Live installation folder. Give the Breeze user you created in step 1 full
control of the folder.
Because Breeze Live and the Breeze Presentation platform run as the Breeze user you created, this
privilege lets them write files to the folder and its subfolders.
Set the FCS_CONTENT_PATH property in the Breeze Presentation platform custom.ini configuration
file to the location of the content folder you created in step 2.
For example, if the Breeze Live host computer is named ZLIVE, you set FCS_CONTENT_PATH as
shown in the following example:
FCS_CONTENT_PATH=\\ZLIVE\breeze_live_install_folder\content
For more information about the FCS_CONTENT_PATH configuration property, see the table of
configuration properties in “Configuring the Breeze Presentation Platform” on page 17.
The custom.ini configuration file on the Breeze Presentation platform host computer resides in the
Breeze Presentation platform installation folder.
6 If your Breeze server will serve presentations for Internet clients, add the following entries at the end
of the configuration file. In the example below, breeze.yourhostname.com represents the fully
qualified domain name of your Internet accessible Breeze server as it appears in the Domain Name
Service (DNS) and in your ADMIN_HOST entry.
USE_HOST_MAPPINGS=yes
host.breeze=breeze.yourhostname.com
7
8
Copy the custom.ini file to the Breeze Live installation folder on the Breeze Live host computer.
On the Breeze Presentation platform host computer, set the login properties for the Macromedia
Breeze Application Service so that the Breeze user account can start the service.
To set login properties for the Macromedia Breeze Application Service:
a Depending on your operating system, do one of the following:
In Windows 2000, select Start > Settings > Control Panel > Administrative Tools > Services.
In Windows XP, select Start > Control Panel > Performance and Maintenance > Administrative
Tools > Services.
In Windows 2003, select Start > Administrative Tools > Services
b
In the list of services, double-click Macromedia Breeze Application Service.
The Properties window for the Macromedia Breeze Application Service appears:
c
Click the Log On tab.
The Log On dialog box appears:
Select This Account and then enter the name of the Breeze user account you created, followed
by the account’s password and a confirmation of the password.
9 Restart the Macromedia Breeze Application Service for your changes to take effect.
10 On the Breeze Live host computer, follow the procedure given in step 7, and set the login properties
for the Flash Communication Server and the Flash Communication Administration Server so that
the Breeze user account can start the services.
11 Restart the Flash Communication Server and the Flash Communication Administration Server for
your changes to take effect.
d
Verifying Your Installation
After you have installed and configured Macromedia Breeze, you should verify that the installation was
successful and that all features are functional.
Note: If you are using the Breeze Live stand-alone configuration, all references in this chapter to the Breeze
Presentation platform also apply to the Breeze application server.
This chapter describes how to verify a successful Breeze installation using the following procedures:
To verify a successful Breeze installation:
Start your Breeze components and other required software (see “Starting your Breeze components”
on page 21).
2 Verify that the Breeze database and Breeze Presentation platform work together (see “Verifying that
the Breeze database and Breeze Presentation platform work together” on page 22).
3 Verify that you can use the Breeze Manager, a web application within the Breeze Presentation
platform, and that it can send e-mail using your e-mail server (see “Verifying that you can use the
Breeze Manager and send e-mail notifications” on page 23).
If you installed the Breeze Live stand-alone configuration, skip steps 4 and 5, and go directly to
step 6.
4 Verify that you can use basic features of the Breeze Presentation platform: Convert a PowerPoint
presentation to a Breeze Flash presentation, save it in the Presentation platform content library, and
then view it (see “Verifying that you can use the Breeze Presentation platform” on page 23).
5 If you have installed Breeze Training, verify that you can use it (see “Verifying that you can use
Breeze Training” on page 24).
6 If you have installed Breeze Live, verify that you can use it (see “Verifying that you can use Breeze
Live” on page 24).
If you receive error messages or cannot perform any of the steps, visit the following website for
troubleshooting information: www.macromedia.com/go/breeze_licensed_support.
1
Starting your Breeze components
Before you can verify that your Breeze components function successfully, you must start the database
management system for the Breeze database and the Breeze Presentation platform. You must start your
Breeze components in the following order:
1 Start the Breeze database before you start the Breeze Presentation platform.
2 Start the Breeze Presentation platform before you start Breeze Live.
If you are using Breeze Live stand-alone configuration, start the Breeze application server before
you start Breeze Live.
Starting the database management system for the Breeze database
The following procedure applies to the Breeze database engine, which is installed as a Windows service. If
you configured Microsoft SQL Server 2000, you simply need to verify that the database is running.
To start the Breeze database:
Open the Services window under the Windows Control Panel:
■
In Windows 2000, select Start > Settings > Control Panel > Administrative Tools > Services.
■
In Windows XP, select Start > Control Panel > Performance and Maintenance > Administrative
Tools > Services.
■
In Windows 2003, select Start > Administrative Tools > Services.
2 In the list of services, find MSSQLSERVER.
The Breeze database engine appears as MSSQLSERVER in the list of services.
3 If the status is Stopped, select MSSQLSERVER, and click the Restart icon (Windows 2000 and
Windows 2003) or the Restart link (Windows XP).
1
Starting the Breeze Presentation platform
The following procedure starts the Breeze Presentation platform.
To start the Breeze Presentation platform:
• Select Start > All Programs > Macromedia > Macromedia Breeze 4 > Start Breeze Server.
Starting Breeze Live
The following procedure starts Breeze Live.
To start Breeze Live:
• Select Start > All Programs > Macromedia > Macromedia Breeze 4 > Start Breeze Live Server.
Verifying that the Breeze database and Breeze Presentation
platform work together
If you can log in to the Breeze Manager (a web application within the Breeze Presentation platform), it
means that the Breeze database and the Breeze Presentation platform can function together.
To log in to the Breeze Manager:
Go to the following URL: http://hostname/common/support/course/startmain.htm.
In this URL, hostname is the name of the Breeze Presentation platform host computer.
The Welcome page for Macromedia Breeze appears. Under the Start Using Macromedia Breeze
heading, there is a link for logging in to Breeze and a link for downloading the Macromedia Breeze
Plug-In for Microsoft PowerPoint. You will download the Breeze Plug-in for PowerPoint in a later
step (see “Verifying that you can use the Breeze Presentation platform” on page 23).
2 Click the login link.
The Breeze Manager log-in window appears.
3 As your login name, enter the value you set for the ADMIN_EMAIL property in the Breeze Presentation
platform configuration file (see the table of configuration properties in “Configuring the Breeze
Presentation Platform”).
4 As your password, enter the value you set for the ADMIN_PASSWORD property in the Breeze
Presentation platform configuration file (see the table of configuration properties in “Configuring
the Breeze Presentation Platform”).
If you can log in successfully, the Breeze Manager home page appears. If you do not have Breeze
Training, the Courses tab is not visible. If you do not have Breeze Live, the Meetings tab is
not visible.
1
Verifying that you can use the Breeze Manager and send
e-mail notifications
To verify that you can use the Breeze Presentation platform and that it can send e-mail using your e-mail
server, you’ll create a new Breeze user, send an e-mail notification to the user, and then confirm that the email was received.
To create a new user and send an e-mail notification:
Click the Users tab on the Breeze Manager home page.
In the Users and Groups page, click New User.
The New User Information page appears and requires the following information:
■
First Name
■
Last Name
■
Email (your e-mail address, which is used as your login name)
■
Password (this must be four characters or more in length)
3 Enter the required information using your e-mail address in the Email text box, and make sure that
the Email the New User Account Information, Login and Password option is selected.
4 Under the Group Memberships heading, assign the user to the Account Administrators group and
click Save.
5 Allow enough time for an e-mail notification to arrive, and check your e-mail.
If you received the notification, your Breeze Presentation platform is functional and can send emails using your e-mail server.
The new-user notification contains the following text and URL:
To start using your Macromedia Breeze account, use the following link:
http://ADMIN_HOST/common/support/course/startmain.htm
Here, ADMIN_HOST is the value you set for the ADMIN_HOST property in the Breeze Presentation
platform custom.ini configuration file. For more information about the ADMIN_HOST configuration
property, see the table of configuration properties in “Configuring the Breeze Presentation
Platform” on page 17.
The URL takes you to the Breeze Welcome page, from which you can download the Breeze Plug-In
for PowerPoint, which is required in the next section.
1
2
Verifying that you can use the Breeze Presentation platform
To verify that you can use the Breeze Presentation platform, you’ll send a PowerPoint presentation to the
Breeze Presentation platform for compilation into a Breeze Flash presentation and then view it.
Before you can send a PowerPoint presentation to the Breeze Presentation platform, you must install the
Breeze Plug-In for PowerPoint on a computer that meets the following requirements:
• PowerPoint is already installed on the computer.
• The Breeze Presentation platform is not currently installed on the computer and is not going to be
installed later, as long as the plug-in is in use.
To create a Breeze presentation and view it:
1
2
3
4
5
Go to the URL that you received in the new-user notification that was described in the preceding
section (http://ADMIN_HOST/common/support/course/startmain.htm).
The URL takes you to a page with the heading “Welcome to Macromedia Breeze” and a link for
downloading the Breeze Plug-In for PowerPoint.
Click the download link.
A login window for the download appears.
Log in with the e-mail address and password of the user you created in step 2 of “Verifying that you
can use the Breeze Manager and send e-mail notifications” on page 23.
The Macromedia Breeze Plug-In for PowerPoint page appears and gives instructions for installing
the plug-in.
Follow the instructions for installing the plug-in.
If you do not have a PowerPoint presentation that you can send to the Breeze Presentation platform
for compilation into a Breeze Flash presentation, create a presentation of one or two slides and save
the presentation.
Open the Breeze Publish Wizard by selecting Publish from the Breeze menu in PowerPoint.
The Publish Wizard login window appears.
7 Log in with the e-mail address and password you used in step 3, and follow the steps in the
Publish Wizard.
When you complete the steps in the Publish Wizard, your PowerPoint presentation is uploaded to
the Breeze Presentation platform and compiled into a Breeze Flash presentation. When the
compilation is complete, the Presentation platform sends you an e-mail notification with a link to
the presentation.
8 Click the link in the e-mail notification to view the presentation in your browser.
6
Verifying that you can use Breeze Training
To verify that Breeze Training is functional, you’ll use the Breeze Plug-In for PowerPoint to create a quiz
within a PowerPoint presentation, publish the presentation using the Publish Wizard, create and enroll in
a Breeze course, and take the quiz. Then confirm that you can generate a report that contains the quiz
results.
To verify that Breeze Training is installed and functioning successfully:
1
2
3
4
5
6
7
8
9
In PowerPoint, select Breeze > Quizzes and Surveys.
In the Quiz Wizard that appears, follow the steps to create a quiz.
Only one quiz question is necessary.
After you create your quiz in PowerPoint, publish it to the Breeze Presentation platform.
The publishing procedure is the same as step 6 in the procedure in “Verifying that you can use the
Breeze Presentation platform” on page 23.
In the Breeze Manager, click the Courses tab to open the Courses page, and then click New Course.
In the Course wizard, follow the steps to create a course.
■
In step 2, select the PowerPoint presentation that contains the quiz you created.
■
In step 3, enroll yourself as a learner.
■
In step 5, send an e-mail notification to yourself.
The e-mail notification you receive contains a link to the course presentation.
Click the link to see the course presentation and take the quiz.
After submitting your quiz, go to the Breeze Manager, and click the Reports tab.
On the Reports page, click the Course Reports [View] link.
The Course Reports page appears. Your course should be listed.
Click the By Users link for your course.
A page that contains information about your course by individual user appears. If the report lists
you as a user and gives your quiz results, you have verified that Breeze Training is successfully
installed.
Verifying that you can use Breeze Live
To verify that Breeze Live is functional, you’ll create a Breeze meeting and then enter (log in to) the
meeting room.
To verify that Breeze Live is installed and functioning successfully:
In the Breeze Manager, click the Meetings tab and select New Meeting.
The first page of the Meeting Wizard appears and requires the following information:
■
Meeting Name
■
Summary
■
Start Time
■
Duration
■
Meeting Access
2 Enter the required information. For the Meeting Access option, select Only Registered Users and
Accepted Guests May Enter This Room, and then click Next.
The Select Participants page appears.
1
Select the user you created earlier (see step 2 in “Verifying that you can use the Breeze Manager and
send e-mail notifications” on page 23) and click Finish.
The Meeting Information page for the meeting you created appears.
4 Click the Invitations link.
5 On the Invitations page, click Send to send yourself a meeting invitation. This invitation contains a
link to the meeting room in which the meeting is held.
6 When the meeting invitation arrives, click the meeting link.
If the Presenter Add-In for Breeze is not installed on your computer, the following window appears:
3
If the Presenter Add-In for Breeze window appears, click Yes.
A login window for your meeting appears.
8 Log in to enter the meeting as a Registered User.
Use the e-mail address and password for the user you created earlier (see step 2 in “Verifying that
you can use the Breeze Manager and send e-mail notifications” on page 23).
If your browser successfully displays the online meeting room for your meeting, Breeze Live
is functional.
7
Appendix A: Clustering Breeze Presentation Platforms
If your Macromedia Breeze license permits, you can install the Breeze Presentation platform on two or
more computers, and then cluster the Breeze Presentation platforms to provide load balancing and
failover.
Clustering Breeze Presentation platforms has the following advantages:
• You can effectively use third-party hardware or software to provide load balancing and failover for
HTTP requests. Clustering Breeze Presentation platforms allows them to share session data with
each other so that load balancing and failover through third-party solutions can be effective.
• Clustered Breeze Presentation platforms provide their own load balancing for requests to create
Breeze Flash presentations from Microsoft PowerPoint presentations.
• All Breeze Presentation platforms in a cluster have copies of the same content. If one computer in a
cluster fails, the Breeze Presentation platform on another computer in the cluster can take over and
supply the same content.
Note: If you are using the Breeze Live stand-alone configuration, all references to the Breeze Presentation platform in
this appendix apply also to the Breeze application server.
This appendix explains how to cluster Breeze Presentation platforms and verify that the cluster functions
successfully. The following topics are discussed:
• “Setting up a cluster of Breeze Presentation platforms” on page 26
• “Verifying failover for HTTP requests” on page 27
• “Verifying replication of content across the cluster” on page 27
Setting up a cluster of Breeze Presentation platforms
Each Breeze Presentation platform in a cluster must be able to access the Breeze database. Because
licensing restrictions do not allow more than one Breeze Presentation platform to access the Breeze
database engine, you must use Microsoft SQL Server 2000 for the Breeze database.
The following figure illustrates a cluster with a load balancer and with the Breeze Presentation platform on
three computers.
Load balancer
Breeze
Presentation
platform
Breeze
Presentation
platform
Breeze database
(Microsoft SQL Server 2000)
Breeze
Presentation
platform
To set up clustered Breeze Presentation platforms:
Install the Breeze Presentation platform on each computer that will be in the cluster.
During installation, you use the same license key each time you install the Breeze Presentation
platform.
2 Set configuration properties in the custom.ini file belonging to one of the Breeze Presentation
platforms in the cluster.
For information on setting configuration properties for the Breeze Presentation platform, see
“Configuring the Breeze Presentation Platform” on page 17.
Some of the properties you need to set in the custom.ini configuration file apply to the Breeze
database. For information on these properties and on setting up the Breeze database, see “Setting
Up the Breeze Database” on page 15.
3 Copy the custom.ini configuration file to the installation folder of all the other Breeze Presentation
platforms in the cluster.
All Breeze Presentation platforms must have identical custom.ini files.
Your Breeze Presentation platforms are now clustered. Before you start one of the Breeze Presentation
platforms, you need to start Microsoft SQL Server.
1
Verifying failover for HTTP requests
You can verify that your Breeze Presentation platform cluster provides failover in the event that one of the
computers in the cluster fails. The following procedure assumes that there are two computers in the
cluster: Computer1 and Computer2. The steps for verifying failover with more than two computers are
very similar.
The main approach in the procedure that follows is to demonstrate failover when you are using the Breeze
Manager. If the computer you are accessing for the Breeze Manager fails and you can continue to use the
Breeze Manager without logging in again and without interruption, failover is successful.
To verify failover for HTTP requests in a Breeze Presentation platform cluster with two computers:
1
2
3
4
5
Verify that the Breeze Presentation platform on Computer1 is started and that the Breeze
Presentation platform on Computer2 is stopped.
Before you start the Breeze Presentation platform, Microsoft SQL Server 2000 must be running.
To start the Breeze Presentation platform:
■
Select Start > All Programs > Macromedia > Macromedia Breeze 4 > Start Breeze Server.
To stop the Breeze Presentation platform:
■
Select Start > All Programs > Macromedia > Macromedia Breeze 4 > Stop Breeze Server.
Log in to the Breeze Manager.
You can log in to the Breeze Manager from the following URL: http://admin_host/servlet/admin.
In the URL, admin_host is the host name you entered as the value of the ADMIN_HOST property in
the Breeze Presentation platform custom.ini configuration file (see step 2 under “Setting up a
cluster of Breeze Presentation platforms” on page 26).
When you log in, the Breeze Manager home page opens.
Start the Breeze Presentation platform on Computer2.
Stop the Breeze Presentation platform on Computer1.
Click the Reports tab.
If failover is successful, the Breeze Manager Reports page opens. If the login page opens or any
other page is displayed, failover was not successful.
Verifying replication of content across the cluster
You can verify that content uploaded to one Breeze Presentation platform in a cluster is replicated to all
other Breeze Presentation platforms in the cluster and is therefore available whenever failover is necessary.
As in the preceding section, the procedure that follows assumes a cluster with two Breeze Presentation
platforms.
To verify replication of content across a cluster with two Breeze Presentation platforms:
1
2
3
4
5
6
7
8
9
Verify that the Breeze Presentation platform on Computer1 is running and that the Breeze
Presentation platform on Computer2 is stopped.
Before you start the Breeze Presentation platform, Microsoft SQL Server 2000 must be running.
To start the Breeze Presentation platform:
■
Select Start > All Programs > Macromedia > Macromedia Breeze 4 > Start Breeze Server.
To stop the Breeze Presentation platform:
■
Select Start > All Programs > Macromedia > Macromedia Breeze 4 > Stop Breeze Server.
Log in to the Breeze Manager.
You can log in to the Breeze Manager from the following URL: http://admin_host/servlet/admin.
In the URL, admin_host is the host name you entered as the value of the ADMIN_HOST property in
the Breeze Presentation platform custom.ini configuration file (see step 2 under “Setting up a
cluster of Breeze Presentation platforms” on page 26).
When you log in, the Breeze Manager home page opens.
Upload a JPEG image or other content to the Breeze Presentation platform on Computer1:
a Make sure that you are a member of the Account Authors user group.
To upload content, even if you are an account administrator, you must also be a member of the
Account Authors user group. As an account administrator, you can add yourself to the Account
Authors group. For more information, open Using the Breeze Manager Help > Contents >
Managing Users and Groups > Managing Groups > Adding members to a group.
b Click the Content tab in the Breeze Manager.
c On the Content page, click New Content and then follow the steps displayed in your browser
for adding content.
Once your test content is uploaded, a User Content page opens and displays a list of the content
that belongs to you.
Click the link to the newly uploaded test content.
A Content Information page with a URL for viewing your test content opens.
Make a note of the URL.
You will use it in step 9.
Click the URL.
Your test content is displayed.
Start Computer2, wait 10 seconds or so, and then stop Computer1.
Close the browser window in which you were viewing the test content.
Open a new browser window and go to the URL for viewing your test content.
If your test content is displayed, replication to Computer2 was successful. A blank window or an
error message means that replication failed.
Appendix B: Clustering Breeze Live
If your Macromedia Breeze license permits, you can install Breeze Live on two or more computers and
then cluster the computers to provide load balancing and failover for Breeze Live.
This appendix explains how to create a Breeze Live cluster and verify that the cluster functions successfully.
It contains the following main sections:
• “Setting up a Breeze Live cluster” on page 29
• “Verifying failover for Breeze Live” on page 30
Setting up a Breeze Live cluster
When you create a Breeze Live cluster, Breeze Live on each computer must communicate with the Breeze
Presentation platform and with a file server that stores the files created by each Breeze Live installation.
The Breeze Presentation platform also needs access to the Breeze Live files on the file server. The following
figure illustrates a cluster with Breeze Live on three computers.
Note: If you are using Breeze Live stand-alone configuration, all references to the Breeze Presentation platform in
this appendix also apply to the Breeze application server.
Breeze Presentation platform
Breeze
Live
Breeze
Live
File
Server
Breeze
Live
Breeze database
To set up a Breeze Live cluster for load balancing and failover:
Install Breeze Live on each computer that will be in the cluster.
Create a user account on the domain that contains the Breeze Live and Breeze Presentation platform
computers, and give the user account administrative privileges to all the Breeze Live and
Presentation platform computers.
This is the Breeze user account. Each Breeze Live in the cluster and the Breeze Presentation
platform will use this account to run as services under the Windows operating system.
3 On a file server, create a folder for Breeze, and immediately below the Breeze folder, create a
subfolder for the Breeze Live files that will be shared.
For example, the following is a possible path to the shared files: \\fileserver1\breeze\content. In this
appendix, the examples assume that the Breeze folder is named “breeze” and that the folder for
shared files created by Breeze Live is named“content.” In practice, you can choose other names for
the folders.
1
2
On the file server, share the Breeze folder, giving the Breeze user you created in step 2 full control
over the folder.
To share the Breeze folder:
a Right-click the Breeze folder in the Windows Explorer Folders panel, and select Sharing
and Security.
The Properties window for the Breeze folder opens:
b Click Share This Folder and enter a Share name, for example, Breeze.
c Click Apply and then click the Permissions button.
The Permissions window opens.
d Remove the Everyone group, if you want to, and then click Add.
The Select Users or Groups window opens.
e Click the Locations button and select the domain in which you created the Breeze user.
f In the Object Names text box, enter the name of the Breeze user, and then click Check Names
to verify that the name you entered is recognized, and click OK.
g In the Permissions window, select the Breeze user and click Full Control, and then click OK.
h In the Properties window, click OK.
5 Set the FCS_CONTENT_PATH property in the Breeze Presentation platform custom.ini configuration
file to the location of the folder containing shared Breeze Live files.
For example, given \\fileserver1\breeze\content as the folder containing the shared files, you would
set the FCS_CONTENT_PATH property as shown in the following example:
4
FCS_CONTENT_PATH=\\fileserver1\breeze\content
6
7
8
9
10
For more information about the FCS_CONTENT_PATH configuration property, see “Configuring the
Breeze Presentation Platform” on page 17.
The custom.ini configuration file on the Breeze Presentation platform computer resides in the
Breeze Presentation platform installation folder.
Copy the custom.ini file to the Breeze Live installation folder on each of the Breeze Live computers.
On the Breeze Presentation platform computer, set the login properties for the Macromedia Breeze
Application Service so that the Breeze user account can start the service.
a Depending on your operating system, do one of the following:
For Windows XP, select Start > Control Panel > Administrative Tools > Services Shortcut.
For Windows 2000, select Start > Settings > Control Panel > Administrative Tools > Services.
For Windows 2003, select Start > Administrative Tools > Services.
b In the list of services, double-click Macromedia Breeze Application Service.
The Properties window for the Macromedia Breeze Application Service appears.
c Click the Log On tab.
d Select This Account and then enter the name of the Breeze user account you created, followed
by the account’s password and a confirmation of the password.
Restart the Macromedia Breeze Application Service so that your changes take effect.
On each Breeze Live computer, follow the procedure given in step 7, and set the login properties for
the Flash Communication Server and the Flash Communication Administration Server so that the
Breeze user account can start the services.
On each Breeze Live computer, restart the Flash Communication Server and the Flash
Communication Administration Server so that your changes take effect.
Verifying failover for Breeze Live
You can verify that your Breeze Live cluster provides failover if one of the computers in the cluster fails. If
failover is successful, you have configured the cluster correctly and can expect that load balancing also
functions successfully.
When a Breeze meeting is created, as soon as the first user enters the online meeting room in which the
meeting is held, the meeting and its meeting room are assigned to Breeze Live on a specific computer.
To verify that failover works, the basic strategy is to create a Breeze meeting, enter the online meeting
room for the meeting, and do something that changes the state of the meeting room, such as entering a
note in the meeting room’s Note pod. Then shut down the Breeze Live that is responsible for the meeting
and see if the meeting room is redisplayed in the same state as before.
The following procedure for verifying failover in a Breeze Live cluster assumes that there are two
computers in the cluster, Computer1 and Computer2. The procedure for verifying failover with more
than two computers is very similar.
To verify failover in a Breeze Live cluster with two computers:
1
2
3
4
5
6
7
Verify that no Breeze meetings are currently open.
This ensures that if you create two meetings, load balancing assigns each meeting to a
different computer.
Open the Breeze Manager and create a new meeting. Enter the meeting room for the meeting.
For information about opening the Breeze Manager and creating meetings, see “Verifying that the
Breeze database and Breeze Presentation platform work together” on page 22 and “Verifying that
you can use Breeze Live” on page 24.
When you create a meeting room, your browser displays a Meeting Information page. Click Enter
Meeting Room.
In the meeting room’s Note pod, enter Meeting room 1 or similar text for identification purposes.
To enter text in the Note pod, simply place the cursor in the Note pod and start typing.
Repeat steps 1 and 2 to create a new meeting and a Note pod entry, such as Meeting room 2.
You can have two or more meeting rooms open in your browser at the same time.
Because of load balancing, each meeting you created should be assigned to a different computer.
Stop Breeze Live on Computer1 by selecting Start > All Programs > Macromedia > Macromedia
Breeze 4 > Stop Breeze Live Server.
If failover is successful, the window for one of the meeting rooms goes blank for up to a minute
while failover is activated. Then the meeting room is displayed again, exactly as it was before.
If failover is successful for Computer1, the next step is to test failover for Computer2.
To enable testing of failover for Computer2, restart Breeze Live on Computer1 by selecting To Start
> All Programs > Macromedia > Macromedia Breeze 4 > Start Breeze Live Server.
Stop Breeze Live on Computer2.
If failover takes place, as described in step 5, you have successfully configured your Breeze
Live cluster.