1
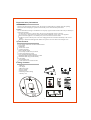
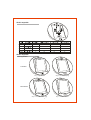
Инструкция для
Pyle PIPDSP2B
Перейти в карточку товара
8 800 775 98 98
л чит т нич
ю н льт цию.
гл т чн . Б з вы дны
www.sotmarket.ru
д бн я инф м ция
тзывы, бз ы и
т в
ы
,
WN
'S
ANUAL
Please Read the Ma al Fist bfoe Oatio
PIPDSP2
Po/Phone Pa Dockng Staton
wth But-In F o/Alarm Clock
WWW.PYL
UD
.C
Table of Contents
Important Safety Information
1
For Customers
Caution
Package Contents
LCD Display Window
Main Unit
Back Panel Connection
iPod Compatible
iPad Compatible
Manner of Working with iPad
Remote Control System
1
2
2
2
3
3
3
3
Battery Installation
Note
Touch Key Control System
Basic Operation
Power Up the System
Select Sleep Mode
Master Volume Control
How to Adjust Treble
How to Adjust Bass
How to Play AUX
How to Play iPod/iPhone/iPad
iPod/iPhone/iPad connection
iPod/iPhone/iPad control
How to Play Tuner
Select FM Input Mode
Listen to the Preset Program
Select Program
Memory Program
How to Adjust the Clock
How to Adjust the Alarm
Alarm Setting
Alarm Source Setting
Turn on/off Alarm
How to Mute
Trouble Shooting
4
4
Important Safety Information
For Customers
Thank you for purchasing the docking center. We strongly recommend that you carefully study the operating
instructions before attempting to operate the unit and that you note the listed safety information.
Caution
You are cautioned that changes or modifications not expressly approved in this manual could void your authority to
operate this equipment.
To reduce the risk of fire or electric shock, do not expose this apparatus to rain or moisture.
To prevent fire or shock hazard, do not place objects filled with liquid, such as vases, on the apparatus.
Do not install the appliance in a confined space, such as a bookcase or built-in cabinet.
Install this system so that the power cord can be unplugged from the wall socket immediately in the event of
trouble.
Batteries or batteries installed apparatus shall not be exposed to excessive heat such as sunlight or fire.
System Features
Dock Station with Remote for All iPods/iPhone/iPad
Line-in Input
FM Bulid in
Alarm/Clock Control
2 Channel Amplifier
Real 2 Channel Output
Power Output: 2x20W for L,R Channel
Fully Function Remote Control
Every Channel Adjustable Separately
iPod/iPhone/iPad Controlled by Remote Control
iPod/iPhone/iPad Charged Automatically
LCD Display
Two-side Work Dock
L and R Channel Auto-switch Function
Package Contents
1.Main unit
2.AC adapter
3.MP3 audio cables
4.Owner's manual
5.Remote control
6.iPad 2nd generation fittings
7.Warranty card
3
2
E WN
Pleas e
ea t he
'S
ANUAL
al F st ef o e
pe at on
PIPDSP2
P / Ph one Pa Doc k n g S tat o n
w th B t -In F
o/ Ala m Clock
WWW.PYL A UDI .C
1
4
5
7
6
.1.
LCD Display Window
1
2
3
1.Digital display
2.Input display Area
3.Alarm logo
4.MHz/KHz icon
4
Main Unit
1
4
1.iPad take out button
2.iPod/iPhone plug
3.LCD display
4.iPad plug
5.Touch key
2
3
5
Back Panel Connection
DC INPUT
15V 1.5A
SL
AUX INPUT
.2.
iPod Compatible
o !"
#P$
#n#
Nano
To%ch
#Phone
iPod
G ene &at#on
()
*
3 ,4th,4th photo)
5th,6th Class c)
*
+
,)
) ()
1st, 2
1st, 2n , 3
4th, 5th, 6th
1st, 2 , 3 , 4th
1st, 2 , 3 , 4th
,) ()
,) ()
Cha&g#ng
Supported iPod Features
A % #o Play'ack
en % Cont&ol
V# eo Play'ack
Yes
Yes
Yes
Yes
Yes
Yes
Yes
Yes
Yes
Yes
Yes
Yes
Yes
Yes
Yes
Yes
Yes
Yes
Yes
Yes
iPad Compatible
iPad 1st generation
Connection
Step 1: Input the iPad
Step 2: Insert the iPad plug
Step 1: Switch off the iPad plug
Step 2: Take out the iPad
Disconnection
.3.
iPad 2nd generation
1
2
3
iPad 2nd generation as the same steps as iPad 1st generation, but you must install the three iPad 2nd generation
fittings before you input the iPad 2nd generation.
Manner of Working with iPad
When the unit working with iPad you have two ways to place the unit. (90 degree rotation)
Remote Control System
1."Mute mode" control selector
1
6
2.iPod/iPhone/iPad control area
2
3
3.Adjust settings
7
8
9
4
Power on/off control selector
10
11
5
12
4.Tuner control area
5.Alarm source selector(FM's, iPod's)
6.Sleep mode selector
7.Input mode selector(iPod, FM, AUX)
8.EQ control selector(Treb, Bass, Master vol)
9.Clock selector
10.Alarm selector
11.Return to the previous menu when select the clock/alarm.
12.Alarm on/off selector
.4.
Battery Installation
1.On the back of the remote control, push the tab and lift off the battery cover.
2.Obtain two (2) fully-charged AAA batteries. Match the "+" and "-" marks on the batteries to the "+" and "-"
marks in the battery case, then insert the new batteries.
3.Align the cover keys with the case holes and press the cover back into place. The tab should click when the
cover is locked.
4.Test the unit by pressing POWER or any mode key. If the batteries are inserted correctly, the selected mode key
will blink once.
Note
Do not leave the remote control in an extremely hot or humid place.
Do not use a new battery with old ones.
Do not mix manganese batteries with other kinds of batteries.
Do not expose the remote sensor to direct sunlight or lighting apparatuses. Doing so may cause a malfunction.
If you do not intend to use the remote control for an extended period of time, remove the batteries to avoid
possible damage from battery leakage and corrosion.
Touch Key Control System
" , ": Adjust the system master volume.
" , ": Select the input mode (iPod, FM or AUX) or search FM frequency
automatically when you select the FM input mode. (To right the FM frequency
will increase; to left, decrease.)
Basic Operation
Power Up the System
When connecting the AC adapter, the LCD will display "WELCOME". System will power up when it disappear.
Select Sleep Mode
Sleep mode allows you to make the system sleep at a selected time.
1. Press" "key or press the sleep button on the back panel to select an amount of time before the system
shuts off: 5, 15, 30 minutes or off.
2. Wake up the system by pressing the same key when the system in the sleep mode.
Master Volume Control
Press the "
" or touch the "
" Key to adjust the main channel volume.
How to Adjust Treble
Press "
" key to choose treble option, and then you can press"
" to adjust the treble volume.
How to Adjust Bass
Press "
" key to choose bass option, and then you can press"
" to adjust the bass volume.
How to Play AUX
Make sure AUX lines are well-connected, Press the "
AUX input mode.
" or touch the "
" key to choose the
How to Play iPod/iPhone/iPad
1.iPod/iPhone/iPad connection
Insert iPod/iPhone/iPad into the docking socket. The system will turn to "iPod" input mode automatically.
When you move out of the iPod/iPhone/iPad, it will return to the previous input mode.
2.iPod/iPhone/iPad Control
At the top of the remote control there is an area designed especially for iPods/iPhone/iPad player.
"
"
"
"
"
"
"
" : Controls the play and pause function of the iPods/iPhone/iPad player.
, " : Press and hold for 2 seconds to Fast Forward or Fast Reverse.
, " : Controls the iPods/iPhone/iPad player to play the previous or the next song.
" : Selects the previous file of the iPods/iPhone/iPad player.
" : Selects the next file of the iPods/iPhone/iPad Player.
" : Selects the iPods/iPhone/iPad player to return to the previous submenu.
" : Controls the iPods/iPhone/iPad player to enter next submenu.
.5.
How to Play Tuner
1.Select FM Input Mode
Press the "
" or touch the "
" key to choose the FM input mode. The LCD will display the last
turned channel, for example: 87.50 Mhz.
2.Listen to the Preset Program
Press the number keys " - " to select the radio program that you already saved. Once selected, screen will
display the radio program's frequency in the memory area.
3.Select Program
Press the " / " key to adjust the band of tuner. Press the " / " key for 2 seconds, the FM will
search automatically. You can press " / " the key once to stop the function .
4.Memory Program
When you receive a clear radio program and want to save the channel, press one of the 10 " - " number
key for 2 seconds to assign that number key to that channel.
How to Adjust the Clock
Press "
" key to enter the clock adjustment menu. Then you can adjust the hours by press "
After hours setting, press " " key to adjust the minutes, after minutes setting, you can press "
confirm the setting or Press " " key to return the hours adjustment menu.
" key.
" key to
How to Adjust the Alarm
1.Alarm Setting
You can set 2 alarms by this system, the alarm1/alarm2 setting has the same operation as the clock setting, after
the setting, the time on the screen will flicker momentarily to confirm successful alarm setup.
2.Alarm Source Setting
When you want to select the alarm1(alarm2) source, press the " ( )" key and choose the alarm source (FM's,
iPod's) by press the " " key.
3.Turn on/off Alarm
When you want to turn on the alarm1(alarm2), press the " ( )" key and turn on the alarm by the " " key.
When the alarm is on, the " "logo will flash all the time. Then you can press "
","
"," "key to turn
off the alarm. If you choose FM's alarm source, the system will turn to FM input mode; if you choose iPod's
alarm source, the system will turn to iPod input mode.
How to Mute
Press "
" key to turn sound off/on.Press again to restore the audio to the original level.
Trouble Shooting
Problem
Possible Reasons/solutions
The system has no power.
The AC adapter is connected incorrectly.
The socket has no power.
No sound at all.
Incorrect selection of input signal.
If mute state is turned on.
Sound source machine is not powered.
Either of the main channels has
no sound.
The signal plug is connected incorrectly or
lines are short-circuited.
LCD screen displays abnormally.
It may be effected by exterior strong disturbance,
turn off first and then turn on again.
Avoid direct sunlight/heat.
Pyle PIPDSP2B
Îписание
ф мл ни
дит
нл н з 2 мин ты
À-сессуары
Характеристики
Д т в
в
м
з
нии
з в
ии
Д т в
и
гл
л жб
т чн я
дд ж и
л т
вин и
л т з з любым
д бным
б м
тзывы
ции и
ид и