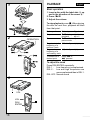
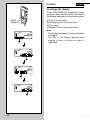
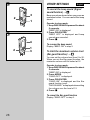
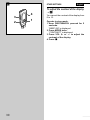
1
d
n
MINIDISC PLAYER
AM-HX30
OPERATING INSTRUCTIONS
BEDIENUNGSANLEITUNG
MODE D’EMPLOI
WARNING
TO REDUCE THE RISK OF FIRE OR ELECTRIC SHOCK, DO NOT EXPOSE
THIS APPLIANCE TO RAIN OR MOISTURE.
English
1
2
CAUTION
Use of controls or adjustments or
performance of procedures other than those
specified herein may result in hazardous
radiation exposure.
This minidisc player is classified as a CLASS
1 LASER product. The CLASS 1 LASER
PRODUCT label is located on the exterior.
3
CAUTION!
4
Invisible laser radiation when
open and interlocks defeated.
Avoid exposure to beam.
5
Accessories
6
7
2
Following accessories are supplied with
this unit. Check them before use.
1 LCD remote control
2 Stereo headphones
3 Battery charger
4 Rechargeable battery
5 Battery case
6 Battery carrying case
7 Carrying case
TABLE OF CONTENTS
English
PRECAUTIONS .................................... 4
USING ON THE RECHARGEABLE
BATTERY ......................................... 10
USING ON AC HOUSE CURRENT .... 12
USING ON DRY CELL BATTERY ...... 14
PREPARATIONS ................................ 16
PLAYBACK
Basic operation ...................................
Other playback modes ........................
Programmed play ................................
To change the display .........................
Title search function ............................
18
20
22
24
26
OTHER SETTINGS
To cancel the beep sound
(Signal sound function) ..................... 28
To limit the maximum volume level
(Ear guard function) .......................... 28
To adjust the contrast of the display ... 30
MD GUIDE MESSAGES ..................... 32
TROUBLESHOOTING GUIDE ........... 34
SPECIFICATIONS .............................. 36
PRECAUTIONS
To maintain good performance
• Do not use the unit in places which are
extremely hot, cold, dusty or humid. In
particular, do not use or keep the unit in
the following places.
• in a high humidity area such as a bathroom
• near a heater
• in an area exposed to direct sunlight
(Example: inside a parked car, where it
can become extremely hot)
• where it is very dusty or sandy
• near sources of strong magnetism, such
as televisions, speakers, or magnets
• where there is a lot of movement or
vibration, such as on a car dashboard or
unstable shelf
4
PRECAUTIONS
English
For safety
• Do not attempt to disassemble the unit.
Laser rays from the optical pickup are
dangerous to the eyes.
• Make sure that pins or other foreign objects
do not get inside the unit.
• Take care not to drop the unit or subject it
to strong shocks.
• To keep dust from the pickup lens, keep
the disc holder closed after use. Never
touch the lens.
• If you hear no sound when playing a disc,
DO NOT turn the volume up too high
since the music could suddenly start.
Turn the volume to the lowest level before
starting playback and slowly turn it up to
the desired level.
Note on listening with the headphones
• Listen at a moderate volume to avoid
hearing damage.
• Do not wear the headphones while driving
or cycling. It may create a traffic hazard.
• You should use extreme caution or
temporarily discontinue use in potentially
hazardous situations, such as walking,
jogging, etc.
• Wear them properly; L is left, R is right.
• The in-ear type headphones should be
worn with the longer cord behind your
neck.
CAUTION
Listening to headphone stereo at full power
for extended periods of time can result in
hearing damage.
6
A
PRECAUTIONS
English
Note on condensation
If the unit is suddenly moved from a cold
place to a warm one, it may result in
condensation on the pickup lens causing
malfunction or playback difficulties.
Should this occur, leave the unit for a few
hours, then try playback again.
Note on handling MD → A
Since MDs come in a cartridge a which
protects the discs inside from fingerprints
and dust, you do not have to be overly
careful when handling them.
However, soiled or damaged cartridges
can lead to malfunctions in the unit.
Observe the following tips when handling
MDs.
• Keep a cartridge in the attached case.
• Do not open the shutter b of the cartridge
to touch the disc c directly. If the disc
inside becomes soiled, it is very difficult to
clean. The cartridge can also be damaged.
• Close the shutter if it opens while handling
or ejecting a disc. Otherwise dust may
enter or a disc may become scratched.
To clean the cabinet
Use a soft cloth lightly moistened with a
detergent solution.
Do not use strong solvents such as alcohol,
benzine or thinner.
8
1
English
USING ON THE
RECHARGEABLE BATTERY
When using the rechargeable battery for
the first time, charge it for about 8 hours.
2
3
10
1 Insert the rechargeable battery into
the battery charger.
2 Recharge the battery.
Plug the battery charger into a wall outlet.
Recharging fully used battery takes about
8 hours.
After recharging, remove the battery
from the battery charger and disconnect
the battery charger from the wall outlet.
3 Insert the rechargeable battery with
the 4 and 5 marks correctly aligned.
Time to recharge the battery
The battery indicator changes from
to
to
to
based on the
remaining power in the battery. Recharge
the battery when the
lights.
If the unit remains in use after
lights,
“LOW BATT” appears and the operation
will stop.
USING ON THE RECHARGEABLE
BATTERY
English
Note on the rechargeable battery
• Use only the supplied charger to recharge
the battery.
• Do not carry the battery in a pocket or
handbag together with metal objects such
as pendants or key holders. Use the
supplied battery carrying case when
carrying the rechargeable battery.
• Do not short-circuit the terminals.
• Do not disassemble the battery, heat it or
put it in water.
• The supplied rechargeable battery can
be recharged approximately 300 times.
USING ON AC HOUSE
CURRENT
Contact your Aiwa dealer and purchase an
AC adaptor.
Connect the plug of AC adaptor to the DC
1.5 V jack on the battery case and connect
the AC adaptor to a wall outlet.
12
USING ON DRY CELL
BATTERY
1
English
1 Attach the battery case.
2 Insert an LR6 (size AA) alkaline battery
with the 4 and 5 marks correctly
aligned.
Battery replacement
2
AA
LR6 )
LR6( (AA)
The battery indicator changes from
to
to
to
based on the
remaining power of the battery. Replace
the battery when the
lights.
lights,
If the unit remains in use after
“LOW BATT” appears and the operation
will stop.
For prolonged operation
Insert the fully charged rechargeable battery
in the unit and attach the battery case with
a new LR6 (size AA) alkaline battery inside.
Playback of approx. 21 hours is possible.
Note on dry cell battery
• Make sure that 4 and 5 marks correctly
aligned.
• To prevent the risk of electrolyte leakage
or explosions, never recharge the battery,
apply heat to it, or take it apart.
• When not using the battery, remove it to
prevent needless battery wear.
• If liquid leaks from the battery, wipe
thoroughly to remove.
14
A
PREPARATIONS
English
Connecting the headphones → A
Connect the supplied headphones to the
remote control and connect the remote
control to the ! REMOTE jack of the main
unit.
• To turn on the backlight of the display on
the remote control, press DISP/SEARCH.
HOLD switches → B
B
HOLD
16
When operating with the main unit,
release HOLD on the main unit. → a
When operating with the remote control,
release HOLD on the remote control. → b
When not using the unit, set both to the
HOLD position. → c
Accidentally pressed buttons will not
function.
If buttons on the main unit are pressed
when the HOLD switch is set to the HOLD
position, “HOLD” appears.
PLAYBACK
1
English
Basic operation
1 Insert a disc with the label side a up
and in the direction of the arrow b.
2 Press `.
3 Adjust the volume.
To stop playback, press a. When playing
the disc the next time, playback will start
from that point.
Basic operation
To pause
2
OPERATION
Button to press
` during
playback
` while in
To resume
pause mode
To go back to the g briefly
beginning of a
previous track
Signal sound
bip, bip, bip,
bip ••••
bip
bipbipbip
h briefly
bipbip
To go to the
beginning of a
succeeding track
To search for a
Keep g or
desired point
h pressed
To adjust the sound
Press DSL/ENTER repeatedly.
DSL 1 : Low frequency is emphasized.
DSL 2 : Low and high frequencies are
more emphasized than in DSL 1.
DSL OFF: Normal sound
3
VOL
VOL
DSL/
ENTER
18
PLAYBACK
English
Other playback modes
MODE
a
b
c
d
20
This unit has 4 play modes other than
normal play.
Press MODE repeatedly during playback
to select the desired play mode.
Each time the button is pressed, the play
mode changes in the following order.
a All-repeat play
All tracks are played repeatedly.
V
b One-track repeat play
Current track is played repeatedly.
V
c Random play
All tracks are played in random order.
V
d Programmed play
The programmed tracks are played in
programmed order.
To program, please refer to page 22.
V
Normal play
Note
• The selected playback mode does not
change when the power is turned off.
• The play mode changes to normal play
after:
opening the disc holder
removing the battery
PLAYBACK
2,4
Programmed play
5
1
English
3,4
• You can memorize up to 25 tracks in a
desired order.
Operate during playback or in
playback pause mode.
1 Press MODE repeatedly until “PRGM”
is displayed.
2 Press g or h to select a track.
3 Press DSL/ENTER to program the
track.
4 Repeat steps 2 and 3 to program other
tacks.
5 Press ` to start programmed play.
To cancel the program
Press MODE repeatedly until “PRGM”
disappears.
You can cancel the program by opening the
disc holder or removing the battery.
If “PRGM FULL” appears
25 tracks are already programmed.
You cannot add any track to the program.
Note
You cannot go back to a previous track by
keeping g pressed during programmed
play.
22
PLAYBACK
English
To change the display
Press DISP/SEARCH repeatedly during
playback. Each time the button is pressed,
the display changes in the following order.
DISP/
SEARCH
a Title of current track
b Remaining time of current track
c Disc name
d Elapsed time of the current track
Note
• The display changes to 1 when playback
is stopped.
• “No Title” or “No Name” appears when
playing a disc in which no data is
registered.
1
24
2
PLAYBACK
English
Title search function
3
3
1
1
• You can search for a desired track
confirming the title during playback.
Operate during playback.
1 Keep DISP/SEARCH pressed for 3
seconds.
2 While the track number flashes, press
g or h repeatedly until the desired
track title is displayed.
3 Press ` or DSL/ENTER to start
playback.
• You can start this operation in playback
pause mode.
In this case, press ` again after step
3 to resume playback.
Note
• Title search function is not activated during
random play and program play.
• If the flashing stops during operation,
repeat the procedure from the beginning.
26
A
OTHER SETTINGS
English
To cancel the beep sound (Signal
sound function) → A
3
2
1
B
4
2
1
3
Beep sounds are heard when you press an
operation button. You can cancel this beep
sound.
Operate in stop mode.
1 Keep DISP/SEARCH pressed for about
5 seconds.
“BEEP ON” is displayed.
2 Press DSL/ENTER.
“BEEP OFF” is displayed and beep
sounds are canceled.
3 Press a.
To resume the beep sound
Display “BEEP ON” in step 2.
To limit the maximum volume level
(Ear guard function) → B
You can set the volume level from 0 to 20.
When you set the Ear guard function, the
maximum volume will be limited at 12.
Operate in stop mode.
1 Keep DISP/SEARCH pressed for about
5 seconds.
“BEEP ON” is displayed.
2 Press MODE.
“EARG OFF” is displayed.
3 Press DSL/ENTER.
“EARG ON” is displayed and the Ear
guard function is set.
“EAR GUARD !” is displayed when setting
the volume over the level of 12.
4 Press a.
To cancel the Ear guard function
Display “EARG OFF” in step 3.
28
C
OTHER SETTINGS
3
2
30
4
1
English
To adjust the contrast of the display
→C
You can set the contrast of the display from
0 to 15.
Operate in stop mode.
1 Keep DISP/SEARCH pressed for 5
seconds.
“BEEP ON” is displayed.
2 Press MODE twice.
“CONTRAST” is displayed.
3 Press VOL 6 or 7 to adjust the
contrast of the display.
4 Press a.
MD GUIDE MESSAGES
English
BLANK DISC
• Nothing is recorded on the disc.
DISC ERROR
• The disc is damaged by scratches.
• The TOC (Table of contents) data is not
registered correctly.
EAR GUARD !
• You cannot increase the volume anymore
by the EAR GUARD function.
HOLD
• The HOLD switch is set to HOLD position.
NO DISC
• No disc is inside the unit.
LOW BATT
• The battery wears out.
OPEN
• The disc holder is not closed.
PRGM FULL
• 25 tracks are already programmed and
no track can be added.
32
TROUBLESHOOTING
GUIDE
English
If the unit sails to perform as described in
these Operating Instructions, check the
following guide.
Power does not turn on.
• Insert the batteries correctly.
• Recharge the rechargeable battery or
replace the dry cell battery.
Operation does not start.
•
•
•
•
•
Close the disc holder completely.
Insert a disc.
Release the HOLD switch.
Connect the remote control completely.
Remove the battery and leave the unit for
about 30 seconds.
Then, insert the battery and try playback
again.
The sound noisy.
• If the unit is close to a magnetic object,
keep the unit further away from it.
Sound mutes.
• Place the unit on a stable surface with no
vibration.
Sound cannot be heard from the
headphones.
• Connect the headphones firmly.
Wrong or no display appears on the
remote control.
• Connect the remote control firmly.
34
SPECIFICATIONS
Main unit
Playback system
MiniDisc digital audio system
Laser pickup
Semiconductor laser
Sampling Frequency
44.1 kHz
Number of channels
Stereo: 2 channels
Monaural: 1 channel
D/A converter
1-bit
Frequency response
40 – 20,000 Hz ±4 dB
20 – 20,000 Hz ±1 dB (10 kΩ)
Wow and Flutter
Below measurable limit
(±0.001% W.PEAK)
Output
!REMOTE jack
Maximum output level
10 mW +10 mW (16 ohms)
Power requirements
DC 1.2 V using the supplied Ni-MH
rechargeable battery MHB-901
DC 1.5 V using an LR6 (size AA) dry cell
battery
AC house current using an optional AC
adaptor
Battery life
Using the supplied rechargeable battery
Approx. 8 hours
Using an LR6 (size AA) dry cell battery
Approx. 9 hours
Using the supplied rechargeable battery and
an LR6 (size AA) dry cell battery
Approx. 21 hours
36
English
Dimensions
Approx. 86.8 (W) × 16.3 (H) ×
77.6 (D) mm
(3 1/8 × 25/32 × 3 7/8 in.)
Weight
Approx. 132 g, 6.5 oz
including the rechargeable
battery
<Battery charger RB-M02 E>
Rated voltage
AC 230 V, 50 Hz
<Battery charger RB-M02 K>
Rated voltage
AC 240 V, 50 Hz
Supplied headphones HP-M031
Type: In-ear type
Impedance: 16 ohms
Sensitivity: 94 dB/mW
Recommended commercially available
headphones
Type: In-ear type/Vertical type/
Headband type
Impedance: 16 – 32 ohms
Sensitivity: 91 – 99 dB/mW
• The specifications and external
appearance of this unit are subject to
change without notice.
• US and foreign patents licensed from
Dolby Laboratories Licensing Corporation.
A
8Z-HM4-907-01
981210AYO-O-U0