1
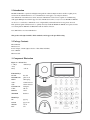
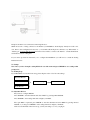
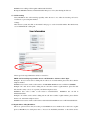
Meritline
Netphone (MeritPhone)
ML 220
User Manual
1. Introduction ........................................................................................................................................................... 3
2. Package Contents................................................................................................................................................... 3
3. Component Illustration .......................................................................................................................................... 3
4. Character Strings ................................................................................................................................................... 4
5. Installation and Settings......................................................................................................................................... 4
5.1 Installation ................................................................................................................................................... 4
5.2 Settings ........................................................................................................................................................ 5
6. Service Features..................................................................................................................................................... 7
6.1 MeritPhone Calling MeritPhone.................................................................................................................. 7
6.2 MeritPhone Calling Regular Phone ............................................................................................................. 7
6.3 Call Forwarding ........................................................................................................................................... 8
6.4 Regular Phone calling MeritPhone .............................................................................................................. 8
6.5 Conferencing ............................................................................................................................................... 9
7. Functions ............................................................................................................................................................. 11
7.1 Redial......................................................................................................................................................... 11
7.2 Adjusting Handset and Speaker Volumes .................................................................................................. 11
7.3 Review Incoming and Outgoing Call Information .................................................................................... 11
7.4 Use PhoneBook ......................................................................................................................................... 11
7.6 Back Space ................................................................................................................................................ 12
7.7 Hand Free Function ................................................................................................................................... 12
7.8 Upgrade ..................................................................................................................................................... 12
7.9 AbbrDialPlan ............................................................................................................................................. 12
7.10 SpeedDials: M1---M8.............................................................................................................................. 12
8. Frequent Problems and Answer ........................................................................................................................... 13
9. Others .................................................................................................................................................................. 13
9.1 System Characteristics............................................................................................................................... 13
9.2 Standard and Protocol................................................................................................................................ 14
9.3 Specification .............................................................................................................................................. 14
9.4 Electric Characteristics .............................................................................................................................. 14
9.5 Operational Environment........................................................................................................................... 14
9.6 Recommend usage net condition ............................................................................................................... 14
10. Installation Options............................................................................................................................................ 14
1. Introduction
MeritPhone-ML220 is a practical and highly manageable broadband VoIP phone that looks like a regular phone,
and uses the broadband Internet for voice communication. It can apply to any enterprise intranet,
telecommunication level IP service carrier, and users with Internet connection. It is capable of communicating
with regular PSTN phones with the support of telecommunication carriers, at very low costs. MeritPhone-ML220
can also be a cost-effective communication tool of high stability with traditional feel for any private network.
This quick start guide will instruct users to quickly and easily install the MeritPhone-ML220, and operate it with a
soft-switch platform. ML220 is VOIP terminal with two RJ45 connectors.
Note: ML 220 does not have NAT function
This product is designed with U.S. FCC standards, and is approved upon FCC testing.
2. Package Contents
Phone Handset
Handset Cord
Power Adapter: 12V DC (Input selection: 110V, 220V, 110/220V)
User’s Manual
Ethernet Cable
3. Component Illustration
Figure 1——Front View
1~9 Keys
number keys
* Key
# Key
call out
Function Keys:
M1~M8
PHONEBOOK
HOLD
VOL+
VOLBACKSPACE
CALL
REDIAL
SPEAKER
fast dial
phone book
call keeping
volume increase
volume decrease
backspace
call out
redial
hand free
Menu Keys:
UP
DOWN
SET/OK
ESC
page up
page down
set/ok
exit
Figure 2——Side View
1——RJ-45 input port
2——RJ-45 output port
3——Power Port
3
2
1
4. Character Strings
Corresponding Keys:
Key
Characters
1
. '
2
a b c 2AB C 2
3
def3DEF3
4
ghi4GHI4
5
jkl5 JKL5
6
mno6MNO6
7
pqrs7PQRS7
8
tuv8TUV8
9
wxyz9WXYZ9
0
*
"1-
()@0-*&
*
If you need to enter alphabetic characters or a numeric sequence then press the corresponding key above
repeatedly until the character you require is displayed.
Only when you key in the ‘Local IP’, ‘Subnet Mask’, ‘Router IP’,‘DNS1’ and ‘DNS2’ you should use the ‘*’ key
for the dot.
IMPORTANT NOTE: If the next character you want to type needs to be input using the same key then you must
press ‘#’ to confirm the last entry before you can generate the next character. For example: To enter ‘Damon’,
press ‘3333326#666#66#’. (“m”, “o” and “n” are all entered using ‘6’ key so you must press ‘#’ to confirm the last
letter before you can generate the next character)
5. Installation and Settings
5.1 Installation
1
Place your MeritPhone-ML 220 near a power outlet.
2
Plug the RJ-45 connector of the Ethernet 10/100Base-T cable into the MeritPhone-ML 220’s side input
port ,and plug the other side into a hub or switch, or wall/ground socket of the structuring cable.
3
Plug the accessory power-adapter into the power outlet, then connect the output-plug to power-port
of the MeritPhone-ML 220.
NOTE: If the network is without a HUB, the MeritPhone-ML 220 should be connected with other Ethernet
equipment (such as XDSL adapter, CABLE modem or PC) by crossing-over cable. Otherwise the
direct-connecting cable is applied.
The phone should now be connected as in the diagram above.
Within 30 seconds of being connected to the Internet your MeritPhone should display “Ready For Calls”. If it
does, then no other configuration is necessary – you can make calls. If the phone continues to say “Please Wait” or
“Wait Logon” for more than 30 seconds then it has not been able to connect to the Internet – consult the Problems
and Solutions section of this guide.
If your service provider has instructed you to configure the MeritPhone you will need to consult the Setting
Instructions below.
5.2 Settings
Note: After you have changed a setting ESC back out of the menu and press SET/OK to save settings when
prompted to.
5.2.1Setting Steps
If your MeritPhone account has been set up, please skip the section ‘5.2.5 Account settings’.
Dynamic IP Users
PPPoE Users
Parameter Settings
Account Settings
Static IP Users
5.2.2 Dynamic IP Users
If you need to configure DNS IP
Press SET/OK to enter the submenu and select ‘DNS1’ by pressing UP and DOWN.
Press SET/OK to enter setting menu and configure your DNS2.
If a spare DNS is requested, press SET/OK to enter the submenu and select DNS2 by pressing UP and
DOWN; or you may press SET/OK to enter setting menu and configure your DNS2.
If the account information has been set up, you may start using as soon as you plug in.
5.2.3 PPPoE Users’ Parameter Settings
Press ‘SET/OK’ to enter the main menu, and use ‘UP’ and ‘DOWN’ to scroll and select ‘TCP/IP Settings’.
A. Do not use DHCP
Press ‘SET/OK’ to enter the submenu, and use ‘UP’ and ‘DOWN’ to select ‘Use DHCP’.
Press ‘SET/OK’ to enter settings. Input 0 to disable DHCP.
B. Use PPPoE
Press ‘SET/OK’ to enter the submenu, and use ‘UP’ and ‘DOWN’ to select ‘Use PPPoE’.
Press ‘SET/OK’ to enter settings. Input 1 to enable PPPoE.
C. Set PPPoE account
Press ‘SET/OK’ to enter the submenu, and use ‘UP’ and ‘DOWN’ to select ‘PPP Identity’.
Press ‘SET/OK’ to enter settings. Continue pressing a number key to change the letter, and press the ‘#’ key
to confirm it.
D. Set PPPoE Password
Press ‘SET/OK’ to enter the submenu, and use ‘UP’ and ‘DOWN’ to select ‘PPP Identity’.
Press ‘SET/OK’ to enter settings. Continue pressing a number key to change the letter, and press the ‘#’ key
to confirm it.
E. If DNS IP is requested
Press ‘SET/OK’ to enter the submenu, and use ‘UP’ and ‘DOWN’ to select ‘DNS1’.
Press ‘SET/OK’ to enter settings and configure your ‘DNS1’.
If a spare DNS is requested, press SET/OK to enter the submenu and select DNS2 by pressing UP and
DOWN; or you may press SET/OK to enter setting menu and configure your DNS2.
NOTE: When you finish setting up, press ‘SET/OK’ to confirm or ‘ESC’ to cancel. If you input your setting
accordingly, the LCD will display the new setting. Otherwise, the LCD will display ‘Input Invalid’; press
ESC to return to your previous setting.
5.2.4 Static IP Users’ Parameter Settings
Press ‘SET/OK’ to enter the main menu, and use ‘UP’ and ‘DOWN’ to scroll and select ‘TCP/IP Settings’.
A. Do not use DHCP
Press ‘SET/OK’ to enter the submenu, and use ‘UP’ and ‘DOWN’ to select ‘Use DHCP’.
Press ‘SET/OK’ to enter settings. Input 0 to disable DHCP.
B. Set Local IP
Press ‘SET/OK’ to enter the submenu, and use ‘UP’ and ‘DOWN’ to select ‘Local IP’.
Press ‘SET/OK’ to enter settings. Input the IP address. Use the ‘*’ key for the dot.
C. Set subnet mask
Press ‘SET/OK’ to enter the submenu, and use ‘UP’ and ‘DOWN’ to select ‘Subnet Mask’.
Press ‘SET/OK’ to enter settings. Input the IP address. Use the ‘*’ key for the dot.
D. Set Router IP
Press ‘SET/OK’ to enter the submenu, and use ‘UP’ and ‘DOWN’ to select ‘Router IP’.
Press ‘SET/OK’ to enter settings. Input the IP address. Use ‘*’ key for the dot.
E. Set DNS IP
Press ‘SET/OK’ to enter the submenu, and use ‘UP’ and ‘DOWN’ to select DNS IP.
Press ‘SET/OK’ to enter settings. Input the IP address. Use ‘*’ key for the dot.
If a spare DNS is requested, press SET/OK to enter the submenu and select DNS2 by pressing UP and
DOWN; or you may press SET/OK to enter setting menu and configure your DNS2.
NOTE: When you finish set- up, press ‘SET/OK’ to confirm or ‘ESC’ to cancel. If you input your setting
accordingly, the LCD will display the new setting. Otherwise, the LCD will display ‘Input Invalid’; press
ESC to return to your previous setting.
5.2.5 Account Settings
Press ‘SET/OK’ to the main menu; use ‘UP’ and ‘DOWN’ to select ‘Account Settings.
A. Set phone number
Press ‘SET/OK’ to the submenu; use ‘UP’ and ‘DOWN’ to select ‘Phone Number’.
Press ‘SET/OK’, and then, use 0~9 to input the phone number
B. Set user ID
Press ‘SET/OK’ to the submenu; use ‘UP’ and ‘DOWN’ to select ‘User Identity’.
Press ‘SET/OK’, and then, use 0~9 to input the user ID. Continuous press a number key to change the letter
and press ‘#’ key to confirm it.
C. Set user password
Press ‘SET/OK’ to the submenu; use ‘UP’ and ‘DOWN’ to select ‘User Password’.
Press ‘SET/OK’, and then, use 0~9 to input the user password. Continuous press a number key to change the
letter and press ‘#’ key to confirm it.
6. Service Features
MeritPhone calling MeritPhone
MeritPhone calling Regular Phone
Call Forwarding
Regular Phone Calling MeritPhone (For service areas please refer to the service carrier’s web sites)
Conferencing
6.1 MeritPhone Calling MeritPhone
Every MeritPhone will be assigned a MeritPhone number. MeritPhone users can directly call each other’s
number followed by ‘#’ key.
Example: A user with the number 6667777 calling another user with the number 7778888.
The 6667777 user simply pick up the MeritPhone handset, and dial 7778888 then press “#” key after hearing
a dialing tone.
6.2 MeritPhone Calling Regular Phone
Every MeritPhone can call any land or mobile phone anywhere in the world. Please dial with the service
carrier’s dialing rule.
Example 1: If a U.S service carrier’s dialing rule: To call a U.S or Canada number, please first dial 1, then the
telephone number followed by ‘#’ key.
MeritPhone user calling a U.S/Canada regular number 213-000-0000.
Pick up the MeritPhone handset, dial 12130000000 then press “#” key after hearing the dial tone.
Example 2: If a U.S service carrier’s dialing rule: To call other countries’ regular numbers, please first dial
011, then the country code (no ‘0’ as prefix), and dial the telephone followed by ‘#’ key.
MeritPhone user calling a China regular number 0755-88889999.
Pick up the MeritPhone handset; dial 0118675588889999 then press “#” key after hearing the dial tone.
Example 3: If a China service carrier’s dialing rule: To call other countries’ regular numbers, please dial the
district code, and dial the telephone followed by ‘#’ key.
MeritPhone user calling a China regular number 0755-88889999.
Pick up the MeritPhone handset, dial 075588889999 then press “#” key after hearing the dial tone.
6.3 Call Forwarding
Every MeritPhone has call forwarding capability, when the user is not online the incoming call can be
forwarded to a preset telephone number.
Settings:
Enter the user system and click on the manual’s main page to set the forwarded number. The number must
accord with MeritCall’s dialing rule.
Please type in the target number the called is forwarded to.
NOTE: Call forwarding target number must be a PSTN number, with more than 7 digits.
Example 1: If a U.S service carrier’s dialing rule: To call a U.S or Canada number, please first dial 1, then the
telephone number.
MeritPhone users want to make a call forward to 213-000-0000. MeritPhone user can fill in 12130000000.
Example 2: If a U.S service carrier’s dialing rule: To call other countries’ regular numbers, please first dial
011, then the country code (no ‘0’ as prefix), and dial the telephone at last.
MeritPhone users want to make a call forward to 0755-88889999. MeritPhone user can fill in
0118675588889999.
Example 3: If a China service carrier’s dialing rule: To call other countries’ regular numbers, please dial the
district code, and dial the telephone at last.
MeritPhone users want to make a call forward to 0755-88889999. MeritPhone user can fill in 075588889999.
6.4 Regular Phone calling MeritPhone
This is an optional service. Only areas that provide MeritPhone access numbers allow calls from a regular
phone to MeritPhone, for detail please refer to ‘Access Code Availability Schedules’ on the Carrier Service
page.
This service is categorized into two types: Once Dialing and Twice Dialing.
Once Dialing: Users with this service will have their MeritPhone numbers bundled with a regular local phone
number of a certain place, and people will only have dial that bundled local phone number to reach the
subscribing MeritPhone user.
Example: A Mexico MeritPhone user 6667777 bundles with a U.S Los Angeles regular phone number
1-213-000-0000, then friends in the U.S just have to dial 1-213-000-0000 to connect with the 6667777
MeritPhone.
Twice Dialing: People just have to dial any number listed on the Carrier Service page, and dial the
MeritPhone number that subscribes to this service after hearing a second dial tone, and then they can reach
that MeritPhone user.
Examples: A Mexico MeritPhone user 6667777 is subscribed to this service, and its Los Angeles access code
is 1-213-000-0000. People only just need to dial 1-213-000-0000, then dial 6667777 then press “#” key to
reach that MeritPhone user in Mexico.
6.5 Conferencing
How it Works
Once the conferencing call feature has been set-up on your account, you can initiate a conference and have a
conference with different parties simultaneously. You will act as a ‘Host’ and invite ‘Participants’ into the
conference that you initiated.
Setting yourself up for conference calling now
Go to “My Account” interface
Enter your IP Phone Number, Password and the digits displayed then click Submit.
Click “My Conference Call” in the grey menu bar to view the Conference Call Setup:
Enter the maximum number of people you will likely be conferencing with at one time.
In some circumstances a password will be required for the Host and Participant to be involved in the
conference.
Click on the check boxes to select the defaults of 1234 and 4321 to be the password or change them to
something else you will remember easily. (If you do not click on the check boxes a random password will be
chosen and advised to you.)
Click Submit and your conference feature will be established.
How to initiate a conference call and invite others.
You, as the Host, enter the conference and bring the other participants into the call:
Steps in Detail:
A. Dial access number, followed by # from your Phone.
B. You will hear a beep tone confirming that you have entered the conference room. Now press # to invite a
Participant to the conference room. After hearing the voice prompt ‘Please enter the destination phone number
followed by the pound key’, dial the phone number of the person you want to bring into the conference and
then press #. After the Participant answers, press # to add this participant to the conference. Alternatively if
you dialed the wrong number or the Participant does not answer just press the “*” key and you will be
returned to the conference without the Participant.
C. To invite another participant, press #, wait for prompt, dial next participant’s phone number followed by #,
wait for answer and then press # to join them into conference. Repeat this process to invite more participants
into the conference. Remember you can use * if you want to return to the conference without the Participant.
Note: You can conference other users by simply dialing their Phone number followed by #. For Participants
with regular phone just dial the international dialing prefix followed by their regular telephone number
and then press #.
How to have participants to enter the conference room themselves
Any participant that has a MeritPhone can dial our participant access number to enter an active conference
him or herself. However the conference call needs to have already been initiated by the Host before the
participant can join.
Steps in Detail:
A. The Host must setup the Participant Password on the “My Account” web site. The Host must then tell the
Participants the conference ID and the Participant password.
B. Host initiates the Conference by dialing, host access number + #.
C. Participant dials participant access number + #. Participant will hear the prompt ‘To join a conference, press 1.
To listen to a conference recording, press 2. To access your messages, press 3. To leave a voice mail, press the
* key’. Participant should then press 1 and will hear the prompt “Please enter conference ID”. Participant
should then enter the conference ID (Host’s Phone number) followed by #. Finally Participant will hear the
prompt “Please enter the conference password followed by the # key” and should then enter the Participant
password followed by # to enter the conference.
D. Other participants can follow the same process as mentioned in C. to join the conference.
Note: Participants who only have a regular phone and are located in USA, Hong Kong or Taiwan can enter the
conference from their regular phone by dialing the local access number (contact us for details) and once connected
can dial participant access number + # as above. Otherwise the participant can only be invited into the conference
by host
7. Functions
7.1 Redial
After the phone is hung up, pick up the handset, and press ‘REDIAL’ to dial the last dialed number.
7.2 Adjusting Handset and Speaker Volumes
During the phone call, press ‘VOL+’ to increase the volume and press ‘VOL-’ to lower the volume.
NOTE: Volume is reset to default volume when the phone is turned off or restarted
7.3 Review Incoming and Outgoing Call Information
Press ‘SET/OK’ to enter the main menu, and use ‘UP’ and ‘DOWN’ to scroll and select ‘PhBook Settings’ to
view incoming and dialed calls information.
7.3.1Review Missed Calls
Press ‘SET/OK’ to enter the submenu, and use ‘UP’ and ‘DOWN’ to select ‘Missed Call’.
Press ‘SET/OK’ to enter, and use ‘UP’ and ‘DOWN’ to select the phone number. Press ‘CALL’ to launch.
When the missed number is displayed on the screen, press SET/OK and then input contact person
information, press SET/OK to save this number.
7.3.2Review Received Calls
Press ‘SET/OK’ to enter the submenu, and use ‘UP’ and ‘DOWN’ to select ‘Received Calls’.
Press ‘SET/OK’ to enter, and use ‘UP’ and ‘DOWN’ to select the phone number. Press ‘CALL’ to launch.
You could check your call duration.
When the received call number is displayed on the screen, press SET/OK and then input contact person
information, press SET/OK to save this number.
7.3.3Review Dialed Number
Press ‘SET/OK’ to enter the submenu, and use ‘UP’ and ‘DOWN’ to select ‘Dialed Number’.
Press ‘SET/OK’ to enter, and use ‘UP’ and ‘DOWN’ to select the phone number. Press ‘CALL’ to launch.
You could check your call duration.
Note: For Missed calls, Received calls and Dialed number, you can at most store 80 pieces records
under each menu. When the record has reached this limit, the earliest records would be removed
automatically. In case of power break or system reboot, all records would be lost.
Calling duration showed on the screen is only for your reference for the exact calling duration; please
refer to the Gatekeeper billing system.
7.4 Use PhoneBook
Press SET/OK to the main menu and use UP and DOWN to select ‘Phone Book Settings’
7.4.1Query Phone Book
Press SET/OK to the submenu and use UP and DOWN to select ‘Query Phone Book’.
Press SET/OK and use UP and DOWN to do query.
7.4.2Add new numbers
Press SET/OK to the submenu and use UP and DOWN to select ‘Add Phone Number’.
Press SET/OK to add new numbers.
Note: The limit is 112 pieces records.
7.4.3Delete Phone Number in the Phone Book
A prompt to delete your phone number would pop up if you press SET/OK after entering your Phone Book.
Press SET/OK to add new numbers.
7.5Hold
Press HOLD to block the voice.
7.6 Back Space
If entered a wrong number or letter, press the ‘BACKSPACE’ button to delete the last entry.
7.7 Hand Free Function
Press the ‘SPEAKER’ button can enable hand free conversation.
7.8 Upgrade
Press ‘SET/OK’ to enter the main menu, and use ‘UP’ and ‘DOWN’ to scroll and select ‘Advanced Settings’.
Press SET/OK to the submenu and use UP and DOWN to select ‘Upgrade Now!’.
Press SET/OK to upgrade.
NOTE: If no notice, please do not change the contents of ‘Upgrade Now!’.
7.9 AbbrDialPlan
Press ‘SET/OK’ to enter the main menu, and use ‘UP’ and ‘DOWN’ to scroll and select ‘Advced Settings’.
7.9.1Use AbbrDialPlan
Press SET/OK to the submenu and use UP and DOWN to select ‘Use AbbrDialPlan’
Press SET/OK and then input 1.
7.9.2Cancel AbbrDialPlan
Press SET/OK to the submenu and use UP and DOWN to select ‘Use AbbrDialPlan’
Press SET/OK and then input 0.
7.9.3Query AbbrDial
Press SET/OK to the submenu and use UP and DOWN to select ‘Query AbbrDial’;
Press SET/OK and then use UP and DOWN to check. There are altogether 10 pieces records in AbbrDial.
[Short Number form 0 to 9, Long Number is what the specific short number stands for.]
7.9.4Add AbbrDialPlan
Press SET/OK to the submenu and use UP and DOWN to select ‘Add AbbrDialPlan’.
Press SET/OK to add AbbrDialPlan.
7.9.5Delete AbbrDialPlan
Press SET/OK to the submenu and use UP and DOWN to select ‘Query AbbrDial’;
Press SET/OK and use UP and DOWN to choose the particular piece of record you want to delete, press
SET/OK to delete. Press ESC to cancel.
7.10 Speed Dials: M1---M8
7.10.1SpeedDial Query
Just press the M1---M8 key to display the Speed Dial number. Press “Call” to launch this number.
7.10.2Add Speed Dial number
Press M1---M8. If Speed dial is empty screen will display “Speed Dial Empty Add number/SetOk”. Press
SET/OK. Key in Contact’s Name (refer Section 4 of this guide) followed by SET/OK and then enter the
contact’s phone number. Press SET/OK to add.
7.10.3Modify or delete Speed Dial number
Press M1---M8 speed dial to be modified or deleted. Press SET/OK to delete the currently stored speed dial.
Press SET/OK if you wish to enter new details for this speed dial. Otherwise, if you wish to leave the Speed
Dial empty just press ESC. Please press SET/OK to save the changes when prompted to.
Note: Speed dials can not be modified. You must delete the speed dial and then enter a replacement.
8. Frequent Problems and Answer
Problem
Poor Voice Quality
Possible Cause
Your internet connection
bbandwidth is less than 30Kbps
Unstable network connection:
Network delay > 500ms or network
trembling > 100ms or network
packet loss > 10%
Phone continues to
display either ‘Please
Wait’ or ‘Wait Logon’
Phone’s connection to the internet is
obstructed by a firewall.
Your network has a proxy server
which is blocking the phone’s
connection to the internet.
Solution
Your internet connection may not be
performing correctly. Please contact your
Internet Service Provider or Network
administrator.
Please contact the supplier of your
MeritPhone for advice on how to configure
your firewall or proxy server.
Your phone is configured with
incorrect account details.
Please contact the supplier of your
MeritPhone for advice on how to reconfigure
your account details.
Your phone is configured with an
incorrect server address.
Please contact the supplier of your
MeritPhone to confirm your phone has the
correct server details.
9. Others
9.1 System Characteristics
Program memory—1024KB Flash memory
Ethernet interface— two RJ45 connector compatible with IEEE 802.3 10 Base-T
Keypad besides the standard keys 0-9,*, , there are another 12 function keys for operation and
setting of MeritPhone-KE1000
Status indicator—LED to indicate working status and LCD light
Hand free function—full duplex speakerphone, dial-tone, speaker and loudspeaker volume can be
digitally adjusted independently
AC/DC adapter— input 100~120V (USA, Japan etc.) or 220~240V (China, Europe etc.) or
100~240V,47-63Hz
Log on Soft-switch
Automatic find Soft-switch
Support DHCP: Automatically obtain local IP, subnet mask, router IP
Support PPPoE
Voice active detection
Comfortable noise generation
16ms echo cancellation
Dynamic buffer management—minimize effect to voice quality caused by audio delay jitter
9.2 Standard and Protocol
IEEE 802.3 10 Base-T
G.711A, G.711µ, G.723.1 5.3K/6.3 Kbps and G.729 audio codec
H.323
Abbreviation dial plan
TCP/IP: Internet Transport and Control Protocol
RTP: Real-time Transport Protocol
RTCP: Real-time Control Protocol
G.723.1 G.729 VAD/CNG economical bandwidth
G.165 16ms Echo cancel
DTMF DTMF Tone Generate and Detection
DHCP: Dynamic Host Configuration Protocol
DNS:Domain Name Server
NTS: Network Time service
HTTP: Hyper Text Transfer protocol
FTP File Transfer Protocol
Build in H323 proxy support
9.3 Specification
180 x 160 x 92 mm (L x W x H)
9.4 Electric Characteristics
Voltage: 12V DC, 500mA
Power adapter: AD/DC input 100~120V (USA, Japan etc.) or 220~240V (China, Europe etc.) or
100~240V,47-63Hz
Network interface: IEEE 802.3 10 Base-T
EMC: FCC Part15 CLASS B
9.5 Operational Environment
Operational temperature: 0 to 50° C (32° to 122° F)
Storage temperature: -30° to 65° C (-22° to 149° F)
Humidity: 10% to 90% no dew
9.6 Recommend usage net condition
Delay:
Less than 400ms
Jitter:
Less than 100ms
Package lost percent: Less than 10%
Bandwidth: More than 30Kbps
Safety Warning: Please do not place this product under fire and high temperature. Avoid heavy impact, and
do not leave the product in rainy or highly humid environments!
10. Installation Options