1
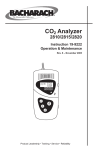
SOP-RTS-002-0008-v01
Print ID Number:
Original Effective Date: 10/5/2011
Current Version Effective Date:
Title: Operation and Maintenance of Bacharach CO2
Analyzer
Page 1 of 4
Operation and Maintenance of Bacharach CO2 Analyzer
1.0
Purpose
The purpose of this SOP is to define the procedure for operation and
maintenance of the Bacharach CO2 Analyzer when used at the University of
Texas Medical Branch at Galveston (UTMB).
2.0
Application/Scope
This procedure shall be applied to the RTS Bacharach CO2 Analyzer.
3.0
Definitions
4.0
RTS Personnel
A blanket term used in the description of persons who
constitute Research Technology Support (RTS), as different
RTS duties are carried out by different individuals within RTS,
and each individual within RTS is aware of their
responsibilities listed within this SOP.
RTS Technician
The qualified biomedical equipment personnel from RTS who
will perform testing.
References
User Manual for the Bacharach CO2 Analyzer
5.0
Associated SOPs
There are no associated SOPs.
6.0
Responsibilities
6.1. RTS Technician
6.1.1. Ensure procedures herein are followed.
7.0
Materials and Equipment
Bacharach CO2 Analyzer
8.0
Procedure
8.1. NOTES
8.1.1. Ensure the gas inlet connector and gas exhaust are unobstructed and
open to the atmosphere.
8.1.2. Do not breathe directly on the analyzer while taking a measurement as
an inaccurate CO2 reading will result.
Form rev. 2/18/2011
SOP-RTS-002-0008-v01
Print ID Number:
Original Effective Date: 10/5/2011
Current Version Effective Date:
8.2.
8.3.
8.4.
8.5.
8.6.
Title: Operation and Maintenance of Bacharach CO2
Analyzer
Page 2 of 4
8.1.3. When first switched on, there is a warm-up period before the CO2 level is
displayed (approximately 20 sec for the 2820 model; 60 sec for the
2810/15 analyzer).
8.1.4. Normal fresh-air background reading of CO2 is approximately 340 ppm.
Pump Operation
8.2.1. Momentarily press the on/off button to switch on the pump; likewise,
pressing it again will turn the pump off.
8.2.2. Connect the sampling probe and hose assembly to the gas inlet
connector on the top of the analyzer.
8.2.3. Particulate filter P/N 54-0548 is placed on top of the gas inlet to prevent
dust or dirt from being drawn into the instrument.
8.2.4. Replace particulate filter once a month or when the filter is contaminated
as evidenced by a slower response time.
8.2.5. Run pump 30 minutes before zeroing.
Pump Contamination
8.3.1. To check for contamination, turn on the pump and hold your index finger
over the inlet fitting.
8.3.2. The pump should normally stall.
8.3.3. If the pump continues to run, then the pump is contaminated.
8.3.4. The analyzer needs to be sent to a vendor for repair and cleaning.
High humidity Gas Sampling
8.4.1. If used to draw in gas samples from areas with high levels of humidity
such as an incubator, first install the small round particulate filter that is
supplied with the instrument onto the analyzer’s outlet using a 1.5
section of Portex tubing.
8.4.2. Connect a lure fitting to the particulate filter.
8.4.3. Connect the Nafion tubing that is also supplied with the analyzer to the
luer fitting using a 2” section of Portex tubing.
8.4.4. On the other end of the Nafion tubing use a 6-12” section of Portex
tubing to connect to the incubator.
8.4.5. When testing water jacketed-incubators, the potential exists of drawing
water droplets that form inside the incubator’s internal sample line
through the Nafion tubing and into the analyzer.
8.4.5.1.
A water trap is provided with the instrument and should be
installed between the incubator and the Nafion tubing.
After completing a test
8.5.1. Run the pump while sampling fresh air until the reading is below 0.1.
8.5.2. This purges the residual CO2 and moisture before proceeding to the next
test.
Maintenance
8.6.1. Keep the analyzer clean by wiping with soft cloth dampened with a mild
detergent solution.
8.6.2. Do not leave the analyzer in direct sunlight or in areas where there is
excessive heat.
8.6.3. There are no user-serviceable parts inside the analyzer.
Form rev. 2/18/2011
SOP-RTS-002-0008-v01
Print ID Number:
Original Effective Date: 10/5/2011
Current Version Effective Date:
8.7.
Title: Operation and Maintenance of Bacharach CO2
Analyzer
Page 3 of 4
8.6.4. “BattLow” message indicates the analyzer must be recharged using the
battery charger.
8.6.4.1.
Switch the analyzer off.
8.6.4.1.1.
Plug the supplied charger into the appropriate AC wall
socket.
8.6.4.1.2.
Plug the charger’s output connector into the analyzer’s
charging socket.
8.6.4.2.
Charging time is ~ 2 hrs at 22ºC.
8.6.4.3.
The word “charging” appears while the battery is being
charged. The word “charged” appears when the battery is
fully recharged and the analyzer will also emit a beeping
tone for 30 secs.
8.6.4.4.
Unplug charger and remove its output connector from the
analyzer.
Calibration
8.7.1. The analyzer can be sent to a vendor for calibration OR
8.7.2. The RTS tech may follow the air calibration/ N2 calibration listed below.
This calibration is recommended at the beginning of each work day or
each time the instrument is switched OFF/ON.
8.7.3. These procedures assume you are using the Bacharach calibration kit.
8.7.4. N2 Calibration
8.7.3.1
100% N2 or fresh ambient air can be used
8.7.3.2
Switch the analyzer on; allow analyzer to sample fresh air
for 5 mins with its internal pump turned OFF.
8.7.3.3
Press and hold down the f2 button until the USER CAL
screen is displayed.
8.7.3.4
Wait until the analyzer automatically switches to its N2/Gas
screen.
8.7.3.5
Attach a 100% N2 cylinder to the inlet of the analyzer then
adjust the regulator attached to the gas cylinder for an
outlet pressure of 2 psi.
8.7.3.6
If N2 is unavailable, turn ON the analyzer’s pump and allow
it to draw in fresh air for at least 30 sec before proceeding.
8.7.3.7
Press the f1 button to zero the analyzer using the 100% N2
or fresh air.
8.7.3.8
If the zero procedure was successful, the display will show
OK; if unsuccessful, the message will read failed.
8.7.3.9
If this happens, retry the zero procedure, ensuring the
analyzer is only exposed to either 100% N2 or fresh air.
8.7.3.10
If still unsuccessful, the analyzer must be sent out for
repair.
8.7.4 CO2 calibration
8.7.4.1
Ensure pump is off
8.7.4.2
Press and hold down the f2 button until User Cal screen is
displayed.
Form rev. 2/18/2011
SOP-RTS-002-0008-v01
Print ID Number:
Original Effective Date: 10/5/2011
Current Version Effective Date:
Title: Operation and Maintenance of Bacharach CO2
Analyzer
Page 4 of 4
8.7.4.3
8.8
8.9
Wait until the analyzer automatically switches to the N2/Gas
screen
8.7.4.4
Press f3 button to display the gas calibration screen.
8.7.4.5
The top line shows the preset calibration gas value that
must be applied to the analyzers inlet.
8.7.4.6
The bottom line shows the current CO2 reading.
8.7.4.7
Attach a CO2 calibration gas cylinder to the inlet of the
analyzer
8.7.4.8
Adjust the regulator attached to the gas cylinder for an
outlet pressure of 2 psi.
8.7.4.9
Observe that the gas level displayed on the second line of
the gas calibration screen should slowly rise to the value
displayed on the top line
8.7.4.10
Allow the calibration gas to flow until the second line of the
gas calibration screen stabilizes, then press the f1 button.
8.7.4.11
If successful, the display will show OK; if unsuccessful, the
display will show failed.
8.7.4.12
If this happens, retry the gas calibration procedure ensuring
that the analyzer is exposed to the correct concentration of
calibration gas.
8.7.4.13
If the procedure is still unsuccessful, then the analyzer
must be sent to a vendor for repair.
8.7.4.14
Turn off regulator, remove and store calibration
accessories.
The analyzer should be sent out annually for maintenance and calibration.
All maintenance, calibrations, repair, etc will be kept with the equipment record
file.
9.0
Revision History
SOP Number including Revision Number
SOP-RTS-001-0008-v01
Form rev. 2/18/2011
Effective Date
10/5/2011