1
FO-1650
MODEL
FO-1650
FO-1850
FACSIMILE
FACSIMILE
OPERATION MANUAL
1.INSTALLATION
2.INITIAL SETTINGS
3.FAX OPERATIONS
4.USING THE ANSWERING MACHINE
5.MAKING COPIES
6.MAKING TELEPHONE CALLS
7.SPECIAL FUNCTIONS
8.OPTIONAL SETTINGS
9.PRINTING OUT REPORTS AND LISTS
10.MAINTENANCE
11.TROUBLESHOOTING
SPECIFICATIONS
QUICK REFERENCE GUIDE
INDEX
FCC-1Laser
WARNING FCC Regulations state that any unauthorized changes or modifications to this
equipment not expressly approved by the manufacturer could void the user’s authority to
operate this equipment.
Note: This equipment has been tested and found to comply with the limits for a Class B
digital device, pursuant to Part 15 of the FCC Rules.
These limits are designed to provide reasonable protection against harmful interference in
a residential installation.
This equipment generates, uses and can radiate radio frequency energy and, if not installed
and used in accordance with the instructions, may cause harmful interference to radio
communications. However, there is no guarantee that interference will not occur in a
particular installation. If this equipment does cause harmful interference to radio or
television reception, which can be determined by turning the equipment off and on, the
user is encouraged to try to correct the interference by one or more of the following
measures:
Reorient or relocate the receiving antenna.
Increase the separation between the equipment and the receiver.
Connect the equipment into an outlet on a circuit different from that to which the receiver
is connected.
Consult the dealer or an experienced radio/TV technician for help.
NOTE The laser component of the UX-1000/1100 is rated Class 1 and complies with 21
CFR 1040.10 and 1040.11 of the CDRH standards. This means that the machine does
not produce hazardous laser radiation.
ABOUT THE TELEPHONE CONSUMER PROTECTION ACT OF 1991
"The Telephone Consumer Protection Act of 1991 makes it unlawful for any person to use
a computer or other electronic device to send any message via a telephone facsimile
machine unless such message clearly contains in a margin at the top or bottom of each
transmitted page or on the first page of the transmission the following information:
(1) The date and time of transmission.
(2) Identification of either the business, business entity or individual sending the message.
(3) Telephone number of either the sending machine, business, business entity or
individual.
In order to program this information into your facsimile machine, please refer to the
appropriate instructions in the operation manual."
As an ENERGY STARSM partner, SHARP has determined that this product meets the ENERGY STARSM
guidelines for energy efficiency.
FOR YOUR RECORDS
Please record the model number and serial number below, for easy reference, in case of loss
or theft. These numbers are located on the rear side of the unit.
Space is also provided for other relevant information.
Model Number ____________________________________________________________
Serial Number ____________________________________________________________
Date of Purchase __________________________________________________________
Place of Purchase _________________________________________________________
FO1650U-INBU
<P=001>
INTRODUCTION
Welcome to the FO-1650/1850 and thank you for choosing Sharp! The
FO-1650/1850 combines a fascimile and answering machine into a single unit,
allowing you to engage in both fax and voice communications with convenience
and economy. In addition, the FO-1650/1850 features plain paper printing and the
ability to be connected to a personal computer.
This manual gives you easy-to-follow instructions for installing and using the
FO-1650/1850. The Table of Contents will show you where instructions for using
each feature are located. While you may not need to read every section in detail at
first, we recommend you at least look over them briefly.
If you have any questions or problems which cannot be solved by reading this
manual, please contact your Sharp dealer.
Important:
•
•
This facsimile machine is not designed for use on a line which has call waiting,
call forwarding, and some other special services offered by your telephone
company. If you attempt to use the fax machine in conjunction with any of these
services, you may experience errors during transmission and reception of
facsimile messages.
This fax machine is not compatible with digital telephone systems. No other fax
machines may be connected to the same line.
Note: The illustrations in this manual show the FO-1650.
INTRODUCTION
i
<P=002>
INTRODUCTION
Important safety information
• If any of your telephone equipment is not operating properly, you should immediately
remove it from your telephone line, as it may cause harm to the telephone network.
• The socket-outlet shall be installed near the equipment and shall be easily accessible.
• Never install telephone wiring during a lightning storm.
• Never install telephone jacks in wet locations unless the jack is specifically designed
for wet locations.
• Never touch uninsulated telephone wires or terminals unless the telephone line has
been disconnected at the network interface.
• Use caution when installing or modifying telephone lines.
• Avoid using a telephone (other than a cordless type) during an electrical storm. There
may be a remote risk of electric shock from lightning.
• Do not use a telephone to report a gas leak in the vicinity of the leak.
• Do not install or use the machine near water, or when you are wet. Take care not to
spill any liquids on the machine.
ii
INTRODUCTION
UX1300U-TCTC
<P=001>
RT
TABLE OF CONTENTS
1
INSTALLATION
Unpacking Check List . . .
Installing the Imaging Film
Connections . . . . . . . .
Attachments . . . . . . . .
Loading Printing Paper . .
2
3
.
.
.
.
.
.
.
.
.
.
.
.
.
.
.
.
.
.
.
.
.
.
.
.
.
.
.
.
.
.
.
.
.
.
.
.
.
.
.
.
.
.
.
.
.
.
.
.
.
.
.
.
.
.
.
.
.
.
.
.
.
.
.
.
.
.
.
.
.
.
.
.
.
.
.
.
.
.
.
.
.
.
.
.
.
.
.
.
.
.
.
.
.
.
.
1-1
1-2
1-6
1-8
1-9
Setup Guide . . . . . . . . . . . . . .
A Look at the Operation Panel . . . .
Entering Your Name and Fax Number
Entering Letters for Names . . . . . .
Setting the Date and Time . . . . . .
Selecting the Reception Mode . . . .
Answering Machine Set-up . . . . . .
Distinctive Ringing . . . . . . . . . . .
Storing Numbers for Automatic Dialing
Volume Adjustment . . . . . . . . . .
.
.
.
.
.
.
.
.
.
.
.
.
.
.
.
.
.
.
.
.
.
.
.
.
.
.
.
.
.
.
.
.
.
.
.
.
.
.
.
.
.
.
.
.
.
.
.
.
.
.
.
.
.
.
.
.
.
.
.
.
.
.
.
.
.
.
.
.
.
.
.
.
.
.
.
.
.
.
.
.
.
.
.
.
.
.
.
.
.
.
.
.
.
.
.
.
.
.
.
.
.
.
.
.
.
.
.
.
.
.
.
.
.
.
.
.
.
.
.
.
. 2-1
. 2-2
. 2-4
. 2-5
. 2-7
. 2-8
. 2-9
. 2-17
. 2-20
. 2-24
INITIAL SETTINGS
FAX OPERATIONS
Sending Documents . . . . . . . . . . . . . . . . . . . . . . . 3-1
Receiving Documents . . . . . . . . . . . . . . . . . . . . . . 3-11
4
USING THE ANSWERING MACHINE
Operating the Answering Machine . . . . . . . . . . . . . . . 4-1
Remote Operations . . . . . . . . . . . . . . . . . . . . . . . 4-5
Other Functions . . . . . . . . . . . . . . . . . . . . . . . . . 4-13
5
MAKING COPIES
6
MAKING TELEPHONE CALLS
7
SPECIAL FUNCTIONS
Caller ID . . . . . . . . . . . . . . . . . . . . . . . . . . . . .
Anti Junk Fax . . . . . . . . . . . . . . . . . . . . . . . . . .
Memory . . . . . . . . . . . . . . . . . . . . . . . . . . . . .
7-1
7-5
7-6
iii
<P=002>
TABLE OF CONTENTS
Broadcasting . . . . . . . .
Polling . . . . . . . . . . . .
Timer Operations . . . . . .
Entering and Using Programs
Reminder Function . . . . .
PC Link Function . . . . . .
. . . .
. . . .
. . . .
. . .
. . . .
. . . .
.
.
.
.
.
.
.
.
.
.
.
.
8
OPTIONAL SETTINGS
9
PRINTING OUT REPORTS AND LISTS
10
MAINTENANCE
11
TROUBLESHOOTING
.
.
.
.
.
.
.
.
.
.
.
.
.
.
.
.
.
.
.
.
.
.
.
.
.
.
.
.
.
.
.
.
.
.
.
.
.
.
.
.
.
.
.
.
.
.
.
.
.
.
.
.
.
.
.
.
.
.
.
.
.
.
.
.
.
.
.
.
.
.
.
.
7-8
7-10
7-13
7-15
7-20
7-22
Problems and Solutions . . . . . . . . . . . . . . . . . . . . . 11-1
Messages and Signals . . . . . . . . . . . . . . . . . . . . . 11-3
Clearing Paper Jams . . . . . . . . . . . . . . . . . . . . . . 11-5
SPECIFICATIONS
FCC REGULATORY INFORMATION
QUICK REFERENCE GUIDE
INDEX
iv
RT
FO1650U-ISUN
<P=001>
1
INSTALLATION
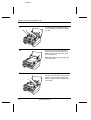
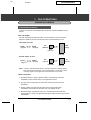
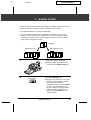
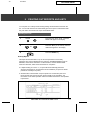
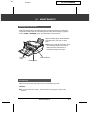
UNPACKING CHECKLIST
After unpacking your fax, make sure you have all the items shown below. If any are
missing, contact your dealer or retailer.
Received
document
tray
Rapid key labels
Operation
manual
Paper tray
cover
Handset cord
Paper tray
Telephone
line cord
Handset
Sample sharp
printing paper
(with the FO-1850
only)
3 gears and
1 flange
Multifunction
interface kit
(with the FO-1850
only)
(two cables, PC
interface box,
CD-ROM,setup
instructions)
Imaging film
Points to keep in mind when setting up
♦ The fax must be installed on a level surface.
♦ Keep the fax away from air conditioners, heaters, direct sunlight, and dust.
♦ If the fax is moved from a cold to a warm place, it is possible that condensation
may form on the reading glass, preventing proper scanning of documents for
transmission. To remove the condensation, turn on the power and wait
approximately two hours before using the fax.
♦ If your area experiences a high incidence of lightning or power surges, we
recommend that you install surge protectors for the power and telephone lines.
Surge protectors can be purchased at most telephone specialty stores.
INSTALLATION
1-1
YF
FO1650U-ISIF
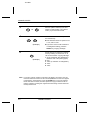
<P=001>
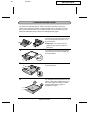
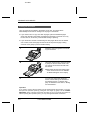
INSTALLING THE IMAGING FILM
The printer unit in your fax creates printed text and images by applying heat to the
imaging film, which causes toner to be transferred from the film to the page. Follow
the steps below to install or replace the imaging film.
1
Grasp the finger hold on the right side of
the printing compartment cover, and pull
up to open the cover.
2
Push back the green levers on each side
of the printing compartment, and rotate
the printing head frame up and to the
rear.
• Caution! The printing head (the strip of
metal on the underside of the frame)
applies heat to the printing film. It may
be hot if a document has just been
printed.
3
1-2
If you are replacing the imaging film,
take the old film out of the printing compartment and remove the three gears
and the flange from the ends of the
spools.
INSTALLATION
<P=002>
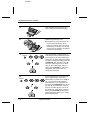
INSTALLING THE IMAGING FILM
4
Take the new film out of its package,
and insert two of the gears provided with
the fax into the ends of the spool with
film. Make sure that the two tabs on the
gears fit properly into the slots in the
ends of the spool.
• Do not yet remove the band which
holds the spools together.
2 slots
2 tabs
5
Hold the empty spool so that the end
with only one slot is on the left, and
lower the spools into the front of the printing compartment. The gears in the ends
of the spool with film should fit into the
slots on each side of the printing compartment.
6
Cut the band which holds the spools together with scissors, and remove it. Insert the remaining gear into the right end
of the empty spool and the flange into
the left end of the empty spool. Make
sure the tabs on the gear and the flange
fit into the slots in the ends of the spool
(the gear has two tabs and the flange
has one tab).
1 tab
1 slot
2 slots
Flange
2 tabs
Gear
INSTALLATION
1-3
<P=003>
INSTALLING THE IMAGING FILM
7
8
Pull the empty spool toward the back of
the compartment, unwinding the film as
you pull.
Insert the empty spool into the back of
the compartment so that the gear and
the flange fit into the slots on the sides
of the compartment.
• Make sure that the gear engages with
the gear below it.
9
1-4
Wind the film slightly (rotate the gear on
the right side of the empty spool) so that
there is no slack in the film. Make sure
that both edges of the film wind onto the
spool evenly.
INSTALLATION
<P=004>
INSTALLING THE IMAGING FILM
10
11
Rotate the printing head frame back
down, and press down on the "PUSH "
mark in the center of the frame until the
frame clicks into place. Close the printing
compartment cover.
If you replaced the film, initialize the new
film by pressing the FUNCTION key,
the "6" key, and the "#" key on the operation panel. Make sure that "INITIALIZE
FILM" appears in the display, and then
press the START key. (Do not perform
this step if you installed the initial sample
roll of film.)
FUNCTION
6
START
• You must initialize FO-16CR film to
make it wind to the starting position for
printing. If this is not done, the first
pages you print will come out blank.
Note that initialization will not be possible if the paper tray is not in the fax.
When to replace the imaging film
The sample roll of imaging film provided with your fax is capable of printing
approximately 90 pages of letter size paper. When it is used up, "FILM END " will
appear in the display. Replace it with the following imaging film, which is available
at your dealer or retailer.
FO-16CR Imaging Film
One roll of FO-16CR imaging film is capable of printing approximately 660 pages of
letter size paper.
Caution!
The text of documents printed with the imaging film is visible on the used film. If
confidential information has been printed, dispose of the film appropriately.
INSTALLATION
1-5
DD
UX1300U-ISCO
<P=001>
CONNECTIONS
Connect the power cord, telephone line, and handset as shown below. If desired,
you can also connect an extension telephone to your fax.
♦ You can use an extension phone connected to the fax to make and receive calls
like any other extension phone on your line. For details on receiving faxes from
an extension phone, see "Receiving Documents" in Chapter 3.
Plug the power cord into a 120 V,
60 Hz, grounded (3-prong) outlet.
AC outlet
Caution: Do not plug the
power cord into any other kind
of outlet. This will damage the
machine and is not covered
under the warranty.
Extension
telephone
If you want to connect an extension phone to the fax, first remove the seal covering the
"TEL. SET" jack on the fax, and
then insert the end of the extension phone line into the jack.
1-6
INSTALLATION
<P=002>
CONNECTIONS
Use the handset to make
ordinary phone calls, or to
transmit and receive documents manually.
Handset
TEL
SET.
TEL
LIN .
E
Insert one end of the telephone
line cord into the "TEL. LINE" jack.
Insert the other end into a standard (RJ11C) single-line telephone
wall jack.
Note: Be sure to insert the telephone line cord into the "TEL.
LINE" jack. Do not insert it into the
"TEL. SET" jack (the "TEL. SET"
jack is only used for connecting an
extension phone).
Wall jack
Comments:
•
•
•
Your fax is set for touch-tone dialing. If you are on a pulse dial (rotary) line, you
must set the fax for pulse dialing by changing Option Setting 8. This procedure is
described in Chapter 8, "Optional Settings".
FO-1650 only: If you intend to use a computer fax modem on the same phone
line as your fax, see "PC Link Function" in Chapter 7 for a explanation of how
you can connect your computer to your fax. If you want to use a computer fax
modem on the same line but do not want to use the setup described in "PC Link
Function", you must set Option Setting 10 to "NO" as described in Chapter 8,
"Optional Settings".
FO-1850 only: To use your fax with a computer, you must connect it to the
computer and install the fax software. Instructions for this are included in the
Multifunction interface kit.
INSTALLATION
1-7
DD
UX1300U-ISAT
<P=001>
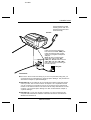
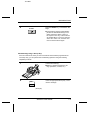
ATTACHMENTS
Attach the received document tray by inserting the tabs into the holes at the rear of
the fax.
1-8
INSTALLATION
UX1300U-ISLP
<P=001>
DD
LOADING PRINTING PAPER
The paper tray holds the paper on which received documents and copies are
printed. Up to 300 sheets of letter or legal size paper from 16 to 24 lbs. (60 to 90
g/m2) can be loaded in the tray. For the best results, we recommend that you use
Sharp FO-16NA (letter size) or Sharp FO-16NB (legal size) paper.
1
If the paper tray is in the fax machine, remove the cover. Grasp the end of the paper tray, lift it slightly, and pull it out of
the fax machine.
• Important: You must remove the
paper tray from the fax machine to
add paper.
2
If you are going to load legal size paper,
press the catch as shown, and pull out
the tray extender.
3
Push the pressure plate down until it
locks into position.
4
Fan the paper and then place it in the paper tray, print side up. Make sure the corners of the paper go under the holders,
and then shake the tray gently to
straighten the paper.
INSTALLATION
1-9
<P=002>
LOADING PRINTING PAPER
5
Insert the paper tray into the fax machine, making sure it clicks into place.
6
Replace the paper tray cover.
• The paper tray cover also serves as a
tray for original documents which
come out of the fax after scanning for
transmission or copying. You can pull
out the cover as needed to ensure that
it catches the documents.
7
FUNCTION
6
1
or
2
STOP
8
FUNCTION
6
1
or
STOP
1-10
2
Your fax has been set at the factory to
scale the size of the printed image to letter size paper. If you have loaded legal
size paper, you must change this setting
to legal. To change the setting, press the
"FUNCTION " key, the "6" key, the "*"
key twice, and then press "1" to select
letter, or "2" to select legal. When finished, press the STOP key. Be sure to
change this setting every time you
change the paper size.
Your fax has been set at the factory to
print on regular paper. If you have
loaded Sharp FO-16NA or FO-16NB paper, you must change this setting to
"HIGH QUALITY". To change the setting, press the "FUNCTION " key, the "6"
key, the "*" key three times, and then
press "1" to select regular, or "2" to select Sharp high quality paper. When finished, press the STOP key. Be sure to
change this setting again if you change
back to regular paper.
INSTALLATION
RT
UX1300U-IPSG
<P=001>
2
INITIAL SETTINGS
SETUP GUIDE
Before you can begin using your fax, there are some settings which must be made
with the keys on the operation panel. Some of the settings are required for basic
use of your fax, others may or may not be necessary depending on how you want to
use the fax. The procedures for making the settings are described in this chapter in
the order shown below (with the exception of Caller ID).
Required settings:
♦ Entering your name and fax/telephone number in the fax
♦ Setting the fax to the current date and time
♦ Selecting the reception mode
♦ Answering machine set-up
Settings which may be necessary:
♦ Distinctive ringing: If you subscribe to a distinctive ringing service from your
telephone company (this is a service which allows you to use several different
devices, each with its own phone number and ringing pattern, on one line), you
may want to select ringing patterns for the fax and/or the built-in answering
machine.
♦ Caller ID: If you subscribe to a Caller ID service from your telephone company,
the fax will display and retain information which the telephone company provides
about each call. To use this feature, reset Option Setting 13 as described in
Chapter 8, "Optional Settings". For information on using Caller ID, see "Caller ID"
in Chapter 7.
Other settings:
♦ Storing numbers for automatic dialing: Automatic dialing allows you to dial a full
fax or phone number by simply pressing a Rapid Key, or by pressing the SPEED
DIAL key and entering a 2-digit number. To use automatic dialing, you must
store the desired fax and phone numbers in the fax.
♦ Volume adjustment: Adjustment of the volume of the speaker, handset, and
ringer.
INITIAL SETTINGS
2-1
DD
UX1300U-IPOP
<P=001>
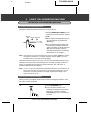
A LOOK AT THE OPERATION PANEL
Before you make the settings, take a moment to familiarize yourself with the
operation panel.
PLAY/SKIP key
Press this key to play
recorded messages.
During playback, press it
to skip forward to the next
message.
REDIAL key
Press this key to
automatically redial
the last number
dialed.
REMINDER key
Press this key to send a fax
and/or voice message to
another party or yourself at
a preset time.
SPEED DIAL key
Press this key to dial
a 2-digit Speed Dial
number.
DELETE key
Press this key to erase
recorded messages.
REC/MEMO key
Press this key to record
a phone conversation
or a message.
REC/MEMO
REPEAT key
Press this key to
repeat playback of a
message.
Number keys
Use these keys to dial
numbers, and enter
numbers and letters
during number/name
storing procedures.
REPEAT PLAY/SKIP DELETE REMINDER
ABC
DEF
1
2
3
GHI
JKL
MNO
4
5
6
PRS
TUV
WXY
7
8
9
SLOW PLAY
OPER
FAST PLAY
SPEED DIAL
REDIAL
HOLD/SEARCH
SPEAKER
0
SLOW PLAY key
Press this key to
reduce the speed of
message playback.
FAST PLAY key
Press this key to
increase the speed of
message playback.
2-2
SPEAKER key
Press this key to dial a
number without picking
up the handset.
INITIAL SETTINGS
HOLD/SEARCH key
Press this key to search
for an automatic dialing
number, or, during a
phone conversation,
press it to put the other
party on hold.
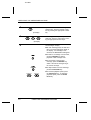
<P= 002>
A LOOK AT THE OPERATION PANEL
Display
This displays various
messages during operation
and programming.
RESOLUTION key
Press this key to adjust the
resolution and contrast
before sending or copying
a document.
RECEPTION MODE key
Press this key to select the
mode of reception.
FUNCTION key
Press this key to select
various special functions.
RECEPTION
MODE
FUNCTION RESOLUTION MEMORY
01
02
03
04
05
06
07
08
09
10
11
12
13
14
VOLUME keys
Press these keys to adjust the
volume of the handset when
the handset is lifted, the
volume of the speaker when
the SPEAKER key has been
pressed, or the volume of the
ringer at all other times.
VOLUME
DOWN
UP
COPY/HELP
STOP
15
START
16/P1
17/P2
18/G1
19/G2 20/POLL
Rapid Dial Keys
Press one of these keys to
dial a fax or voice number
automatically. (Note that you
must attach the Rapid Key
labels.)
MEMORY key
Press this key to scan a
document into memory
before transmitting it.
STOP key
Press this key to stop
operations before
they are completed.
COPY/HELP key
When a document is in the
feeder, press this key to make
a copy. At any other time,
press this key to print out the
Help List, a quick reference
guide to the operation of your
fax.
START key
Press this key to send
or receive a document.
INITIAL SETTINGS
2-3
RT
UX1000U-IPSN
<P=001>
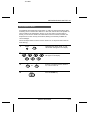
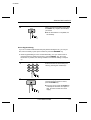
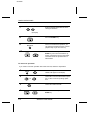
ENTERING YOUR NAME AND FAX NUMBER
To have your name and fax/telephone number (called the "Sender’s name" and
"Sender’s number") printed at the top of every page you transmit, program them by
pressing the panel keys as shown below.
♦ You must program your name and fax number in order to comply with the
Consumer Protection Act of 1991 (see inside of front cover).
♦ If you enter an incorrect number or letter, press the HOLD/SEARCH key to
move the cursor back to the mistake, then enter the correct number or letter. (To
move the cursor forward, press the SPEAKER key.)
1
FUNCTION
Press the keys shown at left. "ENTRY
MODE" will appear in the display.
3
2
Press the "#" key 2 times. "OWN NUMBER SET" will appear in the display.
3
Press the START key.
START
4
5
5
5
1
2
3
4
(Example)
5
6
Enter your fax number (max. of 20 digits) by pressing the number keys. (To insert a space between digits, press the
"#" key. To insert a "+", press the "*"
key.)
Press the START key.
START
7
7
7
4
4
4
2
2
7
7
7
7
7
7
Enter your name by pressing the appropriate number keys as shown on the following page. Press each key repeatedly
until the desired letter appears in the display. (Max. of 24 characters.)
SPEAKER
7
7
2-4
7
START
(Example: "SHARP")
STOP
Press the START key and then the
STOP key.
INITIAL SETTINGS
<P=001>
RT
UX1300U-IPEL
ENTERING LETTERS FOR NAMES
Names are programmed by pressing the number keys. You will notice that letters
are marked above each of the number keys "2" through "9". To enter a letter (or
number), press the appropriate key one or more times until the letter appears in the
display (the number will appear first, followed by the letters in the order marked
above the key). The keys used for entering letters and editing are shown below.
Space
Press this key twice to
enter a space.
ABC
Letters and numbers
To enter a letter or number, press
the appropriate key repeatedly until
the desired number/letter appears
in the display (the number appears
first, then the letters in the order
marked above the key).
DEF
1
2
3
GHI
JKL
MNO
4
5
6
PRS
TUV
WXY
7
8
9
SLOW PLAY
OPER
FAST PLAY
Delete
Press this key to delete the
letter highlighted by the cursor
(if the cursor is to the right of
the last letter entered, it will
backspace and delete the last
letter).
SPEED DIAL
REDIAL
Shift
Press this key once to change
case (press it again to change
back).
HOLD/SEARCH
Cursor left
Press this key to move the
cursor to the left.
SPEAKER
0
Symbols
Press either key repeatedly until the
desired symbol appears (see the
symbol list on the following page).
Cursor right
Press this key to move the
cursor to the right.
Comments:
•
•
•
Enter "Q" with the "7" key, and "Z" with the "9" key (these are not marked on the
machine).
To enter two letters in succession which require using the same key, press the
SPEAKER key once after entering the first letter, then enter the second letter.
To change one individual letter to another, move the cursor to that letter and
enter the desired letter. The new letter will simply replace the old one.
INITIAL SETTINGS
2-5
<P=002>
ENTERING LETTERS FOR NAMES
Symbol list
To enter a symbol from the list below, press the "#" key or the "*" key repeatedly until
the desired symbol appears.
#→
←*
. / ! " # $ % & ’ ( ) + + , - : ; < = > ? @ [ ¥ ] ^ _ p { | }→ ←
Example
The following is an example of entering the name "ABC Co. #1".
♦ The cursor in the display is indicated below by a rectangle:
Step
Press these keys:
ABC
ABC
1
Display
A
2
2
SPEAKER
A
2
ABC
3
ABC
ABC
2
2
2
A B
SPEAKER
A B
4
5
ABC
ABC
ABC
ABC
2
2
2
2
ABC
ABC
1
6
ABC
7
1
2
REDIAL
2
2
2
MNO
MNO
MNO
6
6
6
6
9
1
1
11
12
A B C
ABC
MNO
8
10
A B C
1
A B C
C
A B C
C o
A B C
C o .
A B C
C o .
A B C
C o .
#
A B C
C o .
# 1
START
13
2-6
INITIAL SETTINGS
FO1650U-IPSD
<P=001>
RT
SETTING THE DATE AND TIME
The date and time appear in the display and reports, and are printed at the top of
every page you transmit. Set the date and time by pressing the keys on the
operation panel as shown below.
♦ To correct a mistake, press the SPEED DIAL key to move the cursor back to
the mistake, and then enter the correct number.
1
Press the keys shown at left. "ENTRY
MODE" will appear in the display.
FUNCTION
3
2
Press the keys shown at left. "DATE &
TIME SET" will appear in the display.
3
Press the START key.
START
4
0
1
(Example: January)
5
5
0
(Example: the 5th)
6
6
9
(Example: 1996)
7
0
START
Enter a 2-digit number for the day ("01"
to "31").
Enter the last 2 digits of the year. (Note:
In the year 2000, "00" will appear for the
year.)
(Example: 9:25)
Enter a 2-digit number for the hour ("01"
to "12") and a 2-digit number for the minute "00" to "59").
or
Press "*" to select A.M., or "#" to select
P.M.
9
2
5
8
9
Enter a 2-digit number for the month
("01" for January, "02" for February, "12"
for December, etc.).
STOP
Press the START key and then the
STOP key.
INITIAL SETTINGS
2-7
<P=001>
DD
UX1300U-IPRM
SELECTING THE RECEPTION MODE
Your fax has three modes for receiving incoming calls and faxes:
TAD mode: Select this mode when you are out and want the built-in answering
machine to answer all calls. Voice messages will be recorded, and fax messages
will be received automatically. ("TAD" stands for "Telephone Answering Device".)
TEL mode: Select this mode when you are in and want to receive both voice calls
and fax messages on the same line. You must answer all calls, including fax
messages, using the fax’s handset or an extension phone connected to the same
line.
FAX mode: Select this mode when you only want to receive fax messages on your
line. The fax will answer all calls and receive incoming fax messages automatically.
Setting the reception mode
RECEPTION
MODE
FUNCTION RESOLUTION
Set the mode of reception with the
RECEPTION MODE key on the panel.
• To select TAD, press the key until
"GENERAL OGM PLAY" appears in
the display ("TAD" will appear after the
general outgoing message plays).
• To select TEL, press the key until
"TEL" appears in the display.
• To select FAX, press the key until
"FAX" appears in the display.
Note: TAD mode cannot be selected unless a general outgoing message has
been recorded as described in "Answering Machine Set-up" in this chapter.
FO-1850 only: Selecting the receiving unit
If you have connected the FO-1850 to a personal computer with the provided PC
interface box, you can choose whether to have incoming faxes received by the
FO-1850 or by your computer. The initial setting is "FAX" (reception by the
FO-1850). To change the setting, follow the steps below.
For detailed information on how faxes will be received if you choose reception by
your computer, see "PC reception" in "Receiving Documents" in Chapter 3.
1
2
2-8
Press the FUNCTION key and the "#"
key. "RECEIVE UNIT" will appear in the
display.
FUNCTION
1
or
2
Press "1" (FAX) to select the FO-1850,
or "2" (PC) to select your computer.
INITIAL SETTINGS
DD
FO1650U-IPAM
<P=001>
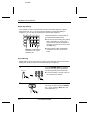
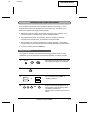
ANSWERING MACHINE SET-UP
About the answering machine
The FO-1650/1850’s built-in answering machine allows you to receive both voice
messages and fax transmissions while you are out. Up to 24 minutes of voice
messages can be recorded when no documents are stored in memory (memory
capacity will vary depending on current memory features in use).
When the reception mode is set to T.A.D., the answering machine will automatically
answer incoming calls and play your outgoing message (this is your recorded
greeting which informs callers that they can leave a message or send a fax). Voice
callers can leave a message, and fax transmissions will be received automatically.
The built-in answering machine has four different "boxes" in which voice messages
from callers can be recorded. This allows individuals in your office or members of
your family to each receive their own private messages. A passcode can be
programmed for each box to prevent other people from listening to or erasing
messages.
The General Box is for general use, and Boxes 1, 2, and 3 are each for personal
use. An outgoing message for the General Box must be recorded, and an outgoing
message must also be recorded for each personal box used.
When the answering machine answers a call, the caller will hear the general
outgoing message. If the caller wants to leave a message in the General Box, they
should wait for the beep and then speak. If the caller wants to send a fax to the
General Box, they should press their Start key. By pressing their Start key after
speaking, the caller can leave a voice message and send a fax without having to
place a separate telephone call.
If the caller wants to leave a message in a personal box, they must enter the
number of the box ("1" for Box 1, "2" for Box 2, or "3" for Box 3) by pressing the
appropriate key on their telephone before the beep. The outgoing message for the
selected box will play, and the caller can then leave a message or press their Start
key to send a fax.
When a fax is sent to a personal box, it will not be printed out immediately. Instead,
it will print out when you play back the messages left in the box. If you program a
passcode for the box, you will be able to receive confidential faxes. When a fax is
sent to the General Box, it will be printed out immediately unless a passcode has
been programmed for the General Box, in which case it will be printed out after
message playback.
Note: To leave a message in a personal box, the caller must be on a touch-tone
phone.
INITIAL SETTINGS
2-9
<P=002>
ANSWERING MACHINE SET-UP
Recording an outgoing message
To use the built-in answering machine, you must first record a general outgoing
message. This must be done even if you only intend to use personal boxes. An
outgoing message for each personal box used must also be recorded. A personal
box cannot be accessed if it does not have an outgoing message.
The following is an example of a general outgoing message:
"Hello, this is the Jones family. We are not at home right now. If you would like to
leave a general message, please speak after the beep. If you would like to leave a
private message, press "1" for John, "2" for Jane, or "3" for Billy before the beep. If
you would like to send a fax, press your facsimile Start button."
The following is an example of an outgoing message for a personal box:
"This is Jane’s personal box. Please leave a message after the beep."
1
Press the keys shown at left. "T.A.D.
SETTINGS" will appear in the display.
FUNCTION
0
2
3
Press the "#" key. OGM RECORDING
will appear in the display.
Press the START key.
START
4
Press a numeric key to select the outgoing message you want to record:
• "0": General outgoing message
0
• "1": Box 1 outgoing message
(Example)
• "2": Box 2 outgoing message
• "3": Box 3 outgoing message
• "4": Transfer outgoing message
(This is used for the Transfer function,
which is described in "Other
Functions" in Chapter 4.)
2-10
INITIAL SETTINGS
<P=003>
ANSWERING MACHINE SET-UP
5
Pick up the handset and speak into it.
• The general outgoing message can be
up to 60 seconds long. A personal
outgoing message can be up to 30
seconds long.
• While recording, the display will show
the time remaining to record.
6
STOP
or
When finished, replace the handset or
press the STOP key.
• If your message exceeds the time limit
or more than 6 seconds of silence is
detected, recording will stop
automatically.
7
STOP
STOP
Go back to Step 4 to record an outgoing
message for another box, or press the
STOP key twice to return to the date
and time display.
To listen to or erase an outgoing message
To listen to or erase an outgoing message, follow Steps 1 through 4 of the above
procedure to select the message, and then press the PLAY/SKIP key to listen to it,
or the DELETE to erase it. To return to the date and time display, press the STOP
key twice. Note that the general outgoing message cannot be erased. If you need
to change it, simply repeat the recording procedure.
Note: If an extension phone is connected to the FO-1650/1850, an outgoing message cannot be recorded, played, or deleted while the extension phone is being used (while LINE IS IN USE appears in the display).
INITIAL SETTINGS
2-11
<P=004>
ANSWERING MACHINE SET-UP
Programming a passcode
A 3-digit passcode can be programmed for each of the boxes. If this is done, the
passcode must be entered before messages in the box can be listened to or
erased. Program a new passcode or clear a previously programmed passcode by
pressing the panel keys as shown below.
♦ The numbers "1", "2", and "3" cannot be selected for the first digit of the
passcode.
1
Press the keys shown at left. "T.A.D.
SETTINGS" will appear in the display.
FUNCTION
0
2
Press the keys shown at left. "BOX
PASSCODE" will appear in the display.
3
1
or
Press "1" to enter a passcode, or "2" to
clear a previously programmed
passcode.
2
4
1
(Example)
5
4
5
6
Enter the number of the box for which
you want to program or clear a
passcode by pressing the appropriate
numeric key.
If you are clearing a passcode, go to
Step 6.
Enter a 3-digit passcode by pressing the
number keys.
(Example)
6
START
STOP
Press the START key and then the
STOP key.
Note: To ensure confidentiality, passcodes cannot be checked. If you have forgotten a passcode, clear it and program a new one.
2-12
INITIAL SETTINGS
<P=005>
ANSWERING MACHINE SET-UP
Fax reception in boxes
As explained at the beginning of this section, a caller can press their Start key after
accessing a box to send a fax to that box. In this case, the fax will not be printed out
until you listen to the messages in the box. If you don’t want to receive faxes in
boxes, you can turn this function off. When the function is turned off, all faxes will
be printed out as soon as they are received, leaving more memory available for
voice messages.
Follow the steps below to turn the Fax box function on or off (it has been turned on
at the factory).
1
Press the keys shown at left. "T.A.D.
SETTINGS" will appear in the display.
FUNCTION
0
2
3
4
Press the keys shown at left. "FAX BOX"
will appear in the display.
1
or
STOP
2
Press "1" to turn the Fax box function
on, or "2" to turn it off.
Press the STOP key.
INITIAL SETTINGS
2-13
<P=006>
ANSWERING MACHINE SET-UP
Setting ICM time
Incoming messages (ICMs) are the messages which callers leave for you on the
built-in answering machine. The answering machine is set at the factory to allow
each caller a maximum of 4 minutes to leave a message. If desired, you can
change this setting to 15, 30, or 60 seconds.
1
FUNCTION
0
Press the keys shown at left. "T.A.D.
SETTINGS" will appear in the display.
2
Press the keys shown at left. "ICM RECORD TIME" will appear in the display.
3
Press a numeric key to select the desired ICM recording time:
4
• "1": 15 seconds
(Example)
• "2": 30 seconds
• "3": 60 seconds
• "4": 4 minutes
4
2-14
STOP
Press the STOP key.
INITIAL SETTINGS
<P=007>
ANSWERING MACHINE SET-UP
Fax reception on TAD failure
If the memory for recording incoming messages becomes full while you are out, the
answering machine will no longer be able to record messages. The ON TAD
FAILURE setting is used to choose the response of the machine to incoming calls
when this happens:
♦ Automatic fax reception "NO": The FO-1650/1850 will answer after 20 rings, after
which it will wait to receive a remote command. Most callers will hang up before
it answers; however, when you call the FO-1650/1850 from a remote location,
you can wait until it answers, listen to your messages, and then erase them (see
"Remote operations" in Chapter 4).
♦ Automatic fax reception "YES": The reception mode will switch to FAX mode,
allowing the FO-1650/1850 to continue to receive faxes automatically. With this
setting, you can still use the remote commands to listen to your messages and
erase the message memory (see "Remote operations").
Automatic fax reception is set to NO at the factory before shipping. If you want to
set it to YES, press the panel keys as follows:
1
FUNCTION
0
2
3
4
Press the keys shown at left. "T.A.D.
SETTINGS" will appear in the display.
Press the keys shown at left. "ON TAD
FAILURE" will appear in the display.
1
or
STOP
2
Press "1" to turn automatic fax reception
on, or "2" to turn it off.
Press the STOP key.
INITIAL SETTINGS
2-15
<P=008>
ANSWERING MACHINE SET-UP
Calling Party Control detection
When a caller hangs up, the central telephone exchange will issue a signal called a
Calling Party Control (CPC) signal. The built-in answering machine has been set to
detect this signal, and this allows it to immediately stop recording when a caller
hangs up, thereby saving memory space and freeing you from having to listen to
long periods of silence when you play back your messages.
However, if you are a subscriber to such telephone services as Call Waiting or Call
Forwarding, signals used by these services may be mistaken for a CPC signal,
causing the machine to hang up during a call. In this case, follow the steps below to
turn off CPC detection.
Note: CPC detection may not operate properly in some telephone exchanges. For
this reason, periods of silence and/or telephone company signals may be recorded even if CPC detection is turned on.
1
Press the keys shown at left. "T.A.D.
SETTINGS" will appear in the display.
FUNCTION
0
2
3
4
2-16
Press the keys shown at left. "CPC DETECTION" will appear in the display.
1
or
STOP
2
Press "1" to turn CPC detection on, or
"2" to turn it off.
Press the STOP key.
INITIAL SETTINGS
DD
UX1300U-IPDR
<P=001>
DISTINCTIVE RINGING
Distinctive ringing in FAX mode
Distinctive ringing is a service offered by some local telephone companies which
allows you to use up to four different telephone numbers, each with a different
ringing pattern, on your regular single line. If you subscribe to a distinctive ringing
service, you can set your fax to automatically answer when it detects one of those
ringing patterns, thereby allowing you to use the number corresponding to that
pattern as an exclusive fax number.
Important:
•
•
To use distinctive ringing, you must subscribe to a distinctive ringing service from
your local phone company. Do not make this setting if you do not subscribe to a
distinctive ringing service.
Your fax may not be compatible with some distinctive ringing services.
When using this feature, you must set the reception mode of your fax to FAX as
described in "Receiving a Document" in Chapter 3. When your designated fax
number is dialed, your fax will automatically answer and begin reception after two
rings. Note that other devices on the same line will also ring until your fax answers.
If one of your other numbers is dialed, the fax will ring; however, it will not answer.
To use distinctive ringing, select one of the ringing patterns below for your fax by
pressing the panel keys as shown on the following page. The selections are as
follows:
1. RING PATTERN 1:
Two short rings.
2. RING PATTERN 2:
One short, one long, and one short ring.
3. RING PATTERN 3:
Two short rings and one long ring.
4. STANDARD RING:
Your standard (normal) ringing pattern.
5. OFF SETTING:
Answer all ringing patterns (this turns
distinctive ringing off).
Your fax has been set to "5" at the factory.
INITIAL SETTINGS
2-17
<P=002>
DISTINCTIVE RINGING
1
Press the keys shown at left. "OPTION
SETTING" will appear in the display.
FUNCTION
4
2
Press the keys shown at left. "DISTINCTIVE RING" will appear in the display.
3
Select a ringing pattern by entering the
appropriate number ("1" to "5" as shown
in the list on the previous page).
1
(Example)
4
Press the STOP key.
STOP
Distinctive ringing in TAD mode
You can also use distinctive ringing with the built-in answering machine. By turning
on the TAD distinctive ringing setting as shown on the following page, each ringing
pattern will be assigned to a message box as follows when the reception mode of
the fax is set to TAD.
STANDARD PATTERN:
GENERAL BOX
PATTERN 1:
BOX 1
PATTERN 2:
BOX 2
PATTERN 3:
BOX 3
Each box is accessed by calling the number of its ringing pattern. For example, if a
caller dials the number corresponding to ringing pattern 2, the answering machine
will answer, the outgoing message for Box 2 will play, and the caller can then leave
a message in Box 2. Fax transmissions can be received with any of the ringing
patterns.
2-18
INITIAL SETTINGS
<P=003>
DISTINCTIVE RINGING
♦ Note that the above assignment of ringing patterns to boxes is not affected by
the distinctive ringing setting for FAX mode described on the previous page. The
above assignment is effective when the fax is in TAD mode, and the selection
made for FAX mode is effective when the fax is in FAX mode.
An outgoing message must be recorded for each box used with distinctive ringing.
If an outgoing message is not recorded for a box, the answering machine will not
answer when the corresponding number is dialed. However, if you have selected
that ringing pattern for fax reception in FAX mode as described on the previous
page, the fax will answer that pattern and receive a document just like it does in
FAX mode.
As an example, you could have the answering machine answer only the standard
ringing pattern by recording an outgoing message only for the General Box. The
other patterns would be left free, so you could use one of them for fax reception as
described on the previous page, and another for a computer modem or other
device.
To turn distinctive ringing in TAD mode on, press the panel keys as follows:
1
Press the keys shown at left. "DISTINCTIVE RING" will appear in the display.
FUNCTION
0
2
1
or
3
2
Press "1" to turn distinctive ringing in
TAD mode on, or "2" to turn it off.
Press the STOP key.
STOP
INITIAL SETTINGS
2-19
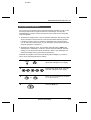
UX1300U-IPAD
<P=001>
RT
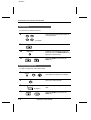
STORING NUMBERS FOR AUTOMATIC DIALING
Automatic dialing is a quick and convenient way of dialing which is done by either
pressing a Rapid Key (Rapid Key Dialing), or pressing the SPEED DIAL key and
entering a 2-digit number (Speed Dialing). It can be used for both fax transmissions
and voice calls.
To use automatic dialing, you must first store the full number in your fax and assign
a 2-digit Speed Dial number to it. You can also enter a name which appears in the
display when the number is dialed. Up to 99 numbers can be stored.
♦ Speed Dial numbers from "01" to "20" can be used for both Rapid Key Dialing
and Speed Dialing; Speed Dial numbers from "21" to "99" can only be used for
Speed Dialing.
♦ To allow easy identification of the Rapid Keys, attach each strip of Rapid Key
labels above the appropriate row of Rapid Keys. The arrangement of the keys is
shown in "Operation Panel" at the beginning of this chapter. Each time you store
a number for Rapid Key Dialing, write the name of the party above the
appropriate key.
Storing numbers
Comments:
•
•
You may need to add a pause between certain digits in the number to allow time
for connection. For example, if you are on a PBX telephone system that requires
an access number to be dialed (such as "9") to access an outside line, you will
need to enter a pause between the access number and the telephone/fax
number of the other party. Pauses are entered by pressing the REDIAL key (2
seconds per pause). If necessary, several pauses can be entered in a row.
To enter letters for names or correct a mistake, see "Entering letters for names"
in this chapter.
1
FUNCTION
3
2
2-20
1
Press the keys shown at left. "FAX/TEL.
# MODE" will appear in the display.
Press "1" to select SET.
INITIAL SETTINGS
<P=002>
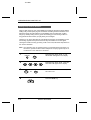
STORING NUMBERS FOR AUTOMATIC DIALING
3
Enter a 2-digit number (from "01" to
"99") by pressing the number keys. This
will be the Speed Dial number.
1
0
(Example)
4
5
5
5
1
2
3
4
Enter the fax or voice number by pressing the number keys (max. of 32 digits including pauses).
(Example)
5
Press the START key.
START
6
ABC
DEF
GHI
2
3
4
…
WXY
9
(Example)
7
START
8
Step 3 or
STOP
Enter the name of the location or party
by pressing number keys as described
in "Entering Letters for Names" in this
chapter (max. of 20 characters). If you
don’t want to enter a name, skip this
step.
Press the START key.
Return to Step 3 to store another number, or press STOP to exit. If the number will be used for Rapid Key Dialing,
you can write the name on the label
above the appropriate Rapid Key.
INITIAL SETTINGS
2-21
<P=003>
STORING NUMBERS FOR AUTOMATIC DIALING
Clearing numbers
Note: You cannot clear a number if it is used in a program or timer operation, or if it
is included in a Group Key. First clear the number from the operation or
group, then perform the following clearing procedure. To check where the
number is used, print out the "Program/Group List and/or the "Timer List" as
described in Chapter 7.
1
2
3
Press the keys shown at left. "FAX/TEL.
# MODE" will appear in the display.
FUNCTION
3
Press "2" to select CLEAR.
2
0
1
(Example)
4
Press the START key.
START
5
STOP
Step 3 or
Enter the Speed Dial number that you
want to clear by pressing the number
keys.
Return to Step 3 to clear another number, or press STOP to exit.
Making changes
To make changes in a number previously stored, repeat the storing procedure.
Select the code number for which you want to make changes in Step 3, and then
change the number and/or name when they appear in the display (Steps 4 and 6,
respectively).
Numbers and letters are changed as described in "Entering letters for names" in
this chapter.
♦ A lithium battery keeps automatic dialing numbers in memory
Your fax uses a lithium battery to keep automatic dialing numbers and other
programmed data in memory when the power is turned off. Battery power is
consumed primarily when the power is off. With the power kept continuously off, the
life of the battery is about 5 years. If the battery dies, have your dealer or retailer
replace it. Do not try to replace it yourself.
2-22
INITIAL SETTINGS
<P=004>
STORING NUMBERS FOR AUTOMATIC DIALING
Storing Numbers in Group Keys
Group Keys allow you to dial a group of fax numbers by simply pressing the
appropriate Group Key once. They are convenient for the Broadcasting function,
which is used to transmit a document to a group of fax machines.
Rapid Keys 18/G1 and 19/G2 can be programmed as Group Keys. To program or
clear a Group Key, follow the steps below. Note that one key cannot be
simultaneously programmed as both a Rapid Key and a Group Key.
♦ Up to 20 fax numbers can be stored in one Group Key.
♦ Only Speed Dial numbers can be stored in a Group Key. Full numbers cannot be
stored.
♦ A Group Key cannot be cleared if it is being used in a programmed Broadcasting
operation. First clear the programmed operation as described in "Entering and
Using Programs" in Chapter 5, then clear the key. If you need to check which
program the key is used in, print out the Program and Group List as described in
Chapter 7.
1
Press the keys shown at left. "GROUP
ENTRY MODE" will appear in the display.
FUNCTION
7
2
1
3
or
Press "1" to program a Group Key, or
"2" to clear a Group Key.
2
18/G1
(Example)
4
0
1
0
2
Press a Group Key (Rapid Key 18/G1 or
19/G2) to select it. If you are clearing the
key, go to Step 5.
Enter the Speed Dial numbers of the receiving machines.
(Example)
5
START
6
Press the START key.
STOP
Step 3 or
Return to Step 3 to program or clear another Group Key, or press STOP to exit.
INITIAL SETTINGS
2-23
DD
UX1300U-IPVA
<P=001>
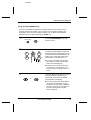
VOLUME ADJUSTMENT
You can adjust the volume of the speaker, handset, and ringer using the UP and
DOWN keys on the operation panel.
Speaker
The speaker has three volume levels: HIGH, MIDDLE, and LOW. To adjust the
volume of the speaker, press the SPEAKER key and then press the UP or DOWN
key until the desired level appears in the display. Press the SPEAKER key again
to turn the speaker off.
Handset
The handset receiver has two volume levels: HIGH and MIDDLE. To adjust the
volume of the handset receiver, lift the handset and then press the UP or DOWN
key until the desired level appears in the display.
Ringer
The ringer has four volume levels: HIGH, MIDDLE, LOW, and OFF. To adjust the
volume of the ringer, press the UP or DOWN key until the desired level appears in
the display (make sure the SPEAKER has not been pressed and the handset is
not lifted). The fax will ring at the new volume level each time you change the level.
If you select OFF, press the START key to confirm your selection.
2-24
INITIAL SETTINGS
RT
UX1000U-BOPS
<P=001>
3
FAX OPERATIONS
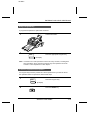
SENDING DOCUMENTS
Transmittable documents
Your fax can transmit most standard office documents. Specific guidelines are as
follows:
Size and weight
The size and weight of documents which you can load in the document feeder
depend on whether you load one sheet at a time or several sheets at once.
One sheet at a time:
14 lbs.
2
(52 g/m )
36 lbs.
2
(157 g/m )
39.4"
(1.0 m)
5.0"
(128 mm)
5.8"
(148 mm)
8.5"
(216 mm)
Several sheets at once:
14 lbs.
2
(52 g/m )
20 lbs.
2
(80 g/m )
5.0"
14"
(128 mm)
(356 mm)
5.8"
(148 mm)
8.5"
(216 mm)
Note: The area of the document which is scanned by the fax is slightly smaller
than the actual document size. The scanning width is 8.3 inches, and the
scanning length is the length of the document minus 0.32 inches.
Other restrictions
♦ Documents written in yellow, greenish yellow, or light blue ink cannot be
transmitted, as the scanner does not recognize these colors.
♦ Ink, glue, and correcting fluid on documents must be dry before they are
transmitted.
♦ All clips, staples, and pins must be removed from documents before
transmission. If these are not removed, they may damage the fax.
♦ Documents which are patched, taped, torn, smaller than the minimum size,
carbon backed, or easily smudged should be photocopied, and the copy used for
transmission.
FAX OPERATIONS
3-1
<P=002>
SENDING DOCUMENTS
Loading the document
Up to 20 pages can be placed in the feeder at one time. The pages will be
automatically fed into the fax starting from the page on the bottom.
♦ If you need to send or copy more than 20 pages, place the additional pages
gently and carefully in the feeder just before the last page is scanned. Do not try
to force them in, as this may cause double-feeding or jamming.
♦ If your document consists of several large or thick pages which must be loaded
one at a time, insert each page into the feeder as the previous page is being
scanned. Insert gently to prevent double-feeding.
1
Adjust the document guides to the width
of your document.
2
Place the document face down and push
it gently into the document feeder. The
top edge of the document should enter
the fax first.
• The feeder will draw the leading edge
of the document into the fax. READY
TO SEND will appear in the display.
3
You can now either make resolution
and/or contrast settings as described in
the following section, or dial the other
party as described in the section, "Dialing
and transmission".
Important:
If you need to remove the document from the feeder before transmission or copying,
first open the operation panel by pulling the front edge up (grasp it at the "PANEL
RELEASE" mark), and then remove the document. If you try to pull the document out
without opening the operation panel, you may damage the feeder mechanism.
3-2
FAX OPERATIONS
<P=003>
SENDING DOCUMENTS
Optional transmission settings
If desired, there are several transmission settings which you can make before
dialing and transmitting the document.
Note: To make the settings, the document must first be loaded in the feeder.
Resolution
Your fax has four resolution settings. If you do not make a setting, the fax will
automatically send the document in STANDARD resolution.
STANDARD:
Use STANDARD for ordinary documents. This setting
gives you the fastest and most economical transmission.
FINE:
Use FINE for improved reproduction, especially with
documents containing small letters or fine drawings.
SUPER FINE:
Use SUPER FINE when you need the highest quality of
reproduction.
HALF TONE:
Use HALF TONE for photographs and illustrations. The
original will be reproduced in 64 shades of gray.
Note: In order to transmit in FINE or SUPER FINE resolution, the receiving fax
machine must also have that resolution. If it doesn’t, your fax will
automatically step down to the next best available setting.
Contrast
The contrast is normally set to AUTO, which means that the fax automatically
controls the contrast, but for faint documents you can change the setting to DARK.
Setting the resolution and contrast
RECEPTION
MODE
FUNCTION RESOLUTION MEMORY
Press the RESOLUTION key one or
more times until the desired resolution
and contrast settings appear in the display.
• The first time you move through the
list of resolution settings, the contrast
setting AUTO will appear next to each
resolution setting. The second time
you move through the list, the contrast
setting DARK will appear.
FAX OPERATIONS
3-3
<P=004>
SENDING DOCUMENTS
Cover Sheet
You can have your fax generate a cover sheet and send it as the last page of the
transmission. The cover sheet includes the date and time, the sender’s name and
number, and the receiver’s name and number if an automatic dialing number is
used. The total number of pages sent is indicated on the bottom.
♦ Your name and number must be programmed in order for them to appear on the
cover sheet. (See "Entering Your Name and Fax Number" in Chapter 2.)
To include a cover sheet with each transmission, set Option Setting 14 to "YES" as
described in Chapter 8, "Optional Settings". Note that once Option Setting 14 is set
to "YES", cover sheets will be automatically included with every transmission until
you change the setting to "NO".
When the cover sheet function is turned on, you can also select a message which
will appear as a header at the top of the cover sheet. To do so, follow the steps
below. Note that the message selection is only effective for one transmission.
1
FUNCTION
5
2
1
(Example)
Press the keys shown at left. "COVER
SHEET HEAD" will appear in the display.
Select a message by entering a number
from "1" to "4" as shown below:
"1": URGENT
"2": IMPORTANT
"3": CONFIDENTIAL
"4": PLS. DISTRIBUTE
Example
3-4
FAX OPERATIONS
<P=005>
SENDING DOCUMENTS
Batch Page Numbering
This setting is used to change the page numbering of the transmitted document
from simple numbering ("P.1", "P.2", etc.) to batch numbering, which means that a
slash and the total number of pages being sent are added after each page number
(for example, "P. 1/5", "P.2/5", etc.). This allows the receiver to check for any
missing pages.
♦ If you are sending a cover sheet, do not include the cover sheet in the total
number of pages. Your fax will adjust the number to include the cover sheet
automatically.
♦ If you need to cancel a batch number entry, remove the document from the
feeder or press the STOP key.
♦ If the number of pages actually transmitted does not coincide with the batch
number entered, the alarm will sound and PAGE COUNT ERROR will appear in
the display. "PAGE E" will also appear in the "NOTE" column of the Transaction
Report if it has been set to print out.
1
Press the keys shown at left. "PAGE
COUNTER SET" will appear in the display.
FUNCTION
2
1
Enter the total number of pages ("01" to
"99") by pressing the number keys.
0
(Example)
FAX OPERATIONS
3-5
YF
UX1000U-BOSD
<P=001>
SENDING DOCUMENTS
Dialing and transmission
Once you have loaded the document and made any desired transmission settings,
you are ready to dial the number of the receiving fax machine and transmit the
document. There are several ways of dialing, and you can select the one which
best suits your needs.
Normal Dialing
With Normal Dialing, you pick up the handset (or press the SPEAKER key) and
dial as you would to make a telephone call. If the receiving machine is set to
receive faxes manually (this means that the receiving party first answers your call
vocally, and then presses their Start key to begin fax reception), you can talk with
them before sending the fax.
1
SPEAKER
Pick up the handset or press the
SPEAKER key. Listen for the dial tone.
or
2
ABC
DEF
1
2
3
GHI
JKL
MNO
4
5
6
PRS
TUV
WXY
8
9
7
Dial the number of the receiving machine by pressing the number keys.
OPER
0
3
Beep
Wait for the connection. Depending on
the setting of the receiving machine, you
will either hear a facsimile reception tone
or the other person will answer.
• If the other party answers, ask them to
press their Start key (if you pressed
the SPEAKER key, pick up the handset to speak with them). This causes
the receiving machine to issue a reception tone.
3-6
FAX OPERATIONS
<P=002>
SENDING DOCUMENTS
4
When you hear the reception tone, press
the START key. Replace the handset if
you used it.
START
• When transmission is completed, the
fax will beep.
Direct Keypad Dialing
If you do not need to talk with the other party before sending the fax, you can just
dial; it isn’t necessary to pick up the handset or press the SPEAKER key.
♦ Direct Keypad Dialing is a form of automatic dialing, so if you need to insert a
pause between any digits of the number, press the REDIAL key. (For more
information on pauses, see "Storing Numbers for Automatic Dialing" in Chapter
2.)
1
ABC
DEF
1
2
3
GHI
JKL
MNO
4
5
6
PRS
TUV
WXY
8
9
7
Enter the number of the receiving machine by pressing the number keys.
OPER
0
2
START
Check the display. If the number of the
receiving machine shown is correct,
press the START key.
• If it is not correct, press the STOP key
to backspace and clear one digit at a
time, and then re-enter the correct
digit(s).
FAX OPERATIONS
3-7
<P=003>
SENDING DOCUMENTS
Rapid Key Dialing
If the number you want to dial has been stored for automatic dialing as a Speed
Dial number from "01" to "20" (see "Storing Numbers for Automatic Dialing" in
Chapter 2), you can dial it by pressing the corresponding Rapid Key.
01
02
03
04
05
06
07
08
09
10
11
12
13
14
15
Press the Rapid Key corresponding to
the desired Speed Dial number.
• The name of the receiving party will ap16/P1
17/P2
18/G1
pear in the display. If no name was
stored, the fax number will appear. (If
the name or number is incorrect, press
the STOP key.)
19/G2 20/POLL
• The document will be automatically
Example: To dial Speed
Dial number "02", press
Rapid Key 02.
transmitted once the connection is
made.
Speed Dialing
Speed Dialing can be used to dial any number which has been stored for automatic
dialing (see "Storing Numbers for Automatic Dialing" in Chapter 2).
1
ABC
SPEED DIAL
DEF
1
2
3
GHI
JKL
MNO
4
5
6
PRS
TUV
WXY
8
9
7
Press the SPEED DIAL key and then
enter the two digits of the Speed Dial
number by pressing the number keys.
• To enter numbers 1 through 9, first enter 0 and then the number.
OPER
0
2
3-8
START
Check the display. If the name or number shown is correct, press the START
key. (If not, press the STOP key and
then repeat Step 1.)
FAX OPERATIONS
<P=004>
SENDING DOCUMENTS
Using the HOLD/SEARCH key
If you don’t remember the Rapid Key or Speed Dial number in which you have
stored a particular fax number, you can search for the number by following the
steps below. Once you have found the number, you can dial it and transmit the
loaded document by simply pressing the START key.
1
Press the HOLD/SEARCH key and
then the "1" key.
HOLD/SEARCH
1
2
ABC
DEF
1
2
3
GHI
JKL
MNO
4
5
6
Enter the first letter of the stored name
by pressing the appropriate number key
(the key below the marked letter) one or
more times until the letter appears in the
display. If the name begins with a special character or number, press "1".
• If you don’t remember the first letter,
go to Step 3 (you will scroll through
the list from the beginning).
• If a name wasn’t stored for the number, press "0". This will cause numbers, not names, to appear when you
scroll.
3
or
Press the "#" key or the "*" key to scroll
through the names (numbers if you
pressed "0"). Stop when the desired
name appears in the display.
• If no names have been stored that begin with the entered letter, you will
scroll from the next name, in alphabetical order, in the list. If no names/numbers have been stored at all, NO
DATA will appear.
FAX OPERATIONS
3-9
<P=005>
SENDING DOCUMENTS
4
START
Press the START key. The document
will be automatically transmitted once
the connection is made.
Redialing
Automatic redialing
If you use automatic dialing (including Direct Keypad Dialing) and the line is busy,
your fax will automatically redial the number. Up to 2 redialing attempts will be
made at intervals of 5 minutes.
♦ To stop automatic redialing, press the STOP key.
♦ If desired, you can change the number of times the fax redials to any number
from 0 to 15 with Option Setting 4, and the interval at which redialing is done to
any number of minutes from 1 to 15 with Option Setting 3. See Chapter 8,
"Optional Settings".
Using the REDIAL key
You can press the REDIAL key to redial the last number dialed. To send a
document, proceed from Step 3 of Normal Dialing. Note that the speaker will be
automatically activated, so you do not need to pick up the handset immediately.
3-10
FAX OPERATIONS
YF
UX1000U-BORD
<P=001>
RECEIVING DOCUMENTS
Using FAX mode
When the reception mode is set to FAX (press the RECEPTION MODE key until
"FAX" appears in the display), your fax automatically answers all calls on 4 rings
and receives the incoming documents.
♦ You can change the number of rings on which the fax answers incoming calls by
changing Option Setting 2 (see Chapter 8, "Optional Settings"). Any number
from 1 to 5 can be selected. Note, however, that reception of auto-dialed faxes
may not be possible from certain fax machines if you select a large number of
rings.
♦ If you pick up the handset before your fax answers, you can talk to the other
party and/or receive a document as described below in "Using TEL mode". For
example, with the fax set to answer on 4 rings, you can receive both voice calls
and fax messages in FAX mode by answering before the fourth ring, but still
have the fax answer calls automatically at times when you are unable to respond
personally.
Note: If you are using distinctive ringing, your fax will answer incoming calls after
two rings regardless of the setting of Option Setting 2.
Using TEL mode
When the reception mode is set to TEL (press the RECEPTION MODE key until
"TEL" appears in the display), you must answer all calls (including fax
transmissions) using the fax’s handset or an extension phone connected to the
same line.
Receiving documents on your fax machine
When your fax rings, pick up the handset.
• If you hear a fax tone, wait until
RECEIVING appears in the display,
and then replace the handset.
• If the other party first talks to you and
then wants to send a fax, press the
START key after speaking (press your
START key before the sender presses
their Start key). Replace the handset.
FAX OPERATIONS
3-11
<P=002>
RECEIVING DOCUMENTS
Note: If you have set Option Setting 10 to "OFF" and you hear a fax tone when
you pick up the handset, you must press the START key to begin reception.
Receiving documents on an extension phone
If you hear a soft fax tone when you answer an extension phone, wait until your fax
answers (the extension phone will go dead if it is connected to your fax, or you will
hear pronounced high-pitched fax tones if the phone is connected to a separate
wall jack), and then hang up. Your fax will automatically receive the document.
Note: If your fax does not respond within 5 seconds, noise on the line may be preventing it from detecting the fax tone. In this case, manually activate fax reception as described in the following paragraph.
If the other party first talks to you and then wants to send a document, press "5",
"*" and "*" if you are on a touch tone phone. If you are on a pulse dial phone, set
the handset down (do not hang up), walk over to the fax, pick up the handset, and
press the START key.
Note: Your fax will not accept the signal to begin reception ("5", "*", and "*") if a
document is loaded in its feeder.
Comments:
•
•
•
If you have set Option Setting 10 to "OFF" and hear a fax tone when you answer
the extension phone, you must press "5", "*", and "*" if you are on a touch-tone
phone, or walk over to the fax, pick up the handset, and press the START key if
you are on a pulse dial phone.
The code used to activate fax reception from a touch-tone extension phone ("5",
"*", and "*") can be changed if desired. See Option Setting 5 ("Tel/Fax Remote
Number") in Chapter 8, "Optional Settings".
If you do not intend to use the code for activating fax reception, you can turn
detection of the code off by resetting Option Setting 6. This will ensure that the
fax never mistakenly attempts to begin reception if it detects a signal similar to
"5", "*", and "*" while you are talking on an extension phone.
3-12
FAX OPERATIONS
<P=003>
RECEIVING DOCUMENTS
Optional reception settings
2 in 1 Print
To save paper, you can have the size of your incoming faxes reduced by 55%. This
will allow you to receive, for example, a 2-page document on one page (note that
this may not be possible if the document pages are longer than your printing
paper). To turn on this function, follow the steps below.
1
2
FUNCTION
Press the keys shown at left. "2 IN 1
PRINT" will appear in the display.
6
1
3
or
2
STOP
Press "1" to turn on the function, or "2"
to turn it off.
Press the STOP key.
Reception Ratio
Your fax has been set at the factory to automatically reduce the size of received
documents to fit the size of the printing paper. This ensures that data on the edges
of the document are not cut off. If desired, you can turn this function off and have
received documents printed at full size.
Note: If a document is too long to fit on the printing paper, the remainder will be
printed on a second page. In this case, the cut-off point may occur in the
middle of a line.
Note: Automatic reduction may not be possible if the received document is too
large, contains too many fine graphics or images, or is sent at high resolution. In this case, the remainder of the document will be printed on a second
page.
1
2
3
Press the keys shown at left. "RECEPTION RATIO" will appear in the display.
FUNCTION
6
1
or
STOP
2
Press "1" to turn automatic reduction on,
or "2" to turn it off.
Press the STOP key.
FAX OPERATIONS
3-13
<P=004>
RECEIVING DOCUMENTS
PC reception (only for FO-1850)
If you have connected the FO-1850 to a personal computer with the provided PC
interface box and have set the RECEIVE UNIT setting to "PC" as described in "
Selecting the Reception Mode" in Chapter 2, faxes will be received as follows
depending on the reception mode of the FO-1850:
♦ If the FO-1850 is set to FAX reception mode, an incoming call will be
automatically answered after the number of rings set in your fax software. The
fax will be received by your computer (make sure your fax software is running).
If your computer is turned off or the fax software is not running, the FO-1850 will
receive the fax.
♦ If the FO-1850 is set to TEL reception mode, you must first answer a call by
picking up the FO-1850’s handset. If the call is an auto-dialed fax transmission
(you will hear a fax tone), your computer will automatically begin reception. If the
other party speaks to you and then wants to send a fax, you must initiate fax
reception manually with the fax software.
♦ If the FO-1850 is set to TAD reception mode, the OGM will play before the
computer begins fax reception (voice callers will be able to leave a message). If
your computer is not turned on or the fax software is not running, the FO-1850
will receive the fax.
♦ If the FO-1850 is set to TAD reception mode and the FAX BOX setting is YES,
faxes sent to personal boxes will be received by the FO-1850. The FO-1850 will
also receive faxes sent to the General Box if a General Box passcode has been
programmed.
For information on how to receive faxes with your Multifunction Interface software,
refer to your Multifunction Interface software manual.
If the RECEIVE UNIT setting is set to FAX, faxes will be received by the FO-1850
only. FAX, TEL, and TAD reception modes will function as explained in "Reception
Mode" in Chapter 2.
Note: Scanning, printing, and PC faxing can take place in all modes.
3-14
FAX OPERATIONS
YF
FO1650U-UAUA
<P=001>
4
USING THE ANSWERING MACHINE
OPERATING THE ANSWERING MACHINE
Activating the answering machine
Activate the answering machine before you go out as follows:
Press the RECEPTION MODE key one
or two times to set the reception mode to
RECEPTION
MODE FUNCTION RESOLUTION
T.A.D.
• Each outgoing message will play (you
can stop playback by pressing the
STOP key).
• If no general outgoing message has
been recorded, an alarm will sound
and the reception mode will change to
TEL. Record a general outgoing
message as described in "Answering
Machine Set-up" in Chapter 2.
Note: If the memory is full from messages previously recorded, MEMORY IS FULL
will appear in the display. To set the reception mode to T.A.D., you must
first erase some or all of the stored messages.
When the reception mode is set to T.A.D., the FO-1650/1850 will answer incoming
calls after two rings if it has received at least one incoming message, or after four
rings if no messages are received. (For more information, see "Toll Saver" in
"Remote Operations" in this chapter.)
Note: In T.A.D. mode, the machine will automatically switch to fax reception if it detects a period of silence longer than six seconds after answering a call. For
this reason, if a caller pauses for this length of time while leaving a message, they will be cut off.
Listening to received messages
When you return, the display will show the number of messages recorded in each
box. Listen to them as follows:
1
Press the PLAY/SKIP key.
PLAY/SKIP
• If you only want to listen to new
messages (messages not previously
listened to), continue to hold the
PLAY/SKIP key down for at least two
seconds.
USING THE ANSWERING MACHINE
4-1
<P=002>
OPERATING THE ANSWERING MACHINE
2
1
(Example)
3
8
7
5
If you want to listen to the messages in a
personal box, enter the number of that
box by pressing the appropriate number
key.
If the box (general or personal) has a
passcode, enter the passcode by pressing the appropriate number keys.
(Example)
4
The messages will play.
• As each message plays, the date and
time of recording will appear briefly in
the display. If no messages were
received, NO MESSAGES will appear.
REPEAT
• To listen to a message a second time,
press the REPEAT key before
playback of that message ends.
• To move back to the previous
message, press the REPEAT key
within 3 seconds of the beginning of
the current message.
PLAY/SKIP
• To skip forward to the next message,
press the PLAY/SKIP key.
• To increase playback speed, press
SLOW PLAY
4-2
FAST PLAY
the FAST PLAY key. To decrease
playback speed, press the SLOW
PLAY key.
USING THE ANSWERING MACHINE
<P=003>
OPERATING THE ANSWERING MACHINE
Note: Playback will stop if you receive a call, lift the handset, press the STOP key,
or open the paper compartment cover.
Erasing received messages
It is important to erase received messages after you listen to them to ensure that
the memory does not become full. This is done as follows:
• Erasing general messages: To erase
all messages in the General Box,
press and hold down the DELETE key
for at least 2 seconds. If the General
Box has a passcode, press the
DELETE key and then enter the
passcode.
DELETE
• Erasing personal messages: To
erase all messages in a personal box,
press the DELETE key (do not hold it
down), enter the number of the box,
and then enter its passcode (if it has
one).
• Erasing a single message: To erase
only a single message, press the
DELETE key while the message is
being played.
Using the REC/MEMO key
You can use the REC/MEMO key to record telephone conversations and
messages for other users of the FO-1650/1850. These will be recorded in the
General Box, and played back together with any incoming messages in that box
when the PLAY/SKIP key is pressed.
REC/MEMO
• Recording messages: To record a
message, press the REC/MEMO key
for at least 1 second, and then pick up
the handset and speak into it. When
you have finished speaking, replace
the handset or press the STOP key.
USING THE ANSWERING MACHINE
4-3
<P=004>
OPERATING THE ANSWERING MACHINE
• Recording phone conversations: To
REC/MEMO
record a phone conversation, hold
down the REC/MEMO key during the
conversation you want to record.
When you are finished, release the
key.
Note: To comply with federal and local regulations regarding recording a telephone call, start the recording process and then inform the caller that you
are recording the call.
Date and time of ICMs
You can check the date and time of your received messages by pressing the panel
keys as shown below.
♦ The dates and times are also shown in the Message List, which can be printed
out as described in Chapter 9.
1
FUNCTION
0
2
3
Press the keys shown at left. "T.A.D.
SETTINGS" will appear in the display.
Press the keys shown at left. "ICM CONFIRMATION" will appear in the display.
START
4
Press the START key. The number of
messages recorded will appear in the
display.
Press "#" or "*" one or more times to
show the date and time of each of the
messages.
or
• The message number will appear first,
and then the date and time several
seconds later.
5
STOP
Press the STOP key.
Note: The recorded dates and times are cleared each time you erase the messages.
4-4
USING THE ANSWERING MACHINE
YF
FO1650U-UARO
<P=001>
REMOTE OPERATIONS
You can call the FO-1650/1850 from any touch-tone telephone and play back your
messages using the remote commands. You can also use these commands to
change the reception mode and other settings.
Remote code number
When you call the FO-1650/1850, you must enter the passcode for the box you
want to listen to, or a remote code number if the box does not have a passcode.
One remote code number can be programmed, and it is used to access all boxes
which do not have passcodes. This prevents unauthorized people from listening to
your messages. You can use any 3-digit number as the remote code number.
The remote code number has been set to "001" at the factory. If you want to
change it, press the panel keys as shown below.
1
Press the keys shown at left. "T.A.D.
SETTINGS" will appear in the display.
FUNCTION
0
2
3
Press the keys shown at left. "REMOTE
CODE" will appear in the display.
2
2
Enter a 3-digit number by pressing the
number keys.
2
(Example)
4
START
STOP
Press the START key and then the
STOP key.
USING THE ANSWERING MACHINE
4-5
<P=002>
REMOTE OPERATIONS
Toll Saver
When you call the FO-1650/1850 to listen to your messages, it will answer after two
rings if it has received at least one message in any of the boxes, or after four rings
if no messages are received.
This allows you to save money on telephone charges, particularly if you are calling
long distance. If the machine does not answer after the second ring, you can simply
hang up before it answers, saving yourself the cost of that call.
If you do not want to use the Toll Saver function, you can turn it off by following the
steps below. In this case, the FO-1650/1850 will answer after the number of rings
set with Option Setting 2 (see Chapter 8), the ring setting for FAX reception mode.
1
Press the keys shown at left. "T.A.D.
SETTINGS" will appear in the display.
FUNCTION
0
2
Press the keys shown at left. "TOLL
SAVER" will appear in the display.
3
Press "1" to turn Toll Saver on, or "2" to
turn it off.
2
(Example)
4
4-6
STOP
Press the STOP key.
USING THE ANSWERING MACHINE
<P=003>
REMOTE OPERATIONS
Retrieving your messages
Follow the steps below to listen to your messages from a remote location. Note that
you can only access one box per call; if you want to access more than one box, you
must make a separate call for each box.
Note: You can also access the FO-1650/1850 for remote operation when the reception mode is set to FAX. In this case, call the FO-1650/1850, press the
"#" key immediately after it answers (before you hear the fax tone), and then
continue from Step 2 below.
1
Call the FO-1650/1850 from a touchtone telephone. When your outgoing
message begins, press the "#" key on
the telephone.
• You will hear a short beep, and the
outgoing message will stop.
2
2
(Example)
3
5
2
2
Enter the number of the box you want to
listen to. If you want to listen to the General Box, skip this step.
Enter the box’s passcode, or your remote code number if the box does not
have a passcode. When finished, press
"#" on the telephone.
• You will hear a series of beeps equal
(Example)
to the number of messages recorded
in the box, or one long beep if four or
more messages have been received.
The machine will then play back the
messages, beeping once at the end of
each message. When all messages
have been played back, you will hear
a long beep.
USING THE ANSWERING MACHINE
4-7
<P=004>
REMOTE OPERATIONS
• If no messages have been received in
the box, you will hear a short beep.
You can either hang up, or perform
any of the operations described in the
following section "Other remote
operations".
4
While the messages are playing, you
can do any of the following:
• Repeat: To listen to a message a
2
5
second time, press "2" and "#" on the
telephone before that message ends.
To move back to the previous
message, press "2" and "#" within the
first 3 seconds of the current message.
• Skip forward: To skip forward to the
next message, press "5" and "#" on
the telephone.
• Stop: To stop playback, press "0" and
0
"#" on the telephone. After this, you
can enter any of the commands
described in the following section,
"Other remote operations".
• Play new messages: To listen to only
0
6
your new messages, first stop
playback by pressing "0" and "#", and
then press "6" and "#".
• Erase a message: To erase the
3
4-8
message you are currently listening to,
press "3" and "#" before it ends.
USING THE ANSWERING MACHINE
<P=005>
REMOTE OPERATIONS
5
When you have finished listening to your
messages, you can do any of the following:
• Erase all messages: To erase all of
3
3
the messages in the box, press "3",
"3", and "#".
• Repeat playback: To listen to your
7
messages again, press "7" and "#".
• Perform other operations: You can
enter any of the commands described
in the following section, "Other remote
operations".
• Hang up: If you do not erase your
messages first, they will be saved and
any new messages will be recorded
after them. If you want the
FO-1650/1850 to resume normal
operation immediately, press "*"
twice before hanging up (in some
cases, particularly when the Transfer
function is used, the FO-1650/1850
may not accept new calls for one or
two minutes after you hang up unless
you first press "*" twice).
Comments:
•
•
•
•
When a remote command is accepted by the machine, you will hear one beep. If
an incorrect command is entered, you will hear four beeps. In the latter case,
re-enter the correct command.
When entering a command, do not pause longer than 10 seconds between each
digit. If you do, a 4-beep error signal will be issued and the digits entered up to
that point will be disregarded. In this case, re-enter the command from the
beginning.
If you make two errors (causing two 4-beep signals to be issued) while entering
your remote code number, the line will be disconnected. This prevents
unauthorized people from attempting to guess your remote code number.
If you pause for longer than 60 seconds before entering a command, you will be
disconnected.
USING THE ANSWERING MACHINE
4-9
<P=006>
REMOTE OPERATIONS
Other remote operations
After listening to your messages, you can do any of the operations described below
by pressing the appropriate keys on the telephone.
Note: The following commands cannot be entered while messages are being
played back. If you do not want to wait until playback ends to enter a command, first stop playback by pressing "0" and "#", and then enter the command.
Changing the fax reception mode
Select a new reception mode by pressing the keys as follows:
8
• T.A.D. mode: "8", "1", and "#".
1
(Example)
• FAX mode: "8", "2", and "#".
• TEL mode: "8", "3", and "#".
Recording a new outgoing message
Note: A new outgoing message can only be recorded for the box you selected at
the beginning of the remote operation procedure.
1
Press "4" and "*" on the telephone.
4
2
When you hear a short beep, speak into
the telephone to record the new message.
• The message (including the general
outgoing message) can be up to 15
seconds long. After 15 seconds (or
earlier if the machine detects silence
after you finish speaking), you will
hear a beep, and the new message
will be played back.
4-10
USING THE ANSWERING MACHINE
<P=007>
REMOTE OPERATIONS
Turning the Transfer function on or off
(The Transfer function is described in the following section, "Other functions".)
9
To turn Transfer on: Press "9", "1", and
"#", followed by the number of the box
("0" for the General Box) and "#".
1
1
(Example)
To turn Transfer off: Press "9", "2", and
"#" on the telephone.
Changing the transfer telephone number
1
Press "9", "0", and "#" on the telephone.
0
9
2
5
4
6
1
1
3
4
(Example)
After you hear a short beep, enter the
new telephone number. When finished,
press "#".
• To insert a pause between any two
digits of the number, press "*".
Recording a new transfer message
1
2
Press "9", "3", and "#" on the telephone.
9
3
When you hear a short beep, speak into
the telephone to record the new message.
• The time for the transfer message is
fixed at 15 seconds. After 15 seconds
(or earlier if the machine detects
silence after you finish speaking), you
will hear a beep, and the new
message will be played back
automatically.
USING THE ANSWERING MACHINE
4-11
<P=008>
REMOTE OPERATIONS
Recording a "Memo"
You can leave a "memo" for yourself or other users of the machine. It will be
recorded in the General Box, and played back when messages in that box are
listened to.
1
Press "*" and "#" on the telephone.
2
When you hear a short beep, speak into
the telephone to record the memo.
3
When you are finished, press "0" and "#".
0
• If the FO-1650/1850 detects a certain
period of silence, it will stop recording
automatically.
4-12
USING THE ANSWERING MACHINE
YF
FO1650U-UAOF
<P=001>
OTHER FUNCTIONS
Transfer function
The Transfer function is used to make the FO-1650/1850 automatically call you at a
specified number every time it receives an incoming message in a selected box.
This allows you to hear your messages immediately after they come in, even when
you are at a remote location.
When you answer the telephone, you will hear your recorded message telling you
that the call is a transfer call. Enter "#", the box number, the box’s passcode (or
your remote code number if the box has no passcode), and "#". The FO-1650/1850
will then play back your messages. You can also perform any of the remote
operations described in the previous section.
Note: When you hang up after a transfer call, the FO-1650/1850 will not immediately resume normal operation. If you want the FO-1650/1850 to accept
calls immediately after a transfer call, enter "*" twice before hanging up (if
you want to hang up during message playback, first enter " 0" and " #" to
stop playback, then enter "*" twice).
Programming the transfer number
To use the Transfer function, you must first give the FO-1650/1850 the number to
call (the transfer number). This is done by pressing the panel keys as follows:
1
Press the keys shown at left. "T.A.D.
SETTINGS" will appear in the display.
FUNCTION
0
2
Press the keys shown at left. "TRANSFER # ENTRY" will appear in the display.
3
4
Press the START key.
START
5
5
5
1
2
3
4
(Example)
5
START
STOP
Enter a transfer number (max. of 32 digits including pauses) by pressing the
number keys.
Press the START key and then the
STOP key.
USING THE ANSWERING MACHINE
4-13
<P=002>
OTHER FUNCTIONS
Note: If needed, you can change the transfer number from a remote location. See
"Other remote operations" in the previous section, "Remote operations".
Recording the transfer message
The transfer message plays when you answer the telephone, and informs you that
the call is a transfer call. It can be up to 15 seconds long. To record a transfer
message, follow the steps described in "Recording an outgoing message" in
"Answering Machine Set-up" in Chapter 2. The following is an example:
"Hello. This is a transfer call for (YOUR NAME). Enter your remote code number
now."
Note: If needed, you can record the transfer message from a remote location. See
"Other remote operations" in the previous section, "Remote operations".
Turning the Transfer function on and off
1
FUNCTION
0
2
Press the keys shown at left. "TRANSFER FUNC" will appear in the display.
3
1
2
or
4
1
(Example)
5
4-14
Press the keys shown at left. "T.A.D.
SETTINGS" will appear in the display.
STOP
Press "1" to turn the Transfer function
on, or "2" to turn it off. (If you pressed
"2", go to Step 5.)
Enter the number of the box for which
you want the Transfer function to operate (for the General Box, enter "0").
Press the STOP key.
USING THE ANSWERING MACHINE
<P=003>
OTHER FUNCTIONS
Note: If needed, you can turn the Transfer function on or off from a remote location. See "Other remote operations" in the previous section, "Remote operations".
Override Ringing
This function allows selected callers using a touch-tone telephone to override the
answering machine’s outgoing message and cause the FO-1650/1850 to make a
special ringing sound, alerting you that they are calling. This is useful when you are
near the machine but only want to talk with certain callers, taking all other calls on
the answering machine.
Programming the override code
To override the answering machine, your callers must enter a 3-digit override code
from their telephone. This code has been set to "009" at the factory. If you want to
change it, press the panel keys as shown below.
Important!
•
Make sure the override code is different from the remote code or any passcodes
programmed for boxes.
1
FUNCTION
0
2
3
Press the keys shown at left. "T.A.D.
SETTINGS" will appear in the display.
Press the keys shown at left. "OVERRIDE CODE" will appear in the display.
5
5
4
Enter a 3-digit code number by pressing
the number keys.
(Example)
4
START
STOP
Press the START key and then the
STOP key.
USING THE ANSWERING MACHINE
4-15
<P=004>
OTHER FUNCTIONS
Overriding the answering machine
Your callers should follow the steps below to override the answering machine.
1
Your caller calls the FO-1650/1850 from
a touch-tone telephone. When the outgoing message begins, they should press
the "#" key on their telephone.
• The caller will hear a short beep, and
the outgoing message will stop.
2
5
5
4
(Example)
3
The caller should enter the override
code and "#" by pressing the appropriate
keys on their telephone.
• If an incorrect code is entered, the
caller will hear four beeps. He or she
must re-enter the correct code within
60 seconds or the line will be
disconnected.
The FO-1650/1850 will make a special
ringing sound. Pick up the handset to answer the call. (Note that an extension
telephone connected to the same line
will not ring.)
• If you do not answer within 30
seconds, the outgoing message will
play again and the caller can then
leave a message.
4-16
USING THE ANSWERING MACHINE
YF
FO1650U-BOCY
<P=001>
5
MAKING COPIES
Your fax can also be used to make copies. Single and multiple copies (up to 99 per
original) can be made, enabling your fax to double as an office copier.
♦ The default resolution for copying is SUPER FINE.
♦ If you are making multiple copies of more than one original, you can choose
whether to have the copies sorted (SORT COPY) or not sorted (MULTI COPY).
The following example shows how the copies are ordered in each case when 3
copies each of 3 originals are made.
A
B
C
Originals
Sorted (SORT COPY)
A
B C
A
B C
Not sorted (MULTI COPY)
A
1
B C
A
A A
B
B B
C
C C
Load the document(s) face down.
• If desired, adjust the resolution and
contrast with the RESOLUTION key.
2
Press the COPY/HELP key.
COPY/HELP
• If you are only making one copy of the
original (or of each original) and don’t
want to make a reduction or
enlargement setting, press the START
key twice. Copying will begin. If you
are only making one copy and want to
make a reduction or enlargement
setting, press the START key once
and go to Step 5.
MAKING COPIES
5-1
<P=002>
MAKING COPIES
3
1
or
Press "1" (MULTI COPY) if you don’t
want the copies sorted, or "2" (SORT
COPY) if you want them sorted.
2
4
Enter the desired number of copies with
the number keys.
1
2
• If the desired number of copies is from
1 to 9, enter "0" first.
(Example)
• If you don’t want to make a reduction
or enlargement setting, press the
START key. Copying will begin.
5
2
(Example)
Set the amount of reduction or enlargement by entering a number from "1" to
"5" as shown below. Copying will begin.
1: AUTO (automatic size adjustment to
match the size of the printing paper)
2: 50%
3: 100% (no reduction or enlargement)
4: 125%
5: 135%
Note: If you place a large number of originals in the feeder, the memory may become full before all of them can be scanned (MEMORY IS FULL will appear
in the display). If this happens, press the START key to copy the originals
which have been scanned, and then repeat the copy procedure for the remaining originals, including the original which was being scanned when the
memory became full.
5-2
MAKING COPIES
<P=003>
MAKING COPIES
Copy Cut-off
When making a copy, your fax has been set at the factory to not print the remaining
part of a document if the document is longer than the printing paper. If you want
your fax to always print the remaining part of the document on a second page,
follow the steps below.
1
FUNCTION
Press the keys shown at left. "COPY
CUT-OFF" will appear in the display.
6
2
1
3
or
STOP
2
Press "1" to turn copy cut-off on (the remaining part of the document will not be
printed), or "2" to turn it off (the remaining part will be printed on a second
page).
Press the STOP key.
MAKING COPIES
5-3
MAKING COPIES
Notes
5-4
MAKING COPIES
RT
FO1650U-BOVC
<P=001>
6
MAKING TELEPHONE CALLS
Your fax can be used like a regular telephone to make and receive voice calls.
♦ To make or receive a phone call, the power must be on.
1
SPEAKER
Pick up the handset or press the
SPEAKER key. Listen for the dial tone.
or
2
ABC
DEF
1
2
3
GHI
JKL
MNO
4
5
6
PRS
TUV
WXY
7
8
9
OPER
0
Dial the number using one of the following methods:
• Normal Dialing: Enter the full
telephone number with the numeric
keys.
• Rapid Key Dialing: Press the
appropriate Rapid Key.
• Speed Dialing: Press the SPEED
DIAL key, and enter the 2-digit Speed
Dial number with the numeric keys.
3
Speak with the other party when they answer.
• If you pressed the SPEAKER key,
pick up the handset.
Note: While the handset of the fax is lifted (off hook), an extension phone connected directly to the fax cannot be used to speak with the other party.
MAKING TELEPHONE CALLS
6-1
<P=002>
MAKING TELEPHONE CALLS
Using the HOLD/SEARCH key
You can use the HOLD/SEARCH key to search for a Rapid Key or Speed Dial
number. First search for the number as described in "Using the HOLD/SEARCH
key" in "Sending Documents" in this chapter, and then pick up the handset or press
the SPEAKER key. The number will be dialed automatically after you do so (do not
press the START key).
Redial
The last number called can be redialed by pressing the REDIAL key (it is not
necessary to pick up the handset or press the SPEAKER key). When the other
party answers, pick up the handset.
Hold
You can put the other party on hold during a conversation by pressing the
HOLD/SEARCH key. When this is done, they cannot hear you. You can put the
handset back in the cradle without breaking the connection. When you are ready to
speak with them again, pick up the handset. If you did not put the handset back in
the cradle, press the HOLD/SEARCH key one more time.
6-2
MAKING TELEPHONE CALLS
RT
FO1650U-SFCI
<P=001>
7
SPECIAL FUNCTIONS
CALLER ID
If you subscribe to a caller identification service from your telephone company, you
can set your fax to display the name and number of the caller while the fax rings.
The fax will also store information about unanswerered calls which you can view in
the display or print out as a list. This allows you to screen your calls as they come
in, and makes it easy to respond to callers who do not leave messages.
To use the Caller ID function, set Option Setting 13 to YES and enter your area
code as described in Chapter 8, "Optional Settings".
Important:
•
•
To use this function, you must subscribe to a caller identification service from
your telephone company.
The FO-1650/1850 may not be compatible with some caller identification
services.
How Caller ID operates
When you receive a call, the name and phone number of the caller will alternately
appear in the display, beginning just before the second ring. The information will
continue to be displayed until you pick up the handset, or until the fax answers
automatically if it is in TAD or FAX mode.
Note: Some caller ID services may not provide the name of the caller. In this case,
only the phone number will appear.
Display messages
One of the following messages will appear while the fax rings if caller information is
not available.
NO SERVICE
No caller information was received from your
telephone company. Make sure that the
telephone company has activated your service.
CALLER-ID ERROR
Noise on the telephone line prevented
reception of caller information.
OUT OF AREA
The call was made from an area which does
not have a caller identification service, or the
caller’s service is not compatible with that of
your local phone company.
PRIVATE CALL
Caller information was not provided by the
telephone company at the caller’s request.
SPECIAL FUNCTIONS
7-1
<P=002>
CALLER ID
Viewing the caller list
If you subscribe to a caller ID service and have set Option Setting 13 to YES, your
fax will keep information on the most recent 20 unanswered calls you have
received. (Note that if the caller sends a fax or leaves a voice message, information
on that call will not be stored.) You can view this information, which consists of the
name and number of each caller, in the Caller ID List.
♦ After you have received 20 unanswered calls, each new call will delete the oldest
call.
Follow the steps below to view the Caller ID List in the display. If desired, you can
immediately dial a number when it appears.
To print out the list, see Chapter 9, "Printing Out Reports and List".
1
HOLD/SEARCH
2
2
or
3
Press the keys shown at left. "REVIEWING CALLS" will appear in the display.
Press the "#" to scroll through the list
from the most recent call, or the "*" key
to scroll through the list from the oldest
call.
If you want to dial one of the numbers in
the list, scroll through the list until the
number appears in the display.
START
• If you want to send a fax, first load the
document and then press the START
key.
• If you want to make a voice call, pick
up the handset or press the
SPEAKER key. Dialing will begin
automatically. (If you pressed the
SPEAKER key, pick up the handset
when the other party answers.)
4
7-2
STOP
Press the STOP key when you have finished viewing the list.
SPECIAL FUNCTIONS
<P=003>
CALLER ID
To delete calls from the caller list
If you want to delete a single call from the caller list, press the "0" key while the call
appears in the display. If you want to delete all calls from the list, hold the "0" key
down for at least 3 seconds while you are viewing any number in the list.
Priority Call
If desired, you can set your fax to make a special ringing sound when you receive a
call from a designated phone number. This lets you know immediately who is
calling without having to look at the display. To use this function, enter the desired
phone number by following the steps below (only one phone number can be
entered).
Note: This function cannot be used if you are using Distinctive Ringing.
1
Press the keys shown at left. "PRIORITY CALL #" will appear in the display.
FUNCTION
3
2
1
or
Press "1" to enter a number, or "2" to
clear a number. (If you pressed "2", go
to Step 4.)
2
3
5
5
5
1
2
3
5
4
5
5
Enter the phone number, including the
area code, by pressing the number keys
(the number must be 10 digits long).
(Example)
4
START
STOP
Press the START key and then the
STOP key.
SPECIAL FUNCTIONS
7-3
<P=004>
CALLER ID
Direct Call
If desired, you can allow a designated phone number to access a personal box
directly when the answering machine is activated. In this case, when the caller
calls, he or she will immediately hear the outgoing message of the personal box
instead of that of the general box. You can designate one phone number for each
personal box.
Note: This function cannot be used if you are using Distinctive Ringing.
1
FUNCTION
Press the keys shown at left. "DIRECT
CALL #" will appear in the display.
0
2
or
1
3
Press "1" to enter a number, or "2" to
clear a number. (If you pressed "2", go
to Step 5.)
2
Enter the number of the personal box to
be accessed directly.
(Example)
1
4
5
5
5
1
2
3
5
4
5
(Example)
5
START
STOP
5
Enter the phone number, including the
area code, by pressing the number keys
(the number must be 10 digits long).
Press the START key and then the
STOP key.
Preventing voice calls
With Caller ID turned on, you can use the Anti Junk Fax function described in the
following section to prevent voice calls as well as fax receptions (the Anti Junk Fax
function can normally only prevent faxes).
In this case, when a voice call or a fax transmission comes in from a number you
have specified as a "Junk Number", your fax will break the connection as soon as it
receives the calling phone number from the caller ID service (before the second
ring).
To use this function, set Option Setting 11 to YES as described in Chapter 8,
"Optional Settings", and then enter the number in the Anti Junk Number List as
described in "Anti Junk Fax" in the following section of this chapter.
Note: This function cannot be used if you are using Distinctive Ringing.
7-4
SPECIAL FUNCTIONS
YF
UX1300U-SFAJ
<P=001>
ANTI JUNK FAX
The Anti Junk Fax function allows you to block reception of faxes from parties
which you specify. This saves paper by not printing out unwanted "junk" faxes.
To use this function, first turn it on by setting Option Setting 11 to YES as described
in Chapter 8, and then enter the fax numbers from which you do not want to receive
faxes as shown below. If you are using the Caller ID function as described in the
previous section, you can also enter voice numbers.
Comments:
•
•
•
•
Up to 5 numbers can be entered in the Anti Junk Number List.
The Anti Junk function will not operate for a number which has also been stored
as a Priority Call or Direct Call number.
To clear a number from the Anti Junk Number List, you need to know the 1-digit
number which identifies it. If you have forgotten this number, print out the Anti
Junk Number List as described in Chapter 7.
FO-1850 only: When you have selected fax reception by your computer, Anti
Junk Fax will not operate unless you are using Caller ID.
1
Press the keys shown at left. "STORE
JUNK FAX #" will appear in the display.
FUNCTION
3
2
1
or
Press "1" to store a number in the Anti
Junk Number List, or "2" to clear a number from the list.
2
3
Storing: Enter a 1-digit number from "1"
to "5". This number identifies the
fax/voice number you will store in the
next step.
Clearing: Enter the number which identifies the fax/voice number you want to
clear, and go to Step 5.
1
(Example)
4
5
5
5
1
2
3
4
Enter the fax/voice number (max. of 20
digits).
(Example)
5
6
START
Step 3 or
Press the START key.
STOP
Return to Step 3 to enter (or clear) another number, or press STOP to exit.
SPECIAL FUNCTIONS
7-5
YF
UX1300U-SFME
<P=001>
MEMORY
Your fax has a memory which can be used to temporarily store both incoming and
outgoing documents.
♦ When no voice messages (including outgoing messages) have been recorded,
approximately 34 pages of average content can be held in memory if they are all
going to be transmitted (24 pages if Option Setting 16 is set to YES), or 31
pages if they are all received (29 pages if Option Setting 16 is set to YES). Less
pages can be held if any were scanned using fine or halftone resolution.
Sending documents from memory
With this function, the original document is scanned immediately, stored in memory,
and then transmitted once the connection to the receiving machine is made. This is
convenient when transmitting to places where the line is often busy, as it saves you
from waiting to pick up the original document and frees the feeder for other
operations. After transmission, the document will be cleared from memory.
♦ Only one memory transmission can be set at a time.
♦ The amount of memory currently occupied appears as a percentage in the
display while the document is being scanned.
1
Load the document(s).
• Set the resolution and/or contrast if desired.
2
MEMORY
1
3
Press the MEMORY key and then "1".
Enter the number of the receiving machine using one of the following methods:
01
• Press a Rapid Key.
• Press the SPEED DIAL key and enter
a Speed Dial number.
• Enter a full telephone number by
(Example)
7-6
pressing the number keys.
SPECIAL FUNCTIONS
<P=002>
MEMORY
4
Press the START key if you entered a
Speed Dial number or a full number.
START
• The document will be scanned and
stored in memory. Your fax will then
dial the receiving machine and transmit the document (redialling will be
done automatically if necessary).
If the memory becomes full...
If the memory becomes full while the document is being scanned, MEMORY IS
FULL will appear in the display.
♦ Press the START key if you want to transmit the pages which have been stored
up to that point in memory. The remaining pages will be ejected from the feeder.
After transmission, the memory will be cleared and you can transmit the
remaining pages. You will also need to transmit the page which was being
scanned when the memory filled up.
♦ Press the STOP key if you want to cancel the entire transmission.
Substitute reception into memory
This is a back-up function which is automatically activated if your fax runs out of
paper, the printing ribbon needs replacement, or the paper jams.
When you have received a document in memory, FAX RX IN MEMORY will appear
in the display, alternating with OUT OF PAPER, FILM END, or PAPER JAM. When
you add paper, replace the imaging film, or clear the jam, the stored documents will
automatically print out.
♦ If you received documents in memory because the fax ran out of paper, be sure
to add paper which is the same size as the paper previously used. If not, the
document print-out size may not match the size of the printing paper.
SPECIAL FUNCTIONS
7-7
UX1300U-SFBR
<P=001>
YF
BROADCASTING
This function allows you to send the same document to as many as 20 different
locations with just one operation. First store the document in memory, then enter
the numbers of the receiving machines. The document will be transmitted to each
location.
♦ You can only use Rapid Keys or Speed Dial numbers to dial the numbers of the
receiving machines.
1
2
Load the document(s).
Press the MEMORY key and then "2".
MEMORY
2
3
2
2
Dial the receiving machines (maximum
of 20) using one or both of the following
methods:
• Enter one or more Speed Dial num-
01
bers by pressing the number keys.
• Press one or more Rapid Keys.
(Example)
4
START
Press the START key.
• Set the resolution and/or contrast if desired.
7-8
SPECIAL FUNCTIONS
<P=002>
BROADCASTING
5
Press the START key. Transmission will
begin.
START
• A Transaction Report is automatically
printed out after Broadcasting is completed. Check the "Note" column of
the report to see if any of the locations
are marked "Busy" or have a communication error code. If so, send the document to those locations again.
Broadcasting using a Group Key
If the fax machines to which you want to broadcast have all been programmed into
one Group Key, you can perform the broadcasting operation using the following
simplified procedure:
1
Load the document(s).
• Make any desired transmission settings (resolution, contrast, etc.).
2
Press the appropriate Group Key. Transmission will begin.
18/G1
(Example)
SPECIAL FUNCTIONS
7-9
RT
UX1300U-SFPO
<P=001>
POLLING
Polling allows you to request another fax machine to send a document to your fax
machine. In other words, the receiving fax machine, not the transmitting fax
machine, initiates the transmission. You can use your fax to both poll and be polled
by others.
Setting the polling key
To use the polling function, you must first reset Rapid Key 20/POLL for use as a
polling key. This is done by resetting Option Setting 12, as described in Chapter 8,
"Optional Settings".
Polling others
1
Dial the fax machine you want to poll using one of the following methods:
• Pick up the handset (or press the
SPEED DIAL
1
0
(Example)
SPEAKER key) and dial the full number. Wait for the fax answerback tone.
• Press the SPEED key and enter a 2digit Speed Dial number.
• Enter the full number using the numeric keys.
2
Press Rapid Key 20/POLL.
20 POLL
• If you used the handset, replace it
when POLLING appears in the display.
Reception will begin.
Note for FO-1850 only: Polled documents will be received by the FO-1850
regardless of the RECEIVE UNIT setting.
7-10
SPECIAL FUNCTIONS
<P=002>
POLLING
Being polled (Polling Standby)
To let another fax machine poll your fax, simply set the reception mode to FAX, and
load the document(s) to be sent.
Transmission will take place when the other fax machine calls your fax and
activates polling. Automatic reception is possible while your fax is on polling
standby.
Note for FO-1850 only: This function will not operate if you have set RECEIVE
UNIT to your PC as described in "Reception Mode" in Chapter 2.
Polling Security
Polling Security allows you to prevent unauthorized polling of your fax. When this
function is turned on, polling will only take place when the fax number of the polling
fax machine has been entered in your fax’s list of permitted fax numbers (called
"passcode numbers"). The number of the polling fax must also be programmed in
itself for identification.
Turning Polling Security on and off
1
FUNCTION
Press the keys shown at left. "ENTRY
MODE" will appear in the display.
3
2
3
4
Press the "#" key 3 times. "SECURITY
SELECT" will appear in the display.
1
START
or
Press "1" to turn polling security on, or
"2" to turn it off.
2
STOP
Press the START key and then the
STOP key.
SPECIAL FUNCTIONS
7-11
<P=003>
POLLING
Storing and clearing fax numbers for polling permission
You can store up to 10 fax numbers in your fax’s list of permitted numbers.
1
FUNCTION
Press the keys shown at left. "ENTRY
MODE" will appear in the display.
3
2
Press the "*" key 4 times. "PASSCODE
# MODE" will appear in the display.
3
1
Press "1" to store a number, or "2" to
clear a number.
2
or
4
Storing: Enter a 2-digit number from
"01" to "10". This number identifies the
fax number you will store in the next
step.
Clearing: Enter the number which identifies the fax number you want to clear,
and go to Step 6.
1
0
(Example)
5
5
5
5
2
1
3
4
Enter the fax number (max. of 20 digits).
(Example)
6
7
STOP
Step 4 or
7-12
Press the START key.
START
Return to Step 4 to enter (or clear) another number, or press STOP to exit.
SPECIAL FUNCTIONS
YF
<P=001>
UX1300U-SFTI
TIMER OPERATIONS
The Timer function allows you to set a transmission and/or polling operation to be
performed automatically at a time you specify. One transmission operation and one
polling operation can be set at any one time, and the times they will be performed
can be specified up to 24 hours in advance.
You can use this function, for example, to take advantage of lower nighttime
telephone rates without having to be there when the operation is performed.
Note: Only a Speed Dial number can be used to dial the receiving machine.
Setting a timer operation
1
FUNCTION
Press the keys shown at left. "TIMER
MODE" will appear in the display.
1
2
Press "#" to set a transmission operation
(SEND MODE), or "*" to set a polling
or
operation (POLLING MODE).
3
Press "1" to select SET.
1
4
0
9
2
5
Enter the time at which you want the operation to take place (2 digits for the
hour and 2 digits for the minute).
(Example: 9:25)
5
or
6
START
Press "*" to select A.M., or "#" to select P.M.
Press the START key.
SPECIAL FUNCTIONS
7-13
<P=002>
TIMER OPERATIONS
7
0
Enter the Speed Dial number of the receiving fax machine.
5
(Example)
8
9
Press the START key.
START
If this is a transmission operation, you
can adjust the resolution and/or contrast
(skip this step if you don’t want to).
RESOLUTION
10
STOP
START
Press the START key and then the
STOP key. If this is a transmission operation, load the document in the feeder
sometime before the specified time of
transmission.
To cancel an operation
If you need to cancel an operation after it has been set, follow the steps below.
1
FUNCTION
1
2
Press the keys shown at left. "TIMER
MODE" will appear in the display.
Press "#" to cancel a transmission operation, or "*" to cancel a polling opera-
or
tion.
3
4
7-14
Press "2" to select CLEAR.
2
START
STOP
Press the START key and then the
STOP key.
SPECIAL FUNCTIONS
YF
<P=001>
UX1300U-SFEU
ENTERING AND USING PROGRAMS
If you frequently perform the same operation involving the same party, you can
program all the steps of the operation into one Program Key. This allows you to
perform the operation by simply pressing that key.
♦ Rapid Keys 16/P1 and 17/P2 can be used as Program Keys. However, a key
cannot be used if it is already being used for Rapid Key Dialing.
♦ Only Speed Dial numbers can be used to enter fax numbers of receiving
machines in the Program Keys. Full numbers cannot be entered.
♦ If the program is for a regular transmission or polling operation, a timer setting
can be included to have the operation performed automatically at a selected time.
♦ To clear a mistake, press the STOP key.
Initial procedure
To program an operation, first perform the following procedure. After you have
completed it, go to the procedure for the specific operation you want to program.
1
Press the keys shown at left. "PRG. ENTRY MODE" will appear in the display.
FUNCTION
7
2
Press "1" to select SET.
1
3
4
16/P1
or
ABC
DEF
GHI
2
3
4
Press a Program Key ("16/P1 " or
"17/P2 ") to select it.
17/P2
…
WXY
9
Enter a name for the program (max. of
20 characters). (See "Entering Letters
for Names" in Chapter 2).
Skip this step if you don’t want to enter a
name.
SPECIAL FUNCTIONS
7-15
<P=002>
ENTERING AND USING PROGRAMS
5
Press the START key.
START
6
Press the "#" key or the "*" until the desired operation appears in the display.
The operations will appear in the following order:
• Transmission ("SEND")
• Polling
• Broadcasting
or
7
Press the START key and then continue with the specific procedure for your
operation (see the following pages).
START
Transmission
(Continued from "Initial procedure".)
8
1
Press "1" if you want the document to be
scanned into memory and then transmitted, or "2" if you want the document to
be transmitted directly from the feeder.
(Note: If you select "2", you can include
a timer setting in the program.)
2
or
• If you pressed "1", go to Step 12. If
you pressed "2" and don’t want to
make a timer setting, go to Step 11.
9
0
9
2
5
(Example: 9:25)
10
11
7-16
or
START
Enter the time at which you want the operation to take place (2 digits for the
hour and 2 digits for the minute).
Press "*" to select A.M., or "#" to select
P.M.
Press the START key.
SPECIAL FUNCTIONS
<P=003>
ENTERING AND USING PROGRAMS
12
2
Enter the Speed Dial number of the receiving fax machine.
5
(Example)
13
START
14
15
Press the START key.
If desired, set the resolution and/or contrast by pressing the RESOLUTION key
(otherwise, skip this step).
RESOLUTION
Press the START key and then the
STOP key.
STOP
START
Polling
(Continued from "Initial procedure".)
8
0
9
2
5
(Example: 9:25)
9
11
Press "*" to select A.M., or "#" to select
P.M.
or
10
START
2
Press the START key.
5
(Example)
12
START
Enter the time at which you want the operation to take place (2 digits for the
hour and 2 digits for the minute).
If you don’t want to make a timer setting,
go to Step 10.
STOP
Enter the Speed Dial number of the receiving fax machine.
Press the START key and then the
STOP key.
SPECIAL FUNCTIONS
7-17
<P=004>
ENTERING AND USING PROGRAMS
Broadcasting
(Continued from "Initial procedure".)
8
9
10
11
2
5
3
5
Enter the Speed Dial numbers of the receiving machines.
(Example)
Press the START key.
START
If desired, set the resolution and/or contrast by pressing the RESOLUTION key
(otherwise, skip this step).
RESOLUTION
STOP
START
Press the START key and then the
STOP key.
Clearing a Program Key
To clear a Program key, follow these steps:
1
Press the keys shown at left. "PRG. ENTRY MODE" will appear in the display.
FUNCTION
7
2
3
Press "2" to select CLEAR.
2
16/P1
(Example)
4
7-18
START
STOP
Press the Program Key you want to
clear.
Press the START key and then the
STOP key.
SPECIAL FUNCTIONS
<P=005>
ENTERING AND USING PROGRAMS
Using a Program Key
A programmed operation is performed as follows:
1
2
Load the document.
16/P1
Press the appropriate Program Key.
(Example)
Note: A maximum of 2 timer operations can be set at any one time, including both
timer operations set by pressing a Program Key and operations set as described in "Timer Operations" in this chapter.
To cancel a programmed timer operation
If a Program Key has been pressed for a timer operation and you need to cancel
the operation before it is performed, follow these steps:
1
16/P1
Press the Program Key.
(Example)
2
START
Press the START key.
SPECIAL FUNCTIONS
7-19
DB
FO1650U-SFRE
<P=001>
REMINDER FUNCTION
The Reminder function allows you to send either a voice message, fax message, or
both to another person or yourself at a preset time. If the reminder is for another
person, your fax will call the other machine and transmit the message when the
selected time arrives. If the reminder is for you, your fax will prompt you to press
the REMINDER key to play and/or print out the message.
♦ Only one reminder (voice message, fax, or both) can be set at one time.
♦ The reminder can be set up to one year in advance.
Setting a reminder
1
REMINDER
Press the REMINDER key.
2
1
5
0
Enter two digits for the month ("01" to
"12") and two digits for the day ("01" to
"31").
5
(Example: May 15th)
3
9
0
2
Enter two digits for the hour ("01" to
"12"), and two digits for the minute ("00"
to "59").
5
(Example: 9:25)
4
Press "*" to select A.M., or "#" to select
P.M.
or
5
Press the START key.
START
6
5
5
5
1
2
3
4
If the reminder is for another person, enter his or her telephone or fax number
(max. 32 digits). (Skip this step if the reminder is for you.)
(Example)
7-20
SPECIAL FUNCTIONS
<P=002>
REMINDER FUNCTION
7
Press the START key.
START
8
To record a voice message, pick up the
handset and speak into it. When finished, replace the handset or press the
STOP key. (Skip this step if you only
want to send a fax message.)
9
If you are only sending a voice message, press the REMINDER key.
REMINDER
If you are sending a fax message, press
the START key, load the document, set
the resolution if desired, and then press
the START key again.
or
START
START
• The document will be scanned and
stored in memory.
When the selected time arrives
If the reminder is for you, the fax will beep repeatedly for 60 seconds when the
selected time arrives and "PRESS REMINDER" will appear in the display. Press
the REMINDER key to play the voice message and/or print out the fax message.
If the reminder is for another person, your fax will call his or her number and then
play the voice message and/or transmit the fax message. If the line is busy or no
one answers, 2 redialing attempts will be made at intervals of 5 minutes.
Note: It will not be possible for a voice message to be recorded in an answering
machine.
To check or cancel a reminder message
To check a reminder message before it is sent, press the REMINDER key and
then press "1". The set date and time will appear, followed by the telephone or fax
number of the receiving party if the reminder is for another person. Press the
START key to play the recorded message and/or print the document.
To cancel a reminder messsage, press the REMINDER key and then press "2".
SPECIAL FUNCTIONS
7-21
RT
FO1650U-SFPC
<P=001>
PC LINK FUNCTION
Note: This section applies only to the FO-1650.
If you have a personal computer with a fax modem and fax software, you can
connect the computer to your fax with a regular telephone cord and set your fax to
PC Mode (PC mode is a special mode for operation with a computer). This will
allow you to use the fax as a simple scanner and printer. It is also the most
convenient setup if you want to use a computer for fax operations on the same
phone line as your fax machine.
Important:
To use your fax as a scanner, your fax software must have a manual reception function.
Connecting your fax to your computer
Plug one end of the telephone cord into your computer modem’s telephone line
jack (not the jack for an extension phone if it has one), and plug the other end into
the TEL. SET jack on your fax (not the TEL. LINE jack). If necessary, first remove
the seal covering the TEL. SET jack.
If your computer fax modem has an extension
phone jack, you can connect an extension phone
to it.
Modem
TEL
SET. TEL.
LIN
E
EXT
.
PHO
T
NE EL.
The TEL. LINE
jack should be
connected to the
wall jack.
LIN
E
Setting your fax to PC MODE
To use your fax as a printer or scanner, you must set it to PC MODE. We also
recommend that you keep the fax machine set to PC MODE if you will be
performing fax operations with your computer.
♦ To use PC MODE, your computer modem must be connected to your fax as
shown above.
1
FUNCTION
To set the fax to PC Mode, press the
FUNCTION key and then the "#" key.
• "PC" will appear next to the time in the
display.
7-22
SPECIAL FUNCTIONS
<P=002>
PC LINK FUNCTION
2
To turn PC Mode off, press the FUNC TION key and then the "#" key once
again.
FUNCTION
• The reception mode ("FAX", "TEL", or
"TAD") will appear next to the time in
the display.
Note: If you will be performing fax operations with your computer but do not set
the fax machine to PC MODE, you must set Option Setting 10 to "NO" (see
Chapter 8, "Optional Settings").
Receiving documents in PC Mode
The current reception mode setting (FAX, TEL, or TAD) is effective while you are in
PC Mode. If you need to change the reception mode, press the RECEPTION
MODE key once to make the current reception mode appear in the display, and
then press it again to change the setting.
Important: If you answer a call by picking up the fax’s handset when the fax is in
PC Mode, the fax will not begin reception automatically when you hear a fax tone.
To receive a fax, you must press the START key. If you answer a call by picking
up a touch-tone extension phone connected to the same line, begin fax reception
by pressing "5", "*", and "*" (or the current setting of Option Setting 5).
If you want to receive incoming faxes in your computer, set the reception mode of
your fax to TEL so that it will not answer. Or, set the reception mode to FAX and set
Option Setting 2 (Number of Rings to Answer) to a number greater than the number
of rings on which your computer answers. In this case, your computer will normally
answer first, but your fax will still answer if your computer is turned off or fails to
answer for some reason.
Using your fax as a scanner
To scan a document into your computer from your fax, follow the steps below. The
document will be received by your computer as if it had received a fax, and after
that you can use your fax software to process it as desired.
1
FUNCTION
Make sure the fax is set to PC Mode
(press the FUNCTION key and then the
"#" key). "PC" will appear next to the
time in the display.
SPECIAL FUNCTIONS
7-23
<P=003>
PC LINK FUNCTION
2
Load the document.
• If desired, press the RESOLUTION
key to make a resolution and/or contrast setting.
3
Press the START key.
START
4
Start your fax software on your computer
(if it is not already running) and select
manual reception. The document will be
scanned and sent to your computer.
Using your fax as a printer
To have your fax print out a document which you have prepared with your fax
software, follow the steps below.
1
FUNCTION
2
3
7-24
Make sure the fax is set to PC Mode
(press the FUNCTION key and then
the "#" key). "PC" will appear next to the
time in the display.
Send the document by manual transmission with your fax software on your computer. If your software does not have a
manual transmission function, enter any
number in your software’s auto-dial
phonebook that is not a real phone number (such as "## " or "6# "), and then dial
that number .
START
Wait until "LINE IS IN USE" appears in
your fax’s display, and then press the
START key. Your fax will print out the
document.
SPECIAL FUNCTIONS
RT
UX1000U-OSOS
<P=001>
8
OPTIONAL SETTINGS
A variety of optional settings are available which you can use to fine-tune your fax
to better suit your needs. The settings are made by pressing the panel keys, and
each setting is described in the list below.
Accessing the settings
1
FUNCTION
Press the keys shown at left. "OPTION
SETTING" will appear in the display.
4
2
Move through the list of settings by
pressing "#" to move forward, or "*" to
move backward. The settings will appear
in the order listed below.
or
3
2
(Example)
4
STOP
When the desired setting appears in the
display, change it appropriately as described below.
Press the STOP key.
Settings
Setting 1: FINE RESOLUTION PRIORITY
This sets the default resolution (the resolution used if a setting is not made with the
RESOLUTION key) for transmitting documents. Press "1" (YES) to set it to FINE, or
"2" (NO) to set it to STANDARD.
• Factory setting: "2"
Setting 2: NUMBER OF RINGS TO ANSWER
This sets the number of rings the fax machine waits before answering an incoming
call in FAX reception mode. Enter any number from "1" to "5".
• Factory setting: "4"
OPTIONAL SETTINGS
8-1
<P=002>
OPTIONAL SETTINGS
Setting 3: RECALL INTERVAL
This sets the amount of time your fax will wait between automatic redials when the
line is busy. Enter "01" for 1 minute, "02" for 2 minutes, etc., up to a maximum of 15
minutes.
• Factory setting: "05"
Setting 4: RECALL TIMES
This sets the maximum number of times your fax will automatically redial if the line
is busy. Enter any number from "00" to "15".
• Factory setting: "02"
Setting 5: TEL/FAX REMOTE NUMBER
This sets the 1-digit number for activating fax reception from an extension
telephone. Enter any number from "0" to "9".
• Factory setting: "5"
Setting 6: REMOTE RECEPTION SELECT
This turns detection of the code for activating fax reception from an extension
phone on or off. Press "1" to turn detection on, or "2" to turn detection off.
• Factory setting: "1"
Setting 7: TRANSACTION REPORT PRINT SELECT
This sets the condition for printing out Transaction Reports. Enter a number from
"1" to "5" as follows:
"1" (ALWAYS PRINT):
Print out after each transmission, reception, or error.
"2" (ERR/TMR/MEM PRINT): Print out after an error, timer operation, or memory
operation.
"3" (SEND ONLY):
Print out only after a transmission.
"4" (NEVER PRINT):
Never print out.
"5" (ERROR ONLY):
Print out only after an error occurs.
• Factory setting: "5"
Setting 8: DIAL MODE
This sets the mode of dialing. Press "1" if you are on a touch-tone line, or "2" if you
are on a pulse dial line. (If you don’t know which type of line you have, try making
phone calls with both settings and see which one works.)
• Factory setting: "1"
8-2
OPTIONAL SETTINGS
<P=003>
OPTIONAL SETTINGS
Setting 9: DISTINCTIVE RINGING
This sets the ring pattern to which your fax will answer if you subscribe to a
distinctive ringing service. Enter a number from "1" to 5" to select a pattern. See
"Distinctive Ringing" in Chapter 2 for more details.
• Factory setting: "5"
Setting 10: FAX SIGNAL RECEIVE
Your fax is set to automatically begin reception if you hear a high-pitched fax tone
after answering a call on your fax or an extension phone. If you use a computer fax
modem to send documents on the same line, you must turn this setting off in order
to prevent your fax from mistakenly attempting to receive documents from the
computer fax modem. Press "1" to turn the setting on, or "2" to turn it off.
• Factory setting: "1"
Setting 11: JUNK NUMBER CHECK
Press "1" to prevent reception from fax numbers (and voice numbers if you are
using Caller ID) entered in the Anti Junk Number List. Press "2" to allow reception
from all numbers.
• Factory setting: "2"
Setting 12: POLLING
Press "1" if you want to use Rapid Key 20 as a polling key. Press "2" if you want to
use it as a regular Rapid Key.
• Factory setting: "2"
Setting 13: CALLER ID
If you subscribe to a caller ID service and want to use the Caller ID function, press
"1", enter your area code by pressing the number keys, and then press the START
key. To turn Caller ID off, press "2".
• Factory setting: "2"
Setting 14: AUTO COVER SHEET
Press "1" (YES) to have the fax automatically generate a cover sheet and send it as
the last page of each transmission. Press "2" (NO) to turn the function off.
• Factory setting: "2"
OPTIONAL SETTINGS
8-3
<P=004>
OPTIONAL SETTINGS
Setting 15: ACTIVITY REPORT AUTO PRINT OUT
Press "1" to have your fax automatically print out an Activity Report once every 30
operations. (The list can still be printed out manually when desired.) Press "2" to
turn automatic print-out off.
• Factory setting: "2"
Setting 16: ERROR CORRECTION MODE (ECM)
Press "1" (YES) to have any distortions in a transmission due to noise on the
telephone line be corrected before print-out at the receiving end. This is only
effective when the other machine has ECM as well. Press "2" (NO) to turn the
function off.
• Factory setting: "1"
8-4
OPTIONAL SETTINGS
YF
<P=001>
9
UX1300U-PRPR
PRINTING OUT REPORTS AND LISTS
You can print out a variety of lists showing settings and information entered in the
fax. You can also have the fax automatically print out a report on transactions after
they are made. Each list and the report is described below.
Printing out a list
1
FUNCTION
2
2
3
or
START
Press the keys shown at left. "LISTING
MODE" will appear in the display.
Press the "#" key or the "*" key until the
desired list appears in the display.
Press the START key.
Activity Report
This report shows information on up to 30 of the operations most recently
performed. The report is divided into two parts: the TRANSMISSIONS ACTIVITY
REPORT, which shows information on transmissions, and the RECEPTIONS
ACTIVITY REPORT, which shows information on receptions.
♦ If Option Setting 15 is set to "1", a report will be automatically printed out
whenever information on 30 operations has accumulated. (A report can still be
printed out manually at any time.)
♦ All information is erased after a report is printed out. If automatic print-out is
turned off and print-out has not been done manually for 30 operations, the
information on the oldest operation will be overwritten each time a new operation
is performed.
PRINTING OUT REPORTS AND LISTS
9-1
<P=002>
PRINTING OUT REPORTS AND LISTS
Explanation of headings
SENDER/
RECEIVER
The fax number of the other machine involved in the transaction. If this
machine does not have an ID function, the communication mode will
appear (for example, "G3").
PAGES
Number of pages transmitted or received.
NOTE
OK - Transmission/reception was normal.
P.FAIL - A power failure occurred.
JAM - A problem with the fax paper or document occurred.
NO PAPER - You ran out of fax paper during reception.
CANCEL - Transmission was cancelled because the STOP key was
pressed, no document was in the feeder, or the other machine
requested transmission using a function which your fax does not have.
COM.E-0 to COM.E-7 - A telephone line error prevented the
transaction. Explanations of the error numbers are given in the following
tables, however, these are primarily for use by service engineers. In
general, you will want to simply try the transaction again. If necessary,
check with the other party to make sure their machine is functioning
properly.
Transmission errors
E-0
Able to recognize handshake signal, but it has errors.
E-1
Cannot recognize the handshake signal from the receiver side.
E-2
Line disconnected during transmission.
E-3
Line disconnected after modem speed fall-back.
E-4
Line disconnected during multi-page transmission.
E-6
Cannot recognize the handshake signal for next page at receiver side.
E-7
No response from receiver side or "disconnect signal" is received at transmitter side.
E-8
Error was not corrected after the predetermined number of retries because of an
error in a part of a page.
E-11
Error occurred after or while reception by the remote (receiving) machine was
revealed to be impossible.
E-12
Error occurred just after fall-back.
E-13
Error occurred after a response to a retransmission end command was received.
9-2
PRINTING OUT REPORTS AND LISTS
<P=003>
PRINTING OUT REPORTS AND LISTS
Reception errors
E-0
Able to recognize handshake signal, but it has errors.
E-1
Line disconnected during reception.
E-2
Cannot recognize the handshake signal from the transmitter side.
E-3
Cannot recognize the last handshake signal from the transmitter side.
E-4
Cannot recognize the handshake signal for next page from the transmitter side in the
case of mode change.
E-5
Cannot recognize the handshake signal for next page from transmitter side.
E-7
No response from transmitter or "disconnect signal" is received at receiver side.
E-8
Error occurred upon completion of reception of all pages.
E-9
Error occurred when mode was changed or transmission/reception switching was
performed.
E-10
Error occurred during partial page or physical page reception.
E-11
Error occurred after or during inquiry from the remote (transmitting) machine as to
whether reception was possible or not.
E-12
Error occurred during or just after fallback.
E-13
Error occurred after retransmission end command was received.
E-14
Error occurred after voice communication command was received.
Timer list
This list shows the timer operations which are currently set.
PRINTING OUT REPORTS AND LISTS
9-3
<P=004>
PRINTING OUT REPORTS AND LISTS
Telephone Number List
This list shows the fax and voice numbers which have been stored for automatic
dialing.
Passcode List
This list shows settings made for polling security, your name and fax/telephone
number as entered in the machine, and a sample of the header printed at the top of
every page you transmit (HEADER PRINT).
9-4
PRINTING OUT REPORTS AND LISTS
<P=005>
PRINTING OUT REPORTS AND LISTS
Options Setting List
This list shows the current status of the optional settings. The bottom part of the list
shows the status of the settings made for answering machine connection.
Anti Junk Number List
This list shows the fax numbers (and voice numbers if the Caller ID function is
being used) from which reception is not allowed.
PRINTING OUT REPORTS AND LISTS
9-5
<P=006>
PRINTING OUT REPORTS AND LISTS
T.A.D. Program List
This list shows the settings and codes programmed for the answering machine.
Message List
This list shows information about the messages currently recorded in the answering
machine, including the date and time of recording, the length, and the type (ICM or
memo).
9-6
PRINTING OUT REPORTS AND LISTS
<P=007>
PRINTING OUT REPORTS AND LISTS
Program and Group List
The top part of this list shows the programs which have been entered. The bottom
part shows the fax numbers which have been stored in each Group Key.
Caller ID List
This list shows information about your most recent unanswered calls (maximum
of 20 calls). (This list is only available if you are using the Caller ID function.)
PRINTING OUT REPORTS AND LISTS
9-7
<P=008>
PRINTING OUT REPORTS AND LISTS
Print Set List
This list shows the current status of the printing settings made by pressing the
FUNCTION key and the "6" key.
Transaction Report
This report is printed out automatically after an operation is completed to allow you
to check the result. Your fax is set at the factory to print out the report only when an
error occurs, or after a timer or memory operation. If desired, you can change the
setting to have it printed out under a variety of other conditions. This is done by
changing Option Setting 7 as described in Chapter 8.
♦ The Transaction Report shows the same information as the Activity Report. See
"Activity Report" in this chapter for an explanation of the headings.
♦ The report cannot be printed out manually.
9-8
PRINTING OUT REPORTS AND LISTS
SO
FO1650U-MAMA
<P=001>
10
MAINTENANCE
Reading glass and rollers
Clean the reading glass and rollers frequently to ensure the quality of transmitted
images and copies. Open the operation panel by pulling the front edge up (grasp it
at the "PANEL RELEASE" mark), and clean them as shown below.
Wipe the reading glass, white backplate,
and rollers with a soft cloth or cotton
swab.
• Make sure that all dirt and stains (such
as correcting fluid) are removed, as
these will cause vertical lines on
transmitted images and copies.
Document
rollers
White backplate
Reading glass
The housing
Wipe the external parts and surface of the machine with a dry cloth.
Caution!
•
Do not use benzene or thinner. These solvents may damage or discolor the
machine.
MAINTENANCE
10-1
<P=002>
MAINTENANCE
Fax print head
Clean the print head frequently to ensure optimum printing performance. To clean
the print head, first unplug the power cord, open the paper compartment cover
(grasp the finger hold on the right side of the cover and pull up), and remove the
imaging film.
Print head
Wipe the print head, frame and roller
with a soft cloth dampened with denatured alcohol.
Frame
Rollers
Caution!
•
•
10-2
Do not use benzene or thinner. Avoid touching the print head with hard objects.
The print head may be hot if your fax machine has just received a large
number of documents. If this is the case, allow the print head to cool prior to
cleaning.
MAINTENANCE
RT
UX1300U-TSPS
<P=001>
11
TROUBLESHOOTING
PROBLEMS AND SOLUTIONS
Problem
Check and remedy
Nothing appears in the display.
• Make sure the power cord is properly
plugged into a power outlet.
• Make sure the power switch has been
switched to the correct position.
• Connect another electrical appliance to
the outlet to see if it has power.
The fax does not respond when you
press any of its keys.
Automatic document feeding does
not work for transmission or copying.
• If a beep sound is not made when you
press the keys, turn off the power and
then turn it back on several seconds
later.
• Check the size and weight of the
document (see "Transmittable
documents" in Chapter 3).
• Make sure the power is on.
Dialing cannot be done.
• Make sure that the telephone line is
properly connected to both the TEL.
LINE jack and the wall jack.
• Make sure that the fax is set to the
correct dialing mode for your telephone
line. See Option Setting 8 in Chapter 8.
Nothing is printed at the receiving
end.
• Make sure that the document for
transmission is placed face down in the
feeder.
• Make sure that the printing paper is
properly loaded in the receiving machine.
A distorted image is received at the
other end.
• Noise on the telephone line may cause
distortion. Try sending the document
again.
• Make a copy of the document on your
fax. If the copy is also distorted, your fax
may have a problem.
TROUBLESHOOTING
11-1
<P=002>
PROBLEMS AND SOLUTIONS
• Make sure that the receiving machine
The power is on, but no
transmission takes place.
has printing paper.
• Make sure that the telephone line cord is
plugged into the "TEL. LINE" jack, and
not the "TEL. SET" jack.
• If the receiving machine is in manual
mode with no attendant, reception will
not be possible.
• If the receiving machine is not a Sharp
model, make sure it is G3 compatible.
• Check the display for error messages.
• Pick up the handset and check for a dial
tone.
The power is on, but no reception
takes place.
The printing paper does not come
out.
• Make sure that the telephone line cord is
plugged into the "TEL. LINE" jack, and
not the "TEL. SET" jack.
• The printing paper may be jammed. See
"Clearing Jammed Printing Paper" in this
chapter.
• Make sure that the printing paper is
properly loaded in your machine.
• Make sure the power is on.
The printing paper comes out blank
when you try to receive a document.
• Make sure that the document is loaded
properly in the feeder of the transmitting
machine. Make a copy to confirm the
printing ability of your machine.
• Ask the other party to send higher
The received document is faint.
contrast documents. If the contrast is still
too low, your fax may have a problem.
Make a copy to check it.
• Noise on the telephone line may cause
Received images are distorted.
distortion. Have the other party try
sending the document again.
• Make a copy of another document on
your fax. If the copy is also distorted,
your fax may have a problem.
11-2
TROUBLESHOOTING
DD
UX1300U-TSDM
<P=001>
MESSAGES AND SIGNALS
Display messages
CHECK PAPER SIZE
The paper size setting is incorrect. Change the
paper size setting as described in "Loading the
Paper" in Chapter 1.
COVER OPEN
The printing compartment cover is open. Close it.
DOCUMENT JAM
The original document is jammed. See the
following section, "Clearing Paper Jams".
FAX RX IN MEMORY
A fax has been received in memory because the
imaging film needs replacement, you have run
out of printing paper, or the paper is jammed.
The fax will print out automatically when the
problem is fixed.
FILM END
The imaging film may need replacement. Check
the film and replace it if necessary.
FUNCTION MODE
The FUNCTION key has been pressed.
LINE ERROR
Transmission or reception was not successful.
Press STOP to clear the message, and then try
again.
LINE IS IN USE
An extension phone connected to the fax is
being used. Do not lift the fax’s handset or
attempt transmission at this time, as this will
interrupt the conversation on the extension
phone.
MEMORY IS FULL
The memory is full. See "Memory" in Chapter 7.
MEMORY PRINTING
The fax is preparing to or printing out a
document from memory.
ON HOOK DIAL
The SPEAKER key has been pressed and the
fax is waiting for you to dial.
OUT OF PAPER
You are out of printing paper.
OVER HEAT
The print head has overheated. Operation can
be continued once it cools.
PAPER JAMMED
The printing paper is jammed. See the following
section, "Clearing Paper Jams".
Note: If you have turned on the Caller ID function, see "Caller ID" in Chapter 7 for
display messages related to Caller ID.
TROUBLESHOOTING
11-3
<P=002>
MESSAGES AND SIGNALS
Audible signals
Continuous tone
3 seconds
Indicates the end of
transmission, reception, or
copying.
Intermittent tone
(3 beeps)
5 seconds
(1 second on,
1 second off)
Indicates incomplete
transmission, reception, or
copying.
Rapid intermittent tone
0.5 seconds on,
0.5 seconds off
Indicates that the printer cover is
open.
Rapid intermittent tone
35 seconds
(0.7 seconds on,
0.3 seconds off)
Indicates that the handset is off
hook.
11-4
TROUBLESHOOTING
<P=001>
RT
UX1300U-TSCP
CLEARING PAPER JAMS
Clearing a jammed document
If a document doesn’t feed properly during transmission or copying, or DOCUMENT
JAMMED appears in the display, first try pressing the START key. If the document
doesn’t feed out, open the operation panel (grasp the front edge at the "PANEL
RELEASE " mark and pull up) and pull it out gently.
Clearing jammed printing paper
1
Grasp the finger hold on the right side of
the printing compartment cover, and pull
up to open the cover.
2
Push back the green levers on each side
of the printing compartment, and rotate
the printing head frame up and to the
rear.
• Caution! The printing head (the strip
of metal on the underside of the
frame) applies heat to the printing film.
It may be hot if a document has just
been printed.
3
Remove the imaging film from the printing compartment and set it on a sheet of
paper.
TROUBLESHOOTING
11-5
<P=002>
CLEARING PAPER JAMS
4
Remove the paper tray from the fax.
5
Gently pull the jammed paper out of the
printing compartment.
6
Replace the imaging film, making sure
that the flange goes into the rear slot on
the left side of the printing compartment.
Also, make sure that the right, rear gear
engages with the gear below it.
7
Wind the film slightly (rotate the gear on
the right side of the rear spool) so that
there is no slack in the film. Make sure
that both edges of the film wind onto the
spool evenly.
8
Rotate the printing head frame back
down, and press down on the "PUSH "
mark in the center of the frame until the
frame clicks into place. Close the printing compartment cover and replace the
paper tray.
11-6
TROUBLESHOOTING
YF
FO1650U-SPSP
<P=001>
SPECIFICATIONS
Applicable telephone line:
Compatibility:
Configuration:
Memory size*:
Public switched telephone network
ITU-T (CCITT) G3 mode
Half-duplex, desktop transceiver
512 KB (approx. 31 average pages with ECM function off and no
voice mesages recorded, or 24 minutes of voice messages with
no documents in memory)
1 MB add-on available as option
Compression scheme:
MH, MR, MMR
Scanning method:
Flat-bed, solid-state CCD
Resolution:
Horizontal:
203 lines/inch (8 lines/mm)
Vertical:
Standard 98 lines/inch (3.85 lines/mm)
Fine /Halftone 196 lines/inch (7.7 lines/mm)
Super fine 392 lines/inch (15.4 lines/mm)
Recording system:
Thermal transfer recording
Display:
7 x 5 dots, 1 line by 16-digit display
Reception modes:
Auto/Manual/Ans./switching
Modem speed:
14400 bps with automatic fallback to 12000, 9600, 7200, 4800,
or 2400 bps
Transmission time*:
Approx. 6 seconds (memory transmission)
Effective recording width:
8.0" (203 mm) (average)
Input document size:
Automatic feeding:
Width 5.83 to 8.5" (148 to 216 mm)
Length 5.04 to 14" (128 to 356 mm)
Manual feeding:
Width 5.83 to 8.5" (148 to 216 mm)
Length 5.04 to 39.4" (128 to 1000 mm)
Effective scanning width:
8.3" (210 mm) max.
Automatic document feeder: 20 sheets max.
Halftone (gray scale):
64 levels
Contrast control:
Automatic/Dark selectable
Copy function:
Single/Multi-copy/Sort-copy (99 copies/page)
Telephone function:
Standard (cannot be used if power fails)
Power requirements:
120 V AC, 60 Hz
Operating environment:
41 - 95°F (5 - 35°C), 20 to 80% RH
Power consumption:
Stand-by: 6 W
Maximum: 100 W
Dimensions:
Width: 14.3" (363 mm)
Depth: 19.2" (488 mm)
Height: 7.4" (188 mm)
(Without attachments)
Weight:
Approx. 13.0 lbs. (5.9 kg)
* Based on ITU-T Test Chart #1 at standard resolution in Sharp special mode, excluding time
for protocol signals (i.e., ITU-T phase C time only).
As a part of our policy of continuous improvement, SHARP reserves the right to make design
and specification changes for product improvement without prior notice. The performance
specification figures indicated are nominal values of production units. There may be some
deviations from these values in individual units.
SPECIFICATIONS
Spec-1
SPECIFICATIONS
Notes
Spec-1
SPECIFICATIONS
SPECIFICATIONS
Notes
SPECIFICATIONS
Spec-1
FO1650U MSDS-Front 1/2
SHARP
Date Issued: Feb. 9,1996
MATERIAL SAFETY DATA SHEET
MSDS No. B-1006
Section 1. Product Identification
Product Code: FO-16CR
Imaging Film
Section 2. Supplier’s Name and Address
Sharp Corporation
22-22 Nagaike-cho, Abeno-ku, Osaka, Japan
Local suppliers are listed below. Please contact the nearest supplier for additional information.
(Country)
U.S.A.
Canada
United
Kingdom
(Name and Telephone Number)
Sharp Electronics Corporation
Telephone number for information :
Emergency telephone number
:
Sharp Electronics of Canada Ltd.
Telephone number for information :
Emergency telephone number
:
Sharp Electronics(U.K.)Ltd.
Telephone number for information :
201-529-8200
1-800-255-3924
416-890-2100
1-800-424-9300
0923-211900
Section 3. Ingredients
Ingredients
Polypropylene terephthalate
Carbon black
Ethylene-vinyl acetate
copolymer
Ester wax
Parraffin wax
Microcrystalline wax
Modified wax
Polyester resin
Others
CAS No.
25038-59-9
1333-86-4
24937-78-8
8015-86-9
8002-74-2
63231-60-7
8016-60-2
27923-68-8
-
Proportion
51.0 %
8.5 %
3.1 %
5.6
12.5
15.2
1.3
1.3
1.5
%
%
%
%
%
%
OSHA PEL
3.5mg/m3
ACGIH TLV
3.5mg/m3
Other Limits
-
-
-
-
-
-
-
2mg/m3 (fume)
-
Section 4. Hazardous Identification (Emergency Overview)
This product is ink film for thermal transfer facsimile. "Ink film" is a thin film coated with ink.
It is no special hazard under normal use condition.
Section 5. Health Hazard Data
Route(s) of Entry:
Inhalation ?
not applicable
Skin ?
not applicable
Ingestion ?
Possible but very unusual
Health Hazards: The ingredients are not listed in ACGIH (1986) and OSHA (1989) ecept carbon black and
paraffin wax
Carcinogenicity:
NTP?
not listed
IARC Monographs?
not listed except
carbon black
Signs and Symptoms of Exposure:
not applicable
Medical Conditions Generally Aggravated by Exposure: not applicable
Emergency and First Aid Procedures:
not applicable
OSHA Regulated?
not listed
FO1650U MSDS-Front 2/2
SHARP
Date Issued: Feb. 9,1996
MATERIAL SAFETY DATA SHEET
MSDS No. B-1006
Section 6. Physical Chemical Characteristics
Boiling/Melting Point
Vapor Pressure
Vapor Density
Evaporation Rate
Appearance
Odor
m.p. about 70 °C
for ink
not applicable
not applicable
negligible
thin film coated
with ink
slight wax odor
Specific Gravity
about 1
Solubility
PH
Viscosity
Color
negligible (water)
not applicable
not applicable
black
Section 7. Fire and Explosion Data
Flash Point (Method Used):
Ignition Temperature:
Flammable Limits:
Extinguishing Media:
Special Fire Fighting Procedure:
Unusual Fire and Explosion Hazard:
Sensitivity to Mechanical Impact:
Sensitivity to Static Charge:
about 250 °C for ink
not applicable
not applicable (LEL);
(UEL);
CO2, water, dry chemicals and form etc.
especially none
none
no hazardous effect by mechanical impact
not applicable
Section 8. Reactivity Data
Stability:
Incompatibility (Materials to Avoid):
Hazardous Decomposition:
Hazardous Polymerization:
Stable
especially none
not applicable
not applicable
Section 9. Precautions for Safe Handling and Use
Personal Protection Information (Respiratory, Eye Protection and Protective Glove):
not required
Engineering Control/Ventilation:
especially none
Work/Hygienic Practice:
especially none
Steps to be taken in case of Spill or Leak:
If rumple the product and wax layer peel off, sweep up or clean with
vacuum cleaner and wash with water.
Waste Disposal Method:
Disposein an approved incinerator or contrct with licensed chemical
disposal agency.
ensure conformity with governmental disposal regulations. (Dispose by
the same method of ordinary plastic products.)
Section 10. Other Information
NFPA Rating (U.S.A.):
WHMIS Legislation (Canada):
Transport Information:
UN No.:
no information
not controlled
no information
no information
FO1650U/FCC68-FO
FCC REGULATORY INFORMATION
FCC regulatory information
This equipment complies with FCC rules, Part 68. On this equipment is a label that
contains, among other information, the FCC Registration Number and Ringer Equivalence
Number (REN) for this equipment. If requested, this information must be provided to your
telephone company.
An FCC compliant telephone cord and modular plug is provided with this equipment. This
equipment is designed to be connected to the telephone network or premises wiring using a
compatible modular jack which is Part 68 compliant. This equipment connects to the
telephone network through a standard USOC RJ-11C network interface jack.
The REN is used to determine the quantity of devices which may be connected to your
telephone line and still have all of those devices ring when your number is called. Too many
devices on one line may result in the devices not ringing in response to an incoming call. In
most, but not all, areas the sum of the RENs of all devices should not exceed five (5.0). To be
certain of the number of devices that may be connected to your line, as determined by the total
REN, contact your local telephone company.
If this equipment causes harm to the telephone network, your telephone company may
disconnect your service temporarily. If possible, they will notify you in advance. If advance
notice is not practical, you will be notified as soon as possible. You will also be advised of
your right to file a complaint with the FCC.
Your telephone company may make changes in its facilities, equipment, operations, or
procedures that could affect the operation of your equipment. If this happens, the telephone
company will provide advance notice in order for you to make necessary modifications to
maintain uninterrupted service. If the equipment is causing harm to the telephone network,
your telephone company may ask you to disconnect the equipment until the problem
resolved.
If you have any questions or problems which cannot be solved by reading this manual,
please contact Sharp Electronics Corporation at Sharp Plaza, Mahwah, NJ 07430-2135.
The customer number is 800-237-4277.
This equipment may not be used on coin service provided by the telephone company.
Connection to party lines is subject to state tariffs. Contact your state’s public utility
commission, public service commission, or corporation commission for more information.
This equipment is hearing-aid compatible.
When programming and/or making test calls to emergency numbers:
• Remain on the line and briefly explain to the dispatcher the reason for the call.
• Perform such activities in the off-peak hours, such as early morning or late evening.
FCC REGULATORY INFORMATION
i
AY
UX1300U-R-CARD FRONT
<P=001>
REMOTE OPERATION CARD
The card below is provided as a quick guide to remote operation. Cut it
out and carry it with you when you go out.
Remote Operation Guide
1. Call your fax from a touch-tone telephone, and
press # when the outgoing message begins.
2. If you want to listen to a personal box, enter its
number.
3. Enter your passcode or remote code:
4. Press # .
5. After listening to your messages, you can either
hang up to save them, or enter one of the commands on the reverse side.
.
UX1300U-R-CARD REAR
•
•
•
•
REMOTE COMMANDS
• FAX RECEPTION MODES
PLAYBACK
Play messages. . . . . . . . . .
Move backward/repeat. . . .
Skip forward . . . . . . . . . . . .
Stop . . . . . . . . . . . . . . . . . .
Play new messages only . .
(first stop playback)
7
#
2
#
5
#
0
#
6
#
ERASING MESSAGES
Erase single message . . . . 3 #
Erase all messages . . . . . . 3 3 #
RECORDING A MEMO
#
Start . . . . . . . . . . . . . . . . . .
End . . . . . . . . . . . . . . . . . . . 0 #
RECORDING A NEW OGM
Start . . . . . . . . . . . . . . . . . . 4
•
T.A.D. mode . . . . . . . . . . . . 8 1 #
FAX mode . . . . . . . . . . . . . 8 2 #
TEL mode . . . . . . . . . . . . . . 8 3 #
TRANSFER FUNCTION
Turn on . . . . . . . . . . . . . . . . 9 1 #
(Box#)
#
Turn off . . . . . . . . . . . . . . . . 9 2 #
New transfer number . . . . . 9 0 #
(Tel.#)
#
Record transfer OGM. . . . . 9 3 #
To quickly disconnect. . . . .
RT
UX1300U-QRQR
<P=001>
QUICK REFERENCE GUIDE
INSTALLATION
4. Enter your fax number (max. of 20 digits)
by pressing the number keys.
♦ If you make a mistake, press the
HOLD/SEARCH key to move the cursor
back to the mistake, then enter the correct
number or letter. (To move the cursor forward, press the SPEAKER key.)
5. Press the START key:
TEL.
SET
telep
hone
START
TEL.
LIN
E
6. Enter your name by pressing the appropriate number keys as shown below. Press
each key one or more times until the desired letter appears in the display.
tel
line
ABC
1. Connect the handset as shown.
2. Plug one end of the telephone line into the
"TEL. LINE" jack on the rear of the fax, and
the other end into your telephone wall jack.
3. Plug the power cord into a grounded, 120
V outlet.
INSTALLATION WITH AN EXTENSION
TELEPHONE
DEF
1
2
3
GHI
JKL
MNO
4
5
6
PRS
TUV
WXY
7
8
9
SLOW PLAY
OPER
FAST PLAY
0
SPEED DIAL
REDIAL
HOLD/SEARCH
SPEAKER
Deletes highlighted letter
Upper/lower
case shift key
Moves cursor to
the left.
Moves cursor to
the right.
Press either key one or more times to select
and enter a symbol.
♦ Enter "Q" with the "7" key, and "Z" with the
"9" key (these are not marked on the machine). Enter a space with the "1" key.
4. Remove the seal covering the "TEL. SET"
jack on the rear of the fax. Connect an extension telephone to the "TEL. SET" jack.
♦ To enter two letters in succession which re-
ENTERING YOUR NAME AND
NUMBER
Example: To enter "ABZ Co.", press:
"2" twice for the letter A,
Press SPEAKER to move the cursor to the
right,
"2" three times for the letter B,
"9" five times for the letter Z,
"1" twice for a space,
"2" four times for the letter C,
Press REDIAL for a lower case letter,
"6" four times for the letter o,
"#" once for a period.
quire using the same key, press the
SPEAKER key after entering the first letter.
The law requires your name and fax number
to appear on all documents you send. To program your fax to do this automatically, follow
the steps below:
1. Press the FUNCTION key and then press
"3":
FUNCTION
3
"ENTRY MODE" will appear in the display.
2. Press the "#" key twice:
"OWN NUMBER SET" will appear in the
display.
START
3. Press the START key.
7. When finished, press the START key and
START
STOP
then the STOP key.
(See Page 2-4 of your operation manual.)
QUICK REFERENCE GUIDE
Quick-i
<P=002>
QUICK REFERENCE GUIDE
SETTING THE DATE & TIME
SENDING DOCUMENTS
To set the date and time, press the following
sequence of keys: FUNCTION
Place your document
(up to 20 pages) face
down in the document
feeder.
3
"DATE & TIME SET" will appear.
START
Press the START key:
Normal Dialing
Enter two digits for the Month (01 through 12).
Enter two digits for the Date (01 through 31).
Enter two digits for the Year (00 through 99).
Enter two digits for the Hour (01 through 12).
1. Lift the handset or press
SPEAKER
2. Dial the fax number by pressing the number keys.
Enter two digits for the Minute (00 through 59).
3. Wait for the reception tone (if a person answers, ask them to press their Start key).
Press the "*" key for A.M. or the "#" key for
P.M.
4. Press your START key and then replace
the handset.
When finished, press the START key and
START
STOP
then the STOP key:
(See Page 2-7 of your operation manual.)
STORING & CLEARING NUMBERS
FOR AUTOMATIC DIALING
To store a new number or change an existing
number, press the following sequence of keys:
FUNCTION
Rapid Key Dialing
Press the appropriate Rapid Key. Transmission will begin.
Speed Dialing
1. Press the SPEED DIAL key:
SPEED DIAL
2. Enter the Speed Dial number by pressing
the number keys.
START
3. Press:
3
Direct Keypad Dialing
"FAX/TEL # MODE" will appear.
1. Press the "1" key:
1. Enter the fax number by pressing the number keys.
1
START
2. Enter a 2-digit number (from "01" to "99")
by pressing the number keys. This will be
the Speed Dial number.
START
3. Press the START key:
4. Enter the name of the location by pressing
number keys (max. of 20 characters).
5. Press the START key:
START
6. Return to Step 3 to store another number,
or press STOP to exit.
To clear a Speed Dial number, press the following sequence of keys: FUNCTION
3
Press "2" and then enter the 2-digit Speed Dial
number. S T A R T
STOP
Press:
(See Page 2-11 of your operation manual.)
Quick-ii
2. Press:
(See Pages 3-1- 3-10 of your manual.)
RECORDING AN OUTGOING MESSAGE
The answering machine in your fax has four
boxes for recording incoming voice messages
when it is set to TAD reception mode. The
General Box is for general messages, and
Box 1, Box 2, and Box 3 are each for personal
messages. To leave a message in a personal
box, your caller must press the number of that
box on his or her telephone before speaking.
If a number isn’t pressed, the message will be
recorded in the General Box.
Note: To use TAD mode, you must record a
General outgoing message. To use a personal
box, you must also record an outgoing message for that box.
QUICK REFERENCE GUIDE
<P=003>
QUICK REFERENCE GUIDE
Record an outgoing message for a box as follows:
1 Press the following sequence of keys:
START
FUNCTION
0
2 Press a number key to select the outgoing
message you want to record:
General outgoing message
0
Box 1 outgoing message
1
Box 2 outgoing message
2
Box 3 outgoing message
3
Transfer outgoing message
DELETING MESSAGES
Erasing a single message: Press the
DELETE key while the message is being
played.
Erasing all messages in the general box::
Hold down the DELETE key for at least 2 seconds. If the general box has a passcode,
press the DELETE key and then enter the
passcode.
3 Pick up the handset and speak into it.
Erasing all messages in a personal box:
Press the DELETE key (do not hold it down),
enter the box number, and then enter the
passcode if the box has one.
4 When finished, press the STOP key or replace the handset.
SETTING THE RECEPTION MODE
4
5 Go back to Step 2 to record an outgoing
message for another box, or press the
STOP key to exit.
Programming a passcode
Press the RECEPTION
MODE key until "TAD",
"FAX", or "TEL" appears in
the display.
RECEPTION
MODE
FUNCTION RESOLUTION
If desired, you can program a 3-digit passcode
for a box. If this is done, the passcode must
be entered before messages in the box can
be listened to or erased.
TAD mode: Select this mode when you go out
and want the built-in answering machine to record voice messages from callers. Both voices
messages and faxes will be received.
Note: The numbers 1, 2, and 3 cannot be selected for the first digit of the passcode.
FAX mode: The fax will automatically answer
after four rings and receive the incoming document.
1 Press the following sequence of keys:
FUNCTION
0
2 Press "1" to enter a passcode, or "2" to
clear a previously programmed passcode.
3 Enter the number of the box for which you
want to enter or clear a passcode. If you
are clearing a passcode, go to Step 5.
4 Enter a 3-digit passcode by pressing the
number keys.
5 Press:
START
TEL mode: Lift the handset when the fax
rings. If you hear a fax tone, wait until "RECEIVING" appears in the display, then hang
up (if "RECEIVING" doesn’t appear, press the
START key). If the calling party talks to you,
press your START key to begin reception.
(See Pages 3-11 - 3-12 and Chapter 4 of your
manual.)
STOP
LISTENING TO MESSAGES
1 Press:
PLAY/SKIP
2 If you want to listen to the messages in a
personal box, enter the number of that box.
3 Enter the passcode for the box if it has
one.
QUICK REFERENCE GUIDE
Quick-iii
<P=004>
QUICK REFERENCE GUIDE
FUNCTION key menu
The following chart shows the layout of the functions and settings accessed by pressing
the FUNCTION key. First press the FUNCTION key, the appropriate numeric key as
shown, and then "#" or "*" until the desired item appears.
Instructions for making each setting appear in the display. If you have any difficulty, refer to the detailed instructions on the page shown below the setting.
FUNCTION
0
1
2
TAD Settings
Timer Mode
Listing Mode
Entry Mode
OGM Recording
(2-10)
Send Mode
(7-13)
Activity Report
(9-1)
Toll Saver
(4-6)
Poll Mode
(7-13)
Timer List
(9-3)
Fax/Tel Numbers
for Auto Dialing
(2-20)
ICM Record Time
(2-14)
Remote Code
(4-5)
Telephone Number
List
(9-3)
Passcode List
(9-4)
Override Code
(4-15)
Option Setting List
(9-5)
Transfer Number
(4-13)
Anti Junk Fax
Number List
(9-5)
Transfer On/Off
(4-14)
Fax Box
(2-13)
ICM Confirmation
(4-4)
On TAD Failure
(2-15)
CPC Detection
(2-16)
Direct Call Number
(7-4)
Own Number and
Name Set
(2-4)
Polling Security
Select
(7-11)
Passcode Numbers
for Polling
(7-12)
Date and Time Set
(2-7)
T.A.D. Program List Store Junk Fax
Number
(9-5)
(7-5)
Message List
Priority Call Number
(9-6)
(7-3)
Program and Group
List
(9-7)
Caller ID List
(9-7)
Box Passcode
(2-12)
Print Setup List
(9-8)
Distinctive Ringing
(2-18)
Quick-iv
3
QUICK REFERENCE GUIDE
<P=005>
QUICK REFERENCE GUIDE
4
5
Optional Settings
Fine Resolution
Priority
(8-1)
Polling
(8-3)
Caller ID
Number of Rings in (8-3)
Auto Mode
Autocover Sheet
(8-1)
(8-3)
Recall Wait Interval Activity Report
(8-2)
(8-4)
Recall Times
ECM
(8-2)
(8-4)
Remote Reception
Number
(8-2)
6
7
Cover Sheet
Print Set-up
Program/Group
Cover Sheet
Header
(3-4)
Initialize Film
(1-5)
Program Entry
Mode
(7-15)
Reception Ratio
(3-13)
2 in 1 Print
(3-13)
Group Entry
Mode
(2-23)
Paper Type Set
(1-10)
Paper Size Set
(1-10)
Copy Cut-off
(5-3)
Remote Reception
Select
(8-2)
Transaction Report
Print Select
(8-2)
Dial Mode
(8-2)
Distinctive Ringing
(2-17, 8-3)
Fax Signal Receive
(8-3)
Junk Number Check
(8-3)
QUICK REFERENCE GUIDE
Quick-v
FO1650U-ININ
INDEX
A
E
Activity Report, 9-1 - 9-3
Automatic print-out, 8-4
Anti Junk Fax/Number, 7-5, 8-3
Anti Junk Number List, 9-5
Audible signals, 11-4
Auto Cover Sheet, 8-3
Automatic dialing, 2-20 - 2-23
Electrical outlet, 1-6
Error Correction Mode, 8-4
Extension telephone, connecting, 1-6 1-7
Extension telephone, using, 3-11 - 3-12
F
Batch page numbering, 3-5
Broadcasting, 7-8 - 7-9
FAX reception mode, 2-8, 3-11
Fax reception on TAD failure, 2-15
Fine Resolution Priority, 8-1
Function key, 2-3, Quick-iii
C
G
Caller ID, 7-1 - 7-4, 8-3
Caller ID List, 7-2 - 7-3, 9-6
Calling party control, 2-16
Cleaning, 10-1 -10-2
Connections, 1-6 - 1-7
Contrast, 3-3
Copies, 3-14 - 3-16
Copy cut-off, 3-16
Copy/Help key, 2-3, 3-14
Cover sheet, 3-4, 8-4
Group Keys
Storing, 2-23
Using, 7-9
B
D
Date, setting, 2-7
Dialing
Direct Keypad, 3-7
Normal, 3-6, 3-17
Rapid Key, 3-8, 3-17
Search, 3-9, 3-18
Speed, 3-8, 3-17
Dial mode, 8-2
Direct Call, 7-4
Direct Keypad Dialing, 3-7
Display, 2-3
Display messages, 11-3
Distinctive ringing, 2-17 - 2-19
Document feeder, 3-2
Document guide, 3-2
Document restrictions, 3-1
Document rollers, 10-1
Document sizes, 3-1
Document, maximum scanning size, 3-1
H
Halftone, 3-3
Handset, 1-7
Handset receiver volume, 2-24
Hold, 6-2
Hold/Search key, 2-2, 3-9, 6-2
Housing, cleaning, 10-1
I
Imaging film, 1-2 - 1-5
Incoming message time, 2-14
Initialize film setting, 1-5
J
Jams, clearing, 11-5
L
Letters, entering, 2-5 - 2-6
Loading the document, 3-2
M
Rec/Memo key, 2-2, 4-3 - 4-4
Memory, 7-6 - 7-7
Message List, 9-5
Messages
Index-i
INDEX
Playback, 4-1 - 4-3
Erasing, 4-3
Date and time, 4-4
N
Normal Dialing, 3-6, 3-17
Number of Rings in FAX Mode, 8-1
Number keys, 2-2
O
Option Setting List, 9-4
Outgoing message, 2-10 - 2-11
Override ringing, 4-15 - 4-16
P
Paper jams, clearing, 11-5
Paper type setting, 1-10
Paper size setting, 1-10
Passcode List, 9-4
Passcodes for boxes, 2-12, 4-2, 4-3, 4-7
Pauses in automatic dialing numbers,
2-20
PC connection, 7-22 - 7-24
PC mode, 7-22 - 7-24
Play/Skip key, 2-2, 4-2
Polling, 7-10 - 7-12
Polling key, setting, 7-10, 8-3
Power cord, 1-6
Print head, cleaning,10-2
Print Set List, 7-6
Printing from a computer, 7-24
Priority Call, 7-3
Program and Group List, 9-5
Programs, 7-15 - 7-19
R
Rapid Key Dialing, 3-8, 3-17
Rapid Keys, 2-3
Reading glass, cleaning, 10-1
Recall Wait Interval, 8-2
Recall Times, 8-2
Receive unit setting,2-8,3-14
Reception mode, 2-8
Setting, 2-8
FAX mode, 2-8, 3-11
TAD mode, 2-8, 4-1
Index-ii
TEL mode, 2-8, 3-11 - 3-12
Reception mode key, 2-3, 2-8
Reception ratio setting, 3-13
Redial key, 2-2, 2-11, 3-9, 3-18
Redialing, 3-9, 3-18
Reminder Function, 7-20 - 7-21
Resolution, 3-3
Resolution key, 2-3, 3-3
Ringing volume, 2-24
Rec/Memo key, 2-2, 4-3 - 4-4
Rollers, cleaning, 10-1 -10-2
S
Scanning to a computer, 5-22 - 5-23
Search Dialing, 3-9, 3-18
Sender’s name and number, entering,
2-4
Slow Play key, 2-2, 4-2
Speaker key, 2-2, 3-6, 3-17
Speaker volume, 2-15
Speed Dial key, 2-2, 3-7, 3-17
Speed Dialing, 3-8, 3-17
Start key, 2-3
Stop key, 2-3
Storing numbers for automatic dialing,
2-20 - 2-22
T
TAD Program List, 9-5
TAD reception mode, 2-8, 4-1
TEL. LINE jack, 1-7
TEL reception mode, 3-11 - 3-12
TEL. SET jack, 1-7
Telephone, using as, 3-17
Telephone/Fax Remote Number, 8-2
Telephone line cord, 1-7
Telephone Number List, 9-3
Time, setting, 2-7
Timer operations, 7-13 - 7-14
Timer List, 9-3
Transaction Report, 9-6
Transaction Report Print Select, 8-2
Transfer function, 4-13 - 4-15
Two-in-one printing, 3-13
V
Volume Keys, 2-3, 2-24
FO1650U\SEC-WARRANTY
WARRANTY NOTICE
BE SURE TO ASK YOUR AUTHORIZED SHARP DEALER ABOUT THE WARRANTY THAT YOUR SELLING DEALER EXTENDS TO YOU. In order to assure
you, the end-user, of warranty protection, Sharp extends a limited warranty to each
of its authorized dealers, and in turn requires each of its authorized dealers to
extend its own warranty to you on terms that are no less favorable than those given
to the dealer by Sharp. You should be aware, however, that Sharp does not itself
extend any warranties, either express or implied, directly to you, the end-user, and
no one is authorized to make any representations or warranties on behalf of Sharp.
Specifically, SHARP DOES NOT EXTEND TO YOU, THE END-USER, ANY
EXPRESS WARRANTY OR ANY IMPLIED WARRANTY OF MERCHANTABILITY, fitness for use or fitness for any particular purpose in connection with the
hardware, SOFTWARE, OR FIRMWARE EMBODIED IN OR USED IN CONJUNCTION WITH THIS PRODUCT. Sharp is not responsible for any damages or
loss, whether direct incidental or consequential, which you, the end-user, may
experience as a result of your purchase or use of the hardware, software or
firmware embodied in or used in conjunction with this product. Your sole remedy
in the event that you encounter difficulties with the product is against the authorized
dealer from which you purchased the product. In the event that this authorized
dealer does not honor its warranty commitments, please contact the General
Manager Business Communication Systems Division, Sharp Electronics Corporation, Sharp Plaza, P.O. Box 650, Mahwah, NJ 07430-2135 so that Sharp can try
to help you to assure complete satisfaction of all the warranty rights to which you
are entitled from the authorized dealer.
FO1650U-BACK
SHARP ELECTRONICS CORPORATION
Sharp Plaza, Mahwah, New Jersey 07430-2135
SHARP CORPORATION
PRINTED IN THAILAND
(TINSE3594XHZC)