1
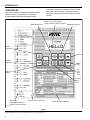
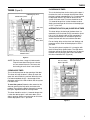
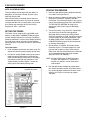
Digital
Gateway
®
Installation &
Owners Manual
Model DG1200
[Revision: April 15, 1998, 0-215-006, ©Rytec Corporation]
TABLE OF CONTENTS
PAGE
HOW TO USE MANUAL ......................................................................... 1
INTRODUCTION .................................................................................... 2
EXPLANATION OF DIGITAL GATEWAY CONTROLS
TERMINAL STRIP .................................................................................... 3
INPUT STATUS LEDS .............................................................................. 3
PUSHBUTTONS
Open Jog/Reset ......................................................................................... 3
Close Jog ................................................................................................... 3
UP Arrow/DOWN Arrow ............................................................................ 3
Other Pushbuttoms .................................................................................. 3
DISPLAY/COUNTER ................................................................................ 3
DISPLAY MESSAGE EXPLANATION ..................................................... 3
INPUTS TO THE DIGITAL GATEWAY
AC INPUTS ............................................................................................... 4
Limit Switches—Terminals 8 and 9......................................................... 4
OPEN (LSO) ....................................................................................... 4
CLOSE (LSC) ..................................................................................... 4
PB1 (Pushbutton)—Terminal 11 .............................................................. 4
Alternate Action Inputs (A/A Momentary Contact Activators)—
Terminal 12 ............................................................................................. 4
Auto Inputs (Maintained Contact Activators)—
Terminal 14 ............................................................................................. 4
Reversing Edge—Terminal 17 ................................................................. 4
OLR (Overload Relay)—Terminal 18 ....................................................... 5
Open—Terminal 20 ................................................................................... 5
Close—Terminal 21 ................................................................................... 5
Stop/Reset—Terminal 23 .......................................................................... 5
Program 2—Terminal 24 ........................................................................... 5
Program 3—Terminal 26 ........................................................................... 5
LSB (Breakaway Kill Switch)—Terminal 27 ............................................ 5
PAGE
DC INPUTS ............................................................................................... 6
Photoeye—Terminal 15 ............................................................................ 6
Loop—Terminal 29, Three Terminal Plug................................................ 6
PRIORITY OF INPUTS ............................................................................. 6
TIMERS .................................................................................................. 7
OPEN BACKUP TIMER ............................................................................ 7
CLOSE BACKUP TIMER .......................................................................... 7
ALTERNATE ACTION (A/A) CLOSE DELAY TIMER............................... 7
AUTO CLOSE DELAY TIMER .................................................................. 8
SETTING THE TIMERS .......................................................................... 8
START-UP PROCEDURES .................................................................... 8
ALARM CONDITIONS
COnnECt, MISSING CONNECTIONS ..................................................... 9
OP = 0, OPEN TIME EXCEEDED ............................................................ 9
CL = 0, CLOSE TIME EXCEEDED .......................................................... 10
AJAr, BREAKAWAY KILL SWITCH ......................................................... 10
OLr, OVERLOAD RELAY ......................................................................... 10
EdGE, REVERSING EDGE ...................................................................... 10
NON-ALARM CONDITIONS
HELLO, SAFE START-UP ........................................................................ 11
EdGE, REVERSING EDGE TRIPPED ..................................................... 11
LOC, IDLE STATE .................................................................................... 12
POWER .................................................................................................. 12
OUTPUTS .............................................................................................. 12
REPLACEMENT .................................................................................... 13
TROUBLESHOOTING ........................................................................... 13
OPTIONAL PROGRAMS ....................................................................... 13
PROGRAM 1, OUTPUT 7 ........................................................................ 13
Door Not Closed ....................................................................................... 13
Door Open ................................................................................................. 13
Delay to Close ........................................................................................... 13
PAGE
PROGRAM 2, INPUT 24 .......................................................................... 14
LOC Condition .......................................................................................... 14
MAN-AUTO Selector Switch ..................................................................... 14
MAN-AUTO Selector Switch with Open and Close
Inactive in AUTO ................................................................................. 14
Passage Entry—Timed ............................................................................. 14
Passage Entry—Position ......................................................................... 14
PROGRAM 3, INPUT 26 .......................................................................... 14
Photoeye AC .............................................................................................. 14
Passage Limit Switch, LSP ...................................................................... 14
PROGRAM 4, PROGRAMMABLE OPTIONS ......................................... 15
Close Jog ................................................................................................... 15
Open Jog ................................................................................................... 15
Reverse Delay ............................................................................................ 15
Loop Call Delay ......................................................................................... 15
PROGRAM 5, REVERSE INPUT LOGIC ................................................ 15
PROGRAM 6 ............................................................................................ 15
SETTING THE PROGRAM OPTIONS ................................................... 15
DEFAULT INPUT SETTING ................................................................... 17
FAST-SEAL DOOR ................................................................................... 17
FAST-FOLD DOOR ................................................................................... 17
PREDADOOR/TURBO-SEAL DOOR ...................................................... 17
WIRING SCHEMATICS
FAST-SEAL—ONE-SPEED DIGITAL GATEWAY .................................... 18
FAST-FOLD—TWO-SPEED DIGITAL GATEWAY .................................... 19
PREDADOOR—TWO-SPEED DIGITAL GATEWAY ................................ 20
This page intentionally left blank.
HOW TO USE MANUAL
HOW TO USE MANUAL
Throughout this manual, the following key words are
used to alert the reader of potential hazardous
situations, or situations where additional information
for successfully performing the procedure is presented:
WARNING is used to indicate the potential for personal injury, if the procedure is
not performed as described.
CAUTION is used to indicate the potential
for damage to the product or property damage, if the procedure is not followed as described.
IMPORTANT: IMPORTANT is also used to relay information CRITICAL to the
successful completion of the procedure.
NOTE: NOTE is used to provide additional information to aid in the performance of the procedure, or operation of the door, but not
necessarily safety related.
1
INTRODUCTION
It provides connections for multiple activators, close
delay timers, backup timers, and status indicators.
See Figure 1 for an overview of the Digital Gateway
controls.
INTRODUCTION
Your door control box is equipped with Rytec's Digital
Gateway® which is a state of the art, solid state
microprocessor-based high-speed door control.
Digital Display:
Shows Cycles, Timer Settings,
Alarm Conditions and Door Functions
CLOSE Backup Timer
OPEN Backup Timer
HELLO
OPEN
Jog Button
UP Arrow
CLOSE
Jog Button
DOWN
Arrow
Auto
Close
Delay
Timer
Auto Close
Switch
A/A Close
Delay
Timer
Status LEDs:
Light is ON When Remote
Contact Has Been Activated
Input Connection Information
A0500028
Figure 1
Digital Gateway® is a registered trademark of Control Associates & Mfg., Inc.
2
Display Message Explanation
EXPLANATION OF DIGITAL GATEWAY CONTROLS
EXPLANATION OF DIGITAL GATEWAY
CONTROLS
TERMINAL STRIP
The Digital Gateway has plug-in terminal strips along
the left side of the unit. The power, output and input
connections to the Digital Gateway are made through
this terminal strip. The terminal strip is factory-wired
to a larger terminal strip in the control box. The larger
strip is used for external connections.
INPUT STATUS LEDS
These lights will show the status of the activator,
safety device or other input connected to the controller. The light will be on if the input has been activated.
(See Figure 2 for an example of an LED):
• If the input requires a normally-open (N.O.)
contact, the LED will light when the contact
closes.
• If the input requires a normally-closed (N.C.)
contact, the LED will light when the contact
opens.
• In the alarm condition, the LED connected to the
input causing the problem will blink.
PUSHBUTTONS
OPEN JOG/RESET: This pushbutton jogs the door
open. It is also the reset for alarm conditions once the
fault causing the alarm has been corrected. It is not
operational when the door is being controlled by an
activator. The open jog/reset button will operate while
the Digital Gateway is in the AJAr or EdGE alarm
condition. (See Figure 1.)
CLOSE JOG: This pushbutton jogs the door closed. It
is not operational when the door is being controlled by
an activator. The close jog button will operate while
the Digital Gateway is in the AJAr or EdGE alarm
condition. (See Figure 1.)
UP ARROW/DOWN ARROW: In the normal operating
mode these pushbuttons are used to set the timers.
The UP arrow will increase the setting. The DOWN
arrow will decrease the setting. In the program mode
the arrows are used to set various program options.
(See Figure 1.)
OTHER PUSHBUTTONS: The remaining buttons
include:
• OPEN BACKUP TIME
• CLOSE BACKUP TIME
• A/A CLOSE DELAY OPTION
• A/A CLOSE DELAY/SET
Indicates the Door Is on
the "Open" Limit Switch
• AUTO CLOSE DELAY/SELECT
0000000
These pushbuttons are used to turn on various timers
and set various program options. (See TIMERS on
page 7 and OPTIONAL PROGRAMS on page 13.
(See Figure 1.)
DISPLAY/COUNTER
The seven digit display shows timer settings, alarm
conditions, door functions, program settings and the
number of door cycles. The count displayed on the
counter is permanent, even with the loss of power.
(See Figure 1.)
DISPLAY MESSAGE EXPLANATION
The front of the Digital Gateway gives an explanation
of the various display messages. It also lists actions
required to solve the problems indicated by the Digital
Gateway display. (See Figure 1.)
A0500027
Figure 2
3
INPUTS TO THE DIGITAL GATEWAY—AC INPUTS
INPUTS TO THE DIGITAL GATEWAY
AC INPUTS (Figure 3)
NOTE: All AC inputs should be contact closure or
solid state connections only. RC networks,
MOV's or noise suppression devices allowing leakage current may cause the inputs
to become active and should be removed.
All inputs operate at 24 vac. The hot side
of the 24 vac, provided at terminal 1 in the
control box, is connected to one side of
the input contact (limit switch, activator,
etc.). The other side is connected to the
proper input. Terminals 10, 13, 16, 19, 22,
25 and 28 are not used.
PB1 (Pushbutton)—Terminal 11 (N.O. Contact)
The pushbutton on the control box is connected here.
Pushing the button (momentary connection) while the
door is closed, closing or stopped between limits will
open the door. Pushing the button while the door is in
the full open position will close the door.
The PB1 input can be converted to automatic closing.
(See SETTING THE TIMERS on page 8.)
The PB1 input works the same as the A/A input as
described below.
Alternate Action Inputs (A/A Momentary Contact
Activators)—Terminal 12 (N.O. Contact)
A momentary connection while the door is closed,
closing or stopped between limits will open the door. A
momentary connection while the door is in the full
open position will close the door.
The A/A input can be converted to automatic closing.
(See SETTING THE TIMERS on page 8.)
Typical activators include pull cords, pushbuttons or
radio controls.
The input works the same as PB1 input as described
above.
AC Inputs
Auto Inputs (Maintained Contact Activators)—
Terminal 14 (N.O. Contact)
A maintained connection while the door is closed,
closing or stopped between limits will open the door.
The door will remain open as long as the connection
is present. When the connection is removed, the Auto
Close delay timer (dEL) will count down and close the
door.
AC Inputs
The Auto Close delay timer will reset if another
maintained connection is made while the timer is
timing out. If you require no closing delay, set the
timer to 0.
A0500027
Figure 3
Limit Switches—Terminals 8 and 9 (N.C. Contact)
Once the door has started, it will move until it is shut
off by one of the limit switches or a backup timer.
OPEN (LSO)
The LSO LED will be ON when the door has reached
the full open position.
CLOSE (LSC)
The LSC LED will be ON when the door has reached
the closed position.
4
Typical activators include floor loops and motion
detectors.
Reversing Edge—Terminal 17 (N.C. Contact)
A momentary loss of this connection, such as the
door making contact with something while it is closing,
will immediately reverse the door to the open position.
The door will remain open and the Digital Gateway
display will read EdGE until the system is reset.
To reset the system and close the door: Activate
an A/A activator, the pushbutton (PB1) on the enclosure, or the Close input. The system will reset and the
door will close.
INPUTS TO THE DIGITAL GATEWAY—AC INPUTS
To reset the system and leave the door open:
Activate the Stop input or push the Open Jog/Reset
button on the Digital Gateway. The system will reset
and the door will remain open.
This input is inactive when the door is opening or
when the door is closed (on the close limit switch).
A loss of this connection for two seconds while the
door is open (LSO on) will keep the door from closing.
This is an alarm condition. The EdGE message will be
displayed and the reversing edge LED will blink.
To reset the system: Re-establish the connection,
then push the Open Jog/Reset button, or the Stop
input. (See ALARM CONDITIONS on page 9.)
OLR (Overload Relay)—Terminal 18 (N.O. Contact)
When the overload relay in the control box detects a
motor malfunction it will trip and turn the motor
contactors off. It will also send a signal to the Digital
Gateway by closing the contact connected to terminal
18. The OLr message will be displayed and blink and
the OLR LED will be on.
Once the malfunction has been corrected and the
overload reset, the OLR LED will go out, but the
Alarm Condition message OLr will continue to blink
until the system is reset. Reset the system by pressing the Open Jog/Reset button or the Stop input.
Open—Terminal 20 (N.O. Contact)
A momentary connection while the door is closed,
closing or stopped between limits will open the door.
This input is ignored during the opening cycle.
Close—Terminal 21 (N.O. Contact)
A momentary connection while the door is opened or
stopped between limits will close the door. This input
is ignored when the door is closed or during the
opening cycle.
Stop/Reset—Terminal 23 (N.C. Contact)
A momentary loss of this connection will stop the door
while it is opening or closing when the door was
activated by the Open or Close inputs.
This input can also be used as a remote reset for
Alarm Conditions. It will reset the system the same as
the Open Jog/Reset button.
Program 2—Terminal 24 (N.O. Contact)
This input has various functions that are explained in
the Programming section of this manual. (See OPTIONAL PROGRAMS on page 13.)
The default function is the LOC command. When a
connection is present and the door is closed (LSC on)
the Digital Gateway will be idle. The LOC message
will be displayed and no inputs will be active. Removing the connection will return the Digital Gateway to
normal operation.
Program 3—Terminal 26 (N.C. Contact)
This input has various functions that are explained in
the Programming section of this manual. (See OPTIONAL PROGRAMS on page 13.)
The default function is Photoeye AC. A loss of this
connection while the door is closing will immediately
reverse the door to the open position. The door will
remain open as long as the object is in the path of the
photoeye beam.
After the obstruction has been removed the door will
remain open (if it was originally opened by a nonautomatic activator: A/A, PB1 or Open-Close) until it is
closed by a nonautomatic activator. The door will
close automatically if it was originally opened with an
automatic activator (Auto or PB1-A/A with A/A Close
Delay timer on).
If the photoeye is activated while either Close Delay
timer is timing down, the timer will reset and resume
timing down after the photoeye beam has been
cleared.
The photoeye input is inactive while the door is closed
or opening.
LSB (Breakaway Kill Switch)—Terminal 27 (N.C.
Contact)
The breakaway kill switches are connected to this
input. If the breakaway bottom bar is hit and comes
apart the connection to terminal 27 is lost. The Digital
Gateway will turn off the motor contactors and the
door will stop and not operate until the system is
reset. The AJAr message will be displayed and the
LSB LED will blink.
To reset the system: Reassemble the breakaway
bottom bar and press the Open Jog/Reset button on
the Digital Gateway or the Stop input.
5
INPUTS TO THE DIGITAL GATEWAY—DC INPUTS
DC INPUTS (Figure 4)
Loop—Terminal 29, Three Terminal Plug (N.O.
Contact)
This input is used if a 12 vdc loop detector is used as
an activator. When something is present on the loop,
a contact in the detector will close. This maintained
connection will open the door if the door is closed,
closing or stopped between limits. The door will
remain open as long as the connection is present.
When the connection is removed, the Auto Close
delay timer will count down and close the door.
DC Inputs
The Auto Close delay timer (dEL) will reset if another
maintained contact is made while the timer is timing
out. If you require no closing delay, set the timer to 0.
The input operates the same as the Auto input
(terminal 14).
PRIORITY OF INPUTS
DC Inputs
Various inputs to the Digital Gateway have priority
over other inputs. The following paragraphs explain
how some inputs affect others:
A0500027
Figure 4
NOTE: All DC inputs should be contact closure or
NPN open collector only. RC networks,
MOV's or noise suppression devices allowing leakage current may cause the inputs
to become active and should be removed.
All inputs operate at 12 vdc which is supplied internally. The ground side of the 12
vdc, provided at terminal 31 on the Digital
Gateway, is connected to one side of the
input contact (photoeye or loop). The other
side is connected to the proper input.
Photoeye—Terminal 15 (N.C. Contact)
A loss of this connection while the door is closing will
immediately reverse the door to the open position.
The door will remain open as long as the obstruction
is in the path of the photoeye beam.
After the obstruction has been removed, the door will
remain open, if it was originally opened by a nonautomatic activator (A/A, PB1 or Open-Close) until it is
closed by a nonautomatic activator. The door will
close automatically if it was originally opened with an
automatic activator (Auto or PB1-A/A with A/A Close
Delay timer on.)
If the photoeye is activated while either Close Delay
timer is timing down, the timer will reset and resume
timing down after the photoeye beam is cleared. The
photoeye input is inactive while the door is closed or
opening.
6
• If any other input is activated while the door is
being opened by the Auto input, the new input will
be ignored.
• If the Auto input is activated while the door is
being opened by the A/A, PB1 or Open input, the
Auto input will be ignored.
• If the RE, Close, Stop or Program 2 inputs are
activated while the Auto Close delay timer is
counting down, these inputs are ignored.
• If the A/A, PB1 or Open input is activated while
the Auto Close delay timer is counting down, the
new input will immediately take over.
• If the A/A Close Delay timer option is turned on
and the A/A or PB1 input is activated while the
Auto Close timer is counting down, the A/A Close
Delay timer will immediately take over.
• If the Auto, Photoeye DC or Program 3 input is
activated while the Auto Close delay timer is
counting down, the timer will reset and start over
when the activator is no longer activated.
• If the door is open in a normal condition and the
Auto input is activated, the door will remain open
when the Auto input is not present. If another
activator tries to close the door while the Auto
input is on, the door will remain open until the
Auto input is not present.
TIMERS
CLOSE BACKUP TIMER
TIMERS (Figure 5)
CLOSE Backup Timer
OPEN Backup Timer
Auto Close
Timer
A/A Close
Delay Timer
A/A Close Delay Timer—
ON/OFF Button
A0500027
This is the backup timer for the closing of the door. It
functions the same as the open backup timer. When
the time has been exceeded, the CL = 0 message will
be displayed and the LSC LED will blink until the
system has been reset. This timer should be set for
1–2 seconds longer than it takes the door to close.
Setting and messages for this timer will be displayed
as "CL =" plus time.
ALTERNATIVE ACTION (A/A) CLOSE DELAY TIMER
This timer delays the closing of the door when it is
opened by an A/A activator or PB1 connection (terminals 11 or 12). After the A/A or PB1 connection is
removed and the door has reached the open limit
switch, the timer will time out and close the door.
For no closing delay, set the timer to 0. Settings and
messages for this timer will be displayed as "ACL="
plus time.
The use of this timer is optional. It is turned on with
the A/A Close Delay Option button. The LED above
the button will be on when the timer is on. To operate
the door manually with the A/A or PB1 connection,
this timer should be OFF. (Figure 6.)
Figure 5
NOTE: The timers have a range of 0–99 seconds.
They will count down from the set value to
0 in one second intervals. The factory default setting for each timer is one second.
A/A Close Delay
Option LED "ON"
A/A Close Delay Timer
Set for 2 Seconds
OPEN BACKUP TIMER
ACL= 2
This is the backup timer for the opening of the door.
This timer will stop the door if it does not reach the
open limit switch within the set time. When the time
has been exceeded, the OP = 0 message will be
displayed and the LSO LED will blink until the system
has been reset.
To reset the system: Determine the reason for the
door not reaching the limit switch and correct the
problem. Then reset the Digital Gateway by pressing
the Open Jog/Reset button or the Stop button.
This timer should be set for 1–2 seconds longer than
it takes the door to open. It will count down as the
door is opening. Setting and messages for this timer
will be displayed as "OP =" plus time.
A0500027
Figure 6
7
START-UP PROCEDURES
AUTO CLOSE DELAY TIMER
START-UP PROCEDURES
This timer delays the closing of the door when it is
opened by an Auto input activator (terminal 14) or
floor loop (terminal 30).
1. Install the door following the procedures outlined
in the door installation manual.
After the connection is removed and the door has
reached the open limit switch, the timer will time out
and close the door. For no closing delay, set the timer
to 0. Setting and messages for this timer will be
displayed as "dEL =" plus time.
SETTING THE TIMERS
The timers are set using the UP and DOWN arrow
buttons as described in PUSHBUTTONS on page 3
and the individual buttons for each timer. The Digital
Gateway should be in a normal state (display showing
the cycle count and no activators activated) before
setting the timers. The timers will count in one-second
intervals.
To set the timers:
1. Push the button for the timer you want to set. The
display will show the present setting of that timer.
2. Use the UP and/or DOWN arrow keys to raise or
lower the setting. Releasing the arrow key will
enter the new setting in the memory. The display
will show that setting for four seconds, or until
another button is pushed. Figure 7 shows the
setting of the Close Delay backup timer.
Push to Choose the
CLOSE Backup Timer
CL = 3
A0500027
Figure 7
8
Push to
Set the
Timer
2. Make all necessary electrical connections. Follow
the electrical schematic shipped in the door
control box. The schematics shown in this manual
are for informational purposes only. (See INPUTS
TO THE DIGITAL GATEWAY on page 4 for a
description of the various inputs to the Digital
Gateway.)
3. Turn on the power. If any of the N.C. connections
are missing, the COnnECt message will be
displayed and the missing input LED will blink.
Once the connection is made, the LEDs will go off
and the system will be ready for operation. (See
ALARM CONDITIONS—COnnECt, MISSING
CONNECTIONS on page 9 for more information
on missing connections.)
4. Set the timers as required. The backup timers
should be set for 1–2 seconds longer than it will
take the door to open or close. The A/A Close
Delay timer and Auto Close Delay timer should be
set as required for proper closing of the door.
(See SETTING THE TIMERS.)
NOTE: Use the OPEN and/or CLOSE jog buttons
to check door operation. If a problem is
noticed, the buttons can be released to
stop the door.
5. Run the door. Check the door for proper operation. Check the motor rotation, limit switch operation, reversing edge, breakaway kill switch, timer
settings, etc. Check all activators for proper
activation.
ALARM CONDITIONS
ALARM CONDITIONS
OP = 0, OPEN TIME EXCEEDED
COnnECt, MISSING CONNECTIONS
The Digital Gateway monitors the N.C. inputs upon
power-up. The alarm indicates one or more missing
required N.C. inputs. The LED(s) for the missing
input(s) and the display message COnnECt will blink.
Once the missing input(s) are connected the LED(s)
will go off, the display will change to the cycle count
and the system will be ready for operation. Figure 8
shows a missing photoeye connection.
This alarm indicates that the open backup timer has
timed out before the door has fully opened and that
the door has not operated in the time set on the
backup timer. The display message OP = 0 and the
LSO LED will blink. Check the door for proper operation and reset the Digital Gateway (Figure 9).
At least one of the two N.C. limit switch connections
must be present. If neither of the limit connections are
present both the LSO and LSC LEDs will blink. If the
limits are wired correctly and the Digital Gateway still
shows a missing limit connection, check the limit
settings. The limits may be set to trip at the same
time. Adjust the limits as required.
OP = 0
COnnECt
A0500027
Figure 9
A0500027
Figure 8
9
ALARM CONDITIONS
CL = 0, CLOSE TIME EXCEEDED
OLr, OVERLOAD RELAY
This alarm indicates that the close backup timer has
timed out before the door has fully closed and the
door has not operated in the time set on the backup
timer. The display message CL = 0 and the LSC LED
will blink. Check the door for proper operation and
reset the Digital Gateway. (See Figure 10.)
This alarm indicates that the overload relay in the
control box has tripped. The display message OLr will
blink and the OLR LED will be on. Find and correct
the problem that caused the overload relay to trip,
reset the overload relay and reset the Digital Gateway.
(See Figure 12.)
CL = 0
OLr
A2500027
A0500027
Figure 12
Figure 10
AJAr, BREAKAWAY KILL SWITCH
EdGE, REVERSING EDGE
This alarm tells you the bottom bar on the door has
been broken away. The display message AJAr and the
LSB LED will blink. Reassemble the bottom bar and
reset the Digital Gateway. (See Figure 11.)
This alarm indicates that the reversing edge connection (input 17) is missing. The Digital Gateway monitors the connection every time the door is fully open.
If the connection is missing for two seconds or more,
the door will remain open, the display message
EdGE, and the RE input LED will blink. Reconnect the
input and reset the Digital Gateway. (See Figure 13.)
AJAr
A0500027
Figure 11
10
The message EdGE will be displayed, but will not
blink if the door came down on something activating
the reversing edge. The door will then reverse to the
open position. The display will show EdGE like Figure
13, but the LED will be off.
NON-ALARM CONDITIONS
EdGE, REVERSING EDGE TRIPPED
EdGE
The message EdGE will be displayed if the door
comes down on something activating the reversing
edge. The door will reverse to the open position. To
reset the system and close the door use the PB1, A/
A, or Close input. To reset the system and leave the
door open use the Open Jog/Reset button or the Stop
input. (See Figure 15.)
EdGE
A0500027
Figure 13
NON-ALARM CONDITIONS
HELLO, SAFE START-UP
When power is applied to the Digital Gateway the door
will not move regardless of the status of any activator.
The display will read HELLO. The system will reset
and be operational with any activator change or if the
Digital Gateway is reset with the Open Jog/Reset
button or Stop input. (See Figure 14.)
A0500027
Figure 15
HELLO
A0500027
Figure 14
11
OUTPUTS
LOC, IDLE STATE
OUTPUTS
This message will be displayed when input 24 is
activated, the door is fully closed (on the closed limit
switch) and the Digital Gateway programmed for LOC.
The Digital Gateway will be inactive and no inputs will
operate the door. (See Figure 16.)
The 3 triac outputs of the Digital Gateway share a
common power source which is terminal 4. Terminal 4
is internally connected to the 24 vac power source.
Terminal 5 is the open output, supplying power to the
open contactor. Terminal 6 is the close output, supplying power to the close contactor. Terminal 7 is the
Program 1 output. It can be used to power a relay
which can be used for a variety of things. (See
OPTIONAL PROGRAMS on page 13.)
LOC
An RC network and MOV are connected across each
output for noise suppression. An external MOV is
recommended across any contactor coil or solenoid
coil. The maximum rating for each output is 1-amp
inductive continuous. (See Figure 17.)
Power
Outputs
A0500027
Figure 16
POWER
The Digital Gateway operates at 24 vac. Power is
applied through terminals 1, 2 and 3. Terminal 1 is 24
vac high side, terminal 2 is 24 vac low side and
terminal 3 is ground. (Figure 17.)
A2500027
Figure 17
12
OPTIONAL PROGRAMS
REPLACEMENT
TROUBLESHOOTING
The fused disconnect must be in the OFF
position and properly locked and tagged
before performing the following procedure.
If the Digital Gateway ever requires replacement:
1. Turn off the power to the door.
2. Remove the plug-in terminal blocks, and remove
the existing Digital Gateway from the control box.
(See Figure 18.)
Mounting Screws
The Digital Gateway has diagnostic features that aid
in troubleshooting door problems. There are status
LEDs and alarm conditions that show you what the
door is doing. The alarm condition explanations and
descriptions of the LEDs will identify problems that
may come up.
OPTIONAL PROGRAMS
NOTE: The Digital Gateway has one programmable
output (output 7), two programmable inputs
(inputs 24 and 26) and various other program options built in. A description of each
available program follows. (See SETTING
THE PROGRAM OPTIONS on page 15 for
programming instructions.)
PROGRAM 1, OUTPUT 7
This output can tell you if the door is not closed, fully
open or about to close. When output 7 is turned on 24
vac will be available at terminal 7. This power can be
used to turn on a 24 vac relay which can indicate
where the door is or what it is about to do. The relay
can operate warning lights, horns or signal an energy
management system. Only one of the three options
available in Program 1 can be selected at a time.
Plug-In
Terminals
Door Not Closed, P1 = LSC
Mounting Screws
Output 7 will be on when the door is not closed. (Not
on the "Close" limit switch.) The output will be off
when the door is fully closed. (On the "Close" limit
switch.) This is the factory default setting. It tells you
the door is not closed.
Door Open, P1 = LSO
A0500031
Figure 18
3. Install the replacement and reconnect the plug-in
terminal blocks, making sure the numbers on the
terminal blocks correspond with the terminal
numbers on the Digital Gateway.
4. Turn on the power, and reset the default setting to
match your door. (See DEFAULT INPUT SETTING on page 17.)
5. Reset all the timers and program options as
required.
Output 7 will be on when the door is fully open. (On
the "Open" limit switch.) The output will be off when
the door is below the open position. (Off of the "Open"
limit switch). It tells you the door is fully open.
Delay to Close, P1 = dtC
When the door is signaled to close, output 7 will turn
on, the Delay to Close timer (dtC) will start, but output
6, which closes the door, will not be on. When the
Delay to Close timer times out, output 6 will activate
and the door will close. Output 7 will remain on until
the door is completely closed. Maximum time is 15
seconds. This option tells you the door is about to
close.
13
OPTIONAL PROGRAMS
PROGRAM 2, INPUT 24
Passage Entry—Position, P2 = PEP
This input can be used to place the Digital Gateway
into an inactive condition, operate the door manually
or automatically or open the door to a height below
fully open. Only one of the Program 2 options can be
selected at a time.
When this option is turned on PROGRAM 3, INPUT
26—Passage Limit Switch, LSP will also be turned on.
These two options allow you to open the door partially
using an activator connected into input 24 and another
limit switch (Passage Limit LSP) connected to input
26. A 20 foot door could be opened 8 feet for small
loads and 20 feet for large loads. The Passage Limit
would be set at 8 feet. Using the activator connected
to input 24 would open the door to the Passage Limit.
Using the other activators would open the door
completely.
LOC Condition, P2 = LOC
When input 24 is on and the door is fully closed the
Digital Gateway will go into an inactive condition. No
inputs will be able to activate the door. The message
LOC will be on the display. Once the connection is
removed from the input, the system will be ready for
normal operation. This is the factory default Program
2 setting and can be used to "lock out" the door.
MAN-AUTO Selector Switch, P2 = SSA
If this option is selected, a manual-automatic
two-position selector switch can be connected to input
24. When the switch is in the MAN position (there is
no connection at terminal 24) the A/A and Auto Close
delay timers are disabled. The Auto and Loop inputs
are inactive when the door is closed, but will reverse
the door if it is closing, or hold it open when it is fully
open.
When the switch is in the AUTO position (there is a
connection at input 24) the A/A Close Delay timer will
turn on and all inputs will operate normally.
This option allows you to operate the door manually or
automatically.
MAN-AUTO Selector Switch with Open and Close
Inactive in Auto, P2 = SSb
This option operates the same as the MAN-AUTO
option described in MAN-AUTO Selector Switch, P2 =
SSA except in the Auto position the Open and Close
inputs are inactive.
Passage Entry—Timed, P2 = Pet
When this option is used and the door is activated to
open with input 24, it will open for a predetermined
time. This allows you to open the door part way with
an activator connected to terminal 24 while other
activators connected to other inputs will open the door
completely. A 20 foot door could be opened 8–10 feet
for small loads and 20 feet for large loads.
When input 24 is activated while the door is fully
closed the door will open and the Passage timer (PEt)
will begin counting down. When the Passage timer
reaches zero the door will stop. Activating this input
again will close the door. If the A/A Close Delay timer
is on when the door is opened with input 24, the door
will open until the Passage timer reaches zero. Then
the A/A Close Delay timer will time out and close the
door.
14
When input 24 is activated while the door is fully
closed it will open until it reaches the Passage limit
switch which will activate input 26. When input 24 is
activated again the door will close. If the A/A Close
Delay timer is used the door will open until it reaches
the Passage limit switch, then the A/A Close Delay
timer will time out and close the door. If the input is
activated while the door is closing the door will open
until it reaches the OPEN or Passage limit switch,
depending on which limit switch is hit first.
PROGRAM 3, INPUT 26
This program option will not appear in the Program
Menu. These options are set through factory defaults
or by other program options.
Photoeye AC
This input will operate the same as the photoeye input
described in DC INPUTS—Photoeye—Terminal 15
(N.C. Contact) on page 6, except it would be used for
AC photoeyes. This is the factory default setting.
Passage Limit Switch, LSP
This option is turned on when the Passage Entry—
Position option is turned on. The Passage Limit switch
is connected to this input. When the door reaches the
Passage position after it is opened by input 24, this
input will be activated and the door will stop.
SETTING THE PROGRAM OPTIONS
PROGRAM 4, PROGRAMMABLE OPTIONS
PROGRAM 5, REVERSE INPUT LOGIC
This program section allows you to change the Open
and Close inputs to constant pressure/jog, set a
reverse delay timer and/or a loop call delay. More than
one of these options can be on at the same time.
This option can be used to reverse the required logic
for some of the inputs. The required contact arrangement can be changed from normally closed (N.C.) to
normally open (N.O.). The inputs that can be changed
are Open Limit (LSO - #8), Close Limit (LSC - #9),
Photoeye—DC (Pdc - #15), Reversing Edge (rE- #17),
Stop (StP - #23), Program 3 (PG3 - #26) and Breakaway Limit (LSb - #27).
Close Jog, CLJ = On/CLJ = OFF
This option converts the Close Input (input 21) to
constant pressure/jog operation. The door will only
close while the input is activated.
Open Jog, OPJ = On/OPJ = OFF
PROGRAM 6
This option converts the Open Input (input 20) to
constant pressure/jog operation. The door will only
open while the input is activated.
This program option is set for factory use. It requires
an additional three digit security code. If you find
yourself in Program 6, press the Set button to return
to the main menu.
Reverse Delay, rdt = 00
The Digital Gateway is programmed to immediately
reverse the door if an activator or safety input is
operated while the door is closing. This option can be
used to delay the reversal of the door. If the A/A, Auto
or Open input is activated while the door is closing the
reversal will be delayed by the time set on the Reverse Delay timer. The door will stop, the Reverse
Delay timer (rdt) will time out and the door will then
open. Reversals due to the photoeye or reversing
edge inputs will not be delayed.
SETTING THE PROGRAM OPTIONS
As described in the OPTIONAL PROGRAMS section,
there are 6 program menus and their submenus
available. You will use the UP and DOWN arrows, the
Set button (A/A Close Delay) and the Select button
(Auto Close Delay) to select and set the program
options which will be shown on the display. (See
Figure 19.)
The maximum setting is 15 seconds. The factory
default setting is 0 which disables the timer.
Display
Loop Call Delay, LPt = 00
This option will delay the opening of the door when it
is opened by the Loop input. This can be used for
cross traffic situations. Traffic crossing in front of the
door will not remain on the loop long enough to open
the door but traffic approaching the door will activate
the door.
UP Arrow
DOWN
Arrow
When the Loop input is activated while the door is
fully closed the Loop timer will count down and then
open the door. If the Loop input returns to the normal
inactivated state while the timer is counting down the
door will not open and the system will return to the
normal state.
If the Loop input is activated while the door is closing
the door will immediately reverse to the fully open
position.
The maximum setting is 15 seconds. The factory
default setting is 0 seconds which disables the timer.
Set Button
A0500027
Select Button
Figure 19
15
SETTING THE PROGRAM OPTIONS
1. To enter into the programming mode press and
hold both the Open and Close Backup Time
buttons for three seconds. The display will change
to three 0's as shown in Figure 20. To continue
the programming mode, you will have to enter the
three digit security code. Contact the Rytec
Customer Support Department at (414) 677-9046
for the code.
PrOG - 1
000
A2500027
Figure 21
4. After you find the program you wish to change,
press the Set button to enter the sub-menu for
that particular program. Each sub-menu will be
identified by the program number and an option
code. Figure 22 shows the default setting (Door
Not Closed) for Program 1.
A2500027
Figure 20
2. The first (left) digit will blink. Press the up or down
arrow key to raise or lower the value of the first
digit. After the first digit is set, press the Select
button to move to the next digit. Repeat the
process for all three digits of the security code,
then press the Set button to enter the Program
Mode.
P1 = LSC
3. Once you have entered the program mode the
display will show the various program menus.
(See Figure 21.) Press the Select button to scroll
through the programs.
A2500027
Figure 22
5. For Programs 1 and 2 only one option can be
selected. Scroll through the options using the
Select button. Press the Set button to select the
option displayed. This will return you to the main
Program menu.
16
DEFAULT INPUT SETTING
6. For the remaining programs use the Select button
to scroll through the options. Use the UP and
DOWN arrow keys to set the time or option and
the Set button to return to the Main Program
menu after all the selections are made.
7. When a timer is associated with an option, the
display will show the code for the option and the
timer setting. Use the UP and DOWN arrow keys
to set the timers. Figure 23 shows the Delay To
Close timer set to 0 seconds. Use the Set button
to return to the Main Program menu.
DEFAULT INPUT SETTING
A number of the inputs on the Digital Gateway can be
set to operate with a normally open (N.O.) or a
normally closed (N.C.) contact connected to them.
(See PROGRAM 5, REVERSE INPUT LOGIC on
page 15.) The various models of Rytec doors require
slightly different combinations of N.O. and N.C.
contacts. The following defaults can be used to set up
the Digital Gateway inputs for standard doors:
FAST-SEAL DOOR
To set this default, press and hold the A/A Close
Delay/Set button, turn the power off and on. Release
the button.
dtc = 00
This default will set LSO (N.C.), LSC (N.C.), PdC
(N.C.), rE (N.C.), Stp (N.C.), PG3 (N.O.) and LsB
(N.C.).
FAST-FOLD DOOR
To set this default, press and hold the Auto Close
Delay/Select button, turn the power off and on.
Release the button.
This default will set LSO (N.C.), LSC (N.C.), PdC
(N.O.), rE (N.O.), StP (N.C.), PG3 (N.O.) and LsB
(N.O.).
PREDADOOR/TURBO-SEAL DOOR
A0500027
Figure 23
8. When all options have been selected, press the
Open and Close Backup Timer buttons to leave
the program mode. The Digital Gateway is then
ready for operation.
To set this default, press and hold the Open Backup
Timer button, turn the power off and on. Release the
button.
This default will set LSO (N.C.), LSC (N.C.), PdC
(N.O.), rE (N.C.), StP (N.C.), PG3 (N.C.) and LsB
(N.C.).
Set the timers and other program options as required.
17
WIRING SCHEMATICS—FAST-SEAL—ONE-SPEED DIGITAL GATEWAY (E4200)
WIRING SCHEMATICS
FAST-SEAL—ONE-SPEED DIGITAL GATEWAY (E4200)
MOTOR DATA
OLR
M1O
L1
T1
L2
T2
L3
T3
FUSED DISCONNECT
BY OTHERS
M1C
FU2
SEE MOTOR TABLE
FOR FUSE SIZE
1
BRAKE
FU2
H1
H3
H2
CT1
FU1
VOLTAGE
MOTOR
230V -
H1-H3
H2-H4
460V -
H2-H3
H4
100 VA
1
24 VAC
1
1
3
4
LSO*
2
INTERNALLY
CONNECTED
8
0-011-592
193-A1D1
0-011-591
460
0.97
1 8/10 AMP
193-A1D1
0-011-591
575
0.7
1 8/10 AMP
193-A1C1
0-011-590
X2
5
M1C
6
M1O
5
9
5
9
6
11
7
OLR
M1O
OPEN
5
M1C
CLOSE
4
TERMINAL BLOCKS
OPEN/CLOSE
PB1
6
BLACK
RED
BLUE
BEIGE
GREEN/YELLOW
11
JUNCTION BOX
ON DOOR HEADER
PULL CORD/PB
12
7
12
MOT DET/LOOP
9
DIGITAL GATEWAY
DG-1200
14
8
G
14
TO PHOTOEYES
PE1 & PE2
LINE 26
RE1*
15
GND
GND
INPUT 15
DC ONLY
L2
L3
17
17
* BY RYTEC
OLR
- POWER
- AC CONTROL
- DC CONTROL
- FLOOR LOOP
- GROUND
L1
15
10
11
RYTEC NO
193-A1E1
3.5 AMP
3
8
LSC*
OVERLOAD
6.0 AMP
1.8
X2
2
4
RECOMMENDED FUSE
2.9
230
X2
1
X1
FLA
208
18
MOTOR
T1
T1
T2
T2
T3
T3
18
FUSED DISCONNECT
BY OTHERS
1
1
1
12
1
20
13
1
NOTE:
INPUT 26 LOGIC
CHANGED TO
NORMALLY OPEN
14
X2
LSO
8
LSC
9
21
15
23
16
RE1
LSB1/LSB2
17
LSB1/LSB2*
BRN
27
18
27
BRN
29 +12VDC
19
1
X2
20
30
21
31 12VDC GND
MAX
150 ma
BRN
PE1
EMITTER
PE2
EMITTER
PE1
BLUE
8
9
12
PULL CORD/PB
14
MOT DET/LOOP
15
15
17
17
27
27
29
29
31
31
32
BLUE
33
BLUE
RECEIVER
WHITE
PE2
BRN RECEIVER BLUE
WHITE
29
22
23
BROWN
PE1
EMITTER
BLUE
BROWN
PE2
EMITTER
BLUE
BROWN
PE1
RECEIVER
BLUE
PE2
RECEIVER
BLUE
31
PHOTOEYES
24
25
26
27
28
29
30
A2500010
18
BROWN
WHITE
WHITE
15
NOTE: This schematic is for general information only. Due to varying requirements for individual customers, a
schematic is prepared for each door
installation. This schematic is
shipped inside of the control box and
must be used for that specific installation.
WIRING SCHEMATICS—FAST-FOLD—TWO-SPEED DIGITAL GATEWAY (E4100)
FAST-FOLD—TWO-SPEED DIGITAL GATEWAY (E4100)
A1500143
NOTE: This schematic is for general information only. Due to varying requirements for individual customers, a
schematic is prepared for each door
installation. This schematic is
shipped inside of the control box and
must be used for that specific installation.
19
WIRING SCHEMATICS—PREDADOOR—TWO-SPEED DIGITAL GATEWAY (E4900)
PREDADOOR—TWO-SPEED DIGITAL GATEWAY (E4900)
MB
MOTOR DATA
B1
MOTOR
BRAKE
B2
B3
M1O
T4
L2
T5
L3
T6
FU2
FU2
H1
H3
H2
CT1
FU1
230V -
H1-H3
H2-H4
460V -
H2-H3
H4
24 VAC
1
1
3
4
LSO*
0-011-592/0-011-592
460
1.6/1.7
3 AMP
193-A1D1/193-A1D1
0-011-591/0-011-591
575
1.3/1.4
2.5 AMP
193-A1D1/193-A1D1
0-011-591/0-011-591
MOTOR
LO
3
5
9
5
0-011-592/0-011-592
193-A1E1/193-A1E1
X2
2
INTERNALLY
CONNECTED
8
LSC*
193-A1E1/193-A1E1
6 AMP
ZNR
8
4
RYTEC NO
6 AMP
X2
X2
1
2
OVERLOAD
RECOMMENDED FUSE
3.2/3.4
T3
100 VA
X1
FLA
3.6/3.8
230
T1
T2
SEE MOTOR TABLE
FOR FUSE SIZE
1
MOTOR
HI
VOLTAGE
208
OLRL
M1C
FUSED DISCONNECT
BY OTHERS
1
OLRH
L1
0.5/1.0 HP, 850/1750 RPM, 1.15 SF
9
6
11
7
5
M1C
6
M1O
OLRL OLRH
M1O
OPEN
5, 18
M1C
CLOSE
4, 19
OPEN/CLOSE
PB1 11
6
TERMINAL BLOCKS
PULL CORD/PB
12
12
7
MOT DET/LOOP 14
8
BLACK
RED
BLUE
BEIGE
GREEN/YELLOW
FIELD WIRING
BY OTHERS
DIGITAL GATEWAY
DG-1200
14
9
TO SMARTEDGE
LINE 22
17
OLRH
18
10
17
18
G
NOTE:
INPUT 15 LOGIC
CHANGED TO
NORMALLY OPEN
L1
L2
L3
* BY RYTEC
11
MOTOR
LO
23
MOTOR
HI
PE1*
PE2*
26
26
13
LSB*
GND
GND
OLRL
12
- POWER
- AC CONTROL
- DC CONTROL
- FLOOR LOOP
- GROUND
NOTE:
INPUT 26 SET TO
PROG3=PHOTO AC
MOTOR
BRAKE
27
T1
T1
T2
T2
T3
T3
T4
T4
T5
FUSED DISCONNECT
BY OTHERS
T5
T6
T6
B1
B1
B2
B2
B3
B3
1
14
27
15
29 +12VDC
16
30
1
17
MAX
150 ma
1
LOOP DC
1
BRN
31 12VDC GND
1
PE1/PE2
X2
BLUE
WHITE
12VDC GND
LOOP
LP-32DG
8
LSC
9
DETECTOR
+ 12VDC
GRY
BRN
GREEN
PE1
PE2
LSB
M1O
MOT DET/LOOP
27
27
FLOOR
LOOP
28
MOTOR BRAKE
MB
SMARTEDGE
34
4
35
5
SMARTEDGE
CONTROL
MODULE
SE1
1
20
PHOTOEYE PE1*
BROWN
24 VAC
YLW
24V NEUTRAL
BLK
1
21
BLUE
24 VAC
YLW
24V NEUTRAL
BLK
26
1
3 24 VAC
EDGE
PHOTOEYE PE1
13
LIGHT ON MODE
PHOTOEYE PE2*
BROWN
X2
WITH POWER ON AND NOTHING
IN THE LIGHT BEAM, PE1 RELAY
CONTACT WILL BE CLOSED.
1
20
PULL CORD/PB
26
33
M1C
A7500148
9
14
32
19
22
8
12
26
32
33
TWISTED PAIR
TO LOOP
IN FLOOR
18
X2
X2
LSO
LOOP DETECTOR
BLUE
BLACK
1
BLUE
X2
PHOTOEYE PE2
13
LIGHT ON MODE
WITH POWER ON AND NOTHING
IN THE LIGHT BEAM, PE2 RELAY
CONTACT WILL BE CLOSED.
SMARTEDGE
SE1
X2
24V NEUT 2
SIGNAL AT 1
WITH
EDGE CONNECTED
4
5
1
34
35
DG17
SMARTEDGE
CONTROL
9
NOTE: This schematic is for general information only. Due to varying requirements for individual customers, a
schematic is prepared for each door
installation. This schematic is
shipped inside of the control box and
must be used for that specific installation.