1
FO-3800M
DIGITAL LASER MULTIFUNCTION
OPERATION MANUAL
SUK COVER PAGE LEO.p65
1
28/03/00, 11:44
This product contains a lithium-ion battery, and must be disposed of properly.
Contact your local environmental officials for disposal instructions.
In some areas, the "POWER" switch positions are marked "I" and "0" on the
copier instead of "ON" and "OFF".
CAUTION:
For a complete electrical disconnection, pull out the main plug.
The socket-outlet shall be installed near the equipment and shall be easily
accessible.
Important safety information
• If any of your telephone equipment is not operating properly, you should
immediately remove it from your telephone line, as it may cause harm to the
telephone network.
• Never install telephone wiring during a lightning storm.
• Never install telephone jacks in wet locations unless the jack is specifically
designed for wet locations.
• Never touch uninsulated telephone wires or terminals unless the telephone
line has been disconnected at the network interface.
• Use caution when installing or modifying telephone lines.
• Avoid using a telephone (other than a cordless type) during an electrical
storm. There may be a remote risk of electric shock from lightning.
• Do not use a telephone to report a gas leak in the vicinity of the leak.
• Do not install or use the machine near water, or when you are wet. Take care
not to spill any liquids on the machine.
DECLARATION
The equipment has been approved in accordance with Council Decision 98/482/
EC for pan-European single terminal connection to the public switched telephone
network (PSTN). However, due to differences between the individual PSTNs
provided in different countries, the approval does not, of itself, give an unconditional
assurance of successful operation on every PSTN network termination point.
In the event of problems, you should contact your equipment supplier in the first
instance.
SUK COVER PAGE LEO.p65
2
28/03/00, 11:44
SOFTWARE LICENSE
PLEASE READ THIS LICENSE CAREFULLY BEFORE USING THE
SOFTWARE. BY USING THE SOFTWARE, YOU ARE AGREEING TO BE
BOUND BY THE TERMS OF THIS LICENSE.
1. License.
The application, demonstration, system and other software accompanying this License, whether on
disk, in read only memory, or on any other media (the “Software”) and related documentation are
licensed to you by SHARP. You own the disk on which the Software is recorded but SHARP and/or
SHARP’S Licensors retain title to the Software and related documentation. This License allows you to
use the Software on one or more computers connected to a single printer and make one copy of the
Software in machine-readable form for backup purposes only. You must reproduce on such copy the
SHARP copyright notice, the copyright notice of SHARP’S Licensors and any other proprietary
legends of SHARP and/or its Licensors that were on the original copy of the Software. You may also
transfer all your license rights in the software, the backup copy of the Software, the related
documentation and a copy of this License to another party, provided the other party reads and
agrees to the terms and conditions of this License.
2. Restrictions.
The Software contains copyrighted material, trade secrets and other proprietary material which is
owned by SHARP and/or its Licensors and in order to protect them you may not decompile, reverse
engineer, disassemble or otherwise reduce the Software to a human-perceivable form. You may not
modify, network, rent, lease, loan, distribute or create derivative works based upon the Software in
whole or in part. You may not electronically transmit the Software from one computer to another or
over a network.
3. Termination.
This license is effective until terminated. You may terminate this License at any time by destroying
the Software and related documentation and all copies thereof. This License will terminate
immediately without notice from SHARP and/or SHARP’S Licensors if you fail to comply with any
provision of this License. Upon termination you must destroy the Software and related documentation
and all copies thereof.
4. Export Law Assurances.
You agree and certify that neither the Software nor any other technical data received from SHARP,
nor the direct product thereof, will be exported outside the United States except as authorized and as
permitted by the laws and regulations of the United States. If the Software has been rightfully obtained
by you outside of the United States, you agree that you will not re-export the Software nor any other
technical data received from SHARP, nor the direct product thereof, except as permitted by the laws
and regulations of the United states and the laws and the regulation of the jurisdiction in which you
obtained the Software.
5. Government End Users.
If you are acquiring the Software on behalf of any unit or agency of the United States Government, the
following provisions apply. The Government agrees:
(i) if the Software is supplied to the Department of Defense (DoD), the Software is classified as
“Commercial Computer Software” and the Government is acquiring only “restricted rights” in the
Software and its documentation as that term is defined in Clause 252.227-7013 (c)(1) of the DFARS;
and
(ii) if the Software is supplied to any unit or agency of the United States Government other than DoD,
the Government’s rights in the Software and its documentation will be as defined in Clause 52.227-19
(c)(2) of the FAR or, in the case of NASA, in Clause 18-52.227-86 (d) of the NASA Supplement to the
FAR.
6. Limited Warranty on Media.
SHARP warrants the disks on which the Software is recorded to be free from defects in materials and
workmanship under normal use for a period of ninety (90) days from the date of purchase as
evidenced by a copy of the receipt. The entire liability of SHARP and/or its Licensors and your
exclusive remedy will be replacement of the disk which fails to meet the limited warranty provided by
this Clause 6. A disk will be replaced when it is returned to SHARP or a SHARP authorized
i
SUK LICENSE LEO.p65
1
27/03/00, 09:13
representative with a copy of the receipt. SHARP will have no responsibility to replace a disk
damaged by accident, abuse or misapplication.
ANY IMPLIED WARRANTIES ON THE DISKS, INCLUDING THE IMPLIED WARRANTIES OF
MERCHANTABILITY AND FITNESS FOR A PARTICULAR PURPOSE, ARE LIMITED IN
DURATION TO NINETY (90) DAYS FROM THE DATE OF DELIVERY. THIS WARRANTY GIVES
YOU SPECIFIC LEGAL RIGHTS, AND YOU MAY ALSO HAVE OTHER RIGHTS WHICH VARY
FROM JURISDICTION TO JURISDICTION.
7. Disclaimer of Warranty on Software.
You expressly acknowledge and agree that use of the Software is at your sole risk. The software and
related documentation are provided “AS IS” and without warranty of any kind and SHARP and
SHARP’S Licensor(s) (for the purpose of provisions 7 and 8, SHARP and SHARP’S Licensor(s) shall
be collectively referred to as “SHARP”) EXPRESSLY DISCLAIM ALL WARRANTIES, EXPRESS OR
IMPLIED, INCLUDING, BUT NOT LIMITED TO, THE IMPLIED WARRANTIES OF
MERCHANTABILITY AND FITNESS FOR A PARTICULAR PURPOSE. SHARP DOES NOT
WARRANT THAT THE FUNCTIONS CONTAINED IN THE SOFTWARE WILL MEET YOUR
REQUIREMENTS, OR THAT THE OPERATION OF THE SOFTWARE WILL BE
UNINTERRUPTED OR ERROR-FREE, OR THAT DEFECTS IN THE SOFTWARE WILL BE
CORRECTED.
FURTHERMORE, SHARP DOES NOT WARRANT OR MAKE ANY
REPRESENTATIONS REGARDING THE USE OR THE RESULTS OF THE USE OF THE
SOFTWARE OR RELATED DOCUMENTATION IN TERMS OF THEIR CORRECTNESS,
ACCURACY, RELIABILITY, OR OTHERWISE. NO ORAL OR WRITTEN INFORMATION OR
ADVICE GIVEN BY SHARP OR A SHARP AUTHORIZED REPRESENTATIVE SHALL CREATE A
WARRANTY OR IN ANY WAY INCREASE THE SCOPE OF THIS WARRANTY. SHOULD THE
SOFTWARE PROVE DEFECTIVE, YOU (AND NOT SHARP OR A SHARP AUTHORIZED
REPRESENTATIVE) ASSUME THE ENTIRE COST OF ALL NECESSARY SERVICING, REPAIR
OR CORRECTION, SOME JURISDICTIONS DO NOT ALLOW THE EXCLUSION OF IMPLIED
WARRANTIES, SO THE ABOVE EXCLUSION MAY NOT APPLY TO YOU.
8. Limitation of Liability.
UNDER NO CIRCUMSTANCES INCLUDING NEGLIGENCE, SHALL SHARP BE LIABLE FOR
ANY INCIDENTAL, SPECIAL OR CONSEQUENTIAL DAMAGES THAT RESULT FROM THE USE
OR INABILITY TO USE THE SOFTWARE OR RELATED DOCUMENTATION, EVEN IF SHARP
OR A SHARP AUTHORIZED REPRESENTATIVE HAS BEEN ADVISED OF THE POSSIBILITY OF
SUCH DAMAGES. SOME JURISDICTIONS DO NOT ALLOW THE LIMITATION OR EXCLUSION
OF LIABILITY FOR INCIDENTAL OR CONSEQUENTIAL DAMAGES SO THE ABOVE
LIMITATION OR EXCLUSION MAY NOT APPLY TO YOU.
In no event shall SHARP’S total liability to you for all damages, losses, and causes of action (whether
in contract, tort (including negligence) or otherwise) exceed the amount paid by you for the Software.
9. Controlling Law and Severability.
For a portion of the Software related with Apple Macintosh and Microsoft Windows, this license shall
be governed by and construed in accordance with the laws of the state of California and Washington,
respectively. If for any reason a court of competent jurisdiction finds any provision of this License, or
portion thereof, to be unenforceable, that provision of the License shall be enforced to the maximum
extent permissible so as to effect the intent of the parties, and the remainder of this License shall
continue in full force and effect.
10. Complete Agreement.
This License constitutes the entire agreement between the parties with respect to the use of the
Software and related documentation, and supersedes all prior or contemporaneous understandings
or agreements, written or oral, regarding such subject matter. No amendment to or modification of
this License will be binding unless in writing and signed by a duly authorized representative of
SHARP.
ii
SUK LICENSE LEO.p65
2
27/03/00, 09:13
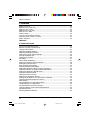
TABLE OF CONTENTS
COPIER PART
1. INSTALLATION
Introduction ....................................................................................................... 1
Overview of the FO-3800M ............................................................................... 1
How to use this manual ..................................................................................... 1
Checking packed components and accessories ................................................ 2
Set up ............................................................................................................... 3
Choosing a location ........................................................................................... 4
Cautions ........................................................................................................... 6
Main features .................................................................................................... 8
Part names ....................................................................................................... 9
Operation panel ............................................................................................... 10
Installing the TD cartridge ............................................................................... 11
Loading copy paper ......................................................................................... 12
Power to machine ............................................................................................ 13
Power on ......................................................................................................... 14
Connections .................................................................................................... 15
Connecting the Telephone Line Cord ................................................................ 15
Final Preparations ........................................................................................... 16
Connecting Other Devices .............................................................................. 16
2. MAKING COPIES
Normal copying .................................................................................................. 17
When using the SPF .......................................................................................... 17
When using the original table ............................................................................. 18
Exposure adjustment/photo copying ................................................................. 20
Automaticexposure adjustment ......................................................................... 21
Reduction / Enlargement / Zoom ....................................................................... 22
Two-sided copying .............................................................................................. 23
3. SPECIAL FUNCTIONS
Description of special functions ......................................................................... 25
Toner save mode ................................................................................................ 26
User programs .................................................................................................... 27
4. SUPPLIES AND USER MAINTENANCE
TD cartridge replacement ..................................................................................
Drum cartridge replacement ..............................................................................
Drum cartridge life .............................................................................................
User maintenance ..............................................................................................
Cleaning the drum cartridge ...............................................................................
When the machine is not in use ........................................................................
29
31
32
33
34
34
iii
SUK 00 TABLE LEO.p65
3
30/03/00, 17:49
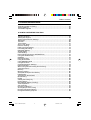
Table of contents
5. PROBLEMS
Misfeed removal ................................................................................................ 35
Misfeed in the paper tray ................................................................................... 35
Misfeed in the copier .......................................................................................... 36
Misfeed in the exit area ..................................................................................... 37
Misfeed in the SPF ............................................................................................ 38
Copier trouble ..................................................................................................... 39
Copy and print quality problems ........................................................................ 40
Displaying total number of copies ...................................................................... 41
Status indicators ................................................................................................ 42
FAX PART
6. INITIAL SETTINGS
A look at the operation panel ........................................................................... 43
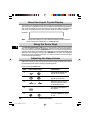
About the Liquid Crystal Display ..................................................................... 44
Using the Arrow Keys ...................................................................................... 44
Adjusting the Beep Volume ............................................................................. 44
Adjusting the Ringing Volume .......................................................................... 45
Setting the Length of Alarm Beeps .................................................................. 45
Turning Key Beeps Off .................................................................................... 46
Setting the Language ...................................................................................... 46
Fax Setup ....................................................................................................... 47
How to Enter Characters ................................................................................. 47
Entering Your Name and Fax Number .............................................................. 48
Setting the Date and Time ............................................................................... 49
Auto Summer Time Setting ............................................................................. 50
Selecting the Reception Mode ......................................................................... 51
Setting the Number of Rings for Auto Reception ............................................. 52
Settinf the Number of Rings for Manual Reception .......................................... 52
Setting the Number of Recall Times ................................................................ 53
Setting the Recall Interval ............................................................................... 53
Setting the Index Function .............................................................................. 54
Setting Fine Resolution Priority ....................................................................... 55
Setting Up the Machine for Use with a PC Modem .......................................... 55
Using the Remote Reception Function ............................................................ 56
PBX Setting .................................................................................................... 57
Storing Numbers for Automatic Dialing ............................................................ 58
Chain Dialing for Long Numbers ...................................................................... 60
Storing Numbers Under Group Keys ................................................................ 61
Using the Machine with a Answering Machine ................................................. 63
Quiet DetectTime ............................................................................................ 63
Answerig Machine Backup .............................................................................. 64
iv
SUK 00 TABLE LEO.p65
4
30/03/00, 17:49
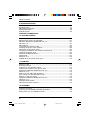
Table of contents
7. CHOOSING SUITABLE MEDIA
Originals Suitable for Faxing ........................................................................... 65
Size and Weight .............................................................................................. 65
Unsuitable Originals ........................................................................................ 66
8. HOW TO USE THE FAX FUNCTION
Sending Originals ............................................................................................ 67
Setting the Original ......................................................................................... 67
Optional Transmission Settings ....................................................................... 69
Resolution ....................................................................................................... 69
Contrast .......................................................................................................... 69
Cover Sheet .................................................................................................... 70
Auto Cover Sheet ............................................................................................ 71
Reverse Sending ............................................................................................. 72
Dialing and Transmitting .................................................................................. 73
Direct Keypad Dialing ...................................................................................... 73
Rapid Key Dialing ............................................................................................ 74
Speed Dialing .................................................................................................. 74
Chain Dialing ................................................................................................... 75
Normal Dialing Using the SPEAKER key ........................................................ 75
Using the SEARCH key .................................................................................. 76
Redialing ......................................................................................................... 76
Receiving Faxes ............................................................................................. 77
Using AUTO Mode .......................................................................................... 77
Using MANUAL Mode ..................................................................................... 77
Using A.M. Mode ............................................................................................ 77
Optional Reception Settings ............................................................................ 78
Receive Reduce .............................................................................................. 78
When using manual sending and receiving ...................................................... 79
Special functions ............................................................................................ 80
Memory ........................................................................................................... 80
Memory backup .............................................................................................. 80
Subsitute Reception into Memory ................................................................... 80
DataTransfer .................................................................................................... 81
Transmission Reservation ............................................................................... 82
Broadcasting ................................................................................................... 84
Polling ............................................................................................................. 86
Setting the Polling key .................................................................................... 86
Polling Others ................................................................................................. 86
Being Polled (Memory Polling) ......................................................................... 87
Timer Operations ............................................................................................ 89
Anti Junk Fax .................................................................................................. 91
Printing Out Reports ....................................................................................... 93
Activity Report Auto Listing ............................................................................ 95
Printing Transaction Reports ........................................................................... 95
Priting Broadcasting Reports .......................................................................... 96
v
SUK 00 TABLE LEO.p65
5
30/03/00, 17:49
Table of contents
9. TROUBLESHOOTING
Troubleshooting ..................................................................................................
Messages and Signals ......................................................................................
Display Messages .............................................................................................
Audible Signals ..................................................................................................
97
98
98
99
PRINTER / SCANNER PART
10. GETTING STARTED
Introduction ...................................................................................................... 101
Making floppy disks from CD-ROM ................................................................. 101
Windows 95/Windows 98/Windows NT 4.0 ...................................................... 101
Windows 3.1x ................................................................................................... 101
Main features ................................................................................................... 102
Connecting the interface cable ........................................................................ 103
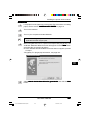
Installing the printer driver software ................................................................. 104
Description of the printer driver ........................................................................ 104
Checking the hardware and software requirements ......................................... 104
Installing the printer driver ............................................................................... 104
Windows 95/Windows NT 4.0 .......................................................................... 105
Windows 98 ...................................................................................................... 107
Windows 3.1 x .................................................................................................. 109
SHARP AL-F_FO printer driver group .............................................................. 110
11. PRINTING
Printing a page ................................................................................................. 111
Executing printing ............................................................................................ 111
Indicators on the operation panel ..................................................................... 112
Setting print conditions from printer driver ....................................................... 113
Windows 95/Windows 98/Windows NT 4.0 ...................................................... 113
Windows 3.1 x .................................................................................................. 114
Printing from an MS-DOS application .............................................................. 115
Print setting from the MS-DOS prompt ........................................................... 115
Settings on the front panel ............................................................................... 116
Windows 95/Windows 98/Windows NT 4.0 ...................................................... 116
Windows 3.1 x .................................................................................................. 116
Software printer setting .................................................................................... 116
HP Laser Jet Series II (PCL4) ......................................................................... 116
12. SCANNING
Scanning an image .......................................................................................... 117
Scanning from a TWAIN-compatible application .............................................. 118
Exiting from AL-F_FO TWAIN software ........................................................... 118
vi
SUK 00 TABLE LEO.p65
6
30/03/00, 17:49
Table of contents
13. TROUBLE ?
Troubleshooting ................................................................................................ 119
Using other installed drivers ............................................................................ 121
Windows 95/Windows 98/Windows NT 4.0 ...................................................... 121
Windows 3.1 x .................................................................................................. 122
Uninstalling drivers ........................................................................................... 122
14. SPECIFICATIONS
Fax specifications ............................................................................................ 123
Copier specifications ........................................................................................ 125
Paper ................................................................................................................ 126
Supply list ........................................................................................................ 126
Proper storage .................................................................................................. 126
Printer specifications ....................................................................................... 127
Scanner specifications .................................................................................... 127
Parallel interface .............................................................................................. 128
Print area .......................................................................................................... 129
Transport .......................................................................................................... 130
15. QUICK REFERENCE
Quick reference ................................................................................................ 131
16. GLOSSARY
Glossary ........................................................................................................... 133
17. INDEX
Index ................................................................................................................ 135
Material safety data sheet ............................................................................... 137
vii
SUK 00 TABLE LEO.p65
7
30/03/00, 17:49
Notes
viii
SUK 00 TABLE LEO.p65
8
30/03/00, 17:49
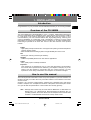
1. INSTALLATION
Introduction
Congratulations on your purchase of the FO-3800M, and thank you for choosing SHARP!
Overview of the FO-3800M
Your new multifunction peripheral (MFP) is a 4-in-1 compact, multifunctional device that
serves as a standalone fax, a standalone copier, a laser printer, and a scanner. In addition
to a full range of fax functions designed to increase the scope and power of your
communications, your new machine features fast, high-quality printing, scanning, and
copying capabilities. It is fitted with a full 2 megabytes of memory to boost overall
performance. Its dual access capability allows to functions to be used simultaneously,
maximizing its potential as an office tool. Some of the other features of this product
include :
Printer
• High-quality 600-dpi resolution and fast 8 ppm laser printing to handle simple and
complex printing needs
• Microsoft Windows® Printing System for high reliability and ease of use
Fax
• Fast 8-ppm scanning increase job efficiency
Scanner
• TWAIN compatibility allows work with various applications
Copier
• Fast, quality copies at 600-dpi resolution
Important :
This machine is not designed for use on a line with call waiting, call forwarding,
and certain other special services offered by your telephone company. If you attempt to use the machine in conjunction with one of these services, you may
experience errors during transmission and reception of facsimile messages.
How to use this manual
This manual provides information for the set up and operation of your new machine. It is
designed to help you master the many innovative features of the machine in the least
amount of time.
Chapters 1 to 5 cover the copier functions. Chapters 6 to 9 describe how to use the fax
functions. Chapter 10 to 13 explain the functions of the printer and scanner parts. At the
end, you will find the specifications of the machine and a handy glossary.
Note : Although this machine may be used with the Windows® 3.1 Windows® for
Workgroups 3.1x, Windows®95, Windows®98 and Windows NT 4.0
operating systems, the screen shots used as examples in this manual were
all taken in a Windows®95 environment, except where noted.
1
INSTALLATION
SUK 01 INSTALLATION LEO.p65
1
30/03/00, 17:45
1
1
Installation
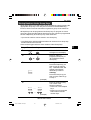
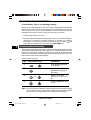
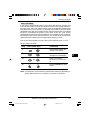
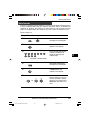
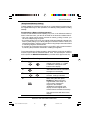
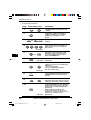
Conventions used in this manual
In this manual, the following icons are used to provide the user with information
pertinent to the use of the machine.
1
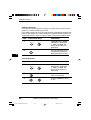
1Warning
Warns the user that injury to the user or damage to the copier may
result if the contents of the warning are not properly followed.
Cautions the user that damage to the copier or one of its components
may result if the contents of the caution are not properly followed.
Caution
Notes provide information relevant to the copier regarding specifications, functions, performance, operation and such, that may be useful
to the user.
Note
Indicates a letter displayed in the display.
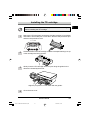
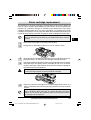
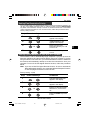
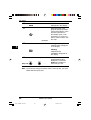
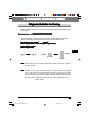
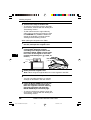
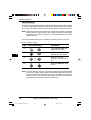
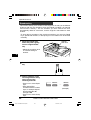
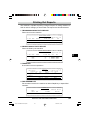
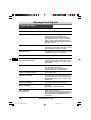
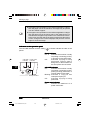
Checking packed components and accessories
Open the carton and check to ensure that the following components and accessories
are included.
Power cord
Interface cable
Telephone line cord
Adapter
Operation manual
(3 pieces)
01
02
03
04
05
06
07
08
09
10
11
12
13
14
15
16
17
18
19
20/POLL
(provided according to destinations)
Rapid key label
Paper tray
Software CD-ROM
TD cartridge
(in a silver bag)
Main unit
Drum cartridge
(installed in machine)
The life of the TD cartridge which has been included in the machine at the
factory is approximately 1500 sheets (A4 size paper at 5% toned area).
In some regions, the shape and type of the packing materials are different
from those shown above.
If anything is not included or is damaged, contact your Sharp dealer.
Save the carton and packing materials. These can be re-used for
transporting the machine, should it be necessary.
INSTALLATION
2
SUK 01 INSTALLATION LEO.p65
2
30/03/00, 17:45
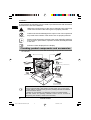
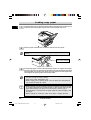
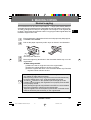
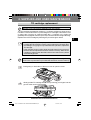
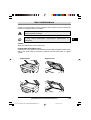
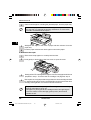
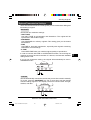
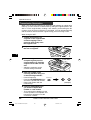
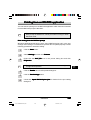
Set up
1
Remove the screw from the left side of the copier by rotating it in the
direction indicated by the arrow.
Save the screw because it will be used if the copier has to be moved
(p. 132). Store the screw inside the front cover.
Tape
Do not remove this part with the front cover closed
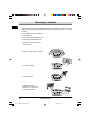
2
Remove the tpa and the protective paper on the original table.
3
Push gently on both sides of the front cover to open the cover.
4
Store the screw which has been removed in step 1 at the right side inside
the front cover.
5
After removing protecting material a, gently pull black protective paper b
and protective material c together to your side and remove them. Be
careful not to tear the protective paper during removal.
3
INSTALLATION
SUK 01 INSTALLATION LEO.p65
3
30/03/00, 17:45
1
1
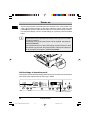
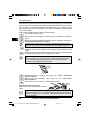
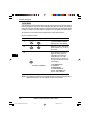
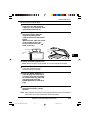
Choosing a location
1
1
All electrical equipment is potentially dangerous if not installed and operated correctly.
Make sure that you meet the following requirements when you set up or move the
machine.
• The machine must be installed on
a level surface.
• Use only the rated voltage from a
properly grounded wall socket.
• Keep the machine away from
areas that are:
• Dusty or smoky, damp or humid
• On direct sunlight
• Poorly ventiated
• Subject to extreme
temperature or humidity
changes, e.g., near an air
conditioneror heater
INSTALLATION
4
SUK 01 INSTALLATION LEO.p65
4
30/03/00, 17:45
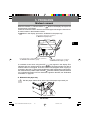
Choosing a location
1
1
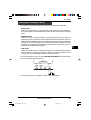
• Provide ample room for easy access
to the front, back, and sides of the
machine.
• Leave enough space around the
ventilation outlets for heat from the
fan to dissipate properly. Blocking
these outlets could cause the
machine to overheat, which can
cause serious damage to the
internal parts.
• Use of extension cords is not
recommended.
Fan
If the machine is moved from a cool place to a warm place,
condensation may form inside the machine. Operation in this
condition will cause poor copy quality and malfunctions. Leave the
machine at room temperature for at least 2 hours before use.
When moving the machine, hold iton both sides as shown below.
5
INSTALLATION
SUK 01 INSTALLATION LEO.p65
5
30/03/00, 17:45
Choosing a location
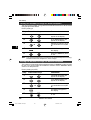
20cm
20cm
Be sure to allow the required space
aroundthe machine for servicing and
proper ventilation.
1
1
10cm
10cm
A small amount of ozone is produced within the machine during operation. The
emission level is insufficient to cause any health hazard.
NOTE :
The present recommended long term exposure limit for ozone is 0.2 mg/m3 calculated
as an 8 hr. time-weighted average concentration.
However, since the small amount that is emitted may have an objectionable odor,
it is advisable to place the machine in a ventilated area.
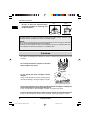
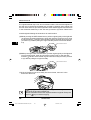
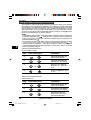
Cautions
Be careful on handling the machine as follow to maintain the performance of this
machine.
Do not drop the machine, subject it to shockor
strike it against any object.
Do not expose the drum cartridge to direct
sunlight.
Doing so will damage the surface (green portion)
of the drum cartridge, causing smudges on copies.
Store spare supplies such as drum cartridges and TD cartridges in a dark place
without removing from the package before use.
If they are exposed to direct sunlight, smudges on copies may result.
Do not touch directly the surface (green portion) of the drum catridge with a hand.
Doing so will damage the surface of the cartridge, causing smudges on copies.
INSTALLATION
6
SUK 01 INSTALLATION LEO.p65
6
30/03/00, 17:45
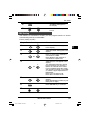
Cautions
• The fusing area is hot. Exercise care in this area when removing misfed
paper.
• Do not switch the machine rapidly on and off. After turning the machine
off, wait 10 to 15 second before turning it back on.
• Do not look directly at the light source. Doing so may damage your eyes.
1
1
• Place the machine on a firm, level surface.
• Do not install the machine in a humid or dusty location.
• When the machine is not used for a long time, for example for consecutive
holidays, turn the power switch off and remove the power cord from the
outlet.
• When moving the machine be sure to turn the power switch off and
remove the power cord from the outlet.
• Do not cover the machine with a dust cover, cloth or plastic film while the
power is on. Doing so may prevent heat radiation, damaging the machine.
Class 1 Laser product
Invisible laser radiation when open and interlocks defeated. Avoid exposure to
beam. At the production line, the output power of the scanner unit is adjusted to
0.6 MILLIWATT PLUS 13.4 PCTS and is maintained constant by the operation
of the Automatic Power Control (APC).
This product contains a low power laser device. To ensure continued safety do
not remove any cover or attempt to gain access to the inside of the product. Refer
all servicing to qualified personnel.
●CAUTION: HIGH TEMPERATURE
●ZUR BEACHTUNG: HOHE TEMPERATUR
●ATTENTION: TEMPERATURE ELEVEE ●CUIDADO: TEMPERATURA ELEVADA
Laserstrahl
LASER RADIATION WHEN OPEN AND INTERLOCKS DEFEATED.
AVOID EXPOSURE TO BEAM.
CAUTION INVISIBLE
UNSICHTBARE LASERSTRAHLUNG WENN ABDECKUNG GEÖFFNET UND
ÜBERERÜCKT. NICHT DEM STRAHL AUSSETZEN.
VORSICHT SICHERHEITSVERRIEGELUNG
USYNLIG LASERSTRÅLING VED ÅBNING, NÅR SIKKERHEDSAFBRYDERE ER
ADVARSEL UDE AF FUNKTION. UNDGA UDSAETTELSE FOR STRÅLING.
USYNLIG LASERSTRÅLING NÅR DEKSEL ÅPNES OG SIKKERHEDSLÅS BRYTES.
UNNGÅ EKSPONERING FOR STRÅLEN.
ADVERSELOSYNLIG
LASERSTRÅLNING NÄR DENNA DEL ÄR ÖPPNAD OCH SPÄRRAR ÄR
URKOPPLADE. STRÅLEN ÄR FARLIG. BETRAKTA EJ STRÅLEN.
VARNING
AVATTAESSA JA SUOJALUKITUS OHITETTAESSA OLET ALTTIINA NÄKYMÄTÖNTÄ
ÄLÄ KATSO SÄTEESEEN.
VARO! LASERSÄTEILYLLE.
VAROITUS! LAITTEEN KÄYTTÄMINEN MUULLA
KUIN TÄSSÄ KÄYTTÖOHJEESSA MAINITULLA
TAVALLA SAATTAA ALTISTAA KÄYTTÄJÄN
TURVALLISUUSLUOKAN 1 YLITTÄVÄLLE
NÄKYMÄTTÖMÄLLE LASERSÄTEILYLLE.
VARNING - OM APPARATEN ANVÄNDS PÅ ANNAT
SÄTT ÄN I DENNA BRUKSANVISNING
SPECIFICERATS, KAN ANVÄNDAREN UTSÄTTAS
FÖR OSYNLIG LASERSTRÅLNING, SOM
ÖVERSKRIDER GRÄNSEN FÖR LASERKLASS 1.
CLASS 1
LASER PRODUCT
LASER KLASSE 1
Caution
This product contains a low power laser
device. To ensure continued safety do not
remove any cover or attempt to gain access
to the inside of product. Refer all servicing
to qualified personnel.
Wave length
Pulse times
Output power
785 nm ± 15 nm
(13,98 ± 2 µs)/7 mm
0,40 mW ± 0,05 mW
Use of controls or adjustments or performance of procedures other
than those specified hereinmay result in hazardous radiation
exposure.
7
INSTALLATION
SUK 01 INSTALLATION LEO.p65
7
30/03/00, 17:45
Main features
1
1
1 High-speed laser copying
• Since warm-up time is zero, copying can be started immediately after the power
switch is turned on.
• First-copy time is only 11 seconds (normal mode).
• Copying speed is 8 copies/min., which improves working efficiency.
2 Digital high-quality image
• High-quality image copying with 600 dpi can be performed.
• In addition to the automatic exposure mode, the manual exposure can be adjusted
in five steps.
• The photo mode copying function which allows clear copying of delicate halftone
original images such as monochrome photos and color photos can be used.
3 Substantial copying functions
• Zoom copying from 50% to 200% in 1% increments can be performed.
• Continuous copying of maximum 50 sheets can also be performed.
• Automatic document feeding through the single pass feeder (SPF) can be performed.
• Toner save mode for reducing toner consumption by approximately 10% can be set.
• User programs which allow setting/modification of functions for customer’s needs are
provided.
4 Scan once/Print many
• The copier is equipped with a 1-page memory buffer. This memory allows the copier
to scan an original 1 time only and make up to 50 copies. This feature allows for
improved workflow, reduced operating noise from the copier and reduced wear and
tear on the scanning mechanism. This feature provides for a higher reliability.
5 Printer/Scanner/Facsimile features
• This machine also has laser printer, scanner and facsimile functions.
6 250-sheet paper tray
•The paper tray holds up to 250 sheets of copy paper (56 to 80g/m2).The capacity adapts
to office use allowing high-volume printing and saving labor for loading paper.
7 Environmentally friendly design
• Paper output tray can be pushed into the copier for space saving when copying is
not performed.
• Preheat mode and auto power shut-off mode are procided to reduce power
consumption when the machine is not in use.
As an ENERGY STAR® Partner, SHARP has determined
that this product meets the ENERGY STAR® guidelines
for energy efficiency.
INSTALLATION
8
SUK 01 INSTALLATION LEO.p65
8
30/03/00, 17:45
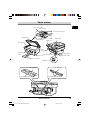
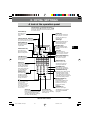
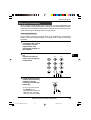
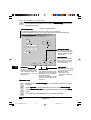
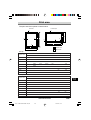
Parts names
1
1
Fax control panel
SPF exit tray
Document feeder tray
Original cover
Original guide
Paper guide
Paper tray
Original table
Paper
release lever
Operation
panel
Power switch
Power cord socket
Interface connector
Front cover
Paper output tray
TEL/LINE jack
TD cartridge
LINE T
EL
Drum cartridge
Drum cartridge handles
TD cartridge handle
9
INSTALLATION
SUK 01 INSTALLATION LEO.p65
9
30/03/00, 17:45
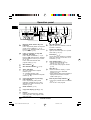
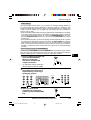
Operation panel
1
1
B
Exposure mode selector key and
indicators
Use to sequentially select the exposure
modes: AUTO, MANUAL (=) or
PHOTO ( ). Selected mode is shown
by a lit indicator. (p.20)
Light ({) and dark (}) keys and
exposure indicators
Use to adjust the MANUAL (=) or
PHOTO ( ) exposure level. Selected
exposure level is shown by a lit indicator. (p. 20)
Use to start and terminate user
program setting. (p. 27)
SPF indicator (
)
SPF misfeed indicator ( ) (p. 42)
Alarm indicators
w: Drum replacement required
indicator (p.31)
t : Misfeed indicator (p.35)
s : TD cartridge replacement required
indicator (p. 29)
Copy ratio selector key and copy
ratio indicators
Use to sequentially select preset
reduction/ enlargement copy ratios.
Selected copy ratio is shown by a lit
indicator. (p. 22)
ON LINE indicator
Lights up when the machine is used as
a printer or scanner.
Power save indicator
Lights up when the copier is in a power
save mode. (p. 25, 27)
Zoom keys (N, L)
Use to select any reduction or enlargement copy ratio from 50 to 200% in 1%
increments. (p. 22)
Copy quantity keys (<, <)
• Use to select the desired copy
quantity (1 to 50). (p. 19)
• Use to make user program entries.
(p. 27)
Clear key (>)
• Press to clear the display, or press
during a copy run to terminate
copying. (p. 19)
• Press and hold down during standby to
display the total number of copies
made to date. (p.41)
Print key and ready indicator ( )
• Copying is possible when the indicator
is on.
• Use to set a user program.
Zoom indicator (p. 22)
Copy ratio display (%) key (p. 22)
Display
Displays the specified copy quantity,
zoom copy ratio, user program code,
and error code.
INSTALLATION
10
SUK 01 INSTALLATION LEO.p65
10
30/03/00, 17:45
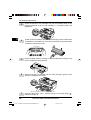
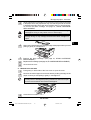
Installing the TD cartridge
1
1
Be sure to remove the protective paper from the drum cartridge
before installing the TD cartridge.
1
Remove the TD cartridge from the bag. Hold the cartridge on both sides
and shake it horizontally four or five times. Remove the protective tape
and then the protective cover.
4 or 5 times
2
Hold the handle of the TD cartridge so that the stamped markings on top
of the cartridge are facing upward.
3
Gently insert the TD cartridge into the copier along the guides in the
direction indicated by the arrow.
Align the projections on both sides with the guides.
4
Close the front cover.
11
INSTALLATION
SUK 01 INSTALLATION LEO.p65
11
30/03/00, 17:45
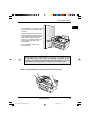
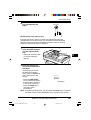
Loading copy paper
1
1
1
Hold the paper tray so that the paper guide of the paper tray is facing front
and then insert the paper tray into the copier’s paper tray slots.
2
Pull the paper release lever located at the back of the copier.
If the paper is inserted without doing this, paper misfeeds will
occur.
Paper tray
View from the
back of the machine
Paper release lever
3
If extra long paper is used, raise the paper support to support the paper.
Fan the copy paper and place it into the paper tray with the side to be printed
facing toward you. Position the paper along the right end of the paper tray.
Then adjust the paper guide to the paper width.
• The paper tray holds up to 250 sheets of standard paper (56 to 80 g/
m²). Do not set too many sheets.
• Feed copy paper lengthwise only.
• When copying onto special paper such as labels and transparency
film, feed one sheet at a time.
• When copying onto an envelope, insert it so that the side to be printed
on is facing upwards and so that the flap on the reverse side is at the
right when looking from the front of the copier. Leave a gap of
approximately 1 mm between the paper guide and the left edge of the
envelope.
• When loading an envelope, make surre that it i straight and flat.
INSTALLATION
12
SUK 01 INSTALLATION LEO.p65
12
30/03/00, 17:45
Loading copy paper
Paper support
Side to be printed
1
1
Paper guide
4
Make sure the paper release lever is pushed back. The paper will be
clamped by the paper feed roller inside the copier.
When placing special paper or several sheets of paper or when
making two-sided copies, the paper may not be clamped inside
the machine even if the paper release lever is pushed back. In
this case, repeat the paper release lever operation several times
to make sure that the paper is clamped.
Power to machine
1
Ensure that the power switch of the machine is in the OFF position. Insert
the attached power cord into the power cord socket at the rear of the
machine.
If you use the machine in a country other than the country where the
copier was purchased, you will need to make sure that your local power
supply is compatible with your model. If you plug the machine into an
incompatible power supply, irreparable damage to the machine will
result.
2
Plug the other end of the power cord into the nearest outlet.
Only insert the power cord into a properly grounded wall socket.
Do not use extension cord or multi-way power distribution boards.
13
INSTALLATION
SUK 01 INSTALLATION LEO.p65
13
30/03/00, 17:45
Power on
1
1
Turn the power switch on the left side of the machine to the "ON" position. The
ready ( ) indicator will light up and other indicators which show the initial
settings of the operation panel will also light up to indicate the ready condition.
For the initial settings, see the "Initial settings of operation panel" described
below.
The machine will enter a power save mode once the set time has
elapsed without any copier operation after the last copy of a run is made
or power is turned on.
The settings of the power save modes can be modified. See page 27,
USER PROGRAMS.
The machine will return to the initial settings a preset amount of time
after the last copy is made. The preset amount of time (auto clear time)
can be changed. See page 27, USER PROGRAMS.
Initial settings of operation panel
The copier assumes the initial settings when the copier is turned on or a preset time
(auto clear time) elapses after the last copy is made.
“0” is displayed in the display.
INSTALLATION
14
SUK 01 INSTALLATION LEO.p65
14
30/03/00, 17:45
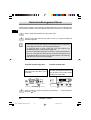
Connections
1
1
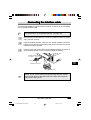
Connecting the Telephone Line Cord
Plug one end of the telephone line cord into the jack on the machine marked
“LINE.” Plug the other side into the walljack (using the provided adaptator, if
necessary).
For Germany, please connect the cable from the fax machine with the wired
plug connector code (F) with the wire down into the wall socket (TAE 6) code
(F).
The fax can be used as single device and in combination (in serial connection)
with approved terminal equipment (s).
To connect an extension telephone or an answering machine, plug the extension
line cordin the provided wall jack adaptator. (See“Connecting Other Devices” in
this chapter for details.)
Note: If your area experiences a high incidence of lightning or power surges,
we recommend that you install surge protectors for the power and
telephone lines. Surge protectors can be purchased from your dealer or
at most telephone specialty stores.
LIN
E
TE
L
15
INSTALLATION
SUK 01 INSTALLATION LEO.p65
15
30/03/00, 17:45
Final Preparations
1 Connecting Other Devices
1
If desired, an answering machine or external telephone can be connected to
the machine by plugging the external line cord in the external jack of the wall
jack (wall socket code “N” for Germany) or in the provided adaptator.
• Connecting an answering machine to the machine allows you to receive both
voice and fax messages when you are out. To use this feature, first change
the outgoing message of your answering machine, and then set the reception
mode of the machine to “A.M.” (Answering Machine mode) when you go out.
The outgoing message of your answering machine should be changed to inform
callers who want to send a fax to press their FAX START key.
Comments:
1. It is advisable to keep the length of the message under 10 seconds. If it is
too long, you may have difficulty receiving faxes sent by automatic dialing.
2. Your callers can even leave a voice message and send a fax message on
the same call. Modify your outgoing message to explain that this can be
done by pressing their FAX START key after leaving their voice message.
• You can connect an extension phone to the machine to make and receive
calls like any other extension phone on your line. Even if you pick up the
extension phone and hear a fax tone, the machine will automatically cut in
and take over the line.
Note: The Remote Reception function is initially set to “ON”.
INSTALLATION
16
SUK 01 INSTALLATION LEO.p65
16
30/03/00, 17:45
2. MAKING COPIES
Normal copying
This machine has two document input stations - a single pass feeder (SPF) for
automatic document feeding and an original table for manual handling of documents.
The SPF is designed to hold up to 30 originals of 52 to 80g/m2 or 25 originals (80
to 90g/m2 paper measuring from A5 to A4. For copying from the original table, the
maximum original size is A4.
1
Ensure that paper of the desired size is set in the paper tray. See page 12,
LOADING COPY PAPER.
2
Pull out the paper output tray until it stops as shown in the illustration.
3
Turn the power switch on.
4
Place the original (s) face down in the document feeder tray or on the
original table.
A. When using the SPF
(1) Make sure that no original is left on the original table.
(2) Adjust the original guides to the size of original.
(3) Set the originals fae down in the document feeder tray. Feed the
originals narrow side into the slot.
• Before feeding originals in the document feeder tray, be sure to remove
any staples or paper clips from them.
• Before placing curled or wavy originals into the document feeder tray,
be sure to flatten them. If not, original misfeeds may result.
• The SPF ( ) indicator on the operation panel will light up. If this
indicator does not light up, the originals are not properly set or the SPF
is not properly closed.
• Badly damaged originals may misfeed in the SPF. It is recommended
that such originals be copied from the original table.
• Special originals such as transparency film should not be fed via the
SPF, but should be placed directly on the original table.
MAKING COPIES
SUK 02 MAKING COPIES LEO.p65
17
17
30/03/00, 16:37
2
Normal copying
Original face down
2
When the original is long, extend the tray of the exit area.
B. When using the original table
(1) Open the original cover.
(2) Place an original face down on the original table and align it with the
original scale. (Make sure the upper left corner of the original is set
the position indicated by the “ ” ). Close the original cover.
Original scale
mark
Print face
When copying a book or an original which has been folded or a
crumpled original, press down the original cover lightly. If the original
cover is not s ecurely closed, the copies may be striped or blurred.
MAKING COPIES
18
SUK 02 MAKING COPIES LEO.p65
18
30/03/00, 16:37
Normal copying
5
Set the number of copies using the two copy quantity (<,<) keys.
• Press the clear (>) key to clear an entry if a mistake is made.
• A single copy can be made with the initial setting, i.e., when “0” is
displayed.
• If copying onto special papers, feed one sheet at a time and leave
the copy quantity at 0.
Tens digit
6
2
• Press the right copy quantity key to set the
unit digit from 0 to 9. This key will not change
the tens digit.
• Press the left copy quantity key to set the
tens digit from 1 to 5. Up to 50 copies can be
set.
Unit digit
Press the print ( ) key.
• To display the number of copies made in a continuous run, press the
left copy quantity key.
• To stop copying in the middle of a run, press the clear (>) key.
Copying will stop and the number in the display will be reset to “0”.
• When the print ( ) key is pressed while printing is being performed,
printing will be interrupted and copying will start. Printing will be
resumed after copying is finished.
Do not perform copying with the original cover open.
MAKING COPIES
SUK 02 MAKING COPIES LEO.p65
19
19
30/03/00, 16:37
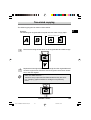
Exposure adjustment/photo copying
2
Copy density adjustment is not required for most originals in the automatic
exposure mode.
To adjust the copy density manually or to copy photographs, the exposure level
can be adjusted in five steps manually.
1
Set the original and check the copy paper size.
2
Press the exposure mode selector key to select the manual (=) or
photo ( ) mode.
3
Use the light ({) and dark (}) keys to adjust the exposure level.
If exposure level 2 is selected, the two left-handmost indicators for that
level will light up simultaneously. Also, if level 4 is selected, the two righthandmost indicators for that level will light up simultaneously.
4
Set the number of copies using the copy quantity (<,<) keys and press
the print ( ) key.
MAKING COPIES
20
SUK 02 MAKING COPIES LEO.p65
20
30/03/00, 16:37
Automatic exposure adjustment
The automatic exposure level can be adjusted to suit your copying needs.This
level is set for copying from the original table and copying from the SPF
respectively.
adjusting the automatic exposure level for copying from the SPF,
1 When
place an oriignal in thedocument feeder tray and make sure that the
SPF( ) indicator lights up.
When adjusting the level for copying from the original table, make sure that
no original is left in the document feeder tray.
2
3
Press the exposure mode selector key to select the photo (
) mode.
Press and hold down the exposure mode selector key for approximately
5 seconds.
The photo ( ) indicator will go out and the AUTO indicator will begin to
blink. One or two exposure indicators corresponding to the automatic
exposure level which has been selected will light up.
4
Press the light ({) or dark (}) key to lighten or darken the automatic
exposure level as desired.
If exposure level 2 is selected, the two left-handmost indicators for that
level will light up simultaneously. Also, if level 4 is selected, the two righthandmost indicators for that level will light up simultaneously.
5
Press the exposure selector key. The AUTO indicator will stop blinking
and light up steadily.
This automatic exposure level will remain in effect until you change it
again by this procedure.
MAKING COPIES
SUK 02 MAKING COPIES LEO.p65
21
21
30/03/00, 16:37
2
Reduction/Enlargement/Zoom
2
Three preset reduction ratios and two enlargement ratios can be selected. The
zoom function enables copy ratio selection from 50% to 200% in 1% increments.
1
Set the original and check the copy paper size.
2
Use the copy ratio selector key and/or zoom (N,L) keys to select the
desired copy ratio.
• To verify a zoom setting without changing the zoom ratio, press and
hold down the copy ratio display (%) key. When the key is released,
the display will return to the copy quantity display.
• To reset the ratio to 100%, press the copy ratio selector key
repeatedly until the 100% indicator lights up.
• In order to decrease rapidly the zoom ration, press and hold down
the (N or L) key. But, the value will stop on the preset reduction and
enlargement ratios. In order to go up to these values, loose the key
and then press and hold it down again.
To select a preset copy ratio:
To select a zoom ratio:
Preset reduction and enlargement
ratios are: 50%, 70%, 86%, 141%,
and 200%.
When a zoom (N or L) key is
pressed, the ZOOM indicator will
light up and the zoom ratio will be
displayed in the display.
B
3
B
Set the number of copies using the copy quantity (<,<) keys and press
the print ( ) key.
MAKING COPIES
22
SUK 02 MAKING COPIES LEO.p65
22
30/03/00, 16:37
Two-sided copying
Two-sided copying can be made on this machine.
2
Example:
The following two originals will be copied onto two sides of copy paper.
Face up or face down
Face up
1st original
Face down
2nd original
1
Place the first oriignal face down on the original table and make a copy.
2
Replace the first original with the second original on the original table and
close the original cover. Place the second original in the reverse orientation to the first original.
• When feeding copies to copy onto the back side, be sure to feed
them one sheet at a time.
• Curled or wavy copies must be flattened before they are fed. If
not, crumpling, paper misfeeds or smudges on copies may
result.
MAKING COPIES
SUK 02 MAKING COPIES LEO.p65
23
23
30/03/00, 16:37
Two-sided copying
2
3
Turn the first copy over top to bottom as shown. Feed the first copy into the
paper tray.
Both the first and second originals ca be set in the SPF but they must
be set separately.
4
Press the print ( ) key.
MAKING COPIES
24
SUK 02 MAKING COPIES LEO.p65
24
30/03/00, 16:37
3. SPECIAL FUNCTIONS
Description of special functions
Toner save mode (page 26)
3
Reduces toner consumption by approximately 10%.
Power save modes (page 27)
The copier has two power save modes of operation: preheat mode and auto
power shut-off mode.
Preheat mode
When the copier enters the preheat mode, the power save ( ) indicator will light
up and other indicators will remain on or off as before. In this condition, the fuser
in the copier is maintained at a lower heat level, thereby saving power. To copy
from the preheat mode, make desired copier selections and press the print ( )
key using the normal copying procedure.
Auto power shut-off mode
When the copier enters the auto power shut-off mode, the power save ( )
indicator will light up and other indicators will go out. The auto power shut-off
mode saves more power than the preheat mode but requires a longer time before
starting copying. To copy from the
auto power shut-off mode, press the print ( ) key. Then make desired copier
selections and press the print ( ) key using the normal copying procedure.
Auto clear (page 27)
The copier returns to the initial settings a preset amount of time after the last
copy is made. This preset amount of time (auto clear time) can be changed.
SPECIAL FUNCTIONS
SUK 03 SPECIAL FUNCTIONS LEO.p65
25
25
27/03/00, 14:45
Toner save mode
When the machine is used as a laser printer, the toner save mode
which is set as described below does not function. Set the toner save
mode using the printer driver.
3
1
Press the exposure mode selector key to select the manual (=) mode.
2
Press and hold down the exposure mode selector key for approximately
5 seconds.
The manual (=) indicator will go out and the photo ( ) indicator will
begin to blink. The exposure indicator marked “5” will light up, indicating
the standard toner mode is active.
3
To enter the toner save mode, press the light ({) key.
The exposure indicator marked “1” will light up, indicating the toner save
mode is selected.
4
Press the exposure mode selector key twice. The photo ( ) indicator will
stop blinking and the AUTO indicator will light up steadily. The toner save
mode is now active.
To return to the standard mode, repeat the procedure but use the dark
(}) key to select exposure level “5” in step 3.
SPECIAL FUNCTIONS
26
SUK 03 SPECIAL FUNCTIONS LEO.p65
26
27/03/00, 14:45
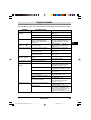
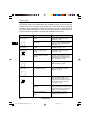
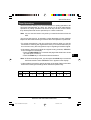
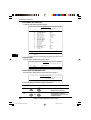
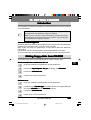
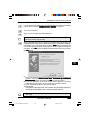
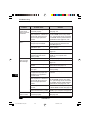
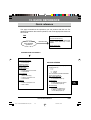
User programs
The user programs allow the parameters of certain functions to be set, changed,
or canceled as desired.
Paper must be present in the paper tray before user programs can be
accessed.
Setting the power save modes and auto clear time
1
Press and hold down the light ({) and dark (}) keys simultaneously for
more than 5 seconds until all the alarm indicators (w, t, s) blink and
“– –” appears in the display.
2
Use the left copy quantity (<) key to select a user program number. The
selected number will blink in the left side of the display.
3
Press the print ( ) key.The entered program number will be steadily lit and
the currently selected parameter number for the program will blink on the
right side of the display.
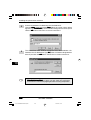
4
Select the desired parameter using the right copy quantity (<) key. The
entered parameter number will blink on the right of the display.
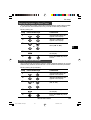
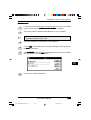
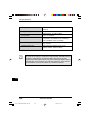
Programno./Mode
1
Auto clear time
Parameters
0➯OFF
* 2➯60 sec.
4➯120 sec.
0➯30 sec.
* 2➯90 sec.
0➯2 min.
2➯15 min.
4➯60 min.
0➯OFF
1➯30 sec.
3➯90 sec.
5➯10 sec.
1➯60 sec.
2
Preheat mode
3
* 1➯5 min.
Auto power
3➯30 min.
shut-off timer
5➯120 min.
5
* 1➯ON
Auto power shut-off mode
9
0➯OFF
* 1➯ON
Paper detection mode
Factory default settings are indicated with an asterisk (*)
Paper detection mode
If the width of the paper in the paper tray is less than 210 mm, the width of scanning
will be reduzed to 138 mm.
SPECIAL FUNCTIONS
SUK 03 SPECIAL FUNCTIONS LEO.p65
27
27
27/03/00, 14:46
3
User programs
5
Press the print ( ) key. The right-hand number in the display will be
steadily lit and the entered value will be stored.
To change the setting or to set another mode, press the clear (>) key.
The copier will return to step 2.
3
6
Press the light ({) or dark (}) key to return to the normal copy mode.
SPECIAL FUNCTIONS
28
SUK 03 SPECIAL FUNCTIONS LEO.p65
28
27/03/00, 14:46
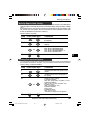
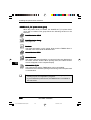
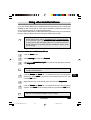
4. SUPPLIES AND USER MAINTENANCE
TD cartridge replacement
Be sure to use only genuine SHARP parts and supplies.
The TD cartridge replacement required (s) indicator will light up when toner is
needed. For more information on purchasing the TD cartridge, see SUPPLY LIST
on page 128. If copying is continued while the (s) indicator is lit, copies will
gradually become lighter until the copier stops and the indicator begins blinking.
Replace the old TD cartridge by following the procedure given below.
• After the copier stops, it may be possible to make a few more copies
by taking the TD cartridge out of the copier, shaking it horizontally, then
reinstalling it. If copying is not possible after this operation, replace the
TD cartridge.
• If the indicator begins to blikn while facsimile data is being received,
the data will not beprinted and will be stored in memory. After the TD
cartridge is replaced,the data that has been storedin memory will be
automatically printed.
Do not turn off the machinepower when replacing the TD cartridge. Doing
so will clear any facsimile or print data that has been stored in memory.
1
Push gently on both sides of the front cover to open the cover.
2
Gently pull the TD cartridge handle out by inserting your fingers into the
groove at the center of the handle.
SUPPLIES AND USER MAINTENANCE
SUK 04 SUPPLIES AND USER MAINTENANCE
29LEO.p65
27/03/00, 15:25
29
4
TD cartridge replacement
4
3
Grasp the handle of the cartridge and pull the cartridge clear of the
machine. Dispose of the old TD cartridge in accordance with local
regulations.
4
Install a new TD cartridge. Remove it from the bag. Hold it on both sides
and shake it horizontally four or five times. Remove the protective tape
and then the protective cover.
4 or 5 times
5
Hold the handle of the TD cartridge so that the stamped markings on top
of the cartridge are facing upward.
6
Gently insert the TD cartridge into the copier along the guides in the
direction indicated by the arrow.
7
Close the front cover. The s indicator will go out and the ready ( )
indicator will light up.
Align the projections on both sides with the guides.
30
SUPPLIES AND USER MAINTENANCE
SUK 04 SUPPLIES AND USER MAINTENANCE
30LEO.p65
27/03/00, 15:25
Drum cartridge replacement
The useful life of the drum cartridge is approximately 20,000 copies. When the
internal counter reaches approximately 19,000 copies, the drum replacement
required (w) indicator will light up indicating that replacement of the drum
cartridge will be needed soon. For more information on purchasing the drum
cartridge, see SUPPLY LIST on page 128. When the indicator begins to blink, the
copier will stop operating until the cartridge is replaced. Replace it at this time.
Do not turn off the machine power when replacing the TD cartridge.
Doing so will clear any facsimile or print data that has been stored in
memory.
1
Place some scrap paper on a nearby level surface.
2
Push gently on both sides of the front cover to open the cover.
3
Gently pull the TD cartridge out and place it on the scrap paper which was
prepared in step 1. To remove the TD cartridge, see page 30, step 3.
4
Using both hands hold the tabs on the drum cartridge between your thumb
and index finger and gently pull the cartridge up and out in a circular
motion to lift it clear of the machine. Dispose of the old drum cartridge in
accordance with local regulations.
The fusing unit beneath the drum cartridge is hot. Be careful not to
touch the fusing unit when removing the drum cartridge.
5
Remove a new drum cartridge from its plastic bag and set it down on a
clean, uncluttered and level surface being careful not touch the drum
surface.
The new drum cartridge is sealed with a sheet of black protective
paper to shield the drum from light. To prevent damage to the drum
surface, do not remove the protective paper until you have inserted
the cartridge into the machine.
SUPPLIES AND USER MAINTENANCE
SUK 04 SUPPLIES AND USER MAINTENANCE
31LEO.p65
27/03/00, 15:25
31
4
Drum cartridge replacement
4
6
Using both hands hold the tabs on the new drum cartridge between your
thumb and index finger, place the two projections on both ends of the
cartridge along the guides, and gently insert the cartridge in the direction
indicated by the arrow.
7
Carefully remove the sheet of black protective paper from the drum
cartridge by pulling the partindicated by the arrow toward you, making sure
not to leave any torn pieces of paper in the machine.
Gently replace the TD cartridge. To install the TD cartridge, see page 29,
TD CARTRIDGE REPLACEMENT.
8
9
Pressing and holding down both the exposure mode selector key and clear
(>) key, close the front cover. Continue to hold down these keys for five
seconds (drum initialization processing). The drum replacement required
(w) indicator will go out.
Drum cartridge life
To find out how many more copies can be made before the 20,000 mark is reached,
follow the procedure described below.
1
Press and hold down the light ({) and dark ( }) keys simultaneously for
more than 5 seconds until all the alarm indicators (w, t, s) blink and
“– –” appears in the display.
2
Press and hold down the clear (>) key for more than 5 seconds to find out
how many more copies can be made.
Example: 500 copies can be made before the next drum cartridge
replacement.
3
Press the light ({) or dark (}) key. The ready ( ) indicator will light up.
32
SUPPLIES AND USER MAINTENANCE
SUK 04 SUPPLIES AND USER MAINTENANCE
32LEO.p65
27/03/00, 15:25
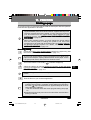
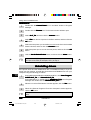
User maintenance
Proper care is essential in order to get clean, sharp copies. Be sure to take a few
minutes to regularly clean the machine.
Before cleaning, be sure to turn the power switch off and remove the
power cord from the outlet.
Do not use thinner, benzene or other volatile cleaning agents. Doing
so may cause deformation, discoloration, deterioration or
malfunction.
Cabinet
Wipe the cabinet with a soft, clean cloth.
Original table and original cover
Dirt or stains on the glass or cover will also be copied. Wipe the glass and the cover
with a soft, clean cloth. If necessary, dampen the cloth with water or a glass
cleaner.
Original cover
Original table
SUPPLIES AND USER MAINTENANCE
SUK 04 SUPPLIES AND USER MAINTENANCE
33LEO.p65
27/03/00, 15:25
33
4
User maintenance
Cleaning the drum cartridge
If some parts of the images are missing from the printed page, you may need to
clean the surface of the drum in the drum cartridge. Because the drum surface is
very sensitive, you must take extreme care when cleaning it, otherwise it may
become damaged, and any damage to this component will have a serious effect
on the print quality.
Follow the procedure below to clean the drum surface.
Turn off the machine power.
4
1
2
3
4
5
Remove the TD cartridge. To remove the TD cartridge, see page 29,
step 2.
Remove the drum cartridge. To remove the drum cartridge, see page 31,
DRUM CARTRIDGE REPLACEMENT.
Put the drum cartridge down on a clean, uncluttered and level surface.
The drum can easily become damaged if it is not handled with care.
Take a sheet of clean paper and roll it into a tube. Roll it tightly so that the
diameter of the hole at each end is less than the thickness of your little
finger.
Gently rub the surface of the drum (green portion) with the rolled-up paper
to remove any particles of toner caking on the drum.
• Do not touch the drum surface with the edges of rolled-up paper.
• Do not let the drum surface come into contact with anything other
than the rolled-up paper. Fingerprints, water, alcohol and other
solvents will damage the drum surface.
6
7
8
Replace the drum cartridge. (See page 31, DRUM CARTRIDGE
REPLACEMENT.)
Replace the TD cartridge. (See page 30, TD CARTRIDGE
REPLACEMENT.)
Close the front cover and turn on the machine power.
When the machine is not in use
Remove the power cord and the interface
cable.
If this machine is not in use for a long time, remove the copy paper from
the paper tray and store it in a location that is not humid. If the copy paper
is left in the paper tray for a long time, it will absorb moisture, resulting
in paper misfeeds.
34
SUPPLIES AND USER MAINTENANCE
SUK 04 SUPPLIES AND USER MAINTENANCE
34LEO.p65
27/03/00, 15:25
5. PROBLEMS
Misfeed removal
When the misfeed (t) indicator blinks or
blinks in the display, the copier will
stop because of a misfeed.
Check the misfeed location. Remove the misfed paper following the instructions
for each location in the illustration below.
If
blinks in the display, proceed to “A Misfeed in the paper tray”.
If the paper is misfed here, process to
”A. Misfeed in the paper tray”.
5
If the misfed paper is seen from this side, proceed to
”C. Misfeed in the exit area”. (p. 37).
If the paper is misfed here, proceed to
”B. Misfeed in the copier”. (p. 36).
If a misfeed occurs when using the SPF,
may appear in the display. This
indicates that one original must be returned to the document feeder tray after a
misfeed. Return one original. Then this number will disappear when copying is
resumed or the clear (>)key is pressed. When the SPF misfeeds an original shet,
the machine will stop and the SPF misfeed ( ) indicator will blink, while the misfeed
(t) indicator will remain off. For a misfeed of originals in the SPF, see ”D. Misfeed
in the SPF” on page 38.
A. Misfeed in the paper tray
1
Pull the paper release lever at the right of the paper tray toward you.
Paper release lever
PROBLEMS
SUK 05 MACHINE TROUBLE LEO.p65
35
35
30/03/00, 16:47
Misfeed removal
2
Remove all the paper, including the jammed paper, from the paper tray.
If the misfed paper will not come out easily, do not pull it hard, as
you may tear it or damage the printing mechanism. In such cases,
proceed to “B. Misfeed in the copier”.
5
3
Straighten the edges of the stack of paper and then reinsert it into the
paper tray.
4
Push the paper release lever back again to secure the paper.
B. Misfeed in the copier
1
Place some scrap paper on a nearby level surface.
2
Push gently on both sides of the front cover to open the cover.
3
Gently pull the TD cartridge out and place it on the scrap paper which was
prepared in step 1. To remove the TD cartridge, see page 29, step 2.
4
Take a piece of scrap paper that is larger than the drum cartridge and fold
it in half. Keep this paper ready to shield the light-sensitive part of the drum
cartridge from light after it is removed from the machine.
• The paper to be used for placing the TD cartridge and drum cartridge
may be soiled due to toner, etc.
• The paper for placing the drum cartridge must be enough large to
cover the surface of the cartridge (green portion) and must be
foldable in half.
PROBLEMS
36
SUK 05 MACHINE TROUBLE LEO.p65
36
30/03/00, 16:47
Blocage de papier - extraction
5
Gently pull the drum cartridge out and wrap the removed drum cartridge
in the paper which was prepared in step 4 so that the green drum section
is shielded from light. Place the drum cartridge down on a level surface.
To remove the drum cartridge, see page 31, DRUM CARTRIDGE
REPLACEMENT.
The fusing unit is hot. Do not touch the fusing unit when removing
misfed paper. Doing so may cause a burn or other injury.
Do not touch the surface of the drum (green portion) of the drum
cartridge. Doing so may damage the drum and cause smudges on
copies.
6
Remove the misfed paper by holding the edge of the paper nearest you and
pulling it gently in a straight line.
7
Replace the drum cartridge. (See page 31, DRUM CARTRIDGE
REPLACEMENT.)
8
Replace the TD cartridge. (See page 29, TD CARTRIDGE REPLACEMENT.)
9
Close the front cover.
C. Misfeed in the exit area
1
Push gently on both sides of the front cover to open the cover.
2
Remove the misfed paper from the exit area by holding the edge of the
paper nearest you and pulling it gently in a straight line.
Do not pull the misfed paper too hard with the front cover closed, as
you may tear it or damage the printing mechanism. Be sure to open
the front cover and then remove the misfed paper.
3
Close the front cover.
PROBLEMS
SUK 05 MACHINE TROUBLE LEO.p65
37
37
30/03/00, 16:47
5
Misfeed removal
D. Misfeed in the SPF
An original misfeed may occur at one of three locations. If the misfed original can
be seen only in the document feeder tray, proceed to (A) below. If the original can
be seen in the exit area, proceed to (B) below. If the misfed original cannot be seen
in the document feeder tray or the exit area, proceed to (C) below. Remove the
misfed original following the instructions for each location.
5
(A)While pressing the SPF release button, pull the original gently to the right and
out from the document feeder tray. Open and close the original cover to clear
the SPF misfeed ( ) indicator. If the misfed original cannot be easily removed,
proceed to (C) without pulling the original forcibly from the document feeder
tray.
SPF release button
(B)While pressing the SPF release button, pull the original gently to the right and
out from theexit area. Open and close the original cover to clear the SPF
misfeed ( )indicator. If the misfed original cannot be easily removed, proceed
to (C) without pulling the original forcibly.
SPF release button
(C)If the original does not move easily into the exit area, remove it in the
direction of the arrow.
may appear in the display, indicating that one original must be
returned to the document feeder tray.
Clear the misfeed and return the required number of originals.Then press
the print ( )key to resume copying.
PROBLEMS
38
SUK 05 MACHINE TROUBLE LEO.p65
38
30/03/00, 16:47
Copier trouble
If any problem occurs, check the list before contacting the Sharp Service Centre.
Problem
Machine does not
operate
Blank copies
Power save (
cator on
) indi-
Copies are too dark
or too light
Dust, dirt, smudges
apear on copies
Par of images missing
Paper misfeeds frequently
Possible cause
Copier plugged in?
Plug the copier into a grounded
outlet. p. 15
Power switch on?
Turn the power switch on. p. 16
Front cover closed?
Gently close the front cover.
Is the original placed face
down on the original table or in
the SPF?
Place the original face down on
the original table or in the SPF.
p. 17
Press the print ( ) key to
cancel the auto power shut-off
mode. p. 25
Adjust the exposure manually.
p. 20
Adjust the automatic exposure
level. p. 21
Cancel the photo exposure
mode. p. 20
Clean regularly. p. 33
Is the copier in the auto power
shut-off mode?
Is original image too dark or
too light?
Is the copier in the automatic
exposure mode?
Is the copier in the photo
exposure mode?
Original table or original cover
dirty?
Original smudged or blotchy?
Is drum cartridge clean?
Non-standard paper used?
Paper curled or damp?
Pieces of paper inside copier?
Paper guides in the paper tray
not set properly?
Too much paper in the paper
tray?
TD cartridge or drum cartridge
not installed properly.
Images rub off the
copy easily
Solution
Is the copy paper too heavy?
Paper damp?
Use a clean original.
Clean the drum cartridge. p. 34
Use standard paper. If using
special papers, feed the paper
one sheet at a time. p. 128
Store copy paper flat in the
wrapper in a dry location. p. 128
Remove all pieces of misfed
paper. p. 35
Set the guide properly depending
on the paper size. p. 12
Remove excessive paper from
the paper tray. p. 12
Ensure that the TD cartridge and
drum cartridge are installed
properly. p. 29, 31
Use copy paper within the
specified range. p. 128
Replace with dry copy paper. If
the copier is not used for long
time, remove the paper from the
paper tray and store it in its
wrapper in a dry location. p. 128
PROBLEMS
SUK 05 MACHINE TROUBLE LEO.p65
39
39
30/03/00, 16:47
5
Copier trouble
Copy and print quality problems
The causes listed in the table below are probable causes only, and may not
represent all of the possible cases which may occur under actual operating
conditions. If you experience a problem which does not seem to fall under any of
the cases listed in this table, or if you are concerned about any other aspect of
copying and printing operation, contact your SHARP service center.
Problem
Irregular faded patches or print
Thank you very much for buying a SHARP laser printer. This manual
tells you how to set up, operate and maintain your new printer,
and contains advice on how to get the best performance from the printer.
The descriptions contained in this manual assume that you are familiar
with the operation of your computer and with how to send files to be printed.
Please use this manual along with the documentation for your computer
hardware and software.
Your new printer has been specially designed to give you high-quality,
trouble-free printing performance. The printer driver software lets the printer
communicate with your computer via an IEEE P1284 bidirectional parallel
interface, so you can control all aspects of printing from the Windows Printer
control panel on your computer screen. Printing speed is a maximum
4 pages per minute at resolutions of 300 x 300 dpi for
the JX-9200 and 600 x 600 dpi for the JX-9210.
Consideration has also been given to ecological and environmental factors.
Your printer features low power consumption, and after printing is
completed it switches to a standby mode which complies with
the US EPA Energy Star program. Moreover, no harmful ozone is
produced during printing, and the toner self-recycling technology
ensures that no toner is wasted. Printer operation is also very
quiet: the printer generates less than 45 dBA of acoustic noise
during printing, and during standby mode the noise level is no
higher than the background noise level.
Despite being packed with so many features, the printer is very compact.
Its footprint is no larger than a single A4 page, and the total weight is
approximately 5 kg, meaning that it is easy to transport and set up. The
100-sheet multipurpose tray is also located at the top of the printer to
save space and to make inserting the paper easy.
Most software applications will let you adjust the margins to have around
the edges of the paper that you will be printing on. The area inside the
margins then becomes the "printable area". The Windows Printer Driver
specifies the minimum values that you can set for these page margins.
These minimum margin settings vary depending on whether you are
printing from a Windows application or from a non-Windows application
in PCL emulation mode.
The following illustration and tables show the minimum settings that can
be made in your software applications in both Windows and PCL modes.
5
Possible cause
There is a paper quality
problem
Toner may be unevenly
distributed
Solution
Use only paper that meets the
pecifications required by the
machine. p. 128
Remove the TD cartridge and
shake it gentl to evenly distribute
the toner. Then replace the TD
cartridge. p. 30
Machines prints out
blank pages
The TD cartridge is not installed
properly
Check that the TD cartridge is
installed correctly. p. 30
Black staining
There is a paper quality
problem
Use only paper that meets the
pecifications required by the
machine. p. 128
A Td cartridge from another
SHARP machine has been
installed
Always use the same TD cartridge
with the same machine. Using a
cartridge that has already been
used in another machine may not
give satisfactory results.
Character voids
The paper may be too dry
Try copying or printing with a
different batch of paper.
Image voids along a
paper edge
TD cartridge or drum cartridge
not installed properly
Ensure that the TD cartridge and
drum cartridge are installed
properly. p. 29, 31
The paper may be to damp
Try copying or printing with a
different batchof paper. Do not
open packages of paper until
necessary so that the paper does
not absorb too much moisture
from the air. p.128
Thank you very much for buying a SHARP laser printer. This manual
tells you how to set up, operate and maintain your new printer,
and contains advice on how to get the best performance from the printer.
The descriptions contained in this manual assume that you are familiar
with the operation of your computer and with how to send files to be printed.
Please use this manual along with the documentation for your computer
hardware and software.
Your new printer has been specially designed to give you high-quality,
trouble-free printing performance. The printer driver software lets the printer
communicate with your computer via an IEEE P1284 bidirectional parallel
interface, so you can control all aspects of printing from the Windows Printer
control panel on your computer screen. Printing speed is a maximum
4 pages per minute at resolutions of 300 x 300 dpi for
the JX-9200 and 600 x 600 dpi for the JX-9210.
Consideration has also been given to ecological and environmental factors.
Your printer features low power consumption, and after printing is
completed it switches to a standby mode which complies with
the US EPA Energy Star program. Moreover, no harmful ozone is
produced during printing, and the toner self-recycling technology
ensures that no toner is wasted. Printer operation is also very
quiet: the printer generates less than 45 dBA of acoustic noise
during printing, and during standby mode the noise level is no
higher than the background noise level.
Despite being packed with so many features, the printer is very compact.
Its footprint is no larger than a single A4 page, and the total weight is
approximately 5 kg, meaning that it is easy to transport and set up. The
100-sheet multipurpose tray is also located at the top of the printer to
save space and to make inserting the paper easy.
Most software applications will let you adjust the margins to have around
the edges of the paper that you will be printing on. The area inside the
margins then becomes the "printable area". The Windows Printer Driver
specifies the minimum values that you can set for these page margins.
These minimum margin settings vary depending on whether you are
printing from a Windows application or from a non-Windows application
in PCL emulation mode.
The following illustration and tables show the minimum settings that can
be made in your software applications in both Windows and PCL modes.
Background scatter
Copying or printing over uneven If printing onto envelopes, change
surfaces
your printing layout to avoid priting
over areas that have overlapping
seams on the reverse side.
Operating environment
(temperature, humidity) is not
proper
PROBLEMS
40
SUK 05 MACHINE TROUBLE LEO.p65
Use the machine in proper
operating environment. p.4
40
30/03/00, 16:47
Copier trouble
Problem
Possible cause
Solution
Missing characters
The paper may be too damp
Try copying or printing with a
diferent batch of paper. Do not
open packages of paper until
necessary so that the paper
does not absorb too much
moisture from the air. p. 128
The drum may be dirty
Clean the drum. p.34
Thick paper is used
Feed thick paperone sheet at
a time. p.128
The paper may be to dry
Try copying or printing with a
different batch of paper.
Thank you very much for buying a SHARP laser printer. This manual
tells you how to set up, operate and maintain your new printer,
and contains advice on how to get the best performance from the printer.
The descriptions contained in this manual assume that you are familiar
with the operation of your computer and with how to send files to be printed.
Please use this manual along with the documentation for your computer
hardware and software.
Your new printer has been specially designed to give you high-quality,
trouble-free printing performance. The printer driver software lets the printer
communicate with your computer via an IEEE P1284 bidirectional parallel
interface, so you can control all aspects of printing from the Windows Printer
control panel on your computer screen. Printing speed is a maximum
4 pages per minute at resolutions of 300 x 300 dpi for
the JX-9200 and 600 x 600 dpi for the JX-9210.
Consideration has also been given to ecological and environmental factors.
Your printer features low power consumption, and after printing is
completed it switches to a standby mode which complies with
the US EPA Energy Star program. Moreover, no harmful ozone is
produced during printing, and the toner self-recycling technology
ensures that no toner is wasted. Printer operation is also very
quiet: the printer generates less than 45 dBA of acoustic noise
during printing, and during standby mode the noise level is no
higher than the background noise level.
Despite being packed with so many features, the printer is very compact.
Its footprint is no larger than a single A4 page, and the total weight is
approximately 5 kg, meaning that it is easy to transport and set up. The
100-sheet multipurpose tray is also located at the top of the printer to
save space and to make inserting the paper easy.
Most software applications will let you adjust the margins to have around
the edges of the paper that you will be printing on. The area inside the
margins then becomes the "printable area". The Windows Printer Driver
specifies the minimum values that you can set for these page margins.
These minimum margin settings vary depending on whether you are
printing from a Windows application or from a non-Windows application
in PCL emulation mode.
The following illustration and tables show the minimum settings that can
be made in your software applications in both Windows and PCL modes.
Double printing
(previous image
overlaps with current image)
Back of printout dir- The transfer roller may be
dirty
ty
Faded graphics
Copy or print a fewblank
pages to clean the transfer
roller.
Toner may be unevenly
distributed
Remove the TD cartridge and
gently shake it horizontally to
evenly distribute toner.p. 30
Toner is low
TD cartridge must be
replaced soon. Prepare a
new TD cartridge. p.29
Displaying total number of copies
Use the following procedure to display the total number of copies.
1
Press the clear (>) key to reset the display to zero.
2
Press and hold down the clear (>) key for approximately 5 seconds. The
total number of copies will appear in two steps, each with three digits.
Example:
Total number of copies is 1,234.
PROBLEMS
SUK 05 MACHINE TROUBLE LEO.p65
41
41
30/03/00, 16:47
5
Status indiators
When the following indicators light up or blink on the operation panel or the following
displays appear in the display, solve the problem immediately referring to both the
table below and the relevant page.
Cause and remedy
Indication
w Drum replacement Steadlily Replacement of drum cartridge will be needed soon.
required indicator
s TD cartridge
replacement
indicator
5
t
lit
Obtain a new cartridge.
Blinking
Drum cartridge must be replaced. Replace it with a new
one. p.31
Steadlily Replacement of TD cartridge will be needed soon. Obtain
a new cartridge.
lit
Blinking
TD cartridge must be replaced. Replace it with a new
one. p.29
Misfeed indicator
Blinking
A misfeed has occurred. Remove the misfed paper
referring to the description of “Misfeed removal.” p.35
SPF misfeed
indicator
Blinking
“CH” is blinking in the
display
An original misfeed has occured in the SPF. Remove the
misfed originals referring to the description of “Misfeed in
the SPF.” p.38
The TD cartridge is not installed. Check if the cartridge is
installed. p.30
“CH” is steadily lit in the
display
Front cover is open. Close the front cover securely.
“P” is blinking in the
display
Paper tray is empty. Load copy paper. p.12
A misfeed has occurred in the paper tray. Remove the
misfed paper. p. 35
A letter and a number
appear alternately
The copier will not function. Turn the power switch off
and then switch it on, and if there is again an error, remove the power cord from the outlet, and contact your
authorized Service representative.
“-1” appears in the
display
A misfeed has occured when using the SPF. Return one
original to the document feeder tray. p.38
A letter and a number
appear
Turn the power switch off. Wait 5 seconds approximately.
Turn the power switch on. If the problem still remains,
contact your authorized Service representative.
PROBLEMS
42
SUK 05 MACHINE TROUBLE LEO.p65
42
30/03/00, 16:47
6. INITIAL SETTINGS
A look at the operation panel
Left arrow key ( ) and right arrow key ( )
Press these keys to scroll through a menu. During
input mode, these keys are also sometimes used
to move the cursor.
FUNCTION key
Press this key to
enter function
mode.
ENTER key
LIQUID CRYSTAL DISPLAY
Press this key to decide an
item in a menu, or to enter
numbers and letters you
have typed in.
This display shows the various message
during fax operation and programming.
AUTO light
This light indicates that the
machine will answer the
machine automatically.
BOOK SEND key
Press this key to fax a
document from the
original table.
MANUAL light
RESOLUTION key
ENTER
Press this key to
adjust the resolution
before sending faxes.
BOOK SEND
A.M. light
AUTO
MANUAL
A.M.
FUNCTION
RESOLUTION CONTRAST BROADCAST RECEPTION MODE
This light indicates the
answering machine will answer
the line if properly connected.
RECEPTION MODE key
CONTRAST key
Press this key to adjust
the contrast before
sending faxes.
01
02
03
04
05
06
07
08
09
10
11
12
13
14
15
16
17
18
19
20/POLL
Rapid keys
Press one of these keys
to dial a fax or telephone
number automatically.
Press Rapid key 20 to
start polling. (Note that
you must attach the
Rapid key labels.)
BROADCAST key
Press this key to send
documents to a group of
receiving fax machines.
DEF
DOCUMENT
GHI
JKL
MNO
SPEED/SEARCH
Press this key to perform a
direct send fax transmission.
PQRS
TUV
WXYZ
REDIAL/PAUSE
SPEED/SEARCH key
SPEAKER
Press these keys to dial
numbers, and enter
numbers and letters
during number/name
storing procedures.
Press this key to select
the mode of reception.
ABC
Number keys
STOP
FAX START
DOCUMENT key
Press this key to dial a two digit
Speed Dial number. During
character inputting, use this
key to delete an incorrect entry.
Press this key twice to search for
an automatic dialing number.
REDIAL/PAUSE key
/
Press this key to
automatically redial the last
number you dialed. Also,
press this key to insert a
pause when entering
numbers.
Press these keys to enter
symbols during the name
storing procedure.
Pres these keys to scroll
thoruh a menu. During
input mode, these keys are
also sometimes used to
move the cursor
SPEAKER key
STOP key
FAX START key
Press this key to stop an operation
before it is completed, or to delete
the number that was last input.
This key is also used to close the
line when manually dialing.
Press this key to begin
sending a fax or manually
receiving a fax.
Press this key to begin
manual dialing. (To close the
line, press the SPEAKER
key again.)
43
INITIAL SETTINGS
SUK 06 INITIAL LEO.p65
6
This light indicates that the
machine must be answered
manually.
43
30/03/00, 17:00
About the Liquid Crystal Display
The machine is equipped with a two-line liquid crystal display (LCD) on the
operation panel for displaying various messages and settings during operation.
This LCD can display up to 20 characters on each line. When the machine is
idle, the LCD shows the date, time, and the stand-by memory available.
Example:
Note:
means this machine is in the Reverse Sending mode. It appears
when LCD shows “STAND-BY” or “SEND READY”.
Using the Arrow Keys
6
The left and right arrow (
) keys on the operation panel of the machine
are very useful for scrolling through the various function lists and settings.
Once you have pressed the FUNCTION key, you can scroll through the ten
functions as desired. (See the Function mode at the top of the Quick Reference
Guide for the settings.) Pressing the ENTER key chooses the displayed
function. For many of the function lists, you can then use the arrow keys again
to scroll through the settings.
Adjusting the Beep Volume
Adjust the volume of both key beeps and alarm beeps (emitted at the end of
transmission and reception) using the procedure below.
Factory setting: 3 (MEDIUM)
Step
1
Press these keys
GHI
FUNCTION
JKL
2
3
5
“BEEP VOLUME” will
appear in the display.
“STORED” will appear in
the display.
ENTER
STOP
STOP
Press the STOP key twice
to exit.
INITIAL SETTINGS
44
SUK 06 INITIAL LEO.p65
“OPTION SETTING” will
appear in the display.
Press the or key to
lower or raise the volume
to the desired level.
or
4
Comments
44
30/03/00, 17:00
Adjusting the Ringing Volume
Adjust the ringing volume of the machine using the procedure below.
Factory setting: 3 (MEDIUM)
Step
1
Press these keys
GHI
FUNCTION
PQRS
2
3
4
5
Comments
“OPTION SETTING” will
appear in the display.
“RINGING VOLUME” will
appear in the display.
Press the or key to
lower or raise the volume
to the desired level.
or
6
“STORED” will appear in
the display.
ENTER
STOP
STOP
Press the STOP key twice
to exit.
Setting the Length of Alarm Beeps
You can select the length in seconds of the alarm beeps following the procedure
below.
Factory setting: 1 (3SEC)
Step
1
Press these keys
FUNCTION
2
GHI
“OPTION SETTING” will
appear in the display.
GHI
“BEEP LENGTH” will
appear in the display.
3
Press the or key to
set the alarm beeps to the
desired length or to turn
them off.
or
4
5
Comments
“STORED” will appear in
the display.
ENTER
STOP
STOP
Press the STOP key twice
to exit.
45
INITIAL SETTINGS
SUK 06 INITIAL LEO.p65
45
30/03/00, 17:00
Turning Key Beeps Off
If you prefer, you can choose to turn the key beeps off. To do this, follow the
procedure below:
Factory setting: 1 (ON)
Step
1
Press these keys
GHI
FUNCTION
2
PQRS
3
ABC
or
6
4
STOP
STOP
Comments
“OPTION SETTING” will
appear in the display.
“KEY BEEPS” will appear
in the display.
Press 1 to turn the key
beeps on, or 2 to turn
them off.
Press the STOP key twice
to exit.
Setting the Language
You can select language of display and reports. To do this, follow the procedure
below :
Step
Press these keys
1
FUNCTION
2
ABC
3
“OPTION SETTING” will
appear in the display.
“LANGUAGE” will appear in
the display.
Press the or key to
scroll the languages.
or
4
ENTER
5
STOP
Comments
GHI
Press the ENTER key twice
to exit.
STOP
Press the STOP key rwice
to exit.
Note:
After changing the language settings, it may take a few moments for the
display to actually change.
INITIAL SETTINGS
46
SUK 06 INITIAL LEO.p65
46
30/03/00, 17:00
Fax Setup
How to Enter Characters
You can enter letters with the number keys. Letters are marked above each of
the number keys “2” through “9”. To enter a letter, press the appropriate key
repeatedly until the desired letter appears (the number of the key appears first,
followed by letters in the order marked above the key). The keys used for
entering characters are shown below.
ABC
DEF
GHI
JKL
MNO
PQRS
TUV
WXYZ
6
• To enter two characters in succession which require using the same key,
press the right arrow ( ) key once after entering the first character, and
then enter the second character.
• To change one individual character to another, move the cursor to the character
you want to change and enter the new one. The new character will replace the
old one.
• Symbols can also be entered by pressing the “#” and “ ” keys:
Å Ä ÆØ ÖÜÑßÒÙ
• Pressing the “1” key on the number keypad enters a space.
47
INITIAL SETTINGS
SUK 06 INITIAL LEO.p65
47
30/03/00, 17:00
Fax Setup
Entering Your Name and Fax Number
Note: You can view all of the items in the menu display by pressing the
FUNCTION key, then using the left and right arrow (
) keys to
scroll through the function list. Pressing the ENTER key chooses the
displayed function. Procedures for inputting various items (name,
telephone number, date, etc.) are given as follows.
To have your name and fax number printed at the top of every page you
transmit, program them by pressing the operation panel keys as shown below.
• If you enter an incorrect character, press the left arrow ( ) key to move the
cursor back to the mistake, then enter the correct character. (To move the
cursor forward, press the right arrow ( ) key.)
Use the following procedure to enter your name and fax number:
Step
6
Press these keys
1
FUNCTION
2
DEF
3
DEF
“ENTRY MODE” will
appear in the display.
“ENTER YOUR FAX #” will
appear in the display.
ABC
TUV
GHI
Comments
ABC
PQRS
DEF
PQRS
PQRS
(example: 18002374277)
4
5
“ENTER YOUR NAME” will
appear in the display.
ENTER
PQRS
PQRS
PQRS
GHI
GHI
GHI
ABC
ABC
PQRS
PQRS
PQRS
PQRS
PQRS
PQRS
PQRS
PQRS
(example: SHARP)
6
7
Enter your name by
pressing the appropriate
number keys as shown on
the left. Press each key
repeatedly until the
desired letter appears in
the display (maximum of
24 characters). To enter a
space, press the 1 key
twice. To switch between
lower case and capital
letters, press the REDIAL
PAUSE key once.
“STORED” will appear in
the display.
ENTER
STOP
STOP
Press the STOP key twice
to exit.
INITIAL SETTINGS
48
SUK 06 INITIAL LEO.p65
Enter your own fax number
(maximum 20 digits) by
pressing the number keys.
To insert a space between
digits, press the “ ” key. To
insert a “+”, press the “#”
key.
48
30/03/00, 17:00
Fax Setup
Setting the Date and Time
The date and time that appear in the display are printed at the top of each page
you transmit. Set the date and time by pressing the keys on the operation
panel as shown below. To correct a mistake, press the STOP key to move the
cursor back to the mistake, and then enter the correct number.
Note: The machine supports the year 2000. To program such a date, enter the
last two digits; for example, the year 2000 is programmed by entering
“00”.
Use the following procedure to set the date and time:
Step
Press these keys
1
FUNCTION
2
ABC
DEF
(example: 2000)
4
PQRS
(example: July)
5
JKL
(example: the fifth)
DEF
ABC
Enter the month (2 digits:
“01” for January, “02” for
February, “12” for
December, etc.). “ENTER
DATE” will appear in the
display.
Enter the day of the month
(“01” to “31”). “PRESS
ENTER KEY” will appear
in the display.
Enter the hour (2 digits:
“01” to “12”).
The clock starts when you
press this button.
“STORED” will appear in
the display.
ENTER
SUK 06 INITIAL LEO.p65
Enter the last two digits of
the year. “ENTER MONTH”
will appear in the
display.
Enter the minute (2 digits:
“00” to “59”).
9
10
6
“ENTER TIME” will appear
in the display.
ENTER
7
8
“ENTRY MODE” will
appear in the display.
“ENTER YEAR” will appear
in the display.
3
6
Comments
STOP
STOP
Press the STOP key twice
to exit.
INITIAL SETTINGS
49
30/03/00, 17:00
49
Fax Setup
Auto Summer Time Setting
The machine can be set to adjust to time changes during the year, so that its
internal clock and all susequent notations of time (fax headers, programmed
times, etc.) are automatically adjusted. When the Auto Summer Time Setting
in on, the adjustments take place as shown below:
03:00
02:00
On the last Sunday of every March: 02:00
On the last Sunday of every October: 03:00
Use the procedure below to program the Auto Summer Time Setting:
Step
1
6
2
Press these keys
JKL
3
4
DEF
FUNCTION
“ENTRY MODE” will
appear in the display.
“AUTO SUMMER TIME”
will appear in the display.
ABC
or
STOP
STOP
Press 1 to turn the Auto
Summer Time Setting on,
or 2 to turn it off.
Press the STOP key twice
to exit.
INITIAL SETTINGS
50
SUK 06 INITIAL LEO.p65
Comments
50
30/03/00, 17:00
Fax Setup
Selecting the Reception Mode
Your machine has three modes for receiving incoming calls and faxes:
• AUTO mode:
Select this mode when you only want to receive faxes on your telephone
line. The machine will automatically answer all calls and receive incoming
faxes.
• MANUAL mode:
This is the most convenient mode for receiving phone calls if you have an
extension phone. To have true manual mode, the machine must be set to not
answer while in MANUAL mode (see “Setting the Number of Rings for Manual
Reception” on the next page). You can also receive faxes; however, all calls
must first be answered by picking up the receiver on the extension phone or
telephone connected to the same line.
• A.M. mode:
Select this mode when an answering machine is connected to the machine
and you want the answering machine to answer all calls. This allows you to
receive both voice messages and faxes while you are out.
To set the reception mode, press the RECEPTION MODE key until the light
next to the desired mode comes on.
ENTER
BOOK SEND
FUNCTION
AUTO
MANUAL
A.M.
RESOLUTION CONTRAST BROADCAST RECEPTION MODE
For more information on reception modes, refer to Chapter 8.
51
INITIAL SETTINGS
SUK 06 INITIAL LEO.p65
51
30/03/00, 17:00
6
Fax Setup
Setting the Number of Rings for Auto Reception
You can set the number of rings before the machine answers in AUTO mode
using the procedure below.
Factory setting: 2
Step
1
Press these keys
FUNCTION
2
3
6
4
5
Comments
GHI
“OPTION SETTING” will
appear in the display.
ABC
“# OF RINGS AUTO” will
appear in the display.
WXYZ
to
Select the number of rings
you would like to use (0 to
9).
“STORED” will appear in
the display.
ENTER
STOP
STOP
Press the STOP key twice
to exit.
Note: If an external telephone is connected, the external telephone will ring
one time when auto reception is set to 0 rings.
Setting the Number of Rings for Manual Reception
The number of rings before the machine answers in MANUAL mode can also
be set. If you do not want the machine to answer at all in MANUAL Mode,
select “0” in Step 3 below.
Factory setting: 0 (OFF)
Step
1
Press these keys
GHI
FUNCTION
DEF
2
3
4
5
WXYZ
to
“OPTION SETTING” will
appear in the display.
“# OF RINGS MAN.” will
appear in the display.
Select the number of rings
you would like to use (0 to
9).
“STORED” will appear in
the display.
ENTER
STOP
STOP
Press the STOP key twice
to exit.
INITIAL SETTINGS
52
SUK 06 INITIAL LEO.p65
Comments
52
30/03/00, 17:00
Fax Setup
Setting the Number of Recall Times
You can select the number of times the machine will try to recall a busy number.
If you enter 00, the machine will not try to recall. Follow this procedure:
Factory setting: 02
Step
1
Press these keys
GHI
FUNCTION
PQRS
2
3
to
4
5
Comments
“OPTION SETTING” will
appear in the display.
“RECALL TIMES” will
appear in the display.
Enter the number of recall
times (“00” to “09”).
6
WXYZ
“STORED” will appear in
the display.
ENTER
STOP
STOP
Press the STOP key twice
to exit.
Setting the Recall Interval
The recall interval, the time the machine waits in between attempts to re-send
a fax to a busy number, can be set from 1 to 15 minutes. Follow this procedure:
Factory setting: 05 (5 minutes)
Step
1
Press these keys
GHI
FUNCTION
TUV
2
3
Comments
“OPTION SETTING” will
appear in the display.
“RECALL INTERVAL” will
appear in the display.
Enter the recall interval
(“01” to “15”).
to
JKL
4
5
“STORED” will appear in
the display.
ENTER
STOP
STOP
Press the STOP key twice
to exit.
53
INITIAL SETTINGS
SUK 06 INITIAL LEO.p65
53
30/03/00, 17:00
Fax Setup
Setting the Index Function
You can print an index mark along the edge of the pages in each job. This
makes it easy to separate different jobs on the output tray.
Separate faxes
with index marks.
6
Use the following procedure to set the index function.
Factory setting: 2 (OFF)
Step
1
Press these keys
FUNCTION
“OPTION SETTING” will
appear in the display.
WXYZ
2
ABC
3
4
or
STOP
STOP
“BATCH INDEXING” will
appear in the display.
Press 1 to turn on the
index function, or 2 to turn
it off.
Press the STOP key twice
to exit.
INITIAL SETTINGS
54
SUK 06 INITIAL LEO.p65
Comments
GHI
54
30/03/00, 17:00
Fax Setup
Setting Fine Resolution Priority
For most faxing jobs, you will most likely want to specify the resolution. However, you
can also set a default resolution when no setting is made using the RESOLUTION
key. When Fine Resolution Priority is turned on, all faxes will be sent in Fine Mode
unless otherwise specified. To turn on this function, follow the procedure below:
Factory setting: 2 (OFF)
Step
1
Press these keys
GHI
FUNCTION
2
“OPTION SETTING” will
appear in the display.
“FINE PRIORITY” will
appear in the display.
ABC
3
4
Comments
or
STOP
STOP
Press 1 to turn Fine
Resolution Priority on, or 2
to turn it off.
6
Press the STOP key twice
to exit.
Setting Up the Machine for Use with a PC Modem
The machine is set to automatically begin reception if you pick up from an
extension telephone and the machine detects a fax tone. However, if you are
using a modem on the same line, you must deactivate this function: otherwise
the machine will mistakenly attempt to receive the transmission from your
computer. To turn off the Fax Signal Receive function, follow the procedure
below.
Note: If you turn off the Fax Signal Receive function, be sure to activate the
Remote Reception function. See “Using the Remote Reception Function”
on the next page for details on how to do this.
Factory setting: 1 (ON)
Step
1
Press these keys
GHI
FUNCTION
2
“OPTION SETTING” will
appear in the display.
“FAX SIGNAL RCV.” will
appear in the display.
3
4
Comments
ABC
Press 1 to turn Fax Signal
Receive on, or 2 to turn it
off.
STOP
Press the STOP key twice
to exit.
or
STOP
55
INITIAL SETTINGS
SUK 06 INITIAL LEO.p65
55
30/03/00, 17:00
Fax Setup
Using the Remote Reception Function
The machine’s Remote Reception feature is designed to allow you to activate
fax reception from an extension telephone or a telephone directly connected
to the machine. The Remote Reception function operates even when the FAX
Signal Receive function is turned off. See “Setting Up the Machine for Use
with a PC Modem” on the previous page. When you hear the fax tone, simply
press the one-digit Fax Remote Number (Factory setting: 5) and
. Follow
the two procedures below to use this feature.
Notes:
• If originals are set in the SPF, the machine does not answer when you press the
Fax Remote Number and
. However, if the originals are set in the SPF as
part of a copy job in progress, the mechine answers when you press the Fax
Remote Number and
.
• If you want to receive a fax while you are on an extension telephone, when
you hear a fax tone, press the one-digit Fax Remote Number and
. To
ensure proper fax reception, hang up the extension phone only after you
have confirmed that fax reception has begun. Furthermore, there is no sound
when fax reception begins.
Turning on Remote Reception:
Factory setting: 1 (ON)
6
Step
1
Press these keys
GHI
FUNCTION
2
“OPTION SETTING” will
appear in the display.
“REMOTE RECEPTION”
will appear in the display.
3
4
Comments
ABC
Press 1 to turn Remote
Reception on, or 2 to turn
it off.
STOP
Press the STOP key twice
to exit.
or
STOP
Setting a Fax Remote Number:
Factory setting: 5
Step
1
Press these keys
GHI
FUNCTION
Comments
“OPTION SETTING” will
appear in the display.
2
WXYZ
“FAX REMOTE NUMBER”
will appear in the display.
3
WXYZ
Enter the number you
would like to use as the
Fax Remote Number.
INITIAL SETTINGS
56
SUK 06 INITIAL LEO.p65
56
30/03/00, 17:01
Fax Setup
4
ENTER
5
STOP
“STORED” will appear in
the display.
STOP
Press the STOP key twice
to exit.
PBX Setting
The machine is connected to a PBX, you can program machine to access
automatically public line outside PBX.
Factory setting: 2 (OFF)
Step
1
2
Press these keys
GHI
FUNCTION
ABC
3
ABC
4
ABC
or
5
WXYZ
ENTER
7
STOP
“OPTION SETTING” will appear
in the display.
Press 1 (YES) if the machine is
connected to a PBX.
Press 2 (NO) if the machine is
connected to a public line.
“PBX SELECT” will appear in the
display.
This parameter permits to define
how connection of a call from a
PBX to an external line is made.
For more details about this mode,
see operation manual of your PBX
or contact support department of
PBX dealer.
Press 1 for “FLASH” mode.
Press 2 for “ID PBX” mode.
“PBX ID CODE” will appear in the
display.
Enter identification number of your
PBX (max. 3 digits)
Press ENTER key to continue.
STOP
Press the STOP key twice to exit.
57
INITIAL SETTINGS
SUK 06 INITIAL LEO.p65
6
“PBX SETTING” will appear in the
display.
or
6
Comments
57
30/03/00, 17:01
Fax Setup
Storing Numbers for Automatic Dialing
Automatic Dialing is a quick and convenient way to dial by using only a Rapid key (Rapid Key
Dialing), or pressing the SPEED/SEARCH key and select the SPEED and entering a two digit
number (Speed Dialing).
To use Automatic Dialing, you must first store the full number. The way you store it depends on
whether you want to use it for Rapid Key Dialing or Speed Dialing:
Note:
If the machine is connected to a PBX, the numbers dialed in automatic dialing are
automatically transferred to the public line (you should not enter access
code, etc.) in order to obtain the external line in case if registred numbers. In
case of an internal number of the PBX, push the SPEAKER key in order to
insert the R character at the beginning of the number (when tou are in step 6,
as shown below) ; this will cancel the automatic dialing of the access code?
Storing numbers
Use the following procedure to store numbers for Rapid Key Dialing or Speed Dialing:
Step
6
Press these keys
1
Comments
DEF
FUNCTION
“ENTRY MODE” will appear in
the display.
2
“FAX NUMBER MODE” will
appear in the display.
3
“FAX NUMBER SET” will appear
in the display.
4
To store a Rapid key number,
press a Rapid key. To store a
Speed Dial number, press two
number keys (“00” to “99”).
“PRESS ENTER KEY” will
appear in the display.
01
(example)
5
6
“ENTER FAX NUMBER” will
appear in the display.
ENTER
ABC
JKL
ABC
WXYZ
Enter the fax number (maximum
of 20 digits including pauses)
using the number keys.
ABC
TUV
(example: 2015298200)
7
“ENTER NAME” will appear in
the display.
ENTER
8
JKL
ABC
GHI
...
(example)
9
“CHAIN DIAL” will appear in the
display.
ENTER
INITIAL SETTINGS
58
SUK 06 INITIAL LEO.p65
Enter the name of the location
or party by pressing number
keys as described in “How to
Enter Characters ” in this
chapter (max. of 20 characters).
If you do not want to enter a
name, skip this step.
58
30/03/00, 17:01
Fax Setup
10
Press “1” if you want to
specify the number as a
Chain Dialing number (see
“Chain Dialing for Long
Numbers” in this section).
Otherwise, press “2”.
ABC
or
11
STOP
STOP
Step 4 or
...
Return to Step 4 to store
another number, or press
the STOP key a number
of times until you exit. If
the number is a Rapid key
number, you can write the
name on the label above
the appropriate Rapid key.
Note: You may need to add a pause between certain digits in the number to
allow time for connection. For example, if you are on a PBX telephone
system that requires an access number, such as “9”, to be dialed to
access an outside line, you will need to enter a pause between the
access number and the fax number of the other party. Pauses are entered
by pressing the REDIAL/PAUSE key (2 seconds per pause). If
necessary, several pauses can be entered in a row.
Use the following procedure to clear numbers:
Step
Press these keys
1
Comments
DEF
FUNCTION
“ENTRY MODE” will appear in the
display.
2
3
“FAX NUMBER MODE” will appear
in the display.
ABC
Select CLEAR. “FAX NUMBER
CLEAR” will appear in the display.
4
01
(example)
5
ENTER
6
STOP
To clear a Rapid key number,
press the appropriate Rapid key.
To clear a Speed Dial number,
enter the 2-digit number with the
number keys. “PRESS ENTER
KEY” will appear in the display. If
there is no number stored under
that Rapid key or Speed Dial
number, “NO NUMBER STORED”
will appear in the display.
“CLEARED” will appear in the display.
STOP
...
Step 4 or
Return to Step 4 to clear another
number, or press the STOP key a
number of times until you exit.
59
INITIAL SETTINGS
SUK 06 INITIAL LEO.p65
59
30/03/00, 17:01
6
Fax Setup
Chain Dialing for Long Numbers
The maximum number of digits which may be entered when storing a fax
number is 20. If you need to store a number which is longer than 20 digits,
use Chain Dialing.
Chain Dialing allows you to combine two or more Automatic Dialing
numbers, or use an Automatic Dialing number followed by additional digits
entered manually with the number keys, to dial a single number. In addition
to being convenient for storing long numbers, it allows you to store an area
code or access code as an Automatic Dialing number.
For example, to store a 36 digit number for Automatic Dialing, you must
break it into two parts:
6
1. Store the first 20 digits into one Speed Dial number (“01”, for example)
using the storing procedure described in the preceding section, and press
“1” in Step 10 of that procedure to specify it as a Chain Dialing number
(this tells the machine to wait for the remainder of the telephone number
when dialing).
2. Store the remaining 16 digits into a separate Speed Dial number (“02”, for
example), and this time press “2” in Step 10 of the storing procedure to
specify that it is not a Chain Dial number (this tells the machine that the
final part of the number has been dialed).
In this way, you specify all parts of the number except the last as a Chain
Dial number.
Note: The maximum number of digits that can be dialed at one time by
Chain Dialing is 50.
INITIAL SETTINGS
60
SUK 06 INITIAL LEO.p65
60
30/03/00, 17:01
Fax Setup
Storing Numbers Under Group Keys
Group keys allow you to dial a group of fax numbers by simply pressing the
appropriate Group key once. They are convenient for the Broadcasting
function, which is used to transmit an original to a group of fax machines.
All Rapid keys can be programmed as Group keys. To program or clear a
group key, follow the steps below. Note that one key cannot be programmed
as both a Rapid key and a Group key at the same time.
• Up to 50 fax numbers can be stored in one Group key.
• Only Rapid keys and Speed Dial numbers can be stored in a Group key.
No full numbers can be stored.
Use the following procedure to store numbers under Group keys:
Step
1
Press these keys
“GROUP ENTRY MODE”
will appear in the display.
JKL
FUNCTION
6
Comments
2
Press “1” (SET) to
program a Group key, or
“2” (CLEAR) to clear a
Group key.
ABC
or
3
Setting:
Press the Rapid key you
wish to use as a Group
key . “GROUP #=XX” will
appear in the display,
followed by “DIAL #=”
Clearing:
Press the Group key you
wish to clear, and then go
to Step 7.
01
(example)
4
02
09
...
ABC
ABC
ABC
...
Enter fax numbers using
one or both of the
following methods:
• Press one or more Rapid
keys.
• Enter one or more Speed
Dial numbers with the
number keys.
(example)
61
INITIAL SETTINGS
SUK 06 INITIAL LEO.p65
61
30/03/00, 17:01
Fax Setup
5
“ENTER GROUP NAME”
will appear in the display.
ENTER
6
Enter the name of the
group by pressing number
keys as described in “How
to Enter Characters” in
this chapter (max. of 20
characters). If you do not
want to enter a name, skip
this step.
(example)
7
Setting:
“GROUP SET” will appear
in the display.
6
ENTER
Clearing:
“GROUP #=XX
CLEARED” will appear in
the display.
8
STOP
STOP
Step 3 or
...
Return to Step 3 to
program/clear another
Group key, or press the
STOP key a number of
times until you exit.
Note: If you have to change a number used in a Group key, you must
delete that Group key first.
INITIAL SETTINGS
62
SUK 06 INITIAL LEO.p65
62
30/03/00, 17:01
Using the Machine with an Answering Machine
Quiet Detect Time
Quiet Detect Time is the function that enables the machine to be used along
with an answering machine for both phone messages and faxes. After the
answering machine has answered, any duration of silence longer than a certain
threshold time will prompt the machine to take over the line and prepare to
receive a fax. The Quiet Detect Time can be set from 00 to 10 seconds,
following the procedure below.
Factory setting: 05
Step
1
Press these keys
TUV
FUNCTION
Comments
“A.M. MODE” will appear
in the display.
2
“QUIET DETECT TIME”
will appear in the display.
3
Enter the Quiet Detect
Time in seconds, from 00
to 10.
(Setting “00” turns off
Quiet Detect Time)
to
4
ENTER
5
STOP
6
“STORED” will appear in
the display.
STOP
Press the STOP key twice
to exit.
Notes:
• The machine has been set at the factory for a Quiet Detect Time of 5 seconds,
which gives the best performance for most answering machines. However,
you may have to adjust the Quiet Detect Time depending on your answering
machine’s disconnect time, the time before the machine disconnects the line
after a period of silence. If your machine has a short disconnect time, you
may have to shorten the Quiet Detect Time. However, if the machine is
interrupting callers in the middle of messages, you should set a longer Quiet
Detect Time.
• If there is a pause at the end of your answering machine message, make
sure that the Quiet Detect Time is longer than this pause.
• Setting Quiet Detect Time to 00 turns the function off. However, the machine
will not be able to receive faxes sent using manual dialing (picking up the
receiver, dialing the number, and pressing the FAX START key when the fax
tone is heard).
63
INITIAL SETTINGS
SUK 06 INITIAL LEO.p65
63
30/03/00, 17:01
Using the Machine with an Answering Machine
If Quiet Detect Time is not working properly...
With some answering machines, there is simply no Quiet Detect Time that will
allow both reception of faxes and uninterrupted voice messages. Even in this
case, however, you can set up the machine to receive both phone and fax
messages from callers on touch-tone lines. Follow this procedure:
1. Set the Quiet Detect Time to 00.
2. Using the Remote Reception Number (factory set to 5) to start fax reception,
change your answering machine message to include the following
information. “If you want to send a fax press 5 and then press the ( ) key
twice, after you hear the fax tone press your FAX START key”.
6
Answering Machine Backup
There may be times when the tape on your answering machine becomes full,
or when the answering machine itself malfunctions. It is still possible to receive
faxes even under these conditions, however, by turning on the Auto Receive
function. The machine will automatically answer all calls after five rings. To use
this function, follow the procedure below.
Factory setting: 2 (OFF)
Step
1
2
Press these keys
TUV
FUNCTION
“A.M. MODE” will appear
in the display.
“SELECT AUTO
RECEIVE” will appear in
the display.
ABC
3
ABC
or
4
Comments
STOP
STOP
Press 1 to turn Auto
Receive on, or 2 to turn it
off.
Press the STOP key twice
to exit.
Note: If you are using Auto Receive, make sure that your answering machine
is set to answer on four rings or less. Otherwise, the machine will take
over all calls, preventing callers from leaving voice messages.
INITIAL SETTINGS
64
SUK 06 INITIAL LEO.p65
64
30/03/00, 17:01
7. CHOOSING SUIT
ABLE MEDIA
SUITABLE
axing
le ffor
or F
Originals Suitab
Faxing
Suitable
Make sure that the originals you want to fax meet specifications and guidelines listed
in this section.
Siz
e and Weight
Size
The size and weight of originals that you can load in the SPF (Single Pass Feeder)
depend on whether you load one sheet at a time or several sheets at once.
One sheet at a time: 52g/m2
130g/m2
(when using the SPF or when using the original table)
Several sheets at once:
(when using the SPF)
7
52 /m2
90 /m2
355 mm
140 mm
216 mm
216 mm
Note: When feeding in a long original, grasp the original at the edges to guide it
into the machine.
Note: Whether you are using the faxing functions of the machine, your originals
are, in effect, being scanned through the machine. The area of an original
that is scanned by the machine while faxing is slightly smaller than the
actual original size. Any text or graphics outside this area will not be scanned.
Scanning length: The length of the sheet minus 4 mm from both the top and
bottom edges.
65
CHOOSING SUITABLE MEDIA
SUK 07 CHOOSING LEO.p65
65
19/04/00, 08:47
Originals Suitable for Faxing
Unsuitable Originals
General guidelines:
• All clips, staples, and pins should be removed from originals before they are used.
If these are not removed, they may damage the machine.
• Ink, glue, and correction fluid on originals must be completely dry before using the
originals with the machine.
• Originals that are in some way dangerous to the internal mechanisms of the machine
should not be used.
• Faxing originals that have print in yellow,yellowish-green, or light blue, may not be
picked up by the scanner and should not be transmitted.
The following kinds of originals should not be used:
7
• Originals with a glossy coating
• Originals with static electricity
• Originals with tears, folds, or curls
• Originals that have become stuck together and cannot be easily separated
• Originals with holes, windows, or perforations
• Transparency films, tracing paper, or other transparencies
• Originals with plastic or metallic coatings
Notes:
• Sharp does not accept any responsibility for the loss or damage of originals.
• It is a good idea to copy valuable originals on a flat-bed copier before using them
with the machine.
• It is recommended to copy valuable originals on the original table first.
CHOOSING SUITABLE MEDIA
66
SUK 07 CHOOSING LEO.p65
66
28/03/00, 12:34
8. HOW TO USE THE FAX FUNCTION
The standalone fax component of your machine offers a range of sophisticated
features that allow you to control image quality, reception mode, broadcasting,
polling, and transmission priorities. Functions such as sending originals from
memory and substituting reception into memory are greatly enhanced by the
large memory capacity.
Sending Originals
Setting the Original
This section describes setting originals in the SPF or on the original table.
When Using the SPF:
1
Confirm that there are no
originals on the original
table and that copying is
not in progress, then
gently close the original
cover.
2
Adjust the original guide
to the size of originals.
3
Place the original face
down and push it gently
into the original feeder
tray. Feed the original
narrow side into the slot.
8
Original face down
When the original is
long, extend the tray of
the exit area.
HOW TO USE THE FAX FUNCTION
SUK 08 USING FAX LEO.p65
67
28/03/00, 14:37
67
Sending Originals
4
There are two ways to send the fax:
•
To scan the original into memory, then dial
and transmit, continue with the “Dialing and
Transmitting” section.
•
To dial and transmit the original directly
without first scanning it into memory, press
the ORIGINAL key. “DIRECT SEND” will
appear in the display. Continue with the
“Dialing and Transmitting” section.
When placing the Original on the Table:
1
Confirm that there are no originals in
the SPF, and open the original cover.
2
Place the original face down on the
original table. Align the original
according to the original scale in the
illustration below. (Make sure the upper
left corner of the original is set to the
position indicated by the “ ” mark, as
shown.)
8
Original scale
mark
3
Gently close the original cover.
Note: When using the original table, do not set originals in the SPF.
4
Press the BOOK SEND key.
•
You can now make resolution or contrast
settings as described in the next section.
5
Press the BOOK SEND key to scan the
page into memory. If you have more
than one original to read into memory,
place the next page, and press the
BOOK SEND key to read each page.
•
To scan the original into memory, then dial
and transmit, continue with the “Dialing and
Transmitting” section.
68
SUK 08 USING FAX LEO.p65
HOW TO USE THE FAX FUNCTION
68
30/03/00, 17:19
Sending Originals
Optional Transmission Settings
There are several transmission settings that you can make before dialing and
transmitting a original.
Resolution
Your fax has four resolution settings:
• HALF TONE
Use HALF TONE for photographs and illustrations. The original will be
reproduced in 256 shades of gray.
• STANDARD
Use STANDARD for ordinary originals. This setting gives you the fastest
transmission.
• FINE
Use FINE for improved reproduction, especially with originals containing
small letters or fine drawings.
• S. FINE
Use SUPER FINE when you need the highest quality of reproduction.
In order to transmit with FINE or SUPER FINE resolution, the receiving fax
machine must also have that resolution. If it doesn't, the next best available
setting will be used.
If you do not change the setting, the original will automatically be sent in
STANDARD mode.
ENTER
BOOK SEND
FUNCTION
AUTO
MANUAL
A.M.
RESOLUTION CONTRAST BROADCAST RECEPTION MODE
Contrast
The fax automatically controls the contrast, but you can also control it manually.
To do this, press the CONTRAST key one or more times until the desired
contrast settings appear in the display. The three contrast levels are light,
ENTER
medium, and dark.
BOOK SEND
FUNCTION
AUTO
MANUAL
A.M.
RESOLUTION CONTRAST BROADCAST RECEPTION MODE
HOW TO USE THE FAX FUNCTION
SUK 08 USING FAX LEO.p65
69
28/03/00, 14:37
69
8
Sending Originals
Cover Sheet
You can have your fax generate a cover sheet and send it as the last page of
the transmission. The cover sheet includes the date and time, the sender’s
name and number, and the receiver’s name and number if an automatic dialing
number is used. The total number of pages sent is indicated on the bottom.
To include a cover sheet with a transmission, follow these steps:
Factory setting: 2 (OFF)
Step
1
Press these keys
PQRS
FUNCTION
2
ABC
3
Comments
“COVER SHEET MODE”
will appear in the display.
Press “1” to turn the cover
sheet function on, or “2” to
turn it off.
If you pressed “1” in the
previous step, select a
message by entering a
number from 2 to 6 as
shown below, or enter 1 if
you do not want to include
a message.
8
ABC
(example: URGENT)
1: NO MESSAGE
2: URGENT
3: IMPORTANT
4: CONFIDENTIAL
5: PLS. DISTRIBUTE
6: PLS. CALL BACK
Note: The receiver's name must be programmed in either the Rapid Key or
Speed Dial function for it to appear on the Cover Sheet.
70
SUK 08 USING FAX LEO.p65
HOW TO USE THE FAX FUNCTION
70
28/03/00, 14:37
Sending Originals
Auto Cover Sheet
If you want to automatically send a cover sheet with each fax, use the Auto
Cover Sheet function. This function differs from the Cover Sheet function in
two ways. First, the Cover Sheet function must be programmed before each
fax transmission is sent. Second, no message is included on the cover sheet
generated by the Auto Cover Sheet function. Please note that the Cover Sheet
function is considered the primary cover sheet of the two cover sheets
generated by the machine. An ideal method is to use both functions together,
by leaving the Auto Cover Sheet function on, you can decide to use the Cover
Sheet function for attaching a message before sending your fax.
Use the procedure below to turn the Auto Cover Sheet function on or off:
Factory setting: 2 (OFF)
Step
Press these keys
1
GHI
FUNCTION
2
ABC
3
ABC
4
or
STOP
STOP
Comments
“OPTION SETTING” will
appear in the display.
“AUTO COVER SHEET”
will appear in the display.
8
Press 1 to turn the
function on, or 2 to turn it
off.
Press the STOP key twice
to exit.
Note: The receiver's name must be programmed in either the Rapid Key or
Speed Dial function for it to appear on the Auto Cover Sheet.
HOW TO USE THE FAX FUNCTION
SUK 08 USING FAX LEO.p65
71
28/03/00, 14:37
71
Sending Originals
Reverse Sending
The SPF on this machine scans the original from the last page. For the machine
to send the originals starting from the first page, Reverse Sending is initially
set to “ON”. This function works only when the original is sent from memory.
Note: In Reverse Sending mode, when you send a large number of originals
and the memory becomes full, the originals already stored will be
cancelled. In this kind of situation, it is recommended you send the
original directly.
Use the procedure below to turn the Reverse Sending function on or off.
Factory setting: 1 (ON)
Step
1
2
8
Press these keys
GHI
FUNCTION
ABC
“OPTION SETTING” will
appear in the display.
“REVERSE SENDING”
will appear in the display.
3
ABC
or
4
Comments
STOP
STOP
Press 1 to turn the
function on, or 2 to turn it
off.
Press the STOP key twice
to exit.
Note: If you are adding to a group of previously scanned originals (for example
for memory polling), keep the Reverse Sending setting the same as it
was for the previously scanned originals. If you change the setting, the
sending order of the originals will change during the transmission.
(According to the setting in effect for each scan.)
72
SUK 08 USING FAX LEO.p65
HOW TO USE THE FAX FUNCTION
72
28/03/00, 14:37
Sending Originals
Dialing and Transmitting
Once you have set the original (either in the SPF or on the original table), and
have selected the desired transmission settings, you are ready to dial the number
of the receiving fax machine and transmit the original. You can choose from one
of the several ways of dialing that best suit your needs.
Direct Keypad Dialing
If the number of the fax you want to reach is not a Rapid key or Speed Dial
number, use Direct Keypad Dialing to manually enter it using the following
procedure:
1
Confirm that you have
correctly set the original
in the SPF or on the
original table. (See
“Setting the Original” in
this chapter)
2
Enter the number of the
fax
machine you want to
send to by pressing the
number keys.
3
Check the display. If the
number of the receiving
machine is shown
correctly, press the FAX
START key.
8
ABC
DEF
GHI
JKL
MNO
PQRS
TUV
WXYZ
FAX START
• If it is not correct, press
the STOP key to
backspace and clear one
digit at a time, and then
enter the correct number.
HOW TO USE THE FAX FUNCTION
SUK 08 USING FAX LEO.p65
73
28/03/00, 14:37
73
Sending Originals
Rapid Key Dialing
If the number you want to dial has been stored as a Rapid key number (see
“Storing Numbers for Automatic Dialing” in Chapter 6), you can dial it by
pressing the appropriate Rapid key as shown:
8
01
02
03
04
05
06
07
08
09
10
11
12
13
14
15
16
17
18
19
20/POLL
Speed Dialing
If the number you want to dial has been stored as a Speed Dial number, you
can dial it using the following procedure:
1
2
Press the SPEED/
SEARCH key and then
enter the 2-digit number
by pressing the number
keys (see “Storing
Numbers for Automatic
Dialing” in Chapter 6).
Check the display. If the
name or number shown
is correct, press the FAX
START key. (If it is not
correct, press the STOP
key and then repeat Step
1.)
74
SUK 08 USING FAX LEO.p65
SPEED/SEARCH
ABC
DEF
GHI
JKL
MNO
PQRS
TUV
WXYZ
FAX START
HOW TO USE THE FAX FUNCTION
74
28/03/00, 14:37
Sending Originals
Chain Dialing
The Chain Dialing function allows you to combine an Automatic Dialing number set
for Chain Dialing (see “Storing Numbers for Automatic Dialing” in Chapter 2) with
another Automatic Dialing number or digits entered manually with the number keys
to dial one phone number up to 50 digits long. The following are some examples of
how this can be done:
• Enter Speed Dial numbers that you have programmed for Chain Dialing. For example,
if you have stored the first part of a fax number in Speed Dial number 22 and the
second half in Speed Dial number 27, press the SPEED/SEARCH key and “22”,
then the SPEED/SEARCH key and “27”. Then press the FAX START key to begin
transmission.
• Press a Rapid key that is set for Chain Dialing and then manually enter a number
by pressing the appropriate number keys. Press the FAX START key after the
final number key to begin transmission. (You can use this method, for example,
when you have stored a long distance access code into a Rapid key, and want to
dial this in combination with a number that is not stored as an automatic dialing
number.)
Normal Dialing Using the SPEAKER Key
To dial using the SPEAKER, press the SPEAKER key and dial using the numeric
keys. You can hear the line and fax tones from the other machine through the
speaker, allowing you to confirm the response of the other machine.
1
•
2
Dial the number by pressing
the number keys, pressing a
Rapid Dial key, or entering a
Speed Dial number.
ABC
GHI
PQRS
3
SPEAKER
Set the original in the SPF and
press the SPEAKER key.
(Refer to “Setting the
Document” earlier in this
chapter for details.)
To adjust the volume, press the
).
left and right arrow keys (
JKL
TUV
ABC
01
02
03
04
05
06
07
08
09
10
11
12
13
14
15
16
17
18
19
20/POLL
SPEED/SEARCH
GHI
JKL
MNO
PQRS
TUV
WXYZ
MNO
WXYZ
When you hear the fax
reception tone of the other
machine, press the FAX START
key.
FAX START
HOW TO USE THE FAX FUNCTION
SUK 08 USING FAX LEO.p65
DEF
DEF
75
28/03/00, 14:37
75
8
Sending Originals
Using the SEARCH Key
If you do not remember the Rapid key or Speed Dial number in which you
have stored a particular fax number, you can search for the number by
following the steps below:
SPEED/SEARCH
1
Press the SPEED/
SEARCH key twice.
2
Enter the first letter of
the stored name by
pressing the appropriate
number key (the key
below the marked letter)
until the letter appears
in the display. If the
name begins with a
special character or
number, press “1”.
• If you do not remember
the first letter, go to Step
3 and scroll through the
list from the beginning.
8
3
4
ABC
ABC
(example: “B”)
Press the left and right
arrow (
) keys to scroll
through the names
(numbers if you pressed
“0”). Stop when the
desired name appears in
the display.
Press the FAX START
key. The original will be
automatically transmitted
once the connection is
made.
ABC
or
FAX START
Redialing
You can send a fax to the number you last dialed by pressing the REDIAL/
PAUSE key, followed by the FAX START key or Rapid key 20/POLL.
FAX START
REDIAL/PAUSE
76
SUK 08 USING FAX LEO.p65
HOW TO USE THE FAX FUNCTION
76
31/03/00, 10:25
Receiving Faxes
You can set the machine to one of three modes of reception, AUTO, MANUAL,
or A.M. (Answering Machine). To select the reception mode, press the
RECEPTION MODE key until the light next to the desired mode comes on.
ENTER
BOOK SEND
FUNCTION
AUTO
MANUAL
A.M.
RESOLUTION CONTRAST BROADCAST RECEPTION MODE
Using AUTO Mode
Select AUTO mode when you only want to receive faxes on your telephone
line. The machine will automatically answer all calls and receive incoming
faxes.
Using MANUAL Mode
MANUAL is the most convenient mode for receiving phone calls if you have
an extension phone. To have true manual mode, the machine must be set to
not answer while in MANUAL mode (see “Setting the Number of Rings for
Manual Reception” in Chapter 6). You can also receive faxes; however, all calls
must first be answered by picking up the receiver on the extension phone or
telephone connected to the same line.
Using A.M. Mode
Select this mode when an answering machine is connected to the machine
and you want the answering machine to answer all calls. This allows you to
receive both voice messages and faxes when you are out.
HOW TO USE THE FAX FUNCTION
SUK 08 USING FAX LEO.p65
77
31/03/00, 10:25
77
8
Optional Reception Settings
The machine has various optional settings for the reception of faxes.
Receive Reduce
You may on occasion receive faxes that are larger than the paper loaded in
the machine. To ensure that you do not lose any part of the original, you
should use the Receive Reduce function, which scales the fax to the printing
paper size. To use this feature, follow this procedure:
Factory setting: 1 (auto reduction)
Step
1
Press these keys
FUNCTION
2
8
Comments
GHI
“OPTION SETTING” will
appear in the display.
DEF
“RECEIVE REDUCE” will
appear in the display.
3
Select one of the
reduction settings listed
below by pushing the
corresponding number
key:
ABC
1 (AUTO REDUCTION):
Automatic reduction
depending on size of
original and printing
paper.
2 (NO REDUCTION):
No reduction
or
“STORED” will appear in
the display.
4
STOP
STOP
Press the STOP key twice
to exit.
Note: If you select 2 (NO REDUCTION) large faxes will be printed on two
sheets of paper.
78
SUK 08 USING FAX LEO.p65
HOW TO USE THE FAX FUNCTION
78
28/03/00, 14:37
When using manual sending and receiving
You need to use the SPEAKER key or an extension telephone to perform
manual sending and receiving. For information about connecting an extension telephone, refer to “Final Preparations” in Chapter 1.
1
When the extension
telephone rings, pick up
the handset and
converse.
• If the SPEAKER key is
used to answer a call you
cannot converse.
Note: You cannot use the SPEAKER key for fax transmission/reception
while copying is in progress.
2
3
When the handset is off
hook or the SPEAKER
key is used, press the
START key.
• When there are originals
in the SPF, the machine
senses the presence of
the originals and displays
the message.
8
Press “1” to send. Press
“2” to receive.
MANUAL MODE
1:SEND 2:RECEIVE
HOW TO USE THE FAX FUNCTION
SUK 08 USING FAX LEO.p65
79
28/03/00, 14:37
79
Special Functions
Memory
Your machine has a memory area that can be used to store both incoming
and outgoing originals.
• Approximately 120 pages of average content can be held in memory for
transmission. Less can be held if any of the pages were scanned using fine
or superfine resolution.
Memory Backup
• The machine uses a lithium-ion battery to keep automatic dialing numbers
and other programmed data in memory when the power is turned off (when
the machine is unplugged). Battery power is consumed primarily when the
power is turned off. With the power kept continuously off, the life of the battery
is about 5 years. If the battery life expires, have your dealer or retailer replace
it. Do not try to replace it yourself.
Substitute Reception into Memory
8
This is a back-up function that is automatically activated if your fax runs out of
paper, the TD cartridge needs replacement, or the paper jams.
The message “FAX RCVD IN MEMORY” will only appear in the display at the
time the original is initially received into memory. After reception is complete,
one of the following messages, “PAPER OUT(XXX),” “CAN NOT PRINT,” or
“PAPER JAM” will appear in the display. When you add paper (and set the
paper size), replace the TD cartridge, or clear the jam, the stored originals will
automatically be printed out.
• If you received originals in memory because the fax ran out of paper, be
sure to add paper which is the same size as the paper previously used. If
not, the original print-out size may not match the size of the printing paper.
Caution!
• If originals received in memory are lost due to a power failure or other
interruption in the power supply, a POWER FAIL REPORT will be printed out
when the power is restored. This gives available information about the faxes
lost, including the fax numbers of the transmitting machines.
Note: Take care that the remaining memory does not become 1% or you
cannot receive any more faxes.
80
SUK 08 USING FAX LEO.p65
HOW TO USE THE FAX FUNCTION
80
28/03/00, 14:37
Special Functions
Data Transfer
If there is a problem with the machine, you can use the Data Transfer function
to have received faxes read into memory and then sent to a different fax
machine for printing. This function is used when you cannot print received
faxes, for example when the machine runs out of toner, a misfeed occurs.
Factory setting: 2
Step
Press these keys
1
FUNCTION
2
ABC
Comments
“RX DATA TRANSFER”
will appear in the display.
“FAX NUMBER” will
appear in the display.
3
ABC
TUV
GHI
ABC
PQRS
DEF
PQRS
TUV
Enter the transferring fax
number (maximum 20
digits) by pressing the
number keys.
8
(example: 18002374278)
4
“RX DATA TRANSFER”
will appear in the display.
ENTER
5
“TRANSFER?” will
appear in the display.
6
If 1 is selected, the data
held in memory is sent to
the fax selected in step 3
above. If you press 2 and
STOP key, the data is not
sent.
ABC
or
STOP
HOW TO USE THE FAX FUNCTION
SUK 08 USING FAX LEO.p65
81
28/03/00, 14:37
81
Special Functions
Transmission Reservation
When your fax is busy receiving an original or transmitting an original from
memory, you can “reserve” a transmission by setting the original (either in the
SPF or on the original table), reading it into memory, and entering the fax
number. Once the current operation is completed, your fax will automatically
dial the number and transmit the original saving you from having to wait.
When Using the SPF:
1
Confirm that there are no
originals on the original table
and that copying is not in
progress, then gently close
the original cover.
2
Adjust the original guide to
the size of originals.
3
Place the original face down
and push it gently into the
original feeder tray. Feed the
original narrow side into the
slot.
Adjust the resolution and/or
contrast settings if desired.
8
•
4
•
•
•
5
•
Enter the number of the
receiving machine using one
of the following methods:
Press a Rapid key.
Press the SPEED/SEARCH key
and enter a Speed Dial number.
Enter a full number with the
number keys.
Original
face down
SPEED/SEARCH
(example)
Press the FAX START key if
you entered a Speed Dial
number or a full number
The number will be dialed once the
current operation is completed, and
transmission will begin once the
connection is made.
82
SUK 08 USING FAX LEO.p65
HOW TO USE THE FAX FUNCTION
82
30/03/00, 17:21
Special Functions
When using the original table:
1
Confirm that there are no
originals in the SPF, and that
copying is not in progress, then
open the document cover.
2
Place the original face down on
the original table. Align the
original according to the
original scale in the illustration
below.
(Make sure the upper left corner
of the original is set to the
position indicated by the “ ”
mark, as shown.)
Original scale
mark
8
3
Gently close the original cover.
Note: When using the original table, do not set originals in the SPF.
4
Press the BOOK SEND key.
• Adjust the resolution and/or
contrast settings if desired.
5
Press the BOOK SEND key to
scan the page into memory. If
you have more than one sheet
to read into memory, place the
next page, and press the
BOOK SEND key to read each
page.
6
Continue with steps 4 and 5 in
the previous section, “Using
the SPF”.
Note: If the original is removed from the original feeder tray after a transmission
reservation is set, the reservation will be cancelled.
HOW TO USE THE FAX FUNCTION
SUK 08 USING FAX LEO.p65
83
30/03/00, 17:21
83
Special Functions
Broadcasting
This function allows you to send the same original to as many as 50 different
locations with just one operation. Once the original is loaded, it is scanned
and stored in memory. The fax numbers you have entered are then
automatically dialed in succession, and the original is transmitted to each
location.
• To enter the fax numbers of the receiving machines, you must use Rapid
keys, Speed Dial numbers, or Group keys; no fax numbers can be entered
manually.
1
Place the original face
down and push it gently
into the original feeder
tray.
Original
face down
• Adjust the resolution and/
or contrast settings if
desired.
8
2
Press the BROADCAST
key.
3
Dial the numbers of the
receiving machine using
one or more of the
following methods:
• Press one or more Rapid
keys.
• Enter Speed Dial
numbers with the number
keys, for example Speed
Dial numbers 01, 02,
through to 09.
• Press one or more Group
keys.
84
SUK 08 USING FAX LEO.p65
BROADCAST
01
02
09
...
(example)
HOW TO USE THE FAX FUNCTION
84
30/03/00, 17:24
Special Functions
4
Press the FAX START
key. Transmission will
begin.
FAX START
Broadcasting using a Group key
If the fax machines to which you want to broadcast have all been
programmed into one Group key, you can perform the broadcasting
operation using the following simplified procedure. Refer to “Storing
Numbers Under Group Keys” in Chapter 6.
1
Original face down
Place the original face
down and push it gently
into the original feeder
tray.
8
• Adjust the resolution and/
or contrast settings if
desired.
2
Press the appropriate
Group key. Transmission
will begin.
If the memory becomes
full while the original is
being scanned, “MEMORY
FULL” will appear in the
display.
19
• Press the FAX START
key to transmit the pages
that have been stored up
to that point in memory.
• Press the STOP key to
cancel the entire
transmission.
(example)
Note: In Reverse Sending mode, you must press the STOP key to cancel the
entire transmission when “MEMORY FULL” appears in the display.
HOW TO USE THE FAX FUNCTION
SUK 08 USING FAX LEO.p65
85
30/03/00, 17:24
85
Special Functions
Polling
Polling allows you to request another fax machine to send a original to your fax
machine. In other words, the receiving fax machine, not the transmitting fax
machine, activates the transmission. You can use your fax to both poll and be
polled by others.
Setting the Polling Key
To use the polling function, you must first set Rapid key 20/POLL for use as a
polling key. This is done by following the procedure shown below.
• The polling key cannot be used for both Rapid Key Dialing and Polling. If it
has already been programmed for Rapid Key Dialing, you must clear it first
as described in “Storing Numbers for Automatic Dialing” in Chapter 6.
Step
1
2
8
Press these keys
DEF
FUNCTION
GHI
“ENTRY MODE” will
appear in the display.
“POLLING FUNCTION”
will appear in the display.
3
ABC
or
4
Comments
STOP
STOP
Press “1” to turn the
polling function on, or “2”
to turn it off.
Press the STOP key twice
to exit.
Polling Others
1
Dial the number of the
fax machine you want to
poll using one of the
following methods:
• Enter the full number
using the number keys.
• Press the SPEED/
SEARCH key and enter
a 2-digit Speed Dial
number.
• Press the SPEAKER key
and dial the full number.
Wait for the fax answerback tone.
• Press the SPEAKER key
and then press a Rapid
key. Wait for the fax
answer-back tone.
2
Press Rapid key 20/
POLL.
86
SUK 08 USING FAX LEO.p65
SPEED/SEARCH
(example)
20/POLL
HOW TO USE THE FAX FUNCTION
86
28/03/00, 14:38
Special Functions
Being Polled (Memory Polling)
To allow multiple fax machines to poll your fax, or in cases where you want to free up
the original feeder tray for other operations, use Memory Polling instead of Polling
Standby.
Programming a Memory Polling Operation
You can choose whether to allow polling only once, or an unlimited number of
times. In the later case, your fax can be used as an electronic “bulletin board”.
• Only one original can be stored at a time for memory polling, however, you
can store multiple page originals.
• If you allow polling only once, the original will be automatically cleared from
memory after polling. If you allow polling an unlimited number of times, the
original will remain in memory until you clear it using the procedure described
in “Clearing Originals” which follows.
• If you have an original stored in memory for polling, and you want to add to
it, following the procedure described in “Adding to Originals”.
To program a Memory Polling operation, either load the original in the SPF or
use the original table as described below. Then, set the reception mode to
AUTO (Press the RECEPTION MODE key until the AUTO light comes on).
Step
1
Press these keys
WXYZ
FUNCTION
2
3
Comments
“MEMORY POLL MODE” will
appear in the display. “1: 1 TIME
2: REPEAT” will appear at the
bottom of the display.
“SET RESOLUTION & CONTRAST”
will appear in the display.
RESOLUTION
CONTRAST
4
Adjust the resolution and/or
contrast settings if desired.
When using the SPF, press
ENTER key. When using the
original table, follow steps 1-5
in the section “Setting the
Original” in this chapter.
“STAND-BY” will appear in the
display, and the original will be
scanned into the machine’s memory.
ENTER
The date and time will return to the
display.
HOW TO USE THE FAX FUNCTION
SUK 08 USING FAX LEO.p65
87
30/03/00, 17:24
87
8
Special Functions
Adding to Originals
If you have an original stored in memory for polling, and you want to add
pages to it, use the following procedure.
If you allow polling only once, the original will be automatically cleared from
memory after polling. If you allow polling an unlimited number of times, the
original will remain in memory until you clear it using the procedure below:
Step
Press these keys
1
WXYZ
FUNCTION
2
Comments
“MEMORY POLL MODE”
will appear in the display.
“1: ADD 2: CLEAR” will
appear at the bottom of
the display.
Continue with step 3 in the
“Programming a Memory
Polling Operation” section.
8
Clearing Originals
Step
Press these keys
1
WXYZ
FUNCTION
2
ABC
3
STOP
88
SUK 08 USING FAX LEO.p65
Comments
“MEMORY POLL MODE”
will appear in the display.
“1: ADD 2: CLEAR” will
appear at the bottom of
the display.
The date and time will
return to the display.
STOP
Press the STOP key twice
to exit.
HOW TO USE THE FAX FUNCTION
88
28/03/00, 14:38
Special Functions
Timer Operations
The timer function allows you to set a transmission or polling operation to be
performed automatically at a time you specify. Up to three transmission
operations or polling operations can be set at any one time, and the times
they will be performed can be specified up to a week in advance.
Note: You can use this function only when you send the document from the
SPF.
You can use this function, for example, to take advantage of lower nighttime
telephone rates without having to be there when the operation is performed.
• For a timer transmission, scan the original into memory when you set the
transmission. Scanning the original into memory is convenient because you
do not have to worry about original mix-ups or forgetting to load the original.
• If the memory becomes full while the original is being scanned, “MEMORY
FULL” will appear in the display.
• Press the FAX START key to transmit the pages that have been stored
up to that point in memory.
• Press the STOP key to cancel the entire transmission.
Note: In Reverse Sending mode, you must press the STOP key to cancel the
entire transmission when “MEMORY FULL” appears in the display.
• Code numbers are used to specify each day of the week. Refer to the table
below when making time settings which include a specified day.
Day
Sunday
Monday
Code
0
1
Tuesday Wednesday Thursday
2
3
4
Friday
Saturday
5
6
HOW TO USE THE FAX FUNCTION
SUK 08 USING FAX LEO.p65
89
30/03/00, 17:25
89
8
Special Functions
To set a timer operation:
Step
1
Press these keys
“TIMER MODE” will appear in the
display.
FUNCTION
2
3
4
Select SET. “TIMER COMM. #=1”,
“TIMER COMM. #=2” or “TIMER
COMM. #=3” will appear in the
display.
ENTER
or
ABC
DEF
(example)
5
ABC
ENTER
8
or
6
Comments
ENTER
(example)
7
JKL
Select “SEND MODE” or “POLLING
MODE”.
Enter the time of the operation (2
digits for the hour and 2 digits for
the minute).
Enter the code for the day of the
operation. If the operation will be
performed within 24 hours, just
press the ENTER key.
“ENTER NUMBER” will appear in
the display.
Enter the fax number of the other
machine using one of the following
methods:
• Press a Rapid key.
• Enter a Speed Dial number
with the number keys.
(example)
8
9
“SET RESOLUTION & CONTRAST
THEN ENTER” will appear in the
display.
ENTER
CONTRAST
RESOLUTION
10
ENTER
(optional)
90
SUK 08 USING FAX LEO.p65
If this is a transmission operation,
adjust the resolution and/or contrast
if desired. (Otherwise, skip this step.)
“LOAD ORIGINAL(S)” will appear in
the display. If the original is already
loaded, no message will appear in
the display.
After loading the original, it is
scanned into memory. Then the
original can be sent at the time you
selected, or polling can be
performed.
HOW TO USE THE FAX FUNCTION
90
28/03/00, 14:38
Special Functions
To cancel a timer operation:
If you need to cancel a timer operation after it has been set, follow the steps
below:
If the timer operation is a transmission operation, you will need to know the
number assigned to it. If you do not remember the number (it appears in the
display when you set the operation), print out the Timer List. See “Printing Out
Reports” in this chapter for details on how to print out the Timer List.
Step
Press these keys
1
FUNCTION
2
ABC
Comments
“TIMER MODE” will
appear in the display.
Select “CLEAR”. “ENTER
# (1-3)” will appear in the
display.
3
Enter the 1-digit number
assigned to the operation.
(example)
4
STOP
5
8
“CLEARED” will appear in
the display.
ENTER
STOP
Press the STOP key twice
to exit.
Anti Junk Fax
You can avoid wasting fax paper by using the Anti Junk Fax function. This
function prevents the reception of faxes from up to ten specified parties.
To turn the Anti Junk Fax feature on and off, use the following procedure:
Factory setting: 2 (OFF)
Step
Press these keys
1
MNO
FUNCTION
2
ENTER
3
4
ABC
or
STOP
STOP
Comments
“ANTI JUNK FAX” will
appear in the display.
“ANTI JUNK SELECT” will
appear in the display.
Turn Anti Junk Fax on or
off.
Press the STOP key twice
to exit.
HOW TO USE THE FAX FUNCTION
SUK 08 USING FAX LEO.p65
91
30/03/00, 17:26
91
Special Functions
To store junk fax numbers, use the following procedure:
Step
Press these keys
1
MNO
FUNCTION
2
ENTER
3
ENTER
4
JKL
JKL
Comments
“ANTI JUNK FAX” will
appear in the display.
“JUNK FAX # MODE” will
appear in the display.
“ENTER JUNK FAX #” will
appear in the display.
ABC
JKL
ABC
MNO
Enter the fax number
(maximum of 20 digits).
(example)
8
5
ENTER
6
STOP
“STORED” will appear in
the display.
STOP
Step 3 or
...
Return to Step 3 to enter
another number, or press
the STOP key a number
of times until you exit.
To clear junk fax numbers, use the following procedure:
Step
Press these keys
1
MNO
FUNCTION
2
3
Comments
“ANTI JUNK FAX” will
appear in the display.
“JUNK FAX # MODE” will
appear in the display.
ENTER
ABC
“JUNK FAX # CLEAR” will
appear in the display.
4
Enter the number of the
fax number to clear.
“CLEARED” will appear in
the display.
ENTER
(example)
5
STOP
STOP
...
Step 4 or
92
SUK 08 USING FAX LEO.p65
Return to Step 4 to clear
another number, or press
the STOP key a number
of times until you exit.
HOW TO USE THE FAX FUNCTION
92
28/03/00, 14:38
Printing Out Reports
The machine is capable of printing a range of reports on faxing activities as
well as various settings you have made. The reports are described below.
1. TRANSMISSIONS ACTIVITY REPORT:
Faxes sent from the machine.
ACTIVITY REPORT (SENDING)
P. 01
20-MAR-2000 MON 13:09
#
DATE
START
RECEIVER
01 13-MAR 05:39
TX TIME PAGES
1
00”
TYPE
NOTE
0 SEND
DOCUMENT JAM
0
TOTAL : 00”
2. RECEPTIONS ACTIVITY REPORT:
Faxes received by the machine.
ACTIVITY REPORT (RECEIVING)
P. 01
20-MAR-2000 MON 00:11
#
DATE
START
SENDER
01 13-MAR 05:40
05:41
05:42
05:44
RX TIME
PAGES
TYPE
05"
31"
12"
12"
0
0
0
0
RECEIVE
RECEIVE
RECEIVE
RECEIVE
8
NOTE
POWER FAIL
CANCEL
CANCEL
CANCEL
TOTAL : 1'00"
3. TIMER LIST:
ID numbers for timer operations.
TIMER LIST
TIMER OPERATION
# RESERVED TIME
1
2
3
11:11
MON
REMOTE TX
P. 01
20-MAR-2000
TYPE
RESOLUTION
SEND
STANDARD
TYPE
RESOLUTION
REMOTE TX
STANDARD
PAGES
17:01
RECEIVER
1
4507
PAGES
TIMES
1
MON
REPEAT
4. FAX NUMBER LIST:
Fax numbers stored in the machine as either Rapid key or Speed Dial
numbers.
FAX NUMBER LIST
RAPID/
SPEED #
R01
P. 01
20-MAR-2000 MON 04:35
NAME
FAX NUMBER
CHAIN DIAL
4507
HOW TO USE THE FAX FUNCTION
SUK 08 USING FAX LEO.p65
93
28/03/00, 14:38
93
Printing Out Reports
5. OPTIONAL SETTING LIST:
Currently activated optional settings.
P. 01
OPTIONAL SETTING LIST
21-MAR-2000 THU 00:11
SW #
01
02
03
04
05
06
07
08
09
10
11
12
13
14
15
16
17
18
19
20
21
ITEM
SETTING
FINE PRIORITY
# OF RINGS AUTO RX
# OF RINGS MANUAL RX
AUTO LISTING
PRINT SELECTION
BROADCAST LISTING
RECALL TIMES
RECALL INTERVAL
FAX REMOTE NUMBER
REMOTE RECEPTION
FAX SIGNAL RECEIVE
AUTO COVER SHEET
RECEIVE REDUCE
BEEP LENGTH
BEEP VOLUME
KEY BEEPS
INCOMING RING VOLUME
PBX SETTING
BATCH INDEXING
REVERSE SENDING
LANGUAGE
SUMMER TIME SETTING
8
OFF
2 RINGS
OFF
OFF
ERROR/TIMER
ALWAYS PRINT
2 TIMES
5 MINUTES
5
ON
ON
OFF
AUTO
3 SECONDS
MIN
ON
MEDIUM
OFF
OFF
ON
ENGLISH
ON
NAME
NUMBER
6. GROUP LIST:
Fax numbers stored under Group keys.
GROUP LIST
P. 01
20-MAR-2000 MON 04:37
#
G09
NAME
REMOTE STATION ID #
GROUP09
R01
7. ANTI JUNK FAX NUMBER LIST:
Fax numbers designated as Anti Junk Fax numbers.
ANTI JUNK FAX NUMBER LIST
P. 01
20-MAR-2000 MON 04:37
#
ANTI JUNK FAX NUMBER
01
0389744530
Use the following procedure to print out reports:
Step
1
2
94
SUK 08 USING FAX LEO.p65
Press these keys
ABC
FUNCTION
PQRS
to
Comments
“LISTING MODE” will
appear in the display.
The machine will then
automatically print out the
selected report.
HOW TO USE THE FAX FUNCTION
94
28/03/00, 14:38
Printing Out Reports
Activity Report Auto Listing
You can have the machine automatically print out Transmission and Reception
Activity Reports at designated times (for example, daily, every two days, weekly,
etc.).
Information about only the 50 most recent transmissions and receptions can
be printed out. Information about transmissions and receptions older than
these are deleted from the unit’s memory.
Factory setting: 5 (OFF)
Step
Press these keys
GHI
FUNCTION
1
GHI
2
3
JKL
to
STOP
4
STOP
Comments
“OPTION SETTING” will appear in
the display.
“AUTO LISTING” will appear in the
display.
Press 1 for AUTO LISTING/DAY,
2 for AUTO LISTING/2DAYS,
3 for AUTO LISTING/4DAYS,
4 for AUTO LISTING/WEEK, or
5 for AUTO LISTING OFF.
8
Press the STOP key twice to exit.
Printing Transaction Reports
You can choose to have various Transaction Reports printed out after certain activities on
the machine : transmission, reception, or error. To use this feature, follow this procedure:
Factory setting: 2 (ERROR/TIMER)
Step
Press these keys
1
GHI
FUNCTION
“OPTION SETTING” will appear in the
display.
JKL
2
“TRANSACTION LIST” will appear in
the display.
3
JKL
to
4
Comments
Select the report setting:
1 (ALWAYS PRINT):
After each transmission, reception, or error.
2 (ERROR/TIMER):
After an error or timer operation only.
3 (SEND ONLY):
After a transmission only.
4 (NEVER PRINT):
Never prints.
5 (ERROR ONLY):
After an error only.
“STORED” will appear in the display.
STOP
STOP
Press the STOP key twice to exit.
HOW TO USE THE FAX FUNCTION
SUK 08 USING FAX LEO.p65
95
28/03/00, 14:38
95
Printing Out Reports
Printing Broadcasting Reports
Broadcasting Reports can be printed out after broadcasting activities. You
can change the report setting. To do this, follow this procedure.
Factory setting: 1 (ALWAYS PRINT)
Step
1
Press these keys
FUNCTION
2
GHI
“OPTION SETTING” will
appear in the display.
MNO
“BROADCAST LIST” will
appear in the display.
3
8
Comments
DEF
to
Selecting the report
setting:
1 (ALWAYS PRINT):
After each transmission
or error.
2 (ERROR ONLY):
After an error only.
3 (NEVER PRINT):
Never prints.
“STORED” will appear in
the display.
4
96
SUK 08 USING FAX LEO.p65
STOP
STOP
Press the STOP key twice
to exit.
HOW TO USE THE FAX FUNCTION
96
28/03/00, 14:38
9. TROUBLESHOOTING
Troubleshooting
Problem
Check and Remedy
Dialing cannot be done.
Make sure that the telephone line is
properly connected to both the machine
and the wall jack.
No transmission takes place.
Make sure that the receiving machine
has not run out of printing paper.
Make sure that the receiving machine is
G3 compatible. (This information should
be included in the machine’s
originalation.)
Check the display for possible error
messages.
Nothing is printed at the
receiving end.
Make sure that the original you are
sending is fed into the machine in the
correct way.
Make sure that the receiving machine is
in working order.
A distorted image is received at
the other end.
Noise on the telephone line may
cause distortion. Try sending the original
again.
Make a copy of the original on the
machine. If the copy is also distorted,
the machine may have a problem.
The received original is faint.
Ask the other party to send higher
contrast originals. If the contrast is still
too low, make a copy with the machine
to check it.
Received images are distorted.
Noise on the telephone line may cause
distortion. Have the sending party send
the original again.
The drum cartridge may need
replacement.
COPY SERVICE ERROR
The copier will not function. Turn the
power switch off, remove the power cord
from the outlet, and contact your
SHARP dealer.
FAX SERVICE ERROR (X)
The fax will not function. Contact your
SHARP dealer.
Note: If your problem cannot be solved by carrying out the instructions in
the Check and Remedy column above, please contact your SHARP
dealer.
97
TROUBLESHOOTING
SUK 09 TROUBLE LEO.P65
97
30/03/00, 17:31
9
Messages and Signals
Display Messages
9
Message
Meaning
ORIGINAL JAM
The original is jammed.
FAX RCVD IN MEMORY
A fax has been received in memory
because the TD cartridge needs
replacement (See the copier chapter.),
the fax machine has run out of printing
paper, or the paper is jammed. The fax
will be printed out automatically once the
problem is fixed.
LINE ERROR
Fax transmission or reception was not
successful. Press the STOP key to clear
the message, and then try again.
MEMORY FULL
The memory is full. See “Memory” under
“Special Functions” in Chapter 8.
PAPER JAM
The printing paper is jammed.
PAPER SIZE ERROR
SET XXX SIZE PAPER
The setting for the printing paper
size is incorrect. Set it correctly. In the
area labeled “XXX,” “LTR”, “LGL” or “A4”
will appear.
CAN NOT PRINT
TD cartridge empty.
TD cartridge not inserted.
TD cartridge or drum cartridge life
expired. (See the copier chapter.)
CHECK COPIER COVER
Front cover open.
PAPER OUT (XXX)
The paper has run out and the data is
read into memory. Set it correctly. In the
area labeled “XXX,” “LTR”, “LGL” or “A4”
will appear.
LOAD ORIGINAL(S)
Set the original(s) in the machine.
NO RESPONSE
Line error
No answer from the receiver.
RETURN ORG.
XX SHEET(S)
Paper jam in the SPF.
When memory is full and there is a line
error, the display alternates between the
RETURN ORG. and MEMORY FULL
messages.
TROUBLESHOOTING
98
SUK 09 TROUBLE LEO.P65
98
30/03/00, 17:31
Messages and Signals
Audible Signals
Sound Type
Duration
Meaning
Continuous tone
3 seconds
Indicates the end of
transmission, reception,
or line error.
Continuous tone
1 second
Warning tone
9
99
TROUBLESHOOTING
SUK 09 TROUBLE LEO.P65
99
30/03/00, 17:31
Notes
9
TROUBLESHOOTING
100
SUK 09 TROUBLE LEO.P65
100
30/03/00, 17:31
10. GETTING ST
AR
TED
STAR
ARTED
Intr
oduction
Introduction
This chapter provides basic information for using the printer and scanner features
of the FO-3800M.
When you try to execute printing while copying is being performed,
printing will be executed after copying is finished.
● When you try to make a copy while printing is being performed,
printing will be interrupted and you can make a copy. Printing will
be resumed after copying is finished.
●
Trademark ac
kno
wledgments
ackno
knowledgments
Windows, MS-DOS, Windows NT and Windows Printing System are trademarks
of Microsoft Corporation in the U.S.A. and other countries.
IBM, PC/AT and OS/2 are trademarks of International Business Machines
Corporation.
HP, LaserJet and PCL are trademarks of the Hewlett-Packard Company.
All other trademarks and copyrights are the property of their respective owners.
Making flopp
y disks fr
om CD-R
OM
floppy
from
CD-ROM
The printer driver data in the CD-ROM can be copied to floppy disks.
Windo
ws 95/Windo
ws 98/Windo
ws NT 4.0:
Windows
95/Windows
98/Windows
1
Insert the installation CD-ROM into the CD-ROM drive.
2
o (CD-ROM), and Makedisk
Double-click My Computer
Computer, Al-f_f
Al-f_fo
Makedisk.
3
xe.
Double-click Makedisk.e
Makedisk.ex
4
Follow the on-screen instructions.
10
Windo
ws 3.1x:
Windows
1
Insert the installation CD-ROM into the CD-ROM drive.
2
ger in the Main window of Program Manager
Double-click the File Mana
Manag
OM and the Makedisk directory.
CD-ROM
and select CD-R
3
xe.
Double-click Makedisk.e
Makedisk.ex
4
Follow the on-screen instructions.
101
GETTING STARTED
UK 10 PREPARATION LEO.p65
101
30/03/00, 17:09
eatures
Main ffeatures
Printing fr
om Windo
ws 3.1x, Windo
ws 95, Windo
ws 98, and Windo
ws NT
from
Windows
Windows
Windows
Windows
4.0 applications
●
High-speed and high-quality printing can be performed from Windows 3.1x,
Windows 95, Windows 98, and Windows NT 4.0 applications through the SHARP
GDI (Graphics Device Interface) system.
●
Since print data are processed in the computer, waiting time during printing is
short.
Scanning fr
om Windo
ws 3.1x, windo
ws 95, Windo
ws 98, and Windo
ws
from
Windows
windows
Windows
Windows
NT 4.0 appliacations
●
The SHARP TWAIN interface software enables the FO-3800M to perform highquality monochrome scanning directly from a TWAIN-compatible application.
TWAIN is an application interface (API) standard which is used to
scan images from scanners. The SHARP TWAIN interface software
supports the TWAIN standard, version 1.6.
10
102
UK 10 PREPARATION LEO.p65
GETTING STARTED
102
30/03/00, 17:09
le
Connecting the interface cab
cable
To use the FO-3800M as a laser printer or scanner, connect it to your computer
using a prallel interface cable.
Use the parallel interface cable included with the FO-3800M.
For specifications of the parallel interface, see page 128.
1
Check that the power switches of both the machine and the computer
are in the OFF position.
2
Plug the parallel interface cable into the printer interface connector.
Fasten the two bail clips at the side of the printer connector to hold the
interface connector in place.
3
Plug the other end of the cable into the parallel interface connector on
your computer. (Refer to your computer manual for details.)
Parallel interface
connector
Cable
10
Interface connector
Bail clip
This machine sends and receives data bi-directionally and at high
speed. Some switch boxes and pass-through devices cannot
support high-speed, bi directional transfer of data, and using them
may cause printing errors.
103
GETTING STARTED
UK 10 PREPARATION LEO.p65
103
30/03/00, 17:09
Installing the printer driver software
Description of the printer driver
The printer driver is the software program which runs the printer. It converts the
data in your file into information that the printer can understand. It also controls
communication between the printer and computer as the data is printed.
Chec
king the har
dware and software requirements
Checking
hard
You will need the following hardware and software in order to install the printer
driver.
Computer type
IBM PC/AT or compatible computer
equipped with a bi-directional parallel
interface and CD-ROM
Windows 3.1x, Windows 95, Windows 98,
Windows NT 4.0
486DX 66MHz or better
Windows 95, Windows 3.1x:
8 MB (16 MB or more is recommended.)
Windows NT 4.0:
12MB (16MB or more is recommended.)
Windows 98:
16MB (32MB or more is recommended.)
8 MB or more
640 x 480 dots (VGA) or better
11 MB or more
Windows type
CPU
Physical RAM
10
Virtual storage (swap file)
Display
Hard disk free space
The printer driver included in this product cannot be used under
Windows NT 3.5x, OS/2, pure MS-DOS and other operating
systems which are not described above.
Installing the printer driver
The software for your printer is provided on CD-ROM which was packed with your
laser printer.
Before installing the printer driver, be sure to check the following items.
●
Is the printer connected properly to the computer?
●
Does the printer have paper?
●
Is there another GDI printer driver or Windows Printing System printer driver already
installed? If installed, change the printer port setting. For the change of the printer
THER INST
ALLED DRIVERS on page121.
port setting, see USING O
OTHER
INSTALLED
104
UK 10 PREPARATION LEO.p65
GETTING STARTED
104
30/03/00, 17:09
Installing the printer driver software
Windo
ws 95/Windo
ws NT 4.0:
Windows
95/Windows
1
Load paper into the paper tray of the printer. For instructions on loading
ADING COPY P
APER on page 12.
paper, see the section LO
LOADING
PAPER
2
Turn on the machine.
3
Turn on your computer and start Windows.
Before installing the printer driver, be sure to close all other
applications which may be open.
4
When using Windows 95 on a personal computer with plug & play*, the
“Update Device Driver Wizard” window will appear. Insert the installation
xt button and follow the
CD-ROM into the CD-ROM drive. Click the Ne
Next
on-screen instructions. If the “Copying Files” window appears during this
operation, enter R:\ (if the CD-ROM is designated as drive R) and click
the OK button.
Update Device Driver Wizard
This wizard will complete the installation of:
by searching your local drives, network, and Internet
locations for the most current driver.
10
If you have a disk or CD-ROM that came with this device.
It is recommended that you let Windows search for an
updated driver. To do this, click Next to continue.
< Back
> Next
Cancel
If you use Windows 95 and the “New Hardware Found” window will
om Disk Pr
ovided b
y Har
d ware
appear, click the Driver fr
from
Pro
by
Hard
Man
ufacturer button and then click OK
Manufacturer
OK. Proceed to step 6.
● If you use Windows 95 and the screen shown above or the “New
Hardware Found” window does not appear, proceed to step 5.
● If you use Windows NT 4.0, proceed to step 5.
★ Plug & play
This feature is effective if both the computer and peripheral equipment
are equipped with IEEE 1284 compliant parallel interface.
●
The screen displayed depends on the version of Windows you
are using.
105
GETTING STARTED
UK 10 PREPARATION LEO.p65
105
30/03/00, 17:09
Installing the printer driver software
5
Insert the installation CD-ROM into the CD-ROM drive.
Click the Star
Startt button and select Run
Run. When the screen shown below
appears, type R:\SETUP (if the CD-ROM is designated as drive R) and
click the OK button. Follow the on-screen instructions.
6
The “Install From Disk” window will appear. Insert the installation CDROM into the CD-ROM drive. Type R:\ (if the CD-ROM is designated as
drive R) and click the OK button. Follow the on-screen instructions.
10
If you have any problem with the test print, see
OUBLESHOO
TING on page 119 and check the symptoms
TROUBLESHOO
OUBLESHOOTING
TR
and solutions. Print the test page again after removing the problem.
106
UK 10 PREPARATION LEO.p65
GETTING STARTED
106
30/03/00, 17:09
Installing the printer driver software
Windo
ws 98:
Windows
1
Load paper into the paper tray of the printer. For instructions on loading
ADING COPY P
APER on page 12.
paper, see the section LO
LOADING
PAPER
2
Turn on the machine.
3
Turn on your computer and start Windows.
Before installing the printer driver, be sure to close all other
applications which may be open.
4
When using Windows 98 on a personal computer with plug & play*, the
xt button
“Add New Hardware Wizard” window will appear. Click the Ne
Next
and follow the on-screen instructions.
● If the “Add New Hardware Wizard” window does not appear, proceed
to step 8.
*Plug &play: For plug & play information, see page 105.
Add New Hardware Wizard
This wizard searches for new drivers for:
10
A device driver is a software program that makes a
hardware device work.
< Back
5
> Next
Cancel
ch ffor
or the best driver ffor
or y
our de
vice and click the Ne
xt
Select Sear
Searc
your
device
Next
button.
107
GETTING STARTED
UK 10 PREPARATION LEO.p65
107
30/03/00, 17:09
Installing the printer driver software
6
Insert the installation CD-ROM into the CD-ROM drive. Select the CDxt button. Follow the on-screen instructions.
Next
ROM drive and click the Ne
Add New Hardware Wizard
Windows will search for new drivers in its driver database
on your hard drive, and in any of the following selected
locations. Click Next to start the search.
Floppy disk drives
CD-ROM drive
Microsoft Windows Update
Specify a location:
Browse...
< Back
> Next
Cancel
Windows driver file search will find the device “SHARP AL-F_FO”. Click
xt button. Follow the on-screen instructions.
the Ne
Next
10
7
8
Insert the installation CD-ROM into the CD-ROM drive. Click the Star
Startt
button and select Run
Run. When the window shown below appears, type
R:\SETUP (if the CD-ROM is designated as drive R) and click the OK
button.Follow the on-screen instructions.
If you have any problem with the test print, see
OUBLESHOO
TING on page 119.
TROUBLESHOO
OUBLESHOOTING
TR
108
UK 10 PREPARATION LEO.p65
GETTING STARTED
108
30/03/00, 17:09
Installing the printer driver software
Windo
ws 3.1x:
Windows
1
Load paper into the paper tray of the printer. For instructions on loading
ADING COPY P
APER on page 12.
paper, see the section LO
LOADING
PAPER
2
Turn on the machine and then start Windows on your computer.
Before installing the printer driver, be sure to close all other
applications which may be open.
3
Insert the installation CD-ROM into a CD-ROM drive.
4
Choose File from the Menu bar in Program Manager, and then choose
the Run… command.
5
Type R:\SETUP (if the CD-ROM is designated as drive R) in the command
line box and then click the OK button.
10
6
Follow the on-screen instructions.
109
GETTING STARTED
UK 10 PREPARATION LEO.p65
109
30/03/00, 17:09
Installing the printer driver software
“SHARP AL-F_FO” printer driver gr
oup
group
When the printer driver is installed, the SHARP AL-F_FO printer driver
group will be created. This group allows the following functions to be
executed.
DOS Em
ulation HELP
Emulation
DOS Em
ulation Setup
Emulation
See page 116.
Readme
The latest information on the printer driver and the TWAIN driver is
included in this note. Read the Readme first.
Status Monitor HELP
Status Monitor
The printer state and information on current printing are displayed on
the status monitor window. When printing starts, the status monitor
screen will appear on the computer display.
10
Uninstall AL-F_FO
The printer driver and the TWAIN driver can be uninstalled.
If the drivers are uninstalled, printing and scanning cannot be performed
on the machine.
●
●
Be sure to read “Readme” found in the printer driver group before
starting to print from application programs.
If you uninstall the printer driver, the TWAIN driver is unistalled at
the same time.
110
UK 10 PREPARATION LEO.p65
GETTING STARTED
110
30/03/00, 17:09
11. PRINTING
Printing a pa
ge
pag
The printing method is described below. Read the description with the operation
manual for the application to be used.
Before you can use this machine as a printer, you must install the
supplied SHARP printer driver which has been supplied with the printer.
Once this software has been installed, you can control the printing of
your documents from the printer driver which appears on your
ALLING THE PRINTER DRIVER
computer screen. See INST
INSTALLING
SOFTW
ARE on page 104.
SOFTWARE
● When using multiple printers, you must change the printer setting
from the control panel to change the printer to be used. This
machinecannot be used with other GDI printers and printers that use
THER
the Windows Printing System. For details, see USING O
OTHER
INST
ALLED DRIVERS on page 121.
INSTALLED
●
Ex
ecuting printing
Executing
Ensure that paper of the desired size is loaded in the paper tray. (See
1
ADING COPY P
APER on page 12.)
the section on LO
LOADING
PAPER
To print onto special papers such as transparency film, labels, thick
paper and envelopes, specify “Manual Feed” as the paper source
using the printer driver, and feed it one sheet at a time.
2
Turn on the machine. The ready (
3
Select the settings for printing such as the number of sets and paper
OM
type from the application. See SETTING PRINT CONDITIONS FR
FROM
PRINTER DRIVER on page 113.
) indicator will light up.
Before printing, ensure that the AL-F_FO has been selected as the
printer.
4
Print the file from your software application.
If copying is being performed when printing is started, copying will
continue. After copying is complete, printing will be executed when
the clear ( ) key is pressed twice or approximately 60 seconds
(auto clear time)* elapsed.
* The auto clear time varies with a user program setting. See page
27.
● Preheat mode and auto power shut-off mode will be canceled when
printing is started.
●
111
PRINTING
UK 11 PRINTING LEO.p65
111
30/03/00, 17:31
11
Printing a page
If the paper size specified from the software application is larger
than the paper size in the machine, the image may be printed
onto two sheets of paper.
● If the paper size specified from the software application is larger
than the paper size in the printer, part of the image that is not
transferred to the paper may remain on the surface of the drum.
In this case, the other side of the paper may become dirty. If this
occurs, change to the correct size paper and print two or three
pages to clean the image.
●
Indicator
s on the operation panel
Indicators
The ON LINE indicator and the ready (
printer.
ON LINE
indicator
Power save
indicator
11
Ready indicator
) indicator indicate the state of the
Read
y indicator
Ready
On:
Indicates the machine is ready
for printing or scanning (on line),
or printing is being performed.
Off:
Indicates copying is being
performed, scanner data is
being read , or the machine is in
the auto power shut-off mode.
ON LINE indicator
On:
Indicates the machine is ready
for printing or scanning (on line),
printing is being performed, or
scanner data is being read.
Blinking: Indicates a copy job has
interrupted a print job.
Off:
Indicates copying is being
performed.
Power sa
ve indicator
save
On:
Indicates the machine is in a
power save mode.
112
UK 11 PRINTING LEO.p65
PRINTING
112
30/03/00, 17:31
om printer driver
Setting print conditions fr
from
The setting method and setting items of the printer driver are described below.
Also refer to the printer driver help for more information.
Before setting the printer driver, check the following items.
●
●
The FO-3800M printer driver has been installed in the computer to be used. If
ALLING THE PRINTER DRIVER SOFTW
ARE on page 104.
not, see INST
INSTALLING
SOFTWARE
The FO-3800M has been selected as the default printer on the computer to be
used.
Windo
ws 95/Windo
ws 98/Windo
ws NT 4.0:
Windows
95/Windows
98/Windows
1
s from
Click the Star
Startt button of the computer and then select Printer
Printers
Settings.
2
If you use Windows 95/Windows 98, right-click the SHARP AL-F_FO
oper
ties in the menu.
icon in the Printer folder and select Pr
Proper
operties
If you use Windows NT 4.0, right-click the SHARP AL-F_FO icon in the
Printer folder and select Document defaults in the menu.
For this description, it is assumed that the mouse is configured
for right hand operation.
11
113
PRINTING
UK 11 PRINTING LEO.p65
113
30/03/00, 17:31
Setting print conditions from printer driver
The properties of the SHARP AL-F_FO printer driver will be displayed. If
you use Windows 95/Windows 98, click the Driver Setup tab to display
the following screen.
3
* Screen on Windows 95
Driver Setup tabs
By selecting a different tab other driver settings can be changed.
Example: Resolution changes can be made by selecting the Image Quality tab.
SHARP AL-F_FO Properties
▲
Paper/Output
Image Quality Tricks
DOS Emulation About...
Copies (C):
Portrait
1
Landscape
Paper Source (S):
xxx
3
Paper Tray
2
1
Collate
xxx
3
2
1
Reverse Order
Paper Size (Z):
A4 210mm x 297mmm
Default All b
utton
button
All settings which have
been selected by all tabs
will be returned to their
default state.
N-Up (N):
1
▲
Default All
OK
11
▲
OK b
utton
button
All driver settings which
have been selected by
each tab will be saved and
the proper ties will be
terminated.
Windo
ws 3.1x:
Windows
Cancel
▲
Apply
Default
Default b
utton
button
The settings which have
been selected by each
tab will be returned to
their default state.
▲
1
Help
▲
Cancel b
utton
button
The settings which have been
selected by each tab will be
cancelled and the properties
will be terminated.
However, the settings which
have been saved will not be
cancelled.
Appl
yb
utton
Apply
button
The settings which have
been selected by each
tab will be saved.
*This button is not
displayed on Windows
NT 4.0.
1
ger icon in the Main window of Program
Double-click the Print Mana
Manag
Manager.
2
Select Options in the Print Manager and then select Printer Setup
Setup.
3
Select SHARP AL-F_FO in the Installed Printers and click the Setup
button.
4
The properties of the SHARP AL-F_FO will be displayed.
114
SUK 11 PRINTING LEO.p65
PRINTING
114
19/04/00, 08:34
om an MS-DOS application
Printing fr
from
You can execute printing from an MS-DOS application which has been executed
from the MS-DOS prompt in Windows.
This printer can only print from applications run from the MSDOS prompt in Windows. It cannot print when running in native
MS-DOS mode.
Print setting fr
om the MS-DOS pr
ompt
from
prompt
Windows 95/Windows 98 has the item, “Spool MS-DOS print jobs” in the port
settings. If this setting is not selected, the printer will not operate properly. Use the
following procedure to check the setting.
1
Click the Star
Startt button.
2
s.
Select Settings and then click Printer
Printers
3
Right-click the AL-F_FO icon in the printer dialog box and click
oper
ties
Proper
operties
ties.
Pr
For this description, it is assumed that the mouse is configured
for right hand operation.
4
Click the Details tab in the Properties dialog box.
5
Click the Por
ortt Settings button.
6
Spool MS-DOS print jobs
Check that “Spool
jobs” is checked in the port setting
dialog box.
115
PRINTING
UK 11 PRINTING LEO.p65
115
30/03/00, 17:31
11
Printing from an MS-DOS application
Settings on the fr
ont panel
front
Paper size, tray selection, and other options are set from the front panel. Use the
following procedure to start the front panel.
Windo
ws 95/Windo
ws 98/Windo
ws NT 4.0:
Windows
95/Windows
98/Windows
1
ogram
ulation Setup
Click Star
Startt, Pr
Program
ogram, SHARP AL-F_FO
AL-F_FO, and DOS Em
Emulation
Setup.
Windo
ws 3.1x:
Windows
1
ulation Setup icon in the SHARP AL-F_FO
Double-click the DOS Em
Emulation
ogram Mana
ger
in Pr
Program
Manag
er..
Software printer setting
Set your MS-DOS application to use the following model printer.
HP LaserJet Series II (PCL4)
If this printer is not listed on the application’s printer setup, choose a PCL4
compatible printer.
11
116
UK 11 PRINTING LEO.p65
PRINTING
116
30/03/00, 17:31
12. SCANNING
Scanning an image
Before you can scan images using the AL-F_FO from a TWAIN-compatible application, you must install the supplied SHARP TWAIN interface software. This software
is automatically installed at the same time you install the SHARP printer driver provided
on CD-ROM. See INSTALLING THE PRINTER DRIVER SOFTWARE on page
104.
●
●
●
●
●
●
Be sure to read “Readme” in the printer driver group before scanning
images from application programs.
When using the FO-3800M as a scanner, you must make sure
that your computer Printer Port is configured for ECP mode. If the
computer is set to a mode other than ECP mode, change the
mode ECP mode. The method for setting ECP mode differs
depending on your computer. Refer to the documentation for your
computer.
Refer to the TWAIN help for more information.
For information about the state of operation panel indicators when
using the scanner function, see Indicators on the operation panel
on page 112.
Preheat mode and auto power shut-off mode will be canceled
when scanning is started.
When scanning more than one original from the SPF with “Reverse
Order” selected, you need enough free space on the hard disk
(Up to 180MB of free space).
117
SCANNING
UK 12 SCANNING LEO.p65
117
30/03/00, 17:35
12
Scanning an image
Scanning from a TWAIN-compatible application
1
When multiple sources are available, choose Select Source from the
appliacation’s File menu and select SHARP AL-F_FO TWAIN_xx.
2
Choose Acquire from the File menu. AL-F_FO TWAIN software starts.
3
Place the original and press the Preview button.
4
Set scanning parameters as necessary.
5
Press the Scan button.
You exit from AL-F_FO TWAIN software and the scanned image appears
in the application’s window.
Exiting from AL-F_FO TWAIN software
To terminate AL-F_FO TWAIN software, click on the close box while AL-F_FO TWAIN
window is active.
12
118
UK 12 SCANNING LEO.p65
SCANNING
118
30/03/00, 17:35
13. TR
OUBLE ?
TROUBLE
leshooting
Troub
oubleshooting
Some problems are common to the copier, printer and scanner features, so also
OUBLESHOO
TING on page 99.
check TR
TROUBLESHOO
OUBLESHOOTING
Problem
Printer
driver
cannot be
installed.
Possible cause
Solution
Hard disk free space is not
sufficient for installation of
the printer driver.
Delete unnecessary files and application
software to increase hard disk free space.
(The driver requires at least 11MB free
space.) See page 104
The operating system is not Use Windows 3.1x, Windows 95, Windows 98
or Windows NT 4.0. See page 104
proper.
Paper does Paper is not set correctly.
not feed
Too much paper in the paper
into the
tray.
machine.
Insert the paper correcly. See page 12
The machine The interface cable might
does not
not be connected properly.
print.
The interface cable is
defective.
Check the interface connection. See page 103
Remove excessive paper from the paper tray.
For envelopes, transparency film, and labels,
feed one sheet at a time. See page 12
Check the cable with a computer and printer
which you know work. If printing is still not
possible, the interface cable is defective.
The port setting is incorrect. Check the printer settings in the Windows
Control panel to make sure that the print job
is being sent to the correct port
(for example, LTP1).
The TD cartridge or drum Ensure that the TD cartridge and drum
cartridge are installed properly.
cartridge is not installed
See page 29, 31
properly.
The printer may be
configured incorrectly.
Check the application to make sure that all
the print settings are correct.
The printer driver may be
incorrectly installed.
Reinstall the printer driver software and try
printing a test page. See page 104
119
TROUBLE?
UK 13 TROUBLE LEO.p65
119
30/03/00, 17:42
13
Troubleshooting
Problem
Possible cause
Solution
The inteface cable might not be
The machine
connected properly.
prints wrong
data or incorrect
The interface cable is not IEEEcharacters.
1284 compliant or a switch box /
pass-through device does not
respond to high speed data
transfer.
Check the interface connection.
See page 103
Printing is too
slow.
Double-click the Printers icon in
Control Panel and check the Use
Print Manager box.
Close all unnecessary applications
before printing.
If using Windows 3.1x, Print
manager may be disabled.
There may be too many
applications open.
The resolution is set to 600 dpi.
The machine
does not print
the full image.
Use the interface cable included with
the FO-3800M. Remove any switch
box / pass-through device connected
FO-3800M. See the parallel interface
specifications. See page 102, 128
Set the resolution to 300 dpi. See
page 113
The computer may have
insufficient random-access
memory (RAM).
The page layout is too compex.
Install more random-access memory
(RAM) in your computer. See
page 104
Simplify the page layout.
Resolution is set to 600 dpi.
Set the resolution to 300 dpi. See
page 113
Page orientation setting may be
incorrect.
Change the page orientation with the
printer driver. See page 113
There may be too many applica- Close all unnecessary applications
before printing.
tions open.
The paper in the machine may Load the correct paper into the
be larger than the paper size
machine.
specified in your application
or printer driver.
The interface cable is not IEEE- Use the interface cable included with
1284 compliant or a switch box / the FO-3800M. Remove any switch
pass-through device does not
box / pass-through device connected
respond to high speed data
FO-3800M. See the parallel interface
transfer.
specifications. See page 102, 128
13
The machine
does not scan.
The CPU specifications may be
incorrect.
Check that the CPU of your computer
is 486DX 66MHz or better. See page 104
The computer may have insufficient
random-access memory (RAM).
The interface cable might not be
connected properly.
Install more random-access memory
(RAM) in your computer. See page 104
Check the interface connection.
See page 103
120
UK 13 TROUBLE LEO.p65
TROUBLE?
120
30/03/00, 17:42
s
Using other installed driver
drivers
If you use another GDI printer or a Windows Printing System printer, including the
SHARP AL-800 series and AL-1000 series, interference between printers may
occur and printing may not be performed properly.
To use another GDI printer or a Windows Printing System printer, you must change
the port setting of the printer driver using the following procedure.
If another printer does not operate properly when the AL-F_FO
printer driver is set to “FILE”, uninstall the AL-F_FO printer driver.
ALLING PRINTER DRIVER
To uninstall the driver, see UNINST
UNINSTALLING
on page 122. If after uninstalling the AL-F_FO printer driver, the
printer still does not operate properly, reinstall the printer driver
you are using.
Windo
ws 95/Windo
ws 98/Windo
ws NT 4.0:
Windows
95/Windows
98/Windows
1
Click the Star
Startt button.
2
s.
Select Settings and then click Printer
Printers
3
Right-click the SHARP AL-F_FO icon in the printer dialog box and then
oper
ties
click Pr
Proper
operties
ties.
For this description, it is assumed that the mouse is configured
for right hand operation.
4
Por
ts tab – on Windows NT4.0) in the Properties
Click the Details tab (P
orts
dialog box, select FILE: in the Print to the following port list box, and
click the OK button.
5
oper
ties
Right-click the icon of the printer to be used and click Pr
Proper
operties
ties.
6
ts tab – on Windows NT4.0) in the Properties
Por
Click the Details tab (P
orts
window, select LPT1 (or the currently used port), and click the OK button.
To use the AL-F_FO again, perform the same procedure but select
the port to be used (for example, LPT1) in step 4.
121
TROUBLE?
UK 13 TROUBLE LEO.p65
121
30/03/00, 17:42
13
Using other installed drivers
Windo
ws 3.1x:
Windows
1
ol P
anel icon in the Main window of Program
Double-click the Contr
Control
Panel
Manager.
2
s icon. The Printers window will then open.
Double-click the Printer
Printers
3
Select AL-F_FO
AL-F_FO, and then click the Connect button.
4
Select File from the list of options in the Ports window, and then click the
OK button.
5
Select the new printer you would like to use from the list in the Installed
Printers window, and then click the Connect button.
6
Select the printer port to use for the new printer, and then click the OK
button.
7
Click the Set As Default Printer button, and then click the Close button.
To use the AL-F_FO again, perform the same procedure but select
the port to be used (for example, LPT1) in step 4.
Uninstalling driver
s
drivers
13
If the printer driver and the TWAIN driver are not installed correctly or if you no
longer use this machine, uninstall the printer driver and TWAIN driver from your
computer using the following procedure.
1
ogram
If using Windows 95/Windows 98/Windows NT 4.0, click Star
Startt, Pr
Program
ogram,
AL-F_FO, and Uninstall AL-F_FO
AL-F_FO.
SHARP AL-F_FO
If using Windows 3.1x, double-click the SHARP AL-F_FO icon in Program
Manager and double-click the Uninstall AL-F_FO icon.
2
When the “Confirm File Deletion” window appears, click the Yes button.
3
When the “Remove Programs From Your Computer” window appears,
click the OK button.
The printer driver and the TWAIN driver are uninstalled at the same
time.
122
UK 13 TROUBLE LEO.p65
TROUBLE?
122
30/03/00, 17:43
14. SPECIFICATIONS
Fax specifications
Compatibility
ITU-T G3
Telephone line
PSTN
Dial mode
Pulse (10 pps), tone
Modem rate
14,400 bps with automatic fallback to
12,000, 9,600, 7,200, 4,800, or 2,400 bps
Compression method
MH, MR, MMR
Transmission time
Approximately 6 seconds using SHARP
standard original.
Transmission times can become longer
depending on the telephone line
conditions and the performance of the
receiving fax machine.
Time excludes fax protocol signals.
Memory
2 megabytes of RAM. Holds 120 pages
(using SHARP standard original at
standard resolution).
Sending original size
Maximun A4, minimum A5
One sheet at a time or several sheets at a
time (when using the SPF)
Maximum 216 mm x 355 mm
Minimum 216 mm x 140 mm
Recording paper size
A4
SPF
30 sheets (52 to 90 g/m2)
Resolution in Text mode
Standard:
Fine:
Super Fine:
Resolution in Half tone mode
200 x 20 dpi
Grayscale method in
Half tone mode
“Error diffusion”
Grayscale level in
Half tone mode
256 levels
Contrast
Light, Medium, Dark
Quick scan
8 pages per minute (Maximum)
(Using SHARP-standard size original)
Broadcasting
Destination: maximum of 50 different
locations
Destinations: Selected from Rapid key,
Speed Dial numbers, or Group keys
locations
200 x 100 dpi
200 x 200 dpi
200 x 400 dpi
14
123
SPECIFICATIONS
SUK 14 SPECIFICATIONS LEO.p65
123
30/03/00, 17:27
Fax specifications
Polling
Modes: Polling Others, Polling from
memory
Delayed faxing
3 types selectable: Standard, Memory
Transmission, or Polling Others
Anti Junk Fax
Up to 10 numbers
Auto Cover Sheet
6 message types selectable: “Urgent,”
“Important,” “Confidential,” “Pls. Distribute,”
“Pls. Call Back,” and no message
Report
Transaction, activity (send/receive), power
fail (receive)
Printable setting lists
Anti Junk Fax numbers, timer, group,
phone number, optional setting
As a part of our policy of continuous improvement, SHARP reserves
the right to make design and specification changes for product
improvement without prior notice. The performance specification figures
indicated are nominal values of production machines. There may be
some deviations from these values in individual machines.
14
124
SUK 14 SPECIFICATIONS LEO.p65
SPECIFICATIONS
124
30/03/00, 17:27
Copier specifications
Type
Copy system
Originals
Original size
Copy sizes
Copy speed
Continuous copying
First-copy time
Copy ratio
Exposure system
Copy paper feed
Fusing system
Development system
Light source
Resolution
Power supply
Power consumption
Overall dimensions
Weight
Copier dimensions
Operating conditions
Noise level
Digital laser multifunction, desk-top type
Dry, electrostatic transfer
Sheets, bound documents
Max. A4
A6 to A4
(Feed copy paper lengthwise only.)
Image loss: Max. 5 mm (leading and trailing edges)
Max. 3 mm (either of the other edges)
8 copies/min.
Max. 50 copies; subtractive counter
11 sec. (normal copying mode)
Variable: 50% to 200% in 1% increments (total 151
steps)
Fixed: 50%, 70%, 86%, 100%, 141%, 200%
Moving optical source, slit exposure (stationary
platen) with automatic exposure / SPF: Moving
original
One paper tray with automatic feed (250 sheets)
Heat pressure roller method
Non magnetic mono component development
system
Fluorescent lamps
600 dpi
Local voltage ±10% (For this copiers power supply
requirements, see the name plate located on the
back of the unit.)
Max. 600 W
460 mm (W) x 650 mm (D)
Approx. 13 kg
TD and drum cartridges included
460 mm (W) x 425 mm (D) x 307 mm (H)
Temperature: 10°C to 35°C
Humidity
20% to 80% (max. 60% at 35°C)
Sound Power Level LWA (1B=10dB)
Copying: 6.7 [B (A)], Standby: Background noise level
Sound Pressure Level LPA (bystander positions)
Copying: 49 [dB (A)], Standby: Background noise level
Noise emission measurement in accordance with ISO 7779.
First-copy timemay differ depending on operating conditions, such as power-supply
votage and room temperature.Thevalues forcopy speed are rounded to the nearest
whole number.
125
SPECIFICATIONS
SUK 14 SPECIFICATIONS LEO.p65
125
30/03/00, 17:27
14
Paper
Type of media
Size
Weight
Standard paper and
thick paper
A4
B5
A5
B6
A6
Transparency A4
film
56 to 80 g/m²
Paper capacity : 250 sheets
80 to 90 g/m²
Paper capacity : 200 sheets
Special
media
52 to 130 g/m² **
Envelope*
International DL
International C5
* Do not use envelopes that have metal clasps, plastic snappers, string closures,
windows, linings, self-adhesive, patches or synthetic materials. These will cause
physical damage to the copier. Envelopes with bent corners may frequently
misfeed. They mustbe flattened.
**For paper weighing from 104 to 130 g/m², A4 is the maximum size that can be
fed.
• Special papers such as transparency film and labels must be fed one sheet at
a time.
Be sure to use only genuine SHARP parts and supplies.
For best copying results, be sure to use only SHARP Genuine Supplies
which are designed, engineered, and tested to maximize the life and
performance of SHARP copiers. Look for the Genuine Supplies label on
the toner package.
Supply list
Supply
14
Part no.
Usable life
Td cartridge
AL-80TD
Approx. 3,000 sheets*
Drum cartridge
AL-80DR
Approx. 20,000 sheets
*Based on copying onto A4 at 5% toned area. The life of the TD cartridge which
has been included in the machine at the factory is approximately 1500 sheets
(A4 size paper at 5% toned area).
Proper storage
1.Store the supplies in a location that is:
• Clean and dry,
• At a stable temperature,
• Not exposed to direct sunlight.
2.Store copy paper in the wrapper and lying flat.
• Paper stored out of the wrapper or in packages standing on end may curl or
get damp, resulting in paper misfeeds.
126
SUK 14 SPECIFICATIONS LEO.p65
SPECIFICATIONS
126
30/03/00, 17:27
Printer specifications
Resolution
600 or 300 dpi canbe selected
Page description language
SHARP GDI
Page orientation
Portrait or landscape
First print time
Approx. 20 seconds*
Print speed
Approx. 8 pages per minute (A4)
Interface port
Bi-directional parallel interface
(IEEE 1284 compliant)
Memory
6MB
* First print time may differ depending on operating conditions, such as powersupply voltage and room temperature. Also the time may differ depending on
data quantity to be printed and applications
Scanner specifications
Scanning method
Flatbed scanner with moving scanning
head
Light source
Fluorescent lamps
Sensor
CCD
Scanning range
Max. 21cm (W) x 35 cm (H)
Resolution
Standard : 400 dpi
Max. 600 dpi (pseudo-resolution)
Output data
1bit
Scanning speed
0.85ms/line (Data tranfer time not included)
Interface
IEEE 1284 compliant parallel interface
(ECP mode only)
127
SPECIFICATIONS
SUK 14 SPECIFICATIONS LEO.p65
127
14
30/03/00, 17:27
Parallel interface
This printer uses a bi-directional parallel interface. Use the interface cable
attachedtothe FO-3800M.
For specifications of the parallel interfaceof your computer, see its
operation manual.
Use the parallel interface cable specified by SHARP for prevention of
external radio wave interference. For details, contact your SHARP dealer.
Connector
36-pin DDK 57LE-40360-730B (D29) female
connector or equivalent connector.
Cable
Shielded typt bi-directional parallel interface.
For best results, use a printer interface cale
which is IEEE1284 compliant.
Pin configuration
The pin numbers and signal names are listed
in the following table.
Pin No.
14
Signal name
18
1
36
19
Pin No.
Signal name
1
STB
19
GND (STB RET)
2
DATA1
20
GND (DATA1 RET)
3
DATA2
21
GND (DATA2 RET)
4
DATA3
22
GND (DATA3 RET)
5
DATA4
23
GND (DATA4 RET)
6
DATA5
24
GND (DATA5 RET)
7
DATA6
25
GND (DATA6 RET)
8
DATA7
26
GND (DATA7 RET)
9
DATA8
27
GND (DATA8 RET)
ACKNLG
28
GND (ACKNLG RET)
10
11
BUSY
29
GND (BUSY RET)
12
PE (Paper End)
30
GND (PE RET)
13
SLTC
31
INPRM
14
AUTO LF
32
FAULT
15
(NC)
33
(NC)
16
GND (0 V)
34
(NC)
17
FG
35
+5V
18
+5V
36
SLTC IN
128
SUK 14 SPECIFICATIONS LEO.p65
SPECIFICATIONS
128
30/03/00, 17:27
Print area
The print area of this printer is shown below.
Portrait
Landscape
E
E
B A
F
E
D C
G
E
F
D
C
G
Paper size
B
A
Print area
600 dpi
Dots
Paper size
A
B
Letter
5100
Legal
5100
Invoice
3300
A4
C
D
4904
6600
6400
100
96
100
4904
8400
8200
100
96
100
3104
5100
4900
100
96
100
4960
4760
7015
6815
100
100
100
A5
3496
3296
4960
4760
100
100
100
E
F
G
B5
4299
4104
6070
5870
100
95
100
Folio
5100
4904
7800
7600
100
96
100
Foolscap
5100
4904
7440
7240
100
96
100
A
B
C
D
F
G
Letter
2550
2456
3300
3200
50
44
50
Legal
2550
2456
4200
4100
50
44
50
Invoice
1650
1552
2550
2450
50
48
50
A4
2480
2384
3507
3407
50
46
50
A5
1748
1648
2480
2380
50
50
50
300 dpi
Dots
Paper size
E
B5
2149
2056
3035
2935
50
43
50
Folio
2550
2456
3900
3800
50
44
50
Foolscap
2550
2456
3720
3620
50
44
50
129
SPECIFICATIONS
SUK 14 SPECIFICATIONS LEO.p65
129
30/03/00, 17:27
14
Transport
When moving the machine, follow the procedure below.
When moving this machine, be sure to remove the TD cartridge. This
prevents toner from spilling inside the machine during shipment.
14
1
Turn the power switch off and disconnect the power cord.
2
Remove the printer interface cable.
3
Push gently on both sides of the front cover to open the cover.
4
Gently pull the TD cartridge out. See page 29, TD CARTRIDGE REPLACEMENT.
5
Remove the copy paper from the paper tray. To remove the paper, see page
35, Misfeed in the paper tray.
6
Remove the paper tray from the machine.
7
Gently push the paper output tray back into the machine until it stops.
8
Attach to the left side of the machine the screw that has been saved. See
page 3, SET UP.
When shipping the machine, the screw must be reinstalled to prevent
shipping damage. This screw will secure the scanning head. If the
power has been turned off while an original was being scanned, the
scanning head is not at the left end position. In this case, turn on the
machine and then turn it off after checking the head is at the left end
position.
9
Close the front cover.
10
Attach the packing materials and tape which were removed during
installation of the machine See page 3, SET UP.
11
Pack the machine into the carton.
130
SUK 14 SPECIFICATIONS LEO.p65
SPECIFICATIONS
130
30/03/00, 17:27
15. QUICK REFERENCE
Quick reference
This page summarizes the operations you can perform with this unit. For
detailed information about each operation, refer to the appropriate section of
this manual.
FAX
Set RESOLUTION/CONTRAST
Load the document
then following
operation
BROADCAST
Normal Broadcasting
BROADCAST ➞ Enter Speed Dial
number / Press Rapid keys ➞ FAX
START
Using Group Key
Press GROUP key
TRANSMITTING DOCUMENTS
Set RESOLUTION CONTRAST MEMORY
Direct Keypad Dialing
Dial (press NUM keys)
➞ FAX START
POLLING OTHERS
Rapid Key Dialing
Press Rapid key
Speed Dialing
SPEED/SEARCH
➞ Enter Speed Dial number
➞ FAX START
Set Rapid 20 key as polling key
(FUNCTION key
➞ 3
➞ 4
➞ 1 STOP
➞ STOP)
And set RESOLUTION/CONTRAST
Normal Dialing
SPEAKER Dial
(Press NUM keys)
➞ Wait for reception tone
➞ FAX START
Direct Keypad Dialing
Dial (press NUM keys)
➞ POLLING (Rapid 20)
Redialing
REDIAL
➞ Wait for reception tone
➞ FAX START
Speed Dialing
SPEED
➞ Enter Speed Dial number
➞ POLLING (Rapid 20)
15
Normal Dialing
SPEAKER
➞ Dial (Press NUM keys)
➞ Wait for reception tone
➞ POLLING (Rapid 20)
131
QUICK REFERENCE
SUK 15 QUICK REFERENCE LEO.p65
131
30/03/00, 14:54
Quick reference
FUNCTION MODE
STEP 1 Press FUNCTION key
STEP 2 Press the menu number from the list below
STEP 3 Press the option number from the list below
1. TIMER MODE
1. OPERATION SET
(SEND/POLLING)
2. OPERATION CLEAR
2. LISTING MODE
1. TRANSMISSION ACTIVITY
REPORT
3. TIMER LIST
5. OPTION SETTING LIST
7. ANTI JUNK FAX NUMBER LIST
2. RECEPTIONS ACTIVITY
REPORT
4. FAX NUMBER LIST
6. GROUP LIST
3. ENTRY MODE
1. FAX NUMBER MODE
(SET/CLEAR)
3. OWN NUMBER SET
5. AUTO SUMMER TIME
2. DATE & TIME SET
01. FINE RESOLUTION
PRIORITY
03. NUMBER OF RINGS
MANUAL RECEPTION
05. TRANSACTION REPORT
07. RECALL TIMES
09. FAX REMOTE NUMBER
11. FAX SIGNAL RECEIVE
13. RECEIVE REDUCTION
15. BEEP VOLUME
17. INCOMING RING VOLUME
19. BATCH INDEXING
21. LANGUAGE SETTING
02. NUMBER OF RINGS
AUTO RECEPTION
04. AUTO LISTING
4. OPTION SETTING
15
4. POLLING FUNCTION
06. BROADCAST LIST
08. RECALL INTERVAL
10. REMOTE RECEPTION
12. AUTO COVER SHEET
14. BEEP LENGTH
16. KEY BEEPS
18. PBX SETTING
20. REVERSE SENDING
5. GROUP ENTRY MODE
1. GROUP SET MODE
2. GROUP CLEAR MODE
6. ANTI JUNK FAX MODE
1. ANTI JUNK SELECT (ON/OFF)
2. JUNK FAX NUMBER MODE
(SET/CLEAR)
7. COVER SHEET MODE
1. COVER SHEET ON
2. COVER SHEET OFF
8. ANSWERING MACHINE
MODE
1. QUIET DETECT TIME
2. SELECT AUTO RECEIVE
(ON/OFF)
9. MEMORY POLL SET
1. 1 TIME
2. REPEAT
0. RX DATA TRANSFER
1. DATA TRANSFER
2. FAX NUMBER
132
SUK 15 QUICK REFERENCE LEO.p65
QUICK REFERENCE
132
30/03/00, 14:54
16. GLOSSARY
Glossary
A.M. mode:
When set to A.M. (Answering Machine) mode, the machine directs all incoming
calls to an answering machine connected to the same line.
Anti Junk Fax:
A faxing feature that enables the user to program up to ten fax numbers from
which he/she does not want to receive faxes.
Automatic Dialing:
A faxing feature by which the machine will automatically dial a user-programmed
number with the press of one or more keys. See Rapid Key Dialing and Speed
Dialing.
AUTO mode:
When set to AUTO mode, the machine receives faxes automatically.
Broadcasting:
A form of transmitting that allows a fax to be sent to multiple fax machine
locations.
Chain Dialing:
A form of dialing that allows the user to dial a long number (up to 50 digits in
length) with a combination of Rapid keys, Speed Dial numbers, or Rapid keys
and manually entered numbers.
Contrast:
The degree of difference between dark and light areas of a printed, faxed, or
scanned original.
dpi (dots per inch):
A standardized machine of measurement used for the resolution of a scanned
or printed image.
Group Keys:
The term for multiple Rapid keys that have been programmed as a group of
fax numbers.
MANUAL mode:
When the machine is set to MANUAL mode, all calls must be answered
manually by pressing the SPEAKER key, or by lifting the handset of an external
phone on the same telephone line.
Polling:
A faxing function that allows the user to request a transmission from another
fax machine. In effect, the receiving fax machine dials the transmitting fax
machine and activates the transmission.
133
GLOSSARY
SUK 16 GLOSSARY LEO.p65
133
29/03/00, 08:30
16
Glossary
Rapid Key Dialing:
A form of Automatic Dialing by which only a single Fax number programmed
key (a Rapid key) has to be pressed in order to dial a number.
Receive Reduce:
A faxing function that automatically scales received faxes to the size of the
paper loaded in the machine.
Reception mode:
The setting that controls how the machine responds to incoming calls. See
A.M. mode, AUTO mode, and MANUAL mode.
Remote Reception:
A faxing function by which fax reception can be activated from an extension
telephone by entering a one-digit Fax Remote Number followed by
.
Resolution:
The amount of space between lines of a printed, faxed, or scanned original.
Generally, the higher the resolution, the higher the quality of the original or
image.
Speed Dialing:
A form of Automatic Dialing done by pressing the SPEED/SEARCH key, and
then entering a programmed 2-digit Speed Dial number.
Transmission Reservation:
A faxing function that enables the user to load a fax and enter the receiving
fax number while the machine is in use. The fax is sent as soon as the machine
has finished the previous job.
16
134
SUK 16 GLOSSARY LEO.p65
GLOSSARY
134
29/03/00, 08:30
17. INDEX
Index
A
A.M. Mode ..................................... 77
Activity Report Auto Listing ........... 95
Alarm Beep Length ........................ 45
Answering Machine Backup ........... 64
Anti Junk Fax ................................. 91
Arrow Keys .................................... 44
Audible Signals .............................. 99
Auto Clear ................................ 25, 27
Auto Cover Sheet ........................... 71
AUTO Mode ................................... 77
Auto Power Shut-off Mode ....... 25, 27
Auto Summer Time Setting ............ 50
Automatic Dialing ........................... 58
Automatic Exposure Adjustment .... 21
B
Beep Volume .................................. 44
Broadcasting .................................. 84
Broadcasting Reports .................... 96
C
Cautions ........................................ 7
Cautions on Handling ..................... 6
Chain Dialing ............................ 60, 75
Connecting the Interface Cable .... 103
Connection ..................................... 15
Contrast ......................................... 69
Copy Paper .................................. 126
Copy Quantity ................................ 19
Copy atio ....................................... 22
Cover Sheet ................................... 70
D
Dark Key ........................................ 20
Data Transfer .................................. 81
Dialing and Transmitting ................. 73
Direct Keypad Dialing ..................... 73
Display Messages ......................... 98
Document Feeder Tray ................... 17
Drum Cartridge Indicator .......... 10, 42
Drum Cartridge Replacement ......... 31
E
Enlargement ................................... 22
Entering Characters ....................... 47
Entering Your Name and Fax Number 48
Exposure Adjustment ..................... 20
F
Fax Transmission Settings ............. 69
Fax Setup ...................................... 47
Features ........................................ 8
Fine Resolution Priority .................. 55
G
Group Keys .................................... 61
Group List ...................................... 94
I
Initial Settings ................................ 14
Index Function ............................... 54
Installing the Printer Driver Software 104
L
Language Selection ........................ 46
Light Key ........................................ 20
Liquid Crystal Display .................... 44
Loading Copy Paper ....................... 12
Location ......................................... 4
M
Machine Trouble ? .......................... 35
Maintenance .................................. 33
Making Floppy Disks from CD-ROM 101
MANUAL Mode .............................. 77
Manual Sending and Receiving ...... 79
Misfeed in the Ext Area ................. 37
Misfeed in the Machine .................. 36
Misfeed in the Paper Tray ............... 35
Misfeed in the SPF ........................ 38
N
Normal Copying ............................. 17
Number of Rings ............................ 52
O
ON LINE Indicator .......................... 10
Operation Panel ....................... 10, 43
135
INDEX
SUK 17 INDEX LEO.p65
135
31/03/00, 10:07
17
Index
Optional Setting List ....................... 94
Optional Transmission Settings ...... 69
Original Cover ................................ 9
Original Guide ............................ 9, 17
Original Table .................................. 9
Originals ........................................ 65
P
Paper Detection Mode .................... 27
Paper Output Tray ........................... 9
Paper Size ................................... 126
Paper Tray ...................................... 9
Parallel Interface .......................... 128
Part Names .................................... 9
PBX Setting ................................... 57
Photo Mode ............................. 10, 20
Polling ............................................ 86
Power Cord .................................... 13
Power On ....................................... 14
Power Save Modes .................. 25, 27
Power Switch ............................. 9, 14
Preheat Mode .......................... 25, 27
Print Key ........................................ 19
Printing aPAge ............................... 111
Q
Quiet Detect Time .......................... 63
R
17
Rapid Key Dialing ........................... 74
Ready Indicator .............................. 10
Recall Interval ................................ 54
Recall Times .................................. 53
Receive Reduce ............................. 78
Receiving Faxes ............................ 77
Reception into Memory .................. 80
Reception Mode ............................. 51
Redialing ........................................ 76
Reduction/Enlargement/Zoom ........ 22
Remote Reception ......................... 56
Resolution ...................................... 69
Reverse Sending ............................ 72
Ringing Volume .............................. 45
136
SUK 17 INDEX LEO.p65
S
Scanning an Image ...................... 118
SEARCH Key ................................. 76
Setting Date & Time ....................... 49
Sending Originals ........................... 67
Single Pass Feeder (SPF) .............. 17
Special Paper ............................... 126
Specifications
125 to 128
Speed Dialing ................................. 74
Status Indicators ............................ 42
Storage of Supply ........................ 126
T
TD cartridge
10, 29, 42
Telephone Line Cord ....................... 15
Timer List ....................................... 93
Timer Operations ........................... 89
Toner Save Mode ........................... 26
Total Number of Copies .................. 41
Transaction Reports ....................... 95
Transmission Reservation .............. 82
Transmissions Activity Report ........ 95
Troubleshooting ........................ 39, 97
Turning Key Beeps Off ................... 46
Two-Sided Copying ......................... 23
U
Uninstalling Drivers ...................... 122
Unsuitable Originals ....................... 66
Use with Answering Machine ......... 63
Use with PC Modem ...................... 55
User Maintenance .................... 33, 34
Using Other Installed Drivers ....... 121
INDEX
136
31/03/00, 10:07
License Agreements
SHARP
Data lssued: September.19,1997
MSDS No.P-00081
MATERIAL SAFETY DATA SHEET
Section 1.
Product:
Product Identification
FO- 36DC (Black Toner)
Section 2.
Supplier’s Name and Address
Sharp Corporation
22-22 Nagaike-cho, Abeno-ku, Osaka, Japan
Local suppliers are listed below. Please contact the nearest supplier for additional
information.
(Country)
U.S.A
(Name and Telephone Number)
Sharp Electronics Corporation
Telephone number for information : 1-800-237-4277
Emergency telephone number
: 1-800-255-3924
Sharp Electronics of Canada Ltd.
Telephone number for information : 905-890-2100
Emergency telephone number
: 1-800-255-3924
Sharp Electronics (U.K.) Ltd.
Telephone number for information : 01923-474013
Canada
United
Kingdom
Section 3.
Ingredients
Ingredients
Carbon black
Silica
Iron oxide
Styrene-Acrylate
copolymer
Organic pigment
mixture
CAS No.
Proportion
OSHA PEL
ACGIH TLV
Other Limits
1333-86-4
68909-20-6
1317-61-9
25767-47-9
4.0% 3.5mg/m3
1.0%80.0mg/m3
1.0% 5.0mg/m3
90.5% Not listed
3.5mg/m3
6.0mg/m3
10.0mg/m3
Not listed
None
None
None
None
1333-86-4
0.5% Not listed
Not listed
None
Polypropylene
Polyethylene
109125-51-1
109125-50-0
84179-66-8
25085-53-4
9002-88-4
(total for the pigment mixture)
Section 4.
Hazardous Identification (Emergency Overview)
1.5% Not listed
1.5% Not listed
Not listed
Not listed
None
None
Toner is a fine, black powder possessing no immediate hazard. There are no
anticipated carcinogenic effects from exposure based on animal tests performed using
toner. When used as intended according to instructions, studies do not indicate any
symptoms of fibrosis will occur.
MATERIAL SAFETY DATA SHEET
SUK SAFETY DATA SHEET LEO.p65
137
30/03/00, 16:23
137
License Agreements
Section 5.
Health Hazard Data
Route(s) of Entry : Inhalation?
Skin?
Ingestion?
Yes
No
Possible but very unusual.
Acute oral toxicity—LD50 of this toner is over 2,000mg/kg.
Mutagenicity—The result of Ames test is negative.
Health Hazards :
Carcinogenicity :
In 1996 the IARC reevaluated carbon black as a Group 2B carcinogen
(possible human carcinogen). This classification is given to chemicals
for which there is inadequate human evidence, but sufficient animal
evidence on which to base an opinion of carcinogenicity. The
classification is based upon the development of lung tumors in rats
receiving chronic inhalation exposures to free carbon black at levels
that induce particle overload of the lung. Studies performed in animal
models other than rats did not show any association between carbon
black and lung tumors. Moreover, a two-year cancer bioassay using
a typical toner preparation containing carbon black demonstrated
no association between toner exposure and tumor development in
rats.
Chronic Effect :
In a study in rats of chronic inhalation exposure to a typical toner,
a mild to moderate degree of lung fibrosis was observed in 92% of
the rats in the high concentration (16mg/m3) exposure group, and
a minimal to mild degree of fibrosis was noted in 22% of the animals
in the middle (4mg/m3) exposure group, but no pulmonary change
was reported in the lowest (1mg/m3) exposure group, the most
relevant level to potential human exposures.
Signs and Symptoms of Exposure
: Minimal irritation to respiratory tract may
occur as with exposure to any non-toxic
dust.
Medical Conditions Generally Aggravated by Exposure : None
Emergency and First Aid Procedures :
Inhalation ; Remove to fresh air. If effects occur, consult medical personnel.
Eye
; In case of contact, immediately flush eyes with water for 15 minutes.
Section 6.
Physical Chemical Characteristics
Boiling/Melting Point
Vapor Pressure
Vapor Density
Evaporation Rate
Appearance
Odor
138
SUK SAFETY DATA SHEET LEO.p65
: Not applicable
: Not applicable
: Not applicable
: Not applicable
: Fine powder
: Odorless
Specific Gravity
Solubility in Water
PH
Viscosity
Color
: 1.1
: Negligible
: Not applicable
: Not applicable
: Black
MATERIAL SAFETY DATA SHEET
138
30/03/00, 16:23
License Agreements
Section 7.
Fire and Explosion Data
Flash Point (Method Used)
Ignition Temperature
Flammable Limits
: Not applicable
: No data available
: (LEL); Not applicable
(UEL); Not applicable
Extinguishing Media
: CO2, dry chemical, foam or water
Special Fire Fighting Procedure
: None
Unusual Fire and Explosion Hazard : This material has no unusual fire or
explosion hazards.
Sensitivity to Mechanical Impact
: None
Sensitivity to Static Charge
: None
Section 8.
Reactivity Data
Stability
: Stable
Incompatibility (Material to Avoid)
Hazardous Decomposition
Hazardous Polymerization
: None
: CO and NOx
: Will not occur.
Section 9.
Precautions for Safe Handling and Use
Personal Protection Information (Respiratory, Eye Protection and Protective Glove):
Use of a dust mask is recommended when handling a large quantity of
toner or during long term exposure, as with any non-toxic dust.
Engineering Control/Ventilation
: Not required.
Work/Hygienic Practice
: Inhalation should be minimized as
with any non-toxic dust.
Steps to be taken in case of Spill or Leak
: Sweep up or clean up with vacuum
cleaner.
Waste Disposal Method
: Waste material may be disposed
under conditions which meet all
federal, state and local environmental
regulations.
Section 10.
Regulatory Information
NFPA Rating (U.S.A)
:
WHMIS Legislation (Canada)
Transport Information
UN No.
:
:
:
Section 11.
Health = 1
Flammability = 1
Reactivity = 0
This product is not a controlled product.
This product is not a hazardous material.
None allocated.
Other Information
References
: IARC (1996) IARC Monographs on the Evaluation of the
Carcinogenic Risk of Chemicals to Humans, Vol. 65, Printing Process and Printing
inks, Carbon Black and Some Nitro Compounds, Lyon, pp-149-261 H. Muhle, B.
Bellmann, O. Creutzenberg, C. Dasenbrock, H. Ernst, R. Kilpper, J. C. Mackenzie, P.
Morrow, U. Mohr, S. Takenaka, and R. Mermelstein (1991) Pulmonary Response to
Toner upon Chronic Inhalation Exposure in Rats. Fundamental and Applied Toxicology
17, pp. 280-299
MATERIAL SAFETY DATA SHEET
SUK SAFETY DATA SHEET LEO.p65
139
30/03/00, 16:23
139
License Agreements
Notes
140
SUK SAFETY DATA SHEET LEO.p65
MATERIAL SAFETY DATA SHEET
140
30/03/00, 16:23
This equipment complies with the requirements of Directives 98/13/EC, 89/336/EEC
and 73/23/EEC as amended by 93/68/EEC, EN 61 000-3-2, EN 61 000-3-3.
Dieses Gerät entspricht den Anforderungen der EG-Richtlinien 98/13/EWG, 89/336/
EWG und 73/23/EWG mit Änderung 93/68/EWG, EN 61 000-3-2, EN 61 000-3-3.
Ce matériel répond aux exigences contenues dans les directives 98/13/CEE, 89/336/
CEE et 73/23/CEE modifiées par la directive 93/68/CEE, EN 61 000-3-2, EN 61 000-3-3.
Dit apparaat voldoet aan de eisen van de richtlijnen 98/13/EEG, 89/336/EEG en 73/23/
EEG, gewijzigd door 93/68/EEG, EN 61 000-3-2, EN 61 000-3-3.
Quest’ apparecchio è conforme ai requisiti delle direttive 98/13/EEC, 89/336/EEC e 73/
23/EEC, come emendata dalla direttiva 93/68/EEC, EN 61 000-3-2, EN 61 000-3-3.
1
, EN 61 000-3-2, EN 61 000-3-3.
Este equipamento obedece às exigências das directivas 98/13/CEE, 89/336/CEE e
73/23/CEE, na sua versão corrigida pela directiva 93/68/CEE, EN 61 000-3-2, EN 61
000-3-3.
Este aparato satisface las exigencias de las Directivas 98/13/CEE, 89/336/CEE y 73/
23/CEE, modificadas por medio de la 93/68/CEE, EN 61 000-3-2, EN 61 000-3-3.
Dette udstyr overholder kravene i Direktiverne 98/13/EØF, 89/336/EØF og 73/23/EØF
med senere ændringer 93/68/EØF, EN 61 000-3-2, EN 61 000-3-3.
Tämä laite noudattaa direktiiveissä 98/13/EEC, 89/336/EEC ja 73/23/EEC säädettyjä
vaatimuksia ja niihin direktiivissä 93/68/EEC tehtyjä tarkistuksia, EN 61 000-3-2, EN
61 000-3-3.
Dette utstyret tilfredsstiller kravene i direktivene 98/13/ECC, 89/336/EEC og 73/23/
EEC med endringer i 93/68/EEC, EN 61 000-3-2, EN 61 000-3-3.
Denna utrustning uppfyller kraven enligt direktiv 98/13/EEC, 89/336/EEC och 73/23/
EEC enligt tillägget 93/68/EEC, EN 61 000-3-2, EN 61 000-3-3.
Required in Appendix ZB of BS 7002 (En 60 950) — United Kingdom
MAINS PLUG WIRING INSTRUCTIONS
The mains lead of this equipment is already fitted with a mains plug which is either a non-rewireable
(moulded) or a rewireable
type. Should the fuse need to be replaced, a BSI or ASTA approved fuse to
.
BS1362 marked
or
and of the same rating as the one removed from the plug must be used.
Always refit the fuse cover after replacing the fuse on the moulded plug. Never use the plug without
the fuse cover fitted.
In the unlikely event of the socket outlet in your home not being compatible with the plug supplied
either cut-off the moulded plug (if this type is fitted) or remove by undoing the screws if a rewireable
plug is fitted and fit an appropriate type observing the wiring code below.
DANGER: The fuse should be removed from the cut-off plug and the plug destroyed immediately and
disposed of in a safe manner.
Under no circumstances should the cut-off plug be inserted elaswhere into a 13A socket outlet as a
serious electric shock may occur.
To fit an appropriate plug to the mains lead, follow the instructions below:
IMPORTANT: The wires in this mains lead are coloured in accordance with the following code:
GREEN-AND-YELLOW:
Earth
BLUE:
Neutral
BROWN:
Live
As the colours of the wires in this mains lead may not correspond with coloured markings identifying
the terminals in your plug, proceed as follows:
The wire which is coloured GREEN-AND YELLOW must be connected to the terminal in the plug which
is marked with the letter E, or by the safety earth symbol
, or coloured green or green-and-yellow.
The wire which is coloured BLUE must be connected to the terminal which is marked with the letter N
or coloured black.
The wire which is coloured BROWN must be connected to the terminal which is marked with the letter
L or coloured red.
If you have any doubt, consult a qualified electrician.
WARNING: THIS APPARATUS MUST BE EARTHED.
ASA
This equipment is not designed for making emergency telephony calls when the power
fails. Alternative arrangements should be made for access to emergency services.
SUK COVER PAGE LEO.p65
3
28/03/00, 11:44
THE IDEAS COMPANY
Printed in France
TINSE7346HSZZ
SUK COVER PAGE LEO.p65
4
28/03/00, 11:44