1
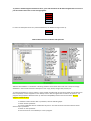
UniFlash USB Supply Package Controller Unit User’s Manual Connecting cable -1 -1 -1 Remote control unit (ver.1 only) Disk with software Packing material & fasteners -1 -1 -1 Brief Description The UniFlash USB device (hereinafter the “UniFlash”) is intended for storage of MIDI files, tones and other data on a Secure Digital (SD) card (hereinafter – memory card). SDHC and later memory standards are not functional. It is possible to insert miniSD and microSD cards via respective adapters. UniFlash is installed inside a musical instrument (hereinafter a “synthesizer”) and is interconnected between the synthesizer’s floppy disk drive and the motherboard with standard ribbon cables (all fasteners and the installation manual are included in a standard package of supply). The memory card space is split into databanks (virtual diskettes). Each databank represents one diskette and has a similar capacity. The number of databanks depends on the memory card capacity. To select among the databanks or to choose other functions, a remote control unit (hereinafter the “RC”) is used. The bank number is shown on the RC display and is selected with the buttons. The supply package also includes 2AVCom Host software, which can be used to edit the memory card content on a PC. Setting Procedure before First Power-up or after Memory Card Replacement The device needs to be set up before use. To enter the edit mode, press and hold down the RC right button while switching on the synthesizer. The following message must appear: NewSD Then the display shows the synthesizer type selection field: <ТXX> where XX is the number of the synthesizer type. Using the left and right buttons, select the required type according to the table below. Type 1 2 3 4 5 6 7 8 9 10 11 12 13 14 15 Description Yamaha PSR340 PSR350 PSR450 PSR540 PSR550 Yamaha QS300 Korg i3 01/W Roland E68 EM25 EXR5 Korg Karma Ensoniq TS10 TS10Plus TS12 ASR10 Korg PA50 PA60 Roland E500 Roland XP60 XP80 Yamaha PSR630 PSR640 PSR730 PSR740 PSR1000 PSR1100 PSR2000 PSR2100 Akai MPC 2000 Ensoniq SD1 Ensoniq MR61 MR76 Korg iS40 iS50 Roland VA3 VA5 Roland G600 G800 EM50 EM55 MT120 E66 E96 RA95 XP50 Type 16 Description Korg iX300 17 18 19 20 21 22 23 24 25 Casio CTK731 WK1800 MZ2000 Roland EXR-E² Yamaha MDF2 Korg n364 Roland G1000 VA7 Roland SD35 Yamaha SY77 Yamaha W7 Roland MV30 26 Yamaha QY700 The following message comes up: DONE Having selected the type of the synthesizer, enter the number of databanks on the memory card. By default, the maximum number of databanks for the given memory capacity is selected. <bMAX> The message shows up: DONE Having selected the required type of the synthesizer, select the mode of operation: <MODE> The UniFlash has three modes of operation: EXT INT EXTMEM INTMEM The EXT mode (external installation) is used when the synthesizer’s own disk drive is out of use. The INT mode (internal installation) is used when your device is operated together with the synthesizer’s own disk drive. The EXTMEM and INTMEM modes automatically memorizes the databank where you are before switching off the instrument. Upon subsequent switching on the synthesizer, the same databank will be available. Select the required mode using the left and right button. The confirmation message comes up again: DONE After selection of the synthesizer type and the UniFlash mode of operation, we can create a system data bank for our synthesizer. <bSYS> Please, note that some electronic musical instruments (such as Akai and Ensoniq modules) require downloading of their operating system from a diskette first, before they can acquire their complete functionality. So, we can store such system in one of the databanks assigned by us for that purpose. Then, upon switching on, the synthesizer downloads the operating system from the databank where it is stored and automatically goes over into the operating mode. Use the left and right buttons to select the required system bank. If you do not need it, leave SYSNO there. The instrument’s own floppy disk drive (FLOPPY) can also be a system databank. It precedes SYSNO and is designated as SYSFL SYSFL SYSNO SYS010 The confirmation message comes up: DONE Having completed the setting procedure, we automatically go into the operating mode. Whenever you install a new memory card, its databanks contain some casual data. Therefore, before using a databank (as well as a diskette) you have to format it. The best way to do it is to use your PC and the software supplied. However, you can do it using the format function on your synthesizer. The colors on the RC display reflect the UniFlash mode of operation: <MODE> DONE b 999 SELECT PC-UNI b 001 FLOPPY Setting mode Setting confirmation Bank, erasure protection enabled Confirmed bank selection UniFlash-PC communication mode Bank, erasure protection disabled Synthesizer’s own floppy disk drive in use The number of the databank is shown on the remote control unit (RC) and is selected by the RC buttons. The FLOPPY option stands for UniFlash operation in conjunction with the synthesizer’s floppy disk drive. The numbers 001-ХХX represent the databanks (virtual diskettes) available. The RC right button increments the databank number, while the left one decrements it. The RC upper button increments the databank number in tens and the lower one decrements in tens. A simultaneous depression of the right and left buttons or depression of the central button triggers the transition to the FLOPPY mode. The SELECT message means that the selection is accepted. The blinking display indicates access to the memory card. The UniFlash device is provided with the bank data protection feature against accidental erasure. A bank can be protected from the RC unit or with the 2AVCom Host software (See: 2AVCom Host Software Installation and Operation). A protected databank is highlighted by the blue background, while an unprotected one with the red color. To unprotect a databank, press and hold down the RC left and right buttons at a time or just the central button until a PrNO message appears. bXXX PrYS2 PrYS1 Pr NO b XXX To protect a databank against accidental erasure, press and hold down the RC left and right buttons at a time or just the central button until a PrYES message appears. b XXX PrNO2 PrNO1 PrYES b XXX In case of an attempted access to a protected databank, the bPROT message comes up. b PROT b XXX 2AVCom Host Software Installation and Operation 2AVCom Host Software is intended for interfacing between the UniFlash device and a PC. It helps to manage databanks in the musical instrument directly from a PC: copy, delete, change name, format, etc. To install the software on your PC, please, run the installer and follow all its instructions. After the installation has been completed, a shortcut appears on the desktop. Click it with the right button and select “Properties”. The program setup properties window comes up. Select the Compatibility tab and click the checkbox “Run this program as administrator”. To establish communication with a synthesizer, take the following steps: 1. Switch off the synthesizer. 2. Connect a USB A-A cable to a USB socket of your PC. Connect the other end of the cable to the RC socket of your synthesizer. 3. Switch on the synthesizer. 4. Click the shortcut on the desktop to run the program. 5. Click the Connect button. If the connection is successful, the status line changes its color from red to green and the right panel displays the contents of the 1-st databank. The program window is divided into three panels. The left panel is used to navigate among the PC folders. To select a folder, click it with the mouse left button. To create a folder, choose the folder which will contain the new folder. Click the Create Folder button, enter the new folder’s name and click “OK”. To delete a folder, pick it up, press the mouse right button and select “Delete” in the pop-up menu. To rename a folder, pick it up, press the mouse right button and select “Rename” in the pop-up menu. The central panel shows the files contained in the selected folder of your PC. To select more than one file, press and hold down “Ctrl” or “Shift” on the keyboard while selecting files with the mouse left button. To select all files in the folder, press the mouse right button and select “Select All Files” in the pop-up menu. The level and the color of the left bar indicator shows if there is enough space in the synthesizer’s current databank to accommodate the selected files. To copy the selected files to the synthesizer, click the button “”. To delete the selected files, press the mouse right button and select “Delete Files” in the pop-up menu. To rename a file, pick it up, press the mouse right button and select “Rename File” in the pop-up menu. To playback a file, pick it up, press the mouse right button and select “Play File” in the pop-up menu, or double-click it with the left button. The right panel contains the list of files in the current bank of the synthesizer. Under the panel, there is the synthesizer bank change field. Files are selected in the same way as in the central panel. To copy the selected files to the PC, click the right panel with the right button and select the button “”. To delete the selected files in the synthesizer, click the right panel with the right button and select “Delete Files”. Press “OK” to confirm the deletion. To rename a file in the synthesizer, click the right panel with the right button and select “Rename File”. . Enter a new name and press “OK”. To create a folder in the synthesizer, click the right panel with the right button and select “Create Folder”. Enter the folder name and press “OK”. To protect a databank against accidental erasure, check the checkbox “Protect”. To remove the protection, uncheck the checkbox. The following auxiliary operations are available in the Tools menu. “Set Protect All Banks” – enabling global write protection for all databanks. “Clear Protect All Banks” – removing global write protection from all databanks. “Format Banks” – formatting the databanks. After selection of this function the format window comes up. “From” represents the starting databank and “to” the ending databank. The Max button sets the maximum possible number of the ending bank. The following commands are available: “Run” and “Stop” the operation, and “Close” the window. “Backup Banks” – creating an image of databanks in the PC selected directory. Selection of this function calls up the image creation window. “From” represents the starting databank and “to” the ending databank. The Max button sets the maximum possible number of the ending bank. The following commands are available: “Run” and “Stop” the operation, and “Close” the window. “Restore Selected Banks” – retrieving the databanks from the bank images. Prior to this operation, pre-select the databanks in the central window. The number in the bank name indicates the bank to be restored. “Update Firmware” - updating the controller software. Having selected this function, first, choose the update file to be downloaded from www.2av.com.ua. Then quit the program, switch off the synthesizer and disconnect the cable. Upon switching the synthesizer on again, the UniFlash controller saves the updated software to its memory within a few seconds and resumes its normal operation. During the updating process, the display screen is blank and lit green. “Prepare SD Card” – preparing a new Secure Digital (SD) card. The SD card should be in a card reader connected to a PC. After selecting this function, the SD card preparation window comes up. Here, you can select the type of the synthesizer for which this card is to be used and the number of databanks (1…999). This portion of the card space will be hidden from Windows and is accessible only via this software, so the amount of the card space available for Windows decreases accordingly. The portion of the space available is used to store audio files. Having set the required parameters, press “Run”. After that, disconnect the card reader from the PC and reconnect it in 10 seconds. Windows will detect the changes which have happened to the disk and may suggest formatting the new disk. Agree and select FAT 32 file system. Start formatting and when it is over, close the format window. Press “Run” in the SD preparation window again. After this, the window will close. Press “Connect” to proceed with the databank operations. Now, you have to format all banks and then you can use them to copy your files. “Prepare CF Card” – preparing a new Compact Flash (CF) card. The CF card should be in a card-reader connected to a PC. After selecting this function, the CF card preparation window appears. Here, you can select the type of the synthesizer for which this card is to be used. The maximum number of databanks is 199. The remaining space is out of use. The card will not be accessible for Windows; it will be accessible only via this software. Upon connecting this card, Windows will suggest its formatting. Please, do not agree, otherwise you can lose your information. Having set the required type of the synthesizer, press “Run”. The window will close thereafter. Then disconnect the card reader from the PC and reconnect it in 10 seconds. Windows will detect the changes which have happened to the disk and may suggest formatting the new disk. Do not agree. Press “Connect” to proceed with the databank operations. Now, you have to format all banks and then you can use them to copy your files. ** If you format the card, it will turn into an ordinary CF card. Should it happen by chance, you can restart preparing a new CF card at once. In this case, some of the starting banks may be lost but you can retrieve the remainder. Warranty The warranty period for the device extends for 12 months since the date of purchasing. Consult the local dealer for the warranty and post-warranty repair. The Manufacturers are open to all proposals and suggestions regarding the improvement of the reliability and performance of the device which would make its operation more convenient and efficient. Thank you for purchasing our product. Have a good time while using it!