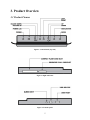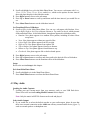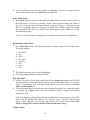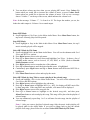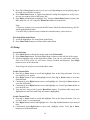
1
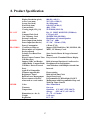
Digital Photo Frame
DPF1040
USER MANUAL
September, 2005
785-UM104V01 Rev. 1
Copyrights ©Wellex Corporation
All rights reserved
Wellex Corporation
551 Brown Rd.
Fremont, CA94539
USA
Tel: +1 (510) 743-1818
Product support: +1 (510)743-1839
www.wellex.com
estore.wellex.com
Table of Contents
1. INTRODUCTION................................................................................................3
2. PACKAGING.......................................................................................................4
3. PRODUCT OVERVIEW ....................................................................................5
3.1 PRODUCT FIGURES .............................................................................................5
3.2 CONTROL PANEL OVERVIEW .............................................................................8
4. OPERATION .......................................................................................................9
4.1 GETTING START .................................................................................................9
4.2 POWER ON/OFF ................................................................................................9
4.3 LOADING MEDIA CONTENTS ............................................................................10
4.4 PLAY PHOTO ....................................................................................................11
4.5 PLAY AUDIO ....................................................................................................15
4.6 SETUP ..............................................................................................................19
4.7 CONNECT TO YOUR COMPUTER .......................................................................22
5. SAFETY ..............................................................................................................24
6. LIMITED WARRANTY...................................................................................25
7. TROUBLE SHOOTING ...................................................................................26
8. PRODUCT SPECIFICATION .........................................................................27
2
1. Introduction
Congratulations on your purchase of the world class 10.4 inch multimedia digital photo display!
This unique device provides you with an unforgettable experience that will allow you to enjoy
viewing a series of your favorite photos, as well as to listen to mp3 music at the same time.
Wellex’s Digital Photo Frame 1040 is a special 10.4” display with an audio output function. The
DPF1040 offers the following features: guaranteed display quality, enormous photos and music
storage capacity, single photo scrolling, automatic slideshow and photo rotation, and elegantly
designed to support all the connections, plus the ability to play MP3s. While listening your
favorite tunes you can enjoy viewing your most memorable digital photo albums. You can easily
relive your memories from the family trip to San Diego, the sweet honeymoon in Maui, that fun
high school reunion in a four star rated French restaurant.
The DPF1040’s elegant design is suited for offices, living rooms, bedrooms, or elsewhere you
would like to display your favorite photos! You can either put it on the desktop or hang it up on
the wall. You can either enjoy viewing the photos yourself, or share them with your guests. You
will be definitely impressed with the brand new lively animated digital photo collections!
3
2. Packaging
The complete product package includes:
•
•
•
•
•
One Photo frame display: assembled product with LCD panel and enclosure.
One Power adapter
-Six feet long, AC to DC power adapter.
-Input: 100-240VAC, 50/60Hz, 0.5A.
-Output: 12VDC, 1.25A Max.
One USB cable: 5 feet long cord.
One User’s Manual
Warranty and registration card
Note:
• A set of speakers built into the DPF1040.
• This product DOES come with an Audio Out, either for use with headphones or external
speakers. There are NO headphones or external speakers provided with this package.
4
3. Product Overview
3.1 Product Figures
Figure 1: Control Panel (Top side)
Figure 2: Right side Panel
Figure 3: Left side panel
5
Figure 4: Bottom side panel
Figure 5: Back side panel
6
Figure 6: All function displayed on the device (Photo mode)
Figure 7: All function displayed on the device (Audio mode)
7
3.2 Control Panel Overview
Power: press the button for a few seconds to turn on and press the button for two seconds.
To turn off the power.
Power LED: the LED light turns green when the power turns on. The LED light is off
when the power is off.
Volume Up: Press to increase the volume (Volume level increases from 0 to 20).
Volume Down: Press to decrease the volume.
Left: Press to scroll left.
Right: Press to scroll right.
Up: Press to scroll up.
Down: Press to scroll down.
Menu/Enter: Press to display the menu in the Photo or Audio mode, or to confirm the
selection.
Mode: Press to switch the device between the photo-display mode and the audio-play
mode.
Compact Flash Card Slot: Insert your Compact Flash (CF) type I or II memory card here.
SD/MMC/MS 3-in-1 Card Slot: Insert your Secure Digital (SD), Multimedia Card (MMC), or
Memory Stick (MS)/ Memory Stick PRO memory card here.
Audio Out: Plug your headphones or external speakers into this standard audio output port.
USB Device: Plug the USB cable (included) with mini type-B connector end to this port for
connecting to your PC if the DPF1040 is used as a memory card reader/writer.
USB Host: Plug in your USB device. USD devices could be USB flash drives, digital cameras,
memory card reader/writers, and mp3 players such as iPod, etc …
Note: 1. Some types and brands of USB devices, USB flash drives, digital cameras, memory card
readers/writers, and MP3 players may not be compatible with the DPF1040.
2. The DPF1040 is not compatible with any USB hard drives since the supplied power is
not sufficient for the USB hard drive use.
8
4. Operation
4.1 Getting Start
11.. Please read through all the safety tips in the Safety chapter before you start.
22.. Connect the DPF1040 to the power adapter (the power port is located on the bottom side
of the panel, figure 4), then connect the power adapter to a power outlet.
4.2 Power ON/OFF
Power ON
11.. Press Power button for more than one second during the device is off. The device’s main
power is being turned on and LED indicator lights on in green color.
22.. Please wait a few seconds for the system to be brought up.
Power OFF
11.. Press Power button for more than one second during the device is on. The device’s main
power is being turned off and LED indicator lights off.
22.. Please wait for a short time for the device to be completely powered off.
9
4.3 Loading Media Contents
You can load media contents (JPEG, PNG, bitmap files and MP3 files) through the following
three slots (Figure 2 and Figure 3):
•
•
•
Compact Flash Card Slot --- supports Compact Flash (CF) Card type I and II
SD/MMC/MS 3-in-1 Card Slot --- supports Secure Digital (SD) card, Multimedia card
(MMC), Memory Stick (MS) / Memory Stick Pro card.
USB Host Port --- supports USB Flash (Jump) Drive, Digital Camera through a USB
cable, or regular memory card reader/writer through a USB cable.
Note: CF, SD, MMC, MS/MS PRO, Smartmedia, Microdrive, and XD memory cards can
be supported through the right memory card reader/writer.
Using Compact Flash Card Slot
11.. Insert your CF card into the Compact Flash Card Slot when you want to play or save
your photos or music from the CF card. You will see a message “CF inserted” shown on
the bottom-right corner of the LCD screen.
22.. Remove your CF card from the Compact Flash Card Slot when you finish using the CF
card. You will see a message “CF removed” shown on the bottom-right corner of the
LCD screen.
Using SD/MMC/MS 3-in-1 Card Slot
11.. Insert your SD, MMC, MS, or MS PRO card into the SD/MMC/MS 3-in-1 Card Slot
when you want to play or save your photos or music from the SD, MMC, MS, or MS
PRO card. You will see a message “SD (MMC, or MS) inserted” shown on the bottomright corner of the LCD screen.
22.. Remove your SD, MMC, MS, or MS PRO card from the SD/MMC/MS 3-in-1 Card Slot
when you finish. You will see a message “SD (MMC, or MS) removed” shown on the
bottom-right corner of the LCD screen.
Using USB Host Port
Connecting USB Flash (Jump) Drive
11.. Insert your USB Flash (Jump) Drive into the USB Host Port (Figure 3) when you want
to play or save your photos or music from the USB Flash (Jump) Drive. You will see a
message “USB0 inserted” shown on the bottom-right corner of the LCD screen.
22.. Remove your USB Flash (Jump) Drive from the USB Host Port when you finish. You
will see a message “USB0 removed” shown on the bottom-right corner of the LCD
screen.
Or
Connecting to Digital Camera
11.. Follow the user’s instruction of your digital camera, which guides you to connect (and
disconnect) your camera to the computer (the DPF1040 here acts as a computer) through
the USB cable.
22.. Connect this USB cable to your digital camera when you want to play or save your
photos from your digital camera.
10
33.. Connect the type A connector of the USB cable to the USB Host Port of the DPF1040.
44.. Power on your digital camera and choose the right setting. (Note: Please follow the
guidance of your digital camera). You will see a message “USB0 inserted” shown on the
bottom-right corner of the LCD screen.
55.. Disconnect the type A connector of USB cable from the USB Host Port of your
DPF1040 if you wish to remove the connection from the digital camera. You will see a
message “USB0 removed” shown on the bottom-right corner of the LCD screen.
Or
Connecting to Memory Card Reader/Writer
11.. Connect the USB cable to your card reader/writer when you want to play or save your
photos or music from your card reader/writer.
22.. Plug the type A connector of the USB cable to the USB Host Port of the DPF1040. You
will see a message “USB* inserted” shown on the bottom-right corner of the LCD screen
if you have inserted the memory card into your card reader/writer already. (Note: “*” can
be 0, 1, 2, or 3 which represents the 1st, 2nd, 3rd, or 4th memory in your card reader/writer.)
33.. You can add any of the memory cards in your card reader/writer if empty slots available.
44.. You can remove any of the memory cards from your card reader/writer when you don’t
need it any more. You will see a message “USB* removed” shown on the bottom-right
corner of the LCD screen.
55.. Disconnect the type A connector of the USB cable from the USB Host Port of the
DPF1040 if you wish to remove the connection from card reader/writer. You will see a
message “USB* removed” shown on the bottom-right corner of the LCD screen.
Or
Connecting to Apple iPod
11.. Connect USB cable to your Apple iPod when you want to play or save your photos or
music from your iPod.
22.. Plug in the type A connectior of the USB cable to the USB Host Port of the DPF1040.
33.. Power on your iPod and choose the right setting. ) You will see a message “USB0
inserted” shown on the bottom-right corner of the LCD screen.
44.. Disconnect the type A connector of the USB cable from the USB Host Port of the
DPF1040 if you wish to remove the connection from your iPod. You will see a message
“USB0 removed” shown on the bottom-right corner of the LCD screen.
4.4 Play Photo
Loading Photos
11.. Provide the source of your photos from your memory cards, digital camera, or USB flash
drive. Please refer to the section Loading Media Contents in this chapter.
Note: Only photos in JPEG, PNG, and Bitmap file formats can be read and displayed.
Select Photo Mode
11.. Press Mode button once to switch the current mode from the Audio mode to the Photo
mode if you are in the audio mode. You will see a message “Photo” shown on the
bottom-right corner of the LCD screen.
11
Display Main Photo Menu
11.. Press Menu/Enter button. The Main Photo Menu is shown on the left side of the screen.
(figure 3) This menu includes:
•
•
•
•
•
•
•
•
•
•
•
Slide/Single
Select
Thumbnail
Rotate
Save
Remove
Info
Interval
Effect
Setup
Exit
22.. The default shows the Slide/Single is highlighted.
33.. Press Up or Down button to scroll up or down.
Play Slideshow
11.. Scroll highlight to Slide/Single in the Main Photo Menu. Press Menu/Enter button, the
device will play slideshow every time interval of your setting or of default setting.
Note: All the photos in the internal flash memory and in any of the memory cards or USB
device inserted will be displayed when the device is in the slideshow mode.
Stop Slideshow (Play Single Photo)
11.. Scroll highlight to Slide/Single in the Main Photo Menu. Press Menu/Enter button, the
device will stop playing slideshow and display the current photo at all time.
Select Photo by File Name
11.. Scroll highlight to Select in the Main Photo Menu. You will see the sub-menu of Select,
which shows a list of media sources including Internal which represents the internal flash
memory , and CF, SD (MMC, or MS), USB0, USB1, USB2, or USB3 if you have inserted
your memory cards or USB devices (USB Flash Drive, Digital Camera, and Memory
Card Reader/Writer). (Refer to Loading Media Contents section)
22.. Insert the desired memory card or USB device if the input slot available. You will see the
device is added on the list on the screen when the insertion is completed.
33.. Press Right button to move to the sub-menu.
44.. Press Up or Down button to scroll up and down until the media source on which the
intended photo resides is highlighted. You will see another list shows the first tier of files
and folders in your media source.
55.. Continuously press Right button and Up or Down buttons until the desired photo file is
highlighted.
66.. Press Menu/Enter button to choose this photo file.
12
Note:
1. The photo will become clear in a few seconds after the file being decoded.
2. If the device is set to the slideshow mode, it will continue to change photos to the next
one at the interval that has been set.
Select Photo by Thumbnail
11.. Scroll highlight to Thumbnail in the Main Photo Menu.
22.. Press Menu/Enter button. 25 thumbnail images will be shown in 5 by 5 format. A Blueframe highlight represents the last photo displayed before you enter the thumbnail state.
33.. You can press Up or Down button to change the page of thumbnail.
44.. Until you see the desired photo on the current displayed page, you continuously press
Right or Left button to shift the highlight frame to the desired photo.
55.. Press Menu/Enter button to choose this photo.
Note:
1. Please wait for a few seconds for the device to decode the file, the photo will become
clear.
2. The device will be set back to the single mode if you enter the thumbnail state and
choose a highlighted photo during the slideshow.
Rotate the displayed photo
11.. Scroll to Rotate in the Main Photo Menu.
22.. Press Menu/Enter button. The current displayed photo rotates 90º clockwise.
33.. You can continuously press Menu/Enter button until the photo set to your desired
orientation.
Save Photo into Internal Flash Memory
11.. Scroll to Save in the Main Photo Menu.
22.. Press Menu/Enter button. The current displayed photo will be copied into internal flash
memory. You will see a block showing the status of copying (in percentage). When the
process is done, another block will show “File Copied Completed”. If you try to save a
photo already existed in the internal flash memory, a message of “The file already
exists” will display.
33.. You can continue to save other photos by repeating the steps above until that the internal
memory is full.
Note: There are about 50 Mbytes free in the internal memory for you to store photos or
mp3 music. The number of photos and songs to be stored in the internal memory depends
on the file size of each photo or the length of the mp3 music.
Remove Photo from Internal Flash Memory
11.. Scroll to Remove in the Main Photo Menu. You can see a sub-menu showing Current and
All.
22.. Press Right button to move to the sub-menu.
13
33.. Press Up or Down button to move a highlight Current in the sub-menu if you would like
to remove the current displayed photo.
44.. Press Menu/Enter button. A “Delete from Internal” dialog block appears to verify if you
are sure to delete this photo file.
55.. Press Right or Left button to highlight “Yes” and press Menu/Enter button to remove the
photo file, or “No” and press Menu/Enter button to keep the file.
Or
33.. Press Up or Down button to move the highlight to All in the sub-menu if you wish to
remove all the photos from the internal flash memory.
44.. Press Menu/Enter button. A “Delete from Internal” dialog block appears to verify if you
are sure to delete photo file.
55.. Press Right or Left button to highlight “Yes” and press Menu/Enter button to remove all
the photo files, or “No” and press Menu/Enter button to keep the files.
Note: 1.Please be cautious. If you remove the photo files from internal memory, file(s)
will be permanently deleted from the device.
2. No file (s) can be deleted from the memory card or any of the USB device.
Display the Information of Photo or Firmware Version
11.. Scroll highlight to Info in the Main Photo Menu. You can see a sub-menu with Photo Info
and Version options.
22.. Press Right button to move highlight to the sub-menu.
33.. Press Up or Down button to move highlight to Version if you would like see the firmware
version. Press Menu/Enter button, you will see information block showing “Wellex
DPF-1040 Vx.xx” which x.xx represents the version number.
Or
33.. Press Up or Down button to move highlight to the sub-menu of Photo Info if you wish to
see the information of the currently displayed photo.
44.. Press Right button to move highlight to another tier of sub-menu which shows Basic,
Camera Info, All, and Off.
Note: Refer to Figure 6,
• Basic information shown on the upper-left part of the screen includes the
information of photo source (e.g. Internal, SD, USB0, etc …), slideshow mode,
page number, picture number, file name, and original resolution.
• Camera Info information shown on the bottom-left part of the screen includes the
photo information recorded by your digital camera.
• All information includes both Basic and Camera Info information.
• Choose Off option to disable the text information of the displayed photo on the
screen.
55.. Press Up or Down button to move and select Basic, Camera Info, All, or Off.
66.. Press Menu/Enter button.
Set Slideshow Interval
14
11.. Scroll to highlight Interval in the Main Photo Menu. You can see a sub-menu with 5 sec,
10 sec, 15 sec, 20 sec, 25 sec, 30 sec, and 60 sec, which are the options for time interval
that each photo displays in the slideshow mode.
22.. Press Right button to move to the sub-menu.
33.. Press Up or Down button to scroll up and down until the time interval you would like to
set.
44.. Press Menu/Enter button to set the slideshow interval.
Set Transition Effect of Slideshow
11.. Scroll to Effect in the Main Photo Menu. You can see a sub-menu with Random, None,
Left to Right, Right to Left, Top to Bottom, Bottom to Top, and Checkered, which presents
slides transition effects, as described below, that photos appeared in slideshow mode.
• Random: New photo appears in a random effect pattern, including all other effects
except none.
• None: New photo appears without any special effect.
• Left to Right: New photo appears from left to right.
• Right to Left: New photo appears from right to left.
• Top to Bottom: New photo appears from top to bottom.
• Bottom to Top: New photo appears from bottom to top.
• Checkered: New photo appears like a checker board square.
22.. Press Right button to move to the sub-menu.
33.. Press Up or Down button to scroll up and down until to the desired effect of slideshow.
44.. Press Menu/Enter button to set the transition effect of the slideshow.
Setup
Refer to the section Setup in this chapter.
Exit from Main Photo Menu
11.. Scroll to highlight exit in the Main Photo Menu.
22.. Press Menu/Enter button to exit from the Main Photo Menu.
4.5 Play Audio
Loading the Audio Contents
11.. Loading your mp3 format music from your memory cards, or your USB flash drive.
Please refer to the section Loading Media Contents in this chapter.
Note: Only the music in MP3 file format can be read and played.
Select Audio Output
11.. If you would like to select the built-in speaker as your audio output, please be sure that
there is no external connection on the Audio out with any external audio device (figure 5),
such as external speakers or headphone sets.
15
22.. If you would like to use external speakers or headphones, you have to plug the audio
cable of those devices into the Audio Out of the DPF1040.
Select Audio Mode
11.. Press Mode button to switch current mode from Photo mode to Audio mode if you are in
the Photo mode. You will see a message “Audio” shown on the bottom-right corner of
the LCD screen. An Audio Information block, as shown in Figure 7, will appear if any
MP3 file is available; otherwise a message “No Audio files available” appears to indicate
that no available MP3 files were found in the inserted memory cards, USB device, or the
internal flash memory.
Note: You can still continue to play photo even though you switch to the Audio Mode.
Display Main Audio Menu
11.. Press Menu/Enter button. The Main Audio Menu is shown on the left side of the screen.
This menu includes:
•
•
•
•
•
•
•
•
Play/Pause
Stop
Select
Play Mode
Equalizer
Save
Setup
Exit
22.. The default shows the Play/Pause is highlighted.
33.. Press Up or Down button to scroll up or down.
Play MP3 Music
11.. Scroll to Play/Pause in the Main Audio Menu. Press Menu/Enter button, the DPF1040
will play the music with information shown in the Audio Information block, as shown in
Figure 7, according to your or default setting (please refer to the sections of Set Play
Mode and Set Equalizer).
22.. You can select the next or the previous music (song) in the playlist you would like to play
by pressing Up or Down button. You will see the Play Order is changed in the audio
information block.
Note: The default playlist includes all music available in the inserted memory cards, USB
device, and the internal flash memory. You can also create a playlist of the selected
music to place and play your favorite songs (please refer to the section Select MP3
Music by Song Title to create a playlist of the selected music (songs).
Adjust Volume
16
11.. You can adjust volume any time when you are playing MP3 music. Press Volume Up
button when you would like to increase the volume of music, or press Volume Down
button when you would like to decrease the volume of music. You can see a message
shown “Volume: *” on the top of the screen, which indicates the volume level.
Note: In the message “Volume: *”, * is from 0 to 20. The larger the number you set, the
louder the audio output is. Volume: 0 is no sound output.
Pause MP3 Music
11.. Scroll highlight to Play/Pause in the Main Audio Menu. Press Menu/Enter button, the
mp3 music currently played will be paused.
Stop MP3 Music
11.. Scroll highlight to Stop in the Main Audio Menu. Press Menu/Enter button, the mp3
music currently played will be stopped.
Select MP3 Music by File Name
11.. Scroll to highlight Select in the Main Audio Menu. You will see the submenu with Card
Select and MP3 List options.
22.. Press Right button to move to the sub-menu.
33.. Press Up or Down button to scroll down and highlight Card Select. It shows a list of
available media sources, such as Internal, CF, MS, MMC, or USBx. (Refer to Provide
Media Contents section).
44.. Press Right button to move to another tier of the submenu.
55.. Press Up or Down button to until the desired media source is highlighted.
66.. Continuously press Right button and Up or Down buttons until the desired MP3 file is
highlighted.
77.. Press Menu/Enter button to select and to play the music.
Select MP3 Music by Song Title to create a playlist of the selected songs
11.. Scroll and highlight Select in the Main Audio Menu. You will see the submenu with
Card Select and MP3 options.
22.. Press Right button to move highlight to the sub-menu.
33.. Press Up or Down button to highlight MP3 List. MP3 List displays all MP3 music files
by their song titles. If the song title is not available, a file name will be displayed.
44.. Press Right button to move to the song title list.
55.. Press Up or Down button to highlight to the desired song title, and then press
Menu/Enter button to select and play this song. This song will be placed in the playlist of
selected songs.
66.. You can continuously repeat Step 1 to 5 to add more favorite songs into the playlist of
selected songs.
Note: 1. After you create a playlist of selected songs, Only the music in this playlist will
be played while in the Audio Mode. If you wish to change back to play the default
playlist of all songs, please follow the section of Select MP3 Music by File Name.
17
2. The playlist of the selected songs will be deleted when you power off.
Set Play Mode
11.. Scroll to the Play Mode in the Main Audio Menu. You can see a sub-menu with Repeat
All, Repeat One, Shuffle, and Play Once options.
a. Repeat All: play all MP3 music available repeatedly.
b. Repeat One: play the selected MP3 music repeatedly.
c. Shuffle: play all MP3 music available randomly.
d. Play Once: play the selected MP3 music once.
22.. Press Right Arrow button to move to the sub-menu.
33.. Press Up or Down button to move to the desired play mode you would like to set.
44.. Press Menu/Enter button.
Set Equalizer
11.. Scroll to Equalizer in the Main Audio Menu. You can see a sub-menu with Normal, Rock,
Jazz, Xbass and Classical options.
22.. Press Right button to move to the sub-menu.
33.. Press Up or Down button to move and highlight Normal, Rock, Jazz, Xbass, or Classical
of the sub-menu if you would like to set equalizer to Normal, Rock, Jazz, Xbass, or
Classical mode.
44.. Press Menu/Enter button.
Save MP3 file into Internal Flash Memory
11.. Scroll to Save in the Main Audio Menu.
22.. Press Menu/Enter button. The currently played MP3 music will be copied into internal
flash memory. You will see a block showing the status of copying (in percentage). When
the process is done, another block will show “File Copied Completed”. If you are saving
a MP3 already existed in the internal flash memory, a block with the text of “The file
already exists” will appear.
33.. You can continue to save other music by repeating the steps described until the internal
memory is full.
Note:
1There are about 50 Mbytes free in the internal memory for you to store photos or MP3
music. The number of photos and songs to be stored in the internal memory depends on
the file size of each photo or the length of the MP3 music.
2. It might take a few minutes to copy a mp3 file to the internal flash memory. Do not
remove the source cards/USBs drives until the copying process is completely done.
Remove MP3 from Internal Flash Memory
11.. Scroll to Remove in the Main Audio Menu. You can see a sub-menu showing Current
and All.
• Current: remove the current playing MP3 music from internal flash memory.
• All: remove all the MP3 files from the internal flash memory.
22.. Press Right Arrow button to move to the submenu.
18
33.. Press Up or Down button to move to Current or All depending on current playing song or
all songs you would like to remove.
44.. Press Menu/Enter button. A “Delete from Internal” dialog block appears to verify if you
are sure you want to delete a MP3 music file.
55.. Press Right or Left button to highlight “Yes” and press Menu/Enter button to remove the
MP3 music file, or “No” and press Menu/Enter button to keep the file.
Note:
1. Please be cautious. If you removed the MP3 music files from internal memory, the file
will be permanently deleted.
2. No MP3 file(s) could be removed from the external memory card or devices.
Exit from Main Audio Menu
11.. Scroll the highlight to Exit in the Main Audio Menu.
22.. Press Menu/Enter button to exit from Main Audio Menu.
4.6 Setup
Access the Setup
11.. Press Mode button to choose the current mode in the Photo mode.
22.. Press Menu/Enter button. The Main Photo Menu is shown on the left side of the screen.
33.. Scroll to highlight Setup in the Main Photo Menu. You can see a sub-menu with Date,
Time, Clock, Sleep, Wake Up, LCD Saver, Display, Default, and Firmware. Press Right
button to move to the sub-menu.
Note: Setup can only be accessed in the Photo mode.
Set the Current Date
11.. Press Up or Down button to scroll and highlight Date in the Setup sub-menu. You can
see month/day/year appear.
22.. Press Right button to move and highlight month. Press Up or Down button to set to the
desired month.
33.. Continuously press Right button to move and highlight day. Press Up or Down button to
set to the desired day.
44.. Continuously press Right button to move and highlight year. Press Up or Down button to
set to desired year.
55.. You can leave setup mode by press Menu/Enter button. To perform other setup, press
Left button several times until Setup sub-menu is highlighted.
Set the Current Time
11.. Press Up or Down button to scroll and highlight Time in the Setup sub-menu. You can
see hour: minute: second appeared.
22.. Press Right button to move and highlight hour. Press Up or Down button to set to desired
hour.
33.. Continuously press Right button to move and highlight minute. Press Up or Down
button to set to desired minute.
19
44.. Continuously press Right button to move and highlight second. Press Up or Down button
to set to the desired second.
55.. You can leave the setup mode by press Menu/Enter button. To perform other setup, press
Left button several times until the setup sub-menu is highlighted.
Display Date and Time on the screen
11.. Press Up or Down button to scroll and highlight Clock in the Setup sub-menu. You can
see lower tier of sub-menu showing Off and On.
22.. Press Right button to move to the lower tier of sub-menu. Press Up or Down button to
move and highlight On if you would like to display the current date and time on the
screen, or to the Off if you would like to turn it off.
33.. You can leave this setting by press Menu/Enter button. Or if you would like to perform
other setup procedures, press Left button to go back to the setup sub-menu.
Set Sleep and Wake Up Time
11.. Press Up or Down button to scroll and highlight Sleep in the Setup sub-menu. You can
see hour: minute: second appeared.
22.. Press Right button to move to the hour setting. Press Up or Down button to set to desired
hour.
33.. Continuously press Right button to move to the minute setting. Press Up or Down button
to set to desired minute.
44.. Continuously press Right button to move to the second setting. Press Up or Down button
to set to desired second.
55.. Press Left button several times until at the setup sub-menu.
66.. Press Up or Down button to scroll and highlight Wake Up in the Setup sub-menu. You
can see hour: minute: second appeared.
77.. Press Right button to move and highlight the hour setting. Press Up or Down button to
set to desired hour.
88.. Continuously press Right button to move to the minute setting. Press Up or Down button
to set to desired minute.
99.. Continuously press Right button to move to the second setting. Press Up or Down button
to set to desired second.
1100.. Once you are done, you can leave setup mode by press Menu/Enter button. Or if you
would like to perform other setup, press Left button several times until the highlight is on
the setup sub-menu.
Enable or Disable Sleep and Wake Up Time
11.. Press Up or Down button to scroll to and highlight LCD Saver in the Setup sub-menu.
You can see another tier of sub-menu showing Off and On.
22.. Press Right button. Press Up or Down button to move to the On if you would like to
enable the sleep time and wake up time function, or on the Off if you would like to
disable the sleep time and wake up time function.
33.. You can leave this setting by press Menu/Enter button. Or if you would like to perform
other setup procedures, press Left button to go back to the setup sub-menu.
Note: Press any button on the control panel to wake up this device from the sleep mode.
20
Adjust the LCD Backlight Brightness
11.. Press Up or Down button to scroll to and highlight Display in the Setup sub-menu.
22.. Press Right button to move and highlight Backlight on the lower tier of sub-menu. A
status bar and number (from 0 to 10) shows the current brightness of the LCD backlight.
33.. Press Right button again to move to the current number.
44.. Press Up or Down button to set the number related to LCD backlight brightness.
• Number 0: Darkest.
• Number 10: Brightest.
55.. You can leave the setup mode by press Menu/Enter button. To perform other setup
procedures, press Left button several times until the highlight is on the setup sub-menu.
Set the Default
11.. Press Up or Down button to scroll to the Default in the Setup sub-menu.
22.. Press Menu/Enter button to set the device setting to manufacture default.
Firmware Upgrade
11.. Download the latest version of the latest source file (The DPF1040.bin) from our estore
website and store it into your USB flash drive. You can confirm the file size by checking
the file size match between the source file and the downloaded file.
22.. Connect your USB Flash drive to the Device USB Host Slot.
33.. Scroll to Setup in the Main Photo Menu. You can see a sub-menu with Date, Time, Clock,
Sleep, Wake up, LCD Saver, Display, Default, and Firmware in the bottom option.
44.. Press Right button and Down button to scroll and highlight Firmware of the submenu.
55.. Press Menu/Enter button. Fimware upgrade information and a message of choice of
“Yes” and “No” will be shown on the screen.
66.. The default of Firmware upgrade is “No”. You can use the Left button to select “Yes”
and press the Menu/Enter button.
77.. If you select “Yes”, a warning message will be shown on the screen to confirm the
upgrading action. If you intend to continue, you can use the Left button to select “Yes”
again and press the Menu/Enter button to start the firmware upgrade.
88.. After the update is completed, the message “Firmware Upgrade…Percentage = 100” will
display, and the system will restart automatically.
After you complete the upgrade process, you are able to utilize the full new features of this
device.
Warning:
1. Never unplug your USB Flash Drive whenever you are in a process of upgrading the
firmware. Mistakenly unplugging causes permanent damage to the system.
2. It is highly advised to consult our customer support before you go ahead and upgrade
the firmware.
Note: For more product information and customer support, please visit our website at
http://estore.wellex.com/
21
4.7 Connect to Your Computer
The DPF1040 can be used as a Memory Card Reader and Writer when you connect it to your
computer.
Connect the DPF1040 to your Computer through a USB Cable
11.. Prepare a USB cable with type-A connector in one end and mini-type-B connector in the
other end.
22.. Connect the end with type-A connector of the cable to the USB port in your computer
which must come with the USB Host Port and have the USB driver installed.
33.. Connect the end with mini-type-B connector of the cable to the mini-type-B Port in the
DPF1040 (Figure 3). You will see a message “Connect to PC” shown on the bottom right
corner of the screen.
44.. When the connection is complete, either the photos or the music being played will be
paused. You can see two icons of “Removable Disk” are added to your computer. One
represents CF memory card, if exists, which is in Compact Flash Card Slot, and the
other represents SD, MMC, MS, or MS PRO memory card, if any exists, in
SD/MMC/MS 3-in-1 Memory Card Slot.
Retrieve the file from the Memory Card in the DPF1040 while working on your
Computer
11.. Insert CF memory card in Compact Flash Card Slot or SD, MMC, MS, or MS PRO
memory card in SD/MMC/MS 3-in-1 Card Slot, if you wish to retrieve the file from any
of the above memory cards, which have not been inserted yet.
22.. Locate the “Removable Disk (*:)” form the root directories in your computer system.
Click on “Removable Disk (*:)”, you can see all the folders and files on this memory
card.
Note: The * in (*:) could be any letter character which assigned by your computer, e.g.
Removable Disk (E:) or Removable Disk (F:).
33.. You can read the file and copy the file from any of the above memory cards to your
computer as the steps you took for reading/copying files from any of the external storage
disk.
Write the file from Your Computer to Memory Card in the DPF1040
11.. Insert CF memory card in Compact Flash Card Slot or SD, MMC, MS, or MS PRO
memory card in SD/MMC/MS 3-in-1 Memory Card Slot.
22.. Locate the “Removable Disk (*:)” in the root directories of your computer system. Click
on “Removable Disk (*:)”, you will see all the folders and files stored in the memory
card.
Note: The * in (*:) could be any letter which assigned by your computer, e.g. Removable
Disk (E:) or Removable Disk (F:).
33.. You can copy the file from your computer to the memory card, as the steps you took for
reading/copying files from any of the external storage disk.
22
Disconnect the USB Cable between THE DPF1040 and your Computer
11.. Follow the instruction of your computer to remove the USB device which represents the
DPF1040 here.
22.. Disconnect the cable from your computer and the DPF1040. You will see a message “PC
Disconnected” shown on the bottom-right corner of the LCD screen.
23
5. Safety
•
•
•
•
•
•
•
•
Keep away this product from shaky or unstable locations. Internal components are highly
delicate and fragile. Dropping from heights could cause serious damages to this product.
Keep this product away from fire or high temperatures (higher than 45°C or 113°F).
This product should be operated from the type of the power indicated on the user guide.
Improper use of the power supply could cause malfunction of the product.
Do not disassemble the case of this display or attempt to modify the DPF1040 in any way.
Repairs should be only carried out by the manufacturer or authorized service centers.
Keep the product away from water and wet areas.
Never put objects of any kinds into this product through the media cards slots as they may
touch dangerous voltage points or short out parts that could result in a fire or electric shock.
Keep this product and its accessories out of the reach of children and animals.
Keep in mind to minimize the sound volume before plugging headphones. Loud volume may
cause serious damage to your ears (sound volume increases from 0 to 20).
24
6. Limited Warranty
Wellex Corporation warrants that this product described in this User Manual will be free from
material defects in design and manufacture and will substantially conform to the published
specifications under normal use for one year from your date of purchase, subject to the
conditions below. This warranty is provided to the original end user purchasing from Wellex
Corporation or any authorized reseller, and is not transferable. Proof of purchased must be
supplied for the warranty use. This product must be used with memory cards that complied with
the specifications of memory stick, memory stick pro, SmartDisk, Multimedia Card, Compact
Flash cards. Use of any other products voids this warranty. Wellex Corporation is not responsible
for any failure or defect caused by any third party product or component, whether authorized or
not. This warranty does not apply to any third party software provided with the product and you
are solely responsible for all the service and repair needed for such software. This warranty is
void if any of the memory card is not used in accordance with this product instructions, or it is
damaged as a result of improper installation, misuse, unauthorized repair, modification or
accident.
Wellex does not warrant and shall not be responsible for any lost data or images contained in any
product (including in any returned product), regardless of the cause of the loss. Wellex’s
products are not warranted to operate without failure. Wellex’s products should not be used in
life support systems or other applications where failure could threaten injury or life. This
warranty gives you specific legal rights, and you may also have other rights which vary by
jurisdiction.
THE FOREGOING IS WELLEX’S SOLE WARRANTY. WELLEX DISCLAIMS ALL
OTHER EXPRESS AND IMPLIED WARRANTIES TO THE FULLEST EXTENT
PERMITTED BY APPLICABLE LAW. THE IMPLIED WARRANTIES OF MERCHANT
ABILITY AND FITNESS FOR A PARTICULAR PURPOSE ARE LIMITED TO THE
DURATION OF THE EXPRESS WARRANTY. SOME JURISDICTIONS DON NOT ALLOW
LIMITATION ON HOW LONG ANY IMPLIED WARRANTY LASTS. SO THE ABOVE
LIMITATION MAY NOT APPLY TO YOU. IN NO EVENT SHALL WELLEX
CORPORATION OR AFFILIATED OR SUBSIDIARY COMPANY BE LIABLE UNDER
ANY CIRCUMSTANCS FOR ANY DIRECT, INDIRECT, OR CONSEQUENTIAL
DAMAGES, ANY FINANCIAL LOSS OR ANY LOST DATA OR IMAGE, EVEN IF
WELLEX HAS BEEN ADVISED OF THE POSSIBILITY OF SUCH DAMAGE. SOME
JURISDICTIONS DO NOT ALLOW THE EXCLUSION OR LIMITATION OF INCIDENTAL
OR CONSEQUENTIAL DAMAGES, SO THE ABOVE LIMITATION OR EXCLUSION
MAY NOT APPLY TO YOU. IN NO EVEN WILL WELLEX’S LIABILITY EXCEED THE
AMOUNT PAID BY YOU FOR THIS PRODUCT.
The information in this manual is subjected to change without notice. Wellex Corporation should
not be liable for technical or editorial errors or omissions contained herein, nor for incidental or
consequential damages resulting from the furnishing performance or use of this material. This
documentation may not be copied, reproduced, translated or reduced to any electronic medium,
in whole or in part, without prior permission from Wellex Corporation.
25
7. Trouble Shooting
Frequent Asked Questions
z Why am I unable to turn on the device?
Answer: The device is supplied by regular DC power. You should check if the power cord is
already plugged into your power outlet.
z My device crashed for some reason, how do I reset the DPF1040?
Answer: Use a sharp pointer to reset this device. Otherwise you should not touch the Reset
button under normal condition.
z Why am I unable to turn off the device?
Answer: You have to press the power button for at least a few seconds to wait for the LED lights
to be off.
z
Why does the USB device icon not show on the screen if I connect the device to my
laptop/PC?
Answer: When you connect the device to your personal computer, the device acts as a card
reader rather than the host device. You should otherwise use your computer instead the device as
the primary device.
For more specific trouble shooting, please contact our product support at +1 510.743.1839 or
email at PRODUCT_SUPPORT @wellex.com
26
8. Product Specification
PANEL
IN / OUT
POWER
FEATURES
OTHER
Size (inch)
Display Resolution (pixel)
Active Area (mm)
Screen Size (inch)
Pixel Pitch (mm)
Contrast Ratio
Viewing Angle (CR ≥ 10)
USB
Compact Flash Card
3-in-1 Memory Card
External Audio out
Power Input (from Outlet)
Power Input (into Device)
Power Consumption
View/Play as Many as
Photos/music as Peripheral
Devices allowed
Friendly Text Based User
Interface
Direct Camera Connect Thru
USB Host Port
Support USB Card Reader
(SmartMedia, CompactFlash)
USB Host / Device External
Ports
Apple iPod Compatible
Firmware upgradeable
Brightness Control
Built-in Power Management
Direct connect to Host PC
when used as a card reader
Color
Warranty
Temperature
Dimensions (w x h x d)
Weight
Regulations
27
10.4” TFT-LCD SVGA
800 (H) x 600 (V)
211.2 (H) x 158.4 (V)
10.4 (Diagonal)
0.264 (H) x 0.264 (V)
400:1 (TYP)
55/55/40/40 (L/R/U/D)
Rev 1.1 HOST & DEVICE (12Mbits/s)
CF Type I & II
SD/MMC/MS (MS-PRO)
Headphone or External Speaker
120 V AC 60Hz
12 V DC 500 mA (TYP)
6 Watts (TYP)
Support USB Flash Drive, MS, MS-PRO, SD,
MMC, CF Memory Cards
Store favorite Photos & Songs to Internal
Memory
Easy to search: Thumbnail Photos Display
Built-in internal Speakers & Audio out for
Headphones/External Speakers
Auto Slideshow with Multiple selected time
Intervals
Photo rotating
Built-in Real-time Clock
Single Photo Scroll
Programmable LCD Backlight ON/OFF
Management with Programmable Sleep and
Wake-up Timer Control
Siler/ Piano Black
One year
Operation 0°C~40°C (32°F~104°F)
Storage
-20°C~60°C (-4°F~140°F)
12 × 7.9 × 1.5 inches
1.6 lb (net)
FCC, CE