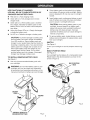
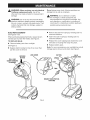
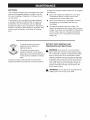
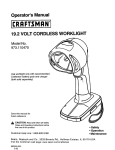
1
per'ator's
anual
19.2 VOLT CORDLESS
RKLIGHT
Model No.
315.113911
Use worklight only with recommended
Craftsman battery pack and charger
(both sold separately)
Save this manual for
future reference
WARNING:
Read and follow all
Safety Rules and Operating Instructions
before first use of this product.
Customer
Help Line: 1-800-932-3188
Sears, Roebuck
Visit the Craftsman
983000-465
2-04
and Co., 3333 Beverly Rd., Hoffman
web page: www.sears.com/craftsman
Estates,
IL 60179 USA
[] Warranty
...........................................................................................................................................................
2
[] Introducton
.......................................................................................................................................................
2
[]
[]
[]
[]
[]
GeneralSafetyRules...........................................................................................................................................
3
SpecificSafetyRules.........................................................................................................................................
4
Symbols...........................................................................................................................................................
5-6
Operation
..........................................................................................................................................................
7-8
Maintenance
......................................................................................................................................................
9-10
[]
PartsOrdering/ Service
...............................................................................................................................................
12
FULL ONE YEAR WARRANTY ON CRAFTSMAN 19.2 Volt Cordless Worklight. If this CRRFTSMRN tool fails to give complete satisfaction within one year from the date of purchase, RETURN IT TO THE NEAREST SEARS STORE OR SEARS
SERVICE CENTER IN THE UNITED STATES, and Sears will repair it, free of charge.
If this II:P,IqF'IrsMFII_ tool is used for commercial or rental purposes, this warranty applies for only 90 days from the date
of purchase.
This warranty gives you specific legal rights, and you may also have other rights which vary from state to state.
Sears, Roebuck and Co., Dept. 817WA, Hoffman Estates, IL 60179
This tool has many features for making your drilling operations more pleasant and enjoyable. Safety, performance and
dependability have been given top priority in the design of this Cordless Worklight, making it easy to maintain and
operate.
READ ALL INSTRUCTIONS
DO NOT PERMIT CHILDREN
[]
LIGHT UNSUPERVISED. It is not a toy. The
temperature of the bulb will become hot after
being on for only a short period of time. This hot
temperature can cause burn injury if touched and
can create sufficient heat to melt some fabrics.
[]
KNOW YOUR WORKLIGHT. Read operator's
manual carefully. Learn its applications and limitations as well as the specific potential hazards
related to this light.
USE ONLY RECOMMENDED BATTERY PACK
TO USE WORK-
WITH YOUR WORKLIGHT. Any attempt to use
another battery pack will cause damage to your
worklight and could possibly explode, cause a
fire, or personal injury.
REMOVE BATTERY PACK FROM WORKLIGHT BEFORE REPLACING BULB OR PERFORMING ANY ROUTINE MAINTENANCE OR
CLEANING,
A
WARNING:
If wrapped or in contact with
fabrics, the worklight lens can produce sufficient heat to melt some fabrics. To avoid serious
personal injury, never allow the worklight lens to
come in contact with anything.
[]
KEEP WORK AREA CLEAN. Cluttered areas
and benches invite accidents.
[]
DO NOT DISASSEMBLE YOUR WORKLIGHT,
[]
AVOID DANGEROUS ENVIRONMENT.
[]
DO NOT PLACE WORKLIGHT
[]
KEEP LIGHT DRY, CLEAN, AND FREE FROM
OiL AND GREASE. Always use a clean cloth
when cleaning. Never use brake fluids, gasoline,
petroleum-based products or any strong solvent
to clean your worklight.
[]
STAY ALERT. Watch what you are doing and use
common sense. Do not rush.
[]
CHECK DAMAGED PARTS. Before further use
of this worklight, a part that is damaged should
be carefully checked to determine that it will
operate properly and perform its intended function. Do not use worklight if it does not function
properly.
[]
[]
OR BATTERY
PACK NEAR FiRE OR HEAT, They may explode.
Also, DO NOT dispose of a worn out battery
pack by incinerating. Do not incinerate the battery, even if it is severely damaged or completely
worn out. The battery may explode in fire.
DO NOT STORE YOUR WORKUGHT iN A
DAMP OR WET LOCATION. DO NOT STORE
iN LOCATIONS WHERE THE TEMPERATURE
iS LESS THAN 50°F OR MORE THAN 100°R
Do not store in outside sheds or in vehicles.
,_
_
SAFETY
WARNING:
Do not operate worklight or charger
near flammable liquids or in gaseous or explosive
atmospheres. Internal sparks may ignite fumes.
WARNING:
use:
[]
Lens and bulb become hot during
oDuring or immediately after use, don't lay
worklight flat on lens surface or place lens
area in contact with a plastic or fabric
covered surface.
[]
®Handle worklight with care around any
flammable surface.
®Let worklight cool for several minutes after
use before changing bulb.
®Do not use or permit use of worklight in bed
or sleeping bags. This worklight lens can
melt fabric and a burn injury could result.
SAFETY
[]
RULES
FOR BATTERY
INSTRUCTIONS
FOR CHARGER
Before using battery charger, read all instructions and cautionary markings in this manual,
on battery charger, and product using battery
charger.
CAUTION: To reduce the risk of injury, charge
only nickel-cadmium type rechargeable batteries. Other types of batteries may burst causing
personal injury and damage.
Do not expose to wet or damp conditions.
[]
To reduce the risk of damage to charger body
and cord, pull by charger plug rather than cord
when disconnecting charger.
[]
An extension cord should not be used unless
absolutely necessary. Use of improper extension cord could result in a risk of fire and electric
shock. If extension cord must be used, make
sure:
TOOLS
USE ONLY THE CHARGER RECOMMENDED
FOR USE WITH YOUR WORKLIGHT. Do not
substitute any other charger. Use of another
charger could cause batteries to explode causing
possible serious injury.
a. That pins on plug of extension cord are the
same number, size and shape as those of
plug on charger.
[]
Your battery tool should be charged in a location
where the temperature is more than 50°F but less
than 100°R
c. That wire size is large enough for AC ampere
rating of charger as specified below:
[]
Under extreme usage or temperature conditions,
battery leakage may occur. If liquid comes in
contact with your skin, wash immediately with
soap and water, then neutralize with lemon juice
or vinegar. If liquid gets in your eyes, flush them
with clean water for at least 10 minutes, then
seek immediate medical attention.
b. That extension cord is properly wired and in
good electrical condition; and
Cord Length (Feet) 25'
Cord Size (AWG)
16
100'
16
Note: AWG = American Wire Gage
WARNNNG: Batteries vent hydrogen gas and
can explode in the presence of a source of ignition, such as a pilot light. To reduce the risk of
serious personal injury, never use any cordless
product in the presence of open flame. An exploded battery can propel debris and chemicals.
If exposed, flush with water immediately.
WARNING"
Never use a battery pack that
has been damaged or received a sharp blow. A
damaged battery pack is subject to explosion.
Properly dispose of a damaged battery pack immediately. Failure to heed this warning can result
in serious personal injury.
[]
16
50'
WHEN SERViCiNG USE ONLY iDENTiCAL
CRAFTSMAN REPLACEMENT PARTS.
[]
DO NOT OPERATE CHARGER WiTH A DAM=
AGED CORD OR PLUG. If damaged, have
replaced immediately by a qualified serviceman.
[]
Do not operate charger if it has received a sharp
blow, been dropped, or otherwise damaged in
any way; take it to a qualified serviceman.
[]
Do not disassemble charger; take it to a qualified serviceman when service or repair is required. Incorrect reassembly may result in a risk
of electric shock or fire.
[]
To reduce the risk of electric shock, unplug
charger from outlet before attempting any maintenance or cleaning. Turning off controls will not
reduce this risk.
[]
Do not use charger in wet or damp conditions.
[]
Disconnect charger from power supply when
not in use.
[]
SAVE THESE iNSTRUCTiONS. Review them
frequently and use them to instruct others who
may use this light. If you loan someone this light,
loan them these instructions also.
SAVE THESE INSTRUCTIONS
4
Someofthefollowingsymbolsmaybeusedonthistool.Pleasestudythemandlearntheirmeaning.Properinterpretationofthesesymbolswillallowyouto operatethetool betterandsafer.
SYMBOL
NAME
DESIGNATION/EXPLANATION
V
Volts
Voltage
A
Amperes
Current
mz
Hertz
Frequency (cycles per second)
W
Watt
Power
min
Minutes
Time
"L,
Alternating Current
Type of current
Direct Current
Type or a characteristic
no
No Load Speed
Rotational speed, at no load
[]
Class II Construction
Double-insulated
.../min
Per Minute
Revolutions, strokes, surface speed, orbits etc., per minute
@
Wet Conditions Alert
Do not expose to rain or use in damp locations.
Read The Operator's Manual
To reduce the risk of injury, user must read and understand
operator's manual before using this product.
Eye Protection
Always wear safety goggles or safety glasses with side shields
and a full face shield when operating this product.
Safety Alert
Precautions that involve your safety.
No Hands Symbol
Failure to keep your hands away from the blade will result in
serious personal injury.
No Hands Symbol
Failure to keep your hands away from the blade will result in
serious personal injury.
No Hands Symbol
Failure to keep your hands away from the blade will result in
serious personal injury.
No Hands Symbol
Failure to keep your hands away from the blade will result in
serious personal injury.
0
A
@
&
of current
construction
The following
product.
SYMBOL
signal words
and meanings
are intended
the levels of risk associated
with this
SIGNAL
MEANING
DANGER:
Indicates an imminently hazardous situation, which, if not avoided, will
result in death or serious injury.
WARNING:
Indicates a potentially hazardous situation, which, if not avoided, could
result in Death or serious injury.
CAUTION:
Indicates a potentially hazardous situation, which, if not avoided, may
result in minor or moderate injury.
CAUTION:
(Without Safety Alert Symbol) Indicates a situation
property damage.
SERVICE
Servicing requires extreme care and knowledge and should
be performed only by a qualified service technician. For
service we suggest you return the product to your nearest
AUTHORIZED SERVICE CENTER for repair. When servicing, use only identical replacement parts.
,i_ WARNING:
to explain
,_
that may result in
WARNING:
To avoid serious personal injury, do not attempt to use this
product until you read thoroughly and understand completely the operator's manual. Save this operator's manual
and review frequently for continuing safe operation and
instructing others who may use this product.
1
Obser,ve all normal safety precautions related to avoiding |
electrical shock.
,_
WARNING:
O
The operation of any power tool can result in foreign objects being thrown into your eyes, which can
result in severe eye damage. Before beginning power tool operation, always wear safety goggles or
safety glasses with side shields and a full face shield when needed. We recommend Wide Vision Safety
Mask for use over eyeglasses or standard safety glasses with side shields. Always use eye protection
which is marked to comply with ANSI Z87.1.
SAVE THESE INSTRUCTIONS
BATTERY
PACK/CHARGER
[]
The battery pack and charger are not included with
your worklight. They are both sold separately. When
purchasing, use the following information:
MODEL NO.
BATTERY PACK
CHARGER
973.113911
item No. _911375
item No. _911041
(1323517 or 1323903)
(1425301)
BATTERY PACK
The battery pack for your worklight has been shipped
in a low charge condition to prevent possible problems. Therefore, you should charge it until light on
front of charger changes from red to green.
Note: Batteries will not reach full charge the first time
they are charged. Allow several cycles (operating
worklight followed by recharging) for batteries to
become fully charged.
CHARGING
BATTERY
Allow battery pack to remain in charger for 15 to
30 minutes. When battery pack reaches normal
voltage range, red LED should come on.
If red LED does not come on after 30 minutes, this
indicates a defective battery pack and should be
replaced.
[]
After normal usage, a minimum of 1 hour of
charging time is required to fully recharge battery
pack.
[]
The battery pack will become slightly warm to the
touch while charging. This is normal and does not
indicate a problem.
[]
Do not place charger and battery pack in an area
of extreme heat or cold. It will work best at normal
PACK
room temperature.
See Figure 1.
[]
Use only the recommended battery pack and
charger with your worklight.
[]
Make sure power supply is normal household
voltage, 120 volts, 60 Hz, AC only.
[]
Connect charger to power supply.
[]
Place battery pack in charger aligning raised
rib on battery pack with groove in charger.
See Figure 1.
Press down on battery pack to be sure contacts
on battery pack engage properly with contacts in
charger.
[]
If both yellow and green LED come on, this
indicates a deeply discharged or defective battery
pack.
[]
Normally, the red LED on charger will come on.
This indicates charger is in fast charging mode.
[]
Red LED should remain on for approximately 1
hour then the green LED will come on. Green LED
on indicates battery pack is fully charged and
charger is in trickle charge mode. Note: Green
LED will remain on until battery pack is removed
from charger or charger is disconnected from
power supply.
BATTERYPACK
SHOWNIN CHARGER
CHARGER
Note: Charger and battery pack should be placed
in a location where the temperature is more than
50°F but less than 100°R
[]
When batteries become fully charged, unplug
charger from power supply and remove the battery pack.
iNFORMATION
FOR RECHARGING
BATTERY PACK
HOT
When using your worklight continuously, the batteries
in your battery pack will become hot. You should let a
hot battery pack cool down for approximately 30 minutes before attempting to recharge. When the battery
pack becomes discharged and is hot, this will cause
the green LED to come on instead of the red LED.
After 30 minutes, reinsert battery pack in charger. If
green LED continues to remain on, return battery pack
to your nearest Sears Repair Center for checking or
replacing.
Note: This situation only occurs when continuous
use of your worklight causes the batteries to become
hot. It does not occur under normal circumstances.
Refer to "CHARGING BATTERY PACK" for normal
recharging of batteries. If the charger does not charge
your battery pack under normal circumstances, return
both the battery pack and charger to your nearest
Sears Repair Center for electrical check.
REDLED ON INDICATES
FASTCHARGINGMODE
GREENLEDON AFTERFAST CHARGING
CYCLE,iNDICATESFULLYCHARGEDBATTERY
PACKANDIN TRICKLECHARGEMODE.
YELLOWANDGREENLED8
ON INDICATESDEEPLY
Fig. 1
LED FUNCTIONS
OF CHARGER
LED WILL BE ON TO INDICATE
CHARGER
AND BATTERY
STATUS
PACK:
[]
Red LED on = Fast charging mode.
[]
Green LED on = Fully charged and in trickle
charge mode.
[]
Green LED on = When battery pack is inserted
into charger, indicates hot battery pack or that
battery pack is out of or below normal temperature range.
Yellow and Green LEDs on = Deeply discharged
or defective battery pack.
[]
[]
Orient battery pack so that raised rib on battery
pack aligns with groove inside worklight. Battery
pack is designed to fit only one way in worklight
handle.
OF
[]
CAUTION: When placing battery pack in your
worklight, be sure raised rib on battery pack
aligns with groove inside worklight handle and
latches snap into place properly. Improper
assembly of battery pack can cause damage to
internal components.
No LED on = Defective charger or battery pack.
[]
CAUTION: To prevent damage to battery pack,
remove battery pack from charger immediately
if no LED comes on. Return battery pack and
charger to your nearest Sears Service Center for
checking or replacing. Also, if you are removing
battery pack from charger and no LEDs are on,
return both battery pack and charger to your
nearest Sears Service Center. Do not insert
another battery pack into charger. A damaged
charger may damage a battery pack.
TO INSTALL/REMOVE
BATTERY
PACK
See Figure 2.
[]
,A
Use only the recommended
your worklight.
Insert battery pack, making sure latches on each
side of battery pack snap into place and battery
pack is secure in worklight before use.
To remove battery pack, locate latches on end of
battery pack and depress to release battery pack
from your worklight.
SWITCH
See Figure 3.
To turn your worklight on and off, depress switch trigger.
MULTI=POSITION
HEAD
See Figure 3.
Your worklight has the feature of a multi-position head.
Rotate head to the desired position as shown in the
arrows in Figure 3.
battery pack with
MULTI-POSITION
HEAD
WARNING:
Do not install battery pack to your
worklight until you have read and understood
all precautions and operating instructions in the
manual and printed on battery pack and charger.
SWITCH
TRIGGER
BATTERY
LMCHE8
Fig. 3
Fig. 2
Do not abuse power tools. Abusive practices can
damage tool as well as workpiece.
_IL WARN(NG:When
servicing, use only identical
Craftsman replacement parts. Use of any
other part may create a hazard or cause product
damage.
_
_
WARNING:
Do not at any time let brake fluids,
gasoline, petroleum-based products, penetrating
oils, etc. come in contact with plastic parts. They
contain chemicals that can damage, weaken or
destroy plastic.
BULB
WARN(NG:
Do not attempt to modify
this worklight or create accessories not
recommended for use with this worklight. Any
such alteration or modification is misuse and
could result in a hazardous condition leading to
possible serious personal injury.
REPLACEMENT
See Figures 4 & 5.
[] Remove old bulb from spring by twisting bulb in a
clockwise direction.
When purchasing replacement bulb, request recommended part number 780115002. See Figure 5.
[] Insert new bulb in spring by twisting bulb in a
clockwise direction.
TO REPLACE BULB:
[] Replace lens cover aligning tabs inside lens cover
with slots on housing then snap into place.
[]
Remove battery pack from worklight.
[] Replace battery pack.
See Figure 2.
Note: For your convenience, your worklight has a bulb
storage area to store an extra bulb. See Figure 5.
[] Depress button located on top of ]en cover then
pull lens cover to remove.
DEPRESS
BUTTON
LENSCOVER
BUTTON
SPRING_
BULB
8TORAGEAREA
PULLLENS
COVERFORWARD
TO REMOVE
SLOT
TABS
\_
REQUEST BULB PART NO.
780115002
Fig. 4
Fig. 5
BATTERIES
Yourworklight'sbatterypackis equippedwithnickelcadmiumrechargeable
batteries.Lengthofservice
fromeachchargingwilldependonthetypeofwork
youaredoing.
Thebatteriesinthisworklighthavebeendesigned
to providemaximumtroublefreelife.However,
like
allbatteries,theywilleventually
wearout.Do not
disassemble
batterypackandattemptto replacethe
batteries.Handlingofthesebatteries,especiallywhen
wearingringsandjewelry,couldresultin a serious
burn.
_YCL
Toobtainthe longestpossiblebatterylife,wesuggest
thefollowing:
[] Storeandchargeyourbatteriesina coolarea.
Temperatures
aboveor belownormalroom
temperature
willshortenbatterylife.
[] Neverstorebatteriesina dischargedcondition.
Recharge
themimmediately
aftertheyare
discharged.
[] All batteriesgraduallylosetheircharge.The
higherthetemperature
thequickertheylosetheir
charge.If youstoreyourworklightforlongperiods
oftimewithoutusingit, recharge
the batteries
everymonthortwo.Thispracticewillprolong
batterylife.
To preserve natural resources,
please recycle or dispose of
batteries properly.
BATTERY PACK REMOVAL AND
PREPARATION
FOR RECYCLING
This product contains nickelcadmium batteries. Local, state or
federal laws may prohibit disposal of
nickel-cadmium batteries in ordinary
trash.
A
WARNING:
Upon removal, cover the battery
pack's terminals with heavy duty adhesive tape.
Do not attempt to destroy or disassemble battery
pack or remove any of its components. Nickelcadmium batteries must be recycled or disposed
of properly. Also, never touch both terminals with
metal objects and/or body parts as short circuit
may result. Keep away from children. Failure to
comply with these warnings could result in fire
and/or serious injury.
_ib
WARNING:
Do not attempt to disassemble the
battery pack. Fire or injury may result.
Consult your local waste authority for information
regarding available recycling and/or disposal options.
10
11