1
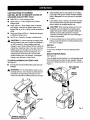
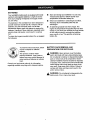
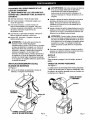
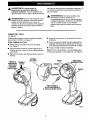
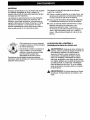
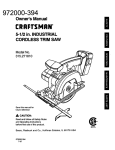
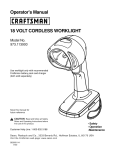
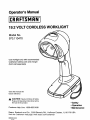
Operator's Manual
ICRRFTSMRN+I
19.2 VOLT CORDLESS WORKLIGHT
Model No.
973.110470
Use worklight only with recommended
Craftsman battery pack and charger
(both sold separately)
Save this manual
future
for
reference
• 1, CAUTION:
Read and follow all Safety
Rules and Operating Instructions before
first use of this product.
Customer
Help Line: 1-800-932-3188
Sears, Roebuck
and Co., 3333 Beverly Rd., Hoffman
Visit the Craftsman web page: www.sears.com/craftsman
983000-003
2-02
• Safety
• Operation
• Maintenance
Estates,
IL 60179
USA
CAUTION:Carefullyreadthroughthisentireoperator'smanualbeforeusingyournewworklight.Payclose
attentiontothe RulesForSafeOperation,
WarningsandCautions.Safety,performance
anddependability
havebeengiventoppriorityinthedesignof thisworklightmakingiteasytomaintainandoperate.Ifyouuse
yourworklightproperlyandonlyforit'sintendeduse,youwillenjoyyearsofsafe,reliableservice.
SAFETY AND INTERNATIONAL
SYMBOLS
This operator's manual describes safety and international symbols and pictographs that may appear on this
product. Read the operator's manual for complete safety, assembly, operating and maintenance, and repair
information.
MEANING
Do not expose to rain or use in damp locations.
READ ALL INSTRUCTIONS
B
•
_i
WARNING:
If wrapped or in contact with
fabrics, the worklight lens can produce sufficient
heat to melt some fabrics. To avoid serious
personal injury, never allow the worklight lens to
come in contact with anything.
•
KEEP WORK AREA CLEAN. Cluttered areas
and benches invite accidents.
REMOVE BATTERY PACK FROM
WORKLIGHT BEFORE REPLACING BULB OR
PERFORMING ANY ROUTINE MAINTENANCE
OR CLEANING.
•
DO NOT DISASSEMBLE
•
DO NOT PLACE WORKLIGHT OR BATTERY
AVOID DANGEROUS
YOUR WORKLIGHT.
PACK NEAR FIRE OR HEAT. They may
explode. Also, DO NOT dispose of a worn out
battery pack by incinerating. Do not incinerate
the battery, even if it is severely damaged or
completely worn out. The battery may explode in
fire.
•
DO NOT PERMIT CHILDREN TO USE
WORKLIGHT UNSUPERVISED. It is not a toy.
The temperature of the bulb will become hot after
being on for only a short period of time, This hot
temperature can cause burn injury if touched and
can create sufficient heat to melt some fabrics.
KNOW YOUR WORKLIGHT. Read operator's
manual carefully. Learn its applications and
limitations as well as the specific potential
hazards related to this light,
USE ONLY RECOMMENDED BATTERY PACK
WITH YOUR WORKLIGHT. Any attempt to use
another battery pack will cause damage to your
worklight and could possibly explode, cause a fire,
or personal injury.
M
n
DO NOT STORE YOUR WORKLIGHT IN A
DAMP OR WET LOCATION. DO NOT STORE
IN LOCATIONS WHERE THE TEMPERATURE
IS LESS THAN 50°F OR MORE THAN 10O°F,
Do not store in outside sheds or in vehicles.
ENVIRONMENT.
KEEP LIGHT DRY, CLEAN, AND FREE FROM
OIL AND GREASE. Always use a clean cloth
when cleaning. Never use brake fluids, gasoline,
petroleum-based products or any strong solvent
to clean your worklight.
•
STAY ALERT. Watch what you are doing and
use common sense. Do not rush.
•
CHECK DAMAGED PARTS. Before further use
of this worklight, a part that is damaged should
be carefully checked to determine that it will
operate properly and perform its intended
function. Do not use worklight if it does not
function properly.
RULES
SAFETY
,_
,_k
FOR SAFE OPERATION
RULES
(Continued)
IMPORTANT SAFETY
INSTRUCTIONS
FOR CHARGER
FOR WORKLIGHTS
WARNING:
Do not operate worklight or charger
near flammable liquids or in gaseous or
explosive atmospheres. Internal sparks may
ignite fumes.
WARNING:
use:
Before using battery charger, road all
instructions and cautionary markings in this
manual, on battery charger, and product using
battery charger.
Lens and bulb become hot during
A
• During or immediately after use, don't lay
worklight flat on lens surface or place lens
area in contact with a plastic or fabric
covered surface.
• Handle worklight with care around any
flammable surface.
Do not expose to wet or damp conditions.
To reduce the risk of damage to charger body
and cord, pull by charger plug rather than cord
when disconnecting charger.
• Let worklight cool for several minutes after
use before changing bulb.
• Do not use or permit use of worklight in bed
or sleeping bags. This worklight lens can
melt fabric and a burn injury could result.
IMPORTANT
TOOLS
•
SAFETY
RULES
CAUTION: To reduce the risk of injury, charge
only nickel-cadmium type rechargeable batteries.
Other types of batteries may burst causing
personal injury and damage.
An extension cord should not be used unless
absolutely necessary. Use of improper extension
cord could result in a risk of fire and electric
shock. If extension cord must be used, make
sure:
FOR BATTERY
USE ONLY THE CHARGER RECOMMENDED
FOR USE WITH YOUR WORKLIGHT. Do not
a. That pins on plug of extension cord are the
same number, size and shape as those of
plug on charger.
substitute any other charger. Use of another
charger could cause batteries to explode causing
possible serious injury.
b. That extension cord is properly wired and in
good electrical condition; and
•
Your battery tool should be charged in a location
where the temperature is more than 50°F but
less than 100°F.
c.
Cord Length (Feet)-25'
50'
100'
•
Under extreme usage or temperature conditions,
battery leakage may occur. If liquid comes in
contact with your skin, wash immediately with
soap and water, then neutralize with lemon juice
or vinegar. If liquid gets in your eyes, flush them
with clean water for at least 10 minutes, then
seek immediate medical attention.
Cord Size (AWG)
16
16
,_,
,_
•
That wire size is large enough for AC ampere
rating of charger as specified below:
16
Note: AWG = American Wire Gage
•
DO NOT OPERATE CHARGER
WITH A
DAMAGED CORD OR PLUG. If damaged, have
replaced immediately by a qualified serviceman.
•
WARNING:
Batteries vent hydrogen gas and
can explode in the presence of a source of
ignition, such as a pilot light. To reduce the risk
of serious personal injury, never use any
cordless product in the presence of open flame.
An exploded battery can propel debris and
chemicals. If exposed, flush with water immediately.
Do not operate charger if it has received a sharp
blow, been dropped, or otherwise damaged in
any way; take it to a qualified serviceman.
Do not disassemble charger; take it to a qualified
serviceman when service or repair is required.
Incorrect reassembly may result in a risk of
electric shock or fire.
To reduce the risk of electric shock, unplug
charger from outlet before attempting any
maintenance or cleaning. Turning off controls will
not red_Jce this risk.
WARNING:
Never use a battery pack that has
been damaged or received a sharp blow. A
damaged battery pack is subject to explosion.
Properly dispose of a damaged battery pack
immediately. Failure to heed this warning can
result in serious personal injury.
•
Do not use charger in wet or clamp conditions.
•
Disconnect charger from power supply when not in
use.
SAVE THESE INSTRUCTIONS. Review them
frequently and use them to instruct others who
may use this light. If you loan someone this light,
loan them these instructions also.
WHEN SERVICING USE ONLY IDENTICAL
CRAFTSMAN REPLACEMENT PARTS.
SAVE THESE INSTRUCTIONS
3
BATI'ERY PACK/CHARGER
Thebatterypackandchargerare not included with
•
your worklight. They are both sold separately. When
purchasing, use the following information:
MODEL NO. BATTERY PACK
CHARGER
973.110470
Item No. _ 11375
Item No. 9 11041
(1310715)
(1425301 )
BA'R'ERY
Allow battery pack to remain in charger for 15 to
30 minutes. When battery pack reaches normal
voltage range, red LED should come on.
If red LED does not come on after 30 minutes, this
indicates a defective battery pack and should be
replaced.
PACK
The battery pack for your worklight has been shipped
in a low charge condition to prevent possible problems. Therefore, you should charge it until light on
front of charger changes from red to green.
Note: Batteries will not reach full charge the first time
they are charged. Allow several cycles (operating
worklight followed by recharging) for batteries to
become fully charged.
CHARGING
BAT'rERY
If both yellow and green LED come on, this indicates a deeply discharged or defective battery pack.
•
After normal usage, a minimum of 1 hour of
charging time is required to fully recharge battery
pack.
•
The battery pack will become slightly warm to the
touch while charging. This is normal and does not
indicate a problem.
•
Do not place charger and battery pack in an area
of extreme heat or cold. It will work best at normal
room temperature.
PACK
Note: Charger and battery pack should be placed
in a location where the temperature is more than
50°F but less than 100°F.
See Figure Y.
Use only the recommended battery pack and
charger with your worklight.
•
Make sure power supply is normal household
voltage, 120 volts, 60 Hz, AC only.
Connect charger to power supply.
When batteries become fully charged, unplug
charger from power supply and remove the battery
pack.
IMPORTANT
INFORMATION
ING HOT BA'I-rERY PACK
Place battery pack in charger aligning raised rib on
battery pack with groove in charger. See Figure f.
Press down on battery pack to be sure contacts on
battery pack engage properly with contacts in charger.
FOR RECHARG-
When using your worklight continuously, the batteries
in your battery pack will become hot. You should let a
hot battery pack cool down for approximately 30
minutes before attempting to recharge. When the
battery pack becomes discharged and is hot, this will
cause the green LED to come on instead of the red
LED. After 30 minutes, reinsert battery pack in
charger. If green LED continues to remain on, return
battery pack to your nearest Sears Repair Center for
checking or replacing.
Normally, the red LED on charger will come on.
This indicates charger is in fast charging mode.
Red LED should remain on for approximately 1
hour then the green LED will come on. Green LED
on indicates battery pack is fully charged and
charger is in trickle charge mode. Note: Green
LED will remain on until battery pack is removed
from charger or charger is disconnected from
power supply.
Note: This situation only occurs when continuous use
of your worklight causes the batteries to become hot.
It does not occur under normal circumstances. Refer
to "CHARGING BATTERY PACK" for normal recharging of batteries. If the charger does not charge
your battery pack under normal circumstances, return
both the battery pack and charger to your nearest
Sears Repair Center for electrical check.
BATTERYPACK
SHOWNIN CHARGER
CHARGER
REDLED ON INDICATES
GREENLEDON AFTERFASTCHARGING
CYCLE,INDICATESFULLYCHARGEDBATTERY
PACKANDINTRICKLECHARGEMODE.
YELLOWANDGREENLEDSONINDICATESDEEPLY
DISCHARGEDOR DEFECTIVEBATTERYPACK.
Fig. 1
4
LED FUNCTIONS
OF CHARGER
LED WILL BE ON TO INDICATE
CHARGER
AND BATTERY
STATUS
Red LED on = Fast charging mode.
•
Green LED on = Fully charged and in trickle
charge mode.
•
Green LED on = When battery pack is inserted
into charger, indicates hot battery pack or that
battery pack is out of or below normal temperature
range,
Yellow and Green LEDs on = Deeply discharged
or defective battery pack,
•
Orient battery pack so that raised rib on battery
pack aligns with groove inside worklight. Battery
pack is designed to fit only one way in worklight
handle.
•
Insert battery pack, making sure latches on each
side of battery pack snap into place and battery
pack is secure in worklight before use.
PACK:
•
•
•
OF
CAUTION: When placing battery pack in your
worklight, be sure raised rib on battery pack
aligns with groove inside worklight handle and
latches snap into place properly. Improper
assembly of battery pack can cause damage to
internal components.
No LED on = Defective charger or battery pack,
•
_
CAUTION: To prevent damage to battery pack,
remove battery pack from charger immediately if
no LED comes on. Return battery pack and
charger to your nearest Sears Service Center for
checking or replacing. Also, if you are removing
battery pack from charger and no LEDs are on,
return both battery pack and charger to your
nearest Sears Service Center. Do not insert
another battery pack into charger. A damaged
charger may damage a battery pack.
TO INSTALL/REMOVE
BATTERY
SWITCH
See Figure 3.
To turn your worklight on and off, depress switch
trigger.
MULTI-POSITION
_,
HEAD
See Figure 3.
Your worklight has the feature of a multi-position head
that has positive stop clicks at each position. Rotate
head to the desired position as shown in the arrows in
Figure 3.
PACK
See Figure 2.
•
To remove battery pack, locate latches on end of
battery pack and depress to release battery pack
from your worklight.
Use only the recommended battery pack with your
worklight.
MULTI-POSITION
WARNING:
Do not install battery pack to your
worklight until you have read and understood all
precautions and operating instructions in the
manual and printed on battery pack and charger.
SWITCH
TRIGGER
BATTERY
PACK
LATCHES
Fig. 3
LATCHESTO
RELEASEBATTERYPACK
Fig. 2
5
_1= WARNING:
When servicing, use only
identical Craftsman replacement parts. Use of
any other part may create a hazard or cause
product damage.
_,
Do not abuse power tools. Abusive practices can
damage tool as well as workpiece,
,_
worklight or create accessories not recommended
for use with this worklight. Any such alteration or
modification is misuse and could result in a
hazardous condition leading to possible serious
personal injury.
WARNING:
Do not at any time let brake fluids,
gasoline, petroleum-based products, penetrating
oils, etc. come in contact with plastic parts. They
contain chemicals that can damage, weaken or
destroy plastic.
BULB
WARNING: Do not attempt to modify this
REPLACEMENT
See Figure 4.
When purchasing replacement bulb, request recommended part number 7811502. See Figure 4.
•
Insert new bulb in spring by twisting bulb in a
clockwise direction.
TO REPLACE BULB:
•
Replace lens cover aligning tabs inside lens cover
with slots on housing then snap into place.
•
Replace battery pack.
•
Remove battery pack from worklight. See Page ,5.
•
Depress button located on top of len cover then
pull lens cover to remove.
•
Remove old bulb from spring by twisting bulb in a
clockwise direction.
LENSCOVER
Note: For your convenience, your worklight has a bulb
storage area to store an extra bulb. See Figure 4.
BUTTON
DEPRESS
PULLLENS BUTTON
COVERFORWARD
TO REMOVE
BULB
STORAGEAREA
SLOT
FOR MODELNO.973.110470
REQUESTBULBPARTNO. 7811502
Fig. 4
BATTERIES
Your worklight's battery pack is equipped with nickelcadmium rechargeable batteries. Length of service
from each charging will depend on the type of work
you are doing.
The batteries in this worklight have been designed to
provide maximum trouble free life. However, like all
batteries, they will eventually wear out. Do not
disassemble battery pack and attempt to replace the
batteries. Handling of these batteries, especially when
wearing rings and jewelry, could result in a serious
burn.
•
Store and charge your batteries in a cool area.
Temperatures above or below normal room
temperature will shorten battery life.
•
Never store batteries in a discharged condition.
Recharge them immediately after they are
discharged.
•
All batteries gradually lose their charge. The
higher the temperature the quicker they lose their
charge. If you store your worklight for long periods
of time without using it, recharge the batteries
every month or two. This practice will prolong
battery life.
To obtain the longest possible battery life, we suggest
the following:
To preserve natural resources, please
recycle or dispose of batteries
properly.
BATTERY PACK REMOVAL AND
PREPARATION
FOR RECYCLING
This product contains nickelcadmium batteries. Local, state or
federal laws may prohibit disposal of
nickel-cadmium batteries in ordinary
trash.
_k
WARNING:
Upon removal, cover the battery
pack's terminals with heavy duty adhesive tape.
Do not attempt to destroy or disassemble battery
pack or remove any of its components. Nickelcadmium batteries must be recycled or disposed
of properly. Also, never touch both terminals with
metal objects and/or body parts as short cimuit
may result. Keep away from children. Failure to
comply with these warnings could result in fire
and/or serious injury.
_k
WARNING:
Do not attempt to disassemble the
battery pack. Fire or injury may result.
Consult your local waste authority for information
regarding available recycling and/or disposal options.
For repair of major brand appliances in your own home...
no matter who made it, no matter who sold it!
1-800-4-MY-HOME SM
Anytime,
day or night
(1-800-469-4663)
www.sears.com
To bring in products such as vacuums, lawn equipment and electronics
for repair, call for the location of your nearest Sears Parts & Repair Center.
1-800-488-1222
Anytime,
day or night
www.sears.com
For the replacement parts, accessories and owner's manuals
that you need to do-it-yourself, call Sears PartsDirect s_ !
1-800-366-PART
(1-800-366-7278)
6am- _ nmCST,
7 days a week
www.sears.com/partsdirect
To purchase or inquire about a Sears Service Agreement:
1-800-827-6655
7 a.m. - 5 p.m. CST, Mon. - Sat.
Para pedir servicio
de reparaci6n
a domicilio,
Au Canada
y para ordenar piezas con entrega a domicilio:
1-888-SU-HOGAR
s_
pour service
(1-877-533-6937)
(1-888-784-6427)
HomeCentral _
® Registered Trademark / _ Trademark of Sears, Roebuck and Co.
@ Sears, Roebuck and Co.
® Marca Registrada /
TM
en fran£ais:
1-877-LE-FOYER s,
Marca de F&bdca de Sears, Roebuck and Co.
_,_;
Manual del Usuario
II:RRFTSMRN'I
LUZ DE TRABAJO A BATERIA
DE 19,2 VOLTIOS
No. de Modelo
973.110470
Usar la luz de trabajo con el
cargador y bloque de baterfas
Crafstman recomendados
(ambos vendidos
Conserve
este manual
para referencia
_,
separadamente)
futura
ATENCION:
Lea cuidadosamente todas las
Reglas de Seguridad y las Instrucciones antes
de usar esta herramienta.
No. de tel_fono
de ayuda a los clientes:
1-800-932-3188
Sears, Roebuck and Co., 3333 Beverly Rd., Hoffman
Visite la p_gina Web de Craftsman: www.sears,com/craftsman
983000-003
2-02
° Seguridad
° Funcionamiento
• Mantenimiento
Estates,
IL 60179
USA
_,
ATENClON:
Lea cuidadosamente todo este manual antes de usar su nueva luz de trabajo. Preste mucha
atencibn a las Reglas para FuncionamientoSeguro, asf como a las Advertencias y Avisos. Se ha dado prioridad
m_tximaa la seguridad, rendimientoy dependabilidad en el dise£=ode esta luz de trabajo pot Io cual es f&cil de
mantener y operar. Si usted utiliza la luz de trabajo debidamente y solamente para el prop6sitoque ha sido
disefiada, usted disfrutard de muchosaries de servicio seguro.
SIMBOLOS DE SEGURIDAD
E INTERNACIONALES
En este manual del usuario se descdben los simbolosy pictogramas de seguridad e intemacionales que puedan
aparecer en este producto. Lea este manual para obtener informaci6n completa sobre seguridad, montaje,
funcionamiento, mantenimiento y reparaci6n.
SIGNIFICADO
No exponga a la Iluvia ni use en tugares h_medos.
LEA TODAS
LAS INSTRUCCIONES
No es un juguete. La temperatura del foco es muy
caliente aun cuando haya estado encendido por un
perfodo corto de tiempo. Esta temperatura caliente
puede causar una quemadura si se toca el foco y
puede crear suficiente calor como para derretir
algunas telas.
•
CONOZCA SU LUZ DE TRABAJO. Lea
atentamente el manual del usuario. Aprenda sus
aplieaciones y limitacionesasi como tambien los
riesgos potenciales especfficosrelacionados con
esta luz.
•
UTILICE SOLAMENTE EL BLOQUE DE
BATERIAS RECOMENDADO CON SU LUZ DE
TRABAJO. Si intenta usar cualquier otro bloque de
baterias puede dafiar la luz de trabajo y
posiblemente explotar, causar un Lncendio o una
lesi6n personal.
RETIRE EL BLOQUE DE BATERIAS DE LA LUZ
DE TRABAJO ANTES DE CAMBIAR EL FOCO O
CUANDO REAUCE EL MANTENIMIENTO
LIMPIEZA RUTINARIA.
A'_ ADVERTENCIA:
Si el lente de la luz de trabajo
411
es envuelto en tela o tiene contacto con alguna tela
puede pmducir suficiente calor como para derretirla.
A fin de evitar una lesi6n personal grave, nunca
permlta que el lente de la luz de trabajo entre en
contacto con nada.
•
MANTENGA EL AREA DE TRABAJO LIMPIA. Los
lugares y bancos de trabajo desordenados invitan a
los accidentes,
•
NO DESARME SU LUZ DE TRABAJO.
•
EVITE LOS AMBIENTES
•
NO COLOQUE LA LUZ DE TRABAJO O EL
BLOQUE DE BATERIAS CERCA DEL FUEGO O
DEL CALOR. Pueden explotar. Ademas, NO
descarte un bloque de baterfas usado
inciner&ndolo. No incinere la baterfa, aun siesta
severamente dafiada o completamente agotada. La
baterfa puede explotar en el fuego.
NO GUARDE SU LUZ DE TRABAJO EN UN
•
MANTENGA LA LUZ SECA, LIMPIA Y SIN
ACEITE NI GRASA. Siempre utilice un patio limpio
para efectuar la limpieza. Nunca use Ifquidode
frenos, gasolina, productosa base de petr61eoo
solventes para limpiarsu luz de trabajo.
•
LUGAR MOJADO O HUMEDO. IGUALMENTE,
NO LA GUARDE EN LUGARES DONDE LA
TEMPERATURA SEA INFERIOR A 50°F O
SUPERIOR A 100°F. No guarde en galpones al aire
libre o en vehiculos.
•
MANTENGASE ALERTA. Ponga atenci6n a Io que
esta haciendo y use sentido comen. No se
apresure.
INSPECClONE LAS PIEZAS DAI_IADAS. Antes de
usar esta luz de trabajo, alguna pieza que est(_
dahada debe ser revisada cuidadosamente para
determinar si funcionard en forma debida y si
desempefiarb la funci6n para la cual fud disefiada.
Una pieza que este dafiada debe set reemplazada
o reparada en forma apropiada.
•
•
•
NO PERMITA QUE LOS NII_IOS UTILICEN LA
LUZ DE TRABAJO SIN SER SUPERVISADOS.
2
PELIGROSOS.
REGLAS PARA FUNCIONAMIENTO
SEGURO
REGLAS DE SEGURIDAD
PARA LA LUZ DE
TRABAJO
(Continuaci6n)
INSTRUCCIONES
IMPORTANTES DE
SEGURIDAD PARA EL CARGADOR
Antes de usar el cargador de la baterfa, lea todas las
instrucciones y advertencias indicadas en este
manual, en el cargador de la baterfa yen el producto
que usa el cargador.
ADVERTENCIA:
No haga funcionar la luz de
trabajo o el cargadorcerca de Ifquidos inflamables o
en ambientes gaseososo explosivos.Las chispas
internas pueden encender los vapores.
_i
ADVERTENCIA:
el uso.
El lente Y el foco se calientan con
_k,
• No deposite la luz de trabajo apoydndola en la
superficie del lente durante el uso o inmediatamente
despues de usarla ni coloque el drea del lente en
contacto con una superficie de pldstico o cubierta
con tela.
No exponga el cargador a ambientes hl3medos o
mojados.
Para reducir el riesgo de dafio al cuerpo del cargador
y al cord6n, cuando desconecte el cargador tire del
enchufe del cargador en vez que del cord6n.
No debe usarse un cord6n de extensi6n a menos
qua sea absolutamente necesario. El uso de
oordones de extensi6n inadecuados puede resultar
en riesgo de incendio y de choque el_ctrico. Si se
debe usar un cord6n de extensi6n, asegL_resede
que:
a. Las clavijas del enchufe del cord6n de extensi6n
son iguales en n_mero, tamafio y forma alas del
cargador.
b. El cord6n de extensi6n esta debidamente
cableado yen buen estado; y
c. El calibre del cable es suficiente para el amperaje
nominal CA del cargador, seg_n se especifica a
continuaci6n:
• Manipule ta luz de trabajo con cuidado cuando se
encuentre cerca de cualquier superficie inflamable.
• Deje que la luz de trabajo se enfrie durante varios
minutos despu_s de usarla antes de cambiar el foco.
• No permita que la luz de trabajo sea usada en la
cama o en sacos de dormir. El lente de esta luz de
trabajo puede derretir las telas y ocasionar una
quemadura.
REGLAS DE SEGURIDAD
IMPORTANTES
PARA HERRAMIENTAS
A BATERIA
USE SOLAMENTE
EL CARGADOR QUE SE
RECOMIENDA
USAR CON LA LUZ DE TRABAJO.
No utilice ningl_n otro cargador. Si usa otro puede
hacer explotar la bateria causando alguna lesi6n
seria.
Su herramienta a baterfa debeser cargada en un
lugar donde la temperatura sea superior a 50°F
(10°C) pero inferior a IO0°F (37°C).
Bajo condiciones de uso o temperatura extrema,
puede ocurrir escape de Ifquidoen la baterfa. Si el
Ifquido entra en contacto con la piel, lavese
inmediatamente con agua y jabbn, luego nautralice
con jugo de lim6n o vinagre. Si entra Ifquido a sus
ojos, I&velos con agua Iimpia durante 10 minutos,
luego busque atenci6n m_dica inmediata.
Largo del Cordbn (Pies)
Calibre del Cordbn (AWG)
•
•
ADVERTENCIA:
Lasbaterfasemiten hidr6genoY
pueden explotar en presencia de una fuente de
ignicibn,tal como una luz piloto. A fin de reducirel
riesgo de sufrir una lesi6n personal grave, nunca use
ning0n producto a baterfa en presencia de una llama
abierta. Una baterfa que explote puede lanzar
residuos y qufmicos. Si antra en contacto con tales
materiales, Idvese inmediatamente con agua la parte
afectada.
,_
•
•
•
•
Nunca use un bloque de baterias
: •
que se haya cafdo o recibido un golpe fuerte. Un
bloquede baterfas dafiado puede explotar. Descarte
inmediatamentey de manera apropiada un bloque de
baterfas que est(_dafiado. El incumplimientode esta
advertencia puede causar una lesi6n personal grave.
ADVERTENClA:
CUANDO EFECTUE LABORES DE
MANTENIMIENTO,
USE SOLAMENTE
CRAFTSMAN AUTENTICOS.
ATENCION:
Para reducirel riesgo de lesi6n,
cargue solamente baterfas recargablesde nfquel y
cadmio. Otros tipos de baterfas pueden explotar
causando lesi6n personaly daho.
100
16
No haga funcionar el cargador si ha recibido un
golpe fuerte, si se ha cafdo o si se ha dafiado de
alguna manera. Llevelo a un reparador calificado.
No desarme el cargador;II_velo a un t_cnico
calificadocuando necesite servicioo reparaci6n. El
rearmado incorrectopuede resultaren un riesgode
choque el_ctrico o incendio.
Para reducirel riesgo de choque el_ctrico,
desenchufe el cargador del tomacorrienteantes de
efectuar eualquiermantenimiento o limpieza. AI
apagar los controlesno se reducir_,este desgo.
No use el cargadoren lugares h=Jmedoso mojados.
Desconecteel cargadorde la fuente de energfa
cuando no est6 en uso.
CONSERVE ESTAS INSTRUCCIONES. Consulte
estas instruccionesfrecuentemente y _selas para
instruira otros sobre el uso de esta luz. Si usted
presta esta luz a otra persona entregue tambi_n las
instrucciones.
ESTAS INSTRUCClONES
3
50
16
Nota: AWG = American Wire Gage
NO HAGA FUNClONAR EL CARGADOR Sl EL
CORDON O EL ENCHUFE ESTAN DAI_IADOS. Si
est&ndafiados, h_.galosreemplazar inmediatamente
por un electricistacalificado.
REPUESTOS
CONSERVE
25
16
BLOQUE
•
DE BATERIAS/CARGADOR
Con esta luz de trabajo no se incluye ni el bloque de
baterfas ni el cargador. Ambos se venden por separado.
Cuando los compre, use la siguiente informaci6n:
MODELO
BLOQUE DE
CARGADOR
NO.
BATERIAS
973.110470
Art. No. 9 11375
Art. No. 9 11041
(1310715)
(1425301)
Deje el bloque de baterias en el cargador durante 15 a
30 minutos. Cuando el bloque de baterfas alcanza el
limite de voltaje normal, el LED rojo debe iluminarse.
BLOQUE DE BATERIAS
•
El bloque de baterfas para esta la luz de trabajo ha sido
enviado con carga baja para evitar posibles problemas.
Por Io tanto usted debe cargarlo hasta que la luz situada
en la parte delantera del cargador cambie de roja a verde.
•
Nota: Las baterfas no alcanzan su carga total la primera
vez que son cargadas. Deje que pasen varios ciclos (la
luz de trabajo en funcionamiento seguido de carga) hasta
que las baterias puedan cargarse en su totalidad.
CARGA
Vet Figura
DEL
BLOQUE
•
DE BATERIAS
I.
•
Con su luz de trabajo use solamente el bloque de
baterfas y el cargador recomendados.
•
Aseg_rese de que la alimentacibn es el voltaje
normal del hogar: 120 voltios, 60 Hz, CA solamente.
•
Conecte el cargador a la fuente de alimentaci6n
el_ctrica.
•
Coloque el bloque de baterias en el cargador
alineando la nervaduradel bloque de baterfas con la
ranura situada en el cargador. YerFiguFd I.
•
Empuje hacia abajo el bloque de baterfas para
asegurarse de que los contactos del bloque de
baterias enganchen debidamente los contactos del
cargador.
•
Normalmente, el LED rojo del cargador se iluminarb.
Esto indica que el cargador esta en modo de carga
r_pida.
•
El LED rojo debe permanecer iluminado durante
aproximadamente 1 hora y luego se cambia al LED
verde. Cuando se ilumina el LED verde, el bloque de
baterias estd totalmente cargado y ahora estd en modo
de carga lenta. Nora: El LED verde permanecer&
iluminado hasta que se retire el bloque de baterias del
cargador o el cargador sea desenchufado de la fuente
de alimentaci6n.
BLOQUEDE BATERIAS
INSTALADOENLA
CARGADOR
Si se iluminan ambos, el LED verde y el LED amarillo,
esto indica que el bloque de baterfas est& totalmente
agotado o defectuoso.
•
Si el LED rojo no se ilumina despues de 30 minutos,
esto indica que el bloque de baterias est_ defectuoso y
debe ser reemplazado.
Despues de uso normal, se requiere un minimo de 1
hora de carga para que el bloque de baterias quede
totalmente cargado.
El bloque de baterias permanecera ligeramente
caliente cuando se esta cargando. Esto es normal y no
es indicaci6n de problema.
No coloque el cargador ni el bloque de baterias en un
ambiente de mucho calor o frio. Trabajara mejor a
temperatura ambiente normal.
Nota: El cargador y el bloque de baterias deben ser
colocados en un lugar donde la temperatura sea
superior a 50°F pero inferior a 100°F.
Cuando las baterfas se carguen completamente,
desenchufe el cargador de la fuente de energia
electdca y descondctelo del bioque de baterfas.
INFORMACION
IMPORTANTE
PARA CARGAR
UN BLOQUE DE BATERIAS CALIENTE
Cuando use su luz de trabajo en forma continua,las
baterlas en el bloque de baterias pueden calentarse.
Usted debe dejar enfriar el bloque de baterfas durante
aproximadamente 30 minutos antes de intentar recargarlo.
Cuando el bloque de baterfas se descarga y estd caliente,
esto causara que el LED verde se ilumine en vez de[ LED
rojo. Despuds de 30 minutos, vuelva a insertar el bloque
de baterlas en el cargador. Si el LED verde continua
ituminado, devuelva el bloque de baterfas a su Centro de
Reparaci6n Sears mds cercano para su revision o
reemplazo.
Nora: Esta situaci6n ocurre solamente cuando el uso
continuo de su luz de trabajo causa que las baterfas se
calienten. No ocurre bajo circunstancias normales.
Consulte "CARGA DEL BLOQUE DE BATERIAS" para
carga normal de las baterfas, Si el cargador no carga su
bloquede baterfas bajocircunstanciasnormales,devueIva
ambos, el bloquede baterias y el cargadora su Centro de
Reparaci6nSears mas cercanopara revisi6n electrica.
CARGADOR
LED ROJOILUMINADOINDICA
CARGARAPIDA
LEDVERDEILUMINADODESPUESDELCICLODE CARGARAPIDA,
INDICAOUE ELBLOQUEDEBATERIASESTATOTALMENTE
CARGADOY ENMODODECARGALENTA.
LED AMARILLOY EL LEDVERDEILUMINADOSINDICA
UE DEBATERIASESTATOTALMENTE
AGOTADO0 DEFECTUOSO.
Fig. 1
4
FUNCIONES
DEL DIODO
EMISOR
DE LUZ
_l,
(LED) DEL CARGADOR
EL DIODO EMISOR DE LUZ (LED)INDICA
EL
ESTADO DEL CARGADOR
Y DEL BLOQUE DE
BATERIAS:
•
LED Rojo iluminado = Modo de carga rapida
•
LED Verde iluminado = Totalmente cargado yen
modo de carga lenta.
•
LED Verde iluminado = Cuando el bloque de
baterias est,. insertado en el cargador, indica que
el bloque de baterfas est_ caliente o que el bloque
de baterias esta fuera o bajo el limite de
temperatura normal.
•
•
LED Amarillo y LED Verde iluminados = Bloque de
baterfas totalmente agotado o defectuoso.
•
Ning_n LED iluminado = Cargador o bloque de
baterfas defectuoso.
,_
_i,
ATENCION:
Cuando instale el bloque de baterias
en su luz de trabajo, asegt_reee de que la nervadura
del bloque de baterias
quede alineada
con la ranura
de la manija de la luz de trabajo y los pestillos entren
a presi6n
en su lugar,
bloque de baterfas
internos.
•
El montaje
puede
da_ar
incorrecto
de[
los componentes
Para sacar el bloque de baterfas, ubique los pestillos
situados en el extremo del bloque y oprima para sacar
el bloque de baterfas de la luz de trabajo.
GATILLO
Vet Figura 3.
Para encender y apagar la luz de trabajo, apriete el
gatillo.
CABEZA
E DEL
DE VARIAS
POSICIONES
Vet Figura 3.
La cabeza de la luz de trabajo tiene varias posiciones
y cada una de elias tiene un tope con chasquido. Gire
la cabeza a la posici6n deseada como se muestra con
las flechas en la Figura 3.
Ver Figura 2.
•
Coloque el bloque de baterfas alineando la nervadura
del bloque de baterfas con la ranura de la luz de
trabajo. El bloque de baterias esta diseSado para
insertarse en la manija de la luz de trabajo de una
manera solamente.
Inserte el bloque de baterias asegur&ndose de que los
pestillos en ambos lados del bloque de baterfas entren
a presi6n en su lugar y que el bloque de baterias est6
firme en la luz de trabajo antes de usarla.
ATENClON: A fin de evitar que el bloque de
baterfas se dane, retffelodel cargador
inmediatamentesi ningDnLED se ilumina.Devuelva
el bloque de baterias y el cargador a su Centro de
Reparaci6n Sears mas cercano para su revisi6n o
reemplazo. Adema,s, si usted retira el bloquede
baterfas del cargadory no hay ning6n LED
iluminado,devuelva ambos, el bloquede baterias y
el cargador a su Centro de Reparaci6n Sears mas
cercano. No inserteningL_n
otto bloque de baterias
en el cargador. Un cargadordefectuosopuede dahar
un bloque de baterias.
INSTALAClON/DESMONTAJ
BLOQUE DE BATERIAS
ADVERTENCIA:
No instale el bloque de baterias
en su luz de trabajo hasta que no haya leido y
comprendido bien todas las advertencias e
instruccionesde funcionamientoindicadasen el
manual e impresas en el bloque de baterfas yen el
cargador.
Con su luz de trabajo use solamente e[ bloque de
baterfas y el cargador reeomendados.
CABEZADEVARIAS
POSICIONES
GATILLO
BLOQUEDE
BATERIAS
PESTILLOS
• OPRIMALOSPESTILLOSPARA
SACAREL BLOQUEDE BATERIAS
Fig. 2
Fig. 3
5
_k
No haga uso abusivo de las herramientas mecanicas. El
uso abusivo puede da_ar la herramienta y tambi_n la
pieza de trabajo.
ADVERTENCIA:
Cuando repare la
herramienta use solamente repuestos
aut6nticos Craftsman. El uso de cualquier otro
repuesto puede crear un riesgo o da_tar el producto.
,_
_
ADVERTENCIA:
Evite en todo memento que los
liquidos de frenos, gasolina, productos a base de
petrbleo, aceites penetrantes, etc. entren en
contacto con las piezas de pl_stico. EIIos contienen
productos quimicosque pueden dahar, debilitar o
destruir el pl_stico.
ADVERTENCIA:
No trate de modificar esta
herramienta ni de crear accesorios no
recomendados para su use con esta herramienta.
Cualquiera alteracibn o modificacibn se considera
mal uso y puede resultar en una condicion
peligrosa que cause una posiblelesibn personal
grave.
CAMBIO DEL FOCO
Per Figura 4.
Cuando desee comprar un foco de repuesto, solicite la
pieza n_mero 7811502. VerFigura 4.
•
Inserte el nuevo foco en el resorte girando el foco a
la derecha.
PARA CAMBIAR EL FOCO:
•
Vueiva a colocar la cubierta del lente alineando las
leng0etas del interior de ia cubierta con las ranuras
de la caja luego presione para colocarla en su lugar.
•
Vuelva a instalar el bioque de bater(as.
•
Retire el bloque de baterias de la luz de trabajo.
Per P,#gi/Ta5
•
Oprima el botbn situado en la parte superior de la
cubierta del lente y luego tire de la cubierta del lente
para sacarla.
•
Nora: Para su conveniencia, su luz de trabajo tiene
un _rea para guardar un foco adicional, l/efF/gLifa 4.
Retire el foco antiguo del resorte girando el foco a la
derecha.
CUBIERTA
DEL LENTE
BOTON
TIRE DELA
OPRIMAEL
CUBIERTADEL
BOTON
LENTEHACIA
ADELANTE
PARASACARLA
AREADONDE
GUARDARELFOCO
RANURA
.ENGOETAS
/
PARAEL MODELO
No.973.110470SOLIClTE
ELFOCONO.DE REF.7811502
Fig. 4
6
BATERIAS
El bloque de baterfas de su luz de trabajo est,, equipado
con baterfas recargables de niquel y cadmio. La
duraci6n del servicio de cada carga depender& del tipo
de trabajo que est_ realizando.
Las baterfas en esta herramienta han sido disefiadas
para proveer duraci6n m_xima sin problemas. Sin
embargo, como todas las baterfas, eventualmente se
agotaran. NO desarme el bloque de baterfas ni intente
reemplazar las baterfas. La manipulaci6n de estas
baterias, especialmente cuando est_ usando anillos y
joyas, puede resultar en una quemadura grave.
le rogamos reciclar o eliminar la baterfa
de manera apropriada.
Este producto contiene una baterfa de
nfquel
y cadmio. los
Las
leyes locales,
Para conservar
recursos
naturales
estatales y federales pueden prohibir
que las baterias usadas sean
descartadas en la basura comdn.
Consulte con las autoridades locales para obtener
informaci6n sobre el reciclaje y/o la manera correcta de
descartar estos productos.
Para obtener la vida L_titm&s larga de las batedas,
sugerimos Io siguiente:
• Guarde y cargue las batedas en un lugar fresco. Las
temperaturas superiores a la temperatura ambiente
normal acortaran la vida _til de las baterfas.
•
Nunca guarde las baterfas descargadas. C_rguelas
inmediatamente despu_s que se han descargado.
•
Todas las baterfas pierden gradualmente su carga.
Mientras mils alta sea la temperatura, mas
rapidamente pierden la carga. Si guarda su
herramienta por perfodos de tiempo prolongados sin
usarla, cargue las baterias cada mes o cada dos
meses. Esta pr&ctica prolongara la vida _til de las
baterfas.
EXTRACCION
PREPARACION
DE LA BATERIA Y
PARA EL REClCLAJE
A
Despu_s de sacar el bloque de
baterias, cubra los bornes del bloque de baterfa con
cinta adhesiva resistente. No intente destruir,
desarmar la baterfa o sacar cualquiera de sus
componentes. Las baterfas de nfquel y cadmio
deben ser recicladas o descartadas de manera
adecuada. Igualmente, nunca toque ambos bornes
con objetos metalicos y/o una parte del cuerpo pues
se puede produeir un cortocircuito.
Mant_ngase
fuera del alcance de los nifios. Si no se cumplen
estas advertencias,
se puede producir un incendio
y/o lesi6n grave.
,_
ADVERTI=NClA:
No intente desarmar el bloque
de bater_'as. Puede producirse un incendio o una
lesi6n.
ADVERTENCIA:
For repair of major brand appliances in your own home...
no matter who made it, no matter who sold ifl
1-800-4-MY-HOM EsMAnytime,
day or night
(1-800-469-4863)
www.sears.com
To bring in products such as vacuums, lawn equipment and electronics
for repair, call for the location of your nearest Sears Parts & Repair Center.
1-800-488-1222
Anytime,
day or night
www.sears.com
For the replacement parts, accessories and owner's manuals
that you need to do-it-yourself, call Sears PartsDirect sM!
1-800-366-PART
(1-800-386-7278)
6 a.m.-
11 p.m. CST,
7 days a week
www.sears.com/partsdirect
To purchase or inquire about a Sears Service Agreement:
1-800-827-6655
7 a.m. "- 5 p.m. CST,
Mon. - Sat.
Para pedir servicio de reparacion a domicilio,
y para ordenar piezas con entrega a domicilio:
1-888-SU-HOGAR
(1-888-784-6427)
_
Au Canada
pour service
1-877-533-6937)
SM
/8_8/r
_
L JH°meCentral"
® Registered
© Sears,
Roebuck
and Co
® Marea
en fran(_ais:
s_
1-877-LE-FOYER
Trademark
aegistrada
/ TM Trademark
/ T_ Marca
de F_bdca
of Sears,
de Sears,
"
Roebuck
Roebuck
and Co.
and Co.
i,