1
Electrical/Liner Installation
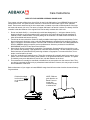
Hoods Using Hy-Ex Remote Ventilator
NOTE: Make all connections in accordance with local codes.
Switch power off at service panel and lock the service disconnecting means before wiring the unit. Detailed instructions
for electrical connection to the remote ventilator will be packaged with the ventilator. Power cables, connectors, conduit
etc. not supplied.
Hy-Ex Remote Ventilator
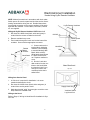
Wiring the Hy-Ex Remote Ventilator HYEX-1.4 or 1.O:
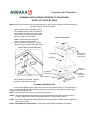
1. Run three #14 AWG wires (black, white and green) in
conduit from the remote ventilator to the hood.
120VAC
2. Remove ventilator’s top cover.
Motor Speed
Control
3. Feed conduit through the knock out into the base of the
ventilator. Secure with an appropriate connector.
Flexible
Metal
Conduit
Duct
Hood Stack
4. Connect wires to the
terminal block inside the
ventilator; connect Black
to terminal labeled LINE/
Black, White to NEU/
White terminal and Green
to GND/ Ground terminal. Replace ventilator’s
cover.
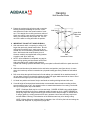
5. Run the 3-wire bundled conduit from the ventilator to the hood. Make
the electrical “whip” long
enough to reach to the
countertop below the installed hood.
Hood Shell
Liner
Liner Knock-out
Top View
Wiring from Service Panel
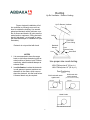
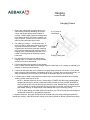
1. A 15A circuit is required for installation. It is recommended to dedicate the circuit.
2. Run three #14 AWG wires: (black, white and green) in
conduit from service panel to hood.
3. Make the electrical “whip” long enough to reach the countertop below the installed hood.
Wiring at the Hood:
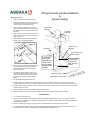
Refer to Page 9, “Wiring At Hood/Liner Re-Installation & System Test.
6
Supply Knock-Out
Ventilator Switch
Leg Knock-Out