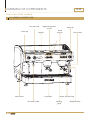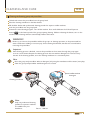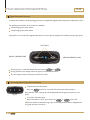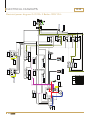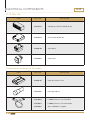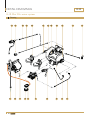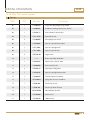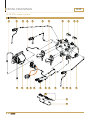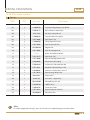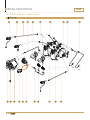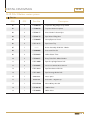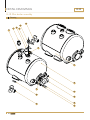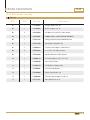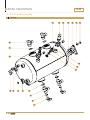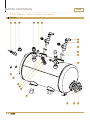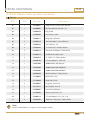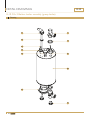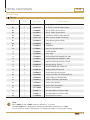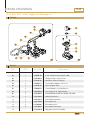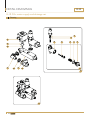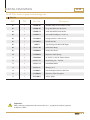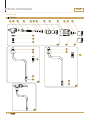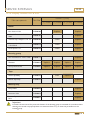
1
G-10
SERVICE MANUAL
R
SM_EN
Date.: 140402
CONTENTS
Original Instructions
G-10
CONTENTS..............................................................................................................................................................................2
SYMBOL DESCRIPTION...................................................................................................................................................5
Hazard intensity levels............................................................................................................................................................................................. 5
general....................................................................................................................................................................................6
Introduction............................................................................................................................................................................................................... 6
General instructions................................................................................................................................................................................................. 6
Warnings..................................................................................................................................................................................................................... 6
Precautions................................................................................................................................................................................................................. 7
Intended use......................................................................................................................................................... 7
TECHNICAL SPECIFICATIONS�����������������������������������������������������������������������������������������������������������������������������������8
G-10 MINI CONTROL........................................................................................................................................................................................... 8
Accessories................................................................................................................................................................................................................ 8
G-10 DISPLAY CONTROL 2GR.......................................................................................................................................................................... 9
Accessories................................................................................................................................................................................................................ 9
G-10 DISPLAY CONTROL 3GR........................................................................................................................................................................10
Accessories..............................................................................................................................................................................................................10
OVERVIEW OF COMPONENTS�����������������������������������������������������������������������������������������������������������������������������11
G-10 MINI CONTROL.........................................................................................................................................................................................11
G-10 DISPLAY CONTROL 2GR........................................................................................................................................................................12
G-10 DISPLAY CONTROL 3GR........................................................................................................................................................................13
DIMENSION SKETCH......................................................................................................................................................14
G-10 MINI CONTROL.........................................................................................................................................................................................14
G-10 DISPLAY CONTROL 2GR........................................................................................................................................................................15
G-10 DISPLAY CONTROL 3GR........................................................................................................................................................................16
TRANSPORT.........................................................................................................................................................................17
Packaging...................................................................................................................................................................................................................17
Delivery inspection.................................................................................................................................................................................................17
INSTALLATION AND START UP����������������������������������������������������������������������������������������������������������������������������17
Positioning................................................................................................................................................................................................................17
Electrical connection..............................................................................................................................................................................................18
Connection types....................................................................................................................................................................................................18
Water connection..................................................................................................................................................................................................19
Pressure and temperature....................................................................................................................................................................................19
Starting the machine...............................................................................................................................................................................................19
CLEANING AND CARE.................................................................................................................................................20
Coffee machine cleaning........................................................................................................................................................................................20
Daily cleaning...........................................................................................................................................................................................................20
Weekly cleaning......................................................................................................................................................................................................20
Regular maintenance..............................................................................................................................................................................................20
Cleaning the Brewing group and porta-filter���������������������������������������������������������������������������������������������������������������������������������������������������21
Cleaning the gasket and shower plate��������������������������������������������������������������������������������������������������������������������������������������������������������������22
Additional handling of the machine....................................................................................................................................................................23
STORAGE AND DISPOSAL OF MACHINE������������������������������������������������������������������������������������������������������23
How to store the machine...................................................................................................................................................................................23
2
R
CONTENTS
G-10
Disposal of machine...............................................................................................................................................................................................23
PROGRAMMING................................................................................................................................................................24
Electronic control panel........................................................................................................................................................................................24
Button functions......................................................................................................................................................................................................24
Machines equipped with display..........................................................................................................................................................................24
Machines not equipped with display...................................................................................................................................................................24
Additional button functions..................................................................................................................................................................................24
Additional functions accessible from the display��������������������������������������������������������������������������������������������������������������������������������������������25
User functions.........................................................................................................................................................................................................25
Counters...................................................................................................................................................................................................................25
Accessing the counters..........................................................................................................................................................................................26
Litre counter............................................................................................................................................................................................................26
Service: service alert..............................................................................................................................................................................................27
Total coffees dispensed.........................................................................................................................................................................................27
Number of coffees dispensed per button��������������������������������������������������������������������������������������������������������������������������������������������������������27
SERVICE PROGRAMMING������������������������������������������������������������������������������������������������������������������������������������������28
Reset parameters to factory default...................................................................................................................................................................28
Accessing service programming..........................................................................................................................................................................28
Language selection..................................................................................................................................................................................................28
Name 1: Programming the publicity display (upper line)������������������������������������������������������������������������������������������������������������������������������29
Name 2: Programming the publicity display (lower line)������������������������������������������������������������������������������������������������������������������������������29
Helpline.....................................................................................................................................................................................................................29
Dose programming.................................................................................................................................................................................................30
Continuous Dispensing button............................................................................................................................................................................30
Hot water button...................................................................................................................................................................................................30
Electronic steam wand...........................................................................................................................................................................................31
Level sensor sensitivity..........................................................................................................................................................................................31
Pre-infusion..............................................................................................................................................................................................................31
Grinding alert...........................................................................................................................................................................................................32
Grinding alert parameter settings.......................................................................................................................................................................32
LED flashing sequence...........................................................................................................................................................................................32
Maintenance cycles.................................................................................................................................................................................................33
Temperature unit (ºC or ºF)................................................................................................................................................................................33
Temperature unit (ºC or ºF)................................................................................................................................................................................33
Water filter: softener regeneration....................................................................................................................................................................33
MULTI-BOILER PROGRAMMING����������������������������������������������������������������������������������������������������������������������������34
Digital thermostat functions.................................................................................................................................................................................34
Connecting/disconnecting each thermostat����������������������������������������������������������������������������������������������������������������������������������������������������34
Setting group temperature...................................................................................................................................................................................35
Reset parameters to factory default...................................................................................................................................................................35
Thermostat alarms.................................................................................................................................................................................................35
messages and alarms�������������������������������������������������������������������������������������������������������������������������������������������36
TROUBLESHOOTING.....................................................................................................................................................37
ELECTRICAL DIAGRAMS..............................................................................................................................................38
Complete electrical diagram: G-10 Mini 2Gr��������������������������������������������������������������������������������������������������������������������������������������������������38
Secondary electrical diagram: G-10 2Gr����������������������������������������������������������������������������������������������������������������������������������������������������������39
R
3
CONTENTS
G-10
Electrical power diagram: G-10 2Gr 3 Boilers 230 V 1N~������������������������������������������������������������������������������������������������������������������������� 40
Electrical power diagram: G-10 2Gr 3 Boilers 400 V 3N~������������������������������������������������������������������������������������������������������������������������� 41
Electrical power diagram: G-10 2Gr 3 Boilers 230 V 3N~������������������������������������������������������������������������������������������������������������������������� 42
High current schematics G-10............................................................................................................................................................................ 43
ELECTRICAL COMPONENTS���������������������������������������������������������������������������������������������������������������������������������46
G-10 Mini 2Gr........................................................................................................................................................................................................ 46
Components common to all models................................................................................................................................................................. 46
G-10 2GR / 3GR.................................................................................................................................................................................................... 47
DETAIL DRAWINGS........................................................................................................................................................48
G-10: Housing parts.............................................................................................................................................................................................. 48
G-10 Mini 2Gr: water system............................................................................................................................................................................. 50
G-10 2Gr: water system...................................................................................................................................................................................... 52
G-10 2Gr 3 Boilers: water system..................................................................................................................................................................... 54
G-10 Mini: boiler assembly.................................................................................................................................................................................. 56
G-10 2Gr: boiler assembly................................................................................................................................................................................... 58
G-10 2Gr 3 Boilers: boiler assembly (main boiler)��������������������������������������������������������������������������������������������������������������������������������������� 60
G-10 2Gr 3 Boilers: boiler assembly (group boiler)������������������������������������������������������������������������������������������������������������������������������������� 62
G-10: Rotary pumps.............................................................................................................................................................................................. 64
Group head............................................................................................................................................................................................................. 66
Portafilters............................................................................................................................................................................................................... 68
G-10 Mini 1Gr : water supply and drainage set��������������������������������������������������������������������������������������������������������������������������������������������� 70
G-10 2Gr: water supply and drainage set������������������������������������������������������������������������������������������������������������������������������������������������������� 72
Steam tap................................................................................................................................................................................................................. 74
Hot water taps....................................................................................................................................................................................................... 76
SERVICE INTERVALS........................................................................................................................................................78
G-10 Mini Control 1Gr & 2Gr........................................................................................................................................................................... 78
G-10 Display Control 2Gr & 3Gr...................................................................................................................................................................... 79
4
R
SYMBOL DESCRIPTION
G-10
Hazard intensity levels
There are three different levels of hazard intensity, identified by signal words DANGER, WARNING and
IMPORTANT. The level of hazard is determined by the following definitions.
Observe the statements to ensure safety, performance, prevent injury and machine damage.
Important:
Alerts against unsafe practices. Observe to ensure drink quality, machine performance, food
safety, to prevent minor personal injury or damage to the machine.
WARNING!
Indicates a potentially hazardous situation which, if not avoided, could result in scalding, serious
injury and even death.
DANGER!
INDICATES A IMMINENTLY HAZARDOUS SITUATION WHICH, IF NOT
AVOIDED, WILL RESULT IN SERIOUS INJURY AND EVEN DEATH.
i
Note:
Gives additional information which may be helpful during the cleaning procedure or operation of
the machine.
R
5
general
G-10
Introduction
Thank you for choosing the G-10 espresso machine.
We hope you enjoy it !
Read the user manual before using the machine.
This manual contains important instructions on
intended and safe use of the coffee machine.
Keep this manual close to hand for future
reference. If damaged or lost, request a copy from
the manufacturer.
General instructions
Machine installation and certain maintenance
operations should only be performed by qualified
service personnel.
All safety instructions and warnings contained in
this manual should be observed to ensure safe
installation, use and maintenance.
Do not attempt to open or repair the machine or
access the interior. Repair should be performed by
an authorised workshop, by a service centre, or by
qualified service staff.
Do not remove operational or protective parts
requiring use of tools for removal.
Purchasers are liable for ensuring that users have
been trained to operate the machine and have been
informed of the potential risks involved.
The installer will be held liable for all nonauthorised modification of the machine.
Non-authorised alteration or modification of the
machine will exempt the manufacturer of all liability
for damages and will invalidate the warranty.
This manual refers to the machine as at the time
of sale. The commercial availability of subsequent
versions featuring modifications, upgrades or
adaptations does not oblige the manufacturer to
apply the same to this machine, nor does it oblige it
to update the documentation supplied.
The manufacturer reserves the right to withdraw
currently available manuals whenever it considers
appropriate and reasonable.
Warnings
The manufacturer will not be held liable for damage to persons or property attributable to failure to follow the
instructions and warnings listed below when installing and using the coffee machine.
Place the machine in a location accessible only to
personnel trained to operate it.
Keep all hazardous packaging materials, such as
plastic bags, expanded polystyrene and staples, out
of reach of children.
Plug the machine into a properly installed, earthed
safety socket, whose line voltage matches the
technical data for the machine.
Make sure that the power supply voltage does not
fluctuate by more than 6%.
Position the power cable so that users cannot trip
over it. Keep the power cable away from sharp
edges and heat sources.
Children should be supervised to ensure they do
not play with the appliance.
6
R
Install this appliance in a horizontal position in a
water-resistant location. Install the machine away
from heat sources and flammable objects.
This appliance is not suitable for installation in an
area where a pressure washer may be used.
Do not use the machine outdoors, where it would
be exposed to adverse weather (rain, snow, frost).
This will cause material damage to the machine.
If the mains cable is damaged, it must be replaced
by the manufacturer, its service agent or a similarly
qualified person in order to avoid a hazard.
general
Do not remove or disable any of the mechanical,
electrical or thermal protection mechanisms.
In case of emergency, (e.g. the machine catches fire
or becomes unusually hot or noisy), disconnect the
power immediately and close the water inlet tap.
If the machine is not going to be used for a
prolonged period of time, disconnect the power.
When disconnecting the power, pull the plug
rather than the cable.
When packed for storage, keep the machine in a
dry place with an ambient temperature of over
5ºC. Boxes may be stacked in piles of up to three
G-10
units of the same model. Do not place other
heavier packages on top of the box.
The machine is likely to be exposed to
temperatures below 0 ºC during handling and
transport, make sure that service personnel empty
the boiler and water system. The machine’s boiler
and water system is empty when delivered from
the factory.
To ensure fault-free machine operation, only use
replacement parts and accessories authorised by
the manufacturer.
Precautions
Before performing maintenance and/or moving the
machine, disconnect the machine from the power
supply and wait for it to cool.
Do not place vessels containing liquid on the
machine.
This appliance must not be cleaned with a pressure
washer.
Never immerse the machine, plug or mains cable in
water, as there is a danger of electric shock.
Do not touch the machine's hot surfaces or
dispensing equipment.
Do not touch the machine if your hands or feet are
wet.
Do not operate the machine if any part except the
dispensing equipment is wet.
Place the machine out of reach of children.
This appliance can be used by children aged from 8
years and above and persons with reduced physical,
sensory or mental capabilities or lack of experience
and knowledge if they have been given supervision
or instruction concerning use of the appliance in a
safe way and understand the hazards involved.
Cleaning and user maintenance shall not be made
by children.
Do not use the machine if the machine, its mains
cable or the plug is damaged or the machine has
been dropped.
Do not obstruct the vents with cloths or other
objects. Do not insert foreign objects into the vents.
Check the drain regularly to make sure that water
is emptied properly.
Intended use
This coffee machine has been designed and
manufactured to make espresso coffee and other
hot drinks, e.g. steaming and frothing milk . Do not
use it for any other purpose.
The machine is intended to be used by trained personnel for preparing foodstuffs.
This machine is not intended for use in industrial
kitchens, domestic kitchens or similar locations.
The manufacturer will not be held liable for
damage to persons or property due to incorrect,
improper or negligent use by non-professional
personnel.
To ensure optimal performance, install the machine
in a location where these parameters will not be
exceeded:
- Maximum permissible inlet water pressure:
600 KPa (6 Bar)
- MINImum permissible inlet water pressure:
200 KPa (2 Bar)
- Maximum inlet water temperature: 40ºC
- Ambient temperature is between +10 ºC (min
and +40 ºC (max.).
R
7
TECHNICAL SPECIFICATIONS
G-10
G-10 MINI CONTROL
MODEL
SPECIFICATIONS
G-10 MINI CONTROL 1GR
G-10 MINI CONTROL 2GR
Steam wand
1 unit
1 unit
Hot water outlet
1 unit
1 unit
Regulated by pressure switch
Regulated by pressure switch
Temperature control by group
No
No
Programmed via display
No
No
Optional
Optional
No
No
530, 460, 590
530, 460, 590
6
6
230V 1N~ 2770 W 50/60 Hz
230V 1N~ 2780 W 50/60 Hz
Female 3/8" thread
Female 3/8" thread
36.05
41.00
Between 0.8 and 1.2 bar
Between 0.8 and 1.2 bar
< 70 db
< 70 db
Temperature control
Dispensing system for tall cups
Energy saving mode
Height, width, depth (mm)
Boiler volume (l)
Power supply
Water connection
Machine weight (kg)
Steam boiler operating pressure
Ambient noise
Accessories
2-spout portafilter
1-spout portafilter
55-cm inlet
hose
Cleaning
membrane
Drainage tube
(150 cm)
MINI 1GR
1 unit
1 unit
1 unit
1 unit
1 unit
MINI 2GR
1 unit
1 unit
1 unit
1 unit
1 unit
MODEL
8
R
TECHNICAL SPECIFICATIONS
G-10
G-10 DISPLAY CONTROL 2GR
MODEL
SPECIFICATIONS
G-10 DISPLAY CONTROL
2GR
G-10 3 BOILERS DISPLAY
CONTROL 2GR
Steam wand
2 units
2 units
Hot water outlet
1 unit
1 unit
PID regulation
PID regulation
Temperature control by group
No
Yes
Programmed via display
Yes
Yes
Optional
Optional
Yes
Yes
530, 680, 590
530, 680, 590
11.5
11.5 + 1.5 + 1.5
230V 1N~ 3330 W 50/60 Hz
230V 1N~ 3330 W 50/60 Hz
400V 3N~ 4780 W 50/60 Hz
400V 3N~ 4790 W 50/60 Hz
230V 3~ 4790 W 50/60 Hz
230V 3~ 4790 W 50/60 Hz
Female 3/8" thread
Female 3/8" thread
51.50
60.90
Between 0.8 and 1.2 bar
Between 0.8 and 1.2 bar
< 70 db
< 70 db
Temperature control
Dispensing system for tall cups
Energy saving mode
Height, width, depth (mm)
Boiler volume (l)
Power supply
Water connection
Machine weight (kg)
Steam boiler operating pressure
Ambient noise
Accessories
2-spout portafilter
1-spout portafilter
55-cm inlet
hose
Cleaning
membrane
Drainage tube
(150 mm)
2 units
1 unit
1 unit
1 unit
1 unit
2 units
1 unit
1 unit
1 unit
1 unit
MODEL
2GR
2GR
3 BOILERS
R
9
TECHNICAL SPECIFICATIONS
G-10
G-10 DISPLAY CONTROL 3GR
MODEL
SPECIFICATIONS
G-10 DISPLAY CONTROL
3GR
G-10 4 BOILERS DISPLAY
CONTROL 3GR
Steam wand
2 units
2 units
Hot water outlet
1 unit
1 unit
PID regulation
PID regulation
Temperature control by group
No
Yes
Programmed via display
Yes
Yes
Optional
Optional
Yes
Yes
530, 980, 590
530, 980, 590
17.5
17.5 + 1.5 + 1.5 + 1.5
Temperature control
Dispensing system for tall cups
Energy saving mode
Height, width, depth (mm)
Boiler volume (l)
400V 2N~ 4290 W 50/60 Hz
Power supply
400V 3N~ 6290 W 50/60 Hz
400V 3N~ 6290 W 50/60 Hz
230V 3~ 4290 W 50/60 Hz
230V 3~ 4290 W 50/60 Hz
Female 3/8" thread
Female 3/8" thread
73.45
81.40
Between 0.8 and 1.2 bar
Between 0.8 and 1.2 bar
< 70 db
< 70 db
Water connection
Machine weight (kg)
Steam boiler operating pressure
Ambient noise
Accessories
2-spout portafilter
1-spout portafilter
55-cm inlet
hose
Cleaning
membrane
Drainage tube
(150 mm)
3 units
1 unit
1 unit
1 unit
1 unit
3 units
1 unit
1 unit
1 unit
1 unit
MODEL
3GR
3GR
4 BOILERS
10
R
OVERVIEW OF COMPONENTS
G-10
Front view of the machine
G-10 MINI CONTROL
Drink
buttons
ON/OFF switch
Hot water tap
Steam tap
Hot water outlet
Porta-filter
Steam wand
Boiler pressure
gauge
Heater element lamp
Brewing group
R
11
OVERVIEW OF COMPONENTS
G-10
Front view of the machine
G-10 DISPLAY CONTROL 2GR
Hot water tap
Steam tap
Display
Porta-filter
Steam wand
Hot water outlet
12
R
Digital temperature
control
Steam tap
Drink
buttons
Steam wand
Heater element lamp
Brewing
group
ON/OFF switch
OVERVIEW OF COMPONENTS
G-10
Front view of the machine
G-10 DISPLAY CONTROL 3GR
Hot water tap
Steam tap
Digital temperature
control
Display
Steam wand
ON/OFF switch
Drink
buttons
Porta-filter
Hot water outlet
Steam tap
Heater element lamp
Brewing
group
Steam wand
R
13
DIMENSION SKETCH
G-10
G-10 MINI CONTROL
A
D
B
14
C
Model
A
B
C
D
G-10 MINI 1Gr
530 mm
460 mm
590 mm
74 mm
G-10 MINI 1Gr
Tall Cup
530 mm
460 mm
590 mm
124 mm
G-10 MINI 2Gr
530 mm
460 mm
590 mm
74 mm
G-10 MINI 2Gr
Tall Cup
530 mm
460 mm
590 mm
124 mm
R
DIMENSION SKETCH
G-10
G-10 DISPLAY CONTROL 2GR
A
D
B
C
Model
A
B
C
D
G-10 2Gr
530 mm
680 mm
590 mm
74 mm
G-10 2Gr
Tall Cup
530 mm
680 mm
590 mm
124 mm
G-10 2Gr 3 Boilers
530 mm
680 mm
590 mm
74 mm
G-10 2Gr 3 Boilers
Tall Cup
530 mm
680 mm
590 mm
124 mm
R
15
DIMENSION SKETCH
G-10
G-10 DISPLAY CONTROL 3GR
A
D
B
C
Model
A
B
C
D
G-10 3GR
530 mm
980 mm
590 mm
74 mm
G-10 3GR
Tall Cup
530 mm
980 mm
590 mm
124 mm
G-10 3Gr Boilers
530 mm
980 mm
590 mm
74 mm
G-10 3Gr 4 Boilers
Tall Cup
530 mm
980 mm
590 mm
124 mm
16
R
TRANSPORT
G-10
Packaging
The machine is shipped in a unique carton box which uses expanded polystyrene paddings.
The machine box is provided with conventional symbols that can be perfectly visible during the handling and
storage tasks.
The machine box must stay in a vertical position during the transport. Do not tip or try to place the box
tilted sideways in any way.
During transportation the box must be protected from hits, impacts, shocks and exposure of bad weather
elements.
Delivery inspection
After the delivery, check that the machine is in the exact condition described in the documentation of the
transport, accessories included.
Check that the machine does not have any damage caused by transportation. If this happens, inform to the
shipper and the distributor of the machine.
The packaging materials are potentially dangerous and should be kept away from children.
Make sure to leave the materials of the box and packaging at a suitable recycling center.
INSTALLATION AND START UP
Positioning
MIN. 10 cm
Install the machine on a level surface. Adjust the feet to
ensure that it dispenses coffee evenly in all of the cups.
MIN. 30 cm Select a level, dry, strong and stable installation surface at
least 110 cm off the floor.
Leave enough space above and behind the machine to
ensure easy cleaning and maintenance.
Do not install the machine whilst wet or damp. If wet or
damp, leave the machine until completely dry then ask
service personnel to check that none of the electrical
components are affected.
i
Note:
Leave an air gap of approximately 30 cm above the machine and 10 cm behind it to ensure
ventilation.
R
17
INSTALLATION AND START UP
G-10
Electrical connection
The coffee machine should only be connected to the power supply by qualified
personnel. The following safety instructions should be followed at all times:
Check that the electrical specifications on the ratings plate match the specifications
of the power supply at the point of installation.
The coffee machine must be connected to an earthed socket that complies with the
regulations in force in the country of installation.
You should protect the electric line of the installation with a circuit breaker switch
appropriated for the power consumption of the machine, specified on its ratings
plate.
A residual current circuit breaker must be installed in accordance with the
characteristics of the area of the installation.
Check the characteristics, power rating of the system and that the diameter of the
cables are suitable for the power used by the machine.
Do not connect the coffee machine to the power supply via extension boards,
adapters or shared sockets.
The
manufacturer will not be held liable for damage to persons, animals or property
resulting from incorrect installation of the coffee machine.
DANGER!
If the mains cable or plug is damaged, it must be replaced by the manufacturer, its service
agent or similarly qualified persons in order to avoid SERIOUS INJURY OR DEATH!
Connection types
Connect the machine as per the instructions on the ratings plate.
Machine:
230Vac Ph+N
Supply
230Vac Ph+N
Blue
Supply hose
Brown
Machine:
230Vac Ph+N
NEUTRAL
Blue
PHASE
Brown
Supply hose
Yellow/Green
Machine:
2Ph+N
Blue
Supply hose
Machine:
2Ph+N
NEUTRAL
PHASE
Supply hose
Yellow/Green
Machine:
2Ph+N
Blue
Supply hose
Brown
Black
Yellow/Green
18
R
Machine:
125Vac Ph+N
PHASE
Blue
PHASE
Brown
Supply hose
Yellow/Green
Supply
230Vac Ph+N
Brown
Black
Supply
2Ph 230Vac
NEUTRAL
PHASE
PHASE
Machine:
380Vac 3Ph
Supply hose
Machine:
2Ph+N
NEUTRAL
PHASE
Supply hose
Blue
Brown
Black
Yellow/Green
PHASE
Blue
Brown
Grey
Black
Supply
3Ph 380Vac+N
NEUTRAL
PHASE
PHASE
PHASE
Yellow/Green
Yellow/Green
Supply
2Ph 230Vac
NEUTRAL
Yellow/Green
Supply
2Ph 380Vac+N
Blue
Brown
Black
Supply
125Vac Ph+N
Supply
3Ph 230Vac
PHASE
PHASE
PHASE
Machine:
230Vac 3Ph
Blue
Supply hose
Brown
Black
Yellow/Green
Supply
3Ph 230Vac
PHASE
PHASE
PHASE
INSTALLATION AND START UP
G-10
Water connection
The Installation of the machine to a water mains connection must be done by a qualified person.
Rinse around 20 liters of water from the main water supply before connecting the machine to the water connection.
Connect the inlet hose that is assembled in the machine to the main water supply, which should have a
3/8” male connection fitted with a shut-off valve, tighten it with a wrench.
Use safe drinking water with hardness between 5ºfH and 8ºfH (French hardness degrees). If the value is
below this limit, the presence of corrosion of hydraulic components is a possibility. If the value is higher
than this limit, the presence of lime in the boiler will increase. In both cases the operation of the machine
and coffee quality will be affected negatively.
If necessary, connect the machine to a water softener or remineraliser to reduce water hardness. Use the
flexible hose that is included in the accessory box of the machine.
Connect one end of the corrugated tube to the drain cup in the machine, connect the other to the main
drainage tube at the installation area.
Important:
Only use the hoses supplied with the machine. Never reuse hoses.
Make sure that the drainage tube is not twisted and ensure that the entire tube is below the
level of the drain cup.
Pressure and temperature
Boiler temperature and pressure are directly related (see Fig. 01).
Machine is fitted with a pressure gauge that will display the boiler pressure, if the machine is fitted with a
display it will also indicate boiler temperature.
O
C
Relationship between boiler pressure and temperature
125
120
115
110
0.7
0.8
0.9
1.0
Standard pressure and temperature
1.1
1.2
BAR
Fig. 01
Starting the machine
Open the external supply of water to the machine.
Turn on the main power switch.
Press a drink button at the control panel on each group, wait until
water comes out continuously from each of them. This way the
heat exchangers in the machine will be correctly filled.
Open the steam tap to release the air trapped in the boiler.
The red lamp indicates that the boiler is heating. The lamp
switches off when the machine reaches operating temperature.
The machine is now ready to use.
R
19
CLEANING AND CARE
G-10
Coffee machine cleaning
Important:
To obtain the best efficiency, quality and performance of the machine, you should always follow the
cleaning and care instructions provided in this manual.
Turn off the power switch when cleaning the exterior of the machine.
All external surfaces should be cleaned with a wet cloth that will not get out fibers, threads or scratch the
machine.
Do not use aggressive cleaning detergents, solvents or degreasers. They can damage the machine.
Important:
Once a day or after 8 hours from the last dispensing of coffee, the following cleaning tasks must be
performed for maintaining the quality and performance of the water system in the machine:
Brewing Group: Place the empty porta-filter (without coffee) in the group head and dispense hot
water for one minute.
Steam wand: Position the wand outside the drip tray and open the steam tap for around one minute.
Hot water outlet: Place a container under the water outlet and open the tap for 20 seconds.
Daily cleaning
Rinse the group and porta-filter without detergent. (only using the membrane and hot water)
Clean the external surfaces of the machine, pay special attention to the stainless steel parts.
Clean the steam wand and the water tap. Be sure that the nozzles are not blocked or half blocked
with for example milk residue. If it’s necessary to clean, be careful not to deform or damage any of the
components.
Clean the dip tray and the stainless steel insert grid under running water with a brush. You can slowly
pour 1L of hot water into the drain cup to dissolve and remove coffee residue that have accumulated
inside the cup and tubes.
Clean the group’s gasket and shower plate (page 25).
Weekly cleaning
Clean the brewing group and porta-filter with professional cleaning powder (page 24).
Regular maintenance
Refilling the boiler
This operation should be performed by service personnel following the steps listed below:
Switch off the machine and wait until the boiler has depressurised (leave the steam tap open until no more
steam emerges) and the water has cooled.
Open the boiler drain tap and wait until the boiler is completely empty.
To empty machines not fitted with a boiler drain tap, remove the anti-depression valve, pump the water
out of the boiler and then replace the anti-depression valve.
Switch on the machine to refill the boiler automatically.
Important:
Make sure that the drainage tube is firmly connected to the drain, as the water in the boiler may
be extremely hot.
Regenerating the water softener
To regenerate the water softener, follow the instructions in the user manual.
20
R
CLEANING AND CARE
G-10
Cleaning the Brewing group and porta-filter
Unlock and remove the porta-filter from the group head.
Place the cleaning membrane in the filter basket.
Fill the filter basket with professional cleaning powder for espresso coffee machines.
Lock the porta-filter into the group head.
Activate the auto-cleaning program: Turn off the machine. Press and hold down the 2 Short Espressos
button
on the button panel of the group requiring cleaning. Without releasing the button, turn on the
machine. Auto-cleaning will start automatically. Release the button.
WARNING!
Never try to remove the porta-filter whilst the group is in cleaning operation, as the pressurized hot
water could cause scalding or serious injury. Once cleaning has finished, wait about 3 seconds before
removing the porta-filter.
Important:
Once cleaning process is finished, remove the porta-filter and run water through the group again
to rinse out all remains. Repeat the cleaning process this time without detergent for removal of any
remains of the cleaning powder, store the cleaning membrane in a convenient place.
Note:
i
Rinse the group and porta-filter without detergent (only using the membrane and hot water) every day.
Clean the group and porta-filter with detergent once a week.
Special coffee-machine
detergent
Cleaning membrane
i
Note:
Only use professional cleaning
powder for espresso machines.
It’s avalible from your
distributor.
Part no: 1104162
R
21
CLEANING AND CARE
G-10
Cleaning the gasket and shower plate
Cleaning the gasket
When placing the porta-filter filled with grinded coffee into the brewing group, left overs will accumulate in the
closing surface. If these remains are excessive it can prevent a good closing between the porta-filter and the
group head.Moreover, these remains can even block the dispensing of water through the group head.
To prevent this perform the following cleaning:
Place the cleaning membrane in the filter basket (without detergent).
Insert the porta-filter in the group head, but do not tighten fully (the porta-filter should be loose).
Press the Continuous Dispensing button
on the button panel.
ake an opening-closing movement of the porta-filter in place without closing it. Water will now flow
M
around the porta-filter, flowing through the closing surface and cleaning it.
WARNING!
Take special care to avoid scalding when
performing this cleaning operation, as the
hot water used to clean the gasket will
spill over the sides of the porta-filter.
WARNING!
Do not fully tighten the porta-filter. If fully
tightened, high-pressure water may spray
out and cause scalding or serious injury.
Cleaning the shower plate
Remove the porta-filter from the group head.
Clean the shower and gasket with a soft brush to remove any coffee remains.
Leftover coffee
requiring cleaning
Shower plate
22
R
CLEANING AND CARE
G-10
Additional handling of the machine
Important:
Avoid placing wet cups directly on the cup
shelf, it may drip into the machine and cause
machine damage.
Remove and insert the porta-filter gently.
Never use excessive force to try to close
the porta-filter.
STORAGE AND DISPOSAL OF MACHINE
How to store the machine
Make all the cleaning procedures described in this manual.
Disconnect and roll up the power cord. (this should be performed by a qualified person).
Disconnect the inlet hose from the machine to the water mains and empty the boiler. (this should be performed
by a qualified person).
Clean the drip tray and exterior of the machine.
Cover / pack the machine and store it in a dry place where it isn’t exposed to bad weather conditions.
If the machine should be used after a long period of storage, make sure to run all cleaning procedures before
using the machine again.
Disposal of machine
Make all the cleaning procedures described in this manual.
Disconnect and roll up the power cord. (this should be performed by a qualified person).
Disconnect the inlet hose from the machine to the water mains and empty the boiler.
(this should be performed by a qualified person).
Clean the drip tray and exterior of the machine.
Pack and send the machine to a certified recycling center.
R
23
PROGRAMMING
G-10
Electronic control panel
Button functions
Here is some of the additional functions that the electronics offers:
Volume control of four different espresso drinks per brewing group.
Time-controlled hot water dispensing. (if available)
Automatic filling and level control of the boiler.
Automatic switch off of the heating element if not enough water.
System supervision through alarms.
RS-232 serial interface with reader for connecting control panel and computer.
Automatic cleaning of the brew groups.
The control panel is by default programmed with 4 standard drinks (these can be reprogrammed as you
wish) and a continuous selection. The first four keys (1 short espresso, 1 long espresso, 2 short espresso, 2
long espresso) brew the programmed volume and then stop automatically, the fifth key brews continuously
until user stops it by pressing button again.
Hot water / Automatic steam
(if enabled)
Continuous Dispensing
1 Short Espresso
1 Long
Espresso
2 Short Espressos/
Auto-cleaning
2 Long
Espressos
Programming
The Continuous Dispensing button performs 3 different functions (depending on length of time pressed):
Machines equipped with display
Under 1 second: Enables automatic water- or steam-dosing (only on machines without manual taps).
Between 1 and 8 seconds: Enables Continuous Dispensing (press again to disable).
Over 8 seconds: Access coffee-dose programming menu (see below).
Machines not equipped with display
Under 4 seconds: Enables Continuous Dispensing (press again to disable).
Over 4 seconds: Access coffee-dose programming menu (see below).
Additional button functions
To activate these functions, turn off the machine at the power switch then, while holding down the
required button on the left-hand Drink buttons, turn the machine back on.
1 Short Espresso.
Enable electronic pre-infusion.
1 Long Espresso.
Disable electronic pre-infusion.
2 Short Espressos.
Perform auto-cleaning.
Note:
i
24
In machines equipped with a display, electronic pre-infusion may have to be enabled/disabled
from the service programming menu.
R
PROGRAMMING
G-10
Additional functions accessible from the display
CREM
EXPOBAR
Programmable publicity
XXX ºC
hh:mm
SELECT
Current time
Boiler temperature
Machines equipped with a display include the following additional functions:
Automatic daily on/off timer (stand-by).
Clock settings (current time and date).
Publicity display.
Number of coffees/infusions dispensed.
Digital boiler-temperature display and control.
PID-technology boiler-temperature control.
Programming and settings help system.
Visual water-softener regeneration alarm.
Display language selector.
+
-
Hot water / Automatic steam
(if enabled)
ok
Continuous Dispensing
ON
STAND-BY (OFF)
Programming
User functions
The Dose Programming, Clock Settings, Auto On/Off and Day Off functions are explained in the user
manual.
Counters
The machine has the following 4 counters:
Litres: Water volume dispensed by the machine (indicator used for descaling).
Service: Number of coffees dispensed (indicator used for servicing).
Number of coffees/infusions dispensed.
Number of coffees dispensed per button.
R
25
PROGRAMMING
G-10
Accessing the counters
With the machine switched ON, hold down the Continuous Dispensing button
Dose programming
Select 30 s
for over 8 seconds (until the "Dose programming" menu is displayed, see fig. 02).
Fig. 02
Hold down the Continuous Dispensing button
Set clock
until the "Set clock" menu is
displayed (see fig. 03).
Fig. 03
Briefly press the Continuous Dispensing button
Counters
. The display will show the "Counters" option (see fig. 04).
Fig. 04
Litre counter
Litres
NN
Fig. 05
This counter displays the water volume in litres dispensed by the machine. It is
principally used to monitor water-softener regeneration cycles.
How to access it: When "Counters" is displayed, press the 2 Short Espressos button
. The display will show the number of litres of water dispensed by the machine
(see fig. 05).
To exit and access the next menu, press the Continuous Dispensing button
.
Use the Water filter: water-softener regeneration option in service programming mode
to program the number of litres of water after which the machine displays the watersoftener regeneration alert. The counter tops up the litres of water dispensed by the
machine and alerts the user when it is time to regenerate the water softener.
To reset the litre counter:
Switch off the machine at the power switch.
Simultaneously press and hold down the 2 Short Espressos
Espressos
26
R
buttons then turn on the machine.
and 2 Long
pROGRAMMING
G-10
Service: service alert
Service
NNNN
Fig. 06
This counter displays the number of coffees/infusions (individual servings) dispensed by
the machine (see fig. 06).
How to access it: Press the Continuous Dispensing button
when the litre
counter is displayed.
To exit and access the next menu, press the Continuous Dispensing button
again.
Use the Maintenance cycles option in service programming mode to program the
number of servings after which the machine alerts the user of the need to service the
machine.
To reset the servings counter:
Switch off the machine at the power switch.
Simultaneously press and hold down the 1 Short Espresso
Espresso
and 1 Long
buttons then turn on the machine.
Total coffees dispensed
Coffees Hot Water
NNNNN NNNNN
Fig. 07
This counter tots up all the drinks dispensed by the machine (see fig. 07).
It cannot be reset. The left-hand side of the display shows the total number of coffees
dispensed while the right-hand side shows the total number of cups of hot water
dispensed.
How to access it: Press the Continuous Dispensing button
when the Service
counter is displayed.
To exit and access the next menu, press the Continuous Dispensing button
again.
Number of coffees dispensed per button
Dose type
Gr:N
NNNNN
Fig. 08
Coffees Hot Water
Totals reset
Fig. 09
This counter displays the total number of coffees/infusions dispensed per option (see
fig. 08).
The upper left-hand part of the display shows the dose type dispensed (espresso,
coffee, 2 espressos, 2 coffees, continuous dispensing, or hot water), while the righthand side shows the dispensing group. The lower part of the display shows the counter.
To reset the counters:
When the display shows the Total coffees/infusions dispensed, simultaneously hold
down the 2 Short Espressos
and 2 Long Espressos
buttons for 4 seconds.
The display will show the message "Totals reset" (see fig. 09).
R
27
SERVICE PROGRAMMING
G-10
Reset parameters to factory default
To reset the control panel settings to the factory default:
Data reset
completed
Switch off the machine at the power switch.
Press and hold down the '1 Short Espresso'
Fig. 10
Continuous Dispensing buttons
, 2 Short Espressos
and
then turn on the machine. Hold down the
buttons until the message shown in fig. 10 is displayed.
Turn the machine off and then on again. The machine will now be in stand-by mode.
Accessing service programming
+
-
Stand-by + Press >14 s → Service prog.
ok
Next menu
ON
OFF
hh:mm
Fig. 11
STAND-BY (OFF)
Accessing these settings menus is only possible via the left-hand button panel (when
the machine is viewed from the front).
To access the settings menus:
Turn the machine OFF (stand-by) by pressing and holding down the Continuous
Dispensing button
Espressos button
whilst the machine is ON then pressing the 2 Short
(see fig. 11).
Hold down the Continuous Dispensing button
for 15 seconds (until the
display shows the "Language" option, see fig. 12).
Language selection
Language
Language
Fig. 12
When "Language" is displayed, select the desired language.
To change language:
Press the 1 Short Espresso button
and the 1 Long Espresso button
(+) to cycle forward through the languages
(-) to cycle backward through them.
Languages available: Spanish, English, French, Italian, German and Portuguese.
To accept the language selected and access the next menu, press the Continuous
Dispensing button
28
R
.
SERVICE PROGRAMMING
G-10
Name 1: Programming the publicity display (upper line)
Name 1
xxxxxxxxxxxxxxxx
Fig. 13
The display comprises two rows of 16 characters. The publicity messages displayed on
these two lines can be edited in this menu (see fig. 13) and the next one.
To edit "Name 1" (line 1):
To change the flashing character, press the 1 Short Espresso
Espresso
(+) and 1 Long
(-) buttons.
To accept the character and move on to the next one, press "OK" (2 Short
Espressos button
).
To accept the setting selected and move on to the next menu, press the Continuous
Dispensing button
.
Name 2: Programming the publicity display (lower line)
Name 2
xxxxxxxxxxxxxxxx
Fig. 14
This menu (see fig. 14) is used to edit the publicity message shown on the display's
bottom line.
To change the flashing character, press the 1 Short Espresso
Espresso
(+) and 1 Long
(-) buttons.
To accept the character and move on to the next one, press "OK" (2 Short
Espressos button
).
To accept the setting selected and move on to the next menu, press the Continuous
Dispensing button
.
Helpline
Helpline
Telephone number
Fig. 15
This menu (see fig. 15) is used to edit the telephone number displayed when the
service alert counter reaches the value set for the maintenance cycle.
To edit the flashing number, press the 1 Short Espresso
Espresso
(+) and 1 Long
(-) buttons.
To accept the number and move on to the next one, press "OK" (2 Short Espressos
button
).
To accept the setting selected and move on to the next menu, press the Continuous
Dispensing button
.
R
29
SERVICE PROGRAMMING
G-10
Dose programming
Dose programming
Enabled/Disabled
Fig. 16
This menu is used to enable/disable coffee-dose programming (see fig. 16).
When disabled, users are not able to modify the doses (as described in the user
manual). This mode is intended to prevent users setting inappropriate doses.
To enable coffee-dose programming, press the 1 Short Espresso button
.
To disable coffee-dose programming, press the 1 Long Espresso button
.
To accept the setting selected and move on to the next menu, press the Continuous
Dispensing button
.
Continuous Dispensing button
Continuous Dispensing button
Enabled/Disabled
This menu is used to enable the Continuous Dispensing button's
continuous
dispensing function (see fig. 17).
Fig. 17
To enable it, press the 1 Short Espresso button
.
To disable it, press the 1 Long Espresso button
.
To accept the setting selected and move on to the next menu, press the Continuous
Dispensing button
.
Hot water button
Hot water button
Yes/No
Fig. 18
If the infusion hot-water spout is controlled by a manual tap:
The function can be disabled by pressing the 1 Long Espresso button
.
If the infusion hot-water spout is controlled by an electrovalve (the machine has a
water spout but no tap):
The function can be enabled by pressing the 1 Short Espresso button
.
To accept the setting selected and move on to the next menu, press the Continuous
Dispensing button
30
R
.
SERVICE PROGRAMMING
G-10
Electronic steam wand
Steam tap Gr.
N
Fig. 19
If the machine has an electronic steam wand (no manual steam tap), this menu is used
to select (via the Continuous Dispensing button) which button panel will control the
wand.
Select which button panel (numbered from left to right) will control the steam
wand using the 1 Short Espresso
(+) and 1 Long Espresso
(-) buttons.
If the machine does not have a steam wand, set this option to 0.
To accept the setting selected and move on to the next menu, press the Continuous
Dispensing button
.
After selecting which button panel will control the electronic steam wand, set the
steam dispensing time (set in the same way as described for similar functions in the
user manual).
If the steam wand is equipped with a temperature gauge, the parameter set will not be
the steam dispensing time but the target liquid temperature.
In this mode, the steam wand will stop dispensing steam when the target temperature
is reached.
Level sensor sensitivity
Sensitivity
Low/Medium/High
Fig. 20
This menu sets the level sensor's sensitivity (see fig. 20). By default, sensitivity is set at
"Medium" and will not normally require modification. However, it may be necessary to
set the sensitivity to "High" if using very pure water with very low dissolved salt levels
(or to set it to "Low" in the opposite case).
To increase sensitivity, press the 1 Short Espresso button
To reduce it, press the 1 Long Espresso button
.
.
To accept the setting selected and move on to the next menu, press the Continuous
Dispensing button
.
Pre-infusion
Pre-infusion
Enabled/Disabled
Fig. 21
This function enables/disables electronic pre-infusion (see fig. 21). By default, this
option is disabled as the dispensing group includes a mechanical pre-infusion chamber.
To enable this function, press the 1 Short Espresso button
.
To disable this function, press the 1 Long Espresso button
.
To accept the setting selected and move on to the next menu, press the Continuous
Dispensing button
.
R
31
SERVICE PROGRAMMING
G-10
Grinding alert
Grinding alert
Enabled/Disabled
Fig. 22
This setting is used to enable/disable the coffee-dispensing monitor (see fig. 22). This
analyses dispensing speed and, depending on this value, indicates if the coffee is too
finely or too coarsely ground. If the dispensing speed is between the pre-established
values, the "OK" message is displayed.
To enable the grinding alert, press the 1 Short Espresso button
.
To disable the grinding alert, press the 1 Long Espresso button
.
To accept the setting selected and move on to the next menu, press the Continuous
Dispensing button
.
Grinding alert parameter settings
Grinding alert
Min. X.X cc/s
Fig. 23
Grinding alert
Max. X.X cc/s
Fig. 24
If the grinding alert was enabled in the previous menu, this menu is used to set the
alert parameters. If the grinding alert was disabled in the previous menu, this menu will
not be displayed.
When the grinding alert is enabled, "Min." sets the minimum accepted dispensing
speed (see fig. 23). To increase the value, press the 1 Short Espresso button
and to decrease it press the 1 Long Espresso button
(+)
(-).
When the grinding alert is enabled, "Max." sets the maximum accepted dispensing
speed (see fig. 24). To increase the value, press the 1 Short Espresso button
and to decrease it press the 1 Long Espresso button
(+)
(-).
To accept the setting selected and move on to the next menu, press the Continuous
Dispensing button
.
LED flashing sequence
Flashing lights
Enabled/Disabled
Fig. 25
To enable the button panels' flashing function, press the 1 Short Espresso button
.
To disable the button panels' flashing function, press the 1 Long Espresso button
.
To accept the setting selected and move on to the next menu, press the Continuous
Dispensing button
32
R
.
SERVICE PROGRAMMING
G-10
Maintenance cycles
Maintenance cycles
N000
Fig. 26
This menu sets the number of coffees dispensed per maintenance cycle (before
replacing shower plates, gaskets, etc.). When the dispensing counter reaches the
number set (see fig. 26), the "Service" message will be displayed.
To increase the number, press the 1 Short Espresso button
(+). To decrease it,
press the 1 Long Espresso button
(-).
The Service: alert menu displays the number of coffees dispensed.
To accept the setting selected and move on to the next menu, press the Continuous
.
Dispensing button
Temperature unit (ºC or ºF)
Temperature
ºC / ºF
Fig. 27
To display the temperature in ºF (Fahrenheit), press the 1 Short Espresso button
.
To display the temperature in ºC (Celsius/centigrade), press the 1 Long Espresso
.
button
To accept the setting selected and move on to the next menu, press the Continuous
.
Dispensing button
Temperature unit (ºC or ºF)
Boiler temperature
XXX ºC
Fig. 28
This menu sets the boiler temperature.
To increase the temperature, press the 1 Short Espresso button
(+). To
(-).
decrease it, press the 1 Long Espresso button
To accept the setting selected and move on to the next menu, press the Continuous
.
Dispensing button
Water filter: softener regeneration
Water filter
No. of litres
Fig. 29
This menu sets the volume of water in litres at which the control panel generates the
water-softener regeneration alert.
To increase the number, press the 1 Short Espresso button
(+). To decrease it,
(-).
press the 1 Long Espresso button
The Litre counter menu displays the volume of water used by the machine.
To accept the setting selected and move on to the next menu, press the Continuous
.
Dispensing button
Water-softener
model
20º
Quantity of water softened, by hardness
(expressed in French degrees)
30º
40º
60º
Salt
80º
KG
L8
1200
1000
900
700
500
1
L 12
1900
1500
1350
1050
750
1.5
Approximate number of litres of water softened per regeneration.
R
33
MULTI-BOILER PROGRAMMING
G-10
Digital thermostat functions
In multi-boiler models, each dispensing group has an independent digital boiler-temperature adjustment system.
The following multi-boiler G-10 models are available:
2 dispensing groups and 3 boilers.
3 dispensing groups and 4 boilers.
Temperature is controlled by a digital thermostat to ensure optimal temperature stability at each group spout.
BUTTONS
GROUP TEMPERATURE
HEATER ELEMENT LAMP
Each group has a numerical display and two buttons:
and
.
During operation, the displays show the groups' current temperature.
The dot indicates when the heater elements are active.
Connecting/disconnecting each thermostat
To disconnect the thermostat:
Press the
button for 2 seconds. The thermostat selected will be
disconnected, "OFF" (see fig. 30) will be displayed and the group will start to cool
Fig. 30
down.
To connect the thermostat:
If the thermostat is "OFF", press either the
or
button. The
thermostat will be connected, the group's current temperature will be displayed and
the group will start to heat up.
34
R
MULTI-BOILER PROGRAMMING
G-10
Setting group temperature
To adjust the group temperature maintained by the thermostat, follow the instructions
below with the machine turned on and the thermostat connected:
Briefly press the
Fig. 31
button. The thermostat will display the "PrG" message
(see fig. 31).
Immediately and briefly press the
button. The programmed temperature
will be displayed (see fig. 32).
Raise or lower the temperature value using the
and
buttons.
Fig. 32
Note
The digital thermostat will exit automatic programming mode 3 seconds
after the last button press.
Reset parameters to factory default
If the thermostat's operating parameters are lost, or in the case of abnormal group
temperature, reset the system to the factory defaults.
To reset the parameters:
Fig. 33
Turn off the machine, press and hold down the
button, then turn on the
machine at the power switch.
Release the button when the system displays the "PrS" message (see fig. 33).
Turn the machine off and on again at the power switch to restart the thermostat.
Thermostat alarms
If the temperature gauge in the group's boiler has short-circuited, the system will
display the "A1" error message (see fig. 34).
Fig. 34
If the temperature gauge cable is disconnected, the system will display the "A2"
error message (see fig. 35).
Fig. 35
R
35
messages and alarms
Alarm
Counter Vol. Gr. N
Time-out alarm
G-10
Fault in volumetric counter N /
Flow fault detected in counter N
Check that the machine is receiving water.
Boiler filling
Sensor fault
Temperature gauge fault
Service the machine.
Service
999999999
To disable the alarm and reset the counter:
Turn off the machine. Simultaneously press and hold down the
1 Short Espresso
and 1 Long Espresso
buttons.
Turn on the machine.
Change the filter
999999999
Regenerate the filter.
To disable the alarm and reset the counter:
Turn off the machine. Simultaneously press and hold down the
and 2 Long Espressos
buttons.
2 Short Espressos
Turn on the machine.
If boiler filling time exceeds the programmed time (2 minutes), all of the button panel lights will flash and the
machine will be disabled. To re-enable it, turn the machine off and on again at the power switch.
If the electronic control panel does not receive a pulse from the volumetric counter (coffee too fine or
volumetric counter fault) within 5 seconds of pressing one of the espresso buttons, the light for the dose
selected will start to flash. To turn it off, press the dose button again.
Maximum dispensing time. As a safeguard, all dose settings have a maximum dispensing time of 5 minutes.
36
R
TROUBLESHOOTING
G-10
The following checks can be carried out by users once the machine has been turned off and disconnected from
the power supply. For all other non-specified machine faults, disconnect the machine from the power supply and
immediately contact authorised and qualified service personnel.
Problem
The machine does not start up
The steam wand does not dispense
steam
Water is found underneath the
machine
Possible cause
Solution
The plug is not correctly inserted
into the power socket
Check that the plug is correctly
inserted and that the power socket
is operational.
The circuit breaker and/or differential
are disconnected.
Check that they are connected.
The cable and/or plug are damaged.
Call service personnel to replace
them.
The steam wand is clogged by milk
Clean the wand and, if necessary,
remove the nozzle and unclog it
using a pin or needle.
The drainage tube is blocked.
Clean the drainage tube.
Faults produced by limescale
Coffee not dispensed at right temperature:
Heat-exchanger outlet pipes clogged by limescale.
Brewing groups do not dispense water:
Water system is clogged by limescale.
90% of faults are due to limescaling inside the coffee machine (due to not softening the water). To avoid these faults,
maintain the water softener regularly.
Coffee-grinding problems
Coffee dispensing is very fast:
The coffee grinding is to coarse. Adjust the coffeegrinding setting.
Coffee dispensing is very slow:
The coffee grinding is to fine. Adjust the coffeegrinding setting.
R
37
38
M
M.
Ref . 60000016
R
C.V.1
Ref . 60100045
S.N
Ref . 60100040
Ev.C.C.
Ref . 60000100
C.E.s .1
Ref . 60100310
I.L.
REF. 60900035
Ev.G.1
Ref . 60000112
C.V.1
Ref . 60100045
G
L1 - R
N-O
S.E
Ref . 60103025
Ev.G.2
Ref . 60000112
C.E.s .2
Ref . 60100310
R.E. A. (90280V)
REF.60800100
N
ELEN-ROS ETTA
t°
P.
REF. 60901001
P
N
t°
T.S.
REF.10200110
N
N
N
N
SERIE
V.A (HIGH
GROUP)
R.E. (2500W.)
REF. 38025001
N
N
N
N
SERIE
STANDARD
INTER
N. ELEGANCE
MEGACREM
MARKUS
G10
MODELS
T.S.
REF.10200110
P.R.P .
REF. 60000008
P
ELECTRICAL DIAGRAMS
G-10
Complete electrical diagram: G-10 Mini 2Gr
Ev.C.C.
REF. 60000105
M.
REF. 60000016
M
EVGR3
EVGR2
EVGR1
PUMP
COMMON
MAIN
SUPPLY
DISPLAY
STE
AM-AUX
Heating-ON/OFFLCD
EVTE
A
EVF
ILL
C.E.L .
Ref . 60100034
8x2
D.G.
Ref . 60100301
8x2
Out
+
Cn 3
Cn 1
GR 3GR 2GR 1
SLiv
+(Vcc)
Gnd
OUT 3
OUT 2
OUT 1
S.T.C
Ref . 60100076
S.N.
Ref . 60100040
Ev.G .1
Ref . 60000112
B.G.1
Ref . 60100300
B .G.2
Ref . 60100300
C.V.1
REF. 60100045
8x2
C.V. 2
REF. 60100045
Ev.G.2
Ref . 60000112
C2
-
C2
ELECTRICAL DIAGRAMS
G-10
Secondary electrical diagram: G-10 2Gr
R
39
40
R
Ev.C.C.
REF. 60000105
EVGR3
EVGR2
EVGR1
PUMP
COMMON
MAIN
SUPPLY
M
DISPLAYLCD
STEAM-AUX
Heating-ONOFF
EVTEA
EVFILL
C.E.L.
Ref. 60100034
D.G.
Ref. 60100301
8x2
M.
REF. 60000016
RAUX 3 NTC 1
OUT 3
OUT 2
OUT 1
SLiv
+(Vcc)
Gnd
S.T.C.
Ref. 60100076
t°
8x2
S.N.
Ref. 60100040
Ev.G.1
Ref. 60000112
T.S.1
REF.10200110
S.T.C.
Ref. 60100076
M2
C.V.1
REF. 60100045
B.G.1
Ref. 60100300
R.E.1
1200W-230V
Ref. 38012000
8x2
ALIM.
Temp
.So
nd
a
N F
F(N) B (F) (N)
CN1 M1
T.D.1 (230V)
Ref. 10200125
Ev.G.2
Ref. 60000112
t°
C.V.2
REF. 60100045
B.G.2
Ref.60100300
T.S.2
REF.10200110
S.T.C.
Ref. 60100076
M2
P.R.P.
REF. 60000008
R.E.2
1200W-230V
Ref. 38012000
P
ALIM.
nda
Temp
.So
N F
F(N) B (F) (N)
CN1 M1
T.D.2 (230V)
Ref. 10200125
R.E.
3050W-230V
R.E
. Ref. 38027000
R.E.A. (90-280
V)
REF.60800100
R.E.A.2 (90-280
V)
REF.60800100
R.E.A.1 (90-280
V)
REF.60800100
P.
REF. 60901001
R.C.
REF. *45000030
S.E
G
L1 - R
N-O
I.G
REF. 60900001
ELECTRICAL DIAGRAMS
G-10
Electrical power diagram: G-10 2Gr 3 Boilers 230 V 1N~
Ev.C.C.
REF. 60000105
D.G.
Ref. 60100301
MAIN
SUPPLY
EVGR3
EVGR2
EVGR1
PUMP
COMMON
STEAM-AUX
Heating-ON/OFF
EVTEA
EVFILL
+
Cn 3
M
M.
REF. 60000016
Cn 1
GR 3 GR 2GR 1
SLiv
+(Vcc)
Gnd
OUT 3
OUT 2
OUT 1
Out
DISPLAY LCD
C.E.L.
Ref. 60100034
8x2
S.T.C.
Ref. 60100076
8x2
(HIGH
N
N
SERIE
N
N
N
MARKUS
SILVER
G10
ELEN
ROSETTA
R
DIAMANT
41
N
N
N
SERIE
N
N
N
N
N
MEGACREM
C.V.1
REF. 60100045
B.G.1
Ref. 60100300
V.A
M2
ALIM.
N F
(F) (N)
R.E.1
1200W-230V
Ref. 38012000
F(N) B
Temp . So nda
GROUP)
N
N
N. ELEGANCE N
INTER
STANDARD
S.N.
Ref. 60100040
Ev.G.1
Ref. 60000112
MODELS
t°
T.S.1
REF.10200110
S.T.C.
Ref. 60100076
CN1 M1
T.D.1.
230V
Ref. 10200125
8x2
R.E.
4500W-230V
REF. 38045000
M2
ALIM.
N F
(F) (N)
P
R.E.2
1200W-230V
Ref. 38012000
P.R.P.
REF. 60000008
C.V.2
REF. 60100045
B.G.2
Ref.60100300
Ev.G.2
Ref. 60000112
t°
F(N) B
Temp . So nd a
T.S.2
REF.10200110
S.T.C.
Ref. 60100076
CN1 M1
T.D.2
230V
Ref. 10200125
R.E.A. 5 (90-280V)
REF.60800100
R.E.A. 4 (90-280V)
REF.60800100
R.E.A. 3 (90-280V)
REF.60800100
R.E.A. 2 (90-280V)
REF.60800100
R.E.A. 1 (90-280V)
REF.60800100
P.
REF. 60901001
R.C.
REF. *45000030
S.E
I.G
REF. 60900010
G
L3 - T
L2 - S
L1 - R
N-O
ELECTRICAL DIAGRAMS
G-10
Electrical power diagram: G-10 2Gr 3 Boilers 400 V 3N~
42
R
Ev.C.C.
REF. 60000105
D.G.
Ref. 60100301
MAIN
SUPPLY
EVGR3
EVGR2
EVGR1
PUMP
COMMON
STEAM-AUX
Heating-ON/OFF
EVTEA
EVFILL
+
Cn 3
M
M.
REF. 60000016
Cn 1
GR 3 GR 2GR 1
SLiv
+(Vcc)
Gnd
OUT 3
OUT 2
OUT 1
Out
DISPLAY LCD
C.E.L.
Ref. 60100034
8x2
V.A
(HIGH
N
N
N
N
N
SERIE
N
N
N
MEGACREM
MARKUS
SILVER
G10
ELEN
ROSETTA
DIAMANT
N
N
N
SERIE
N
N
N
GROUP)
N
STANDARD
S.N.
Ref. 60100040
N. ELEGANCE N
INTER
8x2
Ev.G.1
Ref. 60000112
MODELS
S.T.C.
Ref. 60100076
t°
T.S.1
REF.10200110
S.T.C.
Ref. 60100076
M2
ALIM.
N F
(F) (N)
C.V.1
REF. 60100045
B.G.1
Ref. 60100300
R.E.1
1200W-230V
Ref. 38012000
F(N) B
Temp . So nda
CN1 M1
T.D.1.
230V
Ref. 10200125
8x2
R.E.
4500W-230V
REF. 38045000
M2
ALIM.
N F
(F) (N)
P
R.E.2
1200W-230V
Ref. 38012000
P.R.P.
REF. 60000008
C.V.2
REF. 60100045
B.G.2
Ref.60100300
Ev.G.2
Ref. 60000112
t°
F(N) B
Temp . So nd a
T.S.2
REF.10200110
S.T.C.
Ref. 60100076
CN1 M1
T.D.2
230V
Ref. 10200125
R.E.A. 5 (90-280V)
REF.60800100
R.E.A. 4 (90-280V)
REF.60800100
R.E.A. 3 (90-280V)
REF.60800100
R.E.A. 2 (90-280V)
REF.60800100
R.E.A. 1 (90-280V)
REF.60800100
P.
REF. 60901001
R.C.
REF. *45000030
S.E
I.G
G
L3 - T
L2 - S
L1 - R
I.G.
REF. 60900000
ELECTRICAL DIAGRAMS
G-10
Electrical power diagram: G-10 2Gr 3 Boilers 230 V 3N~
ELECTRICAL DIAGRAMS
G-10
High current schematics G-10
230V 1N~ HEATING ELEMENT 2500W
P
I.L.
REF. 60900035
I.L.
P.
REF. 60901001
R.E.
N-O
L1 - R
G
R.E.
REF. 38025001
R.E.A. (90-280V)
REF.60800100
230V 1N~ HEATING ELEMENT 3050W- 2GR
C2
- C2
I.G
REF. 60900001
P
P.
REF. 60901001
I.G.
R.E.
S.E
N-O
+
-
L1 - R
G
R.E.C. (3-32V)
REF.60800101
R.E.
REF. 38027000
230V 1N~ HEATING ELEMENT 3450W- 2GR
C2
I.G
REF. 60900001
- C2
P
I.G.
N-O
L1 - R
G
P.
REF. 60901001
R.E.
S.E
+
-
R.E.C. (3-32V)
REF.60800101
R.E.
REF. 38034503
R
43
ELECTRICAL DIAGRAMS
G-10
High current schematics G-10
230V 1N~ HEATING ELEMENT 3050W- 2GR
B2’ - B2’
I.G
REF. 60900001
P
1.G.
P.
REF. 60901001
R.E
N-O
L1 - R
G
R.E.A. (90-280V)
REF.60800100
R.E.
REF. 38027000
HEATING ELEMENT 4500W - 2GR
The black wire is painted blue at secondary circuit
I.G
REF. 60900000
B2’ - B2’
1.G.
P
P.
REF. 60901001
R.E
L3 - T
L1 - R
L2 - S
G
R.E
REF. 38045000
REF. 38060000
(x3) R.E.A. (90-280V)
REF.60800100
400V 3N~ HEATING ELEMENT 4500W-2GR
B2’ - B2’
I.G
REF. 60900010
P.
P REF. 60901001
1.G.
R.E
N-O
L1 - R
L2 - S
L3 - T
G
44
R
R.E.A. (90-280V)
R.E.A. (90-280V)
REF.60800100 REF.60800100
R.E.A. (90-280V)
REF.60800100
R.E
REF. 38045000
ELECTRICAL DIAGRAMS
G-10
High current schematics G-10
400V 2N~ HEATING ELEMENT 4000W- 3GR
C3’ - C3’
I.G
REF. 60900002
1.G.
P.
P REF. 60901001
R.E
N-O
+
-
L1 - R
+
-
L2 - S
G
R.E
REF. 38040000
R.E.C. (3-32V)
R.E.C. (3-32V)
REF.60800101 REF.60800101
400V 3N~ HEATING ELEMENT 6000W- 3GR
C3’ - C3’
I.G
REF. 60900010
P.
P REF. 60901001
1.G.
R.E
N-O
L1 - R
L2 - S
L3 - T
G
+
-
+
-
+
-
R.E.C. (3-32V)
R.E.C. (3-32V)
R.E.C. (3-32V)
REF.60800101 REF.60800101 REF.60800101
R.E
REF. 38045000
REF. 38060000
R
45
ELECTRICAL COMPONENTS
G-10
G-10 Mini 2Gr
View
Part No.
Description
C60100310
Switchboard 1D5 G-10 220V Probe
C60100410
Control Board 3D5 Xlc
C60800100
Static Relay
C60900035
Switch Red
Components common to all models
View
46
R
Part No.
Description
C60800103
Relay Protection Cover
C60901001
Pilot Light 60 Cm
C60100038
L.600Mm Monroc Touch Pad Box
C60100039
L.800Mm Monroc Touch Pad Cable
C60100036
Wire 1100 M.M. Touchpad
ELECTRICAL COMPONENTS
G-10
G-10 2GR / 3GR
View
+
K
Y
F D BATTER
IUM 2032o
CR 3V
H
LIT
Part No.
Description
C60100034
Switchboard 3D5 Disp Lux
C60101046
Button Battery D20 Cr2032
C60800101
Static Relay 4-32
C60100301
Display Control Mega/G10 New Elegan
C60100305
Black G-10 Display Membrane
C10200125
Digital Thermostat 230V
C40000050
C60900001
C60900002
C60900010
Main Switch Knob
Switch Position 1 Poles 2 16A
Switch Position 1 3/4Gr 20A
Switch Position 4 Poles
C60100300
G-10 Touchpad
R
47
DETAIL DRAWINGS
G-10
G-10: Housing parts
Drawing
14
13
12
11
09
01
02
03
04
05
06
07
48
R
08
10
DETAIL DRAWINGS
G-10
G-10: Housing parts
Part list
POS.
Machine
Part No.
Description
C17020110
Supp front panel G-10 Minicon 1GR
C17120116
Supp front panel G-10 Minicon 2GR
2 GR
C17000110
Top Front Panel Holder 2Gr
3 GR
C17010110
Top Front Panel Holder 3Gr
POS. Machine
Part No.
Description
MINI
C20000145
Inox Drip Tray Mini
2 GR
C20000166
Inox Drip Tray 2Gr
3 GR
C20000170
Inox Drip Tray 3/4Gr
C19200200
Lower Trim Mk/Mega/G10 Mini
C12031070
Lower Trim Mk/Mega/G10 Mini Ta
C11000210
Lower Trim G10 2Gr
C12030070
Lower Trim Mk/Mega/G10 2Gr Ta
C11010210
Lower Trim G10 3Gr
C12032065
Lower Trim Mk/Mega/G10 3Gr Ta
MINI
06
01
MINI
02
MINI,2,3GR
C17000061AT
Side Panel Trimer G-10 Left Anthra
C17020002KIT
Top Front G-10 Minicon 1Gr
07
MINI
03
C17020010KIT
Top Front G-10 Minicon 2Gr
C17000001KIT
Top Front G-10 2Gr Display
2 GR
3 GR
2 GR
C17000004KIT
Top Front G-10 2Gr Display 3B
C17010001KIT
Top Front G-10 3Gr Control
08
MINI,2,3GR
C*70300010A
Expobar Anagram Nickel
C17010004KIT
Top Front G-10 3Gr Control 4B
09
MINI,2,3GR
C17000060AT
Side Panel Trimer G-10 Right Anthra
C17020080
Frontal G-10 Mini 1GR
10
MINI,2,3GR
C17000050AT
Side Panel G-10 Right Anthracite
C17020081
Frontal G-10 Mini 1Gr TA
MINI
C17020090
Cup Tray G-10 Mini 1GR
C17020085
Frontal Mini 2GR G10ELEN
2 GR
C17000090
Cup Tray G-10 2Gr
C17020086
Frontal 2GR High Group Rosetta
3 GR
C17010090
Cup Tray G-10 3Gr
C17000080
Frontal G-10 2Gr
MINI
C17020091
Central bodywork G-10 Mini SUS
C17000081
Frontal G-10 2Gr TA
2 GR
C17000091
Central Bodyworks G-10 2Gr SUS
C17010080
Frontal G-10 3Gr
3 GR
C17010091
Central Bodyworks G-10 3Gr SUS
C17010081
Frontal G-10 3Gr TA
13
MINI,2,3GR
C16000050
CupTray/SidePanel Supp - MK Plastic
MINI
C20000201
Grill For Mini
14
MINI,2,3GR
C17000051AT
2 GR
C20000216
Grill For 2Gr
3 GR
C20000220
Grill For 3Gr
Take away
C20000240
Cup Grill Of High Group
3 GR
MINI
11
04
2 GR
12
3 GR
Side Panel G-10 Left Anthracite
05
R
49
DETAIL DRAWINGS
G-10
G-10 Mini 2Gr: water system
Drawing
01
21
50
02
20
R
03
19
04
18 17
05
06
16
07
15
08
09
10
14
13
11
13
12
DETAIL DRAWINGS
G-10
G-10 Mini 2Gr: water system
Part list
POS.
PCS
Part No.
Description
01
1
C15000370
Tap Steam Eleg./Mega Comp 4H Bf
02
1
C60000062
D-40 One Reading Manometer Orman
03
1
C35040117
4Ltrs Grinder's Steam Pipe
04
1
C35110530
Pipe Manometer
05
2
C15000050
Group Espresso Preass
06
1
C35040006
Pipe Group Left Return Mini
07
1
C35110002
Pipe Group Right Inlet
08
1
C35110003
Pipe Group Left Inlet
09
3
CESC00100
Magnets Set
10
1
--------
Boiler Assembly G-10 Mini
11
1
C35040106
Pipe Pressure Sensor Mini
12
1
C60000008
Pressostat Piris Ce
13
2
C35040118
Pipe Water Filling Mini
14
1
C35040105
Pipe Group Right Return Mini
15
1
C15000330
Tap Hot Water Complete
16
1
CESC00098
Piping Mini Control 2 Std&Ta
17
1
C70001005
Drain Cup Cover
18
1
C70001001
Drain Cup With Thread
19
1
CESCMPE00
Motor&Pump Ass Eco
20
1
C35900040
55Cm Hose
21
1
C35900180
180Cm Hose
R
51
detail drawings
G-10
G-10 2Gr: water system
Drawing
01
02
22
03
21
04
20
19
07
06
05
18
17
16
15
08
14
13
09
02
25
23
24
52
R
10 11
13
12
detail drawings
G-10
G-10 2Gr: water system
Part list
i
POS.
PCS
Part No.
Description
01
1
C35900020
30Cm Hose
02
2
C15000370
Tap Steam Eleg./Mega Comp 4H Bf
03
1
C35040117
4Ltrs Grinder's Steam Pipe
04
1
C35110465
Pipe Water Filling 2Gr Mc
05
1
C15000330
Tap Hot Water Complete
06
1
C35110005
Pipe Water Tap
07
2
C15000050
Group Espresso Preass
08
1
C35110003
Pipe Group Left Inlet
09
3
CESC00100
Magnets Set
10
1
C35110002
Pipe Group Right Inlet
11
1
--------
12
1
C35110113
Pipe Steam Tap
13
2
C35110000
Pipe Group Right Return 2Gr
14
1
C35040007
Flowmeteroutlet Piping
15
1
C35040104
Volumetric Tube Laberinth Mc
16
1
C35110461
Manifold Tube Distributor 2Gr
17
2
C60100045
Flowmeter Ul/Netw. Brass Tef+Led
18
1
C35110012
Pipe Drainage Boiler 2Gr
19
1
CESC00093
Water Spliter
20
1
C70001000
Drain Filter + High Group
21
1
CESCMPS00
Motor&Pump Ass Std
22
1
C35900180
180Cm Hose
*23
2
C35040103
Volumetric Tube
*24
1
C35110464
Pipe Distribution 2Gr Mc
25
-
CESC00060
Flowmeter Ass
Boiler Assembly G-10 2Gr
Note:
In models designed for tall cups, parts 14, 15 and 16 are replaced by parts 23 (x2) and 24.
R
53
detail drawings
G-10
G-10 2Gr 3 Boilers: water system
Drawing
01
19 18
54
02
17
R
03
16
15
04
14
04
05
13
12
07
06
11
10
03
08
09
detail drawings
G-10
G-10 2Gr 3 Boilers: water system
Part list
POS.
PCS
Part No.
Description
01
2
C15000370
Tap Steam Eleg./Mega Comp 4H Bf
02
1
C15000330
Tap Hot Water Complete
03
2
C35040117
4Ltrs Grinder's Steam Pipe
04
2
C35040118
Pipe Water Filling Mini
05
2
C15000050
Group Espresso Preass
06
2
C35110113
Pipe Steam Tap
07
1
--------
08
1
C60000008
Pressostat Piris Ce
09
2
C35020010
Office Water Tube
10
2
C35040476
Entry Tube D12 Office Grinder
11
2
C35110000
Pipe Group Right Return 2Gr
12
2
C60100045
Flowmeter Ul/Netw. Brass Tef+Led
13
1
C35110464
Pipe Distribution 2Gr Mc
14
1
C35110012
Pipe Drainage Boiler 2Gr
15
1
CESC00093
Water Spliter
16
1
C70001000
Drain Filter + High Group
17
1
CESCMPS00
Motor&Pump Ass Std
18
1
C35900180
180Cm Hose
19
1
C35900020
30Cm Hose
Boiler Assembly G-10 2Gr 3 Boiler
R
55
detail drawings
G-10
G-10 Mini: boiler assembly
Drawing
15
14
12
11
10
13
16
01
02
09
03
08
04
07
05
06
56
R
detail drawings
G-10
G-10 Mini: boiler assembly
Part list
POS.
PCS
Part No.
Description
01
1
C15100016
Copper Boiler 2Gr 6Lt
02
1
C15100018
Boiler Copper 1Gr 6L
03
2
C50010050
3/8 Boiler's Connector Teflon Gaske
04
1
C38025001
2500W-230V- 6Ltrs.Copper Element
05
1
C25093320
Hexagonal Head Screew 8X20 Din 933
06
1
C25012530
Flat Washer M-8 Din-125
07
1
C30000210
Thermics Inf. Adaptor-1/2X1/2X1/4
08
2
C50010010
21.1*25.7* 1/2 Teflon Gasket
09
1
C50010030
40*52*2 Element Teflon Gasket
10
1
C30000110
3 Tracks Adaptor 1/4 * 1/4 * 1/8
11
1
C65000200
Non Suction Valve
12
1
C65000110
Cn10 Ptfe Ce Safety Valve
13
1
C25000003
Inox Ground Washer
14
1
C60100040
Water Level Probe 1/4
15
1
C30000200
Thermics Sup. Adaptor 1/2 X 1/2
16
1
C25679812
M12 Washer Form A
R
57
detail drawings
G-10
G-10 2Gr: boiler assembly
Drawing
01
02
03
04
05
06
07
21
20
19
08
09
10
18
17
16
15
14
13
12
11
58
R
detail drawings
G-10
G-10 2Gr: boiler assembly
Part list
i
POS.
PCS
Part No.
Description
01
1
C15100020
Boiler 2Gr 11Lts.
02
1
C65000110
Cn10 Ptfe Ce Safety Valve
03
2
C30000315
Bling Plug 1/8 Female
04
1
C50010030
40*52*2 Element Teflon Gasket
05
1
C38027000
3050W.230V- 2Gr Element
*05
1
C30834503
3450 W 230 V 2 GR ELEMENT
*05
1
C38045000
4500W-230V 2GR ELEMENT
*05
1
C38040000
4000 W- 230V 3GR ELEMENT
*05
1
C38060000
6000W.230V-3GR ELEMENT
06
1
C25012530
Flat Washer M-8 Din-125
07
1
C25093320
Hexagonal Head Screew 8X20 Din 933
08
1
C60100040
Water Level Probe 1/4
09
1
C25000003
Inox Ground Washer
10
1
C25679812
M12 Washer Form A
11
2
C30000220
Cone Injector 1/4
12
2
C50010020
13.2*18.2*2.5 1/4 Teflon Gasket
13
2
C30000210
Thermics Inf. Adaptor-1/2X1/2X1/4
14
4
C50010010
21.1*25.7* 1/2 Teflon Gasket
15
2
C50010050
3/8 Boiler's Connector Teflon Gaske
16
2
C30000003
Reducer Male-Female-3/8 - 1/4
17
1
C60100076
Temp. Probe + Susp. Steam Pipe Icd
18
1
C30000290
Plug M 3/8
19
2
C30000100
2 Tracks Adaptor- 1/4 X 1/8
20
1
C65000200
Non Suction Valve
21
2
C30000200
Thermics Sup. Adaptor 1/2 X 1/2
Note:
Parts 05 marked with * are options on three-phase models.
R
59
detail drawings
G-10
G-10 2Gr 3 Boilers: boiler assembly (main boiler)
Drawing
01
02
03
04
05
06
07
08
09
10
11
12
21
20
19
18
17
16
15
60
R
14
13
detail drawings
G-10
G-10 2Gr 3 Boilers: boiler assembly (main boiler)
Part list
i
POS.
PCS
Part No.
Description
01
1
C60100076
Temp. Probe + Susp. Steam Pipe Icd
02
1
C30000003
Reducer Male-Female-3/8 - 1/4
03
1
C30000290
Plug M 3/8
04
1
C65000200
Non Suction Valve
05
2
C30000315
Bling Plug 1/8 Female
06
2
C30000510
Conical Adaptor 1/4*1/4 Electron
07
2
C30000220
Cone Injector 1/4
08
2
C50010020
13.2*18.2*2.5 1/4 Teflon Gasket
09
2
C30000210
Thermics Inf. Adaptor-1/2X1/2X1/4
10
1
C65000110
Cn10 Ptfe Ce Safety Valve
11
2
C50010010
21.1*25.7* 1/2 Teflon Gasket
12
1
C30000100
2 Tracks Adaptor- 1/4 X 1/8
13
1
C38027000
3050W.230V- 2Gr Element
*13
1
C38045000
4500W-230V 2GR ELEMENT
*13
1
C38060000
6000W.230V-3GR ELEMENT
14
1
C50010030
40*52*2 Element Teflon Gasket
15
1
C15100020
Boiler 2Gr 11Lts.
*15
1
C15100030
Boiler 3Gr 17Lts.
16
2
C30200035
Long Plug 1/2 Group
17
1
C25679812
M12 Washer Form A
18
1
C25000003
Inox Ground Washer
19
1
C60100040
Water Level Probe 1/4
20
1
C30000110
3 Tracks Adaptor 1/4 * 1/4 * 1/8
21
2
C50010050
3/8 Boiler's Connector Teflon Gaske
Note:
Parts 13 marked with * are options on three-phase models.
R
61
detail drawings
G-10
G-10 2Gr 3 Boilers: boiler assembly (group boiler)
Drawing
01
02
11
10
03
04
05
09
08
06
07
62
R
detail drawings
G-10
G-10 2Gr 3 Boilers: boiler assembly (group boiler)
Part list
POS.
PCS
Part No.
Description
01
1
C30000220
Cone Injector 1/4
02
1
C50010020
13.2*18.2*2.5 1/4 Teflon Gasket
03
2
C25091210
Allen Screw 4X12 Din-912
04
1
C10200110
Office Thermostat 16 A
05
1
C30000290
Plug M 3/8
06
1
C38012000
1200W-230V Office Element
07
2
C30000300
Blind Plug 1/4 Male
08
1
C15100010
Office Cappuccinator Boiler
09
1
C60100076
Temp. Probe + Susp. Steam Pipe Icd
10
2
C50010010
21.1*25.7* 1/2 Teflon Gasket
11
2
C30000200
Thermics Sup. Adaptor 1/2 X 1/2
R
63
detail drawings
G-10
G-10: Rotary pumps
Drawing
04
08
03
07
06
05
09
10
11
01
02
13
12
14
64
15
R
16
detail drawings
G-10
G-10: Rotary pumps
Part list
i
POS.
PCS
Part No.
Description
01
1
C60000016
Motor Crem 230V/50Hz
02
1
C60000028
Motor Crem 120V
03
1
C30000019
Cardan Joint Pump
04
1
C30000022
Cardan Joint Pump Flat
05
1
C30000240
Pump Adaptor 3/8 X 3/8
06
1
C30100100
Inlet Water Filter Holder
07
1
C70000009
Tubular Group Filter
*08
1
C30400055
Pump Bypass Condor
09
1
C30369110
Restrictor pin
10
1
C50000130
O-Ring 8 X 1.9
11
1
C65000010
Retention Valve
12
1
C60000030
Pump (Crem Special Treatment)
13
1
C60000031
Piston Bypass Pump (Tec)
14
-
C60000033
Pump Rotary Compact
15
-
CESCMPS00
Motor&Pump Ass Std
16*
-
CESCMPE00
Motor&Pump Ass Eco
Note:
Part No. C30400055 and CESCMPE00 apply to the G-10 Mini models.
R
65
detail drawings
G-10
Group head
Drawing
01
01
02
03
04
02
22
03
21
27
20
19
05
05
06
23
07
18
08
24
25
09
10
11
17
12
13
14
26
15
16
66
R
28
detail drawings
G-10
Group head
Part list
i
POS.
PCS
Part No.
Description
01
1
C30200035
Long Plug 1/2 Group
02
1
C50010040
21.7*25.7*2 G/C-G Teflon Gasket
03
1
C70000009
Group Teflon Injector Rev3
04
1
C30200061
Group Teflon Injector Rev3
05
1
C30200026
Tefl Water Reduc. Holder 4X6x65
06
1
C25091250
Allen Screw 6*10 Din-912 Group
07
1
C30200010
Crem Brewing Group Body
08
1
C30200040
Diffuser
09
1
C75000010
Shower
10
1
C75000081
8mm Group Head Gasket
11
-
C75000083
Filter 8.5Mm
12
-
C75000085
Filter 9Mm
13
-
C75000090
EXTRA SEAL FOR GASKET 0,5 Mm
14
-
C75000095
EXTRA SEAL FOR GASKET 1 Mm
15
-
C30000043
High Group Brewing Group Thread
16
1
C30000040
Brewing Group Thread
17
4
C25091210
Allen Screw 4X12 Din-912
18
2
C50000100
O-Ring 6.07X1.78 Fkm Fda
19
1
C50000010
Green Body Flat Group Joint
20
1
C50020000
3.5*18.2*2 Teflon Hot Water Reducto
21
-
C50020020
Chicle Teflon 2'5 (2'5X18'2X2)
22
-
C50020010
Chicle Teflon 2 (2X18’2X1)
23
1
C30200026
Teflon Tube 4X6x55
24
1
C30200070
Acople Tubo Portachicle
25
-
CESC50000
Injector Kit Complete
26
1
C60000112
Gro Head Electrov. Parker 220V
27
1
C60000115
Gro Head Electrov. Parker 120V
28
-
C15000050
Group Espresso Preass
Note:
Sets C60000112 and C60000115 do not include no. 17 screws.
The CESC50000 set is designed for threaded group bodies (models prior to 2004).
Pos. 13/14 can be used for old and worn out seals/group heads to ensure proper sealing.
R
67
detail drawings
G-10
Portafilters
Drawing
01 02 03
11
04
05
12
11
06
13
07
11
08
14
68
R
09
10
detail drawings
G-10
Portafilters
Part list
POS.
PCS
Part No.
Description
01
-
C75000059
1 Cup Filter 6 Gr
02
-
C75000037
1 Cup Filter 6,5 Gr
03
-
C75000031
1 Cup Filter (7Gr)
04
-
C75000050
Spout 1Cup
05
-
C75000041
2 Cup Filter (14Gr)
06
-
C75000060
Spout 2Cups
07
-
C75000049
3 Cup Filter (21Gr)
08
-
C75000070
Spout 3 Cups
09
-
C75000020
Blind Cup
10
-
C75000000
Blind Rubber Filter
11
-
C75000120
Filter Spring
12
-
C75001500
Portafilter 1 Cup Std Incl Filter
13
-
C75002500
Portafilter 2 Cups Std Incl Filter
14
-
C75003000
Portafilter 3 Cups Std Incl Filter
R
69
detail drawings
G-10
G-10 Mini 1Gr : water supply and drainage set
Drawing
15
14
10
09
08
07
13
06
12
05
11
04
02 03
01
16
09
Part list
70
POS.
PCS
Part No.
Description
01
2
C30000510
Conical Adaptor 1/4*1/4 Electron
02
1
C60000100
1/4 X 1/4 Electrovalve Parker 220V
03
1
C60000103
1/4 X 1/4 Electrovalve Parker 120V
04
2
C50010020
13.2*18.2*2.5 1/4 Teflon Gasket
05
1
C30000215
Conical Bend Adaptor 1/4 X 1/4
06
1
C30000000
T H-H-H-1/4 Mini
07
1
C30000002
Buttress 1/4-3/8 Mini
08
3
C30100010
Hexagonal Nut 1/4 Pressostat
09
1
C60100045
Flowmeter Ul/Netw. Brass Tef+Led
10
1
C30000220
Cone Injector 1/4
11
1
C60102020
O-Ring Flowmeter
12
1
C60102010
Frontal Botonera Elen
13
1
C60102040
Flow Meter Lid
14
1
C*45000001
Flow Meter Joint
15
1
C60100055
Flow Meter Connector
16
-
CESC00090
Piping Mini Control 1 Std&Ta
R
detail drawings
G-10
G-10 Mini 2Gr : water supply and drainage set
Drawing
02
14
01
03
13
04
05
12
06
11
10
07
08
09
15
09
Part list
POS.
PCS
Part No.
Description
01
1
C60000100
1/4 X 1/4 Electrovalve Parker 220V
02
1
C60000103
1/4 X 1/4 Electrovalve Parker 120V
03
1
C30100010
Hexagonal Nut 1/4 Pressostat
04
1
C35040101
Mini Brass Tube For Battery
05
3
C30000215
Conical Bend Adaptor 1/4 X 1/4
06
2
C35040102
4Ltrs Manifold Tube
07
2
C30000510
Conical Adaptor 1/4*1/4 Electron
08
3
C50010020
13.2*18.2*2.5 1/4 Teflon Gasket
09
2
C60100045
Flowmeter Ul/Netw. Brass Tef+Led
10
2
C60102020
O-Ring Flowmeter
11
2
C60102010
Frontal Botonera Elen
12
2
C60102040
Flow Meter Lid
13
2
C*45000001
Flow Meter Joint
14
2
C60100055
Flow Meter Connector
15
-
CESC00098
Piping Mini Control 2 Std&Ta
R
71
detail drawings
G-10
G-10 2Gr: water supply and drainage set
Drawing
14
13
01
08
02
09
10
11
12
03
04
06
05
16
07
15
17
72
R
detail drawings
G-10
G-10 2Gr: water supply and drainage set
Part list
POS.
PCS
Part No.
Description
01
1
C60000105
50/60Hz 220V Solenoid Electrovalve
02
1
C50000105
Large Autofill Solenoid Gasket
03
1
C50000110
Small Autofill Solenoid Gasket
04
1
C30000215
Conical Bend Adaptor 1/4 X 1/4
05
3
C30100010
Hexagonal Nut 1/4 Pressostat
06
1
C30100033
Distributor Mc
07
1
1860016
08
1
C30369100
Relief Valve Body
09
1
C50000020
Gasket For Motor
10
1
C55000030
Expansion Valve Spring
11
1
C50010040
21.7*25.7*2 G/C-G Teflon Gasket
12
1
C30369135
Barb Fitting 1/2 * 1/4 G/C
13
1
C30369110
Housing Ring
14
1
C50000130
O-Ring 8 X 1.9
15
1
C65000031
Retent+Expans.Valve Set No Hole
16
1
C65000020
Expansion Valve Complete
17
1
CESC00093
Water Spliter
Tap Drainage G1/4M-G1/4F Right
Important:
When ordering a replacement for electrovalve no. 1, specify if the machine operates
at 230 V or 120 V.
R
73
detail drawings
G-10
Steam tap
Drawing
01
02
03
04
05 06 07
08
09
10
11
12
13
16
17
18
24
15
19
19
20
20
14
21
21
22
23
25
22
23
26
27
74
R
detail drawings
G-10
Steam tap
Part list
POS.
PCS
Part No.
Description
01
1
C30370070
Tap Body
02
1
C30370060
Close Nut
03
1
C30370050
Closing Shaft M-6
04
1
C30370040
Shaft Spring
05
1
C30370065
Push Cap
06
2
C30370020
Shaft Ring
07
1
C30370030
Gasket
08
1
C30370010
Tap Fitting
09
1
C30370140
Tap Fixing Nut
10
1
C40000015
High Group Tap Knob
11
1
C25012521
Stainless Steel Knob Washer
12
1
C30370110
Water/Steam Knob Pin
13
1
C30370130
Steam Tap Knob Anagram
14
1
C30370120
Water Tap Knob Anagram
15
1
C25097960
Steam/Water Tap Nut M6-Din 979
16
1
C50010080
Gasket Tap Steam/Water Teflon
17
1
C30370076
Spring Steam/Water Tap
18
1
C30370077
Gasket Tap Steam/Water Brass
19
1
C30370075
O-Ring 12.1X2.7mm
20
1
C70000010
Nut 3/8 For Steamer
21
1
C70000035
Protection Rubber
22
1
C50010090
O-Ring 6*1
23
1
C30370195
Nozzle Steam Tap 3H M8.5 With Gaske
24
1
C15000325
Tap Steam/Water Body
25
-
C30370095
Pipe Steam Eleg./Megacrem Wo Nozzle
26
-
C35010052
Pipe Steam Eleg./Mega Ta Wo Nozzle
27
-
C15000370
Tap Steam Eleg./Mega Comp 4H Bf
R
75
DETAIL DRAWINGS
G-10
Hot water taps
Drawing
01 02
03
04
05 06 07
08
09
10
11
12
13
16
17
18
19
20
15
21
19
20
23
22
24
76
R
25
14
DETAIL DRAWINGS
G-10
Hot water taps
Part list
POS.
PCS
Part No.
Description
01
1
C30370070
Tap Body
02
1
C30370060
Close Nut
03
1
C30370050
Closing Shaft M-6
04
1
C30370040
Shaft Spring
05
1
C30370065
Push Cap
06
2
C30370020
Shaft Ring
07
1
C30370030
Gasket
08
1
C30370010
Tap Fitting
09
1
C30370140
Tap Fixing Nut
10
1
C40000015
High Group Tap Knob
11
1
C25012521
Stainless Steel Knob Washer
12
1
C30370110
Water/Steam Knob Pin
13
1
C30370130
Steam Tap Knob Anagram
14
1
C30370120
Water Tap Knob Anagram
15
1
C25097960
Steam/Water Tap Nut M6-Din 979
16
1
C50010080
Gasket Tap Steam/Water Teflon
17
1
C30370076
Spring Steam/Water Tap
18
1
C30370077
Gasket Tap Steam/Water Brass
19
1
C30370075
O-Ring 12.1X2.7mm
20
1
C70000010
Nut 3/8 For Steamer
21
-
C15000325
Tap Steam/Water Body
22
-
C30370080
Lanza Agua Mod Classic
23
-
C30000050
Nozzle Water Tap Complete
24
-
C35010056
Hot Water Pipe For High Group
25
-
C15000330
Tap Hot Water Complete
R
77
SERVICE INTERVALS
G-10
G-10 Mini Control 1Gr & 2Gr
Main components
Part No.
Months (Cycles)
6 (12500)
12 (25000) 18 (37500) 24 (50000)
Boiler
Non suction valve
C65000200
1/4 X 1/4 Electrovalve Parker
220V
C60000100
Thermics Sup. Adaptor 1/2 X 1/2
C30000200
Check
Replace
Thermics Inf. Adaptor1/2X1/2X1/4
C30000210
Check
Replace
Cone Injector 1/4
C30000220
Check
Replace
Replace
Replace
Replace
Brewing group
Replace
Gro Head Electrov. Parker 220V
C60000112
Showers
C75000010
Replace
Replace
Replace
Replace
8mm group head gasket
C75000081
Replace
Replace
Replace
Replace
Clean
Replace
Taps
Steam tap body
C15000325
Water tap body
C15000325
Replace
Pump head
C60000030
Replace
Retention Valve
C65000010
Replace
Pump Bypass Condor
C30400055
Replace
Motor-pump
Important:
6 months service interval for joints and showers of the brewing group is estimated for a machine where
cleaning was carried out properly. Never use excessive force to try to close the porta-filter on the
brewing group.
78
R
SERVICE INTERVALS
G-10
G-10 Display Control 2Gr & 3Gr
Main components
Part No.
Months (Cycles)
6 (12500)
12 (25000) 18 (37500) 24 (50000)
Boiler
Replace
Replace
Non Suction Valve
C65000200
Solenoid Electrovalve 50/60Hz
220V
C60000105
Thermics Sup. Adaptor 1/2 X 1/2
C30000200
Check
Replace
Thermics Inf. Adaptor1/2X1/2X1/4
C30000210
Check
Replace
Cone Injector 1/4
C30000220
Check
Replace
Replace
Brewing group
Replace
Gro Head Electrov. Parker 220V
C60000112
Showers
C75000010
Replace
Replace
Replace
Replace
Group Head Gasket
C75000081
Replace
Replace
Replace
Replace
Clean
Replace
Taps
Steam tap body
C15000325
Water tap body
C15000325
Replace
Pump head
C60000030
Replace
Retention Valve
C65000010
Replace
Retent+Expans. Valve Set No
Hole
C65000031
Replace
Motor-pump
Important:
6 months service interval for joints and showers of the brewing group is estimated for a machine where
cleaning was carried out properly. Never use excessive force to try to close the porta-filter on the
brewing group.
R
79
For the warranty to be valid, the conditions for maintenance must have been followed
in accordance with our instructions, proper care must have been taken and any claim
against the warranty must be sent without delay.
The equipment in question may not be used while awaiting service if there is any risk
that the damage or defect would worsen.
The warranty will not cover the consumption of supplies such as glassware, normal
maintenance such as the cleaning of filters, water contamination, limescale or
problems associated with incorrect voltages, pressure or amounts of water.
The warranty will not cover damages of defects caused by the incorrect handling and
operation of the appliance.
TECHNICAL SUPPORT
Contact your supplier
Your Dealer
www.creminternational.com
MADE IN SPAIN