1
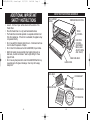
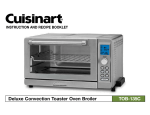
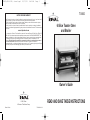
T0600(428-1018) visual.qxd
10/17/03
9:40 AM
Page 1
TO600
LIMITED ONE-YEAR WARRANTY
Rival® warrants this product to be free from defects in materials or workmanship for one (1) year from date of
original purchase. If you have a claim under this warranty please follow these procedures:
1) Within the first 45 days from date of original purchase, defective product should be returned to original
place of purchase for replacement (with proof-of-purchase).
2) Within the first 12 months from date of purchase Rival will repair or replace (at no charge) the defective
product if it is delivered freight prepaid during that period to an authorized service station. To obtain warranty
service visit:
www.rivalproducts.com
6-Slice Toaster Oven
and Broiler
Or, you may write to Rival c/o The Holmes Group, attention: Consumer Returns, 32 B Spur Drive, El Paso, TX
79906. Proof of purchase is required when requesting warranty service - SAVE YOUR SALES RECEIPT. This
warranty is extended only to the original purchaser and does not apply to commercial use, unreasonable use,
or to damage to the product (not resulting from defect or malfunction) while in the possession of the
consumer. Rival disclaims all responsibility for consequential, incidental, or commercial losses caused
by the use of this product. Some states do not allow this exclusion or limitation of incidental or
consequential losses, so the foregoing disclaimer may not apply to you. This warranty gives you specific legal
rights, and you may also have other legal rights which vary from state to state.
Owner’s Guide
READ AND SAVE THESE INSTRUCTIONS
©2003, Rival®
A Division of The Holmes Group
Printed in China
TO600/428-1018
T0600(428-1018) visual.qxd
10/17/03
9:40 AM
Page 3
IMPORTANT SAFEGUARDS
IMPORTANT SAFEGUARDS (CONT.)
When using electrical appliances, basic safety precautions should
always be followed including the following:
1. Read all instructions before using.
2. Do not touch hot surfaces. Use handles and knobs.
3. To protect against electrical shock do not immerse cord, plugs or oven
in water or other liquid.
4. Close supervision is necessary when any appliance is used by or near
children.
5. Unplug from outlet when not in use and before cleaning. Allow to cool
before putting on or taking off parts, and before cleaning.
6. Do not operate any appliance with a damaged cord or plug or after the
appliance malfunctions or has been damaged in any manner. Return
appliance to the manufacturer (see warranty) for examination, repair,
or adjustment.
7. The use of accessory attachments not recommended by the appliance
manufacturer may cause injuries.
8. Do not use outdoors.
9. Do not let cord hang over edge of table or counter, or touch heated
surfaces.
10. Do not place on or near a hot gas or electric burner, or in a heated
oven.
11. Extreme caution must be used when moving an appliance containing
hot oil or other hot liquids.
12. To disconnect, rotate the TIMER CONTROL to the OFF position, then
remove plug from wall outlet.
13. Do not use appliance for other than intended use.
14. Oversize foods or metal utensils must not be inserted in the Toaster
Oven as they may create a fire or risk of electric shock.
15. A fire may occur if the Toaster Oven is covered or touching
flammable material, including curtains, draperies, walls, or the like,
when in operation. Do not store any item on top of the appliance
when in operation.
16. Do not clean with metal scouring pads. Pieces can break off the pad
and touch electrical parts involving a risk of electric shock.
17. Extreme caution should be exercised when using containers
constructed of other than metal or glass.
18. Do not place any cardboard, paper, plastic or other flammable items
inside the oven.
19. Do not cover crumb tray or any part of the oven with metal foil. This
will cause overheating of the oven.
20. To turn the oven off, rotate the TIMER CONTROL to the OFF position.
21. Use extreme caution when removing pan or disposing of hot grease.
22. Do not store any materials, other than the manufacturer's
recommended accessories, in this oven when not in use.
-E2-
-E3-
SAVE THESE INSTRUCTIONS
• FOR HOUSEHOLD USE ONLY.
• No user-serviceable parts inside. Do not attempt to service this
product.
• A short power supply cord is provided to reduce the risk of becoming
entangled in or tripping over a longer cord. An extension cord may be
used with care. However, the marked electrical rating should be at least
as great as the electrical rating of the Toaster Oven. The extension cord
should not be allowed to drape over the counter or tabletop where it
can be pulled on by children or tripped over.
POLARIZED PLUG
This appliance has a polarized plug (one blade is wider than
the other). To reduce the risk of electric shock, this plug is
intended to fit into a polarized outlet only one way. If
the plug does not fit fully into the outlet, reverse the
plug. If it still does not fit, contact a qualified electrician.
Do not attempt to modify the plug in any way. If the plug fits loosely into
the AC outlet or if the AC outlet feels warm do not use that outlet.
T0600(428-1018) visual.qxd
10/17/03
9:40 AM
Page 5
ADDITIONAL IMPORTANT
SAFETY INSTRUCTIONS
KNOW YOUR TOASTER OVEN AND BROILER
RACK SUPPORT
GUIDES
• Leave 6 – 8 inches of open surface all around the exterior of the
Toaster Oven.
• Place the Toaster Oven on a dry, level heat resistant surface.
• The Toaster Oven should be operated on a separate electrical circuit
from other appliances. If the circuit is overloaded, this appliance may
not operate correctly.
• Do not use airtight containers inside the oven. Containers must have
room to allow for expansion of liquids.
• Do not touch hot surfaces such as the GLASS DOOR, top and sides.
• Watch the toasting process carefully when toasting items such as
stale toast, croutons and crackers. Select a light setting for these
types of foods.
• Do not use any sharp utensils to clean the GLASS DOOR as this may
cause damage to the glass or breakage. Clean only with a soapy
damp cloth.
TEMPERATURE CONTROL
TIMER
CONTROL
150
450
200
400
250
Timer
350
Off
300
Ligh
t
FUNCTION
CONTROL
(KEEP WARM,
BROIL, BAKE
/ROAST /PIZZA
AND TOAST)
Dark
10
60
20
50
40
30
Functio
n
Pow
er
WIRE OVEN RACK
GLASS DOOR
BROIL RACK
COOKIE SHEET
BAKE/DRIP PAN
2 OVEN RACKS
12" PIZZA PAN
-E4-
-E5-
T0600(428-1018) visual.qxd
10/17/03
9:40 AM
Page 7
PREPARING YOUR TOASTER OVEN AND BROILER FOR USE
Your Rival® Toaster Oven is equipped with all of the options of a full-size
oven in a countertop appliance – it toasts, bakes and broils.
NOTE: Initial start up operation may result in minimal smell and smoke
(about 15 min). This is normal. It is due to the protective substances on
the heating elements, which protect them from salt effects during
shipment from the factory.
OPERATING INSTRUCTIONS FOR TOASTING
Your new Toaster Oven has a large capacity for toasting up to 6 slices of
bread, 6 muffin halves, 6 frozen waffles, or 6 frozen pancakes. When
toasting only 1 or 2 items, place food in the center of oven.
1. Set TEMPERATURE CONTROL to TOAST/BROIL.
2. Turn FUNCTION CONTROL to TOAST.
3. Ensure CRUMB TRAY is in place.
4. Place food to be toasted on Wire Oven Rack
5. Turn TIMER CONTOL to desired darkness.
6. Bell will signal end of TOAST cycle.
NOTE: For the best toasting result, WIRE OVEN RACK should be positioned
in the bottom RACK SUPPORT GUIDE, face up.
IMPORTANT:
When choosing toast color (light, medium or dark) always rotate the
timer over 5 minutes and then rotate back to dark, medium or light. This
will ensure that the timer operates correctly and safely.
• When the toast cycle is finished the bell will ring and the electrical
power is automatically turned off.
• To stop the cycle at any time, turn the timer control clockwise to the
OFF position and the bell will ring.
• Six (6) slices will be lighter than one (1) slice, adjust TIMER CONTROL
accordingly.
• If toasting only one slice, place bread in the center of the WIRE OVEN
RACK, 6 slices should be toasted side by side.
In this cycle, both the top and bottom heating elements operate.
-E6-
OPERATING INSTRUCTIONS FOR BAKING
NOTE: When using a single rack, position the WIRE OVEN RACK in the
lowest RACK SUPPORT GUIDE, facing up.
1. Place WIRE OVEN RACK in bottom or top RACK SUPPORT GUIDE,
depending on the height of pan or according to recipe directions.
2. Preheat oven as directed in recipe.
3. Ensure CRUMB TRAY is in place.
4. Place item to be baked on WIRE OVEN RACK.
5. Set TEMPERATURE CONTROL to desired temperature.
6. Turn FUNCTION CONTROL to BAKE/ROAST.
7. Set TIMER CONTROL to desired time or turn to STAY ON.
8. Turn TIMER CONTROL to OFF when complete.
NOTE: In this cycle, both the top and bottom heating elements operate.
Baking on Two Racks
Two racks of cakes, cookies, or pies can be baked at the same time.
However, it is necessary to rotate them (i.e. move the top to the bottom
and the bottom to the top) halfway through cooking time.
Positioning of Bake Racks
Cookies - Use bottom and top RACK SUPPORT GUIDES with racks face
down.
Layer Cakes - Use bottom and top RACK SUPPORT GUIDES. Rack
should be face down in bottom position and face up in top position.
Pies - Use bottom and top RACK SUPPORT GUIDES with both racks face
down. Place a COOKIE SHEET under pies to catch any spills or drips.
Follow package or recipe instructions for baking times and
temperatures.
-E7-
T0600(428-1018) visual.qxd
10/17/03
9:40 AM
Page 9
OPERATING INSTRUCTIONS FOR BROILING / TOP BROWN
For best results, preheat oven for 5 minutes on MAX before
BROILING/TOP BROWNING. Trim excess fat from meats and dry any
moisture that may be on food.
1.
2.
3.
4.
5.
Set TEMPERATURE CONTROL to TOAST/BROIL.
Turn FUNCTION CONTROL to BROIL.
Preheat oven.
Place BROIL RACK onto DRIP PAN.
Place food on BROIL RACK then place the BROIL RACK on the WIRE
OVEN RACK and slide into RACK SUPPORT GUIDE, face up or face
down depending on the thickness of food you are cooking.
6. Food should be placed as close as possible to top heating element
without touching it.
7. Brush food with sauces or oil, if desired.
8. Set TIMER CONTROL to desired time or turn to STAY ON.
9. Turn food over midway through prescribed cooking time.
10. Turn TIMER CONTROL to OFF when broiling is complete.
In this cycle, only the upper heating element operates.
NOTE: Always monitor the food at this setting to ensure that you are not
over cooking.
We suggest using the timer as food can burn quickly at this setting.
When broiling, turn the food over for even cooking. Food should not be
placed directly on the WIRE OVEN RACK.
For top browning simply broil as long as desired.
Do not allow aluminum foil to touch the heating elements.
-E8-
BROIL GUIDE
Type/Cut
Weight/Thickness
Desired Doness
Broil Time
Beef
-Porterhouse/Sirloin
-London Broil
-Rib Eye
-Hamburger
1 inch
1 inch
1 inch
8 ounces
Medium
Medium
Medium
Medium
15-20 min
15-20 min
15-20 min
20-25 min
Pork
-Chops
-Ribs
3/4 inch
1 rack
Well
Well
20-25 min
25 min
Chicken
pieces
Well
30-40 min
Fish
-Fillets*
-Steak
1/2 inch
1 inch
Well
Well
10-15 min
18-20 min
*Fish fillets are delicate and should be broiled directly in DRIP PAN
without BROIL RACK. Turn Fillets over carefully midway through broiling.
1.
2.
3.
4.
5.
6.
7.
OPERATING INSTRUCTIONS FOR ROASTING
Place WIRE OVEN RACK in oven at lowest position, facing down.
Place food to be cooked on BROIL RACK and then place BROIL RACK
onto DRIP PAN.
Place DRIP PAN on WIRE OVEN RACK.
Set TEMPERATURE CONTROL to desired temperature.
Turn FUNCTION CONTROL to BAKE/ROAST.
Set TIMER CONTROL to desired time or turn to STAY ON.
Turn TIMER CONTROL to OFF when cooking is complete.
-E9-
T0600(428-1018) visual.qxd
10/17/03
9:40 AM
Page 11
ROASTING GUIDE
Type/Cut
Oven Temp.
Weight
Roasting Time
Temp. of
Finished Roast
Beef*
-Eye of Round
-Standing Rib
-Top Round Roast
325
325
375
3-5 lb
4 lb
3 1/2 lb
1 hr 30 min to 2 hr
2 hr 25 min to 3 hr
2 hr
150-160
150-160
150-160
Pork
-Loin (boneless)
-Loin (with bone)
-Ham (smoked)
325
325
325
3-5 lb
3-5 lb
5-7 lb
2 hr 30 min to 3 hr
2 hr 30 min to 3 hr
1 hr 50 min to 2 hr 25 min
170
170
140
Chicken (whole)
Turkey (breast)
Cornish Hen
350
350
350
3-5 lb
6-8 lb
1-1 1/2 lb
1 hr 25 min to 1 hr 50 min
2 hr to 2 hr 30 min
1 hr to 1 hr 25 min
190
190
190
* Beef times are medium doneness. Subtract 15 minutes for Rare; add 15
minutes for Well Done.
NOTE: All roasting times are based on meats at refrigerator temperature.
Frozen meats may take considerably longer. Therefore, use of a meat
thermometer is highly recommended.
OPERATING INSTRUCTIONS FOR PIZZA
1. Set TEMPERATURE CONTROL to 400º F.
2. Turn the FUNCTION CONTROL to BAKE/ROAST/PIZZA.
3. Place the pizza to be cooked on PIZZA PAN and place it on top of
WIRE OVEN RACK.
4. Set TIMER CONTROL to desired time or turn to STAY ON.
5. Follow package or recipe instructions for times & temperatures.
6. Turn TIMER CONTROL to OFF when cooking time is complete.
NOTE: WIRE OVEN RACK should be positioned in the bottom RACK
SUPPORT GUIDE, face up.
-E10-
OPERATING INSTRUCTIONS FOR KEEP WARM
Keep cooked food warm up to 30 minutes. Longer periods of time are not
recommended as food will become dry or spoil.
1. Set TEMPERATURE CONTROL to 175º F or KEEP WARM setting.
2. Turn FUNCTION CONTROL to KEEP WARM.
3. Set TIMER CONTROL to desired time or turn to STAY ON.
4. Turn TIMER CONTROL to OFF when finished with KEEP WARM.
1.
2.
3.
4.
5.
6.
USEFUL TIPS
Condensation will appear on the GLASS DOOR for some foods and then
disappear. This is normal.
Cook food immediately after defrosting.
Frozen foods and thick meats will take longer to cook.
Avoid opening the GLASS DOOR too frequently to prevent heat loss.
When toasting frozen bread or more than one fresh slice, the toast
preference should be at a darker setting than if you were toasting one fresh
slice.
When broiling, smoke will likely appear. Removing excess fat prior to
broiling can reduce this. Always use the BAKE PAN.
IMPORTANT:
When setting the timer for less than 5 minutes, always rotate the timer past 5
minutes and then rotate back to your chosen time. This will ensure a safe and
accurate time.
HOW TO CLEAN YOUR TOASTER OVEN
1. Before using your Rival® Toaster Oven, wash all of the accessories – WIRE
OVEN RACK, BAKE/DRIP PAN, COOKIE SHEET, PIZZA PAN, BROIL RACK
AND CRUMB TRAY - in hot water with detergent soap.
2. Initial start up operation may result in minimal smell and smoke (about
15 minutes). This is normal. It is due to the protective substance on the
heating elements which protects them from salt effects during shipping
from the factory.
-E11-
T0600(428-1018) visual.qxd
10/17/03
9:40 AM
Page 13
HOW TO CLEAN YOUR TOASTER OVEN AND BROILER (CONT.)
3. Always make sure that the appliance is unplugged and cooled before
cleaning.
4. The WIRE OVEN RACKS can be removed easily for cleaning. Once the
WIRE OVEN RACKS are removed, clean the interior and exterior with a
damp cloth.
REMEMBER: Do not place the entire unit in water or any liquid.
5. Cleaning the bottom of the crumb tray
A. This appliance has a slide out CRUMB TRAY at the bottom of the
baking chamber. First, unplug the appliance and allow it to cool.
B. To clean out the crumbs, simply pull out the CRUMB TRAY located
at the exterior center bottom of the baking chamber right below the
glass door.
C. Once the CRUMB TRAY has been removed wash with hot, soapy
water.
D. DO NOT use any abrasive cleaning products.
E. After cleaning, insert CRUMB TRAY into correct position.
CAUTION
• TO PROTECT COUNTERTOP FROM DAMAGE, THE TOASTER OVEN
MUST BE OPERATED WITH THE CRUMB TRAY IN PLACE, SECURELY
CLOSED AND CLEANED OF EXCESS FOOD.
• NEVER OPERATE YOUR TOASTER OVEN WITH THE GLASS DOOR
OPEN.
• NEVER PUT THE BAKE PAN (OR ANY OTHER ACCESSORY) DIRECTLY
ON THE TOP OF THE LOWER HEATING ELEMENT.
TAKE CARE
• Always leave at least 1” between the top of food and the top heating
elements.
• Remove all plastic and paper from food, TV dinners, etc. before
cooking.
• Always use oven mitts to remove BAKE/DRIP PAN after cooking.
-E12-
COOKING TIME AND TEMPERATURE
FOOD
QUANTITY
Frozen Pizza
2 – 4 Slices
Bacon
Hot Dogs
Hamburgers
Frozen French
Fries
Leftovers
Chicken
TV Dinners
Baked Potato
Pork Chops
COOKING INSTRUCTIONS
Bake on BAKE/DRIP PAN at 450º F
for 15 – 20 minutes.
4 – 6 strips
Bake on BAKE/DRIP PAN at 450º F.
Use timer set to 7 – 12 minutes
according to taste preference.
4 – 8 hot dogs Broil on BAKE/DRIP PAN. Set timer
to 15 minutes and add time
according to taste. Turn hot
dogs often.
Up to 4 pieces Bake on BAKE/DRIP PAN at 450º F for
(1/4 lb. each) 20 minutes.
Fill BAKE PAN Bake in “Stay On” mode for 20
one layer only minutes, then broil for 5 minutes
or more according to taste
preference.
Fill BAKE PAN Bake at 250 – 375º F with timer
one layer only for 15 minutes. Continue
according to taste.
Fill BAKE PAN Bake at 450º F for 35 minutes or
one layer only until juices run clear with the
“Stay On” setting.
Place foil container directly
on WIRE OVEN RACK. Follow
package directions.
1 – 5 potatoes Wash and pierce with a fork. Option
– brush on olive oil. Bake at 450º F
for 60 – 95 minutes with
“Stay On” setting.
Up to 4 chops Place on BAKE/DRIP PAN and broil for
35 min. Turn over at least two times.
-E13-
T0600(428-1018) visual.qxd
10/17/03
9:40 AM
Page 15
COOKING TIME AND TEMPERATURE (CONT.)
NOTE: The recipe guide is for suggestion only. Temperatures may vary
depending on the size and consistency of the food. Frozen food will take
longer to cook than thawed food.
QUESTIONS AND ANSWERS
Q
A
Water Chestnuts Wrapped in Bacon
This is an elegant hors d’euvres anytime of the year
2 cans whole water chestnuts, drained
1 cup brown sugar
1 cup soy sauce
1 lb. bacon
Unit smokes during baking or broil function
Initial start up operation may result in minimal smoke or smell
(about 15 minutes). This is normal and due to the protective
substance on the heating elements which protects them from salt
effects during shipping.
Soak water chestnuts in soy sauce several hours or overnight. Unwrap
bacon and cut each strip into 2 to 3 pieces. Roll in brown sugar and wrap
with bacon. Secure with toothpicks. Broil until bacon is crispy and serve
immediately. Makes approximately 40 pieces.
Smoke in baking function often means the BAKE PAN or interior of
oven is dirty. Clean per instructions.
1 whole bulb garlic, peeled
and coarsely chopped
1 T. sugar, salt and pepper
Salt and pepper to taste
Smoke almost always appears in broiling and is normal. Cut off
excess fat prior to broiling to reduce smoking.
Stop using the appliance if smoke source is the power cord.
Unplug immediately.
Q
A
RECIPES
Toast is black and smoking or too light.
Choose lighter or darker toast setting.
Tomato, Basil and Garlic Sauce
1 1/2 T. extra virgin olive oil
1 28 ounce can plum tomatoes, chopped
1 bunch fresh basil, torn
Saute garlic in extra virgin olive oil for 2 minutes on medium heat until
fragrant. Do not let garlic burn. Add chopped tomatoes and sugar and
season with salt and pepper. Turn up heat and cook until sugar is dissolved
and flavors are incorporated, 2-5 minutes. Remove from heat and season
with salt and pepper and add in torn basil.
Quiche Lorraine
Serve with fresh fruit salad for a simple, elegant brunch.
1 recipe of pate brisee, blind baked
in 9 inch round quiche dish or
deep dish pie pan.
1 cup Gruyere, Jarlsberg or Swiss cheese
pinch freshly grated nutmeg
salt and pepper
4 eggs
1 cup light cream
1 cup ham or pancetta, diced and sautéed
Preheat toaster oven to 400° F. Beat eggs and add cream. Stir well to blend.
Season with nutmeg, salt and pepper. Sprinkle ham and cheese on bottom
of dish and pour egg custard on top. Cook in oven for approximately 45
minutes or until custard is set. Serves 8.
-E14-
-E15-
T0600(428-1018) visual.qxd
10/17/03
9:40 AM
Page 17
RECIPES
RECIPES
Honey Mustard Chicken with Spicy Pecan Cornflake Crust
Fussy kids love this lowfat entrée.
Broiled Salmon with Lemon and Dill
Cover recipe
1/2 cup Dijon mustard
4 skinless, boneless chicken breasts
1 small box cornflakes
pulsed in food processor until flakes
are crumbs
4 6-oz. salmon fillets, skinned,
approximately 1 inch thick
1 lemon
Cooking spray
1/2 cup honey
1 tsp. cayenne pepper
1/2 cup chopped pecans
Nonstick pan spray
Olive oil for drizzling
Mix the mustard and honey together in a shallow bowl. Thoroughly coat
the chicken breasts on both sides. Combine cayenne pepper, cornflakes
and pecans in another shallow bowl. Coat chicken with flake mixture.
Spray baking pan with nonstick spray and place breasts in pan. Drizzle top
with olive oil. Bake at 375°F for 30-40 minutes or until chicken reaches
internal temperature of 180°F. 4 Servings
Broiled Salmon with Balsamic, Orange Glaze
This intensely flavored dish is a healthy, lowfat choice.
1/2 cup balsamic vinegar
1/2 cup orange juice
4 6-oz. salmon fillets, skinned,
approximately 1 inch thick
Cooking spray
1/2 cup good dry white wine
3 T. brown sugar
Salt and pepper
3 T. chopped scallions
Place first 4 ingredients in sauce pan on medium high heat and cook until
reduced by half and mixture resembles a syrupy glaze.
Place seasoned salmon in baking pan coated with cooking spray. Broil
approximately 6 minutes per side or until fish is no longer translucent in
center. Pour glaze over plated salmon and garnish with scallions.
4 Servings.
-E16-
Salt and pepper
4 T. unsalted butter
2-3 T. chopped fresh dill
Place seasoned salmon fillets in baking pan coated with cooking spray.
Dot with butter. Broil approximately 6 minutes per side with rack set in
highest position until fish is no longer translucent in center. Cut lemon into
wedges and garnish with fresh dill.
Roasted Shrimp with Marjoram, Artichoke, Lemon and Feta Salad
Look for shrimp that are not pre-shelled and deveined which can lead to
an ammonia flavor. The fresh taste of the sea will be much more evident
if they are cleaned just prior to use. A great Valentine’s Day recipe,
marjoram is the herb of love.
2 large steamed artichoke hearts,
leaves removed, cleaned and diced
1/2 large red onion, finely diced
1/3 cup extra virgin olive oil
1 lb. large shrimp, peeled and
deveined and sliced in half, lengthwise
Mesclun lettuce mix for four
2 lemon, zested and juiced
1/4 fennel bulb, grated
2 T. marjoram, chopped
salt and pepper
olive oil
1 4 oz. package feta cheese
Prepare dressing: Add first 6 ingredients. Season well with salt and
pepper. Preheat oven to 450°F. Brush shrimp with olive oil and place shrimp
in toaster oven. Roast shrimp on each side for approximately 3 minutes. Top
salad greens with shrimp, crumbled feta and dressing. Serves 4.
-E17-
T0600(428-1018) visual.qxd
10/17/03
9:40 AM
Page 19
RECIPES
RECIPES
Roasted Turkey Breast with Aromatic Vegetables
Serve with roasted, herbed red bliss potatoes. Your kitchen will smell
fantastic!
cheese in mixer until light and smooth. Add sugar and beat for 1 minute.
Add eggs one at a time, incorporating completely each time. Add lemon
juice and vanilla. Blend well. Pour on top of crust. Place in toaster oven. Cook
for approximately 1 hour, ensuring a slight jiggle left to cheesecake in center.
Blend sour cream, sugar and vanilla and smooth over cheesecake center,
leaving _ inch around edge without topping. Cook for an additional 5
minutes to set sour cream topping. Cool and chill overnight in refrigerator.
Serves 12.
1 large turkey breast
1 sprig parsley, sage, rosemary
and thyme
3 stalks celery, cut into 1/4 inch dice
chili powder
1-2 cups chicken broth
2 cloves garlic, peeled
1 small onion, cut into 1/4 inch dice
3 small carrots, cut into 1/4 inch dice
1 lemon, halved
Kosher salt and pepper
Preheat toaster oven to 450°F. Sprinkle vegetables in bottom of an 11 inch
baking pan with 1 1/2 - 2 inches sides and top with turkey breast. Tuck garlic
and herbs under breast. Squeeze lemon on top of turkey and season with
chili powder, salt and pepper. Cook for 25 minutes. Reduce oven temperature
to 325°F and pour broth into bottom of pan Continue cooking until turkey
juices run clear and it reaches internal temperature of 180°F.
Cheesecake
A classic family holiday favorite.
For crust:
20 full sized, finely crushed
graham crackers
2/3 cup butter, melted
1/4 cup finely chopped walnuts (optional)
For cheesecake:
4 8-ounces packages cream cheese,
room temperature
1 lemon, juiced
For topping:
1 pint sour cream
1 1/2 teaspoon. vanilla
1 cup sugar
4 eggs
1 teaspoon vanilla
1/2 cup sugar
Death By Chocolate Brownies
These quick and easy brownies are incredibly fudgy and rich. The better
the chocolate, the better the brownies.
12 oz. bittersweet chocolate, chopped
1 cup sugar
5 large eggs
1/2 cup rum or espresso
2 sticks (1/2 lb.) butter, softened
1 1/2 T. flour
Preheat toaster oven to 350°F. Prepare 9 inch bake pan by lightly buttering
the bottom. Cut parchment to fit into bottom of pan and butter parchment.
Lightly dust with flour and tap out excess. Place chopped chocolate in bowl
of a food processor fitted with steel blade. Place rum and sugar in small
saucepan and heat on high until sugar is dissolved. Pour hot sugar syrup on
top of chocolate and process until chocolate is smooth and melted. With
processor running, add butter into chocolate, one tablespoon at a time.
Add eggs, one at a time and process until completely incorporated. Add
flour and pulse until mixed in. Do not overprocess. Batter should be glossy
and smooth. Pour into prepared pan and cook for 30 minutes. Let cool and
place in refrigerator overnight. Invert cake, remove parchment and invert
again. With hot clean knife, cut brownies to desired size. Makes
approximately 45 1 inch brownies.
Preheat toaster oven to 350°F. Lightly butter a 9 inch springform pan. Add
walnuts and melted butter to crushed graham crackers and blend with a
fork. Press mixture into bottom of pan and up the side of the pan 1 inch.
Place pan in toaster oven and cook for 5 minutes to set crust. Whip cream
-E18-
-E19-
T0600(428-1018) visual.qxd
10/17/03
9:40 AM
Page 21
RECIPES
NOTES
Plum Torte
Great for breakfast or dessert.
1 cup sugar
2 eggs
1 tsp. baking powder
12 prune plums, halved and pitted
1/3 cup sugar
1 stick butter, softened
1 cup flour
1 tsp. salt
1/2 lemon
2 T. cinnamon
Butter and flour 9 inch springform pan. With mixer, cream together sugar
and butter until light and fluffy. Add eggs, one at a time. In separate bowl,
combine flour, baking powder and salt. Add to mixer and blend until just
incorporated. Spread evenly in prepared pan. Starting on the outer rim,
place plums, center cut down, on top of batter. Continue placing plums
halves through middle and center. Squeeze lemon juice on top of cake.
Mix sugar and cinnamon together and sprinkle on top of cake generously.
Bake 1 hour until puffed and golden brown. Let cool on rack. Remove pan
band and serve. Serves 8-10.
Coconut Raspberry Bars
1 package or 8 whole graham crackers
3/4 cups flour
1 egg, lightly beaten
1/2 cup sugar
1/2 stick butter, softened
1/2 stick butter cut into several pieces
1/2 cup sugar
1 1/4 cups seedless raspberry jam
1 egg
1 7 oz. bag flaked, sweetened coconut
Preheat oven to 350°F for 15 minutes. Lightly grease 8 1/2 inch square
bake pan. Place broken graham crackers into bowl of food processor and
process until finely ground. Add butter and process until fully
incorporated. Add flour and sugar and pulse until combined completely.
Add egg and pulse until fully incorporated. Press into bottom of pan.
Spread jam evenly across crust. Combine butter and sugar in mixing bowl
and beat until light and fluffy. Add egg and beat until fully incorporated.
Add coconut. Drop large spoonfuls across jam and spread out across
filling. Bake for 30-35 minutes, until coconut is golden brown. Let cool
and chill for at least one hour before cutting.
-E20-
-E21-