1
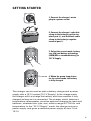
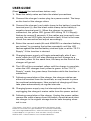
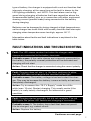
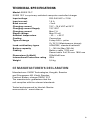
USER GUIDE
12 V Lead acid batteries 1-150 Ah
GB
1
Thank you for choosing this
charger from Exide Technologies
Your new battery charger will enable you to keep your battery
fully charged and will optimize performance and service life. This
charger has been developed to be user-friendly, and contains the
latest in charging technology.
The unit can be stored in its packaging so that you protect the
charger, keep cables tidy, keep the user guide safe, and at the
same time protect the environment. Discarded packaging can be
recycled.
Read the safety instructions and user guide carefully. If you follow
the instructions, you will benefit from a high-performance charger
that will give excellent service for many years to come.
For more information about Exide and our products, please visit:
www.exide.nu www.tudor.se
Best regards
Exide Technologies
2
GETTING STARTED
1. Connect the charger’s mains
plug to a power socket.
2. Connect the charger’s red cable
clamp to the battery’s positive terminal post (+), and the black cable
clamp to the battery’s negative
terminal post (-).
13,7V
Supply
Standard
AGM/GEL
1-19Ah
20-59Ah
13,7V
Supply
20-59Ah
60-150Ah
AGM/GEL
1-19Ah
Standard
3. Select the correct mode, battery
size (Ah) and battery technology
(AGM/GEL or standard battery), or
13.7 V Supply.
MP
60-150Ah
4. When the green lamp shines
for the select mode, the battery
is fully charged.
MP
This charger can be used as both a battery charger and a power
supply with a 13.7 V output (13.7 V Supply). In the charge mode,
the charger will first charge the battery, and then maintain it fully
charged as long as it is connected. The charger, which features a
temperature compensator, provides optimum charging for lead-acid
batteries, whatever their type, size, within a range of 1-150 Ah, and
temperature. In the “13.7 V Supply” mode, the charger acts as a
power supply, and gives a continual power supply of max 7 A at
13.7 V.
3
User guide
(Read through the instructions before use):
1. Read the safety notes and take the stated precautions.
2. Connect the charger’s mains plug to a power socket. The lamp
on the front of the charger shine.
3. Connect the charger’s red cable clamp to the battery’s positive
terminal post (+), and the black cable clamp to the battery’s
negative terminal post (-). When the charger is correctly
connected, the yellow LED (green LED during 13.7 V Supply)
flashes for around 3 seconds. If the cables are incorrectly connected, the red LED lights to indicate a fault. If that is the case,
check the connection and adjust accordingly.
4. Select the correct mode (Ah and AGM/GEL or standard battery,
see below)* by pressing the button repeatedly until the LED
flashes against the desired battery size and type, or at the “13.7 V
Supply” if this function is desired.
5. Charging/power supply will begin automatically after 3 seconds, when the LED will stop flashing and will change to a
constant yellow. At the same time, the lamp on the front of the
charger will go out.
6. The LED will be a constant yellow until the charge is complete,
when the LED changes from yellow to green. In the “13.7 V
Supply” mode, the green lamp illuminates while the function is
connected.
7. Following completion of the charge, the charger cables can
either be removed from the terminals, or may remain in place
for continual maintenance. New periods of charging will then
take place automatically at regular intervals.
8. Charging/power supply may be interrupted at any time, by
unplugging the charger’s mains cable from the power socket.
9. Following completion of the charge. Unplug the power cables,
remove the cable clamps from the battery terminals and store
the charger in its original storage box for safe-keeping when
not in use.
*The battery size (Ah) is usually printed on the battery itself.
Batteries are either of type AGM/GEL or standard. AGM/GEL
are valve-regulated batteries, where the electrolyte (the acid)
is absorbed or is in gel form, and are often clearly marked
AGM or GEL. Other batteries are standard batteries.
4
Safety notes
• The charger has been constructed to charge 12 V lead acid
batteries or to act as a power supply for 12 V equipment. Do
not use the charger for other purposes.
• Do not use the charger if its cables, terminal clamps or casing
are damaged.
• Batteries emit explosive gases while they are charging. It is,
therefore, important to ensure good ventilation and avoid
sparks and naked flames in the vicinity of the battery.
• Use protective eyewear when working with batteries.
• Battery acid (electrolyte) is corrosive. If eyes or skin come into
contact with the acid, rinse immediately with copious amounts
of water, and contact a doctor immediately.
• Never charge a frozen battery.
• Never position the charger above the battery during charging.
• Do not cover the charger.
• Note that in the “13.7 V Supply” mode the charger provides a
constant output voltage of 13.7 V that in certain circumstances
may cause sparking. Be very careful with polarity when using
the unit as a power supply. Fix the clamps onto the battery
poles before plugging the unit into the mains supply. Also
remember when using the power supply function that you must
unplug the unit from the mains before removing the terminal
clamps from the battery.
• This charger is protected against overheating. If the ambient
temperature is too high, the charging current is reduced.
• During the charge, the charger may intermittently provide a
15.5 V charge voltage. Ensure that no equipment that may be
damaged by this voltage level is connected to the battery during charging.
The product is not suitable for use by persons who lack knowledge
or experience, unless they are supervised by, or have received
information about how to use the product from a person who is
responsible for their safety.
Do not allow children to play with any part of this product.
5
Description of functions
The charger is fully automatic and programmed for advanced
charging of lead-acid batteries between 1 and 150 Ah. The
integrated safety functions that are intended to limit overcharging
could interrupt the charge process when charging larger batteries.
This applies especially when charging batteries that are larger than
approx. 180 Ah.
The unit can be used both as a battery charger and power supply.
The power supply is activated by selecting 13.7 V Supply, which
provides a constant 13.7 V voltage at max. 7 A. The mode is also
used for maintenance charging 12 V batteries.
This product is equipped with a temperature compensator,
because temperature is highly significant for batteries’ ability to
receive charge. The thermal sensor is integrated in one of the
terminal clamps. Thanks to our temperature compensation, the
common problems involved in insufficient charging in cold weather
and overcharging at high temperatures are eliminated.
The charging curve is shown on the accompanying diagram,
which shows how the charge is split into five different steps
that are adapted to the battery type and size.
I (A)
U (V)
STEP
1
STEP
2
STEP
3
Ampere (A) standard battery (wet flooded)
Ampere (A) AGM/GEL battery
STEP
4
STEP
5
(h)
Volt (V) standard battery (wet flooded)
Volt (V) AGM/GEL battery
The charger must be connected to the battery as described in
‘getting started’. After it is connected, it will charge the battery and
maintain it fully charged as long as it is connected to the mains
power. In order to minimise the risk of overcharging an incorrect
Continues on next page.
6
type of battery, the charger is equipped with a cut-out function that
interrupts charging, at the same time as the fault is shown by the
LED lighting constantly red. NOTE: This fault alarm can be triggered during charging of batteries that have capacities above the
recommended battery size, or in connection with other equipment
drawing current (parallel loads) being connected to the battery
during charging.
Batteries can be damaged by being charged at high temperatures,
so the charger has been fitted with a safety function that interrupts
charging when temperatures are too high, approx. 50 °C.
Information about faults and fault indications is explained in the
table below.
Fault indications and troubleshooting
1.
Fault: The LED shows constant red when the charger cable
clamps are connected to the battery terminals.
Probable cause: If the cable clamps are incorrectly connected to
the battery, the polarity reversal protection will be activated and
charging will not start.
Action: Check that the charger is connected using the correct polarity.
2.
Fault: Charging does not start, i.e. the lamp continues to shine,
and the LED does not change to the constant yellow light.
Probable cause: The battery voltage is too low to start the charger. This may be because the battery is worn or faulty or has been
completely discharged.
Action: Try to connect the “13.7 V Supply” mode for a little
while (max. 10 min). Restart charging. This usually works if the
battery is really heavily discharged, but otherwise in good
condition.
3.
Fault: Charging started normally, but did not complete. The red
LED lights, the yellow LED flashes and charging is terminated.
Probable cause 1: The battery has a fault that does not permit
it to be charged, e.g. a short circuit.
Action: Replace the battery.
Continues on next page.
7
Probable cause 2: Parallel load. If a piece of equipment that drains
current is connected to the battery, there is a risk that the capacity
of the charger is not sufficient to charge the battery within the time
constraints that are built into the charger for safety reasons.
Action: If possible, disconnect the parallel load and repeat charging, or purchase a larger charger suitable for both charge and drain.
Probable cause 3: Battery is too large. The battery is larger than
the recommended size for the charger, which means that the
charge could not be completed within the time constraints that
are built into the battery for safety reasons.
Action: Repeat charging.
Probable cause 4: The high temperature cut-out that monitors the
battery temperature has been triggered. The reason for the high
temperature could be that the battery has an internal fault,
or that the ambient temperature is high.
Action: If charging is carried out at room temperature, the high
temperature is probably caused by a battery fault or wear. The
battery should be replaced. If charging is taking place at a high
ambient temperature, charging may be resumed when the battery
has cooled to room temperature.
4.
Fault: The lamp does not come on when the charger is power
cable plugged into the mains socket.
Probable cause: No power in mains socket. Lamp blown.
Maintenance/Accessories
The charger is fully maintenance-free. Note that there are no
user-serviceable parts, and opening the charger will invalidate the
warranty. If the mains cable is damaged it must be replaced by
the retailer. Do not use the charger if its cables, terminal clamps
or casing are damaged. The case may be cleaned using a soft,
damp rag and a mild detergent. The charger must be disconnected
from the mains when being cleaned. The charger is supplied with
terminal clamps on each cable. Connecting cables with ring cable
connectors for permanent fixture is enclosed in the box.
8
Technical specifications
Model: EXIDE 12/7
EXIDE 12/7 is a primary-switched computer-controlled charger
Input voltage Input current Back current Charging current Charging current Supply Charging current Ripple voltage Ambient temperature Cooling
Type of charge Lead-acid battery types Battery capacity Cabling
220-240 VAC +/-10%
1,5 A
≤1mA
13,7 – 15,5 VDC at 25ºC
13,7 VDC
Max 7 A
Max 70 mV
- 40 – + 50ºC
Convection
5 step IUIU + pulse
Or 13,7 V (Maintenance charge)
AGM/GEL, standard batteries
1 – 150 Ah (Max 180 Ah)
Battery cable 1700 mm
Power cable 2x0,75 mm2 1800 mm
Dimensions (LxWxH)
225x50x50 mm
International Protection rating IP54
Weight 0,5 kg
CE Manufacturer’s declaration
Manufacturer: EXIDE Technologies, Kungälv, Sweden
and Primepower AB, Växjö, Sweden
Product: Battery charger EXIDE 12/7
The manufacturer guarantees that the
unit complies with the relevant standards.
Tested and approved by Intertek Semko.
www.exide.nu www.tudor.se
9
Warranty
We guarantee that this product is constructed to the highest
quality specifications, and manufactured to the best industrial
standard. If the product should prove to be faulty or has damage
that can be related to manufacture or distribution, the mandatory
guarantee rights apply.
The guarantee will no longer be valid if the charger has not been
handled correctly, or opened or repaired by any other than Exide
Technologies or its authorized representatives.
Exide Technologies is not responsible for other costs than those
stated above, i.e. no potential consequential costs. Nor is Exide
Technologies liable under any other warranty than this one.
10