1
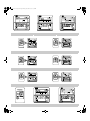
00_3P114261-3M_CV.fm Page 1 Friday, November 7, 2003 6:37 PM
OPERATION MANUAL
System air conditioner
Operation manual
VRVII System air conditioner
English
Manual de operación
Sistema de acondicionador de aire VRVII
Español
Manual de funcionamento
Ar condicionado VRVII System
Portugues
Рóêоводство по эêсплóатации.
Кондиционер системы VRVII.
Russian
Taiwanese
RXY5MY1(E)
RXY8MY1(E)
RXY10MY1(E)
RXY12MY1(E)
RXY14MY1(E)
RXY16MY1(E)
RXY18MY1(E)
RXY20MY1(E)
RXY22MY1(E)
RXY24MY1(E)
RXY26MY1(E)
RXY28MY1(E)
RXY30MY1(E)
RXY32MY1(E)
RXY34MY1(E)
RXY36MY1(E)
RXY38MY1(E)
RXY40MY1(E)
RXY42MY1(E)
RXY44MY1(E)
RXY46MY1(E)
RXY48MY1(E)
RXY5MYL(E)
RXY8MYL(E)
RXY10MYL(E)
RXY12MYL(E)
RXY14MYL(E)
RXY16MYL(E)
RXY18MYL(E)
RXY20MYL(E)
RXY22MYL(E)
RXY24MYL(E)
RXY26MYL(E)
RXY28MYL(E)
RXY30MYL(E)
RXY32MYL(E)
RXY34MYL(E)
RXY36MYL(E)
RXY38MYL(E)
RXY40MYL(E)
RXY42MYL(E)
RXY44MYL(E)
RXY46MYL(E)
RXY48MYL(E)
RXY5MTL(E)
RXY8MTL(E)
RXY10MTL(E)
RXY12MTL(E)
RXY14MTL(E)
RXY16MTL(E)
RXY18MTL(E)
RXY20MTL(E)
RXY22MTL(E)
RXY24MTL(E)
RXY26MTL(E)
RXY28MTL(E)
RXY30MTL(E)
RXY32MTL(E)
RXY34MTL(E)
RXY36MTL(E)
RXY38MTL(E)
RXY40MTL(E)
RXY42MTL(E)
RXY44MTL(E)
RXY46MTL(E)
RXY48MTL(E)
We use recycled paper for making this operation manual
Chinese
00_3P114261-3M_CV.fm Page 2 Friday, November 7, 2003 6:37 PM
Thank you for purchasing this Daikin air
conditioner. Carefully read this operation
manual before using the air conditioner. It
will tell you how to use the unit properly
and help you if any trouble occurs. After
reading the manual, file it away for future
reference.
Gracias por haber adquirido este acondicionador de aire Daikin. Lea con atención
este manual antes de utilizar el artefacto.
El manual explica cómo usar la unidad
correctamente y lo ayuda en caso de que
surjan problemas. Después de leerlo,
guárdelo para referencia futura.
Muito obrigado por ter adquirido este
aparelho de ar condicionado Daikin. Antes
de utilizar o aparelho, leia atentamente o
presente manual de funcionamento. Nele
obterá informações sobre o modo de utilizar correctamente o aparelho e ajuda na
eventualidade de ocorrência de problemas. Depois de ler o manual, guarde-o
para consultas futuras.
Спасибо за поêóпêó данноãо
êондиционера фирмы Daikin. До
начала работы с êондиционером
внимательно изóчите данное
рóêоводство по эêсплóатации. В нем
излаãаются правила надлежащеãо
пользования óстройством и
приводятся реêомендации
пользователю по поисêó и óстранению
неисправностей. После изóчения
рóêоводства сохраните еãо для
обращений в бóдóщем.
00_3P114261-3M_CV.fm Page 3 Friday, November 7, 2003 6:37 PM
1
RXY
3
4
2
2
4
5
00_3P114261-3M_CV.fm Page 4 Friday, November 7, 2003 6:37 PM
5
7.1
7.2
7.3
8
6
6
00_3P114261-3M_CV.fm Page 5 Friday, November 7, 2003 6:37 PM
9
10
10
11
Double-flow Multi-flow
Ceiling Suspended
Wall Mounted
12
14
13
Corner
01_3P114261-3M_EN.fm Page 1 Thursday, November 6, 2003 7:23 PM
RXY5MY1(E)
RXY8MY1(E)
RXY10MY1(E)
RXY12MY1(E)
RXY14MY1(E)
RXY16MY1(E)
RXY18MY1(E)
RXY20MY1(E)
RXY22MY1(E)
RXY24MY1(E)
RXY26MY1(E)
RXY28MY1(E)
RXY30MY1(E)
RXY32MY1(E)
RXY34MY1(E)
RXY36MY1(E)
RXY38MY1(E)
RXY40MY1(E)
RXY42MY1(E)
RXY44MY1(E)
RXY46MY1(E)
RXY48MY1(E)
RXY5MYL(E)
RXY8MYL(E)
RXY10MYL(E)
RXY12MYL(E)
RXY14MYL(E)
RXY16MYL(E)
RXY18MYL(E)
RXY20MYL(E)
RXY22MYL(E)
RXY24MYL(E)
RXY26MYL(E)
RXY28MYL(E)
RXY30MYL(E)
RXY32MYL(E)
RXY34MYL(E)
RXY36MYL(E)
CONTENTS
1. SAFETY CAUTIONS....................................... 1
2. WHAT TO DO BEFORE OPERATION ............ 2
3. REMOTE CONTROLLER AND
CHANGEOVER SWITCH: NAME AND
FUNCTION OF EACH SWITCH AND
DISPLAY ......................................................... 3
4. WARNING ....................................................... 4
5. OPERATION RANGE...................................... 4
6. OPERATION PROCEDURE ........................... 4
7. OPTIMUM OPERATION ................................. 7
8. FOLLOWING SYMPTOMS ARE NOT AIR
CONDITIONER TROUBLES........................... 7
9. TROUBLE SHOOTING ................................... 9
1. SAFETY CAUTIONS
Read the following cautions carefully and
use your equipment properly.
There are three kinds of safety cautions and tips
listed here as follows:
WARNING ....... Improper handling can lead to
such serious consequences as
death or severe injury.
CAUTION ........ Improper handling can lead to
injury or damage. It could also
have serious consequences
under certain conditions.
NOTE
• These instructions will ensure proper use of the
equipment.
Be sure to follow these important safety cautions.
Keep these warning sheets handy so that you
can refer to them if needed.
Also, if this equipment is transferred to a new user,
make sure to hand over this user’s manual to the
new user.
WARNING
It is not good for your health to expose your
body to the air flow for a long time.
In order to avoid electric shock, fire or injury,
or if you detect any abnormality such as smell
of fire, turn off power and call your dealer for
instructions.
1
RXY38MYL(E)
RXY40MYL(E)
RXY42MYL(E)
RXY44MYL(E)
RXY46MYL(E)
RXY48MYL(E)
RXY5MTL(E)
RXY8MTL(E)
RXY10MTL(E)
RXY12MTL(E)
RXY14MTL(E)
RXY16MTL(E)
RXY18MTL(E)
RXY20MTL(E)
RXY22MTL(E)
RXY24MTL(E)
RXY26MTL(E)
RXY28MTL(E)
RXY30MTL(E)
RXY32MTL(E)
RXY34MTL(E)
RXY36MTL(E)
RXY38MTL(E)
RXY40MTL(E)
RXY42MTL(E)
RXY44MTL(E)
RXY46MTL(E)
RXY48MTL(E)
VRVII System
air conditioner
Operation
manual
Ask your dealer for installation of the air conditioner.
Incomplete installation performed by yourself may
result in a water leakage, electric shock, and fire.
Ask your dealer for improvement, repair, and
maintenance.
Incomplete improvement, repair, and maintenance
may result in a water leakage, electric shock, and
fire.
Do not put a finger, a rod or other objects into
the air inlet or outlet. As the fan is rotating at
high speed, it will cause injury.
The refrigerant in the air conditioner is safe
and normally does not leak. If the refrigerant
leaks inside the room, the contact with a fire of
a burner, a heater or a cooker may result in a
harmful gas.
Do not use the air conditioner until when a service
person confirms to finish repairing the portion
where the refrigerant leaks.
For refrigerant leakage, consult your dealer.
When the air conditioner is to be installed in a
small room, it is necessary to take proper measures so that the amount of any leaked refrigerant
does not exceed the limiting concentration even
when it leaks. If the refrigerant leaks exceeding the
level of limiting concentration, an oxygen deficiency accident may happen.
Improper installation or attachment of equipment or accessories could result in electric
shock, short-circuit, leaks, fire or other damage to the equipment. Be sure only to use
accessories made by Daikin which are specifically designed for use with the equipment and
have them installed by a professional.
Ask your dealer to move and reinstall the air
conditioner.
Incomplete installation may result in a water leakage, electric shock, and fire.
In order to avoid electric shock, fire, injury or
damaging the unit, do not use improper
ampere fuses or do not use copper nor steel
wires instead.
CAUTION
Do not use the air conditioner for other purposes.
In order to avoid any quality deterioration, do not
use the unit for cooling precision instruments,
food, plants, animals or works of art.
In order to avoid injury, do not remove the fan
guard.
English
01_3P114261-3M_EN.fm Page 2 Thursday, November 6, 2003 7:23 PM
To avoid oxygen deficiency, ventilate the room
sufficiently if equipment with burner is used
together with the air conditioner.
After a long use, check the unit stand and fitting for damage.
If they are left in a damaged condition, the unit
may fall and result in injury.
Neither place a flammable spray bottle near
the air conditioner nor perform spraying.
Doing so may result in a fire.
Before cleaning, be sure to stop the operation,
turn the breaker off or pull out the supply cord.
Otherwise, an electric shock and injury may result.
Do not operate the air conditioner with a wet
hand.
An electric shock may result.
Do not place items under the indoor unit which
may be damaged by water.
Condensation may form if the humidity is above
80% or if the drain outlet gets blocked.
Do not place appliances which produce open
fire in places exposed to the air flow from the
unit or under the indoor unit. It may cause
incomplete combustion or deformation of the
unit due to the heat.
Do not allow a child to mount on the outdoor
unit or avoid placing any object on it.
Falling or tumbling may result in injury.
Never expose little children, plants or animals
directly to the air flow.
Adverse influence to little children, animals and
plants may result.
Do not wash the air conditioner with excessive
water.
Electric shock or fire may result.
Do not install the air conditioner at any place
where flammable gas may leak out.
If the gas leaks out and stays around the air conditioner, a fire may break out.
In order to avoid electric shock or fire, make
sure that an earth leakage breaker is installed.
Be sure the air conditioner is electrically earthed.
In order to avoid electric shock, make sure that the
unit is grounded and that the earth wire is not connected to gas or water pipe, lightning conductor or
telephone earth wire.
Arrange the drain hose to ensure smooth
drainage. Incomplete drainage may cause wetting of the building, furniture etc.
Do not place the controller exposed to direct
sunlight.
The LCD display may get discolored, failing to display the data.
Do not wipe the controller operation panel with
benzine, thinner, chemical dustcloth, etc.
The panel may get discolored or the coating
peeled off. If it is heavily dirty, soak a cloth in
water-diluted neutral detergent, squeeze it well
and wipe the panel clean. And wipe it with another
dry cloth.
Never touch the internal parts of the controller.
Do not remove the front panel. Some parts inside
are dangerous to touch, and a machine trouble
may happen. For checking and adjusting the internal parts, contact your dealer.
Avoid placing the controller in a spot splashed
with water.
Water coming inside the machine may cause an
electric leak or may damage the internal electronic
parts.
Never press the button of the remote controller
with a hard, pointed object.
The remote controller may be damaged.
Never pull or twist the electric wire of a remote
controller.
It may cause the unit to malfunction.
Do not operate the air conditioner when using
a room fumigation - type insecticide.
Failure to observe could cause the chemicals to
become deposited in the unit, which could endanger the health of those who are hypersensitive to
chemicals.
The appliance is not intended for use by young
children or infirm persons without supervision.
Young children should be supervised to ensure
that they do not play with the appliance.
2. WHAT TO DO BEFORE OPERATION
This operation manual is for the following systems
with standard control. Before initiating operation,
contact your Daikin dealer for the operation that corresponds to your system type and mark.
If your installation has a customized control system,
ask your Daikin dealer for the operation that corresponds to your system.
Outdoor units (Refer to figure 1)
Do not let children play on and around the outdoor unit.
If they touch the unit carelessly, it may result in injury.
Do not place a flower vase and anything containing water.
Water may enter the unit, causing an electric
shock or fire.
English
Cool/heat
changeover remote
control switch
Operation modes
Inverter series
heat pumps RXY series
❏ yes ❏ no
2
01_3P114261-3M_EN.fm Page 3 Thursday, November 6, 2003 7:23 PM
• Names and functions of parts (Refer to figure 1)
1. Outdoor unit
2. Indoor unit
3. Remote controller
4. Inlet air
5. Outlet air
6. Cool/heat changeover remote control switch
(figure 1 shows systems with changeover remote
control switches)
3. REMOTE CONTROLLER AND
CHANGEOVER SWITCH: NAME
AND FUNCTION OF EACH
SWITCH AND DISPLAY
(Refer to figure 2 and 3)
1. On/off button
Press the button and the system will start. Press
the button again and the system will stop.
2. Operation lamp (red)
The lamp lights up during operation.
3. Display “
” (changeover under control)
It is impossible to changeover heat/cool with the
remote controller when this icon is displayed.
4. Display “
” (air flow flap)
Refer to the chapter “Operation procedure Adjusting the air flow direction”.
5. Display “
” (ventilation/air cleaning)
This display shows that the total heat exchange
and the air cleaning unit are in operation. (these
are optional accessories)
6. Display “
C ” (set temperature)
This display shows the temperature you have set.
7. Display “
”“
”“
”“
” (operation
mode)
This display shows the current operation mode.
8. Display “ ” (programmed time)
This display shows the programmed time of the
system start or stop.
9. Display “
TEST ” (inspection/test operation)
When the inspection/test operation button is
pressed, the display shows the mode in which
the system actually is.
10. Display “
” (under centralized control)
When this display shows, the system is under
centralized control. (This is not a standard specification.)
11. Display “
” (fan speed)
This display shows the fan speed you have
selected.
13. Display “
” (defrost/hot start)
Refer to the chapter “Operation procedure Explanation of heating operation.”
14. Timer mode start/stop button
Refer to the chapter “Operation procedure Programming start and stop of the system with
timer.”
15. Timer on/off button
Refer to the chapter “Operation procedure Programming start and stop of the system with
timer.”
16. Inspection/test operation button
This button is only used by qualified service
persons for maintenance purposes.
17. Programming time button
Use this button for programming start and/or stop
time.
18. Temperature setting button
Use this button for setting the desired temperature.
19. Filter sign reset button
Refer to the indoor unit manual.
20. Fan speed control button
Press this button to select the fan speed of your
preference.
21. Operation mode selector button
Press this button to select the operation mode of
your preference.
22. Air flow direction adjust button
Refer to the chapter “Operation procedure Adjusting the air flow direction”.
23. Fan only/air conditioning selector switch
Set the switch to “
” for fan only operation or to
“
” for heating or cooling operation.
24. Cool/heat changeover switch
Set the switch to “
” for cooling or to “
heating operation.
” for
NOTE
• In contradistinction to actual operating situations,
the display on figure 1 shows all possible indications.
• If the filter sign lamp lights up, clean the air filter as
explained in the indoor unit manual. After cleaning
and reinstalling the air filter: press the filter sign
reset button on the remote controller. The filter
sign lamp on the display will go out.
• The remote controller BRC1A52
(for FXS, FXM, FXL, FXN) does not have the display air flow flap (4) nor the air flow direction
adjust button (22).
12. Display “
” (time to clean air filter)
Refer to the indoor unit manual.
3
English
01_3P114261-3M_EN.fm Page 4 Thursday, November 6, 2003 7:23 PM
4. WARNING
** –20°~–15°CWB: Range for operation
–15°~15.5°CWB: Range for continuous operation
4-1 NEVER DO THE FOLLOWING
• Never let the indoor unit or the remote controller get wet.
Do not wash the outdoor unit with water.
It may cause an electric shock or a fire.
*To avoid condensation and water dripping out the
unit.
If the temperature or the humidity is beyond these
conditions, safety devices may work and the air conditioner may not operate.
• Never use flammable spray such as hair spray,
lacquer or paint near the unit.
It may cause a fire.
6. OPERATION PROCEDURE
• Never touch the air outlet or the horizontal
blades while the swing flap is in operation.
Fingers may become caught or the unit may break
down.
• Never replace a fuse with that of wrong
ampere ratings or other wires when a fuse
blows out.
Use of wire or copper wire may cause the unit to
break down or cause a fire.
• Never put any objects into the air inlet or outlet.
Objects touching the fan at high operating speed
can be dangerous.
• Never remove the fan guard of the outdoor
unit.
A fan rotating at high speed without the fan guard
is very dangerous.
• Never press the button of the remote controller with a hard, pointed object.
The remote controller may be damaged.
• Never pull or twist the electric wire of the
remote controller.
It may cause the unit to malfunction.
• Never inspect or service the unit by yourself.
Ask a qualified service person to perform this work.
• To prevent refrigerant leak, contact your
Daikin dealer.
When the system is installed and run in a small
room, it is required to keep the concentration of
the refrigerant, if by and chance coming out, bellow the limit. Otherwise, oxygen in the room may
be affected, resulting in a serious accident.
• Cut off all electric waves before servicing.
5. OPERATION RANGE
Use the system in the following temperature and
humidity ranges for safe and effective operation.
COOLING
outdoor temperature
HEATING
–5°~43°CDB
–20°~21°CDB**
–20°~15.5°CWB**
indoor temperature
21°~32°CDB
15°~27°CDB
14°~25°CWB
indoor humidity
English
≤ 80%*
• Operation procedure varies according to the combination of outdoor unit and remote controller.
Read the chapter “What to do before operation”.
• To protect the unit, turn on the main power switch
6 hours before operation.
• If the main power supply is turned off during operation, operation will restart automatically after the
power turns back on again.
6-1 COOLING, HEATING, AND FAN ONLY
OPERATION
(Refer to figure 4 and 7)
• Changeover cannot be made with a remote controller whose display shows “
”
(changeover under control).
• When the display “
” (changeover under
control) flashes, refer to the chapter “Operation
procedure - Setting the master remote controller”.
• The fan may keep on running for about 1 minute
after the heating operation stops.
• The air flow rate may adjust itself depending on
the room temperature or the fan may stop immediately. This is not a malfunction.
FOR SYSTEMS WITHOUT COOL/HEAT
CHANGEOVER REMOTE CONTROL SWITCH
(Refer to figure 4)
Press the operation mode selector button several times and select the operation mode of
your choice;
1
“
“
“
2
” Cooling operation
” Heating operation
” Fan only operation
Press the on/off button.
The operation lamp lights up and the system
starts operation.
FOR SYSTEMS WITH COOL/HEAT
CHANGEOVER REMOTE CONTROL SWITCH
(Refer to figure 7)
1
Select operation mode with the cool/heat
changeover remote control switch as follows:
“
“
“
”“
”“
”“
” Cooling operation (Refer to figure 7.1)
” Heating operation (Refer to figure 7.2)
” Fan only operation (Refer to figure 7.3)
4
01_3P114261-3M_EN.fm Page 5 Thursday, November 6, 2003 7:23 PM
2
Press the on/off button.
The operation lamp lights up and the system
starts operation.
6-2 PROGRAM DRY OPERATION
• The function of this program is to decrease
the humidity in your room with a minimum
temperature decrease.
• The micro computer automatically determines temperature and fan speed.
• The system does not go into operation if the
room temperature is low.
Adjustment
For programming temperature, fan speed and
air flow direction (only for the remote controller
BRC1A51: FXC, FXF, FXH, FXK, FXA), follow
the procedure shown below.
3
Press the temperature setting button and program the desired temperature.
Each time this button is pressed, the temperature setting rises or lowers 1°C.
NOTE
• Set the temperature within the operation
range.
• The temperature setting is impossible for fan
only operation.
4
5
Press the fan speed control button and select
the fan speed of your preference.
1
2
3
Press air flow direction adjust button.
Refer to the chapter “Adjusting the air flow
direction” for details.
Stopping the system
6
FOR SYSTEMS WITHOUT COOL/HEAT
CHANGEOVER REMOTE CONTROL SWITCH
(Refer to figure 5)
EXPLANATION OF HEATING OPERATION
Defrost operation
• In heating operation, freezing of the outdoor
unit coil increases. Heating capability
decreases and the system goes into defrost
operation.
• The indoor unit fan stops and the remote
controller displays “
”.
• After maximum 10 minutes of defrost operation, the system returns to heating operation
again.
Hot start
• In order to prevent cold air from blowing out
of an indoor unit at the start of heating operation, the indoor fan is automatically
stopped. The display of the remote controller
shows “
”.
Press the on/off button
The operation lamp lights up and the system
starts operation.
Press the air flow direction adjust button (only
for FXC, FXF, FXH, FXK, FXA). Refer to the
chapter “Adjusting the air flow direction” for
details.
Stopping the system
4
Press the on/off button once again.
The operation lamp goes off and the system
stops operation.
NOTE
• Do not turn off power immediately after the
unit stops, but wait for at least 5 minutes.
Press the operation mode selector button several times and select “
” ( program dry operation).
Press the on/off button once again.
The operation lamp goes off and the system
stops operation.
NOTE
• Do not turn off power immediately after the
unit stops, but wait for at least 5 minutes.
FOR SYSTEMS WITH COOL/HEAT
CHANGEOVER REMOTE CONTROL SWITCH
(Refer to figure 8)
1
2
3
4
Select cooling operation mode with the cool/
heat changeover remote control switch.
Press the operation mode selector button several times and select program dry “
”.
Press the on/off button
The operation lamp lights up and the system
starts operation.
Press the air flow direction adjust button (only
for FXC, FXF, FXH, FXK, FXA). Refer to the
chapter “Adjusting the air flow direction” for
details.
Stopping the system
5
Press the on/off button once again.
The operation lamp goes off and the system
stops operation.
NOTE
• Do not turn off power immediately after the
unit stops, but wait for at least 5 minutes.
5
English
01_3P114261-3M_EN.fm Page 6 Thursday, November 6, 2003 7:23 PM
6-3 ADJUSTING THE AIR FLOW DIRECTION
(Refer to figure 6) (only for Double-flow,
Multi-flow, Corner, Ceiling-suspended
and Wall-mounted)
1
2
Press the air flow direction button to
select the air direction.
The air flow flap display swings as
shown below and the air flow direction continuously varies. (Automatic
swing setting)
• The timer can be programmed for a maximum of 72 hours.
• The start and the stop time can be simultaneously programmed.
1
2
Press the air flow direction adjust button to select the air direction of your
choice.
The air flow flap display stops swinging and the air flow direction is fixed.
(Fixed air flow direction setting)
MOVEMENT OF THE AIR FLOW FLAP
(Refer to figure 13)
For the following conditions, a micro computer controls the air flow direction which may be different
from the display.
COOLING
HEATING
• When starting operation.
• When the room temperature is
higher than the set temperature.
• At defrost operation.
• When operating continuously at horizontal air flow direction.
• When continuous operation with downward air flow is performed at the
time of cooling with a ceiling-suspended or a wall-mounted unit, the
microcomputer may control the flow direction, and then the remote control
indication also will change.
The air flow direction can be adjusted in one of the
following ways.
• The air flow flap itself adjusts its position.
• The air flow direction can be fixed by the user.
• Automatic “
” and desired position “ ”.
NOTE
• The movable limit of the flap is changeable.
Contact your Daikin dealer for details. (Only
for Double-flow, Multi-flow, Corner, Ceilingsuspended and Wall-mounted.)
• Avoid operating in the horizontal direction
“
”. It may cause dew or dust to settle on
the ceiling.
6-4 PROGRAMMING START AND STOP OF
THE SYSTEM WITH TIMER
(Refer to figure 9)
3
Press the timer mode start/stop button several
times and select the mode on the display.
The display flashes.
• For setting the timer stop “
”
• For setting the timer start “
”
Press the programming time button and set
the time for stopping or starting the system.
Each time this button is pressed, the
time advances or goes backward by 1
hour.
Press the timer on/off button.
The timer setting procedure ends. The display
“
” or “
” changes from flashing
light to constant light.
NOTE
• When setting the timer off and on at the
same time, repeat the above procedure
(from “ 1 ” to “ 3 ”) once again.
• After the timer is programmed, the display
shows the remaining time.
• Press the timer on/off button once again to
cancel programming. The display vanishes.
For example: (Refer to figure 11)
When the timer is programmed to stop the system after 3 hours and start the system after 4
hours, the system will stop after 3 hours and
start 1 hour later.
6-5 SETTING THE MASTER REMOTE CONTROLLER (for RXY series)
(Refer to figure 10)
• When the system is installed as shown in figure
14, it is necessary to designate one of the remote
controllers as the master remote controller.
FOR RXY SERIES (Refer to figure 14)
When one outdoor unit is connected with several
indoor units.
• Only the master remote controller can select
heating or cooling.
• The displays of slave remote controllers show
“
” (changeover under control) and they
automatically follow the operation mode directed
by the master remote controller.
• The timer is operated in the following two ways.
Programming the stop time “
”. The system stops operating after the set time has
elapsed.
Programming the start time “
”. The system starts operating after the set time has
elapsed.
English
6
01_3P114261-3M_EN.fm Page 7 Thursday, November 6, 2003 7:23 PM
However, it is possible to changeover to program dry
with slave remote controllers if the system is in cooling operation set by the master remote controller.
How to designate the master remote controller
1
2
Press the operation mode selector button of
the current master remote controller for 4 seconds.
The display showing “
” (changeover
under control) of all slave remote controllers
connected to the same outdoor unit flashes.
Press the operation mode selector button of
the controller that you wish to designate as the
master remote controller. Then designation is
completed. This remote controller is designated as the master remote controller and the
display showing “
” (changeover
under control) vanishes.
The displays of other remote controllers show
“
” (changeover under control).
6-6 PRECAUTIONS FOR GROUP CONTROL SYSTEM OR TWO REMOTE CONTROLLER CONTROL SYSTEM
This system provides two other control systems
beside individual control (one remote controller controls one indoor unit) system. Confirm the following if
your unit is of the following control system type.
• Group control system
One remote controller controls up to 16 indoor
units. All indoor units are equally set.
• Two remote controller control system
Two remote controllers control one indoor unit (in
case of group control system, one group of indoor
units). The unit is individually operated.
NOTE
• Contact your Daikin dealer in case of changing the combination or setting of group control and two remote controller control
systems.
7. OPTIMUM OPERATION
Observe the following precautions to ensure the
system operates properly.
• Adjust the air outlet properly and avoid direct air
flow to room inhabitants.
• Adjust the room temperature properly for a comfortable environment. Avoid excessive heating or
cooling.
• Prevent direct sunlight from entering a room during cooling operation by using curtains or blinds.
7
• Ventilate often.
Extended use requires special attention to ventilation.
• Keep doors and windows closed. If the doors and
windows remain open, air will flow out of your
room causing a decrease in the cooling or heating
effect.
• Never place objects near the air inlet or the air
outlet of the unit. It may cause deterioration in the
effect or stop the operation.
• Turn off the main power supply switch to the unit
when the unit is not used for longer periods of
time. If the switch is on, it uses electricity. Before
restarting the unit, turn on the main power supply
switch 6 hours before operation to ensure smooth
running. (Refer to the chapter “Maintenance” in
the indoor unit manual.)
• When the display shows “
” (time to clean the
air filter), ask a qualified service person to clean
the filters. (Refer to the chapter “Maintenance” in
the indoor unit manual.)
• Keep the indoor unit and remote control at least
1 m away from televisions, radios, stereos, and
other similar equipment.
Failing to do so may cause static or distorted pictures.
8. FOLLOWING SYMPTOMS ARE
NOT AIR CONDITIONER TROUBLES
8-1 THE SYSTEM DOES NOT OPERATE
• The air conditioner does not start immediately
after the ON/OFF button on the remote controller is pushed.
If the operation lamp lights, the system is in normal condition.
To prevent overloading of the compressor motor,
the air conditioner starts 5 minutes after it is
turned ON again in case it was turned OFF just
before. The same starting delay occurs after the
operation mode selector button was used.
• If “Centralized Control” is displayed on the
remote control and pressing the operation
button causes the display to blink for a few
seconds.
This indicates that the central device is controlling
the unit.
The blinking display indicates that the remote
control cannot be used.
• The system does not start immediately after
the power supply is turned on.
Wait one minute until the micro computer is prepared for operation.
English
01_3P114261-3M_EN.fm Page 8 Thursday, November 6, 2003 7:23 PM
8-2 COOL/HEAT CANNOT BE CHANGED
OVER
• When the display shows “
”
(changeover under control), it shows that this
is a slave remote controller.
• When the cool/heat changeover remote control switch is installed and the display shows
“
” (changeover under control).
This is because cool/heat changeover is controlled by the cool/heat changeover remote control switch. Ask your Daikin dealer where the
remote control switch is installed.
8-3 FAN OPERATION IS POSSIBLE, BUT
COOLING AND HEATING DO NOT
WORK
• Immediately after the power is turned on.
The micro computer is getting ready to operate.
Wait 10 minutes.
8-4 THE FAN STRENGTH DOES NOT CORRESPOND TO THE SETTING
• The fan strength does no change even if the
fan strength adjustment button in pressed.
During heating operation, when the room temperature reaches the set temperature, the outdoor
unit goes off and the indoor unit changes to whisper fan strength.
This is to prevent cold air blowing directly on occupants of the room.
The fan strength will not change even if the button
is changed, when another indoor unit is in heating
operation.
8-5 THE FAN DIRECTION DOES NOT CORRESPOND TO THE SETTING
• The fan direction does not correspond to the
remote control display.
The fan direction does not swing.
This is because the unit is being controlled by the
micro computer.
8-6 WHITE MIST COMES OUT OF A UNIT
Indoor unit
• When humidity is high during cooling operation.
If the interior of an indoor unit is extremely contaminated, the temperature distribution inside a
room becomes uneven. It is necessary to clean
the interior of the indoor unit. Ask your Daikin
dealer for details on cleaning the unit. This operation requires a qualified service person.
• Immediately after the cooling operation stops
and if the room temperature and humidity are
low.
This is because warm refrigerant gas flows back
into the indoor unit and generates steam.
Indoor unit, outdoor unit
• When the system is changed over to heating
operation after defrost operation.
Moisture generated by defrost becomes steam
and is exhausted.
8-7 NOISE OF AIR CONDITIONERS
Indoor unit
• A “zeen” sound is heard immediately after the
power supply is turned on.
The electronic expansion valve inside an indoor
unit starts working and makes the noise. Its volume will reduce in about one minute.
• A continuous low “shah” sound is heard when
the system is in cooling operation or at a stop.
When the drain pump (optional accessories) is in
operation, this noise is heard.
• A “pishi-pishi” squeaking sound is heard when
the system stops after heating operation.
Expansion and contraction of plastic parts caused
by temperature change make this noise.
• A low “sah”, “choro-choro” sound is heard
while the indoor unit is stopped.
When the other indoor unit is in operation, this
noise is heard. In order to prevent oil and refrigerant from remaining in the system, a small amount
of refrigerant is kept flowing.
Indoor unit, outdoor unit
• A continuous low hissing sound is heard
when the system is in cooling or defrost operation.
This is the sound of refrigerant gas flowing
through both indoor and outdoor units.
• A hissing sound which is heard at the start or
immediately after stopping operation or
defrost operation.
This is the noise of refrigerant caused by flow stop
or flow change.
8-8 DUST COMES OUT OF THE UNIT
• When the unit is used for the first time in a
long time.
This is because dust has gotten into the unit.
Outdoor unit
• When the tone of operating noise changes.
This noise is caused by the change of frequency.
English
8
01_3P114261-3M_EN.fm Page 9 Thursday, November 6, 2003 7:23 PM
8-9 THE UNITS CAN GIVE OFF ODOURS
• The unit can absorb the smell of rooms, furniture, cigarettes, etc., and then emit it again.
8-10 THE OUTDOOR UNIT FAN DOES NOT
SPIN
• During operation.
The speed of the fan is controlled in order to optimize product operation.
8-11 THE DISPLAY SHOWS “
”
• This is the case immediately after the main
power supply switch is turned on and means
that the remote controller is in normal condition. This continues for one minute.
8-12 THE COMPRESSOR IN THE OUTDOOR UNIT DOES NOT STOP AFTER
A SHORT HEATING OPERATION
• This is to prevent oil and refrigerant from
remaining in the compressor. The unit will
stop after 5 to 10 minutes.
8-13 THE INSIDE OF AN OUTDOOR UNIT IS
WARM EVEN WHEN THE UNIT HAS
STOPPED
• This is because the crankcase heater is warming the compressor so that the compressor
can start smoothly.
9. TROUBLE SHOOTING
If one of the following malfunctions occur, take
the measures shown below and contact your
Daikin dealer.
The system must be repaired by a qualified service person.
• If a safety device such as a fuse, a breaker or an
earth leakage breaker frequently actuates, or the
ON/OFF switch does not properly work;
Measure: Turn off the main power switch.
• If water leaks from unit;
Measure: Stop the operation.
• If the display “
TEST ”, the unit number and the
operation lamp flash and the malfunction code
appears; (Refer to figure 12)
1. Inspection display
2. Indoor unit number in which a malfunction
occurs
3. Operation lamp
4. Malfunction code
Measure: Notify your Daikin dealer and report the
malfunction code.
9
If the system does not properly operate except
for the above mentioned cases and none of the
above mentioned malfunctions is evident, investigate the system according to the following procedures.
1. If the system does not operate at all;
• Check if there is no power failure.
Wait until power is restored. If power failure
occurs during operation, the system automatically restarts immediately after the power supply
is recovered.
• Check if no fuse has blown or breaker has
worked. Change the fuse or reset the breaker if
necessary.
2. If the system goes into fan only operation, but as
soon as it goes into heating or cooling operation,
the system stops;
• Check if air inlet or outlet of outdoor or indoor unit
is not blocked by obstacles.
Remove any obstacle and make it well-ventilated.
• Check if the remote controller display shows
“
” (time to clean the air filter). (Refer to the
chapter “Maintenance” in the indoor unit manual.)
3. The system operates but cooling or heating is
insufficient;
• Check if air inlet or outlet of outdoor or indoor unit
is not blocked by obstacles.
Remove any obstacle and make it well-ventilated.
• Check if the air filter is not clogged. (Refer to the
chapter “Maintenance” in the indoor unit manual.)
• Check the temperature setting.
• Check the fan speed setting on your remote controller.
• Check for open doors or windows. Shut doors and
windows to prevent wind from coming in.
• Check if there are too many occupants in the
room during cooling operation.
• Check if the heat source of the room is excessive.
• Check if direct sunlight enters the room.
Use curtains or blinds.
• Check if the air flow angle is not proper.
English
00_3P114261-3M_CV.fm Page 6 Friday, November 7, 2003 6:37 PM
3P114261-3M EM03A053A
(0401) HT