1
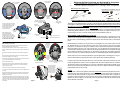
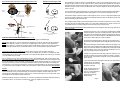
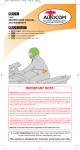
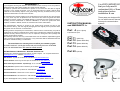
WARRANTY
It is VERY IMPORTANT
that you fully read &
understand ALL of these
instructions before
installation & use
If your supplier has not given advice or demonstration on how to set up or use our products,
please check with them before sending any goods back for warranty.
All Autocom products are warranted for a period of 12 months from the date of original
purchase, to the original purchaser, from an authorised Autocom retailer, against faulty
materials or workmanship, subject to the goods being used only as stated, and only for the
purpose as described in the instruction manuals.
No manufacturer's warranty applies to the goods where they are used for any other purpose
or in any other way than is explained in the instructions. Nor where the goods have been
subjected to misuse, neglect or accidental damage, or used with any other vendor’s products,
including incorrect mechanical or electrical installation, or where the goods have been
repaired, modified or altered, without the manufacturers written authorisation.
The manufacturer's warranty is limited to the goods being returned pre paid to the
manufacture's factory, with the original packaging and the original proof of purchase date.
The goods must be intact for our examination.
Where goods are accepted by the manufacturer, under the terms of the warranty, they will be
repaired free of charge or replaced (at the option of the manufacturer). Where the goods are
returned as faulty and are found not to be, an inspection, testing and return postage and
packing charge will be payable.
This warranty does not cover any consumable items such as batteries, replaceable hygiene
foam coverings for speakers & microphones, or any other items that are described within the
instruction manuals as being a consumable.
The manufacturer's warranty does not effect your statutory rights.
PLEASE CONTACT YOUR SUPPLIER OR AUTOCOM FOR ANY FURTHER
HELP OR INFORMATION. We service what we sell
UK Manufacturer & Distributor. Autocom Products Ltd.
20 Hawkes Drive, Heathcote Industrial Estate, Warwick. CV34 6LX. England. Tel: +44 (0)1926 431249 Email
[email protected] WEBSITE www.autocom.co.uk
INSTRUCTION MANUAL
and WARRANTY for
These parts are designed ONLY
for use with Autocom domestic
motorcycle communication
systems
Part 4. (Pro-7-Sport)
Expandable rider system
Headsets
Part 11. (HS7-U2)
Part 12. (Boom SPB-UB1)
Part 13. (Boom SPB-LB)
Part 14. (Boom SPB-FF)
Part 43. (OFCK)
USA Distributor. Top Gear NY 12159 USA Tel: 518 449 8677 www.autocomamerica.com
German Distributor. Green Frog & JF Motor Sport Tel: +49 6002 911331 www.greenfrog.de
Netherlands & Belgium Distributor. Splash Design. Tel: +31 413 389089 www.splashdesign.nl
Norway Distributor. Spare Parts Service AS Norway Tel: 67 907800 www.sps.no
Finland Distributor. Tokimoto Oy Finland Tel: +358 9 838 6540. www.tokimoto.fi
Switzerland Distributor. Hostettler A.G. Tel: 0041 41926 6111 www.hostettler.com
New Zealand Distributor. Dold Industries Ltd 00647 849 4392 [email protected]
Part. 12
If you need support in any country not listed, please contact Autocom UK.
V3
Part. 11
CONTENTS
Page
1
2
3
4
5
6
7
8
9
10
11
12
Front Cover with illustrations of parts 4, 11 & 12.
Contents and important advice regarding these products.
Pro-7-Sport (Part 4) & basic operation.
Pro-7-Sport (Part 4) Use & Voice activation (VOX)
Headset description Main loom & speakers (Part 11) Notes & tips.
Headset boom microphones (Parts 12, 13, 14 )
Optional part 43 for Open face helmet use (Open Face Conversion Kit. OFCK)
Illustrations of various helmet installations.
Additional information (basic principles)
Additional information and tips for VOX and transceivers
Additional information, typical problems and earplugs.
Back cover with Warranty & Distributor information.
It is very important to properly set up and use these products as designed. Please do not make any
modifications or try to use these products with any non recommended products or in any other way than
described. DO NOT CUT OR MODIFY YOUR HELMETS
It is common sense and the law in some countries that the rider of a vehicle be in control at all times, which
includes the ability to hear other road users warnings. As such the rider should not have the music volume so
loud as to prevent this. SAFETY should always be your first priority and is ultimately the responsibility of the
rider. Mounting the Pro-7-Sport on the bike is safer than having it on your person. Make sure that the quick
release connectors are free to quick release in the event of an emergency. Do not fix or tape them together.
You should set the VOX and/or make any other adjustments while stationary, never while in motion. Always
focus your attention to the riding and safety and do not use the Pro-7-Sport in such a way as to interfere with
this. The added ability to communicate with your fellow riders can improve safety, so become familiar with
using the system to provide warnings etc. Follow the instructions carefully and if in doubt consult your supplier.
The boom microphone has a critical loud spot, which the systems are tuned to and so this loud spot must
be understood and used properly, especially with our voice-activated systems (VOX).
Positioning of the two high quality speakers is critical for maximum performance and sound quality,
especially when using earplugs. Some earplugs can over attenuate the systems sound, especially if the
microphones and/or speakers are not correctly positioned or used as designed.
The Pro-7-Sport is splash resistant. NOTE in order to allow it to vent the unit is not completely waterproof
and so reasonable care should be used to protect it. As a portable it should be safe in a pocket or in the
Autocom carry case. When mounted on a bike it will normally sit under the back seat, near to the brake light.
Avoid mounting it in places like the front fairing or by the wheels where water may be forced in at high speeds,
or direct spray from jet washers, (cover with plastic bag then remove afterwards such that the product can
breath).
The Pro-7-Sport battery lead is designed for 9 volts only. The battery clip is designed for a PP3 battery.
More than 9 volts will cause damage to the Pro-7-Sport. Less that 7.5 volts will cause the Pro-7-Sport not to
function correctly. For 12-volt operation use part 152 (when mounting the Pro-7-Sport on a bike), or part 155
when mounting the Pro-7-Sport in a tank bag etc, with either part 135 or part 156 mounted on the bike. DO
NOT ATTEMPT to make any other type of 12-volt connection to the Pro-7-Sport. Please ask your dealer for
more details.
Page 2
Practise makes perfect and it’s much easier to practice while close together and not riding and worrying about
other things going on.
VOX, or voice activation, gives you several advantages. Apart from turning the microphones off when you are not
speaking. The VOX can automatically mute the music or make your transceiver transmit when you speak, giving
you hands free and safer operation.
Correct VOX settings will make all the difference to a flowing two way conversation (one way at a time with bikebike) as the higher the VOX setting the quicker the switching off of the microphones which allows for faster return
transmissions. To help get reliable speech with the highest VOX setting one MUST set up and use the
microphones loud spot. Speaker positioning is also very important as with the speakers out of position the sound
level will be much lower, this will tend to make you turn the transceivers receive volume up and if too loud it will
cause VOX bounce to warn you that something is wrong and protect the speakers. VOX bounce is where the VOX
switches in and out during conversation normally because the incoming speech is set too loud (normally
associated with excessive transceiver volume, to compensate for incorrect speaker positioning or over attenuating
earplugs) To test this hold the speakers over your ears, turn the transceiver volume down and slowly turn it back
up to a comfortable level, then the VOX should not bounce.
Typical problems are due to misunderstanding the importance of correct setting up; some users turn the VOX
setting too low (clockwise) to compensate for not properly using the microphone loud spot. With the VOX set too
low the microphone may accidentally switch on at higher speeds, causing your transceiver to transmit, which of
course you don't want to happen when trying to receive a transmission from the other bike.
Obviously the faster you go the more likely the helmet noise is to false trigger the VOX, which can cause you to
have break-up in conversations, but with a correct (higher anticlockwise) VOX setting, which is easily activated
when using the microphone LOUD SPOT, you will avoid false VOX operations at higher speeds
With correctly positioned speakers you will find you can turn the transceiver receive volume down, which will avoid
VOX bounce.
With practice your radio discipline will get better and you will avoid clipping the first part of the sentence by using a
key word such as OK, then educate the other users to not return comments until you have said OVER, Plus then
also allow a one or two second delay to allow your transceiver to switch back to receive before they return the
speech, remembering that they must start with a keyword or OK and again end with OVER.
DO NOT increase the transceiver, phone or music volume levels to compensate for incorrectly positioned
speakers, as doing so will impair quality and performance and may cause distortion and/or damage to the
speakers.
A wind/draft excluder is sometimes fitted under the chin of some helmets, which can help reduce wind pick-up,
thus allowing for lower VOX settings. Some helmets have a chin vents that blow straight through, as well as
sending some of the air to the inside of the visor. By blocking/taping the inside chin vent it helps prevent wind
blowing on the back of the microphone, allowing for a lower VOX setting and can also improve visor demisting.
Earplugs. Depending on how well you set the speaker positioning and use the microphone loud spot will depend
on how much sound level you will have at the ears. Extreme ear plugs, or earplugs that have high attenuation
levels will make it hard to hear even the best set-up, but low to average attenuation earplugs will work reasonably
well if your installation and use is good. Remember that for each decibel or dB of attenuation you effectively halve
the sound, so if its very good to start with you can afford to reduce it some. We recommend that you do not use
earplugs with more than 20dB attenuation, as much above this will be likely to cause you to want more volume,
which you cannot have. Remember it is already set to the optimum level.
Page 11
By finding and using the microphone loud spot and projecting your voice through the microphone, you can
easily operate a much higher VOX setting. This is because the critical loud spot produces far more sound,
which is required to give a very good signal-to-noise ratio. Moving the microphone just 2-3mm away from the
loud spot can considerably reduce sound, and make it much harder to activate a higher VOX setting. The
temptation is to turn the VOX control clockwise to make it easier to talk to, but you must not do this. You must
understand and use the LOUD SPOT.
Always speak positively through the microphone. Most first time users will try the intercom in the house and of
course when you are in a quiet location you will naturally talk quietly, especially when you hear your own voice
through the ear pieces, this tends to make you talk even quieter, until you get used to it. With the VOX set as
described above you will find it difficult to keep the microphone’s on unless you try hard, using the loud spot
helps. Once you take the intercom out on the bike and put yourself in the noisy conditions within a helmet, you
will naturally talk a lot louder and find the system naturally much easier to operate. Once you have discovered
the principles, you will be able to properly set the VOX control to suit your riding speeds/helmets/bike. It is a
good idea to properly set the VOX to a speed of about 20+mph more than you normally ride at.
This allows for overtaking and head winds etc.
So if, for example, you normally ride @ 50mph
180
150
120
70
50
25
0
you should test and set up the VOX so that it
Example VOX settings.
does not turn the microphone’s on @ 70+mph.
If you ride with a passenger then you need to set the VOX with both rider and passenger headsets in use. Get
to the desired speed (when and were is safe to do so) and if the microphones switch on, without speech, then
you need to set the VOX higher (by turning the VOX pre-set towards anticlockwise) Note: When the VOX knob
is flat/ horizontal/parallel to the label it will be set for about 60-70mph. With the flat vertical to the left of the knob
it will be set for about 150+mph. fully anticlockwise 180+mph. Fully clockwise and the microphones will be on
all the time. Therefore somewhere between horizontally flat and vertical to the left is where the VOX
should normally be set to suit typical speeds. This of course depends on your helmet noise
Incorrect VOX settings will cause the music to keep muting and/or bike-to-bike radio to keep transmitting,
cutting out any received transmissions, so a correctly set VOX is very important.
USING TRANSCEIVERS, SETTING THE VOX AND RADIO USE. It is to be expected for some first time users
to have some difficulties, although it seems quite simple, and it is, there are some tricks it getting it right, so lets
go through a few pointers. Before riding, set the system up on the bikes and practice some radio disciplines. It
can help if you practice on one bike while listening on the other transceiver with the volume turned up and the
leads unplugged from the side so that the transceiver speaker works. Someone else can talk back to you on
the other transceiver by pressing the PTT button on the side of the transceiver. If they listen carefully they will
hear the short delay after you finish speaking and before your VOX switches off and you stop transmitting. It is
important that you understand this VOX delay, as it is pointless trying to transmit back to someone else if they
are still transmitting. One has to have a short VOX delay so that the system reliably stays on during normal
speech, which may have short pauses and you don't want a transceiver bouncing between transmit and
receive, with the small losses of speech that you get in between.
Part 4. (Pro-7-Sport)
Superior quality and performance, expandable rider system.
Options for PHONE, MUSIC, BIKE to BIKE & PASSENGER
Before using this product please refer to the instructions for
any optional parts that you intend to use with this product
such as the bike power lead, for their installation and use.
The unit has three leads.
1 lead with black 7-pin socket, 47 ¼ " (1200mm long) for use by the rider.
1 lead with black 7-pin socket, 33 ½ " (850mm long) for use by the passenger.
1 lead with grey 5-pin-socket, 15 ¾ " (400mm long) (Aux.1) for connecting to optional accessories, such as a
bike to bike transceiver. Note: A special Y lead can be plugged into the passenger lead for a third headset.
(Sidecar)
The front panel sockets are for optional stereo music, mobile phone, & a remote handle bar speech high/low
control. The black shaft is the voice activated (VOX) pre-set control.
The Pro-7-Sport can be used as a portable with a PP3 (9 volt) battery
(Not supplied), or bike powered using an optional bike power lead
part 152 (PSU-M2). Note you will require headset extension leads
if you mount the system on the bike.
Optional bike power lead (PSU-M2)
Pro-7-Sport (Part 4) Operation & use (as a rider – passenger intercom)
Basically the Pro-7-Sport is almost fully automatic and pre set for the optimum performance. Apart from
choosing any options for bike-bike, phone, music and/or passenger, a rider only has to choose how they want it
powered, set the VOX control to suit their helmet/bike and riding style, then plug in the headset/s and enjoy.
The key to easy operation is understanding and using the microphone loud spot. With this understood and
used properly you can set the VOX control to about 70-75% (so that the flat is almost vertical to the left). This
will effectively give you a VOX setting for about 120-150mph, ensuring that the wind should never accidentally
turns the microphone/s on. BUT the only way your voice will produce enough energy to activate such a high
VOX setting is if you understand and use the microphone loud spot.
For portable use, ensure that a fresh PP3 9-volt alkaline battery is correctly installed, taking care not to trap or
damage the wires when replacing the lid. In this mode the Pro-7-Sport automatically switches on when an
Autocom headset is connected to the riders lead. This means that the power is automatically switched off each
time you unplug the rider’s headset, to save battery wastage. Please note that when using the optional bike
power lead that the unit is switched on and off via the bikes ignition key.
Taking care when connecting or disconnecting the headsets to the Pro-7-Sport leads will ensure many years of
reliable operation. There is a flat on each connector to help you with alignment.
When you first speak you need to draw out the first word or use a key word to get things going. I always use
"OK when you get to the lights take a left, OVER" I always use OK at the start of a conversation because
although the VOX is instant, transceivers have to go from standby to transmit and also standby to receive, the
other end. So there is a 1/2 second or so delay. DON'T TURN LEFT may come over as TURN LEFT, so its
good practice to use a key work like OK then say what you want such as OK, DON'T TURN LEFT. Its also
good practice to say OVER when you have finished speaking, as if after saying OK TURN LEFT the other
person replied with OK, OK, they may well have transmitted over you trying to say something like AND THEN
TAKE THE NEXT RIGHT. Of course if you wait to hear OVER before giving a reply you can help avoid this, but
even a well seasoned user will occasionally jam, which is when two people transmit at the same time.
With the headsets correctly installed and used as per the instructions, speak positively into the microphones
and you should hear your own voice through your own speakers, as well as being heard by the other person. If
not, you either need to adjust the VOX control to a lower setting (clockwise) or speak more positively, or
reposition the microphone/speakers (see headset section). Please note that with the VOX control turned all the
way clockwise, the microphones will be on all the time. With the VOX turned too far anticlockwise it will be hard
to operate the microphones unless you use the microphone loud spot. Finding the best VOX position takes a
little practice and time, as does getting used to hearing your own voice (side tone). Once you have set it
correctly and become used to using the system you will find that it will perform effectively and reliably.
Page 10
Page 3
Additional information and setting up tips.
The voice activated (VOX) pre-set control does the following:
1 Turns the microphones off when you are not speaking, when set correctly. IE not too low (too far clockwise).
2 Mutes the optional music about 50% when you speak, unless set too high (too far anticlockwise). NOTE if the
music does not mute when you speak, it is because the VOX is too high and so you cannot operate it. OR the
VOX is too low, in which case the microphones are already on and the music is already muted.
3 NOTE any optional music will mute about 50% when you receive adequate speech from an optional bike-to-bike
transceiver. The VOX pre-set does not effect this, only the volume from the transceiver.
4 NOTE When you receive adequate speech levels from an optional mobile phone, (plugged into the Aux socket
on the front panel), both the music and transceiver sounds are cut, as is the VOX transmit for the transceiver.
These will come back on after 10-20 seconds of not receiving sound from the phone. The VOX control does not
effect this, only the volume from the phone. This short delay is present each time that you power up the Pro-7Sport.
The Pro-7-Sport has a HIGH/LOW Speech socket WARNING only use the high setting if using earplugs. An
optional handlebar remote high/low speech switch is available from your stockist (Part 164) use this to boost the
speech volume about 9dB (300%) for use with earplugs. A shorted 3.5mm stereo or mono plug, plugged into this
socket will also do this.
Correct headset installation and use is critical to comfort and ease of use. Please read, understand and follow the
headset instructions carefully. It is not unusual for first time users to misunderstand how important this is, or to find
it difficult to solve on their own. As such we recommend that you consult your suppler for assistance.
Some types of earplugs can be used, however as a guide, those that attenuate about 20dB or less usually work
best. Many others that attenuate much more than this can impair sound quality and level.
Unplug any accessory leads from the intercom if they are not being used, as they can encourage any airborne
interference to be picked up and amplified. Try to keep the phone and/or transceiver as far away from the Pro-7Sport and other electrical devices as possible. Note some digital phones may cause undesirable interference.
When using any device that transmits such as a phone or bike-to-bike radios, it is essential to check with your
bike manufacturer/supplier that it is safe to do so. Some bikes can be effected by such transmissions, in particular
those with ABS or other computer controlled systems.
Some other vendor’s equipment such as personal stereo/CD players, phones and transceivers may worker better
than others. Please check with your suppler for advice about Autocom accessories and the compatibility of any
other equipment before using it with this product.
Some bikes may radiate interference. A whining sound related to engine speed may be caused by a noisy
alternator, while a ticking sound relative to engine speed may be caused by a noisy HT ignition system spark
plugs/leads. If you experience any such noises, please contact your supplier for advice.
Note when this unit is bike powered it can power some recommended transceivers via an optional interface lead
The Pro-7-Sport will become warm to touch when using it this way. If mounting the intercom on to a bike, the best
place to position it is normally under the seat. Take care to protect the leads from sharp edges and not to
trap/crush the leads between frame/seat/panels etc. Also watch that you do not snag the seat locking/release
mechanism.
Page 4
Basic principle of an intercom system & why Autocom is different.
The basic principle of an intercom is a microphone, amplifier and speaker. (Of course the phone and
transceiver are just wireless extensions of the system, which interface into the main control box along with
other inputs such as music). The microphone picks up the sound of your voice and the amplifier amplifies it to
the speakers. The problem with basic systems is that the microphone also picks up all the helmet noise and
amplify it to your ears, adding to the helmet noise, making it much louder, resulting in the need for more
amplification to hear the speech. Having a volume control to be able to turn this up also turns up the unwanted
amplified helmet noise. Catch 22, and why we do not fit a volume control. Our systems are set to the optimum
level and so adjustments won’t help other than to compensate for incorrect set-up and use, resulting in poor
performance.
The fact is that you need a very special microphone combined with specially designed filters and speakers that
are all tuned and matched to the system. (A race car cannot win races with just the best engine alone, it also
needs the best brakes, chassis, tyres and of course the all important driver. We have designed and provided all
but the good driver bit, and so now all we need do is help you understand how to set-up and use our systems
properly.
Remember, if a microphone can pick up the sound of your voice when it is away from your mouth then of
course it can also pick up any sound in between, i.e. helmet noise. Therefore one cannot expect a system to
work at higher speeds if the microphones can pick your voice up when they are away from the mouth.
Autocom’s high tech microphones effectively do not pick up any sound, or very little, when away from your
mouth and so if not used correctly they can effectively cut out the sound of the users voice along with the
undesirable helmet noise that they are designed not to pick up. The solution is to find and use the microphone’s
LOUD SPOT, as everything’s been carefully balanced and tuned to this. See the headset section for more on
this.
Obviously if you want the best sound out of the speakers you also need to get them directly over your ears, as
if you were holding them there. This helps provide the speaker sound directly to the ears, in front of the helmet
noise. Moving the speakers away from the ears allows the powerful helmet noise to over power the speaker
sound.
You should test the system out of the helmet before installation, with speech (using the microphone loud spot)
and preferably also with good quality music so that you have a good understanding of just how good it can be
at its best. If it then does not sound as good after installation, you need to adjust the microphone and/or
speakers to suit. You will find that when set-up and used this way it is extremely good, although slight losses
can be expected in a helmet, especially at higher speeds/noise.
The microphone and speaker positioning is the key to getting the best performance out of the system.
VOX & Microphones settings; (using Pro-7-Sport)
Plug the boom microphone into the main headset speaker loom and plug this into the rider’s lead of the Pro-7Sport (longest lead) ensuring that the Pro-7-Sport is properly powered.
Set the VOX to about 3/4 anticlockwise, (with the flat vertical, to the left of the knob). This is a high VOX setting
for speeds of typically up to 150+ mph using a full-face helmet. Position the microphone so that it is touching
your lips and project your voice through it in a positive manner, as if to someone 20 ft (6-7 meters) away. You
will discover that by carefully moving the microphone about while speaking you will find a more sensitive spot
where it is loudest and easiest to operate the high VOX setting. We call this the ‘LOUD SPOT’ (don't worry if
the speech breaks up as the VOX is set deliberately very high to help discover a principle).
Page 9
View from underside
of Shoei Helmet
View from underside of
Arai Helmet
Autocom helmet headsets are designed in two parts.
1
2
Squeeze
gently
together
Main Headset stereo speaker loom.
Remove
straps and
lift out each
cheek pad
individually
Remove
straps and
lift out
complete
Peel back tape and lining, Slide
Speaker inside pushing it right up to
the strap hole
The fabric is either taped or elasticated
over the polystyrene and so it is easy to
install the speakers behind the lining.
Note that the wire should come
out of the speaker towards
the back of the helmet.
May be held by
double sided tape
here
Boom & Mic
assembly
Boom & Mic
assembly
When replacing the cheek
pads trap the boom between
the outer shell and the inner cheek
pad taking care not to cut the speaker
wire with the cheek pads plastic tongue
if it has one. Tape or glue if required.
DO NOT MODIFY THE HELMET
Return Assembly as
removed
Return Assembly as
removed
BMW SYSTEM 4 Helmet Instalation
Tape to hold in place
NOTE that you may need to re-position the speakers to suit
Trap Boom between cheek
pad and outer shell
Viewed from
underside of
Helmet with chin
bar open and
neck collar
removed
Step 1
Remove neck collar by pulling the back of the collar away from the helmet and
slide both side guides out from retaining locators
Detatch velcroed flaps (Marked ‘A’ below) to expose the polystyrene ear cups
Thread boom (Microphone first) under the chin strap but over the opened velcroed
flaps(A).
B
Locate speakers just below the polystyrene ear indents under the velcroed flaps
(B)
A
A
Position headset down lead along the outer egde of the helmet under the velcroed
flap. This may require addition velcro to ensure security
Fit speakers in the ear pockets
.
under the velcroed flaps
Push the thin section of boom into the joint between the skull and cheek lining,
under the chin strap. Locate the boom across the top of left hand cheek pad
forming it to follow it’s contours
Hold boom down firmly and secure in place with velcro pad supplied (D)
Step 3
Form boom so that microphone is situated in-front of and just touching the center of
your mouth.
B
C
Tuck speaker wire away around the back
of the lining underneath the groove for the
neck collar
The boom is tucked tight
into groove above the
cheek pad and under the
chinstrap mounting
Align boom across the
top of the cheek pad
and hold secure with
Velcro provided
Check that down lead and boom are well secured and wires are tidily tucked away.
CAREFULLY check the opening and closing of the front of the helmet does not
snag the boom or down lead.
Test the headset and reposition microphone and speakers if required. Refit neck
collar. Please note that due to the design of this helmet, positioning of the speakers
is limited and as such it may not be possible to position the speakers directly in line
with your ears. If this is the case one cannot expect the sound to be good when
using earplugs.
Step 2
Pass boom
assembly
under flap in
direction of
arrow
Neatly tuck speaker cable under lining around the back of the helmet and below
the neck collar retaining groove, out of sight (C)
Close the velcroed flaps and tidy
Page 8
Main headset loom & plug-in speakers (Part 11. HS7-U2)
Choice of plug-in booms (Parts 12, 13, 14) Plug in boom microphones.
D
Plug-in Boom microphones. Parts 14, 13 & 12
(top to bottom)
These headsets are not designed to work with ½ helmets (Chip style)
There are too many different helmets to be able to fully describe every possible installation and so these instructions
are designed as a basic guide. Please NOTE helmets with straps that go directly over your ears do not lend
themselves for a good headset installation, as the speakers have to sit on top or behind the straps, which can make
them uncomfortable or reduce sound quality. Some helmets do not lend themselves to be installed as we have
shown and may require alternative methods, so please take some time to consider these basic principles and your
helmet design before installation. If you are unsure then please contact your supplier or Autocom. If your system is
not performing as we claim, it is almost certainly due to incorrect installation and/or use.
MAIN HEADSET LOOM SPEAKER (Part 11) (HS7-U2)
This is a twin speaker, stereo headset loom with a short down lead fitted with our 7-pin din plug, for connecting to our
systems. It has a small red socket for plugging in a choice of boom microphones. When this product is plugged into
the rider’s lead of a portable battery powered Pro-7-Sport (Part 4), Easi-7-Advance (Part 2) it activates the battery
power.
Before installing your headset you must first listen to it by plugging it into your powered system, then while holding
the speakers directly over your ears, either play some music or get someone to speak to you through the system.
Doing this is very important to help you to understand what to expect when the speakers are positioned correctly.
Moving the speaker’s just 5mm (1/4”) away from the ears, or out of alignment can easily halve the volume and/or
reduce the bass, especially when out on the bike when the powerful helmet noise can overwhelm the speaker sound.
Correct speaker positioning is essential and you will hear this during this test. Use earplugs during this test if you
intend to use them out on the bike, bearing in mind that over attenuating earplugs will impair speaker sound.
Please study the front cover and page 8 illustrations to get the general idea for installing part 11 into your helmet.
Also note the illustrations on page 6, which shows correct speaker and microphone positioning.
If required, tape or glue the rubber joint and/or boom to the outer shell or inner lining so that they are secure.
Position the speakers for maximum comfort and performance then tuck the speaker wires into or behind the lining.
The small red connector is for plugging in one of our boom microphones (NOT required for AVMS, Part 5). You may
find that you need to reposition the speakers, about once a year, due to slight movement that can happen when
putting the helmet on and off your head.
Top tips
You may need to fine-tune the speakers positioning several times before finding the optimum position for comfort
and performance. Start with the speaker’s low, so as to avoid pressure to the top of the ear and slowly move them up
until you find the optimum position. Try to position the speakers behind the helmet fabric if possible (on top of the
polystyrene). Pack the speakers out to your ears with foam if required. A slight angle out towards the top edge of the
speakers (as shown on page 6) can help with comfort and performance. Normally the speaker wire will come out
towards the back of the helmet.
Page 5
Recommended speaker positioning for maximum performance & comfort
Centre of
speaker
Microphone positioning is critical
Centre of
ear hole
Centre of
speaker
NOTE that wire normally
comes out towards back
The microphone is mounted on the end of a stiff flexible boom so that you can carefully position it close, if not just
touching your lips. In order for it to stay in place it is best to wedge or tape the boom between the outer shell of the
helmet and the inner cheek pad so that the right amount of boom comes up between the outer shell and inner
cheek/chin bar area, into the visor area and then bends down at about 45 degrees so that the microphone is dead
centre to you lips.
You may find that when moving the helmet on or off your head for the first few times that the microphone/boom catches
your nose and so by slightly twisting the helmet while putting it on or off your head it will help to avoid this.
Centre of ear
hole
C O R R E C T M IC R O P H O N E
P O S IT IO N
Avoid pressure directly to the front and back of the microphone covers. To move or adjust the microphone, please hold
it by the outer edges or rubber neck, making sure that the beige side of the fabric sits flat against your lips, then fine
tune the positioning for the critical loud spot.
The microphone fabric is likely to become contaminated in time due to damp, dust, lipstick etc. if so you need to have it
serviced by an Autocom trained dealer. Failure to do so may result in partial sound loss. These covers are considered
consumable parts and so should be expected to need servicing every one to three years.
Avoid speaker near top of
ear
Part 43. Open face conversion kit (OFCK) MUST be fitted to the microphone when used in any Open-face style
motorcycle helmets
Centre of ear
hole
Centre of
speaker
IN C O R R E C T M IC R O P H O N E
P O S IT IO N
CHOICE OF PLUG-IN BOOM MICROPHONES (Part 12, 13, 14 )
Your supplier should help you decide which boom/s you need. (see page 8 for installation tips)
Part 12 (Boom SPB-UB1) is our most universal boom. Suitable for most full face, open face and flip front helmets.
Part 13 (Boom SPB-LB) is similar to our part 12 but is slightly longer for some open face or very large helmets.
Part 14 (Boom SPB-FF) is a short boom designed to Velcro into the helmets chin bar (Front Fit) This is sometimes
useful in some flip front helmets and some full face helmets, but not normally suitable for open face helmets.
These booms MUST have an optional part 43 (OFCK) fitted if used in an open face helmet. See page 7.
Replacement (consumable) foam speaker covers (Part 40) are available from your dealer. If your helmet has deep
ear indentations and you need to pack your speakers out our optional Foam Speaker Pads, Part 45 (1/4”) & Part 46
(1/2”) are available from your dealer.
It is very important to set up and use the microphone correctly. The Microphone has, what we call a critical LOUD
SPOT. The system is tuned to this loud spot and so it is important that you understand and use it properly. Not using
the loud spot will reduce sound considerably. Testing the system before installation will help you to find and use the
loud spot. The best way to do this is by holding the microphone against your lips, dead centre, and powering your
voice through it, as if to someone 15-20 feet away. Listen to the receiving headset and you will hear how important it
is to position and use the microphone correctly. The correct position is where it sounds the loudest (the loud spot).
Top tips
The loud spot is the position of the microphone relative to your lips and the way you shape your mouth when talking
into the microphone. Pucker your lips when talking, as if kissing the microphone, and then carefully move the
microphone about, while talking or making a continuous tone, to find the point where your voice is the loudest. This is
the microphone loud spot that the systems are tuned to.
Wherever possible you should try to fit the boom 12, as shown in the illustrations, behind the cheek pad. Where it is
not possible to do this, you may have to consider boom 13. Ask your supplier for more advice.
Page 6
The purpose of the kit is to act as a wind guard, preventing direct windblast
onto the microphone, which may cause false activation of the VOX circuitry. It
may also be used in other helmets where the microphones are exposed to
windblast, such as some flip-front helmets or the BMW System 4 helmets that
can be used as either a flip-front or open face helmet.
Ensure that the microphone fabric is clean and dry (free of lipstick etc), and if
not then have it serviced/replaced before fitting the Open Face Conversion
Kit.
Remove the backing from the self adhesive Velcro pad and apply it to the
BLACK side of the microphone fabric. Apply light pressure around the outside
edges to ensure that it adheres to the fabric. Avoid squeezing the middle of
the front and back covers, as this can cause the microphone to move, which
may cause damage to the fine microphone wires.
Carefully cut a small hole in the outer edge of the foam windsock so you can
slide the microphone red connector and then boom through it. Carefully
position the foam over the fabric microphone covers so that the beige cover
part is exposed.
If your foam windsock gets dirty replace it with one of the spare windsocks
supplied with this kit. Follow the
same procedure after removing
any pieces of old tape.
NOTE: The foam windsock is a
Hygiene replaceable part, as
such it is a consumable part as
defined by our warranty
agreement with a 60 Day
limited warranty.
Page 7