1
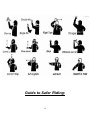
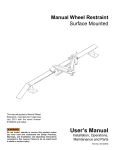
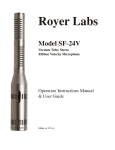
Contents
Page
1- Mission statement
2
2- Objectives
2
3- Rules of the Road
4
4- Guide to Safer Riding
15
5- Dress to Live
18
6- Road Surface Dangers
20
7- Riding Alone
23
8- Riding with a Passenger
27
9- Riding in a Group
29
10- After a Ride
41
1
Bahrain Motorcycle Club M.C
MISSION STATEMENT:
BMC will provide a means to unite riders with similar interests, to promote
safety, friendship and structure regardless of the make of bike or
nationality of rider.
OBJECTIVE:
Bahrain motorcycle club has been formed to provide an organization to
meet the needs of like-minded bikers in the Kingdom of Bahrain.
BMC will provide services to its members such as advice, planning, and
guidance within the scope of the BMC activities. This will include
promotional campaigns for official rides, providing official Bahrain
motorcycle club clothing, labels, and patches to identify with the Bahrain
motorcycle club has a commitment to safety to all road users and to
developing a safe motorcycling culture wherever our riders may be. We
have a commitment to the brotherhood of motorcycle riders of the and to
the commitmentunit Bahrain motorcycle club in general.
2
Rules of the Road
The purpose of riding in an organized group instead of an undisciplined pack is to
provide the additional safety that a well-organized group inherently generates.
When groups ride in an orderly fashion, people don’t get in each other’s way, and
the organization of the formation itself discourages cars from attempting to cut in.
For example, trucks have been known to move to the far side of their lane to
minimize windblast for bikers when they see a well-ordered formation.
Once a group has adopted riding rules, EVERYONE riding with the group is
expected to follow them. Anyone violating the rules, or anyone who
compromises the safety of the ride, will be warned and if their actions
continue, they will have their memberships revoked and will not be
welcome to ride with the . Bahrain motorcycle club
The following rules are compiled from a number of sources. Most groups that
ride in an orderly formation follow similar rules. Details may vary from one group
to another, but for the Bahrain motorcycle club these will be the rules we follow.
FORMATION:
3
The group will ride at or below the posted speed limit. Formation riding will be in
a standard staggered formation. In staggered formation the bikes form two
columns with the Road Captain at the head of the left column. In this position he
will be able to view all bikes in his rearview mirrors and also be able to see
around vehicles that the group might approach. The second bike will head the
right column, and will ride approximately one second behind the Road Captain
(and in the opposite side of the lane). The other riders will position their bikes two
seconds behind the diagonal bike. This formation allows each rider sufficient
safety space and discourages vehicles from cutting in the line. The last rider, or,
Safety, may ride on whichever side of the lane he prefers. He will have to
change sides during the ride as is necessary.
THE ROAD CAPTAIN:
The Road Captains bear tremendous responsibility to ensure that the ride gets to
and from the designated destination safely, smoothly and as a group.
This requires experience, personal discipline and good communication between
the Road Captains and the Group.
The Road Captain must be aware of length of the columns and must gauge the
passing of merges, highway entrances, exits, etc. to allow for maximum safety
and keeping the group together. He must be sure that he leaves enough time
and space for the formation to get into the appropriate lanes before exits, etc.
All directions come from the Road Captain.
4
The Road Captain makes all decisions regarding lane changes, stopping
for breaks or fuel, closing of gaps, turning off at exits, any concerns of
what lies ahead, accepting / rejecting radioed messages from other
individuals, and so on. No individual will assert himself independently
without first receiving direction from the Road Captain.
ANNOUNCEMENTS BEFORE A RIDE:
The Road Captain, (or in his absence, Safety Officer or Committee Member)
should call all members to gather into a group to hear the announcement
regarding the ride. Once everybody is listening, clearly state the following:
1. Destination of the Ride.
2. Precise description of the route.
3. Mileage and Time requirement.
4. Reminder that everyone should have enough fuel
5. Maximum speed not to be exceeded.
6. Mention any known hazards or obstacles.
7. Identify and welcome any new riders along for the first time or any new
members. Instruct them, for reasons of safety and until they are familiar with
group ride procedures, to join the rear of the group.
8. Designate the Road Captains and other key positions within the convoy.
9. Ask for 2 volunteers (preferably with big bikes with large taillights to act as
traffic stoppers as the group is leaving.
10. Indicate where to line up.
5
11. Instruct the Stoppers that the Road Captain will signal them to move to block
passing traffic as soon as the group is ready to leave.
12. Ask for a show of hands of those riders, intending to leave the group before
arrival at final destination. Instruct such riders to join the rear of the group where
they can depart without inconveniencing others. No cutting through the group or
swapping columns!
13. Repeat the Safety Rules as needed:
-Staggered formation,
-2 second interval,
-No overtaking,
-No swapping files,
-If the group gets split up in traffic, the lead group will slow down for others to
catch up, there is no need to speed unnecessarily.
THE SAFETY:
The Safety serves as the eyes of the Road Captain. He watches the formation
and informs the Road Captain of any potential problems within the group. He
watches other vehicles and informs the Road Captain of hazardous conditions
approaching from the rear, such as vehicles trying to cut into the formation and
trucks passing which could cause potentially dangerous wind blasts.
He will watch for merging lanes and will move into a merging lane (or stay in a
merging lane just vacated by the group) in order to “close the door” on other
vehicles that may otherwise find themselves trying to merge into the formation.
6
At the Road Captain’s request, the Safety changes lanes before the formation, to
secure the lane (blocking traffic behind him) so the formation can move into it.
THE STOPPER:
The Stopper(s) volunteer to stop traffic, so that the ride can leave together or,
during a ride, when circumstances permit, to stop side traffic so the convoy can
keep together. This is done at the riders’ own personal risk and
responsibility. This is not an easy task. It requires great skill and the ability to
read traffic conditions. Such support should only be used when absolutely
unavoidable.
NEW RIDERS:
The position of new riders who are inexperienced with group riding is significant.
New riders should be positioned as far at the back of the group as possible.
LANE CHANGES:
All lane-changes start with a radio request or a hand signal from the Road
Captain to the all the riders. The Safety will (when or if it is safe to do so) move
into the requested lane and will inform the Road Captain when the lane is clear.
At this point, the Road Captain has three options:
SIMPLE LANE CHANGE:
7
This is an ordinary lane change and can be used in most situations. After the
Safety has secured the new lane the Road Captain will put on his directional
signal as an indication that he is about to order a lane change. As each rider
sees the directional signal he also turns on his signal so that the riders following
him will get the order to change lanes. The Road Captain then initiates the
change and all other riders follow by changing lanes as well.
The important concept to remember is that NO-ONE moves until the bike in
front of him has started moving.
GROUP LANE CHANGE:
This can be used interchangeably with Simple Lane Change. It requires a little
more work, but it is well worth the effort. It’s quite impressive to watch, and gives
the riders a tremendous feeling of “togetherness.” This may sound a little
complicated, but it is actually very simple to do. After the Safety has secured the
new lane, the Road Captain will put on his directional signal as an indication that
he is about to order a lane change. As each rider sees the directional signal he
also turns on his signal, so that the riders following him get the order for a lane
change. The Road Captain then raises his left arm straight up. Each rider
repeats this signal. Then by lowering his arm to point to the lane into which he’s
moving, the Road Capitan actually initiates the change. All other riders lower
their arms at the same time and change lanes as well. This allows the entire
formation to move from one lane to another as a single block.
8
REAR FILL-IN (Blocking):
This is sometimes necessary if a long enough gap cannot be maintained in the
new lane (for example: when trying to move from the right lane to the center lane
while vehicles from the left lane keep cutting into the opening). The Road Captain
will call for the group to fill-in the space from the rear. He puts on his directional
signal as an indication that he is about to order a lane change. As each rider
sees the directional signal he also turns on his signal, so that the riders following
him get the order for a lane change.
The Road Captain then raises his hand to shoulder height and “pushes
out”. Each rider repeats this signal, then he points to the lane into which he’s
moving. The Safety will first secure the new lane, the last bikes move into the
space in the new lane ahead of the Safety. The next bikes at the rear move in
ahead of those behind them and so on, until the Road Captain finally moves into
the space ahead of the entire formation.
EMERGENCIES:
In the unlikely event of an emergency condition the Road Captain will make
every attempt to move the formation to the shoulder in an orderly manner. If a
bike breaks down, you must let the rider move off to the right—DO NOT STOP!
The Safety will stop with the problem bike. The Road Captain will lead the group
to a safe stopping place.
HAND SIGNALS:
9
Each rider (and passenger) should duplicate all hand signals given by the rider
in front of him or her, so that the signals get passed all the way to the back of the
formation. The following signals are used in addition to the standard (right turn,
left turn, slow/stop) hand signals:
GROUP LANE CHANGE:
The Road Captain raises his left arm straight up. Each rider repeats this signal,
and then as the Road Captain lowers his arm to point to the lane into which he’s
moving, he actually initiates the change. All other riders lower their arms at the
same time and change lanes too.
REAR FILL-IN (Blocking):
After having the Safety secure the lane and putting on his directional signal
(which is repeated by each rider) the Road Captain raises his left hand to his
shoulder and “pushes” his open hand toward the lane into which he wants to
move. This signal is repeated by all riders and each rider, in turn (rearmost first)
moves into space ahead of the riders behind him.
SINGLE UP:
When conditions warrant a single file (narrow roads, anticipated windblast from
trucks, obstructions, pedestrians, etc.) the Road Captain will raise his left hand
10
holding up only his index finger. All other riders will repeat this and the two
columns will merge into one.
STAGGERED FORMATION:
When single file is no longer necessary the Road Captain will raise his left hand
with thumb and pinky out and his other fingers closed, rotating his wrist back and
forth (indicating left, right, left, right). All other riders will repeat this and resume
staggered formation.
TIGHTEN FORMATION:
When the Road Captain feels that the formation should be tighter (i.e.: bikes
closer together) he raises his left hand with fingers spread wide and repeatedly
closes them into a fist. All other riders repeat this and close up all unnecessary
space in the formation.
ROAD HAZARD:
This is the one signal that can be initiated by ANYONE. Anyone seeing a
hazardous condition on the road surface (road-kill, oil, gravel, significant pothole,
etc.) will point at it. Pointing can be accomplished by sticking your right or left leg
out, right leg for right side hazard or left leg for left side hazard. All following
riders will repeat this so that all riders will avoid the hazard.
11
ANY SUGGESTIONS:
After the ride, if you have any suggestions on safety aspects or want to express a
viewpoint, please feel free to contact the Road Captains, Safety Officer or any
other Committee Member. It’s your ride and safety is everyone’s concern!
REMEMBER THIS:
1. When asked to do so, please form up quickly in a column comprising 2 files of
bikes.
2. No switching between files during the ride.
3. Ride in a staggered formation, 1st bike in the left file, 2nd bike slightly behind
in the right file, 3rd bike slightly behind in the left file, etc.
4. Maintain a 2 second gap between you and the bike ahead
5. No overtaking
6. There should be only one bike in a corner at a time.
7. Headlights should be switched on at all times.
8. Please remember to use hand signals as part of keeping rides safe for all.
REMEMBER: RIDE SAFE
12
Hand Signals
Please remember to use hand signal as part of keeping rides safe for all
13
Guide to Safer Riding:
14
Ensure your Motorcycle is more than just ‘roadworthy’. By keeping your
bike reliably serviced and safe to ride, you will protect your investment and
yourself!
CARRY WITH YOU:
-Your motorcycle registration card.
-Your motorcycle insurance policy card.
-Your motorcycle driver’s license.
-Your BMC membership card.
-Name and address of next of kin (employer or friend) to be contacted in an
emergency.
REGULAR SERVICING:
Because of the hot and dusty conditions, your oil and air filter should be changed
more often than usually recommended (e.g. after 3000 km). Remember that the
lubricating properties of engine oil deteriorate after 6 months. Have your bike
regularly serviced. Familiarize yourself with the recommendations in the service
manual regarding tire pressures, oil, fuel grades, etc.
TIRES:
15
Regularly check tire walls and tread for cracks. If cracks are visible have the tire
replaced. Change tires at least every 3 years, especially if the bike is usually
parked outside. Minimum profile depth: 3mm. No bald tires! Keep the valve clean
by ensuring the valve cap is in place. A tire blowout, especially on the front,
makes steering impossible. Check cold tire pressure every 2 weeks. Carry your
own tire gauge for this purpose.
LIGHTS:
Ensure that turn signals, headlights, hazard lights, taillights and brake lights all
function perfectly.
Remember that an inattentive driver coming up fast behind you at night can
easily overlook the small rear light of a lone motorcycle. Consider installing a
larger, more visible taillight.
BRAKES:
Ensure front and rear brakes are functioning perfectly. For extra stopping power,
consider installing double caliper brakes on your bike. If you intend to regularly
carry a passenger, you are well advised to invest in the best brake system.
BATTERY:
16
Under local climatic conditions, a bike battery can last for 12-36 months
depending on type, storage, and usage. Maintenance-free batteries are readily
available. Have battery strength checked once a year.
WINDSCREEN:
A windscreen protects you from being struck by messy bugs, flying sand, stones,
tire debris from blow-outs, birds etc. If you opt instead for the ‘naked bike’ look,
then it would be wise to invest in a good set of goggles, nose-clip mask and
helmet (or full-face helmet instead).
CHECK BEFORE EACH RIDE:
Perform a visual check of the bike to identify any loose fittings, oil or fuel
leaks, headlight, tail light, etc.
17
Dress to Live
HELMET:
Invest in the best quality helmet you can afford. Look for the DOT or SNEL
quality approval. Each helmet has its advantages and disadvantages.
Let us inform you on the available options.
- Full-face helmets protect your face and chin against wind, sand, birds and
insects if you ride without a windscreen, but are not well suited to this climate.
Certain makes of helmets (e.g. Schubert) have enough room even for persons
who wear spectacles.
- Cruiser style helmets leave the face free but have no chin protection.
- “Bed-Pan” helmets may look stylish and let you 'hear' the exhaust, but they do
not afford any real protection in an accident.
GOGGLES:
Either goggles or glasses should be worn whenever riding. Buy a darkened set
for the day, and a clear set for night rides. Whatever style you go for, it’s
recommended to buy the ‘wrap-around’ style that reduces the chance of sand
getting into your eyes.
18
GLOVES:
In an accident, it’s natural to put your hands out to break your fall.
Lightweight leather gloves with reinforced sections on the palm, offer some
protection against skin-loss.
BOOTS:
Should be sturdy, cover the anklebone and have heat resistant, non-slip soles.
Avoid riding with only sandals on!
JEANS:
Special biker jeans are available, made from denim but with Kevlar
reinforcements. Consider wearing body armor, incorporated into lightweight
mesh underwear. Leather clothing traditionally offers the best and most
fashionable protection. When you’re sliding on the hot asphalt, leather is
abrasion-resistant - denim is not. Whatever your fashion tastes, leather is still
cheaper than (your) skin!
Avoid riding in shorts, as they don’t even offer protection against leg burns
from a hot exhaust.
HIGH VISIBILITY CLOTHING / COLOURS:
Whatever clothing style you choose, remember that they should be fashionable,
practical, guarantee good protection and increase your visibility to other roadusers.
19
Road Surface Dangers
DIESEL:
Keep a constant watch for slippery, dark patches on the road, as this may be
diesel that has spilled from a truck, or water which has dropped from a car’s air
conditioner unit.
ROAD MARKINGS:
Bear in mind that the painted areas on the roads DO NOT have a 'grip' surface.
They are very smooth! Try to avoid braking on any painted surface, as the
chances of a wheel lock and skidding are high. Be extra cautious around
pedestrian crossings, which have a higher than usual amount of painted area.
SAND:
Blown onto the road, sand can cause a bike to slip or make steering difficult.
FURROWS:
Look out for furrows, corrugations or other uneven surfaces, which can affect
bike stability and steering. For this reason, especially if you are on a section of
road that you aren’t familiar with, avoid riding with only one hand on the steering.
20
SPEED HUMPS:
Be especially wary around speed humps. They are often overlooked by many
motorists, frequently resulting in accidents. Check your rear mirrors to ensure
that any traffic behind you has seen and will slow down for the hump. Otherwise
you could be hit from behind.
Make use of hand signals to make clear to others that you are slowing down and
may come to a complete stop to negotiate a speed hump (take care not to
bottom the bike, especially if your bike has been lowered).
PEDESTRIANS:
Keep a look out for pedestrians, who may unexpectedly step into your path. In
particular, beware of persons in the center aisle trying to cross a busy road.
Some may be difficult to see in the shade of trees, at night, or on roads with poor
lighting. Pedestrians often overlook or underestimate the speed of an
approaching bike or are more concerned in not missing their bus or pick-up, so
they run unexpectedly to the other side of the road – right in front of you!
STOPPING ON THE ROADSIDE:
If you have to stop, signal your intention clearly, choose a clean and even piece
of hard shoulder and move as far away from traffic as possible.
21
WILDLIFE:
Beware of any type of animal on or close to the road. Be especially careful at
sunrise and sunset when you may be blinded by the sunlight, as well as at night,
when animals are difficult to see. Always check to see if the road you are
traveling on is fenced on both sides, as fences will reduce the risk of animals
wandering onto the road.
SWERVING OR EMERGENCY STOPS:
If you see animals in the road ahead, you should warn others, slow down and
give the animals a wide berth. However, you may find yourself in an “it came out
of nowhere” situation where you have little time to react. What then?
You can try to swerve away from the animal / object, but it is NOT
RECOMMENDED, as you will be putting the bike and yourself in an instable
condition, and there is actually a slight increase in speed when swerving.
22
Riding Alone
DRIVING STANDARDS:
Road-users come from all over the world. There is a wide variation in the
understanding of the Highway Code and differing levels of competency among
drivers, with a lot of room for personal interpretations. This makes riding exciting
and challenging.
FIT TO RIDE:
Avoid riding if you are not well, have taken medication or consumed ‘beverages’
that may impair your judgment or reaction time.
Remember there is no drink-drive tolerance. If you are involved in an accident
and found to be under the influence, the consequences are severe.
RIDER SKILLS TRAINING:
Constantly improve your riding skills. Try to participate in a ‘Safe Rider Program’,
‘‘Advanced Riding Skills Training’, or a ‘Track Day’. At the time of writing, no such
services are available locally so a course in Europe or Asia is the only option.
23
BUTTON-UP ALL LOOSE CLOTHING:
Before setting off on a ride, make sure that all items of clothing are securely
fastened (helmet, chinstrap, neck-scarf, jacket, etc), as loose clothing flapping in
the wind is distracting and potentially dangerous.
DRINK LOTS OF WATER:
Dehydration occurs more quickly on a bike, especially in a hot, dry climate. It’s
important to make a habit of drinking water at every stop. Dehydration will impair
your judgment.
RIDE WITH A ‘BUDDY’:
If a friend is not available and you decide to ride out alone, be sure to inform
someone of your intended route and approximate time of return. If you cannot
return at the expected time, then be sure to let those persons know, to avoid
undue concern.
LIGHTS ON:
Always ride with your headlight on – day or night. Use your high-beam during
daylight hours. If other road-users signal to say your lights are on - Great! You
have been noticed!
24
BRAKING:
Avoid heavy braking which may cause your wheels to lock and make the bike
unstable. Remember the 70/30 rule - 70% front and 30% back.
Avoid using front brakes on sand as the wheel may lock and cause the front to
slip away. If you do need to slow down while in a corner, gently apply the rear
brake. Use of the front brake, while cornering, requires practice to do safely.
MANOUVERING AT LOW SPEED:
When turning at low speed (e.g. maneuvering into a parking space), keep revving
the engine slightly to avoid stalling, the back wheel may suddenly lock and you
may be unable to stay upright.
PARKING HOUSES & BOOM GATES:
When approaching boom gates remember that the pressure sensitive strips
embedded in the road surface in front of the boom do not register a 2 wheeled
vehicle (only cars). So the boom will probably not open for you to pass. When
following a motor vehicle either into, or out of, a parking house equipped with a
boom gate, remember that the boom will fall again immediately after the car has
passed – most likely on your head!
25
SIDE STAND DOWN WHEN REFUELLING:
For those of you who do not get off your bike while filling up at a petrol station (as
you should!), remember your footing could slip unexpectedly on an oily floor,
causing you and the bike to topple over. Make a habit of engaging the side-stand
as an added safety precaution.
26
Riding with a Pasenger
CLOTHING:
A pillion passenger requires the same basic safety gear as the rider, including
helmet, gloves, boots, goggles and suitable clothing.
INSTRUCTIONS:
Make sure your intended passenger knows the basics of how to behave on the
bike. If they are taking their first ride on the back of a bike, they will need
instructions.
- The passenger should mount or dismount only after ensuring themselves that
the rider is holding the handlebars with both hands, both feet planted firmly on
even ground and asking if the rider is ready to accept the increased load.
- When cornering, the passenger should lean with the bike (not against it) and
keep their shoulders in line with those of the rider. Either too much, or too little
balance will have a negative affect on the bike’s stability and steering through
corners.
- Show your passenger where the handgrips are located and mention the best
grip positions when accelerating and slowing down.
- Point out that the exhaust gets very hot and should not be touched once the
engine has warmed up.
27
- Agree on some basic sign language to enable some communication while
traveling.
STOPPING DISTANCE:
Remember, the distance required to stop your bike is almost double that of when
you are riding alone. Increase your usual distance from the vehicle ahead.
TIRE PRESSURE:
Refer to the User Manual for the recommended tire pressure for rider and
passenger. Increase pressure as required.
SUSPENSION:
Refer to the User Manual and adjust as necessary.
INDEMNITY:
If carrying a passenger on a fund-raising ride, it is advisable to have them sign an
indemnity to shield yourself from damage claims in case of an accident.
28
Riding in a Group
COMPETENCY:
Riding in a group requires greater concentration and a higher degree of selfdiscipline than when riding alone. Each rider is responsible to fellow riders for
their safety. A negligent attitude can endanger other riders and result in a
‘domino effect’ of accidents. Before deciding to participate in a group ride, make
sure you are physically and mentally fit to do so and that you are sufficiently
competent on your machine. Remember, a chain – or group ride – is only as
strong the weakest link.
HAND SIGNALS:
Make sure you are familiar with the hand signals illustrated within this manual.
They are designed so that bikers will have a common language to communicate
needs, intentions or dangers to each other while riding in a group.
BIKE CONDITION:
Make sure your bike is mechanically ready for a run. If you are experiencing any
problems, sort them out before the ride, otherwise you will just inconvenience
others or even the entire group. No bald tires.
29
FUEL UP:
Before a ride, fuel up on the way to the meeting point, well before the intended
departure time.
ARRIVE IN TIME:
As a courtesy to others - arrive well before the intended departure time so that
you hear any last minute instructions. Noisy bikes rolling in during final
announcements are very annoying!
LISTEN CAREFULLY:
The Road Captain, or other person designated to make the ride announcements,
will call everyone together to explain what the program is for the evening. It is
important that you listen carefully so that everyone has the correct information. If
anything needs clarifying - ask!
BREAKING OFF FROM THE GROUP:
Make it known at the briefing if you intend to leave the ride before arriving at the
final destination. This way others will not be concerned if you suddenly wave and
depart the group. In this case, position yourself at the back so you don’t
inconvenience other riders by your change of direction.
30
FORMING THE CONVOY:
DEPART ON TIME:
Getting a large group in or out of town can be very difficult. You can make things
easier from the start by being ready to go when told to form up.
FORMATION OF THE CONVOY:
The group will comprise of 2 files of riders in staggered formation:
THE CENTERSIDE FILE (closest to the center of the road) and
THE CURBSIDE FILE:
The Lead Road Captain will take position at the head of the group. Members
should form up behind. At least one Road Captain, or designated rider, will ride
at the rear of the group as ‘Sweep’ to ensure no one is left behind or to render
assistance in case of a breakdown.
NEW MEMBERS:
New members and riders inexperienced with group riding are asked to join the
rear of the convoy, until they have gathered more experience. Group riding
31
requires a degree of proficiency and skill on a motorcycle. If you do not yet have
the required level of experience (if you have recently acquired your license or are
still breaking in your new bike) and will not be able to keep up – then first ride
with a buddy or ride in a small group before joining a large group.
SINGLE RIDERS:
Single riders should use the centerside file, thereby leaving more room in the
curbside file to be filled by bikes carrying pillion passengers. In case of an
emergency, riders closest to the curb have more chance of finding run-off into
soft sand or scrub.
RULES FOR THE GROUP RIDE:
STAGGERED FORMATION:
For reasons of improved forward vision, increased braking distance and room to
swerve around an obstacle in an emergency, ride in a staggered formation - not
side by side. This means first bike in the left file(center side), second bike slightly
behind in the right file(curbside), third bike slightly behind in the left file, etc.
Try to maintain a so-called ‘2 second gap’ between you and the bike ahead to
ensure a minimum stopping distance. The gap is measured by visually selecting
an object at the side of the road, and then as soon as the bike ahead of you
passes that object, start counting. Adjust your speed and distance so that you
pass the object 2 seconds later. On winding, narrow roads or where considered
32
desirable for reasons of increased safety (e.g. narrow traffic circles in rural
areas), the Lead Road Captain may use his discretion to encourage the use of
two lanes.
MAINTAIN EYE CONTACT:
When on the move, never ride in another riders ‘blind spot’. Maintain eye contact
with the rider in front of you via the rider’s side mirrors. Chances are if you can
see his eyes, he or she can see yours. This visual contact helps communication
and cohesiveness within the group.
USE YOUR MIRRORS:
Use your mirrors to a maximum to constantly verify the situation of the bike
behind you. Keep watchful eyes on traffic moving up to overtake the group.
Remember that a car traveling at high speed only takes a few seconds to reach
your position. Above all, make it a habit to always glance over your shoulder
before changing lanes to overtake, or turning even if you just checked your
mirrors and ‘didn’t see any other vehicle’.
LIGHTS:
When riding at night behind other bikes, ensure that high beam headlights are
switched off, unless you are leading the group. Otherwise these lights dazzle the
riders in front of you.
33
FORWARD VISION:
When in your selected file and following the bike in front of you, remember that
anything that happens to a rider ahead will directly affect you as well. Try to
position your bike slightly to the left or right of the bike in front of you, all the time
maintaining the integrity of the column. Occasionally cocking your head slightly to
one side will improve your forward vision and may give you vital milliseconds of
warning of an impending problem with the group ahead.
NO PASSING:
The Road Captains have been given the responsibility to set the pace and get to
the final location as a group. Do not pass either the Road Captain or other riders.
CONSTANT PACE:
Avoid repeatedly accelerating and slowing down for no reason. This disturbs
riders behind you or in the next column who are trying to keep a constant
distance between their bike and yours.
SPEED LIMIT:
The Lead Road Captain will, at his discretion, and in accordance with prevailing
traffic and road conditions, set the pace for the ride.
34
STOPPING DISTANCE:
Always be aware of your braking distance to the bike in front. On slippery roads,
in bad visibility or when carrying a pillion passenger, make sure to factor these
elements into the distance you require to stop in case of an emergency.
STAY IN THE SAME LANE AS THE ROAD CAPTAIN:
After assessing the current traffic and road conditions, the Road Captain will
decide which lane is the safest to use. Remember frustrated drivers, blocked by
a group of bikes spread across several lanes, are dangerous. A possible
exception is when, in the interests of increased space between bikes, (e.g. at
narrow roundabouts in rural areas) and provided there is no other traffic near the
group, the Road Captain may permit the use of no more than two lanes.
NO SWAPPING BETWEEN FILES:
On commencing a ride, select your file and stay in that file until the next stopping
point. DO NOT SWAP FILES. If a gap appears,(e.g. because the rider in the
same file ahead of you signals he is leaving the ride) then move up in your file to
fill the gap. By all means let the rider in the column next to you know your
intentions, or assist by waving a rider forward if you see a gap. Remember file
swapping endangers all the riders in the group – so don’t do it!
35
CORNERING:
There should never be two bikes side by side in a corner. If one of the bikes
slides away, it may drag the other bike down, too.
SPEED HUMPS:
Be especially careful on stretches of road where speed humps are installed. If
the rider behind you is not concentrating properly, he or she may not see the
warning sign and overlook the fact that you are slowing down. Such low-speed
accidents really spoil your day and cause a disproportionate damage to rider and
machine. Be particularly vigilant if there are new riders in the group who may not
know the road as well as you. Activate hazard-warning lights well in advance and
give a clear ‘slow-down’ hand signal to warn everyone behind you.
Get into the habit of doing this for every speed hump. Once you are certain that
the rider behind you has recognized the danger, remember to cancel hazardwarning lights.
IF THE GROUP IS SPLIT:
Constantly check the person behind you. If you find yourself at the end of a
group, which has been split by traffic lights, heavy traffic, traffic delays etc., then
36
stop and wait at the next suitable place (traffic light, next turn-off, etc) to direct
those following.
STAY ALERT:
Don’t be lulled into ‘tunnel vision’ or a sense of false security just because a
number of riders are ahead of you and you think ‘well, if they got through, so can
I’. If any emergency develops it could be that it takes effect from mid-column only
(e.g. a person or animal suddenly steps into the road, a car cuts through the
group to reach an exit etc). Each rider must be alert and ready to take evasive
action if an emergency develops.
EMERGENCY ACTION:
In case of an impending pile-up of bikes, each rider will have to decide the best
evasive action to take to reduce damages and protect lives.
If unable to brake in time, center side bikes should scatter to the left (if possible),
while curbside bikes should scatter to the right (if possible). Do not go down
between the two columns unless clear!
NOT FEELING RIGHT:
Should you at any time feel uncomfortable about the way the ride is developing,
then wave others by and proceed to the destination on your own. As a courtesy,
37
let other riders know of your intentions, to avoid undue concern if someone
suddenly notices you missing from the group.
OVERTAKING AS A GROUP:
NIGHT RIDES:
Overtaking at night has a serious disadvantage to day rides. The lights from a
bike in the overtaking lane, even with dipped headlight, dazzle riders in front,
making a clear view to rear difficult.
The single headlight can be mistaken for that of a car with only one light. Two
lights from 2 bikes in the overtaking lane can be mistaken for a car. Therefore,
stay in your lane.
NO ‘SNAKE EFFECT’:
Stay in your lane until you are closing on the slower vehicle, check your mirrors
to see if it is safe to overtake, then accelerate smoothly and pass the slower
vehicle as smoothly and quickly as possible without excessive speed.
This should be initiated in small groups of 4-5 bikes. Do not move out before
your time as this creates a ‘snake effect’, which blocks other road-users and puts
the convoy at risk. Namely a convoy of bikes traveling at high speed, in the fast
lane, with limited forward vision and no room to maneuver in case of a pile-up!
38
DON’T BLOCK TRAFFIC:
If the driver of a vehicle wishes to pass the group, let them do so. Do not attempt
to hold them back or delay their progress. They have as much right to use the
road as you do. The experienced rider will let an aggressive driver get way ahead
of the group instead of trying to hold a frustrated driver back.
DON’T DAWDLE:
Don’t dawdle along in the overtaking lane. Accelerate to take you past the slower
vehicle as quickly as possible. Do not slow down until you AND THE BIKES
BEHIND YOU are well clear of the slower vehicle. Remember that when you
decide to throttle back because you have cleared the vehicle, it doesn’t mean
that the bikes behind you can do the same! They will still be in various stages of
acceleration towards you, until they too are well past the slower vehicle.
Therefore, do not throttle off too early and do not touch your brakes to reduce
your speed unless for good reason. Keep the time the convoy spends in the
overtaking lane to an absolute minimum.
It is not unknown for an aggressive driver, whose progress in the left lane has
been blocked by the group of bikes, to overtake on the right, come up past the
group in the slow lane, and then try to cut through the group at the front! At times
it may be preferable for the convoy to occupy the overtaking lane (e.g. to support
the action of the Lead Road Captain, or because of an obstacle blocking one of
the lanes ahead). In such a case, the Rear Road Captain can exercise his
39
discretion and move into the overtaking lane. This would then be the signal for
the whole convoy to move over.
CENTERSIDE FILE: DO’S & DON’TS:
Do not initiate the overtaking sequence too late, bringing you and the first bike
closest to you, too close to the vehicle in front. This means that although you will
have left yourself sufficient room to maneuver, the first bike in the next file may
not have enough space!
Do not terminate the overtaking sequence too soon - thereby cutting too close in
front of the bike following in the right-hand file. By checking your mirror you will
see when the first bike in the next file activates its turn signal indicating a return
to its original position. Then activate your turn signal; glance over your right
shoulder at the next bike behind you before gradually moving back into the slow
lane again.
CURBSIDE FILE: DO’S & DON’T’S:
Return to your original lane as quickly as possible by activating your turn signal
and glancing over your right shoulder to ensure you do not cut too close in front
of the slower vehicle.
40
After a Ride
USE THE CUT-OFF SWITCH:
At the end of the ride, instead of reaching for the ignition key, use your cut-off
switch to shut down the engine. By doing so, you keep both hands securely on
the handlebars. By making a habit of switching off in this way, you also build
‘muscle memory’ which will help you if you have to quickly switch off in an
emergency.
TURN THE IGNITION SWITCH ‘OFF’:
If you do not turn the ignition off, obviously the bike’s lights are still on and the
battery will be discharging. It is good routine to use your left hand (if possible) to
do this as it means you can keep your front brake still engaged.
FUEL VALVE TO THE ‘OFF’ POSITION:
Make it a habit to turn your fuel valve to the ‘off’ position at night, especially if you
intend to park your bike in a garage or indoors. If you do not do this, you run the
41
risk of a valve needle in the carburetor sticking and allowing some fuel to leak out
onto the floor. This can cost you your house and life in case of a fire.
By having to switch the valve onto the ‘Run/On’ position whenever you restart the
bike, you reduce the risk of forgetting the valve in the ‘reserve’ position (had it
been there the night before) and eventually running out of petrol!
SIDE STAND DOWN AND CONFIRM:
When parking the bike, make sure you PUT THE SIDE STAND DOWN and
CONFIRM IT IS LOCKED IN PLACE. Then PUT THE BIKE IN GEAR and
TURN THE HANDLEBARS FULL LOCK LEFT. By doing so, you will avoid the
chance of the bike moving forward (if parked facing down on a slight incline), or if
someone bumps your bike causing it to slip off the stand. Remember to park on a
flat surface. If parking on an incline cannot be avoided, then park with the bike
facing ‘up’ the incline.
TURN HANDLEBARS FULL LOCK LEFT:
If you leave your front wheel pointing straight ahead, the bike can quite easily be
nudged forward, causing it to slip off the stand (especially if not in gear). Make it
a habit when parking, to turn the front wheel full lock left.
42