1
TERMS AND CONDITIONS OF SALE AND LICENSE OF RADIO SHACK COMPUTER EQUIPMENT AND SOFTWARE
PURCHASED FROM A RADIO SHACK COMPANY-OWNED COMPUTER CENTER. RETAIL STORE DR FROM A
RADIO SHACK FRANCHISEE DR DEALER AT ITS AUTHORIZED LOCATION
CUSTOMER OBLIGATIONS
A
II.
CUSTOMER assumes full responsibility fhat this RadiO Shack computer hardware purchased (the ·lqulpmenn. and any COpieS of RadiO
Shack software Included with the Equipment or licensed separately (the "Software') meets the specifications. capacity. capabilities.
versatility, and other requllements of CUSTOMER
CUSTOMER assumes tull responsibility for the conditIOn and eftectlveness of fhe operating environment in which the Equipment and Software
are to function. and for ifs installaflon
RADIO SHACK L1MITEO WARRANTIES ANO CONOITIONS OF SALE
A
B.
III.
LIMITED WARRANTY
For a period of nmety (90) calendar days from fhe date of the RadiO Shack sales document rec8lved upon purchase of the Equipment. RADIO
SHACK warrants to the original CUSTOMER that the Equipment and the medium upon which the Software is stored IS free from manufactUring
detects. THIS WARRANTY IS ONLY APPLICABLE TO PURCHASES OF RADIO SHACK EQUIPMENT BY THE ORIGINAL CUSTOMER FROM
RADIO SHACK COMPANY-OWNED COMPUTER CENTERS. RETAIL STORES AND FROM RADIO SHACK FRANCHISEES AND DEALERS AT ITS
AUTHORIZED LOCATION. The warranty IS vOid If the Equipment's case or cabinet has been opened. or it the Equipment or Software has been
subjected to improper or abnormal use. If a manufactUring defect IS discovered during the stated warranty period. the defective Equipment
must be returned to a RadiO Shack Computer Center, a Radio Shack retail store. participating Radio Shack franchisee or Radio Shack dealer
for repall. along With a copy of the sales document or lease agreement. The original CUSTOMER'S sole and exclUSive remedy In fhe event of
a defect IS limited to the correction of the defect by repall. replacement, or refund of the purchase price, at RADIO SHACK'S electIOn and sale
expense RADIO SHACK has no obligation to replace or repall expendable Ifems
RADIO SHACK makes no warranty 3S to the deSign, capability, capacity. or SUitability for use of the Software, except as prOVided in this
paragraph. Software IS licensed on an "AS IS" baSIS, Without warranty The original CUSTOMER'S exclUSive remedy, in the event of a
SoHware manufactUring defect. IS ItS repall or replacement Within thirty (30) calendar days of the date of the RadiO Shack sales document
received upon license of the Software. The defectIVe Software shall be returned to a RadiO Shack Computer Center. a Radio Shack retail store,
partiCipating Radio Shack franchisee or RadiO Shack dealer along With the sales document
Except as provided herein no employee, agent, franchisee. dealer or other person is authorized to give any warranties of any nature on behalf
of RADIO SHACK
Except as prOVided herein, RADIO SHACK MAKES NO WARRANTIES, INCLUOING WARRANTIES OF MERCHANTABILITY OR FITNESS FOR A
PARTICULAR PURPOSE.
Some states do not allow limitations on how long an implied warranty lasts. so the above Ilmltatlon(s) may not apply to CUSTOMER
LIMITATION OF LIABILITY
A.
EXCEPT AS PROVIDED HEREIN. RADIO SHACK SHALL HAVE NO LIABILITY DR RESPONSIBILITY TO CUSTOMER DR ANY OTHER PERSON
DR ENTITY WITH RESPECT TO ANY LIABILITY, LOSS DR DAMAGE CAUSED DR ALLEGED TO BE CAUSED DIRECTLY DR INDIRECTLY BY
"EQUIPMENT' DR "SOFTWARE" SOLD, LEASED, LICENSED DR FURNISHED BY RADIO SHACK, INCLUDING, BUT NOT LIMITED TO, ANY
INTERRUPTION OF SERVICE, LOSS OF BUSINESS DR ANTICIPATORY PROFITS DR CONSEQUENTIAL DAMAGES RESULTING FROM THE
USE DR OPERATION OF THE "EQUIPMENT' DR "SOFTWARE" IN NO EVENT SHALL RADIO SHACK BE LIABLE FOR LOSS OF PROFITS. OR
ANY INDIRECT, SPECIAL, DR CONSEQUENTIAL DAMAGES ARISING OUT OF ANY BREACH OF THIS WARRANTY DR IN ANY MANNER
ARISING OUT OF DR CONNECTED WITH THE SALE, LEASE, LICENSE, USE OR ANTICIPATED USE OF THE "EQUIPMENT' DR "SOFTWARE"
NOTWITHSTANDING THE ABOVE LIMITATIONS AND WARRANTIES, RADIO SHACK'S LIABILITY HEREUNOER FOR DAMAGES INCURRED BY
CUSTOMER DR OTHERS SHALL NOT EXCEED THE AMOUNT PAID BY CUSTOMER FOR THE PARTICULAR 'EQUIPMENT" DR "SOFTWARE"
INVOLVED
RADIO SHACK shall not be liable for any damages caused by delay in delivering or furnishing Equipment and/or Software
No acflon arising out of any claimed breach of this Warranty or transactions under this Warranty may be brought more than two (2) years
after the cause of action has accrued or more than four (4) years after the date of the Radio Shack sales document for the Equipment or
Software, whichever first occurs
Some states do not allow the limitation or exclusion of incidental or consequential damages, so the above limitatlon!s) or excluslon(s) may
not apply to CUSTOMER
IV.
RADIO SHACK SOFTWARE LICENSE
RADIO SHACK grants to CUSTOMER a non-exclusive, paid-up license to use the RADIO SHACK Software on one computer, sublect to the follOWing
proVIsions:
A
Except as otherwise provided in this Software License, applicable copYright laws shall apply to the Software.
B.
Title to the medium on which the Software IS recorded (cassefte and/or diskette) or stored (ROM) is transferred to CUSTOMER. but not title to
the Software.
C.
CUSTOMER may use Software on one host computer and access that Software thrOugh one or more terminals if the Software permits thiS
function
CUSTOMER shall not use, make, manufacture, or reproduce copies of Software except tor use on one computer and as is speCifically
prOVided in this Software License Customer is expressly prohibited 'from disassembling the Software
CUSTOMER IS permitted to make additional copies of the Software only for backup or archival purposes or if additional copies are required in
the operation of one computer with the Software, but only to the extent the Software allows a backup copy to be made. However, for
TRSOOS Software, CUSTOMER is permitted to make a limited number of additional copies for CUSTOMER'S own use.
CUSTOMER may resell or distribute unmodified copies of the Software provided CUSTOMER has purchased one copy of the Software for each
one sold or distributed. The provisions of thiS Software License shall also be applicable to thrrd parties receiving copies of the Software from
CUSTOMER
G
All copYright notices shall be retained on all copies of the Software
V.
APPLICABILITY OF WARRANTY
A.
VI.
The terms and conditions of this Warranty are applicable as between RADIO SHACK and CUSTOMER to either a sale of the Equipment and/or
Software License to CUSTOMER or to a transaction whereby RADIO SHACK sells or conveys such Equipment to a thrrd party for lease to
CUSTOMER
The limitations of liability and Warranty provisions herein shall Inure to the benefit of RADIO SHACK, the author, owner and/or licensor of the
Software and any manufacturer of the Equipment sold by RADIO SHACK.
STATE LAW RIGHTS
The warranties granted herein give the original CUSTOMER speCifiC legal rights, and the original CUSTOMER may have other rights which vary
fro 10 state to state
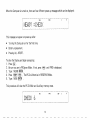
A Special Note to Our Customers ...
To make the TRS-80 PC-2 available to you as quickly as possible, we're providing this Owner's Manual which will
explain how to use the PC-2.
Throughout this manual, we've made reference to the book "TRS-80 PC-2 Programming Guide" (optional/extra).
This manual, which should be available in the Summer of 1982, will be a comprehensive PC-2 BASIC Programming
Manual.
In the meantime, many of your programming questions can be answered by referring to another Radio Shack book
called "Problem Solving on the TRS-80 Pocket Computer" (Catalog number 62-2312).
Thank you,
Radio Shack
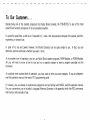
To Our Customers ...
Besides being one of the smallest computers that Radio Shack provides, the TRS-80 PC-2
powerful and versatile computers of its size available anywhere.
IS
one of the most
Its powerful capabilities, as well as its "expandability", make it the ideal personal computer for business, scientific,
engineering, or personal use.
In spite of its size and power, however, the Pocket Computer can be quite simple to use.
determine just how technical a machine you want it to be.
In fact, you can
At its simplest level of operation, you can use Radio Shack cassette programs, RAM Modules, or ROM Modules.
All you will need to know is how to load and run a cassette program or insert a program cartridge into the
Computer.
At a slightly more involved level of operation, you may want to write your own programs. If you are a beginner,
read this operation manual, then read a PC-2 programming guide.
If, however, you are already an experienced programmer and are familiar with BASIC, read this operation manual.
For your convenience, we ve included a Language Reference Summary in the appendix which lists PC-2 commands,
their syntax, and examples of use.
About This Manual
This manual contains operating instructions for the PC-2. The Language Reference Summary includes only those
commands which can be used by the Computer when it is not connected to an optional device (such as Printer/
Cassette Interface).
For a description of the commands which can be used with an optional device, see that peripheral's operation
manual.
For instructions on programming the Computer, see a PC-2 programming manual.
2
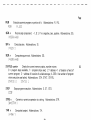
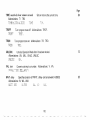
Contents
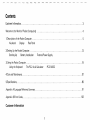
Customer Information. . . . . . . . . . . . . . . . . . . . . . . . . . . . . . . . . . . . . . . . . . . . . . . . . . . . . . . . . . . . . . . . . . . . . .. 3
Welcome to the World of Pocket Computing!
4
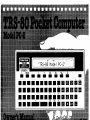
1IDescription of the Pocket Computer
Keyboard
Display
Rear Panel
5
2/Setting Up the Pocket Computer
Starting-Up
Battery Installation
13
External Power Supply
3/Using the Pocket Computer
Using the Keyboard
The PC-2 As A Calculator
19
PC-2 BASIC
4/Care and Maintenance
87
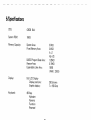
5/Specifications
89
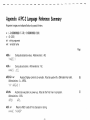
Appendix A/Language Reference Summary
91
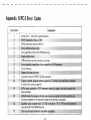
Appendix B/Error Codes
103
Customer Information
3
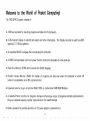
Welcome to the World of Pocket Computing!
The TRS-80 PC-2 system consists of:
• A 66-Key keyboard for inputting programs and data into the Computer.
• A 26-character Display to exhibit data results and other information. The Display can also be used to exhibit
graphics (7 X 156 dot pattern).
• An expanded BASIC Language that includes graphic commands.
• A CMOS microprocessor with more power than the mammoth computers of a few years ago.
•
Read Only Memory (ROM) which contains the BASIC language.
•
Random Access Memory (RAM) for storage of programs and data even when the Computer is turned off
(amount is expandable up to 24K, optional/extra).
• Expansion area for plug-in of optional RAM, ROM, or combination RAM/ROM Modules.
• A Cassette/Printer Interface for long-term storage and hard-copy output of programs and data (optional/extra).
Requires a separate cassette recorder (optional/extra) for cassette storage.
• Battery powered for portable operation or DC power adaptor (optional/extra).
4
.----,
,-.....~-_.....---,,--.~---------.--.-.---,,-
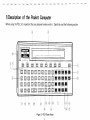
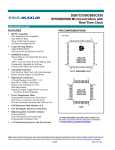
1/Description of the Pocket Computer
Before using the PC-2, it's important that you become familiar with it. Carefully read the following section.
P,c, c', P,P'M""
@-
2CD
.:~t&;j;-.
'= ~OWERr
rL
@-
MeMOR,
l·t":1JHW
TRs-ao
iJJ
@ill
f-
I. '
~
I[TI)I
u
"
S
%
&
,I
1[£]]1 I[ITJI 1lI:El1 I[TI]!
IlTIJl
~
.,
_Ill
ill
~~mmrn~mru[£]W. g g
~ rnJ []] [1] [g] [E]
~ rnJ ~
g g ~
rn
[[] [EJJ [£]
@
n
ru m ~ [E] mml riff] II II R
A
~
[I]
E§ I
@
@
@
SPACE
II II
ENTER
III~
-
$I¢J g II II 'D
1 1 1
@ @ @
@ L@
eb
1=
I
®
@
~I
Figure 1. PC-2 (Front View)
5
®
CA
'-- 9"
@
@
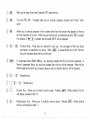
When you're ready to turn the Computer OFF, press this key.
Turns the PC-2 ON.
rupt).
If pressed while you are running a program, execution will "break" (inter-
Allows you to execute programs at line numbers which have had certain keys assigned to them as
the first character of the line. Other keys permanently act as command keys after .@f) is pressed.
For instance, if (DEF) CQJ is pressed, the command INPUT will be displayed.
8)
CIT) ~ @)
Function Keys. These keys are reserved for your use. You can assign to them any values,
commands, or statements you desire. When (SHIFT) is pressed before any of the Function
Keys, the character above the key will be used.
In Lowercase Option Mode (SMALL), any alpha-key pressed after this key will be uppercase. In
Normal (uppercase) Mode, any alpha-key pressed after this key will be lowercase. Press this key
before pressing key which has a character above it and the character above it will be displayed.
®
C£J
(j) C:J
®
~
IT)
(ill ~
Alphabet keys.
W
Number keys.
?
CD
Division Key. Allows you to divide numeric values.
will display a question mark (n.
Pressing (SHIFT)
Multiplication Key. Allows you to multiply numeric values.
this key will produce a colon ( :).
6
before pressing this key
Pressing (SHIFT)
before pressing
,
@G
Subtraction Key. Allows you to subtract numeric values.
key will produce a comma (,).
Pressing
(SHIFT)
before pressing this
,
@CB
@
Addition Key. Allows you to add numeric values. Pressing (SHIFT) before pressing this key produce
a semicolon (;).
CA
(Cl)
Clear Key. Pressing this key will clear the Display and "release" errors. Pressing (SHIFT) before
pressing (Cl) will activate the CA (reset) function. This will clear the display and reset the Computer.
Pressing this key will specify either the RUN or PROgram Operation Mode. Pressing (SHIFT) (MODE)
will specify RESERVE operation mode.
<
>
@ TCD
Parentheses Keys. Pressing (SHIFT)
Than symbols .
@ CD
Display previous program line. Pressing (SHIFT) before pressing this key will produce a square
root ( v ) sign and allow you to compute the square root of a numeric value.
..
before pressing these keys will produce the Greater Than/Less
7l:
@ CD
Display next program line. Pressing (SHIFT) before pressing this key will produce a PI (
and allow you to use a stored value of PI in your computations.
@
Lowercase Option Key. Press once and lowercase (small) letters will be used.
normal (uppercase alpha-) character display will be used.
(SMl)
@GJ
11"
)
sign
Press again and
Reserve Mode Change. Since each of the six Function Keys can be assigned values in each of
three modes 1/II/III - pressing this key will move the Computer to the next Reserve Mode.
7
Recall Key. Pressing this key one will display the function key menu for the current reserve mode
(l/II/III). Pressing this key again will recall the contents of the original display.
Spacerbar Key.
Pressing this key will advance the Cursor, leaving a blank space. Press (SHIFT)
before pressing this key and the Exponential symbol will be produced and allow you to raise a
numeric expression to a power.
When you press this key, whatever you previously typed will "enter" the Computer's memory.
This key is similar to the Carriage Return key on a typewriter. You must press (ENTER) before the
PC-2 will accept alphanumeric input from the keyboard.
DEL
@G]
Backspace Key. This key allows you to move the Cursor to the left without erasing previously
typed characters. Pressing (SHIFT) before pressing this key will DELete whatever character the
Cursor is "on top of."
INS
@CB
@
Forward Key. Pressing this key allows you to move the Cursor to the right without erasing previously typed characters. Pressing (SHIFT) before pressing this key will allow INSertion of characters
directly before the character the Cursor is "on top of."
Printer/Cassette Interface Connector Cover. Remove the Cover to attach the PC-2 to the Printer/Cassette
Interface. See Printer/Cassette Interface owner's manual for details. (And attach the Cover to the
bottom of the Interface so you won't lose it!)
8
CD{-
0{-
(2)
8)
{-
{-
®
{-
®
{-
BUSY
SHIFT
SMALL
DEG
RUN
DEF
(j)
{-
®
{•
]
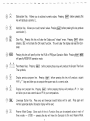
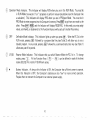
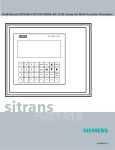
Figure 2. Sample PC-2 Display
CD
BUSY
o
SH 1FT
Program Execution Indicator. This Indicator is on during program execution. When program
execution is complete, the Indicator goes off. The PC-2 will not turn off (manually by pressing
@ or automatically after seven minutes) when the BUSY Indicator is on.
Sh ift Key I ndicator. This I ndicator is on whenever (SHIFT) has been pressed. Press any key (except
CQID ) and the Indi cator wi II go off.
(SML) or
G)
SMALL
Lowercase Option Indicator. This Indicator is on whenever the Computer is in Lowercase Option
Mode (the Computer can display either upper- or lowercase letters). Press (SML) to turn the Indicator on; press again to turn off.
Angular Measurement Indicator. This Indicator will display the current unit of angle for the input of trigonometric functions: DEG for "degrees." (To compute in degrees, type DEGREE (ENTER) ); RAD for
"radians." (To compute in radians, type RADIAN (ENTER) ); GRAD for "gradients." (To compute
in gradients, type GRAD (ENTER) ). The Computer will use a measurement mode until you tell it
to do otherwise.
a
®
Operation Mode Indicator. This Indicator will display RUN when you are in the RUN Mode. You must be
in RUN Mode to execute ("run") programs or perform manual calculations (use the Computer like
a calculator), This Indicator will display PRO when you are in PROgram Mode. You must be in
PRO Mode to enter programs into the Computer's memory. Press (MODE) to go from one mode to the
other. Press (SHIFT) (MODE) and the Indicator will display RESERVE. In this mode, you may assign
values, commands, or statements to the Function Keys as well as set up Function Key menus.
®
DEF
Definable Mode Indicator. This Indicator lights up when you press @ill . When the PC-2 is in the
RUN mode, pressing @IT) followed by a program label key (see Table 2) will allow you to run a
labeled program. I n any mode, pressing (ill) followed by a command instruction key (see Table 1)
allows easy use of keywords.
(jJ
l/1I/1II
Reserve Mode Indicator. This Indicator tells you which Reserve Mode the PC-2 is in. To change
modes, press W . All six Function Keys (
~ CE§) ) can be defined in each of the three
modes O/II/IIO for a total of 18 different val ues.
® •
em
Battery Indicator. As long as this Indicator is ON, the Computer has sufficient power to operate.
When this Indicator is OF F, the Computer's batteries are too "low" to insure correct operation.
Replace them or connect the Computer to an external power supply.
10
/
®
1(\
IV
0
~
0
t=:::t=J
0
..---
([
~o
' - - I--
(-
~o
0
0
CD
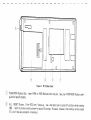
Figure 3.
CD
o
RAM/ROM Module Slot.
guide for specific details.
PC-2 (Rear Panel)
Insert RAM or ROM Modules into this slot. See your RAM/ROM Module user's
ALL RESET Button. If the PC-2 ever "hangs up, , use a ball-point pen to press this button while pressing
(ON) . Hold the button and key down for about 15 seconds. Be aware, however, that memory will be erased
(I. E. you'll lose any programs in memory).
®
o
®
Identification Tag. Place the permanently adhesive Identification Tag here.
Battery Cover. Remove this Cover to gain access to the batteries which supply power to the PC-2. Be careful
not to lose the screw which secures the Cover; it is not attached to the Cover when removed.
External Power Supply Jack. If you have an external power supply adaptor (optional/extra), plug it in here.
12
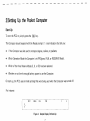
2/Setti ng Up the Pocket Co mputer
Start-Up
To turn the PC-2 on, simply press the (ON) key.
The Computer should respond with the Ready prompt ( > ) and indicators that tell you:
•
If the Computer was last used to compute degrees, radians, or gradients.
•
Which Operation Mode the Computer is in (PROgram, RUN, or RESERVE Mode).
•
Which of the three Reserve Modes 0, II, or III) has been selected.
•
Whether or not there's enough battery power to use the Computer.
On start-up, the PC-2 uses all mode settings that were being used when the Computer was turned off.
For instance:
SHIFT
SMALL
DEG
RUN
....
Figure 4. Sample Display On Start-Up
When the Computer is turned on, there are four different power-up messages which can be displayed:
PRO
DEG
:: i...:i···Ii:::;::::i<:
This message can appear on power-up after:
•
Turning the Computer on for the first time.
•
Battery replacement.
•
Pressing ALL RESET.
To
1.
2.
3.
4.
5.
clear the Display and begin computing:
Press @ .
Be sure you are in PROgram Mode. If not, press ~ until PRO is displayed.
Type: NEW0 (ENTER) .
Press (SHIFT) (M~) , The PC-2 will then be in RESERVE Mode.
Type: NEW (ENTER) .
This procedure will clear the PC-2's Main and Auxiliary memory areas.
OEG
CHl-CK
PRO
t;
14
DEF
If this message appears, it means that one of the peripheral devices (such as a Printer/Cassette Interface) is not
operating properly. Press @) to clear the display and continue computing.
DEG
RUN
.]
II
".
",
The Display will look like this on normal power-on and when optional devices or memory modules are connected.
DEG
PRO
m
.]
This is a sample display. Whenever the PC-2 turns itself off automatically (when the PC-2 has not been busy and
a key has not been pressed for seven minutes), press (QR) to turn the Computer back on. When you do so, the
previous display will appear.
Note: If the ARUN statement is used as the first command in a program, the PC-2 can start up with the BUSY
I ndicator ON.
If you press (ON) while a program is running, it serves as a BREAK key. The program will stop execution and
display the line number at which the "break" took place.
Press CTI and the portion of the program line that had just executed will re-appear. Press CIJ again, and the
next program step will execute. Type CaNT (ENTER) to continue program execution after a break.
15
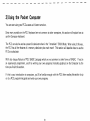
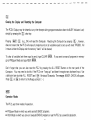
Turning the Computer OFF
When you're ready to turn the PC-2 OFF, press the (Qffi key. The Display will then clear (be erased).
If the BUSY indicator is on, press BREAK before pressing (Qff) .
When it is turned off, the PC-2 remembers programs, mode settings, Definable Keys, etc. that were being used
when the Computer was turned on. When you turn the Computer back ON, those settings will be displayed and
the program will be in memory.
(The PC-2 forgets only when you remove the batteries without first connecting an external power supply or when
you clear memory!).
Note: You cannot turn the Computer off when the BUSY light is on.
Battery Installation
We suggest you use Radio Shack Type AA Alkaline batteries (Radio Shack Catalog Number 23-552).
To install the batteries:
1.
If you wish to preserve the contents of memory, connect the PC-2 to an optional external power supply.
2.
Place the PC-2 upside down on a soft, non-abrasive surface (such as a foam rubber pad).
16
3.
Use a coin to carefully loosen the small screw which holds the Battery Cover in place. (Do not lose the screw!)
4.
Slide the Cover sideways until it is free from the Computer.
5.
Insert four Type AA alkaline batteries into place, matching the battery outline (in the battery slot of the
Computer) with the actual shape of the battery. (Place the "spring" against the bottom ("-") end of the
battery.)
6.
Replace the Cover and tighten the screw.
If you used an external power supply, disconnect it from the PC-2 before turning the Computer ON. (If the
Battery Indicator does not come on, check to make sure the batteries are installed properly.) Then press ALL
RESET (on the back of the Computer). The message NEWO?: CHECK will be displayed. Press (~) and the
Ready prompt ( > ) will appear.
External Power Supply
The PC-2 can be used with external power supply sources (optional/extra) such as the one provided with the PC-2
PRINTER/CASSETTE INTERFACE (26-3605).
The PC-2 will not "recognize" that an external power source is connected to it until the adaptor is plugged into
the Computer (on the right side of the PC-2) and into a wall outlet.
The Battery Indicator light should be ON whenever an external power source is connected to the Computer. If
it is not ON, the power supply could be defective. Disconnect the power supply and see if the Indicator comes ON
17
when the PC-2 is powered by batteries. If the Indicator does not come on, replace the batteries. If the Indicator
still does not come on, check with your local Radio Shack store.
Note that an external power supply will not recharge the batteries. When the batteries are low, replace them.
18
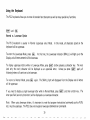
3/Using the Pocket Computer
You can start using your PC-2 as soon as it's been turned on.
Since many symbols on the PC-2 keyboard are not common to other computers, this section will explain how to
use the Computer keyboard.
The PC-2 can also be used as a powerful calculator when in the "immediate" (RUN) Mode. When using it this way,
the PC-2 has all the features of a memory calculator plus much more! This section will describe how to use the
PC-2 as a calculator.
We'll also discuss features of PC-2 BASIC Language which are not common to other forms of BASIC. If you're
an experienced programmer, you'll be writing your own programs (including graphics) on the Computer by the
time you finish this section.
If this is your introduction to computers, you'll be familiar enough with the PC-2 after reading this section to go
on to a PC-2 programming guide and write your own programs.
19
Using the Keyboard
The PC-2 keyboard allows you to enter all standard text characters as well as many special key functions.
(SHIFT)
and
~
Normal vs. Lowercase Option
The PC-2 keyboard is usually in Normal (uppercase only) Mode.
keyboard will be uppercase.
In this mode, all characters typed on the
To enter the Lowercase Mode, press ~ . At this time, the Lowercase Indicator (SMALL) will light up on the
Display and all letters entered will be lowercase.
To display uppercase letters while in Lowercase Mode, press (SHIFT) before pressing a character key. The next
(and only the next) character will be displayed as an uppercase letter. Unless you press (SHIFT) again, all
following letters will continue to be lowercase.
To return to Normal Mode, press ~ again. The SMALL light will disappear from the Display and all letters
will be uppercase.
If you need to display a single lowercase letter while in Normal Mode, press (SHIFT) and then a letter key. The
letter specified (and only that letter) will be displayed as a lowercase character.
Note: When using lowercase letters, it's important to note that program instructions (commands such as RUN,
etc.) must be uppercase. The PC-2 does not recognize lowercase statements or commands.
20
(~)
Clearing the Display and Resetting the Computer
The PC-2's Display may be cleared at any time (except during program execution when the BUSY Indicator is on)
si mply by pressi ng the (CL) clear key.
Pressing (SHIFT) (~) (e.g., CAl will reset the Computer. Resetting the Computer by pressing CID ,however,
does not mean that the PC-2 will erase all programs and set all variables equal to zero as with most TRS-80's. All
it means is that the Display and the memory "stack" will be cleared.
To clear all variables (set them equal to zero), type CLEAR (ENTER) . If you want to erase all programs in memory
go to PROgram Mode and type NEW (ENTER) .
Don't forget that you can also reset the PC-2 by pressing the ALL RESET Button on the rear panel of the
Computer. You may need to do this if the PC-2 ever "hangs up" and doesn't recognize any keyboard input. Use
a ball-point pen to press ALL RESET (and (ON) ) for about 15 seconds. The message: NEWO?: CH ECK will appear.
Press (CL) or (ON) to return to the Ready prompt ( > ).
(MODE)
Operation Modes
The PC-2 uses three modes of operation .
• PROgram Mode in which you write and edit BASIC programs.
• RUN Mode in which you can run (execute) BASIC programs or use the PC-2 as a powerful calculator.
')1
• RESERVE Mode where you assign values to Function Keys and set up Function Key menus.
The Operation Mode Indicator (on the Display) will tell you which mode the Computer is in.
Press the (MODE) key to enter either PROgram or RUN Mode (the Indicator will change).
Press (SHIFT) (MODE) to enter RESERVE Mode.
PROgram Mode
Whenever the Operation mode I ndicator displays PRO, the PC-2 is in the PROgrammable Mode and you can write
BASIC programs.
The PROgram Mode is used only for writing programs. All program lines must begin with a number between 1
and 65279, followed by a program instruction. (If you're typing a long program, we suggest you type in the line
65279: END in advance.) You must always press (ENTER) to enter the program line into the Computer's memory.
For instance, type 50 PRINT X (ENTER) . After you press (ENTER) ,the Computer will display: 50: PRINT X
You cannot use the PC-2 as a calculator (sometimes referred to as "immediate mode calculations") while it is
in PROgram Mode. For example, you cannot instruct the Computer to compute the answer to 2 + 2 when it
is in PRO Mode. It will interpret the first "2" as program line number 2 and create a program line consisting of
1J+2".
In the same sense, if you attempt to enter an alphabet character that has not been assigned a numeric value and
that is not preceded by a number (e.g., a line number), the Computer will return a zero (0) on the right side of the
Display when you press (ENTER) . This is just the PC-2's way of telling you that you entered an invalid entry into
22
its memory.
RUN Mode
Once programs have been entered into the Computer's memory, you can run (execute) them in the RUN Mode.
To enter the RUN Mode, press (MODE) until RUN appears on the Display. Then type: RUN (ENTER). The Computer will go to the first program line number in memory and execute it.
There are, however, a few ways to begin a program without typing RUN.
For instance, you might want to assign the RUN command to a Function Key. Try
example. (See CID ~
Function Keys for details.)
ern
CID , Reserve Mode I
as an
When F1: is displayed, type RUN (ENTER) . Then go to RUN Mode and press CID . The Computer will display
RUN _. Press (ENTER) and program execution will begin with the first program line in memory.
Hint: Assign RUN @ to CID . When you press CID in RUN Mode the program will automatically run without
your having to press (ENTER) . When it follows RUN or any other command, the @ sign serves the same purpose
as pressing (ENTER) .
Another way to RUN a program is to assign Definable Key labels to certain line numbers within a program. (See
Definable Keys for more details.) Then, when you want to RUN a specific program, simply press (ffi) followed
by the key label. You will not have to type RUN (ENTER) .
The PC-2 can also be used as a calculator (make that a super calculator!) when it is in the RUN Mode.
For details on using the PC-2 as a calculator, see Using the PC-2 As A Calculator later in this manual.
RESERVE Mode
To enter the RESERVE Mode, press (SHIFT) (MODE) . RESERVE will appear on the Display.
In this Operation Mode, you can assign commands, statements, or values to any of the Function Keys ( CID ~
in any of the three Reserve Modes (I/II/III) for a total of 18 different Function Keys. To go from one
Reserve Mode to another, press CIJ and the Display will change from I to II to III.
CEID )
For instance, CID
value in Mode III.
can be assigned one value in Reserve Mode I, a different value in Mode II, and still another
To use a Function Key which has two or three values, press
Function Key.
CIJ
to change modes, then press the appropriate
Any value, statement, or command which the PC-2 recognizes can be assigned to a Function Key. You'll find it
most convenient to assign common command statements (such as RUN or TIME) which you might use very
frequently. You might also assign long mathematical functions or command lines to a key. Then, instead of typing
them over and over, just put the Computer in the appropriate Reserve Mode and press the proper Function Key.
The value assigned to a Function Key can be any number of characters in length up to a maximum of 77.
However, the total number of characters for all 18 Function Keys cannot exceed 77. When the maximum number
of characters is reached, Error 13 will result. Press (ENTER) . The value will be assigned and the PC-2 will return to
the Ready prompt.
24
If a function key has not been assigned a value and you press it, the symbol above the key (!, #, $, etc.) will be
displayed.
To make a Function Key assignment:
1.
Be sure you're in the appropriate Function Key Mode (1/11/111) (press
to II to III). Use I for this example.
2.
Press a Function Key ( (II) ~
CfID ).
CD
and the Indicator will go from I
Use (II) for this example.
3. The Display will show:
DEG
[ ;::1'
: J.::
4.
Type the characters you want to assign to the key.
5.
Press (ENTER) to enter the value.
RESERVE
_ _.
• 1
J
For example, you might want to assign the TIME statement to ill) . Type TIME @ (Remember that @ will
serve the same function as pressing (ENTER) ) and the Computer will display:
F1 = .Irl I tliE
RESERVE
DEG
::;.1 .....
Press (ENTER) .
Whenever the Computer is in PROgram or RUN Mode (and Reserve Mode I), and you press
line will be displayed or executed immediately.
In this instance, the PC-2 would display the current time and date as soon as you pressed
C£D
,the command
C£D .
Since it's easy to forget what is stored in a Function Key, the Computer has a couple of ways of reminding you
what values are currently assigned.
One way is to create a "menu" which displays all at once whatever has been assigned (or abbreviations of
what's been assigned) to Function Keys in a specific Reserve Mode.
A menu cannot be more than 25 characters or spaces in length. Consequently, you'll find it a good idea to use
abbreviations of one sort or another when creating menus.
For instance, a typical menu might be:
26
DEG
PRO
lRUN2iIMF3~REA4]:t·~~(~~i~iE:~:6MO
In this instance, the menu lists the individual Function Keys (1 - 6) along with abbreviations that identify the
complete value assigned to a particular key.
Once a menu has been entered into the Computer's memory, you cannot edit or change that menu. To change
the menu (e.g., if you add more values to Function Keys), you will have to re-type the entire menu for that Reserve
Mode.
To set up a menu:
1.
Assign values to one or more of the Function Keys.
2.
When the > prompt is displayed (and you're in the RESE RVE Mode you want tion mark (" ).
3.
Type the value (or an abbreviation) assigned to the keys in the order which they were assigned.
4.
When the list is complete, type another quotation mark (") and press (ENTER) .
I, II, or III), type a quota-
Once a menu has been set up, you can access it from either RUN or PROgram Mode, even if you're in the middle
of entering a program line. Just press (RCL) and the menu for the current RESERVE Mode will be displayed. If
you want to check another RESERVE Mode, press (]J . To get back to the original program line you were
typing in, press ~ again. The Cursor will be positioned exactly where you left off, ready for you to continue
inputting data.
When you exit the RESERVE Mode (for example, go to RUN Mode), simply press CD and the menus indicating
the Function Key assignments you have made in each RESERVE Mode will be displayed.
Another method lets you check the contents stored in each key one-at-a-time. Just go into a Reserve Mode
(I/Il/III) and press a Function Key (such as CfI) ). The contents of that key's memory will be immediately
displayed. However, you will lose whatever was previously on the Display.
@)
Definable Keys
Definable Keys let you use the alpha-keys (and a couple of others) for purposes other than their obvious intent
(e.g., to display letters).
There are two types of Definable Keys the PC-2 recognizes:
• Keys which have permanently been assigned BASIC statements (such as PRINT, INPUT, etc.). See Table 1.
• Keys which can be used to label program line numbers. See Table 2.
To use a definable key that has been assigned to a BASIC command line number, press (~) , then the key of the
statement you need to use.
28
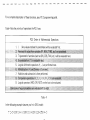
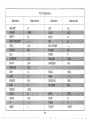
Command Instruction Keys
Key
Command
INPUT
Table 1
* These commands will only be displayed if the PC-2 is connected to the optional/extra Printer/Cassette Interface.
If you use these keys when the Computer is not connected to the optional device, a "~,, will appear.
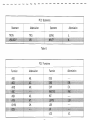
?Q
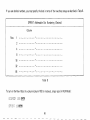
Program Line Number Definable Keys
Table 2
Note that Definable Keys are divided according to rows. The top row of alpha-keys have permanently assigned
program statements; the bottom two rows of alpha-keys (and the equals key and spacebar) are used for labeling
program line numbers.
For instance, you'll probably use the PRINT statement several times in a single program. Instead of typing it over
and over, just press @f) 0iD when you're ready to use the statement in a program line (or in immediate mode).
The statement PRINT will immediately be displayed. Then just type in whatever you want the Computer to
PR INT and press (ENTER) . You can do the same with any other of the statements listed in Table 1.
30
The Command Instruction Defined Keys may be specified in any of the Operation Modes (RUN, PRO, or
RESERVE).
If you are using the Computer by itself (e.g., the Computer is not connected to the Printer/Cassette Interface)
and you press (ill) 0:0 (CSAVEj, (ffi) OJ (CLOAD), or (ffi) CQ) (MERGE), the Computer will display "~".
This simply tells you that the command you specified cannot be used because the Interface is not connected.
Once the Interface and Computer are connected, however, you can specify these commands even if the Interface
is not connected to a Cassette Recorder.
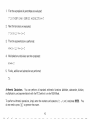
The second set of Definable Keys allows you to begin program execution at a maximum of 18 different program
line numbers.
The first step is to "label" a program by specifying one of the allowable keys in the first line of the program.
To do this:
1. Type the program line number.
2.
Type a quotation mark (").
3.
Type an allowable key (see Table 2).
4. Type another quotation mark (" ).
5. Type a program instruction.
For instance:
31
A II
~,jA I
110 FDF:
;"1-.1.
100
II
T 5: PEN Th i...::. Pt-·o9r·o.m
co,-mt·::. to 10.
TO leI
1·..= ...... 1
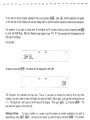
Hint: When you come to line 120 in this example, type: 120 (ffi)
l ·-:· n
.1-"_'
0fD CX)
and the Computer will display:
pp TJ, I'.IT
',.:'
ill
I
I'.
1_
When you're ready to run the program, set the Computer in RUN mode (press (MODE) until RUN appears on the
Display); then press (@) CXJ . The program will begin execution.
You might then want to begin another program at line 200 and label it as "B". When you want to run it, press
@)W.
Cffi
~
(ffi
Function Keys
The keys
Cffi
through (ffi are reserved for your use. You can assign to them any values (program lines, BASIC
32
commands, numeric values, etc.) you want.
Function Keys can be assigned when the PC-2 is in the RESERVE Operation Mode. For instructions on assigning
values to keys CID ~ C£ID ,see RESERVE Mode earlier in this manual.
GJ
Reserve Mode Change
An additional Function Key feature is that the PC-2 really has 18 Function Keys, not just six.
Press the GJ key a few times. Notice that Reserve Mode Indicator (in the upper right of the Display) changes
from I to II to III and back to 1.
For details on using
GJ ,see RESERVE Mode earlier in this manual.
(RCL)
Recall Function Key Assignments
The Recall Key ( (RCL) ) acts as a "toggle" between whatever is on the Display at any particular time and the
menu of Function Key assignments for whichever Reserve Mode (l/II/III) is indicated.
For instance, let's say you are writing a program line (in PROgram Mode) and need to use a value assigned to a
Function Key. The problem is you've forgotten what values were assigned to what key. You can press GJ to
recall the menus in the different Reserve Modes (see RESERVE Mode) and then, by pressing (FlCi.) ,yOU can
"toggle" the Display between the program line you are working on or viewing, and the menu line for the current
RESERVE Mode.
To recall the menu you created for a specific Reserve Mode (see RESERVE Model, press (~) . The menu for
the current Reserve Mode will be displayed. Press (~) again and the program line you were currently typing in
will be displayed and you can finish entering the line.
CD
Display the First/Next Higher Program Line
Anytime the Computer is in the PROgram Mode, you can press
in memory will be displayed.
If you are writing or editing a program, pressing
CIJ
CD
and the first line of the program that's
will display the next program line.
Holding CD down will activate a "repeat" function and the Computer will "scroll" (e.g., automatically go from
one line to the next one) until the last line of the program is reached.
Hint: If you have a long program and want to look at specific program line without scrolling through the entire
program, type: LIST line number (ENTER) . For example: LIST 120 (ENTER) .
When you press (SHIFT)
CD , the Computer will
For example, in the RUN Mode, press (SHIFT)
of the Display (3.141592654).
display
CIJ
1r
(the pi symbol). (Pi = 3.141592654).
and (ENTER) . The value of PI will appear on the right side
34
(SHIFT)
CD
CD
(PI) can be accessed from any of the Operation Modes.
also has several other features.
For instance, if you stop program execution (in RUN Mode) by pressing BREAK, the Display will indicate the
program line in which the"break"occurred. Press (MODE) to go to PROgram Mode, then press CD (or CD ). The
program line where the break occurred will be displayed and the Cursor will be positioned in the exact part of
the line where execution stopped. Press CD again and the next program line will be displayed. (Press CD and
the previous program line will be displayed.)
Whenever the PC-2 encounters an error in a program line, an error message (which indicates which error and which
program line) will be displayed. Press (el) (to clear the Display) and (MODE) (to enter PROgram Mode). Then press
CD (or CD ) and the program line which contains the error will be displayed. Furthermore, the Cursor will
be on top of the part of the line which generated the error message. You can then correct the program line.
If you ever need to "single-step" through a program, press BREAK after the program has begun execution, then
press (g::) to clear the Display. When the Ready prompt appears, press CD and the next program step will be
executed. Press it again and the next step will run. You'll find this technique especially helpful when "debugging"
programs.
CD
Display the Last/Next Lower Program Line
Whenever the PC-2 is in the PROgram Mode, you can press
then press CD to scoll "up" through the program.
35
CD
to display the last line of the program. You can
If the current line is in the middle of a program, pressing
CD will display the next lower numbered program line.
Holding CD down will activate a repeat function and the Computer will scroll "up" through the program until
the first program line is reached.
When you press (SHIFT)
GJ
,the Computer will display
"y".
CD
can be used much the same as [ [ ) except that you cannot single-step through a program by pressing CD .
Pressing and holding down (]J in the RUN Mode after BREAK has been pressed will display the program line
which was executed just before the "break" occurred.
Another difference is that (in the RUN Mode), pressing CD after an error message has been displayed will display
the program line with the Cursor positioned on the cause of the error. The offending line will be displayed only
as long as you hold down CD. Release CD and the error message will disappear, press CD and the line will
appear. To correct the line, press @, go to PROgram Mode, then press CD or (]J and begin editing.
8)
Backspace Cursor/Delete Character
Any time you are writing or editing a program line, you can move the Cursor to the left by pressing 8 ) . Doing
so wi II not erase any existing character.
When the Cursor is in the "current" position while typing characters which appear on the Display, it appears as
36
an underline ( _). Pressing G) will back the Cursor up one space and change it to a blinking block ( -).
Holding down G) will activate a repeat function and the Cursor will automatically move "backwards" until
the first character in the line is reached.
The Cursor can be backspaced in any of the Operation Modes.
Pressing
(SHIFT)
before pressing ~ will activate the Delete function.
This function will erase whatever character (or space) the Cursor is "on top of" although the change will not be
"saved" until you press (ENTER).
A typical use of ~ might be to position the Cursor so it is on top of a character that doesn't need to be there.
Then you could press (SHIFT) ~ and the character would be erased. For example, a program line might be:
100 FOR
~<==1
TO 100_
where the Cursor is at the end of the line.
1.
Press ~ until the Cursor is on top of one of the equal signs.
2.
Press
(SHIFT) ~
and the Computer would display:
1 TO 1 C1CI
3.
Press (ENTER) to enter the "new" program line into memory.
37
If you press CD or CD to go on to another program line, the Computer will not realize you have changed a line.
Any time a program is edited (changed), you must press (ENTE~ after the change!
Note that you can only delete one character at a time. If you want to erase two characters that are next to each
other, you will have to position the Cursor and press (SHIFT) ~ twice.
When (SHIFT) ~ deletes a character, it also deletes the space the character filled and all characters to the right
will move over one space to the left. (You can also delete a character by pressing (SPACE) but this puts a space
where the character was.)
CB
Forward Space/Insert Characters
When you need to move the Cursor "forward" (to the right) without erasing characters, press
CB .
Notice that this is not the same as pressing (SPACE) . If ,the Cursor is displayed at the beginning of a program line
and you move the Cursor by pressing (SPACE) ,you will erase a character, leaving a blank space in its place.
If you hold CB down, a repeat function will be activated and the Cursor will automatically move to the right
until the end of the line is reached.
If you press (SHIFT) before pressing CB , you will put the Computer in the Insert Mode and you can insert a new
character between two existing ones. This will not replace any of the characters; it simply creates a blank space
between them so you can put a new character there.
38
For instance:
100
F~OR
X=TD 100_
The underline is the "current" position of the Cursor and you need to insert the number 1 before TO.
1. Press 8 ) until the Cursor is on top of the T (in TO).
2.
Press (SHIFT) C8 and the Computer will push all characters including the character under the Cursor one
more space to the right. The Cursor, however, will remain in the same position and two square brackets on the
top and bottom of the line will appear.
3.
Press
4.
Press (ENTER) to enter the line into the Computer's memory.
CJ[) .
You must press (ENTER) before going on to another line or your changes will not be in effect.
Using the PC-2's Calculator
Whenever it is in the RUN Mode, the PC-2 can also be used as a powerful scientific calculator with 10 digit
precision and memory capabilities. Furthermore, you can combine calculator and programming instructions.
Note that no more than 80 characters (79 plus (ENTER) ) may be entered into the Computer when it is being used
as a calculator. Also note that any Function Key assignments can be used in the calculator mode as well as the
PROgram Mode.
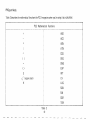
Table 3 describes the mathmatical functions the PC-2 recognizes when you're using it as a calculator.
PC-2 Mathematical Functions
+
ASS
ACS
*
ASN
ATN
/
COS
(
DEG
)
DMS
<>
EXP
E
INT
LN
V
(square root)
LOG
7(
SGN
SIN
SQR
TAN
Table 3
40
For a complete description of these functions, see a PC-2 programming guide.
Table 4 lists the priority of operations the PC-2 uses.
PC-2 Order of Mathematical Operations
1.
) Any values enclosed in parentheses will be evaluated first.
Table 4
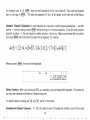
In the following example (assume you're in DEG mode):
("':2+3+:::;OP( 144 ).·SOP( 81 :w:;HH 120+150 ):t:-3
41
1.
First the expressions in parentheses are evaluated:
2.
Next the functions are evaluated:
3.
Then the exponentiation is performed:
4.
Multiplication and division are then completed:
49+4+3
5.
Finally, addition and subtraction are performed:
Arithmetic Calculations. You can perform all standard arithmetic functions (addition, subtraction, division,
multiplication, and exponentiation) with the PC-2 while it is in the RUN Mode.
To perform arithmetic operations, simply enter the numbers and operators (+, -,
do not need to press @
to generate the answer.
42
*, etc.) and press (ENTER) .
You
If you want to see the original expression after you've pressed (ENTER) , press G) and the expression will appear
on the left side of the Display and you can change (edit) or perform another calculation based on the expression.
For example, if you want to know what 10 multiplied by 10 is without having to write a program,press(MODE)
to enter the RUN Mode. When the Ready prompt appears, type 10 10. The expression will be displayed on the
left side of the Screen.
*
For example:
13
1:t :j,e._"".
_DEG
RUN_~~
..•
]
As soon as you press (ENTER) , the answer will be displayed on the right:
DEG
-~~--~~-~----
RUN
--100]
I .
.
.:: :."::.":
The Computer will remember the result too. That is, if you want to multiply the result by 7[ (or any other
number), you don't have to clear the Display and type the result (100) in again. Just type the multiplication sign
(*). The result and * will move to the left side of the Display. Then type (SHIFT) wand press (ENTER) . The
new result will appear on the right side.
Raising to a Power.
To raise a number to a power, type the number (or numeric expression) you wish to
exponentiate, press (SHIFT) (SPACE) , the value of the power you wish to raise to, and press (ENTER) . For instance,
type:
and the PC-2 will display the answer (64 in this easel.
Scientific Notation. Scientific notation is available simply by using the IT] key. For example:
Trigonometric Functions.
is in RUN Mode.
The PC-2 allows you to use the trigonometric functions listed in Table 2 whenever it
Functions are entered in the same order as you would write them on paper. This is different from a calculator
which requires the argument first, then the function. To find the arctangent of 7/3, type:
Press (ENTER) and the result (66.80140949 in DEG model will appear.
If you are in Degree Mode, the result will be displayed in degrees; if you are in Radian Mode, the result will be in
radians.
44
To set the PC-2 to the appropriate Angle Calculation Mode:
• To set the PC-2 to Degree Mode, type DEGREE (ENTER) and the Indicator will display DEG. In this mode,
all angles are expressed in degrees.
• To set the PC-2 to Radians Modes, type RADIAN (ENTER) and the Indicator will display RAD. In this mode,
all angles are expressed in Radians.
• To set the PC-2 to Gradient Mode, type GRAD (ENTER) and the Indicator will display GRAD. In this mode, all
angles are expressed in Grads.
Note: Pressing ALL RESET will return the PC-2 to Degree Mode.
Calculator Memory. Like a calculator, the PC-2 can store numbers in memory locations when it is being used as
a calculator. Unlike a calculator, the PC-2 has 52 fixed memory variables (A-Z for numerics and A$-Z$ for
characters). You can also assign many other variables such as A 1 or NM§. However, these variables will be stored
in the shared memory area normally used for programs.
There are two ways to assign values to a variable:
• Use alphanumeric labels, such as A, A$, AVERAGE
• Use an array in the format of @ (n) where @ is required and n can be an integer between 1-26.
If you use the alphanumeric label, there are a few alpha-combinations that the PC-2 has reserved for its own use
and you cannot use:
IF, LF, LN, ON, OR, TO, PI
Each variable may be used in the calculator mode as well as in a program. For example:
AC
B== 13
(ENTER)
This assigns the value of 7 to a variable named A and the value of 13 to a variable named B. You can then use
these variables in an equation such as:
and the PC-2 will display:
5
It
3~::4tl 1. 53:::5E -Ci i
If you use the array format (@ (n)) where n is a numeric expression between 1 and 26 which specifies a variable
storage location. A is the first memory storage location (1) and Z is the last (26). For example, type:
A==5
(ENTER)
This stores the value 5 in memory storage location A which can also be identified as @(1). Then type:
;jH 1
)+ 10 (ENTER)
This adds 10 to whatever value is stored in memory location #1 (5 in this case). The result -15 the right as soon as you press (ENTER) .
46
appears on
The value you assign to variables will be retained until:
• NEW or CLEAR is entered.
• The values are changed by the execution of a program.
• The variables are assigned new values.
Recalling Values. Any time you need to recall a value assigned to a specific variable (A-Z), just type the variable
(A, for instance) and press (ENTER) . The value currently assigned to A will be displayed on the right side of the
Display.
Another way to recall a value is to specify the memory storage location, using the @ sign. For instance, type:
to recall the value assigned to the variable B.
Recalling Equations. Once you've calculated the result, you may need to recall the original expression. To recall
an expression (when the result is still displayed), press ~ or ~ . The expression will then appear, ready to
be edited or changed.
• If you pressed ~ , the Cursor will be positioned after the last character.
• If you pressed ~ , the Cursor will be on top of the first character of the Display.
To re-display the result, press (ENTER) . Once you clear the Display, the original equation cannot recalled.
If the Computer is turned off, it will remember the values assigned to the variables but you will not be able to
recall the expression itself.
47
For example, type A = 5 (ENTER), then turn the Computer off (or let it turn itself off). Next, turn the Computer
back on and type A (ENTER) . The value you assigned to A (e.g., 5) will appear on the right side of the Display.
Successive (Chained) Calculations. In some instances, you may want to perform several calculations - one after
another - without having to press (ENTER) before moving on to the next calculation. To do this, simply type an
equation, a comma (,), the next equation, another comma (,) and so on. When you've entered the final calculation, press (ENTER) and the last (current) result will be displayed. For instance:
When you press (ENTER), the result will be displayed.
DEG
RUN
....:
" I:
.:...
Editing Equations. When you're using the PC-2 as a calculator, you can change (edit) equations. This means you
can insert new characters and delete or change existing ones.
For specific details on editing, see 8 ) and ~ earlier in this manual.
Hexadecimal-to-Decimal Conversion.
To find the decimal value of hexadecimal numbers, type the hex value
48
(preceeded by &) and press (ENTER) . The decimal equivalent will be displayed on the right. For example:
[ . - - - .....
DEG
RUN
DEG
RUN
n
:~::·/t.:~::l
Press (ENTER) and the PC-2 will display:
Combining Programming and Calculator Mode. Any values assigned to variables in the RUN Mode can be used
by the PC-2 when it is in the PROgrammable Mode.
Press (MODE) to enter the PROgram Mode and type in this one-line program which calculates the Average mileage of
a car (A) when you assign values to the variables:
A=Averoge
M=M~!es
Then return to RUN Mode and assign values to the variables:
,,_-, =
i ,-,
.L '._'
= ;:::
._'
CENTER~
dQ
drLven
G=Gos used
Next type:
When the Ready prompt reappears, type:
(,-j
(ENTER)
and the average mileage (34.28571429) will be displayed on the right.
Pocket Computer BASIC
The PC-2 recognizes almost all standard BASIC commands and statements as well as several non-standard BASIC
keywords.
This section will describe those non-standard BASIC commands and statements (i.e., those commands recognized
by the PC-2 but not by most other computers that use the BASIC Language). If you're familiar with standard
BASIC, you should be able to begin programming after reading this section.
This section will not describe the BASIC commands used with the Printer/Cassette Interface or with any other
PC-2 peripheral. For a discussion of those commands and statements, see your optional device's owner's manual
and a PC-2 programming guide.
For a complete list (including syntax, example, and abbreviations) of the BASIC commands the PC-2 uses, see
Appendix A.
50
--
-
Note that most commands and statements can be abbreviated.
type G. followed by a line number.
For example, instead of typing GOTO, simply
Keywords identified with an asterisk (*) will be described in this section. For details on all keywords listed, see
Appendix A, a PC-2 programming guide or a BASIC language reference manual (such a problem solving on the
PC-1, Catalog Number 62-2313).
Note that most PC-2 BASIC Keywords can be abbreviated. When abbreviating keywords, you must at leave specify
the part of the word which makes it unique from all other keywords - and then add a period. For instance,
GCURSOR can be abbreviated to GC., GCU., GCUR., GCURS., and GCURSO. You cannot use just G. since
GPRINT also starts with this letter (abbreviate to GP). The following Tables list a few of the abbreviations you
may use with the PC-2.
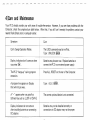
PC-2 Commands
Text
CaNT
Graphics
Abbreviation
GCURSOR*
C.
Table 5
51
Abbreviation
GC.
PC-2 Statements
Statement
AREAD*
Abbreviation
Statement
A.
LET
52
Abbreviat io n
LE.
___
- - - - _ . . - - -
. . . . . . - - . . . - . - . ~
__
_:--.......r-
PC-2 Statements
Statement
TRON
Abbreviation
Statement
TRO.
USING
Abbreviation
U.
Table 6
PC-2 Functions
Function
Abbreviation
Function
ABS
AB.
DEG
Abbreviation
PC-2 Functions
Function
Abbreviation
Function
Abbreviation
MID$
M.
RND
RN.
Table 7
54
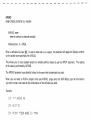
AREAD
Assign Display Contents to a Variable
AREAD name
name is numeric or character variable
Abbreviations: A. AR EA.
When a definable key (see (@ ) is used to label and run a program, this statement will assign the Display contents
to the variable name specified after AREAD.
This allows you to input (assign) values to a variables without having to use the INPUT statement. The reading
of the value is performed by AR EAD.
The AREAD statement must directly follow (in the same line) the definable key label.
When you are ready to RUN a program that uses AREAD, simply enter the RUN Mode, type the information
you wish to enter, and press the key combination of the definable key label.
Example
40: EHI:
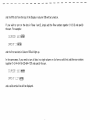
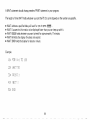
To run this program, enter the RUN Mode and, when the Ready prompt appears, type:
Jcno.tho.n@0
CD
and the PC-2 will display:
YOUR NAt1E IS
20: AVERAGE
50:
.Jon~thctn
= YEAR/12
:REM AVERAGE
~s
monthlY GverQge
am
When you enter the RUN Mode and the Ready prompt is displayed, type a number which represents the total
for the year. Then press CQEl
and the PC-2 will display the result. For instance, type:
m
12DO
(DEF)
m
56
and the PC-2 will display:
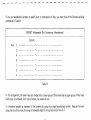
MONTHLY AUERAGE - 100
ARUN
Automatic Program Execution on Start-Up
ARUN
Abbreviations: ARU.
When ARUN is the first program statement in the first program line, the PC-2 will automatically execute (RUN)
the program when you turn the Computer's power on. However, the following conditions must be met:
• The PC-2 must be set to RUN Mode when you turn the power off.
• You must turn the power off. If the PC-2 turns itself off, ARUN will not be recognized.
All variables and commands remain the same when ARUN is used.
1=\7
Example
Set the PC-2 to PROgram Mode and enter the following program:
30: FOR
~<
- 1 TO 100
Press (MODE) to enter the R UN Mode. Press (§IT) to turn the Computer off. When you press
will automatically run.
58
CQID , the program
BEEP
Turn Tone ON/OF F
BEEP switch
switch is ON or OFF.
This statement turns the BEEP tone ON or OFF.
BEEP ON is effect after ALL RES ET has been pressed or after the batteries have been removed from the Computer
without first connecting an external power supply.
Example
To turn BEEP off, type:
BEEF' OFF
To turn BEEP back on, type:
BEEF'
mi
BEEP
Sound Tone
BEEP number, frequency, duration
number is a numeric expression between 0-65535 and specifies the number of times the beep occurs.
frequency is a numeric expression between 0-255 and specifies the frequency of the beep. frequency is
optional; if omitted, 8 is used.
duration is a numeric expression between 0-65279 and specifies the lengh of each beep. duration is optional;
if omitted, 160 is used.
Abbreviations: B.
The PC-2 can produce sounds with the BEEP statement. You must specify the number of beeps. You can also
specify the frequency and duration (e.g., the length of each beep).
The frequency can range from 7kHz (0) to 230 Hz (255). This means that each unit of measurement between
0-255 is equal to about 2605Hz. When you do not specify frequency, the PC-2 uses 8 (approximately 4 kHz.)
60
Example
10: L·jAIT 75
50
100,10
10:
BEEF' 75:, leI, 75
CALL
Execute a Machine-Language Routine
CA L L address. variable
address is a numeric expression between 0-65535 and specifies the entry address of a machine-language
program.
variable is a numeric variable which has previously been defined. variable is optional; if omitted, the
machine-language subroutine located at address will be executed without regard to any variables.
This function will execute a machine-language routine which has been loaded into memory at a specified address.
R1
After execution of the called program is complete, it can RETurn to the BASIC program.
If you include the optional variable, the X register will be pointing at the location where the variable is stored.
If variable is underfined before you use CALL, an ERROR 7 will occur.
Note that machine-language programs can only be stored in the Primary memory buffer (see POKE# and PEEK#
for more details on Primary and Alternate memory buffers).
Example
The following example will produce "reverse video" on the PC-2 Display. Note that the switch from normal video
to reverse video (and back) is much faster than that of a comparable BASIC program.
1C::
1-'1
1-'
;-,1_,::'
3(1:
70: FOR I
=1
TO 11:
FDF~
.J
=1
TO 50:
62
~~E~'::T
.J
::~c!:
C:':::.LL 1:::4CI 7.I
I~Cj:
t'~E::<T
1
I
CURSOR
Position Cursor
CURSOR position
position is a numeric expression between 0-25 and specifies one of the 26 character positions available on
the Display. position is optional; if omitted, 0 is used.
Abbreviations: CU. CUR. CURS.
The CURSOR statement positions the Cursor at one of the 26 character positions on the Display.
The normal use of CURSOR is to position the Cursor before printing some information on the Display. This allows
you to specify where data will appear on the Display.
Using a position less than (I) or greater than 25 will result in ER ROR 19.
63
Example
20: FOR X=O TO 20
40: Pi? I t-IT
5C' ~
r'~E><T
>-::
;..;
When this program is executed, the numbers will move across the display from left to right.
GCURSOR
Selects Graphic Display Start Position
GCURSOR position
position is a numeric expression between 0-155 decimal and specifies the dot column on the Display where
printing will begin.
Abbreviations: GC. GCU. GCUR. GCURS.
64
GCURSOR will allow you to specify the exact column on the PC-2 Display where printing will start. GCURSOR is
like CURSOR but more precise. That is, CURSOR divides the Display into 26 columns; GCURSOR divides the
Display into 156 columns.
GCURSOR is most often used with GPRINT. For details on using GCURSOR with GPRINT, see GPRINT later
in this manual.
Example
In this example, the letter A is printed at the 51st dot position on the Display. After a short "wait", the answer
to the expression 26/3 (8.666666667) is printed, starting at the 81st dot position.
Change line 40 to:
40:
GCURSOR 93 and run the program.
The result to 26/3 will appear (starting at dot
position 93) but it wi II be truncated (chopped off) because it ran off the end of the Display.
(Note: You could achieve much the same result if you changed line 40 to: 40: CURSOR 16.)
GPRINT
Set Graphic Dots
GPRINT pattern delimiter pattern delimiter . ..
pattern is either a numeric expression between 0-127 decimal or a hexadecimal string which specifies a
combination of addressable dots on the Display.
delimiter is either a comma or semi-colon. If a comma is used, a blank column will be left between patterns;
if a semi-colon is used, columns will be printed next to each other.
Abbreviations: GP. GPR. GPRI.
Note: The PC-2 will recognize pattern numbers up to 255. However, since the high bit isn't displayed, numbers
greater than 127 will produce the same result as 0-127.
GPR I NT provides direct, programmable control over all of the dots in the Display.
The PC-2 Display is made up of 156 dots across (columns on the X-axis) and 7 dots down (rows on the Y-axis)
for a total of 1092 addressable dots.
66
GPR INT can set or reset any dot (or pattern of dots) within the columns on the Display. For example, GPR INT
will turn all dots in a column off; GPRINT 127 (or GPRINT "7F") will turn all dots in a column on.
o
To specify which column, use GCURSOR. Then use GPR INT to turn any combination of dots in that column on
or off.
For instance, (in the RUN Mode) type:
This will tell the PC-2 to use column 75. Then type:
and a solid line will appear near the center of the Display.
Press (ENTER) and type:
and aga in ty pe :
This time the solid line will appear at the right side of the Display.
In both instances, the line pattern (all dots turned on) is the same but the lines are displayed in different positions.
67
If you use decimal numbers, you must specify the dots in terms of the rows they occupy as described in Table 8.
GPRINT Addressable Dot Numbering (Decimal)
Column
Row
1
*
2
*
4
*
8
----------*-----------------
16
----------*-----------------
32
*
64
*
Table 8
To turn on the Row 16 dot in a column (column 100, for instance), simply type (in RUN Mode):
68
and the fifth dot from the top of the Display in column 100 will be turned on.
If you wish to turn on the dots in Rows 1 and 2, simply add the Row numbers together (1 +2=3) and specify
the sum. For example:
1'-;pI:;H
~.IT
"_", 1-.1..1
I
.."I
__
(ENTER)
and the first two dots in Column 100 will light up.
In the same sense, if you need to turn all dots in a single column on (to form a solid line), add the row numbers
together (1 +2+4+8+ 16+32+64= 127) and specify the sum.
,"":; F' 1:;:'
T kI-1 T
,-.1!
1_.
I
i.1..1...1
.-:' -::'
QENTERD
and a solid vertical line will be displayed.
£':0
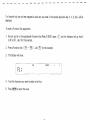
For example, to form a box with a line through it like the one in Figure 5:
1
** * ** **
2
*
*
4
*
*
8
* * * * * * *
16
*
*
32
*
*
64
* * * ** * *
Figure 5
First (in the RUN Mode) specify the Column you want the first dot to be displayed in instance.
Column 140 for
Remember, the PC-2 will automatically turn on the dots in the next column (Column 141) if you separate Row
numbers with semi-colons (;). If you separate Row numbers with commas (,), the PC-2 will leave a blank column.
Next enter the GP RI NT statement and specify the sum of the Row numbers for the first Column numbers dot
(127), the sum of the Row numbers for the next Column (73), the sum of the Row numbers for the next Column
(73), etc. For instance:
Any pattern can be generated by specifying a Column or the sum of several Rows.
70
If you use hexadecimal numbers to specify dots or combination of dots, you must think of the Columns as being
arranged as in Table 9:
GPR INT Addressable Dot Numbering (Hexadecimal)
Column
Row
1
2
4
8
1
2
4
*
*
*
*
*
*
*
Table 9
In this arrangement, the seven rows are divided into a lower group of three rows and an upper group of four rows.
Each group is numbered, from top to bottom, by powers of two.
It is therefore possible to represent all the patterns of a group by a single hexadecimal number. Because the lower
group has only three rows, the range of allowable digits for this group will be from 0-7.
71
Of the two hexadecimal digits required, the first digit will represent the lower group and the second digit will
represent the upper group.
Note that the lower group (1-4) must be specified before the upper group (1-8).
To use hexadecimal numbers with GPRINT, you must enclose the numbers in quotes to create a string ("7F")
or preface the numbers by the & sign (for instance, &7F).
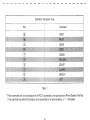
Table 10 describes the different patterns that GPRINT can generate when hexadecimal numbers are used:
72
GPRINT Dot Patterns (Hexadecimal)
1
-
2
- - - - -
4
8
-
-
-
- - -
-
*
*
*
-
- - - - -
0
1
2
4
8
2
- - - - - - - - *
- - - - 4
1
2
4
8
*
*
*
*
5
-
-
-
-
-
-
-
- -
3
6
7
*
-
*
*
- - - - -
*
*
8
1
-
2
4
- - - - -
-
-
A
9
-
-
B
*
*
*
*
*
E
8
C
D
Tabel 10
F
To create a box (like the one that was used in the previous example) but with hexadecimal numbers, type (in the
RUN Mode):
and the box will be created.
If you specify a single-digit Hex number, it must be preceded by a zero (e.g., OA is legal; A is illegal).
Another way to accomplish the same thing is to use the hexadecimal preface &. For instance:
and the box will again be created.
Example
To create an up-arrow using GPR I NT, type:
1 (1 =
~l~ AI T
25
74
To generate the same symbol but with hex numbers, type:
20: ,::':;CUF:::::OF' 100
LOCK/UNLOCK
Locks/Unlocks Current Operation Mode
LOCK
UNLOCK
This statement "locks" the PC-2 into the current Operation Mode (RUN, PROgram, or RESERVE). After LOCK
(ENTER) is typed, you cannot change modes by pressing (MODE) .
On initial start-up, the PC-2 is not locked into any mode. If you lock the current mode and turn the Computer off,
LOCK will still be in effect when you turn the PC-2 back on.
To unlock the Computer, allowing you to change modes, type: UN LOCK (ENTER)
Whenever you type N EWO (ENTER) , the PC-2 is set to UNLOCK.
7r;
Example
To lock the PC-2 into the current Operation Mode, type:
To unlock the PC-2 so you can change modes, type:
PAUSE
Print Message and Continue Execution
PAUSE
Abbreviations: PA. PAU. PAUS.
PAUSE is a semi-automatic form of the PRINT statement.
one second and then goes on to the next program step.
It holds whatever is on the Display for approximately
PAUSE does not require a WAIT statement; PRINT does or you will have to press (ENTER) to continue.
76
PAUSE has a fixed delay value; PRINT has a variable delay (See WAIT).
Example
In the following example, each number will be held on the Display for approximately one second before the
next number appears.
10: FOR X=l TO 10
PEEK#
Returns Contents of address in Alternate Buffer
PEEK# address
address is numeric expression between 0-65535 and specifies a location in memory.
Abbreviations: PE. PEE.
PEEK# is the same as PEEK but returns the value of the specified address in the alternate memory buffer.
77
The PC-2 has two memory buffers data storage only.
a Primary buffer for program and data storage and an Alternate buffer for
PEEK:II: returns (in decimal form) the value stored at the specified byte address of the Alternate buffer. The values
returned represent an ASCII code.
PEEK:II: may be used to retrieve information stored with a POKE:II: statement. PEEK:II: and POKE:II: allows you
to set up very compact, byte-oriented storage systems.
Example
POINT
Test Display
POI NT position
position is a numeric expression between 0-155 and specifies one of the 156 columns on the Display.
Abbreviations: POI.
78
POINT will return a number between 0-255. If 0 is returned, then there are not any dots turned on in the specified
column. If 255 (or 127) is returned, all of the dots in the specified column are turned on. 255 will be returned if
you specified GPRINT 255 or FF and 127 will be returned if you specified GPRINT 127 or 7F.
The number the PC-2 returns will identify the dot pattern specified with GPR INT. For instance, if your program
uses GCURSOR 100 and you specified GPRINT 8, the PC-2 will return the value of 8 when you enter POINT 100.
For details on specifying dot patterns, see GPR INT.
Example
The following program randomly moves the GCURSOR position among the first 10 columns. It GPRINTs pattern
8 (a single dot). The program then tests whatever column you specified and tells you whether or not a dot is on
in the column.
20: GCURSDR RND(10)
30: A=F'DIr-H C
35:
IF A)·O THEN
GD~;UB
100
79
40:
IF
!~:> 1 C! THE~'~
(JOTD 15
GOlD 15
POKE
Put Value I nto Primary Buffer Location
POKE address. value. value. ...
address is a numeric expression between 0-65535 decimal and specifies a memory location in the Primary
memory buffer.
value is a numeric expression between 0-255 decimal and specifies the ASCII value you wish to put into
address. value may be repeated.
POKE allows you to put values into specified memory locations. The PC-2 uses POKE just like other TRS-80's
except you can use multiple values after a single address.
For details on using poke, see a BASIC Language Reference Manual.
For an example that uses POKE, see CALL earlier in this manual.
80
POKE#
Put Value Into Alternate Buffer Location
PO K E # address, value
address is a numeric expression between 0-65535 decimal and specifies a memory location in the Alternate
memory buffer.
value is a numeric expression between 0-255 decimal and specifies the ASCII value you with to put into
address.
Abbreviations: PO. POK.
POKE # is the same as POKE but POKE # puts a value into the Alternate memory buffer.
The PC-2 has two memory buffers data storage only.
a Primary buffer for program and data storage and an Alternate buffer for
POKE # requires a byte address (in decimal or hexadecimal form) and a value (also in decimal or hexadecimal
form).
POKE:I+ may be used in any of the Operation Modes.
81
Example
.'. , '-::'n
F'Dr'::.·E+r f··:>:<;F H.~_
. . . . . . . . .&..._
(ENTER)
will store 20 in hexadecimal address 23FA.
For a more detailed example of POKE #, see CALL.
STATUS
Check Memory Status
STATUS number
number is a numeric expression between 0-255.
o returns the number of free bytes.
1 returns the number of bytes in use.
2 returns the "address + 1" of the location where the current program ends.
3 returns the "address" of the memory location where the current variables are stored.
4-255 returns the line number which was executed immediately before the program was halted.
Abbreviations: STA. STAT.
The STATUS statement lets you check the current status of the PC-2. STATUS can be executed from any Operation Mode (RUN, PROgram, RESERVE).
82
STATUS is useful when you need to know how much memory the PC-2 has left for programming or how much
memory you are using at any time.
Example
will display the number of free bytes.
will display the number of bytes in use.
::T,'·
H Ti
._"
I
I
I'::
1_,,_'
.-::'
.lo..
(ENTER)
will display the memory address where the current program ends. Note that this address is actually one greater
than the actual address where the program ends.
':.~ ····T!
'_' I H
I':'
l '_' '_'
-:: (ENTER)
'_'
will display the memory address where variables are stored. Note that this address is actually one location less
than the actual address where variables are stored.
will display the program line number that was being executed when program execution was halted.
83
TIME
Set/Display Current Time
TIM E = month day hour. minutes seconds
month is a nu mber between 1-12
which specifies the month of the year.
day is a two-digit number between 01-31
which specifies the day of the month.
hour is a two-digit number between 00-23
which specifies the hour of the day .
• is a decimal point.
minute is a two-digit number between 00-59
and specifies the minutes of the hour.
seconds is a two-digit number between 00-59
and specifies the seconds of the minutes.
Abbreviations: TI.
TIME lets you specify (set) the time or display the current time.
Note that the time is set according to the 24-hour clock. That is, 1:00 P.M. would be specified as 13: 00 hours.
If you do not set the time the first time you turn the Computer on, the PC-2's internal clock uses TIME
000000.0000. Whenever you request the time after that, the Computer will display how many days, hours,
minutes, and seconds it has been since you first turned the Computer on.
The PC-2's clock does not stop counting when the Computer is turned off.
84
Example
To set the time on July 28 as 11 :30:01 A.M., type:
To display the current time, type:
and the PC-2 will display the time. For example:
91214.2424
for September 12,2:24:21 P.M.
WAIT
Specify Duration of PRINT
WAIT delay
delay is a numeric expression between 0-65535 decimal and specifies the length of time the PR INT statement will be displayed. delay is optional; if omitted, you must press (ENTER) to go to the next program
step after aPR INT statement.
Abbreviations: W. WA.
A WAIT statement should always precede a PRINT statement in your program.
The length of time WAIT holds whatever you told the PC-2 to print depends on the number you specify.
•
•
•
•
•
WAIT
WAIT
WAIT
WAIT
WAIT
without a specified delay will wait for you to press (ENTER) .
0 causes the information to be displayed faster than you can keep up with it.
65535 holds whatever you want printed for approximately 17 minutes.
64 holds the display for about one second.
3840 holds the display for about a minute.
Example
10: FOR X=l TO 100
3C!: F'F: I f'~T
>.:;
SC!: Er··iI!
86
4/Care and Maintenance
Your PC-2 should provide you with years of trouble-free service. However, if you ever have problems with the
Computer, check the symptom/cure table below. After that, if you still can't remedy the problem, contact your
nearest Radio Shack store or computer center.
Symptom
Cure
Can't change Operation Modes.
The LOCK command may be in effect.
Type: UNLOCK (ENTER)
Display Indicators don't come on when
you press (ON) .
Batteries may be worn out. Replace batteries or
connect the PC-2 to an external power supply.
The PC-2 "hangs-up" during program
execution.
Press ALL RESET on the rear of the Computer.
A program line appears on Display
that will not go away.
c j,i,.-, (ENTER)
Type: t·l
. . L.r-t
A ,,~" appears when you specify a
Defined Key such as LLiST or CSAVE.
The correct optional device is not connected.
Display Indicators do not come on
after installing batteries or connecting
DC adaptor.
Batteries may not be installed correctly or
connections to DC adaptor may not be proper.
I_ 1
Q7
•
5/Specifications
CPU:
CMOS 8-bit
System ROM:
16KB
Memory Capacity:
System Area:
Fixed Memory Area:
O.9KB
O.6KB
A-Z
A$-Z$
BASIC Program/Data Area:
Reserve Area:
Expandable User Area:
Display:
Keyboard:
Dot LCD Display
Display positions:
Graphic display:
1.85KB
O.19KB
16KB
(RAM. 22KB)
26 Columns
7 x 156 Dots
66 Keys
Alphabet
Numeric
Function
Reserved
on
Power:
4 - Type AA Batteries (23-552)
9V DC Adaptor
Expansion Capabilities:
Plug-in RAM (4KB RAM)
Plug-in ROM/RAM (16KB ROM/2KB RAM)
Dimensions:
7-11/16"(W) x 3-3/8"(0) x 1"(H)
195(W) x 86(0) x 25.5(H) mm
Weight:
Approx. 0.83 Ibs. (375 g) (with batteries)
90
------------Appendix A/PC-2 Language Reference Summary
Argument ranges are indicated below by special letters:
n: (-9.999999999 E-99, +9.999999999 E99)
c: (0-255)
str: string argument
var: variable name
Page
ASSn
Computes absolute value. Abbreviations: AB.
,,
::-:1
ACSn
Computes arccosine. Abbreviations: AC.
i ,_lot:..
'-"'~.
..I.
A=AC::
n
AREAD var
Assigns Display contents to variable. Must be used with a Definable Key label.
Abbreviations: A. AREA.
l;
A
/I
~~FEAD
>::
ARUN
Automatic execution on power-up. Must be the first line in a program.
Abbreviations: ARU.
ASC str
A=A'::C
Returns ASCII code of first character in string.
iI
55
~i::;HEF' iI
01
57
Page
ASN n
Computes arcsine. Abbreviations: AS.
,:~=H::;~··1
ATN n
'/=ATt·~
Computes arctangent. Abbreviations: AT.
4L~
BEEP switch
BEEP Dt-j
59
Turns tone feature on or off.
BEEF' OFF
BEEP number. frequency, duration
Sounds tone for specified number of times, frequency,
and duration of each tone. Abbreviations: B.
59
CALL address, var
Calls the machine-language routine stored with specified entry
address and will use specified variable values to execute.
Abbreviations: CA.
61
C:ALL f:2C:CICi
CHR$ c
Converts ASCII code to character.
Abbreviations: CH. CHR.
P$=CHF.:$ T
CLEAR
Clears all data, resets variables to zero.
Abbreviations: CL. CLE. CLEA.
C:LII
92
Page
CLS
Erases Display.
C:L~3
CaNT
Continues execution after BREAK or STOP.
Abbreviations: C. CO. CON.
cos
Computes cosine.
'/=c:o::; ::<
n
CURSOR position
Display printing will start at one of the 26 Display positions specified by
position. Abbreviations: CU. CUR. CURS.
C:L!F:~:;OF~ 13
DATA expression
DATA
DEG
I1EC~
n
Stores data to be accessed by a READ statement. Abbreviations: DA. DAT.
L H~COU'L A. ", 1::::61, "I lL. HID I : : ; II
Converts degrees, minutes, and seconds into decimal degrees.
32 n 2513
DEGREE
Sets Angle Calculation to degrees.
Abbreviations: DE. DEG. DEGR. DEGRE.
DIM
Dimensions an array. Abbreviations: D. DI.
c· 1"
,
".
-.
63
-:::t::
I
"_,
'1
;.
45
Page
DMS
Converts decimal degrees into degrees, minutes, and seconds. Abbreviations: DM.
Computes natural antilog. (en)
EXP n
Abbreviations: EX.
END
Ends program execution. Abbreviations: E. EN.
FOR .. TO .. STEP/NEXT
FO. STE. N. NE. NEX.
Opens program loop. Abbreviations: F.
GOSUB
Transfers program control to the specified line.
Abbreviations: GOS. GOSU.
()D~:;IJ:B
75CI
GOTO
Transfers program control to the specified line.
Abbreviations: G. GO. GOT.
,:JOTO 1. :::0
GCURSOR position
Selects Display start position. Position is between 0-155.
Abbreviations: GCU. GCUR. GCURS.
GCURSOR 100
GCUR. 75
94
64
Page
GRAD
45
Sets Angle Calculation to gradients.
C:;PAD
GPRINT pattern delimiter pattern delimiter. . .
Sets graphic dots on the Display.
Pattern is between 0-127; delimiter is a comma or semi-colon. Addreviations: GP. GPR. GPRI.
()FIF~ I t'4T
.1 Cl:t 1elC:
(JFI~~
II
:~::F ~
f::"2C:
i:JF:
:I
H
?F" 4 ~~l:f '7.i4 r?7F 1I
IF ... THEN
Tests conditional expression.
Abbreviations: T. TH. THE.
IF F'=C!
THEf'~
2ClCl
INKEY$
Gets keyboard character if available.
Abbreviations: INK. INKE. INKEY.
A$= I rW:E\'$
INPUT
INT n
Inputs data from keyboard. Abbreviations: I. IN. INP. INPU.
Returns largest whole number not greater than n.
LEFT$ (str, c)
Returns left portion of string.
Abbreviations: LEF. LEFT.
A$=LEFT$ ( II :E:Er·LTAln WI, :3 )
66
Page
LEN (str)
Returns the number of characters in a string.
::-::=LH4 ( ::;H4$ )
LET
Assigns value to variable (optional).
Abbreviations: LE.
l_ET
::<= 1Ci
LIST line
Lists first program line or specified line.
Abbreviations: L. L I. LIS.
L.
Locks in current Operation Mode. Abbreviations: LaC.
LOCK
LOG n
Computes logarithm to base 10.
Abbreviations: La.
'/=LOG ::<
LN n
\'=L~'4
MEM
1'1E!'1
Computes natural logarithm to base e.
;:<
Finds amount of free memory. Abbreviations: M.
r't
96
75
Page
MID$ (str, position, length)
Abbreviations: MI. MID.
NEW
Takes a character(s) from the middle of the specified string.
Erases current program from memory.
NEWO
Erases current program and resets the Computer.
14
r'iE~,lC
ON ERROR GOTO
Sets up an error-handling routine.
Abbreviations: O. ER. ERR. ERRO.
ON
ERF~DR
GOTD 210
ON ... GOSUB
Multi-way branch to specified subroutines.
Abbreviations: O. GOS. GOSU.
J~.'
y GOSlfB
50,100~150,200
ON ... GOTO
Multi-way branch to specified lines.
Abbreviations: O. G. GO. GOT.
76
Print message and continue execution.
PAUSE
Abbreviations: PA. PAU. PAUS.
97
Page
PEEK address
F'EE~:~~
Gets value in specified address from Primary memory buffer.
34223
PEEK# address
Gets value in specified address from Alternate memory buffer.
Abbreviations: PE. PE E.
PI
1[
77
77
Returns value of PI (3.141592654).
POINT position
Test dot pattern of specified column (0-155) on Display.
Abbreviations: PO I. PO IN.
78
POKE address, value, value. ..
Primary memory buffer.
80
Puts value (0-255) into specified memory address (0-65535) of
Fm:::E 3422,22
POKE # address, value
Puts value (0-255) into specified memory address (0-65535) of
Alternate memory buffer. Abbreviations: PO. POK.
'"7 .'l
.'~,
.-,
"_)I-r..:::'::';,:1
'-l .-,
~..;.:,
PRINT
Prints an item or list of items on the Display at current cursor position.
Abbreviations: P. PRo PRI. PRIN.
PPIt'~T
At
F:R:[~
A
98
81
,.......
Page
PRINT USING
Formats strings and numbers for printing.
The width of a numeric field must always be one more than the width of the data.
# Formats numbers.
PF: I tH U::; I t·K.i "tt#:tt#"; 66.2
* Specifies Asterisk Fill of the specified positions of a Numbering field which do not
contain data.
PP I HT U::: I t·K.i ":t::t::+::tttt /I
•
'/
Decimal point.
F'F:Ir'~T Jj~:;Ir'4C~
A.
;
J1:::::+t+::~= :tt:t:t::::tl!; 5:::~
7::1
Displays a comma to the left of every third digit left of the decimal point.
An extra # is required for each comma.
PF: I NT U::; I t·lC.i "tt#tttttt# ~ tttt:tt II; 246::: 13
Exponential format. Displays numbers in scientific notation.
+ Prints a + sign in the first position if the specified number is a positive number;
a minus sign (-) if the specified number is negative. (0 is assumed to be positive.)
Fl~:
&
I t'1T
'-!~:;
I t·~(j
Ii
+:t::::t:f::::f: II ~
Elt:.
u
~::
F'~:
I j···iT LL:; I
!!
+- :t:f::;::::t~
il
~
_.
7::~
II
1
Specifies a character field.
F'P I rH U::; I tJG
!l
f::~:SS:";
/I
JACK::::DH"
45
RADIAN
Sets Angle Calculation to radians.
Abbreviations: RAD. RADI. RADIA.
99
Page
Reseeds the random number generator.
Abbreviations: RA. RAN. RAND. RANDO.
RANDOM
Reads value(s) from a DATA statement.
Abbreviations: REA.
READ
t-?EAI! T
:REM
Remark; instructs the PC-2 to ignore the rest of the line.
Resets data pointer to the first item in the data line.
Abbreviations: RES. REST. RESTO.
RESTORE
FE:::TCPE
Returns from the subroutine to the next statement after GOSUB.
Abbreviations: RE. RET. RETU. RETUR.
RETURN
FETUFJ~
RIGHT$ (str, c)
Returns the right portion of string. Abbreviations: RI, RIG. RIGH. RIGHT.
ZIP$=RIGHT$(AD$,S)
Generates a pseudo-random number between 1 and n if n> 1,
or between 0 and 1 if n = O. Abbreviations: RN.
'/=FND ( 100 )
RND n
100
Page
RUN
Executes current program or portion of it.
PUt·{
SGN n
::<=::;Gr'~
SIN n
SQR n
Abbreviations: R. RU.
P. 100
Returns sign component: -1, 0, 1, if n is negative, zero, positive. Abbreviations: SG.
( A:+O:B )
Computes sine. Abbreviations: SI.
Computes square root. Abbreviations: SQ.
\'=::;OF' ( A+ B )
STATUS number
Checks the current memory status. number returns
o = program steps available, 1 = program steps used; 2 = address + 1 of location of end of
current program; 3 = address of location of variable storage; 4-255 = line number of program
when execution was halted. Abbreviations: ST A. STAT. STATU.
STATUS 0
STOP
STATUS 1
Stops program execution. Abbreviations: S. ST. STD.
'-'Tni='
.:. I w,
STR$ n
Converts a numeric expression to a string. Abbreviations: STR.
':;$=::;TF:$ ::::
TAN n
Computes tangent. Abbreviations: T A.
::->TAt{ '/
82
Page
TIME month day hour. minutes seconds
Abbreviations. TI TIM.
TI f'1E:::: 1:'23Cj 14 3C!3C!
II
TROFF
TIf:1E
TPOF,
Turn program trace on. Abbreviations: TR. TRO.
nmr'{
TF'O,
UNLOCK
Unlocks Operation Mode after it has been locked.
Abbreviations: UN. UN L. UN La. UN LaC.
VAL (str)
j.)=I.)!:~IL (
84
Turn program trace off. Abbreviations: TROF.
TPOF-F
TRON
Sets or returns the current time.
Converts a string to a number.
75
Abbreviations: V. VA.
" 100 DOLUiP::;" :t
WAIT delay
Specifies duration of PR I NT. Delay can be between 0-65535.
Abbreviations: W. WA. WAI.
i,jA I T 100
i,j" 500
L,j~~.
1C
i..i;::i I .
102
85
--
---
Appendix B/PC-2 Error Codes
Error Code
4
Explanation
Syntax Error. Incorrectly typed statement.
. NEX"fstat6rnefl.twithouta FOR.
READ statement without a DATA.
Array specified without first 01 Mensioning it.
DIMensioned array has more than two levels.
Out of memory.
Incorrect format for PRINT USING statement.
unction Key memory capacity.
value is greater than 65535 decimal.
. Data type is inappropriate for calculationex1Pr:e·~
103
Error Code
18
Explanation
Number of arguments is inappropriate for expression.
Incorrect input data during the execution of an INPUT or AREAD command.
104
SERVICE POLICY
Radio Shack's nationwide network of service facilities provides quick, convenient.
and reliable repair services for all of its computer products, in most Instances.
Warranty service will be performed in accordance with Radio Shack's Limited
Warranty. Non-warranty service will be provided at reasonable parts and labor
costs.
Because of the sensitivity of computer equipment. and the problems which can
result from improper servicing, the follOWing limitations also apply to the services
offered by Radio Shack:
1. If any of the warranty seals on any Radio Shack computer products are broken,
Radio Shack reserves the right to refuse to service the eqUipment or to void any
remaining warranty on the equipment.
2. If any Radio Shack computer equipment has been modified so that it IS not
within manufacturer's specifications, including, but not limited to, the installation
of any non-Radio Shack parts, components, or replacement boards, then Radio
Shack reserves the right to refuse to service the equipment. VOid any remaining
warranty, remove and replace any non-Radio Shack part found In the eqUipment, and perform whatever modifications are necessary to retum the equipment to original factory manufacturer's specifications.
3. The cost for the labor and parts required to retum the Radio Shack computer
equipment to original manufacturer's specifications will be charged to the
customer in addition to the normal repair charge.
)
~
I
I
!
I
!
!
I \
i
1
I
\
I
1
!
1
RADIO SHACK, A DIVISION OF TANDY CORPORATION
I
U.S.A.: FORT WORTH, TEXAS 76102
CANADA: BARRIE, ONTARIO l4M 4W5
!
I
TANDY CORPORATION
t
l
9A2
AUSTRALIA
BELGIUM
U. K.
2BO·316 VICTORIA ROAD
RYDALMERE, N.SW. 2116
PARC INDUSTRIEl DE NANINNE
5140 NANINNE
BllSTDN ROAD WEDNESBURY
WEST MIDLANDS WSl0 7JN
PRINTED IN JAPAN