1
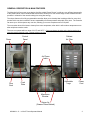
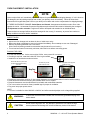
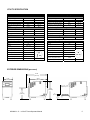
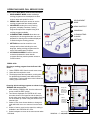
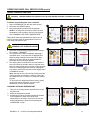
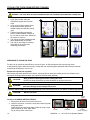
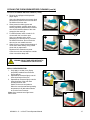
operator manual
eikon e2 Series
Models e2 & e2T(Twin)
This document includes:
• Safety Notices
• Specifications
• Installation Instructions
• Operating Instructions
• Cleaning Instructions
• Warranty Statement
P/N: 20000364
Revision: C
Merrychef USA, LLC
1111 North Hadley Road
Fort Wayne, Indiana 46804
United States of America
Technical Support Hotline: (800) 678-9511
Telephone: (260) 459-8200
www.merrychefusa.com
!
This manual contains important safety and installation-operation instructions. All employees should
be required to read this manual before operating the unit. Failure to follow the instructions contained
in this manual may cause injury or death, damage to the unit, and will void the warranty.
TABLE OF CONTENTS
PURCHASER’S RESPONSIBILITY ................................................................................................................ 2
PLANNED MAINTENANCE ............................................................................................................................. 2
GENERAL DESCRIPTION & MAIN FEATURES ............................................................................................ 3
OVEN PLACEMENT / INSTALLATION ........................................................................................................... 4
UTILITY SPECIFICATION ............................................................................................................................... 5
IMPORTANT SAFETY INFORMATION .......................................................................................................... 6
GROUNDING INSTRUCTIONS..................................................................................................................... 10
ELECTRICAL CODE REFERENCE .............................................................................................................. 10
VENTILATION ............................................................................................................................................... 10
QUICK START GUIDE: QUICK SERVICE OVEN ......................................................................................... 11
START UP .................................................................................................................................................. 11
USING A COOKING PROGRAM ............................................................................................................... 11
OPERATING GUIDE: FULL SERVICE OVEN .............................................................................................. 12
EASYTOUCH MAIN MENU & KEYBOARD SCREEN............................................................................... 12
PRESS & GO ............................................................................................................................................. 12
OPERATING GUIDE: FULL SERVICE OVEN (cont’d) ................................................................................. 13
USING A COOKBOOK PROGRAM ........................................................................................................... 13
CHANGING THE OVEN TEMPERATURE ................................................................................................ 13
COOLING THE OVEN DOWN BEFORE CLEANING ................................................................................... 14
OVEN COOL DOWN.................................................................................................................................. 14
PREPARING TO CLEAN THE OVEN........................................................................................................ 14
COLD OVEN CLEANING INSTRUCTIONS E2 ......................................................................................... 14
TROUBLESHOOTING ................................................................................................................................... 16
HOW TO OBTAIN SERVICE ......................................................................................................................... 17
LIMITED WARRANTY ................................................................................................................................... 18
PURCHASER’S RESPONSIBILITY
It is the responsibility of the purchaser to:
1. See that the electric service for the oven is installed on site in accordance with the manufacturer’s specification.
2. Unload, uncrate, and install the oven in its proper location in accordance with this operator manual.
3. See that the electric service is connected properly by a qualified installer of your choice. All such connections
must be in accordance with applicable code requirements. Refer to Code References section for more
information.
PLANNED MAINTENANCE
Although this oven has been designed to be as trouble free as possible, periodic preventive maintenance is
essential in maintaining peak performance. It is necessary to keep the motors, fans, and electronics free of dirt,
dust, and debris to insure proper cooling. Over-heating is detrimental to the life of all the components mentioned.
The periodic intervals for preventive cleaning may vary greatly depending on the environment in which the oven is
operating.
You must discuss the need for preventive maintenance with your Factory Authorized Servicer to establish a proper
program.
If there are any questions that the service agent cannot answer, please contact Merrychef USA Technical Service
at (800) 678-9511.
2
20000364 – C – e2 & e2T Oven Operator Manual
GENERAL DESCRIPTION & MAIN FEATURES
The Merrychef e2 Oven uses a new design of airflow called “Planar Plumes” to deliver a very efficient heat transfer
to the product which, when combined with microwaves, allows you to cook a wide range of both chilled and frozen
products in a fraction of the normal cooking time using less energy.
The unique features of its fully programmable controller allow you to develop ideal cooking profiles for every food
product which can then be stored to ensure repeatability of both temperature and quality every time. The controller
can store up to 1024 recipes at any one time, allowing you to store complete menus if required.
The oven takes about 20 minutes to heat up from room temperature, after which it will remain at temperature even
after multiple successive cooks.
The oven can operate within a range of 212°F and 527°F. Care must always be taken when placing product in or
removing product from the oven - internal surfaces are hot!
Power
Control
Panel
Cabinet
Air Filter
Air Plume
Inlets
Door
Seal
Adjustable
Legs
Cook
Plate
Power
Cord
Microwave
Window
Return Air
(Grease Filters Behind)
20000364 – C – e2 & e2T Oven Operator Manual
3
OVEN PLACEMENT / INSTALLATION
NOTE:
Upon receipt of this unit, immediately unpack and inspect for possible concealed shipping damage. If unit is found to
be damaged, save all packing materials and contact your delivery carrier immediately. Failure to follow these
instructions will negate Merrychef USA’s or your ability to file claims and receive compensation for shipping damage.
IF THERE IS APPARENT DAMAGE: United States and Canada: Arrangements should be made to file a claim
against the carrier. As Interstate Commerce Regulations require that the claim must be initiated by the consignee.
All shipments to other countries: Freight terms will be developed and extended on an individual basis.
Proper and secure storage facilities should be arranged for the oven(s), if necessary, to protect from outdoor or
damp conditions at all times before installation.
INSPECT OVEN
• Inspect oven for damage such as dents in door or inside oven cavity.
• Report any dents or breakage to source of purchase immediately. Do not attempt to use oven if damaged.
• Remove all packing materials from oven interior.
(Note: Check all packing material as accessories may be stored in oven interior.)
• If oven has been stored in extremely cold area, wait a few hours before connecting power.
PLACING THE OVEN
• Lift the oven onto a cart. As the oven weighs 150 lbs, a two person lift is required.
• If leveling is required, rotate the inside foot of the leg as needed.
• Install the oven accessories as shown below.
Ensure air filter is in place and
properly fitted before locating
the oven.
Fit drain tray on the
rails under the oven.
Place cook plate on its supports
inside the oven.
Drip Tray
•
•
•
•
•
Position the oven with a minimum 2” (two inches) clearance on top and both sides of oven for cabinet venting.
Outlet should be located so that plug is accessible when oven is in place.
Required clearances must be maintained from all walls and combustible materials.
The oven must be mounted on factory installed legs for proper air ventilation.
Plug oven into proper power source.
NOTE:
• This oven is suitable for either 208VAC or 240VAC and will automatically adjust to suit voltage being supplied.
4
!
WARNING:
To avoid risk of electric shock or death, this oven must be grounded and plug must
not be altered.
!
CAUTION:
Do not remove legs from unit. Any attempt to operate the unit without the legs
securely fastened will damage the unit and all warranty claims will be denied.
20000364 – C – e2 & e2T Oven Operator Manual
UTILITY SPECIFICATION
Eikon e2T (Twin)
Eikon e2
Overall Size
Overall Size
Height (on 4” legs)
27"
686 mm
Height (on 4” legs)
27"
686 mm
Width
14.75”
375 mm
Width
31.5”
800mm
Depth (overall without handle)
28.5”
724 mm
Depth (overall without handle)
28.5”
724 mm
Depth (door open 90 degrees)
Depth (door open 90 degrees)
Weight
1022 mm
68 kg (each)
1022 mm
68 kg
9.6”
244 mm
Height
9.6”
244 mm
9.6”
244 mm
12”
305 mm
Weight
Oven Cavity Dimensions (per oven)
Oven Cavity Dimensions
Height
40.25”
150 lbs. (each)
40.25”
150 lbs.
Width
9.6”
244 mm
Width
Depth
12”
305 mm
Depth
Wall Clearance (per oven)
Wall Clearance
Top
2”
50.8 mm
Top
2”
50.8 mm
Sides
2”
50.8 mm
Sides
2”
50.8 mm
Electrical Specifications (per oven)
Electrical Specifications
Phase
1 ph
Phase
1 ph
Voltage
208 / 240
Voltage
208 / 240
Frequency
Frequency
60Hz
Amperage Requirement
Amperage Requirement
20 amp
Plug
4015W
Power Output (Microwave)
1000W
Power Output (Heater)
2200W
NEMA 6-30P
Cord Length
6’
Max Power Rate
30 amp
Plug
NEMA 6-20P
Cord Length
60Hz
6’
Max Power Rate
3100W
Power Output (Microwave)
1000W
Power Output (Heater)
2200W
EXTERIOR DIMENSIONS (per oven)
30.98”
(787 mm)
14.75”
(375 mm)
28.44”
(722 mm)
11.75”
(298 mm)
27.02”
(686 mm)
17.17”
(436 mm)
1.5”
(38 mm)
6.85”
(174 mm)
20000364 – C – e2 & e2T Oven Operator Manual
5
IMPORTANT SAFETY INFORMATION
!
WARNING:
!
READ all instructions before using equipment. When using electrical appliances basic safety precautions should
be followed including the following:
WARNING- To reduce the risk of burns, electric
shocks, fire injury to persons, or exposure to
excessive microwave energy READ AND
FOLLOW the specific PRECAUTIONS TO
AVOID POSSIBLE EXPOSURE TO
EXCESSIVE MICROWAVE ENERGY on page
7.
This equipment MUST BE GROUNDED.
Connect only to a properly grounded outlet.
See GROUNDING INSTRUCTIONS on page
10.
Install or locate the equipment ONLY in
accordance with the installation instructions in
this manual.
Some products such as whole eggs or sealed
containers – for example, closed glass jars –
are able to explode and SHOULD NOT be
HEATED in this oven.
Use this equipment ONLY for its intended use
as described in this manual. Do not use
corrosive chemicals or vapors in this
equipment. This type of oven is specifically
designed to heat or cook. It is not designed for
industrial or laboratory use.
When cleaning surfaces of door and oven that
come together on closing the door, use only
mild, non abrasive soaps or detergents, applied
with a sponge or soft cloth. See CLEAN THE
OVEN instructions on page 14.
As with any equipment, CLOSE SUPERVISION
is necessary when used by children.
DO NOT heat baby bottles in oven. Baby food
jars shall be open when heated and contents
stirred or shaken before consumption, in order
6
DO NOT operate this equipment if it has a damaged
cord or plug, if it is not working properly or if it has been
damaged or dropped.
This equipment including the power cord must be
serviced ONLY by qualified service personnel. Special
tools are required to service the equipment. Contact the
nearest authorized service facility for examination,
repair or adjustment.
DO NOT cover or block any opening on the oven.
DO NOT store this appliance outdoors. DO NOT use
this product near water – for example, near a kitchen
sink, in a wet basement, near a swimming pool, or
similar locations.
DO NOT immerse cord or plug in water.
Keep cord AWAY from HEATED surfaces.
DO NOT let cord hang over edge of table or counter.
For commercial use only.
DO NOT insert oversized foods or oversized utensils in
a microwave/convection oven as they may create a fire,
an electrical arc, or risk of electrical shock.
DO NOT clean with metal scouring pads. Pieces can
break off the pad and touch electrical parts involving risk
of electrical shock.
DO NOT use paper products not intended for cooking
when equipment is operated in convection or
combination mode.
DO NOT store any materials, other than manufacture’s
recommended accessories, in this equipment when not
in use.
DO NOT cover racks or any other part of the oven with
metal foil. Airflow restriction will cause overheating of
the oven.
20000364 – C – e2 & e2T Oven Operator Manual
IMPORTANT SAFETY INFORMATION
!
WARNING:
To avoid risk of fire in the oven cavity:
DO NOT overcook food. Carefully attend oven
when paper, plastic, or other combustible materials
are placed inside the oven to facilitate cooking.
Remove wire twist–ties from paper or plastic bags
before placing bag in oven.
If materials inside the oven ignite, keep oven door
CLOSED, turn oven off and disconnect the power
cord, or shut off power at the fuse or circuit breaker
panel.
DO NOT use the cavity for storage. DO NOT leave
paper products, cooking utensils, or food in the
cavity when not in use.
!
Liquids such as water, coffee, or tea can be
overheated beyond the boiling point without
appearing to be boiling due to surface tension of the
liquid. Visible bubbling or boiling when the
container is removed from the microwave oven is
not always present. THIS COULD
RESULT IN VERY HOT LIQUIDS SUDDENLY
BOILING OVER WHEN A SPOON OR OTHER
UTENSIL IS
INSERTED INTO THE LIQUID.
To reduce the risk of injury to persons:
Do not overheat the liquid.
Stir the liquid both before and halfway through
heating it.
Do not use straight-sided containers with narrow
necks. After heating, allow the container to stand in
the microwave oven for a short time before
removing the container. Use extreme care when
inserting a spoon or other utensil into the container.
!
PRECAUTIONS TO AVOID POSSIBLE EXPOSURE
TO EXCESSIVE MICROWAVE ENERGY
!
Do Not Attempt to operate this oven with the door open as open door operation could
result in harmful exposure to microwave energy. It is important not to defeat or
tamper with the safety interlocks.
Do Not Place any object between the oven front face and the door or allow soil or
cleaner residue to accumulate on sealing surfaces.
Do Not Operate the oven if it is damaged. It is important that the oven door close
properly and there is no damage to the:
(1) Door (bent)
(2) Hinges or latches (broken or loosened)
(3) Door seals and sealing surfaces
The Oven Should Not be adjusted or repaired by anyone except properly qualified
personnel.
20000364 – C – e2 & e2T Oven Operator Manual
7
IMPORTANT SAFETY INFORMATION
!
CAUTION:
Do not deep fat fry in oven. Fat could overheat and be
hazardous to handle.
Do not cook or reheat eggs in shell or with an unbroken
yolk using microwave energy. Pressure may build up
and erupt. Pierce yolk with fork or knife before cooking.
Pierce skin of potatoes, tomatoes, and similar foods
before cooking with microwave energy. When skin is
pierced, steam escapes evenly.
!
Oven temperature is at least 150ºF in convection mode.
Verify plastic, paper or other combustive materials are
recommended by the manufacturer to withstand the
minimum oven temperature.
When cooking with paper, plastic, or other combustible
materials, follow manufacturer’s recommendations on
product use.
Do not pop popcorn in this oven.
Do not use paper towels, which contain nylon or other
synthetic fibers. Heated synthetics could melt and
cause paper to ignite.
Do not use regular cooking thermometers in this oven
when cooking in microwave or combination mode. Most
cooking thermometers contain mercury and may cause
an electrical arc, malfunction, or damage to oven.
Do not heat sealed containers or plastic bags in oven.
Food or liquid could expand quickly and cause
container or bag to break. Pierce or open container or
bag before heating.
Do not use metal utensils in oven except when
recommended by microwave food manufactures or
recipe requires metal utensils in convection or
combination mode. Heat food in containers made of
glass or china if possible.
Racks, utensils, rack guides, and oven surfaces may
become hot during or after use. Use utensils or
protective clothing, like pan grips or dry oven mitts,
when necessary to avoid burns.
Never use paper, plastic, or other combustible materials
that are not intended for cooking. If oven temperature is
high, material may ignite.
Do not unplug oven immediately after use. Internal fan
must cool oven to avoid damage of electrical
components.
To avoid pacemaker malfunction, consult physician or
pacemaker manufacture about effects of
microwave energy on pacemaker.
8
20000364 – C – e2 & e2T Oven Operator Manual
IMPORTANT SAFETY INFORMATION
!
CAUTION:
!
UNPACKING OVEN
• Inspect oven for damage such as dents in door or inside oven cavity.
• Report any dents or breakage to source of purchase immediately. Do not attempt to use oven if damaged.
• Remove all materials from oven interior.
• If oven has been stored in extremely cold area, wait a few hours before connecting power.
RADIO INTERFERENCE
• Microwave operation may cause interference to radio, television, or similar oven. Reduce or eliminate interference
by doing the following:
- Clean door and sealing surfaces of oven according to instructions in Cleaning Instructions section.
- Place radio, television, etc. as far away from oven as possible.
- Use a properly installed antenna on radio, television, etc. to obtain stronger signal reception.
OVEN PLACEMENT
• Do not install the oven next to or above a heat source such as a pizza oven or deep fat fryer. This could cause
microwave oven to operate improperly and could shorten life of electrical parts.
• Install oven on level countertop surface.
• If provided, place warning label in a conspicuous place close to microwave oven.
• Oven should be located so that plug is accessible when oven is in place.
• The switching operation of this microwave oven can cause voltage fluctuations on the supply line. The operation
of this oven under unfavorable voltage supply conditions can have adverse effects. This device is intended for
the connection to a power supply system with maximum permissible system impedance Zmax of 1.1 Ohm at the
interface point of the user’s supply. The user has to ensure that this device is connected only to a power supply
system, which fulfills the requirement above. If necessary, the user can ask the public power supply company for
the system impedance at the interface point.
SAVE THESE INSTRUCTIONS
20000364 – C – e2 & e2T Oven Operator Manual
9
GROUNDING INSTRUCTIONS
!
!
!
WARNING:
WARNING
DOMESTIC:
WARNING:
If the supply cord appears to be damaged, do not attempt to operate unit. Contact a
service agent or qualified electrician to repair.
This appliance is equipped with a three-prong or four-prong (grounding) plug for your
protection against shock hazard and should be plugged directly into a properly
grounded receptacle. Do not cut or remove the grounding prong from this plug.
This appliance must be properly grounded at time of installation. Failure to ensure
that this equipment is properly grounded can result in electrocution, dismemberment
or fatal injury.
• Oven MUST be grounded.
• Grounding reduces risk of electric shock by providing an escape wire for the electric current if an electrical short
occurs. This oven is equipped with a cord having a grounding plug. The plug must be plugged into an outlet that
is properly installed and grounded.
• Consult a qualified electrician or serviceman if grounding instructions are not completely understood or if doubt
exists as to whether the oven is properly grounded.
• Do not use an extension cord. If the product power cord is too short, have a qualified electrician install an outlet
near the appliance. This oven should be plugged into a separate circuit with the electrical rating as provided in
product specifications.
ELECTRICAL CODE REFERENCE
IN USA
When installed, this appliance must be electrically grounded and its installation must comply with the National
Electric Code, ANSI-NFPA 70, latest edition, the Manufacturer’s Installation Instructions, and applicable municipal
building codes.
IN CANADA
All electrical connections are to be made in accordance with CSA C22.1 – Canadian Electrical Code Part 1 and/or
local codes.
ALL OTHER COUTRIES
Local electrical codes will prevail.
1. All pole disconnection switch 3mm open contact distance.
2. To prevent electrical shock, an equal potential bonding ground-lug is provided in the back. This allows the
oven to be connected to an external bonding system.
3. When used as a double-stack (if applicable) and each oven has its own disconnection switch, all switches
should be closed together.
VENTILATION
Ventilation is not required but local codes prevail. These are the “authority having jurisdiction” as stated by the
NATIONAL FIRE PROTECTION ASSOCIATION, INC. in NFPA 96, latest edition.
10
20000364 – C – e2 & e2T Oven Operator Manual
QUICK START GUIDE: QUICK SERVICE OVEN
Note: The easyToUCH screen display, layout and icons shown herein, are for guidance purposes only and are not intended to be an exact
representation of those supplied with the oven.
START UP
1. Switch the oven on;
Make all the relevant safety checks and
ensure the oven is clean and empty
before pressing the oven switch down to
activate the oven.
1
2
3
4
2. The easyToUCH screen illuminates with
the display briefly showing the serial
number and oven data. Lightly tap the
screen once to freeze the display, tap
again to continue.
STOP/CANCEL
3. When the oven is setup with two or more
preheating temperatures a choice is
displayed.
5
COOKBOOK DISPLAY
Scroll arrows at the bottom of the screen
indicates there are more temperature
choices not shown on screen, if
necessary, use the scroll arrows, then
select the temperature required to start
preheating the oven.
DISPLAYS ALL COOKING PROGRAMS (Optional)
SHOWS PROGRAM GROUPS
FAVORITES (Optional)
PROGRAM GROUP
Each group contains a collection of cooking
programs.
4. During preheating the display shows the
progress as the oven heats up to the set
temperature. (To stop the oven heating,
touch the red ‘X’ symbol.)
5. The oven is ready to use when the
‘COOKBOOK’ is displayed.
CHANGE OVEN TEMPERATURE (Optional)
USING A COOKING PROGRAM
WARNING:Taking all the necessary precautions to ensure you do not burn yourself, open the oven
door to place the food into the hot oven and close the door.
1. Select a program group, for example,
‘BURGERS’ to display the individual looking
programs.
2. Select a cook program to start, for example,
2 BURGERS.
3. Follow instructions if displayed on the screen
and touch the green ‘check mark’ to cook.
4. The cooking time counts down for each
program stage.
5. When the program ends a red bar is
displayed usually with an audible sound open the door or touch the red ‘X’ to return to
the cook program.
1
Note: Opening the oven door during cooking stops
the cooking program and displays a warning.
Closing the door allows the user to continue or
cancel the cooking program.
20000364 – C – e2 & e2T Oven Operator Manual
4
2
3
5
PROGRAM STAGE
11
OPERATING GUIDE: FULL SERVICE OVEN
EASYTOUCH MAIN MENU & KEYBOARD SCREEN
1. DEVELOPMENT MODE enables multistage
cooking programs to be developed, then store
under a name and symbol for reuse.
2. PRESS & GO allows quick access to use the
cooking programs that are already stored.
3. COOKBOOK contains the oven’s cooking
programs. It displays Favorites, Cooking
Program Groups and a complete listing of all
cooking programs available.
4. CLEANING/TEMP CHANGE allows the oven
temperature to be changed and the oven to be
prepared for cleaning with reminders displayed
to assist during the cleaning process.
1
DEVELOPMENT
MODE
2
MENU SHORTCUT
3
COOKBOOK
4
CLEANING/TEMP
CHANGE
5
SETTINGS
5. SETTINGS are used to control the oven
settings and functions including time and
language, loading cooking programs and for
service and maintenance purposes.
6. KEYBOARD SCREEN is used to enter an
authorized password to enter data for
programs and may restrict operator access to
some functions.
PRESS & GO
1
2
3
Running a cooking program from the Press & Go
menu:
1. Select ‘PRESS & GO’ from the main menu screen.
2. Select the item required to cook.
3. The display shows the temperature, cooking time,
fan speed and microwave power while the timer
counts down. The timer bar turns red to indicate the
cooking cycle has finished.
Choosing which cooking programs are shown in the
‘PRESS & GO’ menu screen.
2
1
1. After selecting ‘PRESS & GO’ from the main menu
screen, select the EDIT symbol.
2. Two lists are displayed, the ‘PRESS & GO’ menu
items are shown in the upper list and the lower list
shows other menu items which are available. Both lists
can be scrolled up or down using the arrows on the
extreme right.
3. Select an item, then choose whether to change its
order within the menu or to remove it into the lower
list.
4. Select an item to move into the upper list, making it
available in the ‘PRESS & GO’ menu.
5. Select backspace to return to the menu screen when
12 finished.
Change the
order of a
selected item
shown in the
Press & Go
screen.
3
Move a
selected item
to or from
the Press &
Go screen.
4
5
Select to scroll a
down.Oven Operator Manual
20000364 – C –list
e2up&ore2T
OPERATING GUIDE: FULL SERVICE OVEN (cont’d)
USING A COOKBOOK PROGRAM
WARNING: ENSURE THERE IS FOOD PRODUCT IN THE OVEN BEFORE STARTING A COOKING PROGRAM.
To find the required Program in the cookbook:
1. Select ‘COOKBOOK’ from the main menu screen.
2. Select the ALL MENUS symbol.
3. Use scroll up/down arrows to find the program.
NOTE: If an image has a red line around it the oven
temperature is set too high or too low for that recipe.
See ‘CHANGING THE OVEN TEMPERATURE’.
1
2
3
4
5
6
Taking all the necessary precautions to ensure you do
not burn yourself, place the food product into the hot
oven cavity and close the door.
WARNING: HOT SURFACE HAZARD
4. Select the required cooking program to start cooking.
For example, ‘1 BURGER’.
5. The program either starts immediately displaying a
countdown timer, or an instruction is displayed first;
follow the stage instruction then select OK to Start
cooking. If the oven door is not opened within 30
seconds a warning message appears.
6. The cooking timer counts down to zero and makes a
sound to indicate an operator action is required at the
end of a cooking stage or the end of a cooking program.
Once the cooking program has finished, opening the
oven door to remove the food returns the display to the
‘COOKBOOK’ screen.
Note: Opening the oven door during cooking stops the
cooking program and displays a warning. Closing the
door allows the user to continue or cancel the cooking
program.
To check the oven temperature when cooking, lightly
tap the temperature displayed, the oven cavity
temperature is shown with an asterisk.
CHANGING THE OVEN TEMPERATURE
1
2
3
1. Take note of the temperature required for the recipe
and select OK.
2. Select the temperature symbol.
3. An asterisk next to the number indicates the present
oven temperature; select the required oven
temperature for the recipe. Once the oven is at the
required temperature continue from selecting the
‘COOKBOOK’ in step 1.
20000364 – C – e2 & e2T Oven Operator Manual
13
COOLING THE OVEN DOWN BEFORE CLEANING
OVEN COOL DOWN
WARNING: THE OVEN MUST BE COOLED DOWN BEFORE THE CLEANING PROCESSES ARE CARRIED OUT.
1. In Full Serve mode, select the
CLEANING symbol from the main
menu.
2. In Full or Quick Serve mode, select
the blue thermometer symbol to
disable heating and start the cooling
cycle.
3. Taking all necessary precautions
place a suitable heaped container of
ice, into the hot oven cavity. Select the
OK symbol to continue.
4. The cooling progress is displayed and
takes approximately 30 minutes.
5. The oven is now ready for cleaning.
Select OK on the screen after
completing each stage.
1
2
3
4
PREPARING TO CLEAN THE OVEN
For the oven to operate at peak efficiency, the cavity, door, air filter and grease filter must be kept clean.
A daily cleaning routine will ensure that you comply with the required hygiene standards and will help to maintain
and prolong the efficiency of your oven.
Equipment required (not supplied):
Non-caustic proprietary branded oven cleaner, heat proof gloves, protective rubber gloves, non–abrasive nylon
scrub pad, cleaning towel and cloths, eye protection and dust mask (optional).
CAUTION:
WARNING:
Wear protective rubber gloves when cleaning the oven.
NEVER use sharp implements or harsh abrasives on any part of the oven.
DO NOT use caustic cleaners on any part of the oven or oven cavity as it will cause
permanent damage to the Catalytic Convertors
Complete COOL DOWN procedure and allow the oven and accessories to cool before commencing cleaning.
CAUTION:
DO NOT use tools
Grease
Filters
Cold oven CLEANING INSTRUCTIONS e2
1. Remove the air filter from the back of the oven.
2. Open the oven door, remove the cook plate, bottom jet plate,
and grease filters.
Wash all parts in warm soapy water. Wash off using a clean
cloth and plenty of clean, warm water.
Dry by using a fresh, clean cloth.
14
Air Filter
Cook Plate
Jet Plate
(under cook plate)
20000364 – C – e2 & e2T Oven Operator Manual
COOLING THE OVEN DOWN BEFORE CLEANING (cont’d)
Cold oven CLEANING INSTRUCTIONS e2 (cont’d)
3. Remove any spillages with disposable
paper wipes.
Use a dry clean brush to remove any food
particles from between the oven floor and
the inside of the front door.
4. Wear protective rubber gloves and
protective glasses, carefully spray a noncaustic proprietary branded Oven Cleaner
onto all the internal surfaces of the oven
except the door seal (A).
5. For difficult areas, leave to soak for 10
minutes with the oven door open.
Use a non–abrasive nylon scrub
pad/sponge to clean the cavity, roof and
the inside of the door. Do not scrub the
door seal or use metallic scourers.
6. Wash off using a clean cloth and plenty of
clean warm water and dry using a fresh
clean cloth or paper towel.
Replace all the cleaned oven parts.
Close the oven door and wipe the outside
of the oven with a damp cloth.
WARNING:
1
2
A
3
4
DO NOT USE OVEN WITHOUT A
CLEAN AIR FILTER IN PLACE
APPLY OVEN PROTECTOR:
1. Only apply to a clean oven. Spray
proprietary branded Oven Protector
onto a sponge.
2. Spread Oven Protector lightly onto all
internal surfaces of the oven.
3. Spread Oven Protector lightly onto the
internal surface of the oven door
avoiding the door seal.
Switch on the oven and preheat.
When the oven has reached operating
temperature it will take about 30mins
to cure the Oven Protector.
Note: Oven protector turns light brown
when cured.
20000364 – C – e2 & e2T Oven Operator Manual
1
2
3
15
TROUBLESHOOTING
Although every effort is made to ensure your oven will continue to perform to a high standard, please check
the chart to see if the problem can be easily resolved before contacting your service agent.
PROBLEM
PROBABLE CAUSE
REMEDY
Check if there is a power cut.
The oven does not work and the
display screen is blank
Check the isolator switch is ON or
the oven is plugged in correctly.
The oven has no power
Check the oven switch is ON.
Some screen controls do not work
Unauthorized access
Contact the authorized user.
Display warning message that the
door is open
Oven door not closed
Remove any restriction and close the
oven door.
Oven not clean
Clean the oven (see cleaning).
Food not at correct temperature
Use the correct cooking program.
Modified or wrong program selected
Unwrap food for non-microwave
cooking.
The oven does not cook the food
correctly
Food wrapped
The oven does not finish cooking
Food removed early
Check all the cooking stages have
been followed correctly.
Oven not clean
Close oven door.
Food not at correct temperature
Refit air filter.
Modified or wrong program selected
Allow the oven to cool down, if
overheated.
Food wrapped
Food removed early
Display shows an error code
16
Oven malfunction
Check and remove any restrictions
around the air vents.
Note the error code and contact your
Service Agent.
20000364 – C – e2 & e2T Oven Operator Manual
HOW TO OBTAIN SERVICE
If the oven fails to operate, check the circuit breaker to be sure it is turned on. Contact Merrychef USA at
(800)678-9511 for the name and phone number of the nearest Factory Authorized Servicer.
20000364 – C – e2 & e2T Oven Operator Manual
17
LIMITED WARRANTY FOR COMMERCIAL PRODUCTS
LIMITED WARRANTY
Merrychef USA, (“Merrychef”) warrants this product to be
free from defects in material and workmanship for a period
of one (1) year from the date the product is installed or
eighteen months (18) months from the date of shipment
from our facility, whichever comes first.
During the warranty period, Merrychef shall, at Merrychef’s
option, repair or replace parts determined by Merrychef to
be defective in material or workmanship, and with respect
to services, shall re-perform any defective portion of said
services. The foregoing shall be the sole obligation of
Merrychef under this Limited Warranty with respect to the
equipment, products and services. With respect to
equipment, materials, parts and accessories manufactured
by others, Merrychef’s sole obligation shall be to use
reasonable efforts to obtain the full benefit of the
manufacturer’s warranties. Merrychef shall have no
liability, whether in contract, tort, negligence, or otherwise,
with respect to non-Merrychef manufactured products.
WHO IS COVERED
This Limited Warranty is available only to the original
purchaser of the product and is not transferable.
EXCLUSIONS FROM COVERAGE
• Repair or replacement of parts required because of
misuse, improper care or storage, negligence, alteration,
accident, use of incompatible supplies or lack of specified
maintenance shall be excluded
• Normal maintenance items, including but not limited to,
light bulbs, fuses, gaskets, door seals, O-rings, air filters,
interior and exterior finishes, lubrication, de-liming, broken
glass, etc.
• Failures caused be erratic voltages
• Improper or unauthorized repair
• Changes in adjustment and calibration after ninety (90)
days from equipment installation date
• This Limited Warranty will not apply to any parts subject
to damage beyond the control of Merrychef, or to
equipment which has been subject to alteration, misuse or
improper installation, accidents, damage in shipment, fire,
floods, power changes, other hazards or acts of God that
are beyond the control of Merrychef.
• This Limited Warranty does not apply, and shall not cover
any products or equipment manufactured or sold by
Merrychef when such products or commercial equipment is
installed or used in a residential or non-commercial
application. Installations not within the applicable building
or fire codes render this Limited Warranty and any
responsibility or obligations associated therein null and
void. This includes any damage, costs or legal actions
resulting from the installation of any Merrychef commercial
cooking equipment in a non-commercial application or
installation, where the equipment is being used for
applications other than those approved for by Merrychef.
• If any product is cleaned without using an approved
Merrychef cleaning solution, this Limited Warranty
shall be voided.
LIMITATIONS OF LIABILITY
The preceding paragraphs set forth the exclusive remedy
for all claims based on failure of, or defect in, products or
services sold hereunder, whether the failure or defect
arises before or during the warranty period, and whether a
claim, however instituted, is based on contract, indemnity,
warranty, tort (including negligence), strict liability, implied
by statute, common-law or otherwise, and Merrychef its
servants and agents shall not be liable for any claims for
personal injuries or consequential damages or loss,
howsoever caused. Upon the expiration of the warranty
period, all such liability shall terminate. THE FOREGOING
WARRANTIES ARE EXCLUSIVE AND IN LEIU OF ALL
OTHER WARRANTIES, WHETHER WRITTEN, ORAL,
IMPLIED OR STATUTORY. NO IMPLIED WARRANTY OF
MERCHANTABILITY OR FITNESS FOR PARTICULAR
PURPOSE SHALL APPLY, MERRYCHEF DOES NOT
WARRANT ANY PRODUCTS OR SERVICES OF
OTHERS.
REMEDIES
The liability of Merrychef for breach of any warranty
obligation hereunder is limited to: (i) the repair or
replacement of the equipment on which the liability is
based, or with respect to services, re-performance of the
services; or (ii) at Merrychef’s option, the refund of the
amount paid for said equipment or services.
Any breach by Merrychef with respect to any item or unit of
equipment or services shall be deemed a breach with
respect to that item or unit or service only.
WARRANTY CLAIM PROCEDURE
Customer shall be responsible to:
• Immediately advise the Dealer or Merrychef’s Authorized
Service Agent of the equipment serial number and the
nature of the problem.
• Verify the problem is a factory responsibility. Improper
installation or misuse of equipment, are not covered under
this Limited Warranty.
• Cooperate with the Service Agency so that warranty
service may be completed during normal working hours.
GOVERNING LAW
For equipment, products and services sold in the United
States this Limited Warranty shall be governed by the laws
of the state of Delaware, USA, excluding their conflicts of
law principles. The United Nations Convention on
Contracts for the International Sale of Goods is hereby
excluded in its entirety from application to this Limited
Warranty.
Merrychef USA
1111 North Hadley Road
Fort Wayne, Indiana 46804
USA
18
20000364 – C – e2 & e2T Oven Operator Manual
THIS PAGE INTENTIONALLY LEFT BLANK
20000364 – C – e2 & e2T Oven Operator Manual
19
Merrychef
™
20
20000364 – C – e2 & e2T Oven Operator Manual
®