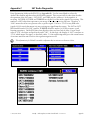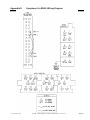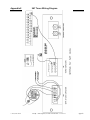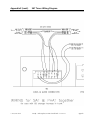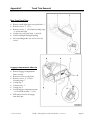
1
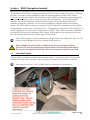
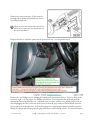
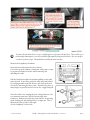
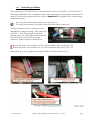
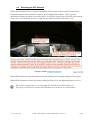
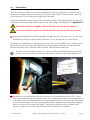
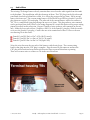
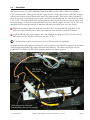
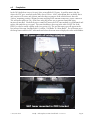
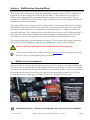
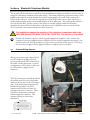
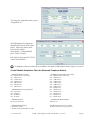
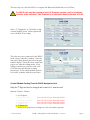
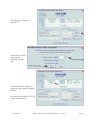
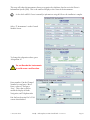
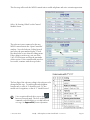
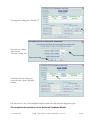
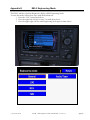
Audi Symphony I to RNS-E Install Guide
Version 2.1
Prepared By:
Contributing Editor:
TeddyBGame
Symbol Glossary
A warning that should receive strict attention
Emphasizes a wiring connection to be made
Additional information on topic but not critical to the installation
Warning - Disclaimer
•
The installer shall indemnify the author and editors for any claims or liability arising
from the vehicle modifications described in this document.
•
To follow this guide requires alterations to the electrical system of the vehicle.
•
Read and understand the entire document before beginning work.
•
Armrest telephone handsets will be no longer be operational as a result.
•
Disconnect the negative battery terminal before altering vehicle electronics.
© 2005, 2006 Lee H.
Preface
I have completed the installation of a RNS-E navigation headunit and OEM satellite radio tuner into
my 2001 A6. This document will be of most use to owners of a 2000-2001 C5 A6 or B5 A4/S4/RS4 and
involves the replacement of the original Symphony I headunit.
For instructions on how to upgrade to the RNS-E from an existing Symphony II headunit in a 2002-2004
A6/S6/RS6 or 2002-2005 allroad, please see these two sets of excellent instructions instead of this document:
• Justin’s RNS-E into a 2003 allroad here: http://audi.ogdenlabs.com
• Nene’s RNS-E into a 2003 RS6 here: www.htms.org/rnse.html
The RNS-E works almost perfectly in the 2000-2001 A6. One issue that has yet to be resolved is the
infamous “Clock problem”. The RNS-E gets the time and date information from the instrument
cluster. When a navigation route is programmed, the RNS-E gives an estimated time of arrival (ETA).
The problem is that the time and date signals from the cluster are not completely understood. This
results in an error in the RNS-E internal clock. Since this clock is wrong, the ETA given during route
guidance is also wrong. If the RNS-E is loaded with the latest US firmware (internal software), the
clock is also shown in the bottom center of the screen at all times. This clock display will also be
wrong most of the time. Many users are in the process of troubleshooting this problem but a solution
has yet to be found.
This document is prepared as a step-by-step guide and will follow the outline on the next page. No one
step is particularly difficult, but as a whole it can seem overwhelming. The outline may reinforce that
feeling at first glance. In this case, the reader is urged to read and understand each section individually.
The work in each section can be performed independently of the other sections, except that the
completion of Section 1 is a prerequisite to the work demonstrated in the remaining sections.
A complete installation of the RNS-E requires all steps in Section 1 to be
performed. Do not install the headunit without connecting to CANbus or
without having access to VAG-COM or other means to code the control module.
Note from the Author
Thanks to the www.navplus.us community as a whole. This is one of the best automotive based
forums to which I have ever had the pleasure of contributing.
Special thanks to users TeddyBGame and Proxus for putting together the deal that enabled me to
obtain the RNS-E navigation headunit. Ted has extensive knowledge of Audi audio and navigation
systems and we have collaborated on many projects. Proxus was a great seller to deal with and
worked with me on some issues with my navigation DVD even after the sale.
Because of some past inquiries, I would like to say that donations are gladly accepted but not
expected. Many hours of research and labor produced this document but I consider it to be freeware.
If you paid money to gain access to this document, you were robbed.
If you have any questions or comments, big or small, please feel free to email me, [email protected].
The most recent version of this document can be downloaded from the web at www.nsxjr.com
© 2005, 2006 Lee H.
NSX JR – Audi Symphony I to RNS-E Install Guide – Version 2.1
Page i
Section 1
RNS-E Navigation Headunit
… … … … … … … … … … … … … .. Page 1
1.1
Instrument Cluster
1.1.1 Connecting to CANbus
1.1.2 Mounting the GPS Antenna
1.2
Reverse Wire
1.3
Headunit Installation
1.3.1 Connecting to CANbus
1.3.2 Plug-and-Play Wiring Harness
1.3.3 Radio Antenna Adapter
1.3.4 Entering the Security PIN Code
1.4
Control Module Coding (VAG-COM)
Section 2
2.1
2.2
2.3
2.4
2.5
2.6
Section 3
3.1
3.2
Section 4
4.1
4.2
4.3
Section 5
Satellite Radio Module
… … … … … … … … … … … … … … .…
Page 19
The Basics: SAT Radio Tuner Wiring Info
Power Wires
Audio Wires
Data Wires
Antenna Wires
Completion
Multifunction Steering Wheel … … … … … … … … … … … … . Page 26
MFSW Control Unit Installation
Control Module Coding (VAG-COM)
Bluetooth Telephone Module … … … … … … … … … … … … . Page 29
Custom Wiring Harness
Connecting the K-line
Control Module Coding (VAG-COM)
TV Tuner Module or A/V Interface (future project)
List of Appendices
Appendix A
Appendix B
Appendix C
Appendix D
Appendix E
Appendix F
Appendix G
Appendix H
Appendix J
Appendix K
© 2005, 2006 Lee H.
Parts List
RNS-E Engineering Mode
SAT Radio Diagnostics
Symphony I to RNS-E Wiring Diagram
SAT Tuner Wiring Diagram
Trunk Trim Removal
BOSE® Amplifier Pinouts
Climate Control Faceplate
Screen Shot Mode
Bluetooth Module Operation via Steering Wheel
NSX JR – Audi Symphony I to RNS-E Install Guide – Version 2.1
Page ii
Section 1
RNS-E Navigation Headunit
The installation of the RNS-E Navigation unit into a 2000-2001 A6 is a multi-step process. The main
obstacle to overcome for this installation is that the original Symphony I radio is not CANbus
(Controller Area Network) enabled. The vehicle has many CANbus systems, from engine management,
to transmission control, to the one of interest here called “infotainment”. These are all separate
networks, and the “infotainment” communication network is the one that helps all the radio,
telephone, navigation, telematics, etc in a vehicle communicate with one another in an efficient
manner. All of these different items are connected to the CANbus like a computer network and they
all communicate via two wires, CAN H and CAN L. The Symphony I radio shows CAN H and CAN L
on the wiring label, but it is not wired to function via CANbus. The CANbus network is available in
the vehicle if the clock in the tachometer dial is digital. If the vehicle has an analog clock then stop
here, the wiring in this document will not apply to that vehicle.
If the CD-based navigation system is installed in the trunk, the CANbus wiring will be present. These wires will
need to be removed and taped out of the way during the installation process.
Have all Radio Security Codes in hand before disconnecting the battery.
Eject the CD from the Symphony headunit before disconnecting the battery.
Do not turn the ignition switch on while the instrument cluster is removed.
1.1
Instrument Cluster
The first tasks to complete are behind the instrument cluster. Cover the top of the steering wheel
column with a shop towel or painter’s tape to prevent scratching when the cluster is removed.
Some images in Section 1 are ©2004 -Ted Basile and are used with express written permission.
© 2005, 2006 Lee H.
NSX JR – Audi Symphony I to RNS-E Install Guide – Version 2.1
Page 1
Remove the center trim piece (1) between the
steering wheel column and instrument cluster
by pulling straight out.
The picture shows the steering wheel removed. It is
not necessary to remove the steering wheel for any
part of this installation.
Remove the driver’s side knee panel and set it out of the way. See the picture below.
Remove the two Phillips screws holding the bottom of the instrument cluster. These are likely to be
extremely tight. Use the proper size Phillips screwdriver. Reach up under the dash and push the
instrument cluster out from the rear. When the cluster is loose, remove it by pulling the left side out
first, unplugging the blue connector on the left rear, then the grey connector in the middle, then the
green connector on the right end. Each of these plugs has a small purple clamp that holds it in place.
Simply lift this purple clamp up and the plug will remove itself from the cluster. See next illustration.
© 2005, 2006 Lee H.
NSX JR – Audi Symphony I to RNS-E Install Guide – Version 2.1
Page 2
To remove the instrument cluster screws, try tightening the screw first just to break it loose. The screw has a very
fine thread pitch meaning the screw will not actually tighten much by being turned clockwise. Also, use an offset
screwdriver for better torque. This method has worked for me numerous times.
Remove the Symphony I headunit.
Insert the four radio removal tools as shown.
Cover the top of the climate control unit with painter’s tape
to prevent accidental scratches while removing and
installing the radio.
Pull the headunit straight out without pulling on the radio
removal tools. If necessary, push the radio out from behind
by reaching around under the driver’s side dash in the area
revealed by removing the knee panel. Alternatively, place as
many fingers as possible in the cassette slot, wiggle and pull.
Once the radio is out, unplug the four wiring harnesses, the
two antenna connectors, and the brown single wire
connector. Remove the radio keys from the face by pressing
in the locking tab and pulling the key straight out. This is
illustrated in the picture to the right.
Set the Symphony I radio aside.
© 2005, 2006 Lee H.
NSX JR – Audi Symphony I to RNS-E Install Guide – Version 2.1
Page 3
1.1.1
Connecting to CANbus
This step changes CLK and DATA wires that run from the cluster to the radio to CAN H and CAN L.
This also accomplishes is the reassignment of the correct pins on the steering wheel control unit to be
on the CAN network for proper operation. Refer to Appendix D for diagrams of the wiring changes
outlined in Section 1.
The steering wheel control module installation is covered in Section 3.
The existing control unit may be left in place with no ill-effects but will not be operational.
The grey instrument cluster connector must be
dismantled to change the wiring. This connector is
called T32c. Slide a little purple clamp off the
bottom, remove the cable tie from the bottom and
then slide the grey cover off the top of the
connector. Rewire the pins as shown below.
Remove the CLK wire from Pin 12 of T32c and reinstall into Pin 5 (CAN H) of T32c.
Remove the DATA wire from Pin 13 of T32c and reinstall into Pin 6 (CAN L) of T32c.
Reinstall the grey cover, purple bottom clip and cable tie onto the connector T32c.
© 2005, 2006 Lee H.
NSX JR – Audi Symphony I to RNS-E Install Guide – Version 2.1
Page 4
1.1.2
Mounting the GPS Antenna
While the instrument cluster is removed, install the GPS Antenna as shown in the picture below.
Extend the antenna wire from this location to the area behind the headunit. This is a proven
installation location for almost every Audi vehicle. It will likely be necessary to fish the wire from the
cluster area to the headunit area by accessing the area under the dash on the driver’s side.
Reinstall all connectors onto the instrument cluster, making sure the purple clamps lock into place.
Reinstall the instrument cluster buy gently pushing back into place and tightening the two screws.
If desired, the instrument cluster screws can be replaced with similarly threaded hex-head screws.
This type of screw will be easier to remove if the instrument cluster needs to be serviced in the future.
© 2005, 2006 Lee H.
NSX JR – Audi Symphony I to RNS-E Install Guide – Version 2.1
Page 5
1.2
Reverse Wire
The RNS-E installation into the A6 requires that a separate connection for the reverse wire be made.
This wire permits the RNS-E to know when the vehicle is in reverse gear so that it will move the
indicator correctly on the map. Without this wire, the RNS-E will move the indicator forward on the
map which will create a location error until the unit is able to synchronize with the GPS satellites.
This sync seems to occur about once a minute while the unit is receiving at least three satellite signals.
This subsection is not required for the installation. If not completed, the vehicle location on the map will be in
error for a period of time after travelling in reverse.
Remove the
left side lower
A-pillar trim.
Locate Connector T10f, the brown 10-pin connector in this connection station. Pin 8 in this connector
is a blue/red wire that signals reverse. Tap into this wire and run the connection to the area behind the
headunit. This wire indicates +12V when the vehicle is in reverse gear.
The wire must be well secured and not interfere with the steering mechanism.
Reinstall the lower A-pillar trim, the driver’s side knee panel, and the upper steering column trim.
© 2005, 2006 Lee H.
NSX JR – Audi Symphony I to RNS-E Install Guide – Version 2.1
Page 6
1.3
Headunit Installation
The subsections within this topic will describe how to complete the physical installation of the RNS-E
headunit. To continue from this point, Sections 1.1 and 1.2 must be complete.
Before performing the work in this section, the original satin black climate control faceplate may be
replaced with a faceplate from a 2002-2004 A6 to match the flat black color of the RNS-E. Since this
step is not required, further information is located in Appendix H.
1.3.1
Connecting to CANbus
Obtain a terminal extractor tool to make this section a snap. http://forums.bostonaudi.org/viewtopic.php?t=3945
In the area behind the headunit, locate the black (or multi-colored) 20-pin connector. This is officially
named Connector I. The pins in this connector are smaller than all the other connectors. The purple
sliding locking bar does not completely come out of this connector, but it must slide out as far as it
will go before moving any wires. The vehicle may have the three colored pieces that all snap together
to form one instead of the black housing. See the picture below for comparison of both types.
Remove the CLK wire from Pin 8 of Connector I and reinstall into Pin 7 (CAN H) of Connector I.
Remove the DATA wire from Pin 9 of Connector I and reinstall into Pin 12 (CAN L) of Connector I.
Slide the purple locking bar back into its closed position.
© 2005, 2006 Lee H.
NSX JR – Audi Symphony I to RNS-E Install Guide – Version 2.1
Page 7
1.3.2
Plug-and-Play Wiring Harness
This section describes a crucial step that is often overlooked during installation.
The plug and play harness provides all electrical connections to an expensive
electronic device that is likely used and carries no warranty coverage.
The plug-and-play (PNP) harness is the easiest way to connect the majority of the wiring when
replacing a symphony radio. This has two ends that will be referred to as the RNS end and the vehicle
end. The RNS end is the large square “Quad-lock” connector. The vehicle end has four housings that
connect to the four plugs removed from the symphony radio. These PNP harnesses can be purchased
for the specific vehicle requirements of Bose or Non-Bose, telephone or none, and CD changer or none.
It is recommended to purchase the telephone and CD changer options even if the vehicle is not
presently equipped with those modules. This will ensure flexibility for future upgrades.
Verify that each wire of the PNP harness connects the proper pins on each end.
The chart on the next page lists each item and the correct pin assignments for comparison. There are
pictures following the chart that detail the pin numbers listed in the chart. There are also wiring
labels on the top of the RNS-E and Symphony I that list all pins with descriptions. This is an
important step to ensure proper operation of the RNS-E. Many PNP harnesses are assembled with the
Symphony II radios in mind, and there will be a few wiring differences compared to the Symphony I.
Reminder: This document is specific to installations replacing the Symphony I radio. For Symphony II radio
replacements, there is a chart specific to that installation available on the web at www.nsxjr.com
Some connections are made outside the PNP harness, meaning it is only connected to one harness end.
Connect RNS-E Pin B7 to ground if the vehicle is equipped with the BOSE system
Connect RNS-E Pin C2 to the reverse wire installed in Section 1.2.
Connect RNS-E Pin D14 to the large brown single pin connector.
Connect vehicle Pin 10, Connector IV to chassis ground in a convenient location.
Once the PNP harness has been verified for accuracy, connect each vehicle end to the corresponding
plug in the vehicle. Each connector can only be inserted one way to protect against wiring mistakes.
If the vehicle is equipped with the BOSE amplifier and speaker system, the front speaker connector can be
completely removed from the PNP harness. This is RNS-E connector A to vehicle connector II.
© 2005, 2006 Lee H.
NSX JR – Audi Symphony I to RNS-E Install Guide – Version 2.1
Page 8
Plug-and-Play Harness wiring chart for Symphony I to RNS-E
Description
Pin
Connector
not
necessary
for
BOSE
systems
1
2
3
4
5
6
7
8
RNS-E harness end
A: Speaker Connecter
N.C.
Right Front (+)
Left Front (+)
N.C.
N.C.
Right Front (-)
Left Front (-)
N.C.
Vehicle harness end
Pin#
N.C.
3
5
N.C.
N.C.
4
6
N.C.
B. EXT Control Connector
Most Ring break
CDC-NF GND
V-Signal
U14R-2
K-Line
CDC-Data out
BOSE Pin
CDC-NF L.IN
CDC-NF R. IN
U14 ST CDC
CDC -Data IN
CDC- Data CLK
N.C.
18
1
16
3
14
Ground for Bose Systems Only
19
20
17
13
15
C: EXT Control Connector
MIC IN (-)
RFSL
Line Out FL
MIC Out (-)
Line Out RL
TEL NF IN (-)
MIC IN (+)
Line Out GND
Line Out FR
MIC Out (+)
Line Out RR
TEL NF IN (+)
Connect to Ground in convenient location
N.C.
Connect to Reverse Wire
4
N.C.
1
4
N.C.
3
5
N.C.
2
3
10
MOST network
CDC Audio
Speed signal
Battery Power out
K diagnostic
CDC Data
Bose ground wire
CDC Audio
CDC Audio
accessory power
CDC Data
CDC Data
1
2
3
4
5
6
7
8
9
10
11
12
mic for speech control
reverse +12V
to amp
mic out to tel module
to amp
tel module audio in
mic for speech control
to amp
to amp
mic out to tel module
to amp
tel module audio in
CDC chassis ground
1
2
3
4
5
6
7
8
9
10
11
12
infotainment bus
infotainment bus
Tel Module mute
Main Ground
Amp turn on
9
10
11
12
13
D: Power Connector
CAN-H
CAN-L
TEL-Mute
Kl.31
U14 ST DSP
Alarm GND
Main Power
Battery Power out
14
15
16
DWA-GND
Kl.30
U14R-1
Connector
7
12
1
8
6
Connect to large brown single
pin connector
7
N.C.
Description
II
II
RF+
LF+
II
II
RFLF-
I
III
I
III
I
S GND
GALA
+12V
K
DATA OUT
I
I
I
I
I
L CH
R CH
ACC
DATA IN
DATA CLK
I
LF
I
IV
LR
TEL -
I
I
COM
RF
I
IV
IV
RR
TEL +
CD GND
I
I
IV
III
I
CAN H
CAN L
MUTE
(-)
ACC
III
(+)
Legend
N.C.
NF
Kl.
DWA
© 2005, 2006 Lee H.
No Connection
Niederfrequenz
Klemme
Diebstahl Warnanlage
English: Audio Frequency
English: Terminal
English: Theft Alarm System
NSX JR – Audi Symphony I to RNS-E Install Guide – Version 2.1
Page 9
Plug-and-Play Harness
RNS-E
© 2005, 2006 Lee H.
Symphony I
NSX JR – Audi Symphony I to RNS-E Install Guide – Version 2.1
Page 10
1.3.3
Radio Antenna Adapter
The Radio Antenna ends must also be used with an adapter harness in order to be connected to the
RNS-E headunit. It is crucial to purchase the correct antenna adapter. Most antenna adapters that are
supplied in package deals are used for upgrades from Symphony II radios and will not work for
replacement of the Symphony I. The correct antenna adapter is shown below.
Connect the two antenna leads from the vehicle to the antenna adapter.
1.3.4 Entering the Security PIN Code
Do not continue without the Radio Security PIN Code available.
Do not press on the LCD screen while sliding the RNS-E into place.
Connect the PNP harness, radio antenna adapter, and GPS antenna to the RNS-E unit.
Slide the RNS-E into place as far as it will go, but not so far that it locks into place. Reconnect the
negative battery terminal. The Security code PIN entry is not as simple as inputting the code once to
unlock the unit. For some reason, the RNS-E unit needs some time to acclimate itself to the vehicle.
Follow the steps below to unlock the unit. This sequence will be necessary every time the unit is
disconnected from the battery for more than a few minutes.
1.
2.
3.
4.
5.
6.
7.
Turn on the ignition. Turn on the RNS-E if it does not start with the ignition.
Press the “SETUP” and “RADIO” (or FM|AM) buttons for a few seconds until the unit reboots.
Input the PIN code. The unit will likely immediately return to the PIN entry screen.
If the unit accepts the PIN code, skip ahead to Section 1.4 to code the control module.
With the ignition still on, input the PIN code a few more times and wait 15 minutes.
Turn the ignition off and wait 30 minutes.
Repeat steps 1 through 4.
If the installation will not continue to include Satellite radio, telephone module, or A/V interface, then
the RNS-E may be pushed all the way into place until the locking tabs click. In the A6 this will be
tricky because extra space behind the headunit is scarce. The housings at the vehicle end of the PNP
harness plugs should be tucked into the space behind the climate control unit. This can be done by
holding the RNS-E as close to the opening as possible with one hand while using the other hand to
tuck the housing ends down. It will take a few tries to get it right. Slide the RNS-E into place by
placing fingertips near the radio removal key slots and pushing straight back. Do not push on the LCD
screen. Ensure all four tabs lock into place with a popping sound.
© 2005, 2006 Lee H.
NSX JR – Audi Symphony I to RNS-E Install Guide – Version 2.1
Page 11
1.4
Control Module Coding (VAG-COM)
The RNS-E and instrument cluster must be coded with VAG-COM to ensure proper operation.
Connect a diagnostic cable to the vehicle and start the VAG-COM software on the computer.
In leiu of using VAG-COM software, the vehicle can be coded at any Audi dealership. Expect to pay for this service.
VAG-COM Release 512 is recommended.
From the Main VAG-COM screen, press
“Select” under the Select Control Module area.
Select “37-Navigation” or “56-Radio” on the
Control Module Screen. Either option will
access the RNS-E for coding.
The software is now connected to the RNS-E
in the “Open Controller” window. Note the
Software Coding located just below the part
number display. Check the chart on the next
page to see what the coding means. If the
coding is satisfactory, exit out of the VAGCOM software and skip the recoding
instructions directly to the adaptation
settings. If the control module needs to be
recoded, continue with the steps below.
My coding is 0509635, this is for: A6 with Bose, SAT radio, BT module, and Multifunction Steering Wheel.
© 2005, 2006 Lee H.
NSX JR – Audi Symphony I to RNS-E Install Guide – Version 2.1
Page 12
Control Module Coding Chart for RNS-E Navigation Unit
0?xxxxx: Vehicle
1 - Lamborghini
2 - Audi A3 (8P)
3 - Audi A4 (8E)
4 - Audi A4 Cabriolet (8E)
5 - Audi A6 (4B)
6 - Audi TT (8J)
0x?xxxx: Diagnostics
0 – Diagnostics for front speaker active (not Audi A4 Cabriolet)
1 – Diagnostics for front speaker inactive (only Audi A4 Cabriolet)
0xx?xxx: Sound Characteristics
0 - Linear
1 - Audi A4 (8E)
2 - Audi A6 (4B)
3 - Audi A4 Cabriolet (8E)
4 - Audi TT (8J)
5 - Audi A3 (8P)
9 - Bose Soundsystem
0xxx?xx: Telephone / Telematics
1 – No Telephone (supply voltage for microphone actively)
2 – Telephone (Temic – supply voltage for microphone inactively)
3 – Telephone (Cullman – supply voltage for microphone inactively)
4 - Telephone (Nokia – supply voltage for microphone inactively)
5 – Telematic EU (supply voltage for microphone inactively)
6 – Telematic US (supply voltage for microphone inactively)
7 - Mobile phone preparation self-diagnostic-able with comfort operation
0xxxx?x: Options I
1 – No additional Tuner
2 - Digital-Radio
3 - Satellite-Radio
4 - Satellite- and Digital-Radio built-in
0xxxxx?: Options II
1 - No TV-Tuner, CD-Changer or MFSW
2 - TV-Tuner Only
3 - CD-Changer Only
4 - TV-Tuner und CD-Changer
5 - MFSW Only
6 - TV-Tuner and MFSW
7 - CD-Changer and MFSW
8 – All: TV-Tuner, CD-Changer and MFSW
© 2005, 2006 Lee H.
NSX JR – Audi Symphony I to RNS-E Install Guide – Version 2.1
Page 13
To change the coding, press “Recode-07”
Enter the new
coding desired in
the “Software
Coding” box.
Verify that the new coding was
accepted in the “Open Controller”
window.
© 2005, 2006 Lee H.
NSX JR – Audi Symphony I to RNS-E Install Guide – Version 2.1
Page 14
To change the adaptation values, press
“Adaptation-10”
Scroll through each adaptation
channel that is listed in the chart
below. Enter the correct value
based on the vehicle
charateristics. When finished,
press “Done, Go Back”. The
important channels are shown in
yellow highlight. The remaining
channels can be set via the menu
system in the RNS-E itself.
Control Module Adaptation Chart for RNS-E Navigation Unit
-> Channel 001 (Tire Circumference in mm)
Summer Tires
Summer Tires
Winter Tires
1790 - 145/80 R14
1815 - 165/65 R15
1803 - 175/60 R15
1806 - 185/50 R16
1935 - 195/65 R15
1910 - 205/60 R15
1930 - 205/55 R16
1818 - 205/40 ZR17
1960 - 215/55 R16
2060 - 225/60 R16
1930 - 225/45 R17
2074 - 225/55 R17
1943 - 225/40 ZR18
1960 - 235/50 R16
1964 - 235/45 R17
1967 - 235/40 ZR18
2065 - 245/45 R18
2065 - 245/45 ZR18
1940 - 255/40 R17
1937 - 255/35 R18
1937 - 255/35 ZR18
2016 - 255/40 ZR18
2016 - 255/35 ZR19
2092 - 255/35 ZR20
1775 - 155/65 R15
1895 - 185/65 R15
1935 - 195/65 R15
1930 - 205/55 R16
1960 - 215/55 R16
2092 - 215/65 R16
2060 - 225/60 R16
1930 - 225/45 R17
2070 - 225/55 R17
1940 - 225/40 R18
2010 - 225/45 R18
2040 - 235/45 R18
2114 - 235/50 R18
1940 - 255/40 R17
© 2005, 2006 Lee H.
NSX JR – Audi Symphony I to RNS-E Install Guide – Version 2.1
Page 15
-> Channel 002 (Speed Signal)
00 - self calibration which automatically selects the correct value after some kilometers.
08 - Audi A6 (4B)
43 - Audi A3 (8P)
45 - Audi A4 (ab MJ 2004)
-> Channel 003 (Language Selection)
0 - German
1 - English (UK – NOT North America)
2 - French
3 - Italian
5 - Spanish
7 - English (US – ONLY North America)
-> Channel 005 (Video in motion switch off)
0 – Switch off once moving.
1 – Switch off over 5 km/hr
-> Channel 007 (Expanded Settings)
+01 – Distance Unit in Miles
+02 – Speed Unit in MPH
+04 – Time Format in 12HR
+08 – Date Format in MM:DD:YYYY
+16 – Repeat Voice Commands
-> Channel 008 (GALA-Function)
000 – GALA Function Switched Off
001 – Level 1
002 – Level 2
003 – Level 3
004 – Level 4
005 – Level 5
255 – GALA via microphone (BOSE audiopilot)
-> Channel 010 (Region)
0 – Northern Hemisphere
1 – Southern Hemisphere
-> Channel 066 (Self Check)
To start the self check enter a value of 1. These values are not permanent and serve only to start the tests.
Thereby the following components are tested:
DVD, GPS Receiver, GPS Antenna, Gyro, Key, Internal Interface Status, Communication to the Tuner module,
CAN-Bus Chip, Card Readers 1 & 2, Passive speakers, radio antenna, DSP, Microphone.
-> Channel 067 (CD/DVD Eject)
000 – Normal Status
001 - CD/DVD eject (value is not stored)
255 – Eject Button disabled (theft protection)
-> Channel 068 (Test Picture)
These values are not permanent and serve only to start the tests.
0 – No test pattern
1 – Test pattern Red
2 – Test pattern Green
3 – Test pattern Blue
4 – Test pattern White
5 – Test pattern Black
6 – Test pattern Chessboard
7 – Test pattern Chessboard (inverted)
8 – Test pattern 64 Greytones (vertical bars)
9 – Test pattern special
-> Channel 069 (Display Mechanism)
000 – Display closed
001 – Display open
200 - Display half open (hinderance)
255 – Undefined position
© 2005, 2006 Lee H.
NSX JR – Audi Symphony I to RNS-E Install Guide – Version 2.1
Page 16
-> Channel 070 (Display-Brightness)
0 – Switched off
1 - 20 % Brightness
2 - 40 % Brightness
3 - 60 % Brightness
4 - 80 % Brightness
5 - 100 % Brightness
-> Channel 099 (Transport Mode)
This channel is used only on vehicles without a CAN gateway.
0 – Transport mode inactive
1 – Transport mode active
-> Channel 111 (System Reset)
When you store a value of 1 the system is reset. The controller is restarted but fault codes are not cleared.
-> Channel 114 (FM-Sender Status)
On inquiry.
-> Channel 117 (Signal Position)
Adjustment of the signal output on individual speakers.
0 – Fader center – Balance Center
1 – Fader front – Balance left
2 - Fader front - Balance right
3 - Fader rear - Balance left
4 - Fader rear - Balance right
-> Channel 136 (Navigation references)
Adjustment of the voice prompts related to driver position.
00005 – Left hand drive (USA)
00013 – Right hand drive (USA)
02632 – Right hand drive (Europe)
03226 – Left hand drive (Europe)
Exit out of the Adaptation screen when
complete. Now is a good time to check out
the Measuring Blocks. These show
information on the active functions of the
RNS-E. From the Open Controller screen,
press “Meas. Blocks - 08”
The Measuring Blocks screen shows
different groups of values that display real
time readings. This is helpful because it
displays all sorts of information that gives
insight into the workings of the RNS-E.
Scroll through the groups to display
different information items.
Exit back out to the Main VAG-COM
screen when finished.
© 2005, 2006 Lee H.
NSX JR – Audi Symphony I to RNS-E Install Guide – Version 2.1
Page 17
The last step is to get the instrument cluster adapted to recognize the radio and navigation data for use
in the Driver’s Information System (DIS). This is the small red display at the center of the instruments.
See the vehicle and RNS-E owner’s manuals for information on using the DIS once this installation is complete.
Select “17-Instruments” on the Control
Module Screen.
To change the adaptation values, press
“Adaptation-10”
Do not Recode the Instruments
It could cause a malfunction.
Enter number 62 in the Channel
Number box and press “Read”.
Enter a value of 5 and press
“Save”. This value is valid to
enable the display of Radio and
Navigation info.
See Section 4.3 for installations
that include a telephone module.
Exit back out of VAG-COM completely and disconnect the cable from the diagnostics port.
This completes the installation of the RNS-E navigation headunit.
© 2005, 2006 Lee H.
NSX JR – Audi Symphony I to RNS-E Install Guide – Version 2.1
Page 18
Section 2 Satellite Radio Module
This section will describe how to install an OEM Audi satellite radio module in a vehicle that is not
pre-wired for it from the factory. These instructions are specific to Audi vehicles with the CD Changer
connection plug in the trunk. First, a note about this installation method. The SAT radio tuner uses
the same wires to send audio signals to the headunit that the external CD changer (CDC) cable uses.
If a phatbox or ipod adapter is plugged into the CDC port, the installation of the SAT module will
require more work than is described here. There is a document on my website www.nsxjr.com that
details how to install sat radio with a CDC or other device that uses the CDC port. The audio wires
are the only potential conflict between the SAT module and the CDC port since they use separate
connections for power and data.
To resolve the audio wire conflict, the SAT radio has a built-in audio pass through for other devices. Three wires
called CD-In Left, CD-In Right, and CD-In GND. These work such that when the SAT module is on, it sends it’s
audio to the headunit and blocks out anything else. When it is turned off (i.e., switch to another source on the
headunit), the SAT radio allows the signals from the audio inputs to pass through to the headunit. The Audio-IN
pinouts can be seen on the SAT radio wiring diagram below. These audio inputs are where to connect the three
audio wires (L, R, GND) from a Phatbox or iPod adapter. There’s a schematic of the SAT and CDC connections
together in Appendix E.
2.1
The Basics: SAT Radio Tuner Wiring Info
There are four categories of wires the SAT tuner requires:
•
•
•
•
Power: Two wires in their own connector. Main source of power used to operate.
Audio: Three wires: Left, Right, and Audio Ground. These send the audio to the headunit.
Data: Two wires: CAN H and CAN L. For communication with the headunit of all other data.
Antenna: Two wires: brown and green FAKRA terminals that the antenna connects to.
A: Audio and Data Connector
1. CAN L
2. CAN H
3. Audio In L
4. Audio In R
5. Audio Out GND
6. Audio Out L
7. Audio Out R
8. Audio In GND
B: Power Connector
1. Kl.31 (GND)
2. Kl.30 (battery power)
3-8. N.C.
C: TER Antenna Connector
D: SAT Antenna Connector
© 2005, 2006 Lee H.
NSX JR – Audi Symphony I to RNS-E Install Guide – Version 2.1
Page 19
2.2
Power Wires
The SAT radio tuner will be located in the trunk and needs a power supply there. Luckily there is a
good source of power from the correct fuse (#37) already in the trunk: a 2.5mm wire that carries the
power from fuse #37 to the amp on the right side of the trunk.
Remove the trunk floor carpet and rear cross panel trim at the lip of the trunk. Remove the right side
trunk trim, at least far enough to allow room to work with wiring at the amplifier. (See Appendix F)
The power wire to be tapped is HOT at all times. Disconnect the battery.
Do not use the power supply wires within the CDC harness for the SAT tuner module.
Remove the wiring harness from the amplifier and splice into the +12V power wire. It is the large
Red/Blue wire at Pin 13 of the Bose Amp connector. For non-Bose amps, the wire is located in Pin 1.
Reconnect the wiring harness to the amp and run a new wire, at least 18AWG in size, from the splice
just made, across the rear of the trunk (under the cross panel trim), behind the left side trunk trim,
into the hole where the SAT module will be installed. Reinstall all the trunk trim.
Alternative: connect a new power wire to the “30”connection on the power bank behind the fuse box and run to
the trunk. An inline fuse between the SAT module and the power connection is required if this method is used.
Install a new wire terminal onto the end of the power wire and install into Pin 2 of T8r. T8r is a
new wire terminal housing in the picture above. It is a small connector with wires arranged in two
rows of four wires each. Install another new wire terminal into Pin 1 of T8r and connect to ground
in a convenient location. Check for good ground by using a multimeter to check voltage using the
new power wire in Pin 2 for positive voltage. The power on this wire is hot at all times if the
battery is connected. Close the wing sides into the T8r connector, it is complete.
© 2005, 2006 Lee H.
NSX JR – Audi Symphony I to RNS-E Install Guide – Version 2.1
Page 20
2.3
Audio Wires
The existing CD changer harness already contains three wires that take audio signals from the trunk
to the headunit. This installation will take advantage of them. The CDC plug is in the left side trunk
panel kind of tucked up behind the tool kit. It is a large plug wrapped in grey foam. Pull it out and
remove the foam cover. The custom wiring harness created in this step will have a female 13-pin DIN
plug that mates to the CDC trunk plug. The other end of the custom harness will be the connector
T8s. T8s is a small black 8-pin plug arranged in one row of 8 pins. This plug and new wire terminals
can be purchased from Audi. Refer to the wiring diagrams for a visual description of the proper wiring
pinouts described in this subsection. Prepare 3 lengths of wire with new wire terminals on one end
only. Solder the loose ends of these 3 lengths to Pins 1,3,4 of the Female 13-pin plug. Slide the outside
cover over the Female 13-pin plug. Connect the new wire terminal end of these 3 wires to the new
wire housing T8s in this order:
Female 13-pin DIN Pin 1 to Pin 7 of T8s (R CH sound)
Female 13-pin DIN Pin 3 to Pin 6 of T8s (L CH sound)
Female 13-pin DIN Pin 4 to Pin 5 of T8s (Spk GND)
Wrap the wires between the two ends of the harness with electrical tape. The custom wiring
harness that plugs into the CDC plug is complete. Plug the round 13 pin connector end into the
CDC plug in the trunk and wrap them with electrical tape to prevent them from separating.
There are two more wires to connect to T8s in the next subsection.
© 2005, 2006 Lee H.
NSX JR – Audi Symphony I to RNS-E Install Guide – Version 2.1
Page 21
© 2005, 2006 Lee H.
NSX JR – Audi Symphony I to RNS-E Install Guide – Version 2.1
Page 22
2.4
Data Wires
Run two new wires (24 AWG minimum) from the headunit to the trunk. I did this by running a
CAT-5 ethernet cable. This type of cable has 4 pairs of wires. Each pair contains a solid and a striped
colored wire that are twisted around each other a few times an inch. This twist is also a standard of
the CAN network. Even though only one pair is needed for this installation, it is easy to run the whole
CAT-5 cable. This will result in three extra pairs in the cable already run that may or may not be used
for future projects. I chose to use the solid wire for CAN L and the striped wire for CAN H. This wire
installation will require the removal of some door sill trims to tuck the wire away out of sight.
Behind the headunit, splice the solid wire into the CAN L wire from Pin D10 of the RNS-E and
splice the striped wire into the CAN H wire from Pin D9 of the RNS-E in the PNP harness.
At the trunk end of the wires, connect new wire terminals and plug the CAN L wire into pin 1 of
SAT connector T8s, and the CAN H wire into pin 2 of T8s.
In the past I have used non-twisted wire pairs for my CANbus network with no problems.
In the picture below the orange twisted pair is used to connect to my small T8s connector on the tuner
(after passing through the large white connector in the harness). The other twisted pairs are just
pushed back out of the way and will sit dormant until used on future projects.
© 2005, 2006 Lee H.
NSX JR – Audi Symphony I to RNS-E Install Guide – Version 2.1
Page 23
2.5
Antenna Wires
With all the other wiring completed, the last step is the SAT antenna. The right antenna must be
purchased for the SAT radio service planned for installation. The OEM Audi antenna will work for
both SAT radio services, but requires a drilled hole in the roof to mount and the purchase of antenna
cables and more connectors. This may be of interest to Avant owners that don’t have the mounting
location of the sedans. This did not interest me, so I bought an antenna and installed it below my rear
parcel shelf, on top of the metal frame that supports it. I bought a slim Terk antenna XM3 and it slides
between the metal
support and the top deck
easily. As long as there is
nothing metal between
the antenna and the
satellites it should work
fine. A two lead antenna
is required to plug into
the SAT tuner. The newer
antennas only have a
single pink lead. This
type of antenna must be
installed with a splitter
that will convert the
single Pink lead to a dual
green and brown lead.
Once the antenna is
installed, run the wires to
the left side trunk panel
where the SAT tuner
module will be installed.
IMPORTANT NOTE ABOUT ANTENNAS
Audi is unique with the colors of their antenna leads. Most aftermarket antennas will have green (XM,
white for Sirius) and “curry yellow” leads. The green (or white) is for terrestrial signals, the curry is
for satellite signals. The connectors on the Audi OEM tuner are green and brown. For Audi, the green
is for satellite signals, the brown is for terrestrial. These are FAKRA SMB type connectors and the
colors correspond to the “key code” of the connector. The “key code” is just some tabs that keep some
connectors from plugging into the wrong slot. Green is key code ‘E’, Curry is key code ‘K’, Brown is
key code “F”, and White is a universal connector that will plug into any color socket.
Terrestrial :
Satellite:
Audi Brown
Audi Green
XM Green
XM Curry
Sirius White
Sirius Curry
On the antenna leads, swap the green connector to where the curry connector was. Buy a new brown
FAKRA connector and connect to the lead that was previously green. Now the antenna can be
plugged into the SAT tuner. (The same can be done for Sirius, but the white connector will plug into
the green Audi socket.) The good thing about Terk brand antennas is that they use Amphenol brand
connectors, so the new brown connector purchased from www.digikey.com will fit perfectly.
© 2005, 2006 Lee H.
NSX JR – Audi Symphony I to RNS-E Install Guide – Version 2.1
Page 24
2.6
Completion
In the 2001 Audi there is not a “factory” place to install the SAT tuner. A good location is the slot
where the CDC goes, attached with a hefty dose of Velcro. A SAT radio mount kit is available, but it
only consists of 4 screws and 4 plastic nuts that have no purpose if the vehicle doesn’t have the
“factory” mounting position. Mount the tuner and plug in the antenna connectors, power connector
T8r, and audio connector T8s. All of these only plug in one way to prevent them from being
incorrectly installed. With all the wires connected, ensure the SAT tuner module is well mounted and
replace the trunk the access panel. The tuner should now show up in the radio “BAND” list if the
RNS-E is coded to enable satellite radio (see section 1.4). The specific tuner type will appear in the
list; in lieu of the term “Satellite Radio” it will list “XM Radio” or “Sirius Radio”. For activation, press
the Setup button while in SAT radio mode and select the menu item to display the radio serial number.
© 2005, 2006 Lee H.
NSX JR – Audi Symphony I to RNS-E Install Guide – Version 2.1
Page 25
Section 3 Multifunction Steering Wheel
This section will describe how to change the multifunction steering wheel (MFSW) control unit to
regain the use of the steering wheel controls with the RNS-E. These instructions are specific to
vehicles with existing multifunction (audio/telephone) buttons on the steering wheel. The new
installation of a MFSW into a vehicle with a regular steering wheel is far more complicated than the
instructions given in this document.
The existing MFSW in the vehicle will work with the RNS-E, but the control unit must be changed.
The MFSW uses an internal and external control unit. The internal unit (inside the steering wheel)
reads in the actual button presses. It communicates the button data over a single data wire to the
external control unit. The external module receives the data and relays it to the CANbus network. It
also gathers data about interior illumination (for button lights), and ignition status (off or on) and
relays that data over the same single data wire back to the internal control module for its use.
The external control unit is the one that must be replaced. This is because the existing control unit
that operates with the Symphony I radio does not communicate via the CANbus language.
Section 1 must be completed for this installation to operate properly.
Look for a separate document to be available in the future on www.nsxjr.com covering the topic of retrofitting
MFSW into vehicles originally equipped regular steering wheels.
3.1
MFSW Control Unit Installation
Remove the driver’s side knee panel as discussed in Section 1.1. Look up into the foot well behind the
fuse box and find the control unit, probably with the number 608 on the top. It will be on the middle
row, far left side. Pull the 608 unit out and install the new 616 unit in its place. There is no rewiring to
be done because the correct pins in the relay socket have been properly reassigned to the CANbus
network based on the wiring already performed in Section 1. Reinstall the knee panel.
Special thanks to Eric C. of Boston for donating his 6I6 control unit for my installation.
© 2005, 2006 Lee H.
NSX JR – Audi Symphony I to RNS-E Install Guide – Version 2.1
Page 26
3.2
Control Module Coding (VAG-COM)
The new MFSW control unit must be coded with VAG-COM to ensure proper operation.
From the Main VAG-COM screen, press
“Select” under the Select Control Module area.
Select “16-Steering Wheel” on the Control
Module Screen
The software is now connected to the new
MFSW control unit in the “Open Controller”
window. Note the Software Coding located
just below the part number display. Check
the chart on the next page to see what the
coding means. If the coding is satisfactory,
exit out of the VAG-COM software and skip
the remainder of this section. If the control
module needs to be recoded, continue with
the steps below.
© 2005, 2006 Lee H.
NSX JR – Audi Symphony I to RNS-E Install Guide – Version 2.1
Page 27
To change the coding, press “Recode-07”
Enter the new coding
desired in the “Software
Coding” box.
Verify that the new coding was accepted in
the “Open Controller” window.
Exit VAG-COM.
© 2005, 2006 Lee H.
NSX JR – Audi Symphony I to RNS-E Install Guide – Version 2.1
Page 28
Section 4 Bluetooth Telephone Module
This section will describe how to install an OEM Audi Bluetooth telephone module in vehicles that are
equipped with analog telephone preparation wiring. This analog telephone preparation consists of the
handsfree microphone near the sunroof dial, and the wiring harness that ends in the trunk with a
DB25 female connector. If the vehicle is equipped with the BOSE audio system, there will also be a
small telephone audio speaker in the middle portion of the B-pillar trim. This small speaker will not
be used with the RNS-E audio system. If the vehicle is actually equipped with the full analog
telephone kit, there will also be a handset in the armrest and a telephone transceiver in the trunk.
These two items can be removed from the vehicle if present.
This installation requires the presence of the telephone connections within the
RNS-E PNP Harness (TEL Mute, TEL NF IN+, TEL NF IN-). See Section 1.3.2 for detail.
Reminder: this document is specific to vehicles originally equipped with Symphony I radios. Vehicles with
Symphony II radios were equipped with newer telephone transceiver modules located under the passenger’s seat
instead of in the trunk. This type of module uses a 42-pin connector instead of a DB25 connector. The wiring in
this section does not apply to vehicles equipped with the newer telephone transceiver modules.
4.1
Custom Wiring Harness
Almost every connection required of the
new BT telephone module is already
present in the female DB25 connector in
the trunk. In this subsection, a custom
wiring harness will be made to allow the
new BT module to plug into this
connector.
The DB25 connector is tucked up behind
the toolkit on the left side of the trunk,
similar to the location of the CD changer
plug. If the analog transceiver box was
installed in the vehicle, the DB25
connector will be liberated once the
existing transceiver is removed. There
will also be an antenna connection
bundled with this connector. This
antenna will not be used in this
installation.
© 2005, 2006 Lee H.
NSX JR – Audi Symphony I to RNS-E Install Guide – Version 2.1
Page 29
Next, construct the custom wiring harness using
the wiring connections shown in the chart
below. The wire gauges are listed for information
only. This is to prove that the wires supplied in
the 25-pin telephone harness are of sufficient size
when compared to the required size listed for the
BT module. The parts required to make this
cable are the 54-pin plug , 5 repair wires, and a
DB25 (D-sub) male terminal with hood. These
parts are shown in the surrounding pictures.
Custom Harness wiring chart for DB25 Analog Phone to 54-pin Bluetooth Phone
BT Tel module (54-pin)
notes
gauge pin
Power +12V
0.5
1
Ground
0.5
2
Tel audio out to HU
0.5
8
Tel audio out to HU
0.5
9
Microphone input
0.35
11
Microphone input
0.35 12
Diagnostics
0.35 15
Tel Mute trigger to HU
0.5 16
infotainment bus
0.35 17
infotainment bus
0.35 18
© 2005, 2006 Lee H.
Connection
KL.30
KL.31
NF OUT+
NF OUTMIC IN+
MIC INK-line
Mute
CAN H
CAN L
Existing TEL connector (DB25)
pin
4
3
19
25
15
14
12
10
N.C.
N.C.
gauge
0.5
1.0
0.5
0.5
0.35
0.35
0.35
0.5
notes
See Section 4.2
CAT5 wire to CANbus
CAT5 wire to CANbus
NSX JR – Audi Symphony I to RNS-E Install Guide – Version 2.1
Page 30
To make the harness, snip each repair wire in half. The pin terminal end will be inserted into the 54pin connector. The bare end can then be stripped of insulation and crimped into the small pins
supplied with the male DB25 connector. These small pins may simply be snapped into the correct
openings (based on the wiring chart) in the male DB25 connector. Once all the connections are made,
the 54-pin connector can be assembled by sliding the blue inner portion into the black outer shell.
The DB25 connector may also be assembled by attaching the connector hood to protect the wire-topin connections. The final product is shown in the picture below. Also notice below that the CANbus
wires do not connect to the DB25 connector. These two wires must be connected to the CANbus in
your vehicle. As described in Section 2 of this document, there are CANbus wire pairs already
available in the trunk if the satellite radio tuner was installed. CANbus is not available within the
DB25 telephone connector already installed. For this installation, a spare CANbus pair was used from
the CAT5 cable that is connected to the CANbus distribution panel (see separate install guide on
www.nsxjr.com) in the vehicle. Another option is to splice into the CAN H and CAN L wires that
supply that satellite radio tuner if installed. If neither of these options are available, please follow the
instructions in section 2.4 of this document to install a new CANbus wire pair into the trunk.
The picture below shows a two pin white Molex disconnect plug installed onto the CANbus wire
pair. This step is not required, but does facilitate quick connection and disconnection of the entire
custom wiring harness. To install without this plug, simply connect the CANbus wires from the
vehicle to the correct pins on the 54-pin connector.
© 2005, 2006 Lee H.
NSX JR – Audi Symphony I to RNS-E Install Guide – Version 2.1
Page 31
The Bluetooth module is shown below fully connected to the vehicle. The final mounting location is
not shown, but a convenient location is on top of the satellite radio tuner, attached with Velcro.
When mounting the BT module, ensure that the location is secure and that the
antenna will not be susceptible to movement or actions that may cause damage.
© 2005, 2006 Lee H.
NSX JR – Audi Symphony I to RNS-E Install Guide – Version 2.1
Page 32
4.2
Connecting the K-line
The K-line is an important connection for the BT telephone module because this is how it
communicates with VAG-COM or other diagnostic software. Without this, the BT module will not be
able to be coded to ensure proper operation in the next section. There is no K-line connection in the
original DB25 phone connector in the trunk. However, there is a simple way to connect this without
having to run new wires into the trunk.
The DB25 phone connector harness includes other wires not listed in the chart in the previous section.
In particular, there are three wires that connected the trunk to the multifunction steering wheel
control unit. These are data wires that the old analog phone system used for communication. These
wires are not needed for the new Bluetooth phone module because it uses CANbus for communication.
This section will describe how to “hijack” one of these dormant data lines to take the K-line
connection into the trunk.
The DB25 phone connector is connected to the front of the car by passing through the left side A-pillar
station. This is the same connector station as shown in section 1.2 to tap into the Reverse Wire signal
for the RNS-E. This location is also conveniently close to the VAG diagnostic connector under the
dash. By making one simple connection, the K-line can be connected to the proper pin at this station.
Remove the driver’s side knee panel (see section 1.1) and left side lower A-pillar trim.
© 2005, 2006 Lee H.
NSX JR – Audi Symphony I to RNS-E Install Guide – Version 2.1
Page 33
Locate Connector T15s, the blue 15-pin connector near the top in this connection station. Pull this
connector out to give enough room to disassemble the housing and change the wiring inside.
Once unplugged, the top portion can be
removed by sliding off as shown.
© 2005, 2006 Lee H.
NSX JR – Audi Symphony I to RNS-E Install Guide – Version 2.1
Page 34
Now the cover can be removed from
the bottom section to reveal and
unlock the wiring pins inside.
Pin 13 in this connector is a small grey wire to be replaced. Simply use a small screwdriver or knife
blade to disengage the locking tab on the grey wire and gently pull out from the rear. This will be very
similar to the wiring in section 1.1.1 of this document to remove the pins from the 32-pin instrument
cluster plug. Once the grey wire is removed from pin 13, tape the contact end off and tuck away into
the wiring harness. This pin will not be used and is not connected to anything, but there’s no reason
to cut it off completely.
Insert a new repair wire (000-979-009) into pin 13 of the connector T15s.
Re-assemble the blue wire housing plug by sliding the cover back on then sliding the top portion back
on with the three larger wire pins. Plug the connector back into its position in the connector station.
This wire is now connected to pin 12 in the DB25 connector in the trunk which connects to pin 15 at
the Bluetooth module through the custom harness assembled in the previous subsection.
© 2005, 2006 Lee H.
NSX JR – Audi Symphony I to RNS-E Install Guide – Version 2.1
Page 35
The final step of this section is to splice the other end of the repair wire into the K-line. The K-line is
the small green wire that connects to pin 7 in the VAG diagnostic connector. In the picture below, a
small section of the wire tape was removed a few inches back from the connector end. The small green
wire was spliced using a red (18-22AWG) wire splice tap. Secure the repair wire by taping off to other
wiring harnesses or by using cable ties. Using fabric tape, wrap the section of the VAG connector
wiring harness that was just spliced to hide the work and protect the connection.
Reinstall the left side lower A-pillar trim and driver’s side knee panel.
The physical installation of the Bluetooth telephone module is complete.
© 2005, 2006 Lee H.
NSX JR – Audi Symphony I to RNS-E Install Guide – Version 2.1
Page 36
4.3
Control Module Coding (VAG-COM)
The BT module, RNS-E, instrument cluster, and MFSW must be coded to ensure proper operation.
Connect a diagnostic cable to the vehicle and start the VAG-COM software on the computer.
In leiu of using VAG-COM software, the vehicle can be coded at any Audi dealership. Expect to pay for this service.
VAG-COM Release 512 is recommended.
From the Main VAG-COM screen, press
“Select” under the Select Control Module area.
Select the “Electronics 1” tab at the top of the
list, then select “77-Telephone” on the Control
Module Screen.
The software is now connected to the TEL
module in the “Open Controller” window.
Note the Software Coding located just below
the part number display. Check the chart on
the next page to see what the coding means.
If the coding is satisfactory, exit out of the
VAG-COM software and skip the recoding
instructions directly to the adaptation
settings. If the control module needs to be
recoded, continue with the steps below.
© 2005, 2006 Lee H.
NSX JR – Audi Symphony I to RNS-E Install Guide – Version 2.1
Page 37
Control Module Coding Chart for Bluetooth Telephone Module
00?xxxx: type (car)
0 - with CAN-bus (A2, A3, TT)
1 - D3/C6 High-System
2 - C6 Standard-System
Not used with US-Spec Bluetooth Module
00x?xxx: type (Steering wheel)
0 - non multifunction steering wheel
1 - standard steering wheel
2 - modular steering wheel
Not used with US-Spec Bluetooth Module
00xx?xx: installed components
1 - none
* WARNING: Do Not Use, this will immediately disconnect your K-line *
2 - MFSW
* WARNING: Do Not Use, this will immediately disconnect your K-line *
3 – Headunit
* WARNING: Do Not Use, this will immediately disconnect your K-line *
4 - MFSW and Headunit* WARNING: Do Not Use, this will immediately disconnect your K-line *
5 - K-line
6 - MFSW and K-line
7 - Headunit and K-line
8 - MFSW, Headunit and K-line
00xxx?x: language for voice control
0 - voice control off
1 - German
Not used with US-Spec Bluetooth Module
2 - English (UK)
Not used with US-Spec Bluetooth Module
3 - French
Not used with US-Spec Bluetooth Module
4 - Italian
Not used with US-Spec Bluetooth Module
5 - Spanish
Not used with US-Spec Bluetooth Module
7 - English (US)
8 - Voice control from external device (i.e. RNS-E)
00xxxx?: Language for DIS
0 - no DIS display
1 - German
2 - English (UK)
3 - French
4 - Italian
5 - Spanish
7 - English (US)
© 2005, 2006 Lee H.
Not used with US-Spec Bluetooth Module
Not used with US-Spec Bluetooth Module
Not used with US-Spec Bluetooth Module
Not used with US-Spec Bluetooth Module
Not used with US-Spec Bluetooth Module
NSX JR – Audi Symphony I to RNS-E Install Guide – Version 2.1
Page 38
To change the coding, press “Recode-07”
Enter the new
coding desired
in the “Software
Coding” box.
Verify that the new coding was accepted
in the “Open Controller” window.
© 2005, 2006 Lee H.
NSX JR – Audi Symphony I to RNS-E Install Guide – Version 2.1
Page 39
To change the adaptation values, press
“Adaptation-10”
Scroll through each adaptation
channel that is listed in the chart
below. Enter the correct value
based on the vehicle
charateristics. When finished,
press “Done, Go Back”.
Exit back to the main VAG-COM
screen when finished.
No adaptation values were altered for my installation. My speaker and microphone volumes require no correction.
Control Module Adaptation Chart for Bluetooth Telephone Module
-> Channel 129 time after ignition off
000 - 30 Seconds
001 - 5 Minutes
002 - 10 Minutes
240 - 20 Hours
-> Channel 131 (Microphone Sensitivity)
000 - 0dB (no increase/decrease)
001 - +1dB increase
002 - +2dB increase
003 - +3dB increase
004 - +4dB increase
005 - +5dB increase
006 - +6dB increase
128 - -1dB decrease
129 - -2dB decrease
130 - -3dB decrease
131 - -4dB decrease
132 - -5dB decrease
133 - -6dB decrease
-> Channel 133 (BT)
BT activate/deactivate.
-> Channel 135 (Bluetooth PIN)
default: 1234
-> Channel 134 (handsfree)
0 - handsfree over BT
1 - handsfree only with mobile in cradle
(The Bluetooth PIN can be set within
the RNS-E menu system at any time.)
-> Channel 128 (Base Volume)
000 - 0dB (no increase/decrease)
001 - +1dB increase
003 - +3dB increase
006 - +6dB increase
128 - -1dB decrease
130 - -3dB decrease
133 - -6dB decrease
© 2005, 2006 Lee H.
NSX JR – Audi Symphony I to RNS-E Install Guide – Version 2.1
Page 40
The next step is to code the RNS-E to recognize the Bluetooth Module data over CANbus.
The RNS-E unit must be running at least US firmware version 0110 for telephone
functions to be activated. This firmware is on the North America Version 2A DVD.
Select “37-Navigation” or “56-Radio” on the
Control Module Screen. Either option will
access the RNS-E for coding.
The software is now connected to the RNS-E
in the “Open Controller” window. Note the
Software Coding located just below the part
number display. Check the chart on the next
page to see what the coding means. If the
coding is satisfactory, exit out of the VAGCOM software and skip the recoding
instructions. If the control module needs to
be recoded, continue with the steps below.
Control Module Coding Chart for RNS-E Navigation Unit
Only the 5th digit needs to be changed and a value of “6” must be used.
0xxx?xx: Telephone / Telematics
1 – No Telephone
2 – Telephone (Temic)
Not used with US-Spec Bluetooth Module
3 – Telephone (Cullman )
Not used with US-Spec Bluetooth Module
4 - Telephone (Nokia )
Not used with US-Spec Bluetooth Module
5 – Telematic EU
Not used with US-Spec Bluetooth Module
6 – Telematic US
7 - Mobile phone preparation self-diagnostic-able with comfort operation
© 2005, 2006 Lee H.
NSX JR – Audi Symphony I to RNS-E Install Guide – Version 2.1
Page 41
To change the coding, press
“Recode-07”
Enter the new coding
desired in the
“Software Coding”
box.
Verify that the new coding was
accepted in the “Open Controller”
window.
Exit back to the main VAG-COM
screen when finished.
© 2005, 2006 Lee H.
NSX JR – Audi Symphony I to RNS-E Install Guide – Version 2.1
Page 42
This step will adapt the instrument cluster to recognize the telephone data for use in the Driver’s
Information System (DIS). This is the small red display at the center of the instruments.
See the vehicle and RNS-E owner’s manuals for information on using the DIS once this installation is complete.
Select “17-Instruments” on the Control
Module Screen.
To change the adaptation values, press
“Adaptation-10”
Do not Recode the Instruments
It could cause a malfunction.
Enter number 62 in the Channel
Number box and press “Read”.
Enter a value of 7 and press
“Save”. This value is valid to
enable the display of Radio,
Navigation, and Telephone info.
Exit back to the main VAG-COM
screen when finished.
© 2005, 2006 Lee H.
NSX JR – Audi Symphony I to RNS-E Install Guide – Version 2.1
Page 43
This last step will recode the MFSW control unit to enable telephone and voice activation operation.
Select “16-Steering Wheel” on the Control
Module Screen
The software is now connected to the new
MFSW control unit in the “Open Controller”
window. Note the Software Coding located
just below the part number display. Check
the chart below to see what the coding means.
If the coding is satisfactory, exit out of the
VAG-COM software and skip the remainder
of this section. If the control module needs to
be recoded, continue with the steps below.
The last digit of the software coding is the only one to be
changed in this step. To enable radio and telephone
buttons only, a value of “1” should be used. To also
enable voice recognition, a value of “5” should be used.
Voice recognition allows the driver to press the
button to activate the mode. The driver can then speak
commands to redial, dial digits, or voice dial with saved
voice tags. See Appendix K for more information.
© 2005, 2006 Lee H.
NSX JR – Audi Symphony I to RNS-E Install Guide – Version 2.1
Page 44
To change the coding, press “Recode-07”
Enter the new coding
desired in the
“Software Coding” box.
Verify that the new coding was
accepted in the “Open Controller”
window.
Exit back out of VAG-COM completely and disconnect the cable from the diagnostics port.
This completes the installation of the Bluetooth Telephone Module.
© 2005, 2006 Lee H.
NSX JR – Audi Symphony I to RNS-E Install Guide – Version 2.1
Page 45
Appendix A
Part Number
4B0 035 192P
8E0 035 593E
XM3
3D0 972 708
3B0 972 724
000 979 009
000 979 131
SD-130J
FA1-NFSJ-C01-0
Parts List
Description
Section 1
RNS-E Navigation Unit
Plug-and-play wiring harness
GPS Antenna with FAKRA connector end
Radio antenna adapter
Radio removal tools
Navigation DVD
A few feet of 18 AWG wire, wire taps and connectors (for reverse wire)
Qty
1
1
1
1
4
1
Section 2
OEM XM Satellite Radio Tuner
Terk XM antenna
Wire terminal housing for SAT T8s
Wire terminal housing for SAT T8r
wire terminal for SAT T8s
wire terminal for SAT T8r
Female 13-pin DIN plug (mates to CDC harness) www.digikey.com
FAKRA SMB connector, straight, "F"(SAT brown) www.digikey.com
15' of CAT-5 cable
A few feet of 18 AWG wire, wire taps and connectors (for power wire)
1
1
1
1
3
1
1
1
Section 3
MFSW control unit CANbus – w/o tiptronic controls “616”
-ORMFSW control unit CANbus – with tiptronic controls “618”
1
8P0 862 335 G
4E0 972 144
000 979 010
000 979 009
8P0 035 503E
Section 4
OEM Bluetooth Tel Module
54-pin connector
Repair wire for 54-pin connector
Repair wire for T15s blue connector at A-pillar station, left
OEM Bluetooth Antenna
DB25 D-Sub male connector with crimp terminals and cover
1
1
5
1
1
1
Satellite Tuner
Reference List
Part Number
Works with…
SAT provider
8E0 035 593
8E0 035 593A
All Symphony & Concert units with SAT button, excl. vehicles w/TPMS
All Symphony & Concert units with SAT button, excl. vehicles w/TPMS
Sirius
XM
8E0 035 593D
8E0 035 593E
RNS-E, also all Symphony & Concert units with SAT button
RNS-E, also all Symphony & Concert units with SAT button
Sirius
XM
4E0 035 593
4E0 035 593A
C6 ('05+ A6) and D3 ('04+ A8) only (w/MOST audio network)
C6 ('05+ A6) and D3 ('04+ A8) only (w/MOST audio network)
Sirius
XM
4B0 907 487F
4B0 907 487H
1
The middle portion of the SAT tuner part number may be “057” to indicate an “accessory” part instead of factory installed “035”.
© 2005, 2006 Lee H.
NSX JR – Audi Symphony I to RNS-E Install Guide – Version 2.1
Appendix
Appendix B
RNS-E Engineering Mode
The RNS-E unit has a built in diagnostics display called Engineering Mode.
To enter this mode, follow these steps with the headunit on:
1. Press the “NAV” button and release.
2. Press the upper left soft key for over 5 seconds then release.
3. Press the upper right soft key until Engineering Mode appears then release.
© 2005, 2006 Lee H.
NSX JR – Audi Symphony I to RNS-E Install Guide – Version 2.1
Appendix
Appendix C
SAT Radio Diagnostics
Enter Engineering Mode on the RNS-E (see Appendix B). Use the control knob to select the
Audio/Tuner button and then select the SDARS testmenu. This screen is full of values that describe
the operation of the SAT tuner. SAT1, SAT2, and TERR are the “addresses” of the signals it is
receiving. SAT1BER, SAT2BER, and TERRBER are the Bit Error Rate of the signals it is receiving. This
number is a HEX value that represents a percentage of bits that are received in error. Therefore, a
“0000”means that it has zero percent error, or perfect signal. If it has a “270A” for any BER value
(equals 99.99% error) that means it is not receiving any signal from that source. The SAT1 or SAT2
BER should be under 3% (012C) and the TERRBER should be under 6% (0258) to ensure a good
listening experience. On the RNS these four digit hex values are listed out of order. For an actual
value of “1234”, the digits are listed in the order “3412”. By this logic, the display of “0A27” translates to
“270A” which means “no signal” as described earlier. To exit engineering mode press the return button
a few times until the unit is back to the regular navigation screen.
This information is for XM and I can neither confirm nor deny its existence or relevance to Sirius.
© 2005, 2006 Lee H.
NSX JR – Audi Symphony I to RNS-E Install Guide – Version 2.1
Appendix
Appendix D
© 2005, 2006 Lee H.
Symphony I to RNS-E Wiring Diagram
NSX JR – Audi Symphony I to RNS-E Install Guide – Version 2.1
Appendix
Appendix E
© 2005, 2006 Lee H.
SAT Tuner Wiring Diagram
NSX JR – Audi Symphony I to RNS-E Install Guide – Version 2.1
Appendix
Appendix E (cont.)
© 2005, 2006 Lee H.
SAT Tuner Wiring Diagram
NSX JR – Audi Symphony I to RNS-E Install Guide – Version 2.1
Appendix
Appendix E (cont.)
© 2005, 2006 Lee H.
SAT Tuner Wiring Diagram
NSX JR – Audi Symphony I to RNS-E Install Guide – Version 2.1
Appendix
Appendix F
Trunk Trim Removal
Rear Cross Panel Trim
•
•
•
•
•
•
Remove trunk light from cross panel trim -1Remove screws -2- (2X)
Remove screws -3- (4X) from fastening rings
-4- on left and right.
Unclip rear cross panel trim -1- upward.
Guide trunk light through opening.
After installing make sure seal is correctly
seated.
Luggage compartment side trim
•
•
•
•
•
•
•
•
Remove luggage compartment
floor covering.
Remove rear cross panel trim.
Remove screws -6- (2X) for
fastening rings -7-.
Unclip clip -3-.
Unfasten clip -4-.
Unclip clip -2-.
Unclip luggage compartment trim
-1- at rear from mounts -5- (3X).
Pull trim forward to disengage
from latch pin.
© 2005, 2006 Lee H.
NSX JR – Audi Symphony I to RNS-E Install Guide – Version 2.1
Appendix
Appendix G
BOSE® Amplifier Pinouts
6 – Line Output – GND (from headunit)
7 – Line Output – Right Rear (from headunit)
8 – Line Output – Left Rear (from headunit)
9 – Line Output – Right Front (from headunit)
10 – Line Output – Left Front (from headunit)
13 – Battery B+ (terminal 30)
16 – Loudspeaker (-) Left Front
17 – Loudspeaker (+) Left Front
18 – Loudspeaker (+) Right Front
19 – Loudspeaker (-) Right Front
20 – Loudspeaker (+) Left Rear
21 – Loudspeaker (-) Left Rear
22 – Loudspeaker (+) Right Rear
23 – Loudspeaker (-) Right Rear
24 – Main Ground (terminal 31)
25 – Switched positive (from headunit)
© 2005, 2006 Lee H.
NSX JR – Audi Symphony I to RNS-E Install Guide – Version 2.1
Appendix
Appendix H
Climate Control Faceplate
It is the opinion of the author that the climate control faceplate does not need to be replaced when the
RNS-E navigation unit is installed. The color difference is not noticeable except in flash photography
or in other very bright light. Below is a picture of a 2001 faceplate in natural lighting for reference.
To replace the climate control faceplate, remove the two screws at the top corners of the climate
control unit. Open the ashtray. With a small screwdriver, push the two tabs on the bottom of the unit
while pushing the unit out from behind. Unplug the five wire connector housings and completely
remove the unit from the car. With a small Philips screwdriver remove all screws from the rear of the
unit. Remove the outer housing from the unit. Now inside the unit, remove the faceplate from the
circuit board by removing all small Philips screws. Remove the “OFF” button from the faceplate by
pushing it out from the back.
Remove the newer faceplate from the new climate control unit. Some newer A6 climate controls are
built with small Torx screws instead of Philips head screws. Once the new faceplate is free from the
circuit board, remove the auto-recirculation button by pushing it out from the back. This is the
button with the letter “A” inside the recirculation arrow. Install the original “OFF” button in its place.
Install the new faceplate onto the original climate control unit. Reinstall the re-faced climate control
unit into the vehicle. Installation is reverse of the removal process.
Do not install the 2002-2004 climate control unit. It will not function properly.
© 2005, 2006 Lee H.
NSX JR – Audi Symphony I to RNS-E Install Guide – Version 2.1
Appendix
Appendix J
Screen Shot Mode
The RNS-E has a nice feature called Screen
Shot Mode that saves the current screen
image to the SD card in slot 1.
The SD card in Slot 1 must have enough free
space to store the screen shots that are
about 300KB each.
SD card slot 2 must be vacant.
To enable Screen Shot Mode, enter
Engineering Mode as described in
Appendix B. Enter the General category
and select “Screen shot mode”. This
selection will highlight to indicate the unit
is ready to save the screen images.
Screen shots may now be saved at any time and in any mode. To save a screen shot,
press and hold the “next track” button for 5 or 6 seconds until the screen flashes
black then returns to the current display.
The screenshots will be saved in .bmp format in a folder named “SCR_Shot” on the SD card.
To exit screenshot mode, return to Engineering Mode and deselect the Screen shot mode menu item.
Special thanks to S4LoneStar for originally posting this information on www.navplus.us
© 2005, 2006 Lee H.
NSX JR – Audi Symphony I to RNS-E Install Guide – Version 2.1
Appendix
Appendix K
Bluetooth Module Operation via Steering Wheel
Prerequisite: Multifunction steering wheel, coded for radio, telephone, and voice recognition operation.
The Basics
•
Press the
in the DIS.
button to activate voice commands. "SPEAK" is displayed
•
Press the
button to display your telephone contacts list in the DIS.
Scroll through the contacts with the
and
buttons on the
steering wheel. The contact information will alternate between the
contact name and the contact phone number every few seconds. If you
have multiple numbers for one contact, they will be listed as a separate
entry that you can scroll to. For this reason, it is helpful to wait until the
actual contact phone number is displayed to verify it is the right number
you wish to dial (mobile, home, work, etc.)
•
Press the
button to dial the contact currently shown in the DIS.
The contact's name will be displayed in the DIS while the call is active.
•
Press the
button to end the current phone call.
None of these button presses actually changes the display on the RNS-E
screen unless you say "Help" while the voice commands menu is active.
This will change the RNS-E screen to show a list of Telephone SDS
commands that are possible. The BT lady will speak this list of possible
commands to you as they are displayed on the screen.
At any time during the steering wheel activated phone call, you may
press the "TEL" button on the RNS-E to enter more numbers (e.g.,
voicemail PIN, etc.)
© 2005, 2006 Lee H.
NSX JR – Audi Symphony I to RNS-E Install Guide – Version 2.1
Appendix
Appendix K (cont.)
Bluetooth Module Operation via Steering Wheel
Voice Recognition Operation
Once in the voice recognition mode, you may dial numbers by speaking the digits, redial the
previous number, or voice dial contacts stored in the car's phonebook. This phonebook is specific
to the car, and are stored in the BT module's memory. You can store up to 50 numbers in the
phonebook by voice and then recall them later to voice dial.
•
To dial number by digits, speak "Dial Number", and then speak each digit. The BT lady will
repeat them back to you. If correct, speak "dial". The BT lady will confirm by saying "the
number is being dialed".
•
To redial the previous number, speak "Redial". The BT lady will confirm by saying "the number
is being dialed".
•
To store a number for voice dialing, speak "Store Name". The BT lady will guide you through
the correct actions. You speak the name twice then speak the digits to be stored. This is very
similar to the older cell phone voice dialing tags that you had to manually store. If successful,
the voice tag will be saved to the BT module phonebook.
•
To hear your phonebook, speak "Phonebook". The phonebook name entries will be played in
sequence to remind you what you have stored.
•
To voice dial an entry in your BT module phonebook, speak "Name". The BT lady will confirm
by saying "Say the Name". Speak the name exactly as you have stored it in your BT phonebook.
The BT module will repeat the entry for confirmation. Speak "Dial" and the BT lady will
confirm by saying "the number is being dialed".
Other Notes
•
At any time during a call, the
button may be pressed to end the call, no matter how it was
originated (steering wheel, voice, or RNS-E entry).
•
The contact name for the active phone call is displayed in the DIS if that number is stored in
your phone's contact list, no matter how the call was originated (steering wheel, RNS-E
buttons, or received call).
•
If you have an entry in your phone's contact list for your voicemail number that includes pause
characters and PIN, these will be dialed correctly if the call is originated using the steering
wheel buttons (R/T, up/down scroll, phone icon).
© 2005, 2006 Lee H.
NSX JR – Audi Symphony I to RNS-E Install Guide – Version 2.1
Appendix