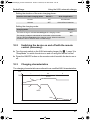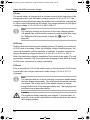
1
_PerfectCharge_IU152A-IU254A.book Seite 1 Mittwoch, 26. März 2008 4:48 16
FF
II
SL
MO EE P
DE
O
I
U
ON
0
IU
E
SE
HA
AS
E
IP
PH
AS
PH
PerfectCharge
IU152A, IU154A, IU252A, IU254A, IU452A
NL
122 IUOU automatische lader
Montagehandleiding en gebruiksaanwijzing
DA 144 IU0U automatisk oplader
Monterings- og betjeningsvejledning
DE
11 IU0U-Automatiklader
Montage- und Bedienungsanleitung
EN
33 IU0U Automatic Charger
Installation and Operating Manual
FR
54 Chargeur automatique de batteries IU0U
Instructions de montage et de service
SV
ES
77 Cargador automático IU0U
Instrucciones de montaje y de uso
NO 186 IU0U-Automatisk batteriladdare
Monterings- og bruksanvisning
IT
100 Caricabatterie automatico IU0U
Istruzioni di montaggio e d’uso
FI
165 IU0U automatisk lader
Monterings- och bruksanvisning
206 IU0U-automaattilaturi
Asennus- ja käyttöohje
_PerfectCharge_IU152A-IU254A.book Seite 3 Mittwoch, 26. März 2008 4:48 16
PerfectCharge
1
1
SL
MO EE
DE P
OF
II
F
U
I
ON
0
IU
PH
E
HA
AS
E
IP
PH
AS
SE
2
3
5
4
6
2
1
2
3
I PHASE
U PHASE
IU PHASE
II 0 I
SLEEP
OFF
MODE
ON
3
_PerfectCharge_IU152A-IU254A.book Seite 4 Mittwoch, 26. März 2008 4:48 16
PerfectCharge
3
IU152A
2
1
3
4
BATT +
BATT -
RC
START BATT +
TS
230 V AC
INPUT
IU154A, IU252A
1
2
3
BATT 2+
BATT 3+
BATT -
RC
BATT 1+
4
TS
230 V AC
INPUT
IU254A, IU452A
1
2
3
4
RC
BATT 1+
TS
230 V AC
INPUT
4
BATT 2+
BATT 3+
BATT -
_PerfectCharge_IU152A-IU254A.book Seite 5 Mittwoch, 26. März 2008 4:48 16
PerfectCharge
4
SL
MO EE
DE P
II
OF
F
I
ON
0
U
IU
PH
E
HA
AS
IP
E
PH
AS
SE
1.
2.
5
2
1
230 V AC
INPUT
5
_PerfectCharge_IU152A-IU254A.book Seite 6 Mittwoch, 26. März 2008 4:48 16
PerfectCharge
OFF
0
E
AS
I PH
E
AS
PH
E
AS
U PH
II
P
SLEE
DE
MO
6
IU
ON
I
2
1
7
1
M
II
FF
E
OD E P
E O
SL
U
I
ON
0
IU
PH
E
HA
S
AS
E
3
4
6
IP
E
PH
AS
2
_PerfectCharge_IU152A-IU254A.book Seite 7 Mittwoch, 26. März 2008 4:48 16
PerfectCharge
8
3
2
1
4
5
230 V AC
INPUT
9
IU152A
BATT +
BATT -
RC
START BATT +
TS
230 V AC
INPUT
+
_
12 V
+
_
12 V
7
_PerfectCharge_IU152A-IU254A.book Seite 8 Mittwoch, 26. März 2008 4:48 16
PerfectCharge
0
IU154A
BATT 2+
BATT 3+
BATT -
RC
BATT 1+
TS
230 V AC
INPUT
+
_
+
_
+
_
_
+
24 V
+
_
+
24 V
a
_
24 V
IU252A
BATT 2+
BATT 3+
BATT -
RC
BATT 1+
TS
230 V AC
INPUT
+
_
12 V
+
_
12 V
8
+
_
12 V
_PerfectCharge_IU152A-IU254A.book Seite 9 Mittwoch, 26. März 2008 4:48 16
PerfectCharge
b
IU254A
BATT 2+
BATT 3+
BATT -
RC
BATT 1+
TS
230 V AC
INPUT
+
_
+
_
+
_
_
+
24 V
+
_
+
24 V
c
_
24 V
IU452A
BATT 2+
BATT 3+
BATT -
RC
BATT 1+
TS
230 V AC
INPUT
+
_
12 V
+
_
12 V
+
_
12 V
9
_PerfectCharge_IU152A-IU254A.book Seite 10 Mittwoch, 26. März 2008 4:48 16
PerfectCharge
d
1
3
23
0
IN V AC
PU
T
2
10
_PerfectCharge_IU152A-IU254A.book Seite 33 Mittwoch, 26. März 2008 4:48 16
PerfectCharge
Please read this manual carefully before installing and starting up the
device, and store it in a safe place. If the device is passed on to another
person, this manual must also be handed over with it.
Table of contents
1
Notes on using the manual . . . . . . . . . . . . . . . . . . . . . . . . . . . . . . . 34
2
General safety instructions . . . . . . . . . . . . . . . . . . . . . . . . . . . . . . . 35
3
Scope of delivery . . . . . . . . . . . . . . . . . . . . . . . . . . . . . . . . . . . . . . . 37
4
Accessories . . . . . . . . . . . . . . . . . . . . . . . . . . . . . . . . . . . . . . . . . . . 37
5
Intended use . . . . . . . . . . . . . . . . . . . . . . . . . . . . . . . . . . . . . . . . . . 37
6
Technical description . . . . . . . . . . . . . . . . . . . . . . . . . . . . . . . . . . . . 38
7
Fastening the IU0U automatic charger . . . . . . . . . . . . . . . . . . . . . . 40
8
Connecting the IU0U automatic charger to the exhaust system . . . 41
9
Connecting the IU0U automatic charger . . . . . . . . . . . . . . . . . . . . . 42
10
Using the IU0U automatic charger. . . . . . . . . . . . . . . . . . . . . . . . . . 45
11
Cleaning and servicing the IU0U automatic charger . . . . . . . . . . . . 50
12
Rectifying faults . . . . . . . . . . . . . . . . . . . . . . . . . . . . . . . . . . . . . . . . 50
13
Guarantee . . . . . . . . . . . . . . . . . . . . . . . . . . . . . . . . . . . . . . . . . . . . 51
14
Disposal . . . . . . . . . . . . . . . . . . . . . . . . . . . . . . . . . . . . . . . . . . . . . . 51
15
Technical data . . . . . . . . . . . . . . . . . . . . . . . . . . . . . . . . . . . . . . . . . 52
33
_PerfectCharge_IU152A-IU254A.book Seite 34 Mittwoch, 26. März 2008 4:48 16
Notes on using the manual
PerfectCharge
1
Notes on using the manual
d
a
e
Caution!
Safety instruction: failure to observe this instruction can cause
material damage or personal injury.
I
Note
Supplementary information for operating the device.
Caution!
Safety instruction: Failure to observe this instruction can cause
material damage and impair the function of the device.
Caution!
Safety instruction relating to a danger from an electrical current or
voltage. Failure to observe this instruction can cause material
damage or personal injury and impair the function of the device.
➤ Action: This symbol indicates that action is required on your part. The
required action is described step-by-step.
✓ This symbol describes the result of an action.
fig. 1 5, page 3: This refers to an element in an illustration. In this case,
item 5 in figure 1 on page 3.
Please observe the following safety instructions.
34
_PerfectCharge_IU152A-IU254A.book Seite 35 Mittwoch, 26. März 2008 4:48 16
PerfectCharge
2
General safety instructions
General safety instructions
The manufacturer will not be held liable for claims for damage resulting from
the following:
z Faulty assembly or connection
z Damage to the appliance resulting from mechanical influences and
excess voltage
z Alterations to the device without express permission from the manufacturer
z Use for purposes other than those described in the operating manual
Please observe the following basic safety information when using electrical
devices to protect against:
z Electric shock
z Fire hazards
z Injury
2.1
General safety
d
z Batteries contain aggressive acids.
Avoid coming into contact with battery fluid.
If your skin does come into contact with battery fluid, wash the
part of your body in question and your clothes thoroughly with
plenty of fresh water.
If you sustain any injuries from acids, contact a doctor immediately.
z Never attempt to charge a frozen or defective battery.
There is a danger of explosions!
Place the battery in a frost-free area and wait until the battery
has acclimatised to the ambient temperature. Only then can
you start the charging process.
z Persons whose physical sensory or mental capacities prevent
them from using this device safely should not operate it without
the supervision of a responsible adult.
z Electronic devices are not toys
Keep electrical appliances out of reach of children or infirm persons. Do not let them use the appliances without supervision.
35
_PerfectCharge_IU152A-IU254A.book Seite 36 Mittwoch, 26. März 2008 4:48 16
General safety instructions
a
PerfectCharge
z Use the IU0U automatic charger only as intended.
z Charge the battery only in well ventilated rooms.
z Always disconnect the power supply when working on the device.
z Store the IU0U automatic charger in a dry and cool place.
z Maintenance and repair work may only be carried out by qualified personnel who are familiar with the risks involved and the
relevant regulations.
2.2
Operating the device safely
e
a
z If electrical devices are incorrectly installed on boats, corrosion
damage might occur. The IU0U automatic charger should be installed by a specialist (marine) electrician.
z Only operate the IU0U automatic charger if you are certain that
the housing and the cables are not damaged.
z Do not operate the IU0U automatic charger in a damp or wet
environment.
z Make sure the device is standing firmly.
The IU0U automatic charger and the batteries to be charged
must be set up in such a way that they cannot tip over or fall
down.
z Take precautions necessary to ensure that the IU0U automatic
charger is out of reach of children.
Dangerous situations may occur which cannot be recognised by
children!
z Always use sockets which are grounded and secured by residual current circuit breakers to operate the device.
36
_PerfectCharge_IU152A-IU254A.book Seite 37 Mittwoch, 26. März 2008 4:48 16
PerfectCharge
3
Scope of delivery
No. in
fig. 1,
page 3
4
Scope of delivery
Designation
1
Charger
2
Holders (4 pcs)
3
Connection cable
(for 230 VAC-supply)
4
Exhaust adapter
5
Mounting bracket
6
Hexagon socket wrench
–
Fastening screws (12 pcs)
–
Operating manual
Accessories
Designation
Item no.
Remote control
Temperature sensor
5
TF-500
Intended use
PerfectCharge IU0U automatic chargers can charge or trickle charge batteries or supply batteries, which are used to generate power in vehicles or on
boats.
The IU0U automatic charger can be used to continuously charge supply or
starter batteries. It can charge these batteries or maintain a high charge level:
z 12 V batteries: IU152A, IU252A, IU452A
z 24 V batteries: IU154A, IU254A
37
_PerfectCharge_IU152A-IU254A.book Seite 38 Mittwoch, 26. März 2008 4:48 16
Technical description
PerfectCharge
The IU0U automatic charger can be used to charge the following types of batteries:
z Lead starter batteries
z Gel batteries
z Fleece batteries (AGM)
z Maintenance-free lead batteries
with the capacities and voltages specified in the chapter “Technical data” on
page 52.
Ask your battery retailer for details relating to the maximum capacity of lead
gel batteries.
e
e
Caution
Batteries with a cell short circuit may not be charged, as explosive
gases may form due to overheating of the battery.
6
Technical description
6.1
Function
Caution
The IU0U automatic charger may never be used to charge other
battery types (e.g. NiCd, NiMH, etc.)!
A fuse protects the device from damage if the polarity is reversed. For the
type and rating of the fuse in your device, see chapter “Technical data” on
page 52.
e
I
38
Caution
The device's fuse may only be replaced by qualified personnel who
are familiar with the risks involved and the relevant regulations.
Note
You can use a temperature sensor (accessory) to protect the battery from damage from extreme outdoor temperatures. The temperature sensor is attached to the battery and connected to the
IU0U automatic charger. It protects the battery by adjusting the
charging voltage to the temperature of the battery (see chapter
“Charging characteristics” on page 47).
_PerfectCharge_IU152A-IU254A.book Seite 39 Mittwoch, 26. März 2008 4:48 16
PerfectCharge
Technical description
Three control lamps on the device are for constant monitoring of the IU0U automatic charger (see chapter “Functional check” on page 49).
6.2
Specifications for the device variants
Various PerfectCharge IU0U automatic charger versions are available.
Your IU0U automatic charger can be used to charge batteries up to a specified battery capacity (see chapter “Technical data” on page 52):
z IU152A: suitable for charging one supply battery and one starter battery
z IU154A, IU252A: suitable for charging up to two supply batteries and one
starter battery
z IU254A, IU452A: suitable for charging up to three supply batteries.
For the identification of your device, see the item number on the type plate.
6.3
Control elements
Front view (fig. 2, page 3)
No.
Description
1
Main switch
0/Off: device is switched off
I/On: device is switched on
II/Sleep Mode: device runs quietly
(sleep mode: half power)
2
Status LEDs: show the current charging status
(see chapter “Charging characteristics” on page 47)
U Phase: the IU0U automatic charger is in the U phase
IU Phase: the IU0U automatic charger is in the U0 phase
I Phase: the IU0U automatic charger is in the I phase
3
Fan
39
_PerfectCharge_IU152A-IU254A.book Seite 40 Mittwoch, 26. März 2008 4:48 16
Fastening the IU0U automatic charger
PerfectCharge
Rear view (fig. 3, page 4)
No.
Description
1
230 V power supply connection
2
RC: connection for remote control (accessory)
3
TS: connection for temperature sensor (accessory)
4
Battery connection terminals
BATT 1+, BATT 2+, BATT 3+: positive terminal for supply batteries
BATT –: negative terminal
START BATT + (only IU152A), BATT 1+ (only IU154A, IU252A): positive terminal of the starter battery
7
Fastening the IU0U automatic charger
You can fasten the IU0U automatic charger using the four holders supplied.
When selecting the installation location, observe the following instructions:
z You can mount the IU0U automatic charger either horizontally or vertically.
z Do not operate the device
– In wet or damp environments
– In dusty environments
– In the vicinity of flammable materials
– In spaces where there is a danger of explosion
z Select a well-ventilated location for the device.
A ventilation system must exist for installations in small, enclosed
spaces. The free space around the IU0U automatic charger must be at
least 5 cm.
z Make sure that the ventilation slots on the front and back as well as under
the IU0U automatic charger are not covered.
z Select a mounting surface which is flat and sufficiently firm.
z Make sure you have adequate space for the mounting bracket behind the
device when choosing a mounting location.
a
40
Caution
Before drilling any holes, make sure that no electrical cables or other parts of the vehicle can be damaged by drilling, sawing and filing.
_PerfectCharge_IU152A-IU254A.book Seite 41 Mittwoch, 26. März 2008 4:48 16
PerfectCharge Connecting the IU0U automatic charger to the exhaust system
Fastening the IU0U automatic charger to the floor
➤ Clip two holders on the left bar and two on the lower right bar (fig. 4,
page 5).
You can move the holders as required.
➤ Fasten the IU0U automatic charger by screwing one screw through each
hole in the holders.
➤ Lay the mounting bracket (fig. 5 1, page 5) with the clip over the edge
on the back of the IU0U automatic charger (fig. 5 2, page 5).
➤ Fasten the mounting bracket by screwing one screw into each of the four
holes.
Mounting the IU0U automatic charger on the wall
➤ Clip two holders on the left bar and two on the lower right bar (fig. 4,
page 5).
You can move the holders as required.
➤ Screw the mounting bracket (fig. 6 1, page 6) on to the wall by screwing
one screw into each of the four holes.
➤ Press the IU0U automatic charger (fig. 6 2, page 6) on to the mounting
bracket so that the edge on the back of the IU0U automatic charger is
pinched between the wall and the clip on the mounting bracket.
➤ Fasten the IU0U automatic charger by screwing one screw through each
hole in the holders.
8
Connecting the IU0U automatic
charger to the exhaust system
You can connect the IU0U automatic charger to an exhaust system. The
warm exhaust is thereby driven out of the internal chamber.
Proceed as follows (fig. 7, page 6):
➤ Set the exhaust adapter (2) on the front of the charger (1) over the fan, so
that the screws fit into the holes.
➤ Attach the exhaust adapter using the four screws provided.
➤ Connect the hose support (3, not included) to the exhaust adapter.
➤ Connect the exhaust system hose (4) to the hose support.
41
_PerfectCharge_IU152A-IU254A.book Seite 42 Mittwoch, 26. März 2008 4:48 16
Connecting the IU0U automatic charger
PerfectCharge
9
Connecting the IU0U automatic
charger
a
Caution
The IU0U automatic charger may only be connected by a qualified
specialist.
The following information is intended for technicians who are familiar with the guidelines and safety precautions to be applied.
Observe the following safety instructions for the electrical connections:
e
z Caution, risk of short circuit
Always use sockets which are grounded and secured by residual current circuit breakers.
z If you have to feed cables through metal walls or other walls with
sharp edges, use ducts or tubes to prevent damage.
z Do not lay cables which are loose or bent next to electrically
conductive material (metal).
z Fasten the cables securely.
z Do not pull on the cables.
z Do not lay the 230 V mains cable and the 12/24 V DC cable in
the same duct.
z Lay the cables so that they cannot be tripped over or damaged.
9.1
Connecting the IU0U automatic charger to a battery
(fig. 8, page 7)
d
e
Warning
Avoid coming into contact with the battery fluid.
42
Caution
Batteries with a cell short circuit may not be charged, as explosive
gases may form due to overheating of the battery.
_PerfectCharge_IU152A-IU254A.book Seite 43 Mittwoch, 26. März 2008 4:48 16
PerfectCharge
a
I
I
Connecting the IU0U automatic charger
Note
Loose connections may cause overheating.
Tighten the screws on the terminals to a torque of 12 – 13 Nm.
Note
IU152A: To connect starter batteries, use the special “START
BATT +” terminal intended for this purpose.
Note
IU154A, IU252A: To connect starter batteries, use the special
“BATT 1+” terminal intended for this purpose.
You will find the circuit diagrams with all possible wiring options for the various IU0U automatic chargers in fig. 9, page 7 to fig. c, page 9.
Laying the battery cables
➤ Lay the positive cable of the batteries to the IU0U automatic charger.
I
Note
To connect more than one battery, connect the negative terminals
of the batteries to an earth cable and connect the earth cable to the
IU0U automatic charger.
➤ Lay the negative cable of the battery or earth cable to the IU0U automatic
charger.
Preparing the IU0U automatic charger
➤ Turn the main switch to “0”.
➤ Unscrew the four fastening screws (2) from the rear panel using the hexagon socket wrench provided.
➤ Remove the rear panel (1).
43
_PerfectCharge_IU152A-IU254A.book Seite 44 Mittwoch, 26. März 2008 4:48 16
Connecting the IU0U automatic charger
PerfectCharge
Connecting the battery cables to the IU0U automatic charger
I
Note
The IU0U automatic charger's connections are suitable for cables
with cross-sections of 10 mm² to 25 mm².
➤ Fit wire sleeves to the ends of the cables to ensure permanent contact.
➤ Connect the positive battery cable to the respective slot:
– Supply battery: “BATT 1+”, “BATT 2+”, “BATT 3+”
– Starter battery: “START BATT +” (IU152A), “BATT 1+” (IU154A,
IU252A)
➤ Connect the negative battery cable or earth cable to the respective slot:
– Supply battery: “BATT –”
The following instructions apply to all cables accordingly:
➤ Fit cable sleeves on the ends of the cables (4).
➤ Undo the safety bolt (3) slightly.
➤ Insert the cable sleeves (4) in the slots provided.
➤ Retighten the safety bolt (3).
Connecting batteries
➤ Connect batteries according to the circuit diagram of your IU0U automatic
charger.
Closing the IU0U automatic charger
➤ Refit the rear panel (1) and fasten it with the screws (2).
9.2
Connecting the 230 V power cable
➤ Connect the 230 V connection cable (fig. 1 3, page 3) to the 230 V connection (fig. 3 1, page 4) of the IU0U automatic charger.
➤ Insert the plug of the 230 V connection cable (fig. 1 3, page 3) to an
earthed socket which is protected by a residual current circuit breaker.
44
_PerfectCharge_IU152A-IU254A.book Seite 45 Mittwoch, 26. März 2008 4:48 16
PerfectCharge
9.3
Using the IU0U automatic charger
Connecting the temperature sensor (accessory)
The temperature sensor measures the temperature at the battery or around
the battery and transfers the data to the IU0U automatic charger. The charging voltages specified in the chapter “Technical data” on page 52 refer to an
ambient temperature of 15 °C to 25 °C. If temperatures deviate, the charging
voltage is increased or reduced according to the diagram on page 49.
➤ Turn the main switch to “0”.
➤ Lay the cable between the battery and the IU0U automatic charger.
➤ Connect the temperature sensor to the TS socket on the back of the IU0U
automatic charger (fig. d 1, page 10).
➤ Attach the sensor head directly to the battery (fig. d 2, page 10), e.g. using double-sided adhesive tape.
9.4
Connecting the remote control (accessory)
The remote control is for activating and deactivating sleep mode and for monitoring the functions (see chapter “Functional check” on page 49) of the IU0U
automatic charger.
➤ Lay the cable between the remote control and the IU0U automatic charger.
➤ Insert the plug of the remote control in the “RC” socket (fig. d 3, page 10)
of IU0U automatic charger.
10
Using the IU0U automatic charger
You can use the IU0U automatic charger to trickle charge empty batteries or
supply batteries.
I
Note
The chargers IU152A, IU252A and IU154A have a charger output
for the starter battery with an output voltage in the range between
13.2 V (26.4 V) and 13.8 V (27.6 V). The charger output for the
starter battery recharges the starter battery with a current of up to
1 A or maintains a high charge level.
➤ Switch on the device with the main switch (fig. 2 1, page 3).
45
_PerfectCharge_IU152A-IU254A.book Seite 46 Mittwoch, 26. März 2008 4:48 16
PerfectCharge
Using the IU0U automatic charger
10.1
Setting the IU0U automatic charger (fig. 8, page 7)
Charging voltage and time limit
I
a
Note
Ask your battery retailer for details on the charging voltage and time
limit required for your batteries.
Caution
Make sure that the device is never used if DIP switches 1 and 2 or
DIP switches 3 and 4 are both at the “ON” position. Only the switch
positions described in the following tables ensure the correct operation of the IU0U automatic charger.
➤ Turn the main switch to “0”.
➤ Unscrew the four fastening screws (2) from the rear panel using the hexagon socket wrench provided.
➤ Remove the rear panel (1).
➤ Use the DIP switches (5) to set the required charging voltage and the duration of the main charging phase (U0 phase, also see chapter “Charging
characteristics” on page 47):
Setting the charging voltage for IU152A, IU252A and IU452A:
Charging voltage
Switch 1
Switch 2
Area of application
13.8 V
OFF
OFF
Old starter batteries,
mains adapter operation
14.4 V
ON
OFF
Wet and gel batteries
14.8 V
OFF
ON
Fleece batteries
Setting the charging voltage for IU154A and IU254A:
46
Charging voltage
Switch 1
Switch 2
Area of application
27.6 V
OFF
OFF
Old starter batteries,
mains adapter operation
28.8 V
ON
OFF
Wet and gel batteries
29.6 V
OFF
ON
Fleece batteries
_PerfectCharge_IU152A-IU254A.book Seite 47 Mittwoch, 26. März 2008 4:48 16
PerfectCharge
Using the IU0U automatic charger
Setting the duration of the main charging phase:
Duration of the main charging phase
Switch 3
Area of application
8 hours
ON
Wet batteries
16 hours
OFF
Gel and fleece batteries
Setting the charging mode:
Charging mode
Switch 4
The trickle charge is activated according to the charging current.
OFF
The charging voltage is maintained for the duration of the set main
charging phase irrespective of the charging current. When this time has
passed, the device switches back to trickle charge.
ON
10.2
Switching the device on and off with the remote
control (accessory)
➤ Turn the main switch on the IU0U automatic charger (fig. 2 1, page 3) to
“SleepMode” to switch the device on and off using the remote control.
➤ Press the ON/OFF button on the remote control to switch the device on or
off.
10.3
Charging characteristics
The charging characteristics are referred to as modified IU0U characteristics.
U/V
I
I/A
U0
U
8/16 h
U
I
I 80%
I 10%
t
47
_PerfectCharge_IU152A-IU254A.book Seite 48 Mittwoch, 26. März 2008 4:48 16
Using the IU0U automatic charger
PerfectCharge
I Phase
The empty battery is charged with a constant current at the beginning of the
charging process, until the battery voltage reaches 13.8 V or 27.6 V. The
charging current falls slowly when the battery has reached this charging level. If the current falls below the 80% mark, the charger switches to the higher
charging voltage of 14.4 V/14.8 V or 28.8 V/29.6 V.
I
Note
The charging voltage and the time for the main charging phase
(U0 phase) can be selected by means of a switch panel (see chapter “Setting the IU0U automatic charger (fig. 8, page 7)” on
page 46).
U0 Phase
Now the time that limits the main charging phase (U0 phase) to a maximum
of 8/16 hours is recorded. When the charging voltage is switched over, the
current is increased until the maximum is reached. It remains constant as
long as the battery voltage is below 14.4 V/14.8 V or 28.8 V or 29.6 V.
When the maximum voltage is established, the current drops again. The voltage remains constant (U0). During this main charging phase, which is limited
to 8/16 hours, the battery is charge completely.
U Phase
If the current falls to 10% of the rated current or if the time limit of 8/16 hours
is exceeded, the charger switches to trickle charge (13.8 V or 27.6 V)
(U phase).
I
Note
The chargers with two or three charging connections enable batteries to be charged separately. The outputs are separated internally
via diodes. The charge level of the weaker battery is always
brought to the level of the stronger battery first. The charging characteristics are as described above.
e
Caution
The maximum battery capacity (see chapter “Technical data” on
page 52) must not be exceeded since that would affect the individual charging phases.
48
_PerfectCharge_IU152A-IU254A.book Seite 49 Mittwoch, 26. März 2008 4:48 16
PerfectCharge
Using the IU0U automatic charger
Devices with temperature sensors (accessory)
The charging voltage is adjusted according to the battery temperature. A
temperature sensor can be connected for an optimum charging function. The
charging voltage is increased or reduced according to the battery temperature (see diagram):
16/32 V
15/30 V
14/28 V
U1
13/26 V
U2
12/24 V
-10
10.4
0
+10
+20
+30
+40
°C
Functional check
The charging of the batteries can be monitored by means of an LED on the
front of the device:
LED
Battery charge status
I Phase
Between 10% and 50%
U0 Phase
Between 50% and 90%
U Phase
Above 90%
49
_PerfectCharge_IU152A-IU254A.book Seite 50 Mittwoch, 26. März 2008 4:48 16
Cleaning and servicing the IU0U automatic charger
PerfectCharge
11
Cleaning and servicing the IU0U automatic charger
a
Caution
Do not use any sharp or hard objects for cleaning since they may
damage the device.
➤ Clean the IU0U automatic charger with a damp cloth from time to time.
12
Rectifying faults
a
I
Caution
This chapter is intended for technicians who are familiar with the
guidelines and safety precautions to be applied.
Note
If you have questions concerning details of the battery specifications please contact the battery manufacturer.
The voltage of the battery does not rise after the IU0U automatic
charger has been connected and put into operation.
➤ Use a suitable multimeter to check whether the voltage of the battery terminals rises during charging.
➤ Check whether the terminals are connected properly to the battery terminals.
➤ Clean the battery terminals as necessary.
The battery is not completely charged after charging for approximately
20 hours.
➤ Disconnect the IU0U automatic charger from the mains power.
➤ Remove the charger terminals from the battery and wait for a few minutes.
➤ Use a suitable multimeter to check the voltage of the battery terminals.
12 V battery: if the multimeter indicates a voltage of 10 V or below, this
means that the battery is defective and cannot be charged.
24 V battery: if the multimeter indicates a voltage of 20 V or below, this
means that the battery is defective and cannot be charged.
50
_PerfectCharge_IU152A-IU254A.book Seite 51 Mittwoch, 26. März 2008 4:48 16
PerfectCharge
Guarantee
➤ Have the battery checked by a specialist, if necessary, or dispose of the
battery.
The battery discharges itself after a short time if it is not used
➤ Use a suitable multimeter to check the voltage of the battery terminals.
If the multimeter indicates a voltage below 12 V (12 V battery) or 24 V (24 V
battery), the battery is too weak to be able to remain charged.
➤ Have the battery checked by a specialist, if necessary, or dispose of the
battery.
13
Guarantee
The statutory warranty period applies. If the product is defective, please
contact the manufacturer's branch in your country (see the back of the
instruction manual for the addresses) or your retailer.
For repair and guarantee processing, please include the following documents when you send in the device:
z A copy of the receipt with purchasing date
z A reason for the claim or description of the fault
14
Disposal
➤ Place the packaging material in the appropriate recycling waste bins
wherever possible.
If you wish to finally dispose of the device, ask your local recycling
centre or specialist dealer for details about how to do this in accordance with the applicable disposal regulations.
Protect the environment
Do not dispose of defective batteries in general household waste.
Return defective rechargeable batteries/conventional batteries to
your retailer or take them to a collection point.
51
_PerfectCharge_IU152A-IU254A.book Seite 52 Mittwoch, 26. März 2008 4:48 16
PerfectCharge
Technical data
15
Technical data
WAECO PerfectCharge
IU152A
IU252A
IU154A
Item no.:
2222500001
2222500002
2222500003
Battery connection 1:
starter battery
13,8 V/1 A
starter battery
13,8 V/1 A
starter battery
27,6 V/1 A
Battery connection 2:
13,8 – 14,8 V/15 A
Battery connection 3:
–
13,8 – 14,8 V
Total max. 25 A for
both connections
27,6 – 29,6 V
Total max. 15 A for
both connections
Input voltage range:
207 – 253 V~ / 50 – 60 Hz
Final charging voltage:
14.4 V/14.8 V
Trickle charge voltage:
13.8 V
Max. battery capacity:
150 Ah
U0 phase limitation:
Max. charging current:
Dimensions:
Weight:
52
27.6 V
300 Ah
200 Ah
8 h or 16 h
15 A
Operating temperature
range:
Fuse:
28.8 V/29.6 V
25 A
15 A
0 °C – 50 C°
T2 A / 250 V
T4 A / 250 V
175 x 91 x 310 mm
208 x 96 x 332 mm
3.1 kg
3.8 kg
_PerfectCharge_IU152A-IU254A.book Seite 53 Mittwoch, 26. März 2008 4:48 16
PerfectCharge
Technical data
WAECO PerfectCharge
IU452A
Item no.:
Battery connection 1:
Battery connection 2:
Battery connection 3:
IU254A
2222500004
2222500005
13,8 – 14,8 V
total max. 45 A for
all three
connections
27,6 – 29,6 V
total max. 25 A for
all three
connections
Input voltage range:
207 – 253 V~ / 50 – 60 Hz
Final charging voltage:
14.4 V/14.8 V
28.8 V/29.6 V
Trickle charge voltage:
13.8 V
27.6 V
Max. battery capacity:
500 Ah
U0 phase limitation:
Max. charging current:
45 A
Operating temperature
range:
Fuse:
300 Ah
8 h or 16 h
25 A
0 °C – 50 C°
T6.3 A / 250 V
Dimensions (mm):
Weight:
T6.3 A / 250 V
208 x 96 x 418 mm
5.5 kg
Variations, technical improvements and delivery options reserved.
Tests/certificates applied to the IU0U automatic charger:
Product series standard:
z IEC 60950-1:2001 (1st Edition), EN 60950-1: 2001 + A11: 2004
Basic standard:
z EN 55022:2006 Class B
z EN 55024: 1998 + A1: 2001 + A2:2003
z EN 61000-3-2: 2000 + 2005 Class A
z EN 61000-3-3: 1995 + A1: 2001 + A2: 2005
53
_PerfectCharge_IU152A-IU254A.book Seite 228 Mittwoch, 26. März 2008 4:48 16
D
Dometic WAECO International GmbH
Hollefeldstraße 63 · D-48282 Emsdetten
℡ +49 (0) 2572 879-195 · +49 (0) 2572 879-322
Mail: [email protected] · Internet: www.waeco.de
Dometic Austria GmbH
Neudorferstrasse 108
2353 Guntramsdorf
℡ +43 2236 908070
+43 2236 90807060
Mail: [email protected]
I
WAECO Italcold SRL
Via dell’Industria, 4/0
I-40012 Calderara di Reno (BO)
℡ +39 051 4148411
+39 051 4148412
Mail: [email protected]
AUS WAECO Pacific Pty. Ltd.
CH
Dometic Switzerland AG
Riedackerstrasse 7a
CH-8153 Rümlang (Zürich)
℡ +41 44 8187171
+41 44 8187191
Mail: [email protected]
N
Dometic Norway AS
Leif Weldingsvei 16
N-3208 Sandefjord
℡ +47 33428450
+47 33428459
Mail: [email protected]
HK WAECO Impex Ltd.
DK
Dometic Denmark A/S
Tværvej 2
DK-6640 Lunderskov
℡ +45 75585966
+45 75586307
Mail: [email protected]
A
E
F
WAECO Ibérica S.A.
Camí del Mig, 106
Poligono Industrial Les Corts
E-08349 Cabrera de Mar
(Barcelona)
℡ +34 93 7502277
+34 93 7500552
Mail: [email protected]
Dometic S.N.C.
ZA du Pré de la Dame Jeanne
F-60128 Plailly
℡ +33 3 44633500
+33 3 44633518
Mail: [email protected]
FIN Dometic Finland OY
Mestarintie 4
FIN-01730 Vantaa
℡ +358 20 7413220
+358 9 7593700
Mail: [email protected]
www.waeco.com
Overseas + Middle East
NL Dometic Benelux B.V.
Ecustraat 3
NL-4879 NP Etten-Leur
℡ +31 76 5029000
+31 76 5029090
Mail: [email protected]
S
Dometic Scandinavia AB
Gustaf Melins gata 7
S-42131 Västra Frölunda
(Göteborg)
℡ +46 31 7341100
+46 31 7341101
Mail: [email protected]
UK Dometic UK Ltd.
Dorset DT2 8LY · Unit G1
Roman Hill Business Park
UK-Broadmayne
℡ +44 1305 854000
+44 1305 854288
Mail: [email protected]
1 John Duncan Court
Varsity Lakes QLD 4227
℡ +61 7 55076000
+61 7 55076001
Mail: [email protected]
Suites 3210-12 · 32/F · Tower 2
The Gateway · 25 Canton Road
Tsim Sha Tsui · Kowloon
Hong Kong
℡ +852 24632750
+852 24639067
Mail: [email protected]
ROC WAECO Impex Ltd.
Taipei Office
2 FL-3 · No. 56 Tunhua South Rd, Sec 2
Taipei 106, Taiwan
℡ +886 2 27014090
+886 2 27060119
Mail: [email protected]
UAE WAECO Middle East FZCO
R/A 8, SD 6
Jebel Ali, Dubai
℡ +971 4 8833858
+971 4 8833868
Mail: [email protected]
3.03.16.01634 03/2008
Europe