1
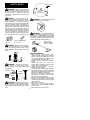
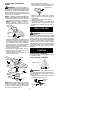
S Push in locking lever and hold.
S Rotate blade nut until the locking lever falls
into one of the grooves in the dust cup.
INSTALLATION OF THE METAL
BLADE
WARNING: Do not use any blades, or
fastening hardware other than the washers and
nuts shown in the following illustrations. These
parts must be provided by Poulan/Weed Eater,
and installed as shown below. Failure to use
proper parts can cause the blade to fly off and
seriously hurt you or others.
NOTE: The dust cup and retaining washer are
located on the gearbox and not in the parts bag.
S Remove the retainer washer from the gearbox, and leave the dust cup on the gearbox.
NOTE: It may be necessary to remove a
plastic protective covering from the
threaded shaft before removing the retaining washer.
Locking Lever
S Continue to hold in locking lever. This will
keep the shaft from turning while tightening
the blade nut.
S Tighten blade nut firmly with a wrench.
S Release locking lever.
S Turn blade by hand. If the blade binds
against the shield, or appears to be uneven,
the blade is not centered, and you must reinstall.
FUEL YOUR UNIT
Dust Cup
WARNING: Remove fuel cap slowly
when refueling.
This engine is certified to operate on unleaded
gasoline. Gasoline must be mixed with a good
quality 2-cycle air-cooled engine oil designed to
be mixed at a ratio of 40:1. Poulan/Weed Eater
brand oil is recommended. (A 40:1 ratio is obtained by mixing 3.2 ounces of oil with 1 gallon of
unleaded gasoline). When mixing fuel follow the
instructions printed on the container. Always
read and follow the safety rules under FUEL
SAFETY.
Retaining
Washer
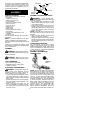
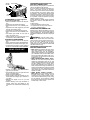
S Install the blade over the threaded shaft extending from the gearbox between the dust
cup and the retaining washer. Make sure
the raised part of the retaining washer is
facing the gearbox, and the raised area fits
into the hole in the center of the blade.
S Slide the blade and retaining washer onto
the shaft of the gearbox.
S Now place the cupped washer onto the
shaft. Make sure the cupped side of the
washer is toward the blade.
S Install the blade nut by threading onto the
shaft counterclockwise.
STARTING
HOW TO STOP YOUR UNIT
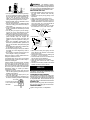
To stop the engine, move the ON/OFF switch
to the OFF position.
Gearbox
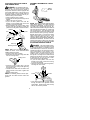
HOW TO START YOUR UNIT
Shield
Starting Position
Dust Cup
Threaded Shaft
WARNING: The trimmer head will
turn while starting the engine. Avoid any contact with the muffler. A hot muffler can cause
serious burns.
S Rest engine and shield on ground, supporting trimmer head off ground.
Blade
Retaining
Washer
Cupped
Washer
Nut
ON/OFF
Switch
NOTE: Make sure all parts are in place as illustrated, and the blade is sandwiched between
the dust cup and the retaining washer. There
should be no space between the blade and the
dust cup or the retaining washer.
Throttle Trigger
6