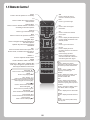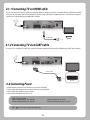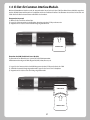
1
User’s Guide
HD Satellite STB
Contents
1. INTRODUCTION ........2
1.1 Safety Instructions........2
1.2 Packaging Contents........3
1.3 Product Descriptions........4
1.4 Conditional Access........5
1.5 Remote Control........6
1.6 Main Features........7
1.7 Technical Data........7
1.7.1 Basic Features........7
1.7.2 Basic Functions........8
5. MENU........19
5.1 Top Menu........19
5.2 Setup........20
5.2.1 System Settings........20
5.2.2 Service Searching........22
5.2.3 Checking CAM........24
5.2.4 Parental Control........24
5.2.5 Factory Reset........25
5.2.6 Software Update........25
5.3 Information........26
5.3.1 Service Information........26
5.3.2 Checking H/W & S/W Information........26
2. INSTALLATION OF XP1000........9
2.1 Connecting the TV........9
2.1.1 Connecting TV via HDMI cable........10
2.1.2 Connecting TV via SCART cable........10
2.2 Connecting Power........10
2.3 Power On/Off........11
6. REMOTE CONTROL UNIT (RCU) SETUP........26
6.1 Setting up as a TV Remote Control........26
6.1.1 4-digit Setting Method........26
6.1.2 Smart Scan Method........27
6.1.3 Changing Factory Default Status........27
6.2 Supported TV Brand List........28
3. FIRST TIME INSTALLATION
(USING WIZARD)........11
3.1 Video Input Selection........11
3.2 Video Mode (Resolution) Selection........11
3.3 Language Selection........11
7. COPYRIGHT – GNU GPL........28
8.TROUBLESHOOTING........31
4. BASIC OPERATIONS........12
4.1 Switching Channels........12
4.2 Volume Control........13
4.3 Selecting Audio Track........14
4.4 Subtitle........13
4.5 Teletext........13
4.6 Program Information........14
4.7 Info Bar........14
4.8 Electronic Program Guide (Event View)........15
4.9 Time Shift........16
4.10 Recording........16
4.11 Recording Play........17
4.12 Managing Recording Files........18
4.13 Media Player........18
4.14 Plug-ins........19
4.15 Sleep Timer........19
01
APPENDIX........32
1. Introduction
1.1 Safety Instructions
XP1000 has been designed and manufactured in compliance with EU consumer safety requirements (CE). Please read the following
safety precautions carefully
1. Connecting Power
• This product operates only in the range of AC 100V~250V and 50Hz/60Hz. Please check first your power supply to see if it fits in this range.
• Please be noted that you need to disconnect from the mains before you start any maintenance or installation procedures.
• Make sure that the power cord is placed in a position where it is easy to unplug it from the mains in an emergency.
2. Overloading
• Do not overload a wall outlet, extension cord or adapter as this may cause electrical fire or shock.
3. Liquid
• This product is not water-proof and should not be exposed to dripping, splashing, or any type of liquid.
• No objects filled with liquid such as vases shall be placed on the product.
• Please do not clean the product with wet cloth, which may cause a short circuit.
• No wet objects should be placed near the product.
4. Ventilation
• Allow sufficient space between the product and other objects to make sure air ventilation of the product.
• Do not block the top or rear of the product with an object, which will close the ventilation holes and lead to a high temperature of
the system. This may cause a failure of the product.
• Do not stack other electronic devices on top of the product.
• Do not insert any kind of pointed objects like screw, gimlet, etc. into the ventilation holes of the product. This will damage
the product.
5. Connecting the Satellite Cable.
• Disconnect the power of the product before you connect the satellite cable to the product. Otherwise, it may cause damage to the LNB.
6. Grounding
• The LNB must be earthed to the system earth for the satellite dish.
7. Location
• Place the product indoor.
• Do not expose the product to rain, sun or lightening.
• Do not place the product near any heat appliances such as a radiator.
• Ensure that there is more than 10 cm distance from any electrical devices & wall.
8. Lightening, Storm or Not In Use.
• Unplug the product and disconnect the antenna cable during a thunderstorm or lightening, especially when left unattended and
unused for a long period of time. This will prevent possible damages from power surges or lightening.
9. Replacement of Parts
• Unauthorized part replacements, especially by one who is not a qualified technician may result in damage to the product.
• Ensure that when part replacements are necessary qualified technicians perform the task using the components specified by the
manufacturer.
10. Hard Disk Drive
• Do not move the product or turn the power off suddenly while the Hard Disk Drive (HDD) is still running. This may result in
damage to the HDD and thus the system.
• The company shall not be liable for any corruption of data on the HDD caused by careless use or misuse of users.
02
11. Battery
• There is danger of explosion if batteries are incorrectly replaced.
• Replace batteries only with the same or equivalent type.
Disposal “WEEE” Symbol instructions
This product should not be disposed with other house hold wastes at the end of its working life.
Please separate this from other types of wastes and recycle it responsibly to promote the sustainable reuse of material resources.
This will help prevent harm to the environment or human health from uncontrolled waste disposal.
1.2 Packaging Contents
Please check all package contents before using your product.
XP1000
User’s Guide
Remote Control & Battery(AAA 1.5V Battery x 2)
HDMI Cable
User’s Guide
Power Cord
AC Adapter
* The accessories may vary according to area.
03
1.3 Product Descriptions
Front Panel
1
2
3
4
5
6
1. IR Receiver: Receive the IR signal from remote controller.
2. Recording Indicator: Display the current recording status of STB.
3. On/Off button and Indicator: Display the current power status of STB. Using this button, you can power on and off your STB.
4. Channel up/down: Using the channel up and down buttons, you can switch the channels directly on your STB.
5. CI Module slot: One CI module slot is provided.
6. Smartcard reader slot: Two Smartcard slots are provided
Rear Panel
1
2
3
4
1. LNB 1 IN: One Satellite cable can be connected.
2. SCART: One SCART connector is provided for TV using SCART cable.
3. HDMI: Connect to TV using an HDMI cable for both audio and video signals.
4. S/PDIF: Connect to a digital audio system using S/PDIF cable.
5. Ethernet: Connect Network.
6. USB: Connect the USB memory stick or external HDD.
7.DC Power Jack: Connect the provided AC/DC adapter (2.5A@12V).
8. DC power On/Off Switch: Power on/off.
04
5
6
7
8
1.4 Conditional Access
Amongst the channels scanned via XP1000, some channels can be properly tuned in only with the corresponding Smartcard and/
or CAM (Conditional Access Module). XP1000 provides two Smartcard Reader slots and one Conditional Interface slot. Users need to
purchase those Smartcards and CAMs that are required for viewing such subscription based services.
Insertion of Smartcard
1 Open the door on the right side.
2 Insert Smartcard as in the following instruction with the IC chip pointing down.
3 Make sure that the Smartcard remain inserted while viewing.
SMARTCARD
Insertion of CAM (Conditional Access Module)
There are several Conditional Access Systems (CAS) that XP1000 supports. To be able to watch channels encrypted in such CAS as
Nagravision, NDS, Irdeto, Viaccess, etc, users need to purchase a CAM corresponding to each CAS, as well as Smartcard to decrypt
those encrypted channels.
1 Insert a Smartcard into the CAM as in the below picture with the IC chip pointing up.
2 Once the Smartcard inserted into the CAM, insert the CAM into the CI slot.
3 Make sure that the CAM remains inserted while viewing.
CI MOUDULE
SMARTCARD
05
1.5 Remote Control
Power
Press to turn the product on or standby.
STB
Press to switch the remote
control to control this product.
TV
Press to switch the remote control to
control TV set.
Next
Press to go to Next Page.
Numeric Keys
Press to enter a channel number or numbers
according to the menu options.
Info
Press to view the Program
information.
Previous
Press to go to Previous Page.
OK
Press to confirm the selected
menu option.
Back
Press to return to the previous service or
Menu.
EPG
Press to display the EPG (Electronic
Program Guide) information if the
channel provide.
Navigation Keys
Press to navigate up/down and left/right on
the menu options.
Up/down keys are used to call up the
channel list.
Portal
Press to go to Portal menu.
File List
Press to display the list of
recordings stored on the external
HDD if any.
Exit
Press to exit the current menu option into
the live mode, or switches one step back of
the menu.
Channel (Page) up/down
Press to navigate through the
scanned channel list or move the
channel/Program list in pages.
Volume +/Press to adjust the audio volume.
MUTE
Press to mute the audio or un-mute.
Text
Press to display the teletext
information of the current channel, if
the channel provides teletext data.
Color Keys – RED, Green, Yellow & Blue
Each key is assigned a specific function
that may be different in each menu.
Audio
Press to select available audio
language and audio type.
Recording[
]
Press to start or stop recording media.
Subtitle
Press to display the subtitle of the
current channel, if the channel
provides subtitle data.
STOP[
]
Press to stop playing media.
Play / Pause[
]
Press to play the selected file (e.g.
recording) at the normal speed or pause
the live program or recording play.
Help
Press to display major important
operation methods. This provides
users with a quick guide of product.
Timer[
]
Press to view the Timer Schedule.
V. Mode
Press to change the display output
ratio: Wide, Zoom or Original.
Previous Program[
]
Press to move to previous program.
TV
Press to display the TV channel list.
Fast Rewind[
]
Faster rewind than the normal speed.
RADIO
Press to display the Radio channel
list.
Fast Forward[
]
Faster forward than the normal speed.
Next Program.[
]
Press to move to Next program.
Sleep
Press to turn off the product sleep
timer by user.
06
1.6 Main Features
• MIPS Processor 3300 class
• Linux Operating System
• Media Player
• Downloadable Plug-ins supported
• 2 x Smartcard Readers
• 1 x Common Interface
• MPEG2 / H.264 Hardware Decoding
• DVB-S2 Single Tuner
• 128MB NAND Flash / 512MB DDR Memory
• 10/100MB Ethernet Interface
• 1 x USB 2.0
• HDMI
• 1 x SCART
• SPDIF for digital bit stream out (optical)
• EPG supported
• Automatic & Manual Service Scan supported
• Multiple LNB control (DiSEqC) supported
• Skin change supported
• Stable power adaptor (external)
1.7 Technical Data
1.7.1 Basic Features
PCB Size
WxD
205x117 mm
Reliability
Operating Temp.
0~45°C
Relative Humidity
10% ~ 80% (non-condensing)
RF Reception
Terrestrial DVB-S
950MHz~2150MHz
Terrestrial DVB-S2
DiSEqC 1.2
Number of RF Input/output terminal
LNB-IN 1 port
(75 Ohms F-Type)
IO Features
Power Indication
Yes (Blue=on, Red=stand-by)
Recording Indication
Red (PVR Ready)
Network activity Indication
Yes (Rear)
Ethernet
Yes (100baseT)
SCART output
CVBS/RGB+LR Supported
HDMI output
576p, 720p @ 50Hz, 1080i @ 25Hz,1080p @ 50Hz
USB 2.0
Yes (Rear, 1 port)
Smart Card Slot
x2 (Front)
CI Card Slot
x1 (Front)
Optical Output
PCM / Dolby Digital
Power Supply
AC-DC Adaptor (12V/2.5A)
07
Packaging
Gift box
Paper box, coloured design
Accessories
RCU
Yes
HDMI Cable
Yes
AC Adaptor (+12V/2.5A)
Yes
Battery (AAAx2)
Yes
User Manual Guide
Yes
1.7.2 Basic Functions
Solution
CPU
MIPS 3300 class
RAM
512MB
ROM
SPI-NOR 4MB
NAND 128MB
OS
Linux version > 3.5.0
Audio Decoder
Dolby Digital (AC3)
Yes
MPEG-1 L1/L2/L3
Yes
MPEG-2 AAC
Yes
MPEG-4 HE-AAC
Yes
Digital multi-lingual
Yes
Video Decoder
MPEG-1
Yes
MPEG-2
MP@HL
H.264
HP@L4 (1080p 30fps)
XVID
XVID Highdef (HD)
Video Display
16:9, 4:3 Monitor Selection
Yes
Aspect ratio control
Yes
(Normal, Wide, Zoom)
576i/576p/720p/1080i/1080p
Yes
08
Control I/F
Front keypad
3Keys – Power, Ch+, Ch-
IR
Yes
AV Input/Output
SCART output
Yes (CVBS & RGB + LR)
HDMI output
x1
SPDIF optical output
Yes
USB 2.0
x1
Copy Protection
HDCP
Yes
Network
LAN
RJ45(10/100 Base-T)
W-LAN
Wi-fi (802.11 b/g),USB type (optional)
DHCP, Static IP
Yes
PPPoE
Optional
Other Functions
Volume & Mute Control
Yes
Photo viewer
Yes
2. INSTALLATION OF XP1000
This chapter will guide you through the whole installation process of XP1000. Please read each section carefully to make sure that
the system runs properly.
2.1 Connecting the TV
XP1000 provides a variety of audio/video connection methods.
We recommend you to use HDMI connector to get the best picture quality. If your television does not have a matching connector,
then use the SCARD connector in the following order for a better picture quality.
You should configure audio and video settings after connecting up the digital receiver.
09
2.1.1 Connecting TV via HDMI cable
For the sake of the best picture quality, especially for digital TV, HDMI connection is recommended. Most HDTVs have HDMI
connectors to ensure the highest picture quality. In the rear panel of XP1000 one HDMI connector is available for this purpose.
Connect your TV to XP1000 using an HDMI cable as follows.
HDMI Cable
HDMI
2.1.2 Connecting TV via SCART Cable
In case your TV is analogue TV, SCART cable is the most common method. Connect your TV to XP1000 using SCART cable as follows.
SCART Cable
SCART
2.2 Connecting Power
A power adaptor is provided as one of the basic accessories of XP1000.
1 Connect the power adaptor to the connector at the rear panel of XP1000.
2 Connect the power adaptor to a power outlet.
3 Turn on the power switch at the rear panel.
NOTE: AC input condition
• Nominal Voltage Range: 100 - 240 VAC
• Maximum Voltage Range: 90 - 264 VAC
NOTE:
• Nominal Frequency: 50 / 60 Hz
• Maximum Frequency Range: 47 - 63 Hz
means Remote control operation order.
10
2.3 Power On/Off
[
: Press Power key / Press MENU > Select Standby/Reset]
There are several ways to turn your XP1000 ON or OFF.
* Complete Power Shutdown
There is a Power Switch in the rear panel and once it is ON, you do not need to turn it on or off each time. It takes a longer time to
boot the system if you turned it off by this switch.
* Standby Mode
POWER key is normally used to turn the power of XP1000 on or off. If you press POWER, it instantly switches your XP1000 off or on.
In this mode, the system is not completely shut down and thus it takes a shorter time to turn it on and off.
* Deep Standby Mode [
: Menu > Standby/Restart > Deep Standby]
Deep Standby is used to reduce the standby power consumption. XP1000 is designed to be energy efficient and to guarantee the
power consumption to be under 1W in the deep standby mode.
3. FIRST TIME INSTALLATION (USING WIZARD)
When you turn on XP1000 for the first time after purchase, an installation wizard will begin step by step.
NOTE: OK key is used for confirmation and turns to the next step. Press EXIT key to return to the previous page.
3.2 Video Mode (Resolution)
Selection
3.1 Video Input Selection
3.3 Language Selection
XP1000 provides various languages and here you can
choose the main language for your XP1000 . Use UP/DOWN
key to scroll up and down to find the language you want.
11
4. BASIC OPERATIONS
4.1 Switching Channels
NOTE:
If channel change is not done, it is probably because
the selected channel is encrypted and you do not
have a proper smartcard.
[
: Press▲/▼, CHANNEL +/- key / Press ◀/▶ to move to
the next channels]
XP1000 offers various channel zapping methods. You can switch the
current channel by pressing
• UP/DOWN key
If you press UP or DOWN key, Channel Selection menu appears.
You can move up and down to select the channel that you want to
tune into
• LEFT/RIGHT key
If you press LEFT or RIGHT key, the previous or subsequent channel
of the current channel is tuned in.
• CHANNEL +/- key
If you press CHANNEL + or - key, this will call up the Channel
Selection menu.
• Channel Number
Enter a channel number, and it will instantly tune into the channel.
In order for you to add certain channels to this Favourites list,
1 Call up the Channel Selection list by Pressing UP or DOWN key.
2 Go to the list of All channels by pressing RED.
3 Select the channel that you want to add to the Favourites list.
4 Press MENU key on the selected channel and channel list menu appears.
5 Choose “add service to bouquet” and press OK.
6 Select “Favourites” and press OK.
7 Go to the “Favourites” list by pressing BLUE to confirm that the selected channel is correctly included in the list.
4.2 Volume Control
[
: Press VOLUME +/- key]
You can adjust the audio volume by pressing VOLUME +/- key. You can also mute or unmute the audio temporarily by pressing
MUTE key ( ).
Mute icon is on when the audio is muted.
12
4.3 Selecting Audio Track
[
: Press AUDIO key]
You can check what audio tracks are available to choose by
pressing AUDIO key.
By using UP/DOWN key and Colour key, you can select a different
audio language or Stereo sound.
NOTE: Available options on this menu will differ
depending on the service.
4.4 Subtitle
[
: Press SUBTITLE key]
You can view the subtitle of the current program if the program
provides the subtitle. Press SUBTITLE key, Subtitle selection menu
appears as below.
Available subtitles, if any, will display. By using UP/DOWN navigate
the list to select a subtitle that you want to play and press OK to
activate it.
4.5 Teletext
[
: Press TEXT key]
You can call up Teletext information by pressing TEXT key. It will
take some time to load all the information.
You can navigate through the Teletext page by using UP/DOWN
key to select a text page. Also, just simply enter the page number
that you want to read.
• MUTE key
Once you activated Teletext, you can toggle between the live mode and the Teletext page by pressing MUTE (
In this case, loading of the Teletext page takes place instantly.
• VOLUME +
If you want to enlarge the page, press VOLUME + key.
• VOLUME If you want to reduce the page size, press VOLUME - key.
13
) key instantly.
4.6 Program Information
[
: Press INFO key]
Whenever you change the channel, infobar is always displayed
for 5 seconds (default setting). Infobar is designed to provide you
comprehensive information of the channel that you are currently
watching.
4.7 Info Bar
• Press OK to call up infobar.
4.8 Electronic Program Guide (Event View)
[
: Press EPG key]
Electronic Program Guide (EPG) displays the program information
of each channel, if provided, in time and date order.
Detailed information of the current channel will be displayed on
EPG. There are four options in the EPG display.
NOTE: Press and hold EPG key for Multi-EPG.
• GREEN (Add Timer)
If you press GREEN key, Timer entry menu appears as shown left. This option is used to set up a new timer for recording or zapping.
14
- Name
Displays the name of the selected program.
- Description
Displays a short description of the selected program.
- Timer Type
• Select Zap for channel tuning reservation.
• Select Record for recording reservation.
- Repeat Type
• Select Once for one time of zapping or recording reservation.
• Select Repeated for repeated zapping or recording reservation.
• Repeats - This option is given only when you selected “Repeated” in the Repeat Type. You can reserve zapping or recording
per Daily / Weekly / Mon-Fri / User-defined.
- Date
Displays the current date. This entry is on when you selected “Repeat Type” as “once“.
- Start Time
You can set the time to begin recording or zapping.
- End Time
You can set the time to stop recording or zapping.
- Channel
This entry allows you to change the channel. Press LEFT/RIGHT key to call up Channel Selection menu. You can select a different
channel from this list using this option. To return to Timer entry menu, press EXIT.
• Multi EPG
- You can move the previous or next program within the same channel by using YELLOW (Previous)/BLUE (Next).
- You can switch to another channel by using UP/DOWN key.
- RED key is used to instantly tune into the selected channel.
- GREEN key is used to reserve recording or zapping of the selected program.
NOTE: Not all channels provide EPG information and thus in case of no EPG data, nothing will be displayed except for
the channel name.
15
4.9 Time Shift
[
: Press
key]
For your information, Timeshift is an instant recording of the current program that you are watching. Press
, it will instantly
pause the audio and video of the program, and a small window displaying elapsing time information will appear on the left upper
side of the screen as below.
In this state, Timeshifted recording is running until you press either PLAY or PAUSE again. You can restart viewing of the program.
If you want to stop Timeshifted recording and to return to the live mode, press
You will be asked of Yes or No to stop Timeshift.
key.
NOTE:
What is different from normal recording is that Timeshifted recording is not meant to be stored on HDD.
If you stop Timeshift, you cannot replay the Timeshifted recording.
4.10 Recording
XP1000 is a Personal Video Recorder with an integrated DVB-S2 tuner. There are two ways to operate and manage recording.
1 Instant Recording
[
: Press REC key]
Press REC key to start the recording of the current program.
Five recording options are given.
- Add recording (stop after current event)
This option is used when you want to end recording when the
current program ends.
- Add recording (indefinitely)
This option is used when you want to keep recording running
without a specific end time. Recording will continue unless you
stop it.
- Add recording (enter recording duration)
This option is used when you want to manually set the length of recording by entering a certain number as below:
- Add recording (enter recording end time)
This option is used when you want to define a certain date and time when the recording is to stop.
- Exit
This option is used to exit from this menu without recording.
16
2 Recording by Timer
You can manage recording process using Timer List menu. Press
MENU and select Timer on the menu.
In this menu, color keys are assigned for each different function.
- RED (Delete)
This option is used to delete a timer.
- GREEN (Add)
This option is used to add a timer.
- YELLOW (Disable)
This option is used to disable the timer and X mark will appear.
[
NOTE: if you want to enable the disabled timer,
press YELLOW again.
: Press MENU key > Select Timer]
- BLUE (Cleanup)
This option is used to remove those finished timers from the Timer List.
NOTE: Make sure that the HDD on your XP1000 has enough free space available for recording. If the free space on the
HDD is not sufficient, recording might stop before the defined end time.
3 Stop Recording
[
: Press REC key > Select “Stop Recording”]
4.11 Recording Play
[
: Press FILE LIST key]
You can view recorded files on the Recorded files menu. Press FILE
LIST to activate this menu.
Select the file that you want to play. It will instantly replay the file
and display the recording infobar.
This infobar gives you the following information of the recording.
1 Title of the recording
2 Remaining time
3 Progressive bar
4 Elapsed time
17
4.12 Managing Recording Files
[
: Press FILE LIST key > Press MENU key]
If you want to delete a recording file, press MENU key while
Recorded file menu is on.
Select “Delete” and confirm OK to delete.
4.13 Media Player
[
: MENU > Plugins > Media Player]
XP1000 is a multimedia receiver capable of playing media contents.
Using Media Player, you can enjoy Music, Photo and Video contents
stored on the external HDD and/or a USB memory stick plugged
into XP1000.
If you play Media Player, the following player will appear.
1. Go into any directory of the HDD or plugged USB.
2. Select a file to play and press OK
* Supported formats are mainly JPG, MP3, AVI, etc.
3. In the same way, you can play the recording files stored on the
HDD.
4.14 Plug-ins
[
: MENU > Plugins]
XP1000 is integrated with standard 10/100Mbps Ethernet with RJ
45 connector. You are recommended to use this network capability
of XP1000 to fully enjoy the system. If your XP1000’s network
connection is established, you can directly download plug-ins from
a designated website of XP1000 .
1 Press MENU and select Plugins menu to active Plugin browser.
2 Press GREEN key to download a list of plug-ins available.
3 Once the download is done, a list of plug-ins will be displayed.
4 Select a plug-in to download.
5 You can check if the download is done properly on the Plugin
browser.
From this site, you can check available plug-ins to download.
18
4.15 Sleep Timer
[
: MENU > Power Management > Sleep Timer]
You can set a specific time when your XP1000 goes into Standby
mode or Deep Standby mode, using this menu. Three colour keys
are used to set up this sleep timer.
1 RED
This option is used to enable or disable Sleep Timer.
2 GREEN
This option is used to choose between Standby mode and Deep
Standby mode.
3 YELLOW
This option is used to choose whether to be asked of confirmation
before system shutdown.
3 BLUE
This option is used to use time of currently running service.
5. MENU
5.1 TOP Main
XP1000 is a very sophisticated device designed to allow users a variety of System Settings options as detailed as possible. You can
fine-tune your XP1000 to be your OWN system to fit your taste. This chapter will guide you through the entire menu of system
configuration.
[
: Press MENU]
The main menu of XP1000 consists of the following sub menus.
- Timer
Enables you to reserve program watching and recording.
- VCR scart
Switches to VCR scart connection.
NOTE: If your XP1000 is not connected to VCR scart, the
screen will go black. In this state, just press EXIT to
return to the previous state.
- Information
Has two sub menus for Service / About. Service menu provides the detailed information of the current channel. About menu
provides the detailed information of the H/W and S/W system of your XP1000. For more information, please refer to the Information
section.
- Plugins
Activates Plugin browser of XP1000. Using this browser, you can log onto the designated website and you can download a variety
of new plug-ins.
- Setup
Provides all of the System Settings. For more information, please refer to the next section.
- Power Management
Provides options for power on/off and sleep timer. For more information, please refer to the Power On/Off section.
19
5.2 Setup
Setup menu consists of the following sub-menus.
1 System Settings
2 Service Searching
3 Common Interface
4 Parental Control
5 Factory Reset
6 Software Update
5.2.1 System Settings
5.2.1.1 Audio/Video
[
: MENU > Setup > System Settings > Audio/Video]
Here you will find options necessary to set up the audio and
video configuration of your XP1000.
NOTE: RED is for cancel and GREEN is for OK. OK key of
RCU is not working in this mode.
Amongst the parameters given in this menu, the following ones are generally what you need to decide for the audio and video.
1 Video output
Here you need to decide which video output you want to use between your TV and XP1000 . The available options are as below.
• HDMI
• SCART
2 Resolution
You need to decide which resolution to use.
3 Downmix
YES is used when you want to set the audio output to be down-mixed to Stereo. NO is used when you do not want to set the audio
output to be down-mixed to Stereo. This option is recommended when you are using S/PDIF connection.
5.2.1.2 Other settings
[
: MENU > Setup > System Settings > Other Settings]
In this menu you will find various customization options and
this menu can be displayed in three different
formats: Simple, Intermediate, and Expert.
NOTE: RED is for cancel and GREEN is for OK. OK key of
RCU is not working in this mode.
Amongst the options given in this menu, the following ones
are generally what you may need to know.
20
5.2.1.3 Network Setup
[
: MENU > Setup > System Settings > Network Setup]
XP1000 is integrated with standard 10/100Mbps Ethernet
with RJ 45 connector standard. You are recommended to use
this network capability of XP1000 to fully enjoy the system.
You can set up the network settings through this Network
Configuration menu.
In the Network Configuration menu, you will see five sub
menus as follows:
1 Adapter settings
Use Interface
YES is used to activate the Ethernet. If you set this option at NO,
the Ethernet will not work.
Use DHCP
YES is used to use DHCP (Dynamic Host Configuration
Protocol). If you set this option at YES, it will automatically
detect the correct IP address. NO is used when you want to use
a certain fixed IP address. In this case, you need to enter correct
addresses in each field.
2 Nameserver settings
This option is required if you selected not to use DHCP. You need to enter the address of the Nameserver.
3 Network test
When you are not sure whether the network configuration has been done correctly or not, you can run this test.
4 Restart Network
This option is used when you want to reboot the Ethernet of your XP1000 .
5.2.1.4 Language Selection
5.2.1.5 Time zone
[
: MENU > Setup > System Settings > Language]
A variety of languages are available for the OSD of XP1000.
[
: MENU > Setup > System Settings > Timezone]
You can set your time zone in this menu.
Using LEFT/RIGHT key, you can find a time zone that you
want to use for your XP1000. After selecting a time zone,
press GREEN to confirm and save the changed setting.
21
5.2.1.6 Hard Disk Set Up
[
: MENU > Setup > System Settings > Hard drive > Hard
drive Setup]
You can set the duration of time after which HDD is to be put
into standby mode.
Here, you can choose from No standby to various duration.
Once you set this option, press GREEN key to confirm the
change.
5.2.2 Service Searching
5.2.2.1 Tuner Configuration
[
: MENU > Setup > Service Searching > Tuner
Configuration]
If you run the First Time Installation process, the Tuner A is
already configured.
5.2.2.2 Automatic Scan
[
: MENU > Setup > Service Searching > Automatic Scan]
The easiest way to scan services is to use Automatic Scan. In
the Automatic Scan menu, there are two options to choose
from as below.
• Clear Before Scan
YES is used when you want to delete the existing channel list
before you start the automatic scan. If you want to keep the
existing list, select NO.
• Scan Tuner A (DVB-S2)
Press OK to activate the automatic scan. This will take some
minutes. As the scan proceeds, you will see the progressive
bar and the newly found services underneath.
22
5.2.2.3 Manual Scan
[
: MENU > Setup > Service Searching > Manual Scan]
If you know well enough to configure each exact setting
required for manual search of services, you can do manual
scan as well. There are many parameter values that you need to
decide as below.
Amongst other things, the below parameters are what you
need to decide prior to performing manual scan.
1 Tuner
You need to decide which tuner you want to use for manual
scan.
2 System Settings
Here you have two options between DVB-S (SD) and DVB-S2 (HD).
3 Frequency
You need to enter the exact frequency of the transponder that you want to scan.
4 Symbol Rate
You need to enter the exact symbol rate of the transponder that you want to scan.
5 Polarization
Here, you have options for Horizontal, Vertical, Circular Left and Circular Right. You need to know the polarity of the transponder
that you want to scan.
6 FEC (Forward Error Correction)
You need to enter the exact FEC value of the transponder that you want to scan.
7 Network Scan
Here you have two options for YES and NO. NO is used to scan the transponder (TP) based on the data that your XP1000 currently
has. YES is used to scan the TP not just based on the existing TP data but also using new TP data, if there is TP data newly
transported from the TP. Naturally, YES option takes longer while it may results in a better scan result.
8 Clear Before Scan
YES is used when you want to delete the existing channel list before you start the automatic scan. If you want to keep the existing
list, select NO.
9 Only Free Scan
Here you have two options for NO and YES. If you want to scan only Free to Air channels without any encryption, select YES.
Otherwise, select NO to scan all FTA and CAS channels.
Press OK to activate the manual scan. This will take some minutes. As the scan proceeds, you will see the progressive bar and the
newly found services underneath.
5.2.2.4 Fast Scan
[
: MENU > Setup > Service Searching > Fast Scan]
In case there are service lists available for certain satellites,
for example, Astra or Hotbird, you can install the lists in the
channel list of your XP1000.
If default service lists are not available, you can run the
service scan automatically or manually to add TV and radio
channels to the channel list of your XP1000.
23
5.2.3 Checking CAM
[
: MENU > Setup > CI > Common Interface]
To be able to watch CAS channels, you need to have a proper
CAM and a Smartcard. XP1000 is integrated with a Common
Interface slot and two Smartcard slots.
If you have inserted CAM, you can check the information of
the inserted CAM, through this menu as below:
5.2.4 Parental Control
[
: MENU > Setup > Parental Control]
If you want to prevent certain channels from being accessed
by others, you can do so using this menu.
1 Go to Parental Control menu by pressing MENU > Setup >
Parental Control.
2 Set the parental control option at YES using LEFT/RIGHT
key. The menu will change as below.
Protect setup
If you set this option at YES, you will be asked to enter PIN code when you enter this Parental
setup menu.
Change setup pin
If you want to change the existing PIN code for Parental setup, you can do so using this menu.
You need to enter a new PIN code twice.
Protect services
You need to set this option at YES, if you want to lock certain channels with PIN code.
This option will be activated only if you set Protect services at YES. Here there are two options:
- White list: This option is used to block all channels except those
channels in the parental control list.
- Black list: This option is used to block only those channels included in the parental control list.
24
Change service pin
Here you can define a PIN code required to change services to
be included in the parental control list.
NOTE: PIN code here is used for Change service and thus you
are recommended to use a PIN code different from
that used for Protect services.
5.2.5 Factory Reset
[
: MENU > Setup > Factory Reset]
If you want to erase all installed service list as well as all
configurations, run the Factory Reset process. Select YES in
the below menu to run the factory reset.
Upon the completion of factory reset process, your XP1000
will reboot automatically and start the First Time Installation
process.
NOTE:
If you do this factory reset, all of your configuration data
including bouquets, service lists, satellite parameters, and so
on will be erased.
5.2.6 Software Update
XP1000 can be updated in two ways. Firstly, you can update XP1000 software by going into Menu > Setup > Software Update. You
can also try USB update as in the following step.
Step1: Download new software image from www.xp-support.tv.
Step2: Extract new software image using winrar, winzip or other extracting tool and copy on a USB stick. All files shall be under
/XP1000 directory.
/xp1000/kernel.bin
/xp1000/rootfs.bin
/xp1000/imageversion
/xp1000/noforce
Step3: Power down the XP1000 by the power switch.
Step4: Place USB stick in the USB slot at the rear side of the XP1000.
Step5: Power up the XP1000 by the power switch. Then, the record LED and standby LED will become red.
Step6: After about 3 seconds, open the front panel cover and press CH+ button to start USB update.
Step7: The standby LED will become purple and record LED is still on, this indicates that update is ongoing.
Step8: Wait couple of minutes till the standby LED will become blue.
Your box is now updated with a “clean” factory default image.
Note: If the box does not start USB update in Step6, press CH+ button earlier.
25
5.3 Information
5.3.1 Service Information
[
: MENU > Information > Service]
In this menu, you can see the service information of the
current channel such as service name, service provider and
video format & size.
5.3.2 Checking H/W & S/W Information
[
: MENU > Information > About]
This menu is for you to check the current system of your
XP1000. You can see the following information:
1 S/W version
2 Detected NIMs for Tuner A
3 Detected HDD
6. REMOTE CONTROL UNIT (RCU) SETUP
In order to use the universal remote control feature, you must correctly setup for TV control. This section explains how to setup the
universal remote control. For the setting up, we have presented the list of supported TV codes.
6.1 Setting up as a TV Remote Control
When you press TV button, supplied remote control unit is working as TV remote controller. To do this, you have to setup with
corresponding TV codes. Valid buttons at TV mode are Power, Volume +/-, Mute, TV (for switching sources), Menu, numeric keys (0~9),
directional buttons (up/down/left/right) and colour buttons (Red/Green/Yellow/Blue).
6.1.1 4-digit Setting Method
1. Power on TV using TV power button or TV remote control.
From this step all further remote controls should be done using the universal remote control and the remote control should be
directed towards the TV.
2. Press and hold the TV button more than 3 seconds. Then, two LED lamps from TV and STB buttons are flickering. Release the TV
button. Then, LED lamp from the TV button is flickering.
3. Enter 4 digits with reference to the “TV Brand List” section. If 4-digit code is in the list, LED lamp from the TV button will flicker 3
times and corresponding 4-digit code is stored. Otherwise, TV LED lamp will turn off and 4-digit code is not stored.
NOTE: In case that the POWER ( ) button for TV is working but other important keys are not working, then repeat the
above procedure or follow “Smart Scan Method”.
26
6.1.2 Smart Scan Method
1. Power on TV using TV power button or TV remote control.
From this step all further remote controls should be done using the universal remote control and the remote control should be
directed towards the TV.
2. Press and hold the TV button more than 3 seconds. Then, two LED lamps from TV and STB buttons are flickering. Release the TV
button. Then, LED lamp from the TV button is flickering.
3. Press ▲ (up) or ▼ (down) button until TV turns off.
4. Once TV turns off, press OK button to store current setting. Then TV LED lamp will flicker 3 times and corresponding 4-digit code is
stored.
In case that the POWER ( ) button for TV is working but other important keys are not working, then follow the above
procedure again to set different code.
6.1.3 Changing Factory Default Status
By default, remote control unit is supplied with volume-unlocked, channel-locked and master power reset status. However, you can
change lock status or set/reset status by following procedures.
6.1.3.1 Volume Key
Volume-unlocked status:
- In TV mode, volume related buttons (Volume +/-, Mute) are only working for TV.
- In STB mode, they are only working for STB.
Volume-locked status:
- Regardless of modes (TV or STB mode), volume related buttons (Volume +/-, Mute) are only working for TV.
How to set Volume-Locked status:
1. Press and hold the STB button more than 3 seconds.
2. If Vol+ button is pressed and then released, STB LED will be turned off and on.
3. Then, press Vol- button and release.
4. Press and release TV button to change the status. Then STB LED lamp will flicker 3 times.
How to set Volume-Unlocked status:
1. Press and hold the STB button more than 3 seconds to enter STB setting mode.
2. If Vol+ button is pressed and then released, STB LED will be turned off and on.
3. Then, press Vol- button and release.
4. Press and release STB button to change the status. Then STB LED lamp will flicker 3 times.
6.1.3.2 Channel Key
Channel-unlocked status:
- In TV mode, channel related buttons (CH+/-) are only working for TV.
- In STB mode, they are only working for STB.
Channel-locked status:
- Regardless of modes (TV or STB mode), channel related buttons (CH+/-) are only working for STB.
How to set Channel-Locked/Unlocked status (Locked/Unlocked status is toggled each other):
1. Press and hold the STB button more than 3 seconds to enter STB setting mode.
2. If CH+ button is pressed and then released, STB LED will be turned off and on.
3. Then, press CH- button and release.
4. Press and release OK button to change the status. Then STB LED lamp will flicker 3 times.
27
6.1.3.3 Master Power
Master Power Reset:
- In TV mode, power button is only working for TV power.
- In STB mode, they are only working for STB power.
Master Power Set:
- Power button is working both for TV and STB power.
How to reset Master Power
1. Press and hold the STB button more than 3 seconds to enter STB setting mode.
2. Press and release POWER (
) button. STB LED lamp will be turned off.
3. Press and release STB button.
4. Press and release POWER (
) button. Then STB LED lamp will flicker 3 times.
How to set Master Power
1. Press and hold the STB button more than 3 seconds to enter STB setting mode.
2. Press and release POWER (
) button. STB LED lamp will be turned off.
3. Press and release STB button.
4. Press and release TV button.
5. Press and release POWER (
) button. Then STB LED lamp will flicker 3 times.
6.2 Supported TV Brand List
Please refer to the appendix.
7. COPYRIGHT – GNU GPL
GNU GENERAL PUBLIC LICENSE
Version 2, June 1991
Copyright (C) 1989, 1991 Free Software Foundation, Inc.
51 Franklin Street, Fifth Floor, Boston, MA 02110-1301, USA
Everyone is permitted to copy and distribute verbatim copies of this license document, but changing it is not allowed.
Preamble
The licenses for most software are designed to take away your freedom to share and change it. By contrast, the GNU General Public
License is intended to guarantee your freedom to share and change free software-to make sure the software is free for all its users.
This General Public License applies to most of the Free Software Foundation’s software and to any other program whose authors
commit to using it. (Some other Free Software Foundation software is covered by the GNU Lesser General Public License instead.)
You can apply it to your programs, too.
When we speak of free software, we are referring to freedom, not price. Our General Public Licenses are designed to make sure that
you have the freedom to distribute copies of free software (and charge for this service if you wish), that you receive source code or
can get it if you want it, that you can change the software or use pieces of it in new free programs; and that you know you can do
these things.
To protect your rights, we need to make restrictions that forbid anyone to deny you these rights or to ask you to surrender the rights.
These restrictions translate to certain responsibilities for you if you distribute copies of the software, or if you modify it.
For example, if you distribute copies of such a program, whether gratis or for a fee, you must give the recipients all the rights that
you have. You must make sure that they, too, receive or can get the source code. And you must show them these terms so they know
their rights.
We protect your rights with two steps: (1) copyright the software, and (2) offer you this license which gives you legal permission to
copy, distribute and/or modify the software.
28
Also, for each author’s protection and ours, we want to make certain that everyone understands that there is no warranty for this
free software. If the software is modified by someone else and passed on, we want its recipients to know that what they have is not
the original, so that any problems introduced by others will not reflect on the original authors’ reputations.
Finally, any free program is threatened constantly by software patents. We wish to avoid the danger that redistributors of a free
program will individually obtain patent licenses, in effect making the program proprietary. To prevent this, we have made it clear
that any patent must be licensed for everyone’s free use or not licensed at all.
The precise terms and conditions for copying, distribution and modification follow.
TERMS AND CONDITIONS FOR COPYING, DISTRIBUTION AND MODIFICATION
0. This License applies to any program or other work which contains a notice placed by the copyright holder saying it may be
distributed under the terms of this General Public License. The “Program”, below, refers to any such program or work, and a “work
based on the Program” means either the Program or any derivative work under copyright law: that is to say, a work containing the
Program or a portion of it, either verbatim or with modifications and/or translated into another language. (Hereinafter, translation is
included without limitation in the term “modification”.) Each licensee is addressed as “you”.
Activities other than copying, distribution and modification are not covered by this License; they are outside its scope. The act of
running the Program is not restricted, and the output from the Program is covered only if its contents constitute a work based on
the Program (independent of having been made by running the Program). Whether that is true depends on what the Program does.
1. You may copy and distribute verbatim copies of the Program’s source code as you receive it, in any medium, provided that you
conspicuously and appropriately publish on each copy an appropriate copyright notice and disclaimer of warranty; keep intact all
the notices that refer to this License and to the absence of any warranty; and give any other recipients of the Program a copy of this
License along with the Program.
You may charge a fee for the physical act of transferring a copy, and you may at your option offer warranty protection in exchange
for a fee.
2. You may modify your copy or copies of the Program or any portion of it, thus forming a work based on the Program, and copy and
distribute such modifications or work under the terms of Section 1 above, provided that you also meet all of these conditions:
a) You must cause the modified files to carry prominent notices stating that you changed the files and the date of any change.
b) You must cause any work that you distribute or publish, that in whole or in part contains or is derived from the Program or any
part thereof, to be licensed as a whole at no charge to all third parties under the terms of this License.
c) If the modified program normally reads commands interactively when run, you must cause it, when started running for such
interactive use in the most ordinary way, to print or display an announcement including an appropriate copyright notice and
a notice that there is no warranty (or else, saying that you provide a warranty) and that users may redistribute the program under
these conditions, and telling the user how to view a copy of this License. (Exception: if the Program itself is interactive but does
not normally print such an announcement, your work based on the Program is not required to print an announcement.)
These requirements apply to the modified work as a whole. If identifiable sections of that work are not derived from the Program,
and can be reasonably considered independent and separate works in themselves, then this License, and its terms, do not apply to
those sections when you distribute them as separate works. But when you distribute the same sections as part of a whole which
is a work based on the Program, the distribution of the whole must be on the terms of this License, whose permissions for other
licensees extend to the entire whole, and thus to each and every part regardless of who wrote it. Thus, it is not the intent of this
section to claim rights or contest your rights to work written entirely by you; rather, the intent is to exercise the right to control the
distribution of derivative or collective works based on the Program. In addition, mere aggregation of another work not based on the
Program with the Program (or with a work based on the Program) on a volume of a storage or distribution medium does not bring
the other work under the scope of this License.
3. You may copy and distribute the Program (or a work based on it, under Section 2) in object code or executable form under the
terms of Sections 1 and 2 above provided that you also do one of the following:
a) Accompany it with the complete corresponding machine-readable source code, which must be distributed
under the terms of Sections 1 and 2 above on a medium customarily used for software interchange; or,
b) Accompany it with a written offer, valid for at least three years, to give any third party, for a charge no
more than your cost of physically performing source distribution, a complete machine-readable copy of
the corresponding source code, to be distributed under the terms of Sections 1 and 2 above on a medium customarily used for
software interchange; or,
29
c) Accompany it with the information you received as to the offer to distribute corresponding source code. (This alternative is
allowed only for noncommercial distribution and only if you received the program in object code or executable form with such
an offer, in accord with Subsection b above.)
The source code for a work means the preferred form of the work for making modifications to it. For an executable work, complete
source code means all the source code for all modules it contains, plus any associated interface definition files, plus the scripts used
to control compilation and installation of the executable. However, as a special exception, the source code distributed need not
include anything that is normally distributed (in either source or binary form) with the major components (compiler, kernel, and so
on) of the operating system on which the executable runs, unless that component itself accompanies the executable.
If distribution of executable or object code is made by offering access to copy from a designated place, then offering equivalent
access to copy the source code from the same place counts as distribution of the source code, even though third parties are not
compelled to copy the source along with the object code.
4. You may not copy, modify, sublicense, or distribute the Program except as expressly provided under this License. Any attempt
otherwise to copy, modify, sublicense or distribute the Program is void, and will automatically terminate your rights under this
License. However, parties who have received copies, or rights, from you under this License will not have their licenses terminated so
long as such parties remain in full
compliance.
5. You are not required to accept this License, since you have not signed it. However, nothing else grants you permission to modify
or distribute the Program or its derivative works. These actions are prohibited by law if you do not accept this License. Therefore, by
modifying or distributing the Program (or any work based on the Program), you indicate your acceptance of this License to do so,
and all its terms and conditions for copying, distributing or modifying the Program or works based on it.
6. Each time you redistribute the Program (or any work based on the Program), the recipient automatically receives a license from
the original licensor to copy, distribute or modify the Program subject to these terms and conditions. You may not impose any
further restrictions on the recipients’ exercise of the rights granted herein. You are not responsible for enforcing compliance by third
parties to this License.
7. If, as a consequence of a court judgment or allegation of patent infringement or for any other reason (not limited to patent issues),
conditions are imposed on you (whether by court order, agreement or otherwise) that contradict the conditions of this License, they
do not excuse you from the conditions of this License. If you cannot distribute so as to satisfy simultaneously your obligations under
this License and any other pertinent obligations, then as a consequence you may not distribute the Program at all. For example, if
a patent license would not permit royalty-free redistribution of the Program by all those who receive copies directly or indirectly
through you, then the only way you could satisfy both it and this License would be to refrain entirely from distribution of the
Program.
If any portion of this section is held invalid or unenforceable under any particular circumstance, the balance of the section is
intended to apply and the section as a whole is intended to apply in other circumstances. It is not the purpose of this section to
induce you to infringe any patents or other property right claims or to contest validity of any such claims; this section has the sole
purpose of protecting the integrity of the free software distribution system, which is implemented by public license practices. Many
people have made generous contributions to the wide range of software distributed through that system in reliance on consistent
application of that system; it is up to the author/donor to decide if he or she is willing to distribute software through any other
system and a licensee cannot impose that choice.
This section is intended to make thoroughly clear what is believed to be a consequence of the rest of this License.
8. If the distribution and/or use of the Program is restricted in certain countries either by patents or by copyrighted interfaces,
the original copyright holder who places the Program under this License may add an explicit geographical distribution limitation
excluding those countries, so that distribution is permitted only in or among countries not thus excluded. In such case, this License
incorporates the limitation as if written in the body of this License.
9. The Free Software Foundation may publish revised and/or new versions of the General Public License from time to time. Such new
versions will be similar in spirit to the present version, but may differ in detail to address new problems or concerns.
Each version is given a distinguishing version number. If the Program specifies a version number of this License which applies to
it and “any later version”, you have the option of following the terms and conditions either of that version or of any later version
published by the Free Software Foundation. If the Program does not specify a version number of this License, you may choose any
version ever published by the Free Software Foundation.
30
10. If you wish to incorporate parts of the Program into other free programs whose distribution conditions are different, write to
the author to ask for permission. For software which is copyrighted by the Free Software Foundation, write to the Free Software
Foundation; we sometimes make exceptions for this. Our decision will be guided by the two goals of preserving the free status of all
derivatives of our free software and of promoting the sharing and reuse of software generally.
NO WARRANTY
11. BECAUSE THE PROGRAM IS LICENSED FREE OF CHARGE, THERE IS NO WARRANTY FOR THE PROGRAM, TO THE EXTENT PERMITTED
BY APPLICABLE LAW. EXCEPT WHEN OTHERWISE STATED IN WRITING THE COPYRIGHT HOLDERS AND/OR OTHER PARTIES PROVIDE
THE PROGRAM “AS IS” WITHOUT WARRANTY OF ANY KIND, EITHER EXPRESSED OR IMPLIED, INCLUDING, BUT NOT LIMITED
TO, THE IMPLIED WARRANTIES OF MERCHANTABILITY AND FITNESS FOR A PARTICULAR PURPOSE. THE ENTIRE RISK AS TO THE
QUALITY AND PERFORMANCE OF THE PROGRAM IS WITH YOU. SHOULD THE PROGRAM PROVE DEFECTIVE, YOU ASSUME THE COST
OF ALL NECESSARY SERVICING, REPAIR OR CORRECTION.
12. IN NO EVENT UNLESS REQUIRED BY APPLICABLE LAW OR AGREED TO IN WRITING WILL ANY COPYRIGHT HOLDER, OR ANY
OTHER PARTY WHO MAY MODIFY AND/OR REDISTRIBUTE THE PROGRAM AS PERMITTED ABOVE, BE LIABLE TO YOU FOR DAMAGES,
INCLUDING ANY GENERAL, SPECIAL, INCIDENTAL OR CONSEQUENTIAL DAMAGES ARISING OUT OF THE USE OR INABILITY TO USE
THE PROGRAM (INCLUDING BUT NOT LIMITED TO LOSS OF DATA OR DATA BEING RENDERED INACCURATE OR LOSSES SUSTAINED
BY YOU OR THIRD PARTIES OR A FAILURE OF THE PROGRAM TO OPERATE WITH ANY OTHER PROGRAMS), EVEN IF SUCH HOLDER OR
OTHER PARTY HAS BEEN ADVISED OF THE POSSIBILITY OF SUCH DAMAGES. END OF TERMS AND CONDITIONS
8. TROUBLESHOOTING
Before you contact your local service centre, please read the following tips carefully.
NOTE: if the antenna is covered with snow or the RF signal is weakened by heavy rain, the quality of audio and video may become
temporarily poor. If you experience poor audio and video quality due to bad weather conditions, please check if your satellite
antenna is oriented in the original direction. And see if it is covered by snow. Also, check if your LNB is not damaged.
1. No video on TV
• Check first if the product is powered on and in operation mode.
• Check if the video cable is properly connected between TV and XP1000.
• Check if the satellite cable is properly connected to XP1000.
• Check if the selected channel is currently on air.
• Check if the selected channel is encrypted and if you have a corresponding access smartcard.
2. Problem with audio quality
• Check if your audio cable is connected correctly.
• Check the volume level of your TV and the product.
• Check if the product or TV is on mute.
• Check the audio option if it is correctly selected for the program that you are currently watching.
3. Remote control problem
• Check if the batteries are correctly mounted.
• If your remote control has been used for long, change the batteries.
• Point the remote control directly toward the product.
• Make sure that nothing blocks the front panel display.
4. Channel search problem
• Make sure if tuner configurations are all correctly made.
• Check if the antenna cable(s) are properly connected.
5. Encrypted channel viewing problem
• Check if you have the appropriate Smartcard and/or CAM.
• Take the Smartcard and CAM out and re-insert them to re-initialize.
• Check if your system correctly detects the smartcard and CAM.
6. Recording problem
• Check if the HDD has a sufficient space for recording.
• Check if there is a conflict between recording timers.
7. Noise
• XP1000 has an integrated FAN. This may create a noise but is inevitable to make sure the safety of the product.
• Also, when HDD is running, you may hear a noise.
31
Inhalt
1. EINFÜHRUNG............................................................................. 34
1.1 Sicherheitshinweise.................................................................. 34
1.2 Verpackungsinhalt................................................................... 35
1.3 Produktbeschreibungen....................................................... 36
1.4 CI-Slot für Common Interface Module............................. 37
1.5 Fernbedienung.......................................................................... 38
1.6 Hauptmerkmale........................................................................ 39
1.7 Technische Daten..................................................................... 39
1.7.1 Grundlegendemerkmale............................................ 39
1.7.2 Grundfuktionen............................................................ 40
2. INBETRIEBNAHME DES XP1000....................................... 41
2.1 Anschließen am TV................................................................. 41
2.1.1 Anschluß am Fernsehgerät über HDMI............... 42
2.1.2 Anschluß am Fernsehgerät über Scart-Kabel... 42
2.2 Anschließen an die Stromversorgung............................. 42
2.3 Ein/Aus........................................................................................ 43
3. STARTASSISTENT.................................................................... 43
3.1 Einstellung Videoformat....................................................... 43
3.2 Einstellung Bildauflösung.................................................... 43
3.3 Spracheinstellungen.............................................................. 43
4. GRUNDLEGENDEBEDIENUNG........................................
4.1 Programwahl...........................................................................
4.2 Lautstärke regulieren...........................................................
4.3 Änderung der Audiosprache.............................................
4.4 Untertitel..................................................................................
4.5 Teletext......................................................................................
4.6 Programminfomationen.....................................................
4.7 Info Bar......................................................................................
4.8 Electronic Program Guide (EPG-Programmführer)...
4.9 Time Shift ( Zeitversetztes Fernshen)............................
4.10 Aufnahme.............................................................................
4.11 Aufzeichnung abspielen..................................................
4.12 Hauptaufnahme Dateien.................................................
4.13 Media Player.........................................................................
4.14 Plug-ins..................................................................................
4.15 Sleep Timer...........................................................................
44
44
44
45
45
45
46
46
46
48
48
49
50
50
50
51
33
5. MENÜ........................................................................................ 51
5.1 Hauptmenü............................................................................ 51
5.2 Setup........................................................................................ 52
5.2.1 Systemeinstellungen.............................................. 52
5.2.2 Sendersuche.............................................................. 54
5.2.3 Überprüfen CAM...................................................... 56
5.2.4 Jugendschutz............................................................ 56
5.2.5 Werkseinstellungen................................................. 57
5.3 Information............................................................................ 58
5.3.1 Serviceinformation................................................. 58
5.3.2 Überprüfen H/W & S/W Informationen........... 58
6. FERNBEDIENUNG EINRICHTEN...................................
6.1 Unterstützte TV-Marken Liste........................................
6.2 Einrichten als TV Fernbedienung..................................
6.3 4-Stellige Code Eingabe...................................................
58
58
58
58
7. COPYRIGHT-GNU GPL........................................................ 59
8. FEHLERBEHEBUNG.............................................................. 63
ANHANG........................................................................................ 64
1. EINFÜHRUNG
1.1 Sicherheitshinweise
XP1000 wurde gemäß den Anforderungen der Europäischen Union für Verbrauchersicherheit entworfen und gefertigt.
Bitte lesen Sie die folgenden Sicherheitshinweise sorgfältig durch.
1. Anschließen der Stromversorgung
• Dieses Produkt arbeitet ausschließlich im Bereich von AC 100V ~ 250V und 50Hz/60Hz. Bitte überprüfen Sie zuerst Ihre
Stromversorgung ob es in diesem Bereich passt.
• Berücksichtigen Sie bitte, dass Sie das Gerät vom Stromnetz trennen, bevor Sie Wartungs-oder Installationsarbeiten durchführen.
• Stellen Sie sicher, dass sich das Netzkabel in einer Position befindet, wo es leicht vom Netz trennen lässt im Notfall.
2. Überlastung
• Überlasten Sie nicht die Steckdose, Verlängerungskabel oder Adapter, da diese elektrische Feuer oder Stromschläge verursachen
können.
3. Flüssigkeit
• Dieses Produkt ist nicht wasserdicht und sollte weder Tropf noch Spritzwasser oder jede Art von Flüssigkeit ausgesetzt werden..
• Keine Gegenstände mit Flüssigkeit wie Vasen auf das Gerät gestellen.
• Bitte nicht das Produkt mit einem feuchten Tuch reinigen, dies kann einen Kurzschluss verursachen.
• Keine nassen Gegenstände in die Nähe des Produkts platzieren.
4. Lüftung
• Lassen Sie genügend Platz zwischen dem Gerät und anderen Objekten, um sicherzustellen, das die Belüftung des Produktes
gewährleistet wird.
• Blockieren Sie nicht die Oberseite oder Rückseite des Geräts mit einem Objekt, dies wird die Lüftungsöffnungen schließen und
führen zu einer hohen Temperatur des Systems. Dies kann zu einem Ausfall des Produkts führen.
• Stellen Sie keine anderen elektronischen Geräte auf der Oberseite des Geräts.
• Stecken Sie keine Art von spitzen Gegenständen wie Schrauben, Bohrer, etc. in die Lüftungsöffnungen des Produkts. Dies wird das
Produkt beschädigt.
5. Anschließen des Satellite Kabels.
• Ziehen Sie den Netzstecker des Produkts, bevor Sie das Satelliten-Kabel mit dem Gerät verbinden. Andernfalls kann es zu
Beschädigungen des LNB führen.
6. Erdung
• Das LNB-Kabel muss geerdet werden. Das Erdungssystem muss dem SABS 061 entsprechen
7. Ort
• Stellen Sie das Gerät Innen auf.
• Setzen Sie das Gerät nicht direkter Sonnenbestrahlung, Blitzen oder Regen aus
• Stellen Sie das Produkt nicht in der Nähe von Hitzequellen wie Heizkörpern auf.
• Stellen Sie sicher, dass es mehr als 10 cm Abstand von allen elektrischen Geräten & Wänden hat
8. Blitz, Sturm oder nicht in Gebrauch.
• Trennen Sie das Gerät und ziehen Sie das Antennenkabel während eines Gewitters oder Blitzschlag, vor allem wenn es
unbeaufsichtigt für eine lange Zeit ist. Dies wird mögliche Schäden aus Überspannungen oder Blitzschlag verhindern.
9. Austausch von Teilen
• Austausch von Teilen, insbesondere von jemandem der kein qualifizierter Techniker ist,kann zu Schäden am Produkt führen.
• Sicherzustellen ist wenn Umbauten notwendig sind, beauftragen sie einen qualifizierte Techniker die Aufgabe zu übernehmen.
10. Hard Disk Drive • Bewegen Sie nicht das Produkt oder schalten Sie das Gerät plötzlich aus, während die Festplatte (HDD) noch läuft. Dies kann zu
Schäden an der Festplatte und damit dam System führen.
• Das Unternehmen haftet nicht für Beschädigung von Daten auf der Festplatte durch fahrlässige Behandlung oder Missbrauch die
von Benutzern verursacht werden.
34
11. Batterie
• Achten Sie bitte darauf, dass die Batterien Ihrer Fernbedienung keiner Hitze ausgesetzt werden dürfen, da sie sonst explodieren
könnten.
• Ersetzen Sie die Batterien nur durch denselben oder einen gleichwertigen Typ.
12. Entsorgungshinweise
Dieses Produkt darf am Ende seiner Lebensdauer nicht über den normalen Haushaltsabfall
entsorgt werden, sondern muss an einem Sammelpunkt für das Recycling von elektrischen
und elektronischen Geräten abgegeben werden.
Das Symbol auf dem Produkt, der Gebrauchsanleitung oder der Verpackung weist dar- auf hin. Die Werkstoffe sind gemäß ihrer
Kennzeichnung wieder verwertbar. Mit der Wiederverwendung, der stofflichen Verwertung oder anderen Formen der Verwertung
von Altgeräten leisten Sie einen wichtigen Beitrag zum Schutze unserer Umwelt. Bitte erfragen Sie bei der Gemeindeverwaltung
die zuständige Entsorgungsstelle.
Achten Sie darauf, dass die leeren Batterien der Fernbedienung sowie Elektronikschrott nicht in den Hausmüll gelangen, sondern
sachgerecht entsorgt werden (Rücknahme durch den Fachhandel, Sondermüll).
1.2 Verpackungsinhalt
Bitte überprüfen Sie die Lieferung auf Vollständigkeit, bevor Sie Ihr Produkt in betrieb nehmen.
Receiver XP1000
Bedienungsanleitung
Fembedienung & Batterien(2X AAA 1.5 V)
HDMI Kabel
Bedienungsanleitung
Storm Anschlusskabel
Storm Anschlussadapter
* Das Zubehör kann je nach Region variieren..
35
1.3 Produktbeschreibungen
Vorder Ansicht
1
2
3
4
5
6
1. IR-Empfänger: Empfang der IR-Signal von der Fernbedienung.
2. Recording-Anzeige: Zeigt den aktuellen Aufnahmestatus STB.
3. On / Off-Taste und Anzeige: Zeigt den aktuellen Status der Stromversorgung des Recseiver an. Mit dieser Taste können Sie Ihren
Recseiver ein-und ausschalten..
4. Kanal nach oben / unten: Mit der Kanal rauf und runter-Tasten können Sie die Kanäle direkt auf Ihrem Receiver schalten.
5. CI-Modul-Steckplatz: Ein CI-Modul-Steckplatz ist am Recseiver vorgesehen.
6. Kartenleser-Steckplatz: Zwei Kartenleser-Steckplätze bereitgestellt
Rück Ansicht
1
2
3
4
5
6
1. LNB 1 IN : Hier kann ein Satelliten-Kabel angeschlossen werden.
2. SCART : Hier kann ein TV Gerät über SCART-Kabel angeschlossen werden.
3. HDMI : Anschließen an das Fernsehgerät über ein HDMI-Kabel für die Audio-und Videosignale.
4. S/PDIF : Verbindung zu einem digitalen Audiosystem mit S / PDIF-Kabel.
5. Ethernet : Verbindung zum Internet.
6. USB : Verbinden Sie den USB-Memory-Stick oder externe Festplatte.
7. Netzanschluss :Für Stromanschlussadapter (2.5A /12V).
8. Ein/Aus Schalter
36
7
8
1.4 CI Slot: für Common Interface Module.
Mit dem XP1000 können Kanäle nur mit der entsprechenden Smart Card und / oder CAM (Conditional Access Module) angesehen
warden. XP1000 bietet zwei Kartenleser -Steckplätze und einen Conditional Interface Slot. Benutzer müssen diese Smartcards und
CAMs die für die Abo-basierten Dienste erforderlich sind erwerben.
Einsetzen der Smartcard
1) Öffnen Sie die Tür auf der rechten Seite.
2) Legen Sie die Smartcard wie in der folgenden Anweisung mit dem IC-Chip nach unten ein
3) Vergewissern Sie sich, dass die Smartcard richtig eingesteckt wurde.
SMARTCARD
Einstecken des CAM (Conditional Access Module)
Es gibt mehrere Conditional Access System (CAS) die XP1000 unterstützt.
Unterstützt werden volgende CAMs: Nagravision, NDS, Irdeto, Viaccess, etc.
1) Legen Sie eine Smartcard wie in der Abbildung unten mit dem IC-Chip nach oben in das CAM
2) Sobald die Smartcard richtig eingesteckt wurde., legen Sie das Cam in den CI-Steckplatz.
3) Vergewissern Sie sich, dass das Cam richtig eingesteckt wurde
CI MOUDULE
SMARTCARD
37
1.5 Fernbedienung
Power
Standby-Taste schaltet Ihre XP1000 ein bzw.
aus.
STB
Drücken sie diese Taste um die Fernbedienung einzuschalten, um den recseiver zu
kontrollieren.
TV
Schaltet Ihre Fernbedienung in den TVFernbedienungs-Modus, um Ihren einprogrammierten Fernseher bedienen zu können
Next
schaltet zwischen den letzten 20
gesehenen Kanälen um
Zifferntaste
Drücken Sie, um einen Kanal oder mehrere
Nummern nach den Menüoptionen einzugeben.
Info
Drücken sie diese Taste um die
Programminformationen anzuzeigen.
Previous
Schaltet zwischen den letzten 20 gesehenen
Kanälen um
OK
Drücken Sie, um den ausgewählten
Menüpunkt zu bestätigen.
Back
Drücken Sie, um zum vorherigen Service oder
Menü zurückzukehren.
EPG
Drücken Sie die EPG (Electronic Program
Guide) Taste um die Informationen
anzuzeigen,die der Kanal bieten.
Navigationstasten
Die Bedienung der Menüs erfolgt generell mit
den Navigationstasten . Um in ein Untermenü
zu gelangen, bestätigen Sie dieses dann mit
der OK-Taste.
Portal
Drücken Sie diese Taste um in das
Portal-Menü zu gehen.
Exit
Drücken sie diese Taste um die aktuelle
Menüoption in den Live-Modus zu verlassen,
oder schaltet einen Schritt zurück im Menü.
Filelist
Drücken Sie diese Taste um die Liste der
gespeicherten Aufnahmen auf der externen
Festplatte zu sehen.
Menu
Drücken Sie diese Taste um das Hauptmenü
aufzurufen.
Kanal hoch/runter
Drücken Sie diese Taste um durch
die gescannten Kanäle zu
navigieren
Lautstärke +/- Taste
regelt die Lautstärke, + für lauter und - für leiser
Ton-Aus-Taste (MUTE)
schaltet den Ton stumm. Es erscheint ein
Symbol in der oberen linken Ecke auf Ihrem
Fernsehbildschirm. Ein nochmaliger Druck auf
diese Taste schaltet den Ton wieder ein
Text
ruft den Teletext (Videotext) auf.
Audio
Drücken Sie diese Taste um
verfügbaren Audio-Sprache und
Audio-Typen zu wählen.
Optionstasten - Rot, Grün, Gelb und Blau
Alle möglichen Optionen werden über vier
farbige Punkte (rot, grün, gelb, blau) angezeigt, und können über diese Optionstasten
aktiviert werden.
Aufnahme-Taste[
]
Drücken Sie die Taste zum Starten
oder Stoppen der Aufnahme.
STOP[
]
dient im Wiedergabe-Modus zum
Stoppen der Wiedergabe einer
Aufnahme
Play / Pause Taste[
]
dient im Wiedergabe-Modus zum
Pausieren und Starten bzw.
Fortsetzen der Wie- dergabe
Timer
Drücken Sie diese Taste um den
Timer-Zeitplan zu sehen.
Subtitle (Untertitel)
Drücken Sie diese Taste um den
Untertitel des aktuellen Kanals
angezeigt, wenn der Kanal Untertitel
ermöglicht.
Previous Program.[
]
Drücken Sie diese
Taste um zum vorherigen
Programm zu bewegen.
Rückspulen-Taste.[
]
Mit der
Rückspulen-Taste können Sie
während der Wiedergabe einer
Aufnahme zurück- spulen.
Vorspulen-Taste[
]
Mit der Vorspulen-Taste können
Sie Während der Wiedergabe einer
Aufnahme vorspulen
Next Program.[
]
Drücken Sie diese Taste um in das
nächste Programm zu gelangen.
38
Help (Hilfe)
Öffnet das Hilfemenü.
V. Mode
Drücken Sie diese Taste um das
Bildformat zu ändern.
TV
Drücken Sie diese Taste um die
Senderliste anzuzeigen.
RADIO
Drücken sie diese Taste um die
Radio-Programmliste angezeigt
Sleep
Drücken Sie diese Taste um das
Gerät auszuschalten Sleep-Timer.
1.6 Hauptmerkmale
• MIPS Processor 3300 class
• Linux Operating System
• Media Player
• Downloadable Plug-ins unterstüzung
• 2 x Smartcard Readers
• 1 x Common Interface
• MPEG2 / H.264 Hardware Decoding
• DVB-S2 Single Tuner
• 128MB NAND Flash / 512MB DDR Memory
• 10/100MB Ethernet Interface
• 1 x USB 2.0
• HDMI
• 1 x SCART
• SPDIF for digital bit stream out (optical)
• EPG unterstüzung
• Automatic & Manual Service Scan unterstüzt
• Multiple LNB control (DiSEqC) supported
• Skin wechsel unterstüzt
• Externer Netzteiladapter
1.7 Technische Daten
1.7.1 Grundlegende Merkmale
Abmessungen
LxB
205x117 mm
Zuverlässigkeit
Arbeitstemperatur
0~45°C
Relative Luftfeuchtigkeit
10% ~ 80%
RF Empfang
DVB-S
950MHz~2150MHz
DVB-S2
DiSEqC 1.2
Number of RF Input/output terminal
LNB-IN 1 Anschluß
(75 Ohms F-Type)
IO Funktionen
Power Anzeige
Ja (Blau=on, Rot=stand-by)
IR Empfänger extern
Nein
Aufnahme Anzeige
Rot (PVR Ready)
Netzwerkaktivität
Ja (Rückseite)
Ethernet
Ja
SCART Ausgang
CVBS/RGB+LR unterstüzt
HDMI Ausgang
576p, 720p @ 50Hz, 1080i @ 25Hz,1080p @ 50Hz
USB 2.0
Ja (Rückseite 1 Anschluß)
Smart Card Slot
x2 (Front)
CI Card Slot
x1 (Front)
Optical Output
PCM / Dolby Digital
Strom Anschlussadapter
AC-DC Adaptor (12V/2.5A)
39
Zubehör
Fernbedienung
Ja
HDMI Kabel
Ja
SCART Kabel
Nein
Netzwerkkabel
Ja
AC Adaptor (+12V/2.5A)
Ja
Batterien (AAAx2)
Ja
Verpackung
Karton
Papierkarton, farbig bedruckt
1.7.2 Basic Grundfunktionen
Solution
CPU
MIPS 3300 class
RAM
512MB
ROM
SPI-NOR 4MB
NAND 128MB
OS
Linux version > 3.5.0
Audio Decoder
Dolby Digital (AC3)
Ja
MPEG-1 L1/L2/L3
Ja
MPEG-2 AAC
Ja
MPEG-4 HE-AAC
Ja
Digital multi-lingual
Ja
Video Decoder
MPEG-1
Ja
MPEG-2
MP@HL
H.264
HP@L4 (1080p 30fps)
XVID
XVID Highdef (HD)
Video Display
16:9, 4:3 Monitor Selection
Ja
Aspect ratio control
Ja
(Normal, Wide, Zoom)
576i/576p/720p/1080i/1080p
3 Tasten – Power, Ch+, Ch-
40
Control I/F
Front Tasten
3 Tasten – Power, Ch+, Ch-
IR
Ja
AV Input/Output
SCART Ausgang
Ja (CVBS & RGB + LR)
HDMI Ausgang
Ja
SPDIF optical Ausgang
Ja
USB 2.0
x1
Kopierschutz
HDCP
Ja
Netzwerk
RJ45
10/100 Base-T
Wi-fi (802.11 b/g)
USB type (optional)
DHCP, Static IP
Ja
PPPoE
Optional
Sonstige Funktionen
Volume & Mute Control
Ja
Photo viewer
Ja
2. INBETRIEBNAHME DES XP1000
Dieses Kapitel wird Sie durch die gesamte Installation von XP1000 führen. Bitte lesen Sie jeden Abschnitt sorgfältig um
sicherzustellen dass das System ordnungsgemäß ausgeführt wird.
2.1 Anschließen am TV
XP1000 bietet eine Vielzahl von Audio / Video-Verbindungs Methoden.
Wir empfehlen Ihnen, den HDMI-Anschluss zu verwenden, um die beste Bildqualität zu erzielen. Wenn Ihr Fernsehgerät nicht über
einen HDMI-Anschluss verfügt , dann können Sie den XP1000 auch über SCART anschließen.
Sie sollte die Audio-und Video-Einstellungen nach dem Anschließen des Digital-Receiver konfigurieren.
41
2.1.1 Anschluss am Fernsehgerät über HDMI-Kabel
Um Höchste Bild/Ton Qualität für das digitale Fernsehen zu gewährleisten, wird eine HDMI-Verbindung empfohlen.Die meisten
HDTVs haben HDMI-Anschlüsse um höchste Bildqualität zu gewährleisten. Auf der Rückseite des XP1000 ist ein HDMI-Anschluss für
diesen Zweck zur Verfügung gestellt. Verbinden Sie Ihren Fernseher und den XP1000 mit einem HDMI-Kabel wie folgt.
HDMI Cable
HDMI
2.1.2 Anschluss am Fernsehgerät über SCART-Kabel
Falls Ihr Fernseher analog ist , dann ist SCART-Kabel die gängigste Methode. Verbinden Sie Ihren Fernseher und den XP1000 mit
SCART-Kabel wie folgt.
SCART Cable
SCART
2.2 Anschließen an die Stromversorgung
Ein Netzteil wird als eines der grundlegenden Zubehöre für den XP1000 vorgesehen.
1 Schließen Sie das Netzteil an den Anschluss an der Rückseite des XP1000 an
2 Schließen Sie das Netzteil an eine Steckdose an.
3 Schalten Sie den Netzschalter auf der Rückseite des Gerätes ein
• Betriebsspannung: 100 - 240 VAC
• Betriebsfrequenz: 50 / 60 Hz
42
2.3 Ein/Aus
Es gibt mehrere Möglichkeiten, um Ihren XP1000 an EIN oder AUS schalten.
* Vollständige Abschaltung
Es ist ein Netzschalter an der Rückseite angebracht sobald sie diesen aktiviert haben ist das Gerät komplett ausgeschalten. Wenn
Sie das Gerät dann wider einschalten, kann es einen Moment dauern bis das System booten.
* Standby-Modus
Wenn Sie die Power-Taste auf der Fernbedienung drücken, wird der XP1000 an-oder ausgeschalten. In diesem Modus wird das
System nicht vollständig abgeschaltet und somit dauert es eine kürzere Zeit zum Ein-und Ausschalten.
*Deep Standby Mode [
: Menu > Standby/Restart > Deep Standby]
Deep Standby wird verwendet, um den Standby-Stromverbrauch zu reduzieren. Der XP1000 soll damit sehr
Energie effizienten sein und den Stromverbrauch von unter 1W zu gewährleisten , er befindet sich im tiefen Standby-Modus.
3. STARTASSISTENT
Wenn Sie den XP1000 zum ersten Mal nach dem Kauf in betrieb nehmen wird ein Installationsassistent Sie Schritt für Schritt durch
die Installation führen.
NOTE: OK key is used for confirmation and turns to the next step. Press EXIT key to return to the previous page.
3.2 Einstellung Bildauflösung
3.1 Einstellung Videoformat
3.3 Spracheinstellungen
XP1000 bietet verschiedene Sprachen und hier können Sie
die Hauptsprache für Ihr Gerät wählen. Mit den UP / DOWNTasten können Sie die gewünschte Sprache einstellen.
43
4. GRUNDLEGENDE BEDIENUNG
4.1 Programmwahl
HINWEIS: Wenn der Kanalwechsel nicht gemacht
wird, ist es wahrscheinlich weil der gewählte
Kanal verschlüsselt ist und Sie nicht über eine
ordnungsgemäße Smartcard verfügen.
[
: drücken ▲/▼, Kanal +/- Tasten ◀/▶um zum nächsten
Kanälen zu wechseln]
XP1000 bietet verschiedene Zapping Methoden. Sie können den
aktuellen Kanal durch Drücken von
• Kanal hoch/runter
Wenn Sie die UP oder DOWN-Tasten drücken, erscheint
Kanalauswahl-Menü.
Durch drücken von oben und unten , können Sie einen
bestimmten Kanal wählen.
• Links/Rechts Taste
Wenn Sie die LINKS oder RECHTS-Taste drücken, wird der
vorherige oder nachträgliche Kanal des aktuellen Kanal
eingestellt .
• Kanal +/Wenn Sie KANAL + oder - Taste drücken, wird das KanalauswahlMenü aufgerufen.
• Zifferntasten
Geben Sie eine Kanalnummer ein und es wird sofort zum Kanal
gewechselt.
Damit Sie bestimmte Kanäle besser finden, fügen Sie diese zur Favoritenliste hinzuzufügen.
1 Rufen Sie die Kanalauswahl-Liste durch Drücken der UP-oder DOWN-Taste auf.
2 Um die Liste aller Kanäle aufzurufen drücken Sie die Rote-Taste.
3 Wählen Sie den Kanal, den Sie in die Favoritenliste hinzufügen möchten.
4 Drücken Sie anschliesend die Menü Taste.
5 Wählen Sie “Kanal zu Favoriten hinzufügen” und drücken Sie OK.
6 Wählen Sie “Favoriten” und drücken Sie OK.
7 Gehen Sie zu “Favoriten”-Liste durch Drücken der Blauen-Taste, um zu bestätigen dass der ausgewählte Kanal richtig ist in
der Liste.
4.2 Lautstärke regulieren
[
: drücken Sie VOLUME +/- ]
Sie können die Lautstärke mit VOLUME + / - einstellen. Sie können auch durch Ein/Ausschalten der Stummschaltung die
Tonwiedergabe vorübergehend stummschalten. (
)Dieses Symbol leuchtet auf, wenn der Ton stumm geschaltet ist.
44
4.3 Änderung der Audiosprache
[
: drücken Sie die AUDIO Taste]
Durch drücken der Audio Taste können Sie überprüfen, welche
Audio-Signale verfügbar sind.
Durch die Verwendung von UP / DOWN-Taste und den FarbeTasten , können Sie eine andere Sprache oder Stereo-Sound
wählen.
HINWEIS: Die verfügbaren Optionen in diesem Menü
sind je nach Dienst unterschiedlich
4.4 Untertitel
[
: drücken Sie SUBTITLE (Untertitel) Taste]
Sie können den Untertitel des aktuellen Programms, wenn das
Programm Untertitel bereistellt durch drücken der SUBTITLE Taste
erscheinen lassen. Sie erhalten Untertitelinformationen wenn der
Kanal Untertitel anbietet.
Durch die Verwendung von UP / DOWN können Sie in der Liste
navigieren, um einen Untertitelden Sie wiedergeben möchten
wählen. Drücken Sie die OK-Taste um es zu aktivieren .
4.5 Teletext
[
: drücken Sie TEXT Taste]
Sie können die Teletext-Informationen aufrufen, indem Sie
die TEXT Taste drücken. Es wird einige Zeit dauern, um alle
Informationen zu laden.
Sie können durch die Teletext-Seiten mit hilfe der UP / DOWNTaste navigieren. Auch Können Sie einfach die Seitenzahl
eingeben, die Sie lesen möchten.
Stumm Taste
Wenn Sie den Teletext aktiviert haben, können Sie zwischen dem Live-Modus und der Teletext-Seite mit der Stumm-Taste (
sofort wechseln. In diesem Fall erfolgt das Laden der Teletext-Seite sofort.
• VOLUME +
Wenn Sie die Seite vergrößern möchten, drücken Sie VOLUME +
• VOLUME Wenn Sie die Seite verkleinern möchten, drücken Sie VOLUME -
45
)
4.6 Programminformationen
[
: drücken Sie INFO ]
Wenn Sie den Kanal wechseln, wird die Infobar immer für 5
Sekunden (Standardeinstellung) angezeigt. Die Infobar ist so
konzipiert, um Ihnen umfassende Informationen über den Kanal
zugeben den Sie gerade ansehen.
4.7 Info Bar
• Drücken Sie OK um die Info Bar aufzurufen.
4.8 Electronic Program Guide (EPG-Programmführer)
[
: drücken Sie EPG ]
Electronic Program Guide (EPG) zeigt das Programm zu jedem
Kanal an, falls diese Daten vorhanden sind. Sie werden in Zeit und
Datum geordnet.
Im EPG werden detaillierte Informationen des aktuellen Kanals
angezeigt. Es gibt vier Optionen in der EPG-Anzeige.
Hinweis: Drücken und halten Sie die EPG-Taste für Multi-EPG
NOTE: Press and hold EPG key for Multi-EPG.
• Grüne Taste (Timer programmieren)
Wenn Sie die GRÜNE Taste drücken, erscheint das Timer Eingabemenü wie links dargestellt. Diese Option wird verwendet, um einen
neuen Timer für die Aufnahme oder Programm umschaltung einzustellen.
46
- Name
Zeigt den Programmnamen an.
- Beschreibung
Zeigt eine kurze Beschreibung des ausgewählten Programms.
- Timer Art
• Wählen umschalten für Kanal wechsel.
• Wählen Sie aufnehmen für die Aufnahme.
- Art der Wiederholung
• Wählen Sie einmal für eine Zeit des Umschaltens oder der Aufnahme .
• Wählen Sie wiederholen für wiederholts Umschalten oder Aufnehmen .
• Wiederholung - Diese Option ist nur, wenn Sie “Wiederholtung” gewählt haben. Sie können die Art der Wiederholung angeben.
Durch drücken von oben und unten können Sie Umschalten ob die Aufnehmen Täglich / Wöchentlich / Mo-Fr / gemacht werden
soll.
- Datum
Zeigt das aktuelle Datum. Dieser Eintrag ist aktiv wenn die Aufnahme einmalig ist
- Startzeit
Hier können Sie die Startzeit für die Aufnahme oder den Programmwechsel festlegen.
- Endzeit
Hier können Sie die Endzeit für die Aufnahme festlegen.
- Kanal
Dieser Eintrag ermöglicht es Ihnen, den Kanal zu wechseln. Drücken Sie LINKS / RECHTS-Taste um das Kanalauswahl-Menü
aufzurufen. Sie können mit dieser Option einen anderen Kanal wählen aus dieser Liste . Um zum Timer- Menü zurückzukehren,
drücken Sie EXIT.
• Multi EPG
- Sie können das Vorherige oder das Nächste Event im gleichen Kanal verschieben, indem Sie GELBE (Zurück) / BLUE (Weiter)
drücken.
- Sie können auf einen anderen Kanal mit UP / DOWN-Taste wechsel.
- Die ROTE Taste wird verwendet, um sofort in den ausgewählten Kanal zu wechseln.
- Die GRÜNE Taste wird verwendet um einen Timer anzulegen oder einen Programmwechsel zu programmieren.
HINWEIS: Nicht alle Kanäle bieten EPG-Informationen , in diesem Fall werden keine EPG-Daten angezeigt außer
dem Sendernamen .
47
4.9 Time Shift (Zeitversetztes Fernsehen)
[
: drücken Sie die
Taste]
Zu Ihrer Information, mit Timeshift starten Sie eine sofortige Aufnahme des aktuellen Programms, das Sie gerade sehen.
Erneutes drücken wird die Aufnahme des Programmes sofort anhalten und ein kleines Fenster, indem die verstrichene Zeit und
Informationen stehen wird auf der linken unteren Seite des Bildschirms angezeigt, wie oben dargestellt.
Timeshift-Aufnahme läuft, bis Sie entweder PLAY oder PAUSE erneut drücken.
Wenn Sie das Zeitversetzt Fernsehen beenden möchten und zum Live-Modus zurückkehren wollen, drücken Sie
Sie werden gefragt mit Ja oder nein ob Sie Timeshift beenden wollen.
Taste.
HINWEIS:
Die Zeitversetzt Aufnahme wird nur solage auf der Festplatte gespeichert solang die Aufnahme läuft. Nach beenden
der Timeshift Funktion werden die Daten sofort gelöscht. Ein wiederholtes abspielen ist nicht möglich
4.10 Aufnahme
XP1000 ist ein Personal Video Recorder mit integriertem DVB-S2-Tuner. Es gibt zwei Möglichkeiten, um Aufnahmen durch zuführen
und zu verwalten.
1. Sofortige Aufnahme
[
: drücken Sie REC ]
Drücken Sie die REC-Taste, um die Aufnahme des aktuellen
Programms zu starten.
Es sind Fünf Aufnahme-Optionen gegeben.
- Aufnahme hinzufügen (Stopp nach aktuellen Event)
Diese Option wird verwendet, wenn Sie das aktuelle Programm
aufzeichnen möchtenbeendet .Die Aufnahme stoppt nach Ende
des Events.
- Aufnahme hinzufügen (unbegrenzt)
Diese Option wird verwendet, wenn Sie die Aufnahme ohne eine bestimmte Endzeit wollen. Die Aufnahme wird gestoppt wenn Sie
es möchten.
- Aufnahme hinzufügen (bestimmte Aufnahmedauer)
Diese Option wird verwendet, wenn Sie manuell die Länge der Aufnahme durch Eingabe einer bestimmten Zeit festlege
- Aufnahme hinzufügen (geben Sie die Aufnahme Endzeit vor)
Diese Option wird verwendet, wenn Sie ein bestimmtes Datum und Uhrzeit festlegen, wann Sie die Aufnahme stoppen wollen.
- Exit(Verlassen)
Diese Option wird verwendet, um aus diesem Menü ohne Aufzeichnung zu gelangen.
48
2. Aufnahme durch Timer
[
: drücken Sie MENU > wählen Sie Timer]
Sie können Aufnahmeprozess in der Timerliste verwalten.
Drücken Sie MENU und wählen Sie Timer auf der Menüseite.
In diesem Menü werden Farbtasten für jede andere Funktion
zugewiesen.
- Rot (löschen)
Diese Option wird verwendet, um einen Timer zu löschen.
- Grün (hinzufügen)
Diese Option wird verwendet, um einen Timer hinzuzufügen.
- Gelb (Deaktivieren)
Diese Option wird verwendet, um den Timer zu deaktivieren und eine X Markierung erscheint.
HINWEIS: Wenn Sie den Aufnahme-Timer aktivieren möchten, drücken Sie wieder gelb.
- Blau (Löschen)
Diese Option wird verwendet, um fertige Aufnahmen aus der Timerliste zu entfernen.
HINWEIS: Stellen Sie sicher, dass die Festplatte an Ihrem XP1000 genügend freier Speicherplatz für Aufnahmen
zur Verfügung hat. Wenn der freie Speicherplatz auf der Festplatte nicht ausreicht, kann die Aufnahme vor dem
definierten Endzeitpunkt stoppen.
3. Aufzeichnung beenden
[
: Drücken Sie die REC-Taste> wählen Sie “Stop Aufzeichnung” ]
4.11 Aufzeichnung Abspielen
[
: Drücken Sie die FILE LIST-Taste]
Drücken Sie die FILE LIST Taste, um das Menü zu aktivieren.
Sie können dort die aufgenommenen Dateien auswählen und
abspielen.
Wählen Sie die Datei, die Sie wiedergeben möchten. Die
wiedergabe der aufgezeichnetet Daten wird sofort beginnen und
die Infobar wird angezeigt.
Diese Infobar gibt Ihnen die folgenden Informationen der
Aufzeichnung.
1
2
3
4
49
Titel der Aufnahme
verbleibende Zeit
Fortschrittsbalken
abgelaufene Zeit
4.12 Hauptaufnahme Dateien
[
: Drücken Sie die FILE LIST-Taste> MENU Taste drücken]
Wenn Sie eine Aufnahme Datei löschen möchten, drücken Sie FILE
LIST Taste um alle aufgezeichneten Datein zu sehen und wählen
sie ihre datei aus. Drücken Sie dann die Menü Taste und wählen Sie
“löschen” und bestätigen Sie dieses mit OK.
4.13 Media Player
[
: MENU > Plugins > Media Player]
XP1000 ist ein Multimedia-Receiver der in der Lage ist
Medieninhalte abzuspielen . Unter Verwendung des Media Player,
können Sie Musik, Fotos und Video-Inhalte auf der externen
Festplatte und / oder einem USB-Memory-Stick speichern.
Wenn Sie mit dem Media Player etwas abspielen wollen, wird die
folgende Liste erscheinen.
1. Gehen Sie in ein beliebiges Verzeichnis auf der Festplatte oder
dem angeschlossenen USB Stick.
2. Wählen Sie eine Datei , und drücken Sie OK zum abspielen
* Unterstützte werden Hauptsächlich die Formate JPG, MP3, AVI, etc.
3. Auf die gleiche Weise können Sie die aufgenommenen
Mediendateien auf der Festplatte abspielen.
4.14 Plug-ins
[
: MENU > Plugins]
XP1000 ist mit Standard 10/100Mbps Ethernet mit RJ 45-Stecker
ausgestattet. Es wird empfohlen, diese Netzwerkfähigkeit zu
verwenden, um das System voll und ganz zu genießen. Wenn Ihre
Netzwerk Verbindung hergestellt ist, können Sie direkt Plug-Ins von
einer bestimmten Website herunterladen.
1 Drücken Sie die MENU Taste und wählen Sie dann das Plugins Menü um aktive Plugin Browser zusehen
2 Drücken Sie die GRÜNE Taste, um eine Liste der verfügbaren Plug-Ins herunterzuladen.
3 Sobald der Download abgeschlossen ist, wird eine Liste der Plug-Ins angezeigt werden.
4 Wählen Sie ein Plug-in zum Download.
5 Sie können überprüfen, ob der Download ordnungsgemäß auf dem Plugin-Browser erfolgen ist.
Von hieraus können Sie überprüfen, welche Plug-Ins zum Download bereit stehen.
50
4.15 Sleep Timer
[
: MENU> Standy/Neustart > Ausschalt Timer]
Sie können eine bestimmte Zeit auswählen nach der Ihr Recseiver
in den Standby-Modus oder Deep Standby Modus über geht. Vier
farbige Tasten dienen zur Einstellung dieser Sleep-Timer.
1
2
3
4
Rot : Diese Option dient zum aktivieren oder deaktivieren des Sleep Timer.
Grün :Diese Option wird verwendet, um zwischen Standby-Modus und Deep Standby Modus zu wählen.
GelbL : Bei dieser Option werden Sie noch eimal gefragt bevor das System heruntergefahren wird.
Blau : Diese Option wird verwendet, um den Zeit laufenden Service zu nutzen.
5. MENÜ
5.1 Hauptmenü
Mit dem XP1000 wurde ein sehr anspruchsvolles Gerät entwickelt, um Benutzern eine Vielzahl von System, Einstellungen und
Optionen so detailliert wie möglich zu bieten. Sie können die Feinabstimmung Ihres XP1000 nach Ihrem Geschmack gestalten.
Dieses Kapitel führt Sie durch das ganze Menü der Systemkonfiguration.
[
: drücken Sie MENU]
Das Hauptmenü des XP1000 besteht aus den folgenden
Untermenüs.
- Timer
Hiermit können Sie das Laufende-Programm Aufzeichnen und
zu einer gewünschten Zeit Umschalten lassen.
- VCR scart
Schalter auf VCR Scart-Anschluss.
HINWEIS: Wenn Ihr XP1000 nicht mit VCR Scart verbundenist , wird der Bildschirm schwarz. In diesem Zustand
drücken Sie einfach EXIT, um zum vorherigen Zustand zurück zugelangen.
- Information
Hat zwei Untermenüs für Service / Info. Das Service-Menü bietet die detaillierten Informationen des aktuellen Kanals an.. Über
Info erfahren Sie alles über die Hardware und Software ihres XP1000 . Weitere Informationen entnehmen Sie bitte dem Abschnitt
Informationen.
- Plugins
Aktiviert Plugin Browser . Mit diesem Browser können Sie auf der angegebenen Website einloggen und Sie können eine Vielzahl
von neuen Plug-Ins herunterzuladen.
- Setup
Bietet alle Systemeinstellungen. Für weitere Informationen, lesen Sie bitte den nächsten Abschnitt.
- Power Management
Bietet Optionen für Power an / aus und Sleep-Timer. Für weitere Informationen verweisen wir auf die Power an / aus Abschnitt.
51
5.2 Setup
Das Setup-Menü besteht aus folgenden Untermenüs.
1 System Einstellungen
2 Kanalsuche
3 CI Einstellungen
4 Jugendschutz
5 Werkseinstellungen
6 Software aktualisieren
5.2.1 System-Einstellungen
5.2.1.1 Audio/Video
[
: MENU> Setup > System Einstellungen > Audio/Video]
Hier finden Sie die notwendigen Optionen , der Audio-und
Video-Konfiguration Ihres XP1000 .
HINWEIS: ROT ist für Abbrechen und Grün steht für OK. Die
OK-Taste der Fernbedienung hat in diesem Modus keine
funktion.
Unter den Parameter in diesem Menü sind die folgenden Einstellmöglichkeiten gegeben. Welche Sie für die Audio-und Video
Einstellungen treffen müssen.
1 Videoausgabe
Hier müssen Sie entscheiden, welche Video-Ausgang Sie zwischen Ihrem Fernsehgerät und dem XP1000 verwenden möchten. Die
verfügbaren Optionen sind wie folgt.
• HDMI
• SCART
2 Modus
Sie müssen entscheiden, welche Auflösung Sie verwenden möchten.
3 Downmix
JA wird verwendet, wenn Sie den Audio-Ausgang in Stereo abgemischt haben wollen. NEIN wird verwendet, wenn Sie dies nicht
wollen. Diese Option wird empfohlen, wenn Sie mit S / PDIF-Anschluss verbunden haben.
5.2.1.2 Weitere Einstellungen
[
: MENU> Setup > Systemeinstellungen>
weitere Einstellungen]
In diesem Menü finden Sie verschiedene Anpassungsoptionen
und dieses Menü kann in drei verschiedenen Formaten
angezeigt werden
Formate: Einfach, Fortgeschritten und Experte.
HINWEIS: ROT ist für Abbrechen und Grün steht für OK.
Die OK-Taste der Fernbedienung hat in diesem Modus
keine funktion.
52
5.2.1.3 Netzwerkeinstellungen
[
: MENU > Setup > Systemeinstellungen >
Netzwerkeinstellungen]
XP1000 ist mit Standard 10/100Mbps Ethernet mit RJ-45Anschluss serienmäßig integriert. Es wird empfohlen, diese
Netzwerkfähigkeit zu verwenden, um voll und ganz das System
genießen zu können. Stellen Sie die Netzwerkeinstellungen
über dieses Menü Netzwerkkonfiguration ein.
Im Menü Netzwerkkonfiguration, sehen Sie fünf Untermenüs
wie folgt:
1 Adapter settings
Über dieses Menü können Sie die grund legenden Ethernet-Konfiguration einstellen.
Lan aktivierung
JA wird verwendet, um den die Ethernet-zu aktivieren. Wenn
Sie diese Option auf NEIN stellen, wird das Ethernet nicht
funktionieren
1 Adresse automatisch beziehen
JA wird verwendet, um den DHCP (Dynamic Host Configuration Protocol) zu verwenden. Wenn Sie diese Option auf JA stellen, wird
es automatisch die richtige IP-Adresse verwenden, wenn Sie eine bestimmte feste IP-Adresse verwenden möchten müssen sie Nein
einstellen.. In diesem Fall müssen Sie die korrekten Daten in jedem Feld eingeben.
2 Servereinstellungen
Diese Option ist erforderlich, wenn Sie DHCP nicht verwenden möchten. Sie müssen die Adresse des Servers eingeben
3 Netzwerktest
Wenn Sie nicht sicher sind, ob die Netzwerkkonfiguration korrekt ist , können Sie diesen Test.
4 Netzwerk Neustart
Diese Option wird verwendet, wenn Sie das Ethernet neu starten möchten.
5.2.1.4 Spracheinstellungen
5.2.1.5 Zeitzone
[
: MENU> Setup > Systemeinstellung > Sprache]
Eine Vielzahl von Sprachen ist für den XP1000 zur verfügung
gestellt.
[
: MENU> Setup > Systemeinstellung > Zeitzone]
Sie können Ihre Zeitzone in diesem Menü eingestellen.
Mit den LINKS / RECHTS-Tasten können Sie eine Zeitzone wählen
die Sie für Ihren XP 1000 verwenden möchten. Nach der Auswahl
einer Zeitzone, drücken Sie die GRÜNE Taste zum bestätigen und
speichern der geänderten Einstellung.
53
5.2.1.6 Festplatten Einstellung
[
: MENU > Setup > Systemeinstellung > Festplatte >
Festplatten Einstellung]
Sie haben nun die Möglichkeit einzustellen, nach wieviel
Minuten Aktivität der Festplatte, sich diese in den StandbyModus schalten soll. Als Optionen stehen zur Verfügung:
• Kein Standby
• 10 oder 30 Sekunden
• 1, 2, 5, 10, 20 oder 30 Minuten
• 1, 2 oder 4 Stunden
5.2.2 Sendersuche
5.2.2.1 Tuner-Konfiguration
[
: MENU > Setup > Kanalsuche > Tuner-Konfiguration ]
Wenn Sie die Erstinstallation Prozess ausgeführt haben ist
der Tuner A bereits konfiguriert.
5.2.2.2 Automatischer Scan
[
: MENU> Setup > Sendersuche > Automatischer Scan]
Der einfachste Weg, um Dienste zu scannen ist der
automatische Scan. Im automatischen Scan-Menü, gibt es
zwei Möglichkeiten zur Auswahl, wie unten aufgeführt.
• löschen der Senderliste
JA wird verwendet, wenn Sie die vorhandene Liste löschen,
bevor Sie den automatischen Suchlauf starten wollen. Wenn
Sie die vorhandene Liste beibehalten möchten, wählen Sie
NEIN.
• Scan Tuner A (DVB-S2)
Drücken Sie auf OK, um die automatische Suche zu
aktivieren. Dies wird einige Minuten dauern. Nach Ende des
Scans, sehen Sie die Info bar und die neu gefundenen Sender
darunter.
54
5.2.2.3 Manueler Scan
[
: MENU > Setup > Sendersuche > Manueler Scan]
Wenn Sie jede genaue Einstellung für die manuelle Suche
kennen, können Sie den manuellen Scan durchführen. Es
gibt viele Parameter Werte die Sie brauchen um wie unten zu
entscheiden.
1 Tuner
Sie müssen entscheiden, welcher Tuner Sie zum manuellen
Scan verwenden möchten.
2 System-Einstellungen
Hier haben Sie zwei Optionen zwischen DVB-S (SD) und
DVB-S2 (HD).
3 Frequenz
Sie müssen die genaue Frequenz des Transponders kennen, den Sie scannen möchten.
4 Symbol Rate
Sie müssen die genaue Symbolrate des Transponders kennen, den Sie scannen möchten
5 Polarization
Hier haben Sie die Optionen für Horizontal, Vertikal, Circular Left und Circular Right. Sie müssen sich die Polarität des Transponders
wissen, den Sie scannen möchten .
6 FEC (Forward Error Correction)
Sie müssen den genauen FEC-Wert des Transponders wissen, den Sie scannen möchten
7 Netzwerk Scan
Hier haben Sie zwei Optionen JA und NEIN. NEIN wird verwendet, um den Transponder (TP) mit den Daten die der XP1000 derzeit
kennt zu scannen. JA wird verwendet, um die TP nicht nur auf den bestehenden TP-Daten, sondern auch mit neuen TP Daten
zu scannen, sofern neue TP-Daten verfügbar sind. Natürlich wenn Sie die JA Option wählen dauert es länger, es führt zu einem
besseren Scan-Ergebnis.
8 löschen der Senderliste
. JA wird verwendet, wenn Sie die vorhandene Liste löschen, bevor Sie den automatischen Suchlauf starten wollen. Wenn Sie die
vorhandene Liste beibehalten möchten, wählen Sie NEIN.
9 Nur frei Empfangbare
Hier haben Sie zwei Möglichkeiten für NO und Ja. Wenn Sie zum Scannen nur Frei empfangbar Sender ohne Verschlüsselung
wollen, wählen Sie JA. Ansonsten NEIN auswählen, um alle FTA und CAS Kanäle scannen.
Drücken Sie auf OK, um den manuellen Suchlauf zu aktivieren. Dies wird einige Minuten dauern.
5.2.2.4 Schneller Suchlauf
[
: MENU> Setup > Sendersuche > Schneller Suchlauf]
Hier finden sie verschiedene Einstellmöglichkeiten für
Satelliten, zum Beispiel, Astra oder Hotbird, Sie können diese
Listen auf ihrem XP 1000 installieren.
Eine Werkssenderliste können Sie nicht auswählen, Sie
können einen Automatischen Sendersuchlauf oder
manuellen vornehmen um ihre Listen auf dem XP 1000
anzupassen.
55
5.2.3 Überprüfen CAM
[
: MENU> Setup > Softcam/CI > CI Modul]
Um CAS Kanäle zu sehen benötigen Sie eine
ordnungsgemäße CAM und eSmartcard . XP1000 ist mit
einem Common Interface Slot und zwei Smartcard-Slots
ausgerüstet.
Wenn Sie das CAM eingesteckt haben, können Sie die
Informationen vom eingesetzten CAM, über dieses Menü wie
folgt sehen:
5.2.4 Jugendschutz
[
: MENU> Einstellungen > Jugendschutz]
Wenn Sie bestimmte Kanäle sperren möchten, können Sie
dies in diesem Menü.
1 MENU > Einstellungen> Jugendschutz.
2 Stellen Sie den Jugendschutz anschalten auf Ja mit den
Links/Rechts Tasten der Fernbedienung
Einstellungen schützen
Wenn Sie diese Option auf JA stellen, werden Sie aufgefordert,einen PIN-Code einzugeben, wenn Sie diese Funktion aufrufen wollen.
Setup Pin ändern
Wenn Sie den bestehenden PIN-Code für die Kindersicherung Setup ändern möchten, können Sie dies mit Hilfe dieses Menü.
Sie müssen einen neuen PIN-Code zweimal eingeben.
Kanal schützen
Sie müssen diese Option auf JA stellen, wenn Sie bestimmte Kanäle mit einen PIN-Code sperren möchten.
Diese Option wird nur aktiviert, wenn Sie Kanäle schützen auf Ja gesetzt haben. Hier gibt es zwei Möglichkeiten:
- Weiße Liste : Diese Option wird verwendet, um alle Kanäle mit Ausnahme der Kanäle in der Jugendschutz-Liste zu blockieren.
- Schwarze Liste :. Diese Option wird verwendet, um nur diese Kanäle in der Jugendschutz Liste zu blockieren
56
Pin Code ändern
Hier können sie den voreingestellten PIN Code ändern..
5.2.5 Werkseinstellungen
[
: Menü > Einstellungen >Werkseinstellungen ]
Wenn Sie alle installierten Service-Liste sowie alle
Konfigurationen löschen möchten, führen Sie den
Werkseinstellung durch. Wählen Sie JA im darunter liegenden
Menüum die Werkseinstellung auszuführen.
Nach Abschluss des Werkseinstellung, wird Ihr XP1000
automatisch neu gestartet und die Erstinstallation kann
wider durch geführt werden.
HINWEIS: Wenn Sie eine Werkseinstellung machen, werden
alle Ihre Konfigurationsdaten einschließlich Service-Listen,
Sat-Parameter und so weiter gelöscht.
5.2.6 Software Update
XP1000 kann auf zwei Arten aktualisiert werden. Erstens können Sie beim XP1000 die Software aktualisieren, indem Sie in Menü>
Einstellungen> Software Update gehen. Sie können auch ein Update über USB-Update durchführen wie in den folgenden Schritt
beschrieben.
Schritt1: Laden Sie die neue Software-Image runter.
Schritt 2: Extrahieren Sie das neue Software-Image mit winrar, winzip oder andere Extrahieren-Werkzeug und kopieren sie auf
einem USB-Stick. Alle Dateien werden unter / beim XP1000 Verzeichnis angezeigt.
/xp1000/kernel.bin
/xp1000/rootfs.bin
/xp1000/imageversion
/xp1000/noforce
Schritt 3: Schalten Sie das XP1000 mit dem Netzschalter aus..
Schritt 4: Stegen Sie den USB-Stick in den USB-Steckplatz an der Rückseite des XP1000..
Schritt 5: Schalten Sie den XP1000 mit dem Netzschalter wider an. Dann leuchtet die Aufnahme-und Standby-LED wird rot.
Schritt 6: Nach ca. 3 Sekunden, öffnen Sie die vordere Abdeckung, und drücken Sie CH + Taste..
Schritt 7: Die standby LED leuchtet rot und Aufnahme LED beginnt ebenfalls zu leuchten.
Schritt 8: Warten Sie ein paar Minuten, bis die Standby-LED blau wird.
Die Box ist nun mit der aktuellen Software aktualisiert
57
5.3 Information
5.3.1 Service Information
[
: MENU > Information > Service]
In diesem Menü können Sie die Service-Informationen des
aktuellen Kanals, so wie Service-Namen, Service-Provider und
Video-Format und Größe abrufen.
1
2
3
4
Kanal
PIDs
Multiplex
Tuner Status
5.3.2 Überprüfen H / W & S / W Informationen
[
: MENU> Information > Über]
Dieses Menü ist für Sie damit sie die aktuelle Systemversion
des XP1000 überprüfen können. Sie können die folgenden
Informationen sehen:
1 S/W Version
2 Erkannte Tuner
3 Erkannte Festplatte
6. FERNBEDIENUNG EINRICHTEN
Mit der XP 1000 Fernbedienung haben Sie die Möglichkeit, Ihren XP 1000 Receiver und Ihren Fernseher mit nur einer
Fernbedienung bedienen zu können. Damit Ihr Fernseher auf die Fernbedienungssignale Ihrer XP 1000 Fernbedienung reagiert,
müssen Sie diese zunächst programmieren. Dazu wird ein vierstelliger Code aus einer TV-Geräteliste ausgewählt und eingegeben.
6.1 Unterstützte TV-Marken Liste
Diese finden Sie im Anhang.
6.2 Einrichten als TV-Fernbedienung
Wenn Sie die TV Taste der Fernbedienung des XP 1000 drücken,arbeitet diese als TV Fernbedienung für ihr TV Gerät.. Um diese
Funktion nutzen zu können,müssen Sie die Fernbedienung mit dem entsprechenden Code aus der Codeliste programmieren.
Folgende Tasten der Fernbedienung funktionieren meist im TV Mode der Fernbedienung: Power, Volume +/-, Mute, TV (umschalten
der Quellen), Menu, Zifferntasten (0~9), Bedienkreuz (hoch/runter/links/rechts) und die Farbtasten (Rot/Grün/Gelb/Blau).
6.3 4-Stellige Code Eingabe
1.TV Gerät mit Taste am Gerät oder TV Fernbedienung einschalten.
Von diesen Schritt an können Sie alle Funktionen ihrer TV Fernbedienung mit der Universal Fernbedienung steuern.
2. Drücken und halten Sie nun die TV Taste für 3 Sekunden.Nun blinken die LEDs der Tasten TV und STB. Lassen Sie nun die TV Taste
los. Then, LED der TV Taste beginnt zu blinken.
3.Geben Sie nun den 4 stelligen Code aus der TV Hersteller Code Liste mittels der Zifferntasten ein., TV Taste blinkt zur Bestätigung 3
mal und der Code ist gespeichert..
58
7. COPYRIGHT – GNU GPL
GNU General Public License
Deutsche Übersetzung der Version 2, Juni 1991
Copyright © 1989, 1991 Free Software Foundation, Inc.
51 Franklin St, Fifth Floor, Boston, MA 02110, USA
Es ist jedermann gestattet, diese Lizenzurkunde zu vervielfältigen und unveränderte Kopien zu verbreiten; Änderungen sind jedoch
nicht erlaubt.
Diese Übersetzung ist kein rechtskräftiger Ersatz für die englischsprachige Originalversion!
Vorwort
Die meisten Softwarelizenzen sind daraufhin entworfen worden, Ihnen die Freiheit zu nehmen, die Software weiterzugeben und
zu verändern. Im Gegensatz dazu soll Ihnen die GNU General Public License, die Allgemeine Öffentliche GNU-Lizenz, ebendiese
Freiheit garantieren. Sie soll sicherstellen, daß die Software für alle Benutzer frei ist. Diese Lizenz gilt für den Großteil der von derFree
Software Foundation herausgegebenen Software und für alle anderen Programme, deren Autoren ihr Werk dieser Lizenz unterstellt
haben. Auch Sie können diese Möglichkeit der Lizenzierung für Ihre Programme anwenden. (Ein anderer Teil der Software der Free
Software Foundation unterliegt stattdessen der GNU Lesser General Public License, der Kleineren Allgemeinen Öffentlichen GNULizenz.)
Die Bezeichnung „freie“ Software bezieht sich auf Freiheit, nicht auf den Preis. Unsere Lizenzen sollen Ihnen die Freiheit garantieren,
Kopien freier Software zu verbreiten (und etwas für diesen Service zu berechnen, wenn Sie möchten), die Möglichkeit, die Software
im Quelltext zu erhalten oder den Quelltext auf Wunsch zu bekommen. Die Lizenzen sollen garantieren, daß Sie die Software ändern
oder Teile davon in neuen freien Programmen verwenden dürfen – und daß Sie wissen, daß Sie dies alles tun dürfen.
Um Ihre Rechte zu schützen, müssen wir Einschränkungen machen, die es jedem verbieten, Ihnen diese Rechte zu verweigern oder
Sie aufzufordern, auf diese Rechte zu verzichten. Aus diesen Einschränkungen folgen bestimmte Verantwortlichkeiten für Sie, wenn
Sie Kopien der Software verbreiten oder sie verändern.
Beispielsweise müssen Sie den Empfängern alle Rechte gewähren, die Sie selbst haben, wenn Sie – kostenlos oder gegen Bezahlung
– Kopien eines solchen Programms verbreiten. Sie müssen sicherstellen, daß auch die Empfänger den Quelltext erhalten bzw.
erhalten können. Und Sie müssen ihnen diese Bedingungen zeigen, damit sie ihre Rechte kennen.
Wir schützen Ihre Rechte in zwei Schritten: (1) Wir stellen die Software unter ein Urheberrecht (Copyright), und (2) wir bieten Ihnen
diese Lizenz an, die Ihnen das Recht gibt, die Software zu vervielfältigen, zu verbreiten und/oder zu verändern.
Um die Autoren und uns zu schützen, wollen wir darüberhinaus sicherstellen, daß jeder erfährt, daß für diese freie Software keinerlei
Garantie besteht. Wenn die Software von jemand anderem modifiziert und weitergegeben wird, möchten wir, daß die Empfänger
wissen, daß sie nicht das Original erhalten haben, damit irgendwelche von anderen verursachte Probleme nicht den Ruf des
ursprünglichen Autors schädigen.
Schließlich und endlich ist jedes freie Programm permanent durch Software-Patente bedroht. Wir möchten die Gefahr ausschließen,
daß Distributoren eines freien Programms individuell Patente lizensieren – mit dem Ergebnis, daß das Programm proprietär würde.
Um dies zu verhindern, haben wir klargestellt, daß jedes Patent entweder für freie Benutzung durch jedermann lizenziert werden
muß oder überhaupt nicht lizenziert werden darf.
Es folgen die genauen Bedingungen für die Vervielfältigung, Verbreitung und Bearbeitung:
Allgemeine Öffentliche GNU-Lizenz
Bedingungen für die Vervielfältigung, Verbreitung und Bearbeitung
§0. Diese Lizenz gilt für jedes Programm und jedes andere Werk, in dem ein entsprechender Vermerk des Copyright-Inhabers darauf
hinweist, daß das Werk unter den Bestimmungen dieser General Public License verbreitet werden darf. Im folgenden wird jedes
derartige Programm oder Werk als „das Programm“ bezeichnet; die Formulierung „auf dem Programm basierendes Werk“ bezeichnet
das Programm sowie jegliche Bearbeitung des Programms im urheberrechtlichen Sinne, also ein Werk, welches das Programm,
auch auszugsweise, sei es unverändert oder verändert und/oder in eine andere Sprache übersetzt, enthält. (Im folgenden wird die
Übersetzung ohne Einschränkung als „Bearbeitung“ eingestuft.) Jeder Lizenznehmer wird im folgenden als „Sie“ angesprochen.
Andere Handlungen als Vervielfältigung, Verbreitung und Bearbeitung werden von dieser Lizenz nicht berührt; sie fallen nicht
in ihren Anwendungsbereich. Der Vorgang der Ausführung des Programms wird nicht eingeschränkt, und die Ausgaben des
Programms unterliegen dieser Lizenz nur, wenn der Inhalt ein auf dem Programm basierendes Werk darstellt (unabhängig davon,
daß die Ausgabe durch die Ausführung des Programmes erfolgte). Ob dies zutrifft, hängt von den Funktionen des Programms ab
59
§1. Sie dürfen auf beliebigen Medien unveränderte Kopien des Quelltextes des Programms, wie sie ihn erhalten haben, anfertigen
und verbreiten. Voraussetzung hierfür ist, daß Sie mit jeder Kopie einen entsprechenden Copyright-Vermerk sowie einen
Haftungsausschluß veröffentlichen, alle Vermerke, die sich auf diese Lizenz und das Fehlen einer Garantie beziehen, unverändert
lassen und desweiteren allen anderen Empfängern des Programms zusammen mit dem Programm eine Kopie dieser Lizenz
zukommen lassen.
Sie dürfen für den physikalischen Vorgang des Zugänglichmachens einer Kopie eine Gebühr verlangen. Wenn Sie es wünschen,
dürfen Sie auch gegen Entgelt eine Garantie für das Programm anbieten.
§2. Sie dürfen Ihre Kopie(n) des Programms oder eines Teils davon verändern, wodurch ein auf dem Programm basierendes
Werk entsteht; Sie dürfen derartige Bearbeitungen unter den Bestimmungen von Paragraph 1 vervielfältigen und verbreiten,
vorausgesetzt, daß zusätzlich alle im folgenden genannten Bedingungen erfüllt werden:
1. Sie müssen die veränderten Dateien mit einem auffälligen Vermerk versehen, der auf die von Ihnen vorgenommene
Modifizierung und das Datum jeder Änderung hinweist.
2. Sie müssen dafür sorgen, daß jede von Ihnen verbreitete oder veröffentlichte Arbeit, die ganz oder teilweise von dem
Programm oder Teilen davon abgeleitet ist, Dritten gegenüber als Ganzes unter den Bedingungen dieser Lizenz ohne
Lizenzgebühren zur Verfügung gestellt wird.
3. Wenn das veränderte Programm normalerweise bei der Ausführung interaktiv Kommandos einliest, müssen Sie dafür sorgen,
daß es, wenn es auf dem üblichsten Wege für solche interaktive Nutzung gestartet wird, eine Meldung ausgibt oder ausdruckt,
die einen geeigneten Copyright-Vermerk enthält sowie einen Hinweis, daß es keine Gewährleistung gibt (oder anderenfalls, daß
Sie Garantie leisten), und daß die Benutzer das Programm unter diesen Bedingungen weiter verbreiten dürfen. Auch muß der
Benutzer darauf hingewiesen werden, wie er eine Kopie dieser Lizenz ansehen kann. (Ausnahme: Wenn das Programm selbst
interaktiv arbeitet, aber normalerweise keine derartige Meldung ausgibt, muß Ihr auf dem Programm basierendes Werk auch
keine solche Meldung ausgeben).
Diese Anforderungen gelten für das bearbeitete Werk als Ganzes. Wenn identifizierbare Teile des Werkes nicht von dem Programm
abgeleitet sind und vernünftigerweise als unabhängige und eigenständige Werke für sich selbst zu betrachten sind, dann gelten
diese Lizenz und ihre Bedingungen nicht für die betroffenen Teile, wenn Sie diese als eigenständige Werke weitergeben. Wenn Sie
jedoch dieselben Abschnitte als Teil eines Ganzen weitergeben, das ein auf dem Programm basierendes Werk darstellt, dann muß
die Weitergabe des Ganzen nach den Bedingungen dieser Lizenz erfolgen, deren Bedingungen für weitere Lizenznehmer somit
auf das gesamte Ganze ausgedehnt werden – und somit auf jeden einzelnen Teil, unabhängig vom jeweiligen Autor.
Somit ist es nicht die Absicht dieses Abschnittes, Rechte für Werke in Anspruch zu nehmen oder Ihnen die Rechte für Werke
streitig zu machen, die komplett von Ihnen geschrieben wurden; vielmehr ist es die Absicht, die Rechte zur Kontrolle der
Verbreitung von Werken, die auf dem Programm basieren oder unter seiner auszugsweisen Verwendung zusammengestellt
worden sind, auszuüben.
Ferner bringt auch das einfache Zusammenlegen eines anderen Werkes, das nicht auf dem Programm basiert, mit dem Programm
oder einem auf dem Programm basierenden Werk auf ein- und demselben Speicher- oder Vertriebsmedium dieses andere Werk
nicht in den Anwendungsbereich dieser Lizenz.
§3. Sie dürfen das Programm (oder ein darauf basierendes Werk gemäß Paragraph 2) als Objectcode oder in ausführbarer
Form unter den Bedingungen der Paragraphen 1 und 2 kopieren und weitergeben – vorausgesetzt, daß Sie außerdem eine der
folgenden Leistungen erbringen:
1. Liefern Sie das Programm zusammen mit dem vollständigen zugehörigen maschinenlesbaren Quelltext auf einem für den
Datenaustausch üblichen Medium aus, wobei die Verteilung unter den Bedingungen der Paragraphen 1 und 2 erfolgen muß.
Oder:
2. Liefern Sie das Programm zusammen mit einem mindestens drei Jahre lang gültigen schriftlichen Angebot aus, jedem
Dritten eine vollständige maschinenlesbare Kopie des Quelltextes zur Verfügung zu stellen – zu nicht höheren Kosten als denen,
die durch das physikalische Zugänglichmachen des Quelltextes anfallen –, wobei der Quelltext unter den Bedingungen der
Paragraphen 1 und 2 auf einem für den Datenaustausch üblichen Medium weitergegeben wird. Oder:
Objectcode zu kopieren.
60
3. Liefern Sie das Programm zusammen mit dem schriftlichen Angebot der Zurverfügungstellung des Quelltextes aus, das Sie
selbst erhalten haben. (Diese Alternative ist nur für nicht-kommerzielle Verbreitung zulässig und nur, wenn Sie das Programm als
Objectcode oder in ausführbarer Form mit einem entsprechenden Angebot gemäß Absatz b erhalten haben.)
Unter dem Quelltext eines Werkes wird diejenige Form des Werkes verstanden, die für Bearbeitungen vorzugsweise verwendet
wird. Für ein ausführbares Programm bedeutet „der komplette Quelltext“: Der Quelltext aller im Programm enthaltenen Module
einschließlich aller zugehörigen Modulschnittstellen-Definitionsdateien sowie der zur Compilation und Installation verwendeten
Skripte. Als besondere Ausnahme jedoch braucht der verteilte Quelltext nichts von dem zu enthalten, was üblicherweise (entweder
als Quelltext oder in binärer Form) zusammen mit den Hauptkomponenten des Betriebssystems (Kernel, Compiler usw.) geliefert
wird, unter dem das Programm läuft – es sei denn, diese Komponente selbst gehört zum ausführbaren Programm.
Wenn die Verbreitung eines ausführbaren Programms oder von Objectcode dadurch erfolgt, daß der Kopierzugriff auf eine dafür
vorgesehene Stelle gewährt wird, so gilt die Gewährung eines gleichwertigen Kopierzugriffs auf den Quelltext von derselben Stelle
als Verbreitung des Quelltextes, auch wenn Dritte nicht dazu gezwungen sind, den Quelltext zusammen mit dem
§4. Sie dürfen das Programm nicht vervielfältigen, verändern, weiter lizenzieren oder verbreiten, sofern es nicht durch diese Lizenz
ausdrücklich gestattet ist. Jeder anderweitige Versuch der Vervielfältigung, Modifizierung, Weiterlizenzierung und Verbreitung ist
nichtig und beendet automatisch Ihre Rechte unter dieser Lizenz. Jedoch werden die Lizenzen Dritter, die von Ihnen Kopien oder
Rechte unter dieser Lizenz erhalten haben, nicht beendet, solange diese die Lizenz voll anerkennen und befolgen.
§5. Sie sind nicht verpflichtet, diese Lizenz anzunehmen, da Sie sie nicht unterzeichnet haben. Jedoch gibt Ihnen nichts anderes
die Erlaubnis, das Programm oder von ihm abgeleitete Werke zu verändern oder zu verbreiten. Diese Handlungen sind gesetzlich
verboten, wenn Sie diese Lizenz nicht anerkennen. Indem Sie das Programm (oder ein darauf basierendes Werk) verändern oder
verbreiten, erklären Sie Ihr Einverständnis mit dieser Lizenz und mit allen ihren Bedingungen bezüglich der Vervielfältigung,
Verbreitung und Veränderung des Programms oder eines darauf basierenden Werks.
§6. Jedesmal, wenn Sie das Programm (oder ein auf dem Programm basierendes Werk) weitergeben, erhält der Empfänger
automatisch vom ursprünglichen Lizenzgeber die Lizenz, das Programm entsprechend den hier festgelegten Bestimmungen
zu vervielfältigen, zu verbreiten und zu verändern. Sie dürfen keine weiteren Einschränkungen der Durchsetzung der hierin
zugestandenen Rechte des Empfängers vornehmen. Sie sind nicht dafür verantwortlich, die Einhaltung dieser Lizenz durch Dritte
durchzusetzen.
§7. Sollten Ihnen infolge eines Gerichtsurteils, des Vorwurfs einer Patentverletzung oder aus einem anderen Grunde (nicht
auf Patentfragen begrenzt) Bedingungen (durch Gerichtsbeschluß, Vergleich oder anderweitig) auferlegt werden, die den
Bedingungen dieser Lizenz widersprechen, so befreien Sie diese Umstände nicht von den Bestimmungen dieser Lizenz. Wenn es
Ihnen nicht möglich ist, das Programm unter gleichzeitiger Beachtung der Bedingungen in dieser Lizenz und Ihrer anderweitigen
Verpflichtungen zu verbreiten, dann dürfen Sie als Folge das Programm überhaupt nicht verbreiten. Wenn zum Beispiel ein Patent
nicht die gebührenfreie Weiterverbreitung des Programms durch diejenigen erlaubt, die das Programm direkt oder indirekt von
Ihnen erhalten haben, dann besteht der einzige Weg, sowohl das Patentrecht als auch diese Lizenz zu befolgen, darin, ganz auf die
Verbreitung des Programms zu verzichten.
Sollte sich ein Teil dieses Paragraphen als ungültig oder unter bestimmten Umständen nicht durchsetzbar erweisen, so soll dieser
Paragraph seinem Sinne nach angewandt werden; im übrigen soll dieser Paragraph als Ganzes gelten.
Zweck dieses Paragraphen ist nicht, Sie dazu zu bringen, irgendwelche Patente oder andere Eigentumsansprüche zu verletzen oder
die Gültigkeit solcher Ansprüche zu bestreiten; dieser Paragraph hat einzig den Zweck, die Integrität des Verbreitungssystems der
freien Software zu schützen, das durch die Praxis öffentlicher Lizenzen verwirklicht wird. Viele Leute haben großzügige Beiträge zu
dem großen Angebot der mit diesem System verbreiteten Software im Vertrauen auf die konsistente Anwendung dieses Systems
61
geleistet; es liegt am Autor/Geber, zu entscheiden, ob er die Software mittels irgendeines anderen Systems verbreiten will; ein
Lizenznehmer hat auf diese Entscheidung keinen Einfluß.
Dieser Paragraph ist dazu gedacht, deutlich klarzustellen, was als Konsequenz aus dem Rest dieser Lizenz betrachtet wird.
§8. Wenn die Verbreitung und/oder die Benutzung des Programms in bestimmten Staaten entweder durch Patente oder durch
urheberrechtlich geschützte Schnittstellen eingeschränkt ist, kann der Urheberrechtsinhaber, der das Programm unter diese Lizenz
gestellt hat, eine explizite geographische Begrenzung der Verbreitung angeben, in der diese Staaten ausgeschlossen werden, so daß
die Verbreitung nur innerhalb und zwischen den Staaten erlaubt ist, die nicht ausgeschlossen sind. In einem solchen Fall beinhaltet
diese Lizenz die Beschränkung, als wäre sie in diesem Text niedergeschrieben.
§9. Die Free Software Foundation kann von Zeit zu Zeit überarbeitete und/oder neue Versionen der General Public
Licenseveröffentlichen. Solche neuen Versionen werden vom Grundprinzip her der gegenwärtigen entsprechen, können aber im
Detail abweichen, um neuen Problemen und Anforderungen gerecht zu werden.
Jede Version dieser Lizenz hat eine eindeutige Versionsnummer. Wenn in einem Programm angegeben wird, daß es dieser Lizenz in
einer bestimmten Versionsnummer oder „jeder späteren Version“ (“any later version”) unterliegt, so haben Sie die Wahl, entweder
den Bestimmungen der genannten Version zu folgen oder denen jeder beliebigen späteren Version, die von der Free Software
Foundation veröffentlicht wurde. Wenn das Programm keine Versionsnummer angibt, können Sie eine beliebige Version wählen, die
je von der Free Software Foundation veröffentlicht wurde.
§10. Wenn Sie den Wunsch haben, Teile des Programms in anderen freien Programmen zu verwenden, deren Bedingungen für
die Verbreitung anders sind, schreiben Sie an den Autor, um ihn um die Erlaubnis zu bitten. Für Software, die unter dem Copyright
derFree Software Foundation steht, schreiben Sie an die Free Software Foundation; wir machen zu diesem Zweck gelegentlich
Ausnahmen. Unsere Entscheidung wird von den beiden Zielen geleitet werden, zum einen den freien Status aller von unserer freien
Software abgeleiteten Werke zu erhalten und zum anderen das gemeinschaftliche Nutzen und Wiederverwenden von Software im
allgemeinen zu fördern.
Keine Gewährleistung
§11. Da das Programm ohne jegliche Kosten lizenziert wird, besteht keinerlei Gewährleistung für das Programm, soweit dies
gesetzlich zulässig ist. Sofern nicht anderweitig schriftlich bestätigt, stellen die Copyright-Inhaber und/oder Dritte das Programm so
zur Verfügung, „wie es ist“, ohne irgendeine Gewährleistung, weder ausdrücklich noch implizit, einschließlich – aber nicht begrenzt
auf – Marktreife oder Verwendbarkeit für einen bestimmten Zweck. Das volle Risiko bezüglich Qualität und Leistungsfähigkeit
des Programms liegt bei Ihnen. Sollte sich das Programm als fehlerhaft herausstellen, liegen die Kosten für notwendigen Service,
Reparatur oder Korrektur bei Ihnen.
§12. In keinem Fall, außer wenn durch geltendes Recht gefordert oder schriftlich zugesichert, ist irgendein Copyright-Inhaber
oder irgendein Dritter, der das Programm wie oben erlaubt modifiziert oder verbreitet hat, Ihnen gegenüber für irgendwelche
Schäden haftbar, einschließlich jeglicher allgemeiner oder spezieller Schäden, Schäden durch Seiteneffekte (Nebenwirkungen) oder
Folgeschäden, die aus der Benutzung des Programms oder der Unbenutzbarkeit des Programms folgen (einschließlich – aber nicht
beschränkt auf – Datenverluste, fehlerhafte Verarbeitung von Daten, Verluste, die von Ihnen oder anderen getragen werden müssen,
oder dem Unvermögen des Programms, mit irgendeinem anderen Programm zusammenzuarbeiten), selbst wenn ein CopyrightInhaber oder Dritter über die Möglichkeit solcher Schäden unterrichtet worden war.
Ende der Bedingungen
62
8. FEHLERBEHEBUNG
Problem
Keine Anzeige auf dem
Display des Receivers
Lösung
• Prüfen Sie das Stromanschlusskabel des Receivers auf Beschädigungen.
Prüfen Sie, ob das Kabel in eine Steck-dose eingesteckt ist, die unter
Spannung steht.
• Prüfen Sie, ob der Hauptschalter auf der Rückseite des Receivers auf ‘ON’ steht.
Kein Bild
• Prüfen Sie die Punkte, die unter ‘Keine Anzeige auf dem
Display des Receivers’ stehen.
• Um ein mit Ihrem Fernseher kompatibles Bildformat (PAL/NTSC) einzustellen,
drücken Sie die V.Format Taste wiederholt, bis ein Bild angezeigt wird.
• Prüfen Sie, dass das Videokabel korrekt mit dem Fernseher und dem
Receiver verbunden ist.
• Prüfen Sie, dass Sie am Fernseher den richtigen Video-eingang gewählt haben.
• Drücken Sie die STB Taste auf der Fernbedienung des Receivers.
So stellen Sie sicher, dass Sie den Receiver steuern und kein
anderes Gerät (TV oder DVD Einstellung)
• Prüfen Sie die Einstellung der Bildhelligkeit am Fernseher.
• Prüfen Sie, welche Auflösungen Ihr Fernseher unterstützt und
wählen Sie eine geeignete Auflösung mit Hilfe der Resolution
Taste auf der Fernbedienung.
Schlechte Bildqualität
• Prüfen Sie die Punkte, die unter ‘Kein Bild’ stehen.
• Prüfen Sie den Pegel des Antennensignales. Falls dieser zu niedrig ist,
versuchen Sie die Satellitenschüssel einzustellen.
Kein Ton
• Prüfen Sie die Punkte, die unter ‘Kein Bild’ stehen.
• Prüfen Sie die Lautstärkeeinstellungen am Fernseher und am Receiver.
• Prüfen Sie die Mute/Tonlos Einstellung am Fernseher und am Receiver.
Fernbedienung geht nicht
• Richten Sie die Fernbedienung direkt auf den Receiver.
• Prüfen Sie, ob die STB Taste aufleuchtet, wenn Sie eine Taste auf der
Fernbedienung drücken. Falls nicht, drücken Sie die STB Taste.
• Prüfen Sie die Batterien und tauschen Sie diese falls nötig aus.
• Prüfen Sie den LNB. Tauschen Sie den LNB ggf. aus.
• Prüfen Sie die Kabelverbindung vom LNB zum Receiver
• Prüfen Sie die Ausrichtung der Satellitenschüssel und korrigieren
Sie diese falls nötig.
• Wenn Sie einen DiSEqC 1.0 Schalter verwenden, prüfen Sie die korrekte
Verbindung zum LNB und die Programmierung.
• Prüfen Sie den Signalpegel- und die Signal-qualitätsanzeige.
Kein oder schlechtes Signal
63
APPENDIX/ANHANG
AOC
4523 4648
A.R. Systems 8644 7213 6896 5090 7014
Accent
7647 8644 6896 3637
Acer
3857
Apollo
4659
Arcam
4469
Arc en Ciel
7430
Action
4523 5510 3637 4648
Ardem
2590 8060 8644 5613 6896
Adcom
4884
Aristona
6896 8644 4648
ADL
7855
ART Tech
Admiral
3193 2438 5553 5605 3488 3637 4648
Adventura
5874
Adventuri
5874
Adyson
4469 4523 4648
4648
Arthur Martin 5605
ASA
4819 6092 4265
Asberg
8644 6896 4648
Asora
7647 3637
AEA
8644 6896
Astra
8644 6896 3637
AEG
5952 6305 5319
Asuka
4016 4469 3488 5896
Agashi
4469 3488
ATD
2924
AGB
8568
Atlantic
8644 6896 4469 4648
7647 8644 6896 4469 4530 6482 5739
3350 3518 3488 3637
Atori
7647 3637
Atoro
3637
Auchan
5605
Hersteller
Aiko
Codes
Aim
8644 6764 6896 3036 7910 8435 8484
Aiwa
5448 7733 6736
Akai
3350
3518
5605
8394
7733
3637
7910
6482
8568
4469
4659
5874
4530
7647
6381
3488
3451
4648
3011
3036
2810
5393
5905
8644
4016
6896
2796
4925
Akashi
7314 7647
Akiba
4016 5896 7014 8644 6896
Akira
5553
Akito
8644 6896
Akura
Alaron
Alba
7507 6812 7647 5090 6764 8644 6896
4469 6305 5620 3488 4698 3637
7855
4469
7430 6127 6982 5301 7910 3453
Barco
5605
8644 3840 6896 8060 7647 5553 7287
4530 5355 7384 4016 4469 5531 5605
6230 6812 7733 5119 4925 3637 4648
Basic Line
4677
Ansonic
7733
AWA
Baird
All-Tel
Anitech
5531
AVP
8060
8644 6896 4648
Anglo
2924
Autovox
B&D
6482
Anam
National
Andersson
4648
Audioworld
8644 6896 5355 6764 7647 4016 5896
3488 8060 7066 3637 4648
Allstar
Anam
2590 7287 3488 3637
Audiovox
7647
4648
Amstrad
Audioton
Axxon
Alkos
Amplivision
6669
8060
8020
3840
3802
7647 8644 5090 8033 6896 7430 8060
6381 7287 3488 4016 2590 3637 4648
Axxent
Alfa
American
High
Americana
5739
2429
4783
6305
4523
Audiosonic
Bauer
Baur
5510
5510
7287
7647 8568 3488 4530 4016 8644 6896
5739 6764 8377 3840 3451 7066 3637
8644 6896 7647 4526
8644 6896 4526
5319 7660
7647 3488 3637
7647 3488 8644 6896 5896 4523 3637
4648
7287 8644 6896 7647 5355 5090 5605
2620 5531 4917 3637
64
3637 4648 5090 8644 5605 5355 6896
7647 4016 5896 7014 6559 3840
8484 7647
7647 6640 5265 3835 8644 6896 3518
3350 6736 3637 5874 4648
Beaumark
5393
BEC
4648
Becrese
4523 3802 5874 4648
Beko
8060 6482 2590 7287 8644 5553 3840
6896 6305 6381 7361 4648
Bell & Howell 4648
Belson
4156 4706
Benchmark4523 5510 3637 4648
Beaumark
Bennett
6896 8644
BenQ
8016
Beon
8644 6896 5553 4648
Berthen
5355
Best
7287
Bestar
8644 6896 7287 5090 4648
BestarDaewoo
5090
Bigston
Black
Diamond
Black Star
3637
5319 8033 3840 6896 7837 3036
5531
Black Strip
6482 3802 5510
Black Way
5896 4016
Blaupunkt
3518 6640 5265 6538 7839 5186 7014
4849 6812
Blue Sky
8644 8060 3840 6230 5355 6381 2499
6896 4016 5896 7014 7733 4156 7361
6685 4648
Blue Star
5896
Bondstec
5531
Boots
7647
Bosch
7839
BPL
8644 6896 5896
Brandt
4884 7430 4422 3270 6982 3847
Brandt
Electronique
Brend Star
Cihan
4648
Cimline
7647 4016 3637
Cinex
3451 5952
Circuit City
4523 3802 5874
Citizen
4523 5510 4648
City
7647 3637
Clarivox
5553 8644 6896 4265
Clatronic
Clayton
3840
CMS
4469
Cobolt
5397
Colortyme
5510 4648
Combitech
7733
Computron
3637
Concorde
7647 3637
Condor
4422 3270
8644 7287 4530 8060 4016 3488 6896
5531 7647 3451 6305 5319 3637
8644 6896 7287 4469 7647 5896 5531
5553 2620 5605 3488 3637 4648
3637
Brinkmann
Conia
8644 6896 5355 7350 5553 2590
3491 7837 4706 8033
Brionvega
Conic
8644 6896 8377 4648
4523 3802 4648
Briorryega
Conrac
4648
7361
Britannia
Conrad
4469
8644 6896
Brockwood
Contec
4523 3802 5874
Broksonic
4523 3802 5874
Brother
3488
Bruns
2590
BSR
5605 3350
BTC
Cosmel
4016
7647 8644 6896 3637
Craig
4648
Crosley
5531 4752 6634 5605 3802 5874 4648
Bush
5355
5896
3840
8060
4016
7384
6230
5832
5605
2438
7910
7733
Continental
Edison
Coronado
7647
5090
5952
5453
6812
7350
5905
3802
8644 4530
3488 3350
2924 6896
4648
Crown
4469 7647 7507 6812 3488 8644 6896
3802 3637
7430 4422 6230
4523
7647 5716 7287 2590 8644 6896 6230
8060 6305 6381 5553 7910 4638 6559
3840 4523 3637 4648
Cample
4523 3802 5874
Candle
4523
Canton
4016
Capehart
4523 3802 4648
Capsonic
3488
Carad
2696 8644 6896 5355 3840
Carena
7014 8644 6896
Carrefour
6812 4265 8644 6896 4648
Carver
4849 4648
Cascade
7647 8644 6896
Casio
8644 6896 5605 4648
Cathay
8644 6896
CCE
8644 6896
Celestial
6498 8033 7837
Centrex
7046 5397
Centrum
3840
Centurion
8644 6896 4648
Century
5531
Dansette
CGE
6764
4752 6634 5553 5531 7287 5605 3637
Dantax
CGM
7287 2590 8060 6305 6381 7733
3637
Datsura
CIE
7910
3637
Dawa
7647 8644 6896 4648
Crystal
CS
Electronics
CTC
4648
4469 4016 5531
5531
CTX
8016
Curtis Mathes 4523 3802 5510 4648 3193
Cybertron
4016 3802
Cytronix
3191
Daewoo
Daichi
3637
Dainichi
4016 4469
Daitsu
4201
Dansai
65
5295 5090 2499 4874 3876 8644 6896
7647 4469 4016 6286 7733 3118 2016
3620 4677 4523 3637 4648
8644 6896 3488 6482 4469 7647 6812
7910 4523
Electro Tech
Daytek
2924 4979 8435 4698
Dayton
4979
Daytron
7647 5090 8644 6896 4523 3637
DEC
4167 7314 5397
3637
Electrobrand 5874
Electrohome 4523 3802 5874
Electronika
4648
Decca
8568 8644 6896 6286 7733 4648
Elekta
7647 8644 6896 3488 5896 3637
de Graaf
7910 5605 4783 2438
Elfunk
3573 3840
Deitron
8644 6896 5090 4016
ELG
8644 6896
Denko
3488
Elin
Denver
8644 6896 6305 4485 8299 3637
DER
6127
Desmet
Elite
8644 6896 7647 3637 4648
4016 8644 6896 4523 3802 5510 4648
Diamant
Elta
8644 6896
7647 3488 4469 3637
Emco
5531
3488 2924 7647 4777 4469 4530 7314
8033 3637
Emerson
Diamond
Digatron
8644 6896
Digihome
7660
Digiline
8644 6896 4819 5355
DigiLogic
8644 6896
Digitek
8033
Digitor
8644 6896 6641
Digivision
3350
DigiX
3118
DiK
8644 6896
Dixi
7647 8644 6896 5531 3637 4648
DL
5397 7046 8644 8299 4677
Domeos
5355
Domland
3158
4469 8644 6896 4819 4783 3350 5605
7647 3637 4648
8060 5393 5531 8644 6896 4530 4265
5896 3350 2499 2590 7287 5605 5355
4523 3802 5874
Emperor
5896
Enzer
3036
EON
3802 5510
Erres
8644 6896 4648
ESC
8644 6896
Estèle
5605
Etron
4709 8644 6896 7647 5605 8033 3637
Eurofeel
3488
EuroLine
8644
Euroman
4469 3488 8644 6896 7287
Euromann
4648
Europa
8644 6896
Europhon
8644 8568 5605 6896 5531 4469 4648
Evesham
4596
Excel
8644 6896
6982 7350 8644 6896 7213 3158 5605
6286 8394 7660 3840 4648 3637
Expert
5605
Exquisit
Dumont
8644 6896 5531
4265 4523 3802 5874
Fagor
Dunai
8644 6896
5605
Fairtec
Durabrand
4156
8644 4917 6896
Family Life
Dux
8644 6896
8644 6896
Fast
D-Vision
3634
8644 7066 6896
Fenner
DVX
5090 7647 3637
5397
Ferguson
Dynamic
3637
Dynatech
4523 3802 5874
Dynatron
8644 6896
Easy Living
4596 5905
Eaton
5510
Ecco
2335 8435
ECR
3802
Dream Vision 8561
DSE
6641 5952 8033
DTS
7647 3637
Dual
EdisonMinerva
Elbe
Fidelis
Fidelity
Filsai
Finlandia
6230
3444 8377 7287 5605 8644 6896 4016
3518 2620 2696 8568 3350
Elbe-Sharp
8568
Elbit
4648
Elcit
5531 8568 5605
Elecs
4648
Electratune
4523
Finlux
Firstline
66
5301 4884 4422 3270 6127 7430 3847
8644 6896 6482 6982 4638 5620 3350
4783 5119 3840 4648
3637
5605 3835 2438 8644 6896 4530 6764
6127 4469 3488 7733 3350
3637
7910 6092 4783 3350 5605 2438 4422
6982
4819 8644 6896 8060 6092 5605 8568
6381 4265 2620 8394 6753 8020 5952
4659 5553 6305 7361 3637 4648
8644 6896 5090 5355 8060 5605 7647
4469 5531 2499 2620 7910 3350 3840
4156 7361 6685 5319 3637 4648
Fisher
6812 7910 7287 3350 5605 3802
Gradiente
4638 4849 8644 6896
Flint
8644 6896 2696 4016 7014 3488 4648
Gradin
3637 4648
Force
7660
Graetz
Forgestone
6127
Formenti
5605 8644 6896 2590 4469 4648
FormentiPhoenix
Fortress
3193 4523 3802
Grandin
Fraba
8644 6896 7287
Friac
7647 8644 6896 7287 4874 2696
Frontech
5531 3488 2438 7647 5605 3637
Fujimaro
4677
Fujitsu
Fujitsu
General
Fujitsu
Siemens
Funai
3451
Grenadier
3637
Gronic
5605
7647 5605
Grundig
5265 4679 6640 3518 8435 6896 8299
7647 4265 6230 8644 5119 6812 7287
4925 7733 6948 5393 4698 6982
Grunkel
5319
GTT
3637
H&B
7361
Haaz
8435
Haier
2924 3488
Halifax
3488 4469
3191 5905 5319
5355 3488 6764 4523 3802 5874
7314
3488 4167 7314
Future
8644 6896
Galaxi
8644 6896 3350 5605
Galaxis
7287 5553 8644 6896
Galeria
7647 3637
GBC
5605 7647 5090 4016 2438 3637
Hallmark
6982 5393 5896 3847 4422 7430 3270
4884
Geant Casino 5605
GEC
5605 3350 8644 8568 6896
Geloso
5531 7647 2438 5605 5090 3637
Gemsound
3637
General
Electric
General
Technic
Genesis
8644 6896 7647 5605 5090 5896 4016
7014 2696 8060 6381 5355 3840 4677
4156 3118
Granprix
Futronic
General
8644 6896 3001 5620 4659 3270 3847
5605 7910 6812 6559 8568 2438 3952
6982 4783 4648
5605 7647 7213 8644 6896 3350 8360
4523 3802 5874
Furichi
GE
Granada
4469
8060 3350 4530 5605 8644 6559 6896
5319
7430 4422 3637
4523 3802 5874
Hammerstein 3488
Hampton
4469
Hanimex
Hanseatic
4016 7733
8644 6896 4874 7350 5605 3350 5896
3158 5295 7287 3876 7647 7361 2590
3637 4648 2796 8060
Hantarex
7647 8644 6896 8568 3637 4648
Hantor
8644 6896
3637 7647
Harley
Davidson
Harrad
6982 4422
Harsper
4677
7647 8644 6896
Harvard
4523 3802 5874
Harwa
2335 3453 7789
Harwood
7647 6764 8644 6896 6230
Hauppauge
8644 6896
4523 3802 5510 5874
4523 3802 5874
Genexxa
4016 8644 6896 6764 5605 7647 4648
Gericom
4677 3191 7855 3118
Gitem
4648
GM
3637
GMG
3637
Goldfunk
5355
Heathkit
5874 4648
Goldhand
4469 3637
Hedzon
6896 8644
Hema
7647
Hicon
2519
Hifivox
7430
Higashi
4469
Highline
3488 8644 6896
Hikona
4016
Hiline
3637
GoldStar
Gooding
HCM
8644 7647 7287 4709 2796 5393 5531
4469 6896 5605 3350 7430 2438 6305
8060 6381 7014 4523 5510 4648
Gorenje
6230
5295
5355
6230
4016
4698
7287
GPM
4016 3637
Goodmans
5905
2499
4530
7733
3637
3840
5090
6982
3876
4648
8644
6812
6482
5832
4874
3488
8020
3118
6896
8568
3847
6948
8060
7647
3270
8299
67
Hinari
7647 6764 8644 6896 4016 5553 5896
3488 3637
7910 8644 6896 7647 4016 6812 5605
7384 5119 6230 3488 7733 3802 3637
4648
Hisawa
6685
3952
Hitachi
4783
7040
4819
8374
Hitachi Fujian 5620
Hitsu
7647
7910
6069
5620
5393
6753
7660
3952
Intervision
4889
4659
8568
4737
3802
6812
5605
6972
3350
5874
6896
6982
4874
3835
4648
7430
6619
8644
8020
2438
5295
6286
3840
2696 7014 4016
HMV
6127
Höher
8060 5952 4677
Home
Electronics
Horizont
International
5896 4016 7014 2696 7733 8060
Hisense
8644 6896 4648
Hoshai
4016 7014 5896
Huanyu
5090 4469
Hugoson
3094 7855
Hygashi
4469
Hyper
7647 4469 5531 3637 4648
Hypersonic
3350
4648
Isukai
4016 8644 6896 5896 7014 4648
ITL
3637
ITT
4648
7647 8644 6896 4016 5531 4530 3637
4648
IST
ITS
6305
Hornyphon
Irradio
4469
5896 7014 8644 4530 2796 7350 2590
7287 3488 5531 7647 6896 3158 6230
4016 5605
ITT Nokia
8644 4530 4016 5896 3488 4469 7647
6896 3637
5605 8020 3350 4659 4783 6127 6092
6559 7910 2696
3350 4783 5605 4659 6305 2696 8394
2438 8020 6092 7910 6559
ITV
3488 8644 6896 5531 5090
JBL
4648
JCB
5874
JDV
7066
Jean
6812
JEC
6482
Jetpoint
5510 4648
JMB
8644 4677 6896 8435 7314 3036 3620
5952
8644 4874 5295 5090 6896 5119 7733
Jocel
5716
Jubilee
6896
8644 6896
Jumbotroic
4648
3488 8644 4530 7647 6896 4016 4469
3637 4648
JVC
Ices
4016 4469
Kaiser
Ict
8644 6286 6896
IISonic
4698
Iiyama
7855 3094
Kambrook
2796
IMA
4523 3802 5874
Kamp
4469
Kapsch
5605 3350
Hypson
Hyundai
Iberia
ICE
Imperial
8644 6896 8060 6381 3488 5896 7014
7733 3840 5355 2590 3637 4648
8644 5605 7287 4752 6634 6896 2620
3350 5553 5531 4648
Indiana
8644 6896 4648
Infinity
4648
InFocus
3251
Ingelen
6230 2696 8060 5605 3350
Ingersoll
7647 3637
Inno Hit
7350 8644 6896
Innowert
4677 3191
Inotech
2335 8033
Interbuy
8644 6896 3835 7839 5605 3350 7287
7430 2620
7647 8644 3488 5531 3835 6896 3637
Interdiscount 4648
Interfunk
8644 6896 3835 7839 5605 3350 7287
7430 5531 6538 4648
Internal
Karcher
4648
4016 5896 8644 6896 4469 7014 7647
3637 4648
8644 6896 7287 2696 5605 5896 3488
5453 8060 5952 6305 3637 4648
Kathrein
6896 8644
Kawa
4530
Kawasho
7647 8644 6896 4016 3637 4648 5896
5319 8568 5531
Innovation
Interactive
Kaisui
4638 6812 6127 4530 4016 6305 5553
3193 4526 3802 4648
8644 6896 4874 5090 2499
68
4469
KB Aristocrat 5605
Kendo
2696 8644 6896 5605 7350 3835 7287
2796 2438 2620 5531 8377 3451 3840
4917 2590 3637 4648
Kendwood
4523
Kennedy
5605 3444
Kennex
Kenwood
4819
Kingsley
4469
Kiota
4709 3637
Kiton
6896 8644 5355
KLH
4523 3802 5874
Kloss
5510
Kneissel
8644 7287 2696 2620 5090 4874 6896
3444 8377 7733
Kobic
3637
Kobra
2519
Kolster
8644 6896 5531 4016 4648
Konichi
7647 3637
Konka
6230
Korpel
8644 6896 4648
Korting
7287
Kosmos
8644 6896
Kotron
6764 3488
Koyoda
7647
KTV
4523 3802 5874
Kuasho
Kuba
Kyoto
L&S
Electronic
LaSAT
Luxor
2438 8644 6896 8377 5605 3350 3488
5301
4648 8644 7647 6896
5319 2438 8020 6753 6092 4659 3840
8394 3350 7910 4783 5605
LXI
5393 4648
M Electronics 3637 4648
Macys
4523 3802
Madison
8644 6896
5531 8568 5605 3637 4648
Magnafon
4523 4648
4648 8568 4469 5301
Magnasonic
5605
4523 3637 4648
Magnavox
8644 6896 6812 7046 3802 4648
5605
Magnum
3451 8060 8644 6896 6381 3730
Mandor
3488
Manesth
8644 6896 3488 6482 5605 2438 4648
Manhattan
8644 6896 5355 3840 4201 5605 5453
Marantz
8644 6896 6764 4648
Marcys
3802
6764 5553 3488
5605 4469
4677 8060
2590 7287
3840 8644 5605
Leader
7647 3637
Lecson
8644 6896
Legend
7647 3637
Lemair
2620
Lenoir
Lux May
8644 2438 5605 2620 6896 5090 7647
8377 3637 4648
Magnadyne
Lavis
Lenco
Lumatron
8644 6896 4530 8060 5553 4016 8485
8299 3491 4706
Kontakt
Kuba
Electronic
Kyoshu
Luma
Mark
Master's
4874 8644
Masuda
4016 4530 7647 3488 8644 6896
Matsui
8644 7647 5605 5090 6896 8299 3840
3637 4648
3637 7647
8644 6896 4469 5090 7647 8060 6381
4648
8644
7910
3270
3840
6896
7507
8060
3637
6230 7647 5605 8568 6482
7384 6812 4530 5265 3518
5739 5119 2438 7014 7733
4648
Matsushita
4526
Matsuviama
8299
Mava
4523
Max-Multi
4648
Max-Tip1
3637
8644 5393 7287 7647 7430 2924 6381
8265 2796 5447 4709 6896 4156 6944
4312 5531 8060 4469 5605 6305 3350
Max-Tip4
4648
Maxam
3488 3637
Maxdorf
2335
7839 8644 6896 4648 8644 7839 5186
6896
Maxell
3637
Maxim
7066 5952
Life
3637
MCE
7647 3637
Lifetec
8644 7647 7350 5090 5355 3835 3840
6286 6896 4016 3488 4596 8060 3637
4648
Mediator
8644 6896 4648
Medion
8644 8060 7361 7350 2924 7733 3840
4917 5355 6896 3835 6286 5832 4596
3118 3730
Megas
2696
Megatron
5393
MEI
3840 8644 6896
Melectronic
7507 2924 2335 7647 6127 3488 4530
4709 3118 7855 3840
6092 8644 3835 7430 2620 5605 4422
6896 6982 5531 4819 5090 5295 3350
3518 5265 7647 8020 6753 4469 3876
8060
Memorex
7647 5393 4526 3637
Logix
5355 7350
Memphis
3637 7647
Luker
7066
Mercury
4709 8644 7647 6896 3637
Lesa
5531
Levis Austria 8644 6896
Lexsor
3453
Leyco
LG
Liesenkötter
3488 8644 6896 4648
Linitron
4523 3802
Lloyd
4523 3802 3637 5874
Lloyd's
4709 7647
Lodos
3840 7660
Loewe
Logik
3835 5613 7337 8644 6896 7287 8377
8568 4648
69
Merritt
Metz
Netsat
4783 3350 5605
2769 6975 5313 2410 8644 6896 8299
5355 5319 5265 6640 3518 3840 7324
Neufunk
8644 6896
8644 7647 6896 2696 4016 5896 8060
8644 7647 6896 6982 3637 4648
MGA
5393 8644 6896 4016
New World
4016
Micromaxx
8644 6896 5355 3840 7361
Nicamagic
4469
Microstar
7361
MicroTEK
8033
Midland
4523
Nikkei
Mikomi
8060
7660
Nikko
Minato
5393
8644 6896
Nissan
Minerva
5510
6230 6640 5265 4265 3518 8568 5620
Noblex
Minoka
3637
6764 8644 6896 4648
Nobliko
4265 4469
Mirror
5832
Nogamatic
7430
Mistral
Electronics
Mitsubishi
Mitsuri
General
Mivar
Nikkai
Nokia
6127
5620 3193 3835 8644 5393 6812 6127
6640 6896 7910 3840 3802 3637 4648
5605
Noname
Nordmende
7287 4469 4318 8568
4016 8644 6896 3488 6482 4469 7647
6812 4523 4648
3350 5605 8020 4783 5090 8394 6305
6092 6753 4659 6559 7910 2696 7430
5510 3637 4648
4648
7430 8060 5397 4422 6896 3270 5605
5905 3847 6982 5265 8644 4648
Monaco
7647
Norfolk
5605
Monitor
5510
Normerel
8644 6896
Morgan's
8644 6896
Novabeam
4648
Motorola
3193 4648
Novak
8644 6896
MTC
3835 5605 4469 3350 4523 5510
Novatronic
8644 4819 5090 6896 3637 4648
MTlogic
8060 6948
Nurnberg
5605 3350
NU-TEC
7014 2924
O Genteral
3637
Oceanic
5605 3350 7910 4659 4783 8020
Odeon
3488
Okano
7287 8644 6896 3488 7647 3637
Olidata
4698
Olympic
3637
Omega
3488
Omni
7046 5397 2924
Onceas
3637
Onwa
4530 2810 4016 5739
Opera
8644 6896 4648
Optimus
4526
Optonica
3193
Orava
4648
Orbit
8644 6896 4648
Orcom
4262
Orient
3637
6127
Multibroadcast
Multitec
8644 6896 2590 5355 3840 5952
Multitech
7647 2438 2590 8644 7287 6896 4469
5531 3488 4523 3802 3637 5874 4648
Murphy
4469 5605
Musikland
8644 4016 5531 6896
MyCom
4698 5393
Myryad
6896 8644
NAD
5393 3350 5605 3802
Naiko
8644 7066 6305 6896
Nakimura
5090 8644 6896
Namsunc
3637
Naonis
2438 5605
NAP
4648
Narita
7066
NAT
3001
National
3001 4648
NEC
Orion
4849 8299 7976 3726 8644 6896 7507
8561 6812 7014 7647 5090 4874 4638
3876 3637 3802 5510
8644 5119 7384 6896 6764 8568 7733
3118 8060 7507 7647 3488 3453 3637
5874 4648 4523 3802
Orline
8644 3518 7287 6736 5553 5531 2620
2438 6538 6896 5605 7839 3835 3637
5874 4648
8644 4016 6896
Ormond
5355 3840 8644 6896
Orsowe
8568
Osaki
NEI
4016 3488 8644 6764 5090 7384 6896
8644 6896 4530 5605 4648
Osio
8644 6896
Neovia
4677 4698
Oso
4016
Nesco
5531 7733
Osume
6812 4016 8644 6896
Neckermann
70
Merritt
Metz
Netsat
4783 3350 5605
2769 6975 5313 2410 8644 6896 8299
5355 5319 5265 6640 3518 3840 7324
Neufunk
8644 6896
8644 7647 6896 2696 4016 5896 8060
8644 7647 6896 6982 3637 4648
MGA
5393 8644 6896 4016
New World
4016
Micromaxx
8644 6896 5355 3840 7361
Nicamagic
4469
Microstar
7361
MicroTEK
8033
Midland
4523
Nikkei
Mikomi
8060
7660
Nikko
Minato
5393
8644 6896
Nissan
Minerva
5510
6230 6640 5265 4265 3518 8568 5620
Noblex
Minoka
3637
6764 8644 6896 4648
Nobliko
4265 4469
Mirror
5832
Nogamatic
7430
Mistral
Electronics
Mitsubishi
Mitsuri
General
Mivar
Nikkai
Nokia
6127
5620 3193 3835 8644 5393 6812 6127
6640 6896 7910 3840 3802 3637 4648
5605
Noname
Nordmende
7287 4469 4318 8568
4016 8644 6896 3488 6482 4469 7647
6812 4523 4648
3350 5605 8020 4783 5090 8394 6305
6092 6753 4659 6559 7910 2696 7430
5510 3637 4648
4648
7430 8060 5397 4422 6896 3270 5605
5905 3847 6982 5265 8644 4648
Monaco
7647
Norfolk
5605
Monitor
5510
Normerel
8644 6896
Morgan's
8644 6896
Novabeam
4648
Motorola
3193 4648
Novak
8644 6896
MTC
3835 5605 4469 3350 4523 5510
Novatronic
8644 4819 5090 6896 3637 4648
MTlogic
8060 6948
Nurnberg
5605 3350
NU-TEC
7014 2924
O Genteral
3637
Oceanic
5605 3350 7910 4659 4783 8020
Odeon
3488
Okano
7287 8644 6896 3488 7647 3637
Olidata
4698
Olympic
3637
Omega
3488
Omni
7046 5397 2924
Onceas
3637
Onwa
4530 2810 4016 5739
Opera
8644 6896 4648
Optimus
4526
Optonica
3193
Orava
4648
Orbit
8644 6896 4648
Orcom
4262
Orient
3637
6127
Multibroadcast
Multitec
8644 6896 2590 5355 3840 5952
Multitech
7647 2438 2590 8644 7287 6896 4469
5531 3488 4523 3802 3637 5874 4648
Murphy
4469 5605
Musikland
8644 4016 5531 6896
MyCom
4698 5393
Myryad
6896 8644
NAD
5393 3350 5605 3802
Naiko
8644 7066 6305 6896
Nakimura
5090 8644 6896
Namsunc
3637
Naonis
2438 5605
NAP
4648
Narita
7066
NAT
3001
National
3001 4648
NEC
Orion
4849 8299 7976 3726 8644 6896 7507
8561 6812 7014 7647 5090 4874 4638
3876 3637 3802 5510
8644 5119 7384 6896 6764 8568 7733
3118 8060 7507 7647 3488 3453 3637
5874 4648 4523 3802
Orline
8644 3518 7287 6736 5553 5531 2620
2438 6538 6896 5605 7839 3835 3637
5874 4648
8644 4016 6896
Ormond
5355 3840 8644 6896
Orsowe
8568
Osaki
NEI
4016 3488 8644 6764 5090 7384 6896
8644 6896 4530 5605 4648
Osio
8644 6896
Neovia
4677 4698
Oso
4016
Nesco
5531 7733
Osume
6812 4016 8644 6896
Neckermann
71
OTF
Otto Versand
President
3637
3802 3637 5874 7350 3518 3350 7430
3001 6736 6812 3193 3835 5531 7647
5896 6982 8644 6896 6640 5265 8568
OVP
4648
Pace
7733
Pacific
8644 6896 6286 8060 3840 5119
Pael
4469
Palladium
Palsonic
7287 8644 2620 8060 5553 6896 5531
7839 6286 3518 6736 6538 5605 7350
2438 4648
Prima
7314
7647 3488 6764 7789 4523 3802 5510
3637 4648
Princess
2924 3637
Prinston
3840
Prinz
3350
Proelco
4648
Profex
7647 5605 3350 2438 3637
Profi
7647
Profitronic
8644 6896 4648
Proline
8644 6896 4884 5295 2620 4698
Proscan
5510
3488 6764 8644 2796 4709 5553 5453
3453 4016 2924 6896 2335
Prosonic
Panama
7647 3488 4469 8644 6896 5531 3637
Panashiba
Protec
4709 3637
Protech
4526 5620 3001 3350 5605 4783 7605
4709 2410 8568 8644 6896 8360 5393
4648
Proton
5393 4523 3637
Provision
4874 8644 6896 3840 8060
Panavision
8644 2620 6896
Pulser
4523 5510 3637 4648 4156
Panavox
3637
Pye
8644 6896 5090 6764 4648
Panorma
3637
Pymi
7647 3637
Papouw
8644 6896
Qty1
4648
Quadral
4016
Panasonic
Pathe Cinema 5605 4469 7287
Pathe
7430
Pausa
7647 3637
PCE/PEC
4523 3802 5510
Penney
4523 5510
Perdio
5605 8644 4469 5896 6896
Perfekt
8644
Performance 3802
Philco
6634
6896
Philex
Philips
Quasar
6896 4648
5874
4752 5553 5531 5605 7287 8644
3802 3637 4648 7350
6127 5605
6896 8644 3518 6127 6538 8016 3802
5874 6982 5090 3350 7647 4648
Phocus
3730 6948 8060
Phoenix
8644 6896 7287 2590 5605 4469 4648
Phonola
8644 6896 6127 4469 4648
Pilot
6896 8644 5716 8435 5510
8644 6896 7287 5090 4530 5355 8060
4469
3637 4648
8644 6896 7647 5531 3488 5553 5355
5896 5605 2590 3840
5531 4526 4677 7647 6634 5186 4265
4819
Quelle
8644
6538
6092
3802
Questa
6812 3802
R Line
4648
6736
3835
7647
3637
7507
6640
6812
5874
7430 5355 6896 5265
3518 3350 3488 3840
5531 4752 7839 4523
4648
Radialva
7430 4016 5605 8644 6896 4422
Radio Shock 4523
Radiola
8644 6896 4648
Radiomarelli 8568 5531 8644 6896
RadioShack 8644 6896 5393
Radiotone
7647 8644 6896 7287 3488 3840 3637
4648 5553 6764 3451 5355
Rank
4265
Rank Arena
6812 2810 3036
4174 7507 8644 4849 3350 7430 5605
4422 6896 8209 7287 6982 2590 3835
4648 7287 2590
RBM
4265
RCA
4884 3193 3847 3270 6982 3036 5510
Realistic
5393
Plantron
8644 6896 3488 7647 3637 4648
Recor
8644 5553 6896 4648
Playsonic
8060 8644 6559 6381
Record
4648
Policom
7430 3350 5605 4265 4752 6634 6640
Rectiligne
8644 6896
Polytron
5896
Rediffusion
3350 4783 6812 6092
Poppy
7647 3637
Redstar
8644 6896
Portland
5090 2499 4523 5874 4648
Reflex
8644 6896 3840 5355
Powerpoint
6230 8644 6896 2924
Regente
3637
Relisys
4677 2108 4979 3191
Reoc
8060 5295 2499
Revox
8644 6896 7287 4648
Pioneer
PrandoniPrince
Premier
5531 8568 3350 2438
7647 3488
72
Revox/Studer 4648
Rex
2438 2620 5531 5605 3488
RFT
7287 3488 8644 6896 2590
Rhapsody
4469
Scotland
5605
Scott
4485 5393 4523 3802 5874
Sears
5393
Seaway
Rice Club
5295
5510
Seelver
Ricoh
6896 3840 8644
8644 6896
Rinex
SEG
2335 5553
R-Line
8644 6896 5605
RMB
4523
Roadstar
8644 6896 3840 4917 8377 4469 5319
4016 5355 6230 7647 5605 2499 3634
8060 3637 3488 5295 6812 5531 4523
3802
SEI
Rodex
8644 6896
6736 5605 8568 8644 6896
Sei-Sinudyne 8568 6736 8644 6896 5874 4648
Seitech
7855
Rosita
3637
Seleco
Rover
6812 2108
Rowa
3840 7647 5553 8644 3488 5896 4485
5832 6896 8060 5355 4016 3637
2438 8377 5605 2620 3444 3488 6092
6812 4530
3488 2924 5716 7647 4469 8299 8644
6896 3637
Semua
4523
Sencora
Royal
7647 3637
3637
Royal Lux
Sentra
7287 6764 3270
6482 4016 7647
Rukopir
Serino
6896 8644
2696 7014 4469 3193
Runco
Sharp
5510
Saba
3193 7138 6812 4638 6127 8568 6538
4174 7409 5319 4523 3802
4884 7430 3847 6982 2104 3270 4783
4526 4422 5605 8568 3350 8060
Shintom
5874
Sagem
2696 7014 5896 2820 2517
Shintoshi
8644 6896
Saisho
8568 7647 7507 5605 3488 4648
Shivaki
8644 6896 5119 5090 5393
Saivod
8644 7066 6896 5319 5355 5716 3840
Show
5553 7647 3637
Sakaï
5605
Siarem
5605 8568
Sakio
3637
Sakura
3637
Sakyno
7014
Salora
5605 3350 8568 2438 4783 6559 7910
8020
Salsa
3270
Sambers
8568
Sampo
4523
Samsung
Siemens
2517 8299 8644 5393 7910 7350 5605
4884 6896 7736 3193 4495 4523 5510
3637 4648 7647 7287 3488 4469
3518 6640 6538 5265 7839 5186 8644
6896 3350
Siemes
4523 4648
Siera
8644 6896 8299
Sierra
4648
Siesta
7287
Sigmax
5510
Signature
5874
Silma
4648
Silva
8644 6896 4469 3350 3451 3637
Silva
Schneider
Silver
5952
Samsux
4523
Sandra
4469
Sanky
4523
SilverCrest
8644 2429 6896 8435 4530 2810 7014
6641 3036 4523 5510 3637 4648
Singer
Sinotec
2335
Sinudyne
5605 3350 8568 6736 8644 6896 7733
Save
7647
7910
6896
3802
8644
Sky
8644 5896 3118 5393 6896 4262
Saville
7733
Skymaster
4819
SBR
8644 6896 6127 4648
Skysonic
3036
Sliding
4677 3118
SLX
5355
Smaragd
6230
Snyder
4648
Soemtron
4677 3191
Solavox
3350 5605 4783 8644 6896
Sansui
Santon
Sanyo
Schaub
Lorenz
Schneider
3573 6812 7507 5605 8644 5620
7287 6559 4469 7647 2590 4849
3637
6896
4783 8060 3350 6305 2590 5090 4156
6286 8644 6896 7350 3840 5605 3451
8060 3158 7213 6982 5531 2499 7733
7066 4265 4530 3350 4016 5355 3637
4648
73
6812 8644 7014 3350 6896 6381 5605
3802
3840 8644 6896
7647 3011 8644 6896 5531 3444 3270
5605 3637 4648
Sonawa
4016
Tashiko
Soniko
8644 6896
Tatung
Soniq
2519
Sonitron
7910 7287 6559
Sonneclair
8644 6896
Sonoko
8644 6896 7647 3488 3637 5896 4648
Sonolor
7910 5605 6736 4783 3350 5896
Sontec
8644 6896 7287 7647 4648
Sony
Sound &
Vision
Soundesign
TCM
6736 2762 7507 6219 3193 4849 4752
5874 3078 6812 8644 6896 3802
4016 5090 8644 6896
4523 3802 5510 5874 5393
Soundmaster 3637
Soundwave 8644 6896 5553 6381
Soyea
2335
Teac
Teak
TEC
6812 4849 4469 5605 2438 3802
5952 8644 6896 8568 7507 7733 8016
5905 4156 4648
8060 3730 7361
2924 3835 8644 4917 5393 7647 6764
5896 3840 6896 5716 5355 5553 4849
8060 7660 7014 8435 3488 2499 5991
3637
7647 5531 3270 8644 6896 3350 5605
3637 3637
Techica
4016
Tech Line
8644 6896 5355 4917 5319
Techlux
4485
Technica
7066
Technics
4526 4648
Techniland
4648
TechniSat
8644 6896 5605 4201
Specrician
4523 4648
Spectra
7647
Ssangyong
7647
Staksonic
7647
Standard
8644 6896 3840 4016 7647 5090 3637
Starlite
7647 5605 8644 6896 3488 6764 3637
Starlux
3637
Stenway
5896 4016
Stern
5605 2438 3488 2620 3444
Stevision
7066 5952
Strato
8644 6896 3488 7647
Strong
Tehnol
5319 7660 3840 8644 6896
3637
Sunic Line
Teiron
8644 6896
7647
Teknant
3637 4648
7384 7014 4016 2696 8644 6896 6230
4677
Teknika
4523 5510
Tekon
Sunstar
5510 3637
4530 8644 6896 7647 3488 3637
Teleavia
Sunwatt
7430 4422 6982
7014
Telecor
Sunwood
8644 6896 5605 4016 3158
8644 6896 7647 3637 4648
Superla
Telefac
8568 4469
3637
Supersonic
Telefunken
7910 6896 2924 3488 8484 7014
Supertec
3637 4648
Supertech
7647 8644 6896 4469 4016 3637
4884
3270
6896
5952
Supra
5393 5090 7647 3637
Telefusion
Supremacy
8644 6896
4523 3802
Telegazi
Supreme
8644 5605 4016 3488 6896
5874
Telemeister
Susumu
8644 6896
3270 4016 4422
Sutron
Teleopta
7647 3637
3637
Svasa
Telesonic
8484
8644 6896
Swissline
Telestar
5531
7647 8644 6896 6764 3637
Swisstec
4262 3118
Teletech
8644 6896 5355 7647 5531 3840 3637
SYC Line
3637
Teleton
5605 6812 2438
Sydney
4469
Televideon
5605 4469
Sylvania
4648
Teleview
8644 6896
Symphonic
4523 3802 5874
Tempest
7647 8644 6896 3488 3637
Sysline
8644 6896
Tennessee
8644 6896
Sytong
4469
T+A
6975
Tandberg
2410 2620 7430 8377 3350 5605
Tandy
4016 5531 3193 5605
Sunkai
Technisson
8060 3730
Technosonic 8644 6896
Techwood
5319 5510 5874
Tecnimagen 6896
Tecnison
Tedelex
Tensai
74
3637
5553 6305 3011 7647 8435 7910 2924
8299 5397 8644 6896 3637
3847
7430
2590
6092
4752 8299 4262 4422 6634
2924 6982 5716 5301 8644
2104 8033 2707 3491 8060
7837
4016 8644 6896 7647 4819 5090 4530
2796 5531 6381 5605 3840 3637 4648
Tenson
3637 7647
Tesla
8644 4648
Tesla Orava
Tevion
4648
United
7350 4706 5905 3191 3451 5355 6286
8060 8644 5952 6896 7361 3840 4596
3730
Universal
Texet
5090 7647 4469 4016
Thomas
4523 5510 3637 5874 4648
Thomson
Thorn
ThornFerguson
4884 3847 6982 4422 7430 3270 8644
6896 4469
5620 6127 7430 5301 8644 6896 7507
3270 3952 6982 3350 6736 3835 6812
5090 6482 4752 6634 4874 6640 4265
3802
5620 7430 6127 3350 3270 4874 5301
6482
Tiny
3453 7789 5393 5510
Tobishi
4016
Tobo
3637
Tokai
8644 6896 5355 5605 5090 7647 3840
4648
3840
Tokyo
4469 6482 5510
Tomashi
5896 4016
Tongtel
7046 8299
Topline
3840 5355
4679
8644
4925
4526
8644 6896
6092
5186
7430
7647
3840
6896
4819
6640
8377
6634
4917
7660
5265
3350
8020
3634
4849
2517
Univox
8644 6896 5605
Uranya
3637
Utax
5605
V7
Videoseven
Vanguard
4659
5531
7287
7507
5319
3637
2620
6753
6538
8644
4265
4648
4752
6736
5553
3835
5605
5991 5393 3118 4698 7855
3637
Veco
3637
Vestel
8644 5605 6896 5355 3840 5319 4648
Vexa
7647 8644 6896 3637 4648
4081
6812
5952
8561
6482
4265
4940
3802
4638
Video System 4648
Videologic
4016 4469
Videologique 4469 4016
Videosat
5531
VideoSystem 8644 6896
Videotechnic 4469 5090
Videoton
5605
3730 7733 7647 2924
8060 7430 3251 5319
5265 3518 2517 5447
5510
Vidion
3637
Vidtech
6812 5393
ViewSonic
5991
Visiola
4469
Tosonic
4523 5510
Vision
Totevision
8644 3488 6896 3637 4648
4523
Vistar
Toyoda
3350
7647 4530 3488
Vocson
Trakton
4648
7647 3488
Vortec
8644 6896 4648
Voxson
8644 6896 2438 5553 5605 5393
TRANScontinents
Transonic
5355 3840 8644 6896 2590 4677
Waltham
8644 6896 7014 8299 3835 3488 2924
5716 5553 7647
Transtec
4469
TRC
3637
Trevi
3637
Triad
8644 6896 4016 4648
Trident
8568
Trilux
4648
Tristar
3488 4016 6127
Triumph
8568 6092 6896 8644
Trivision
3637
Tsoschi
5896
TVTEXT95
6896
Uher
7839
5355
8394
6812
3488
Victor
Tokaido
Toshiba
Universum
8060 8644 6381 6896 7733 3840 8299
7066
Wards
Watson
5553 4422 8644 6896 5355 7430 3840
5605 5119
4648
3840 4596 8644 6896 5605 7647 5355
4016 4698 7839 3637 4648 7350 3158
7733 4917
Watt Radio
5605 4469
Wega
8644 6896 6812 3802
Wegavox
7647 8644 6896 3637 4648
Welltech
8060
Weltblick
8644 6896 4648
Weston
8644 6896
Wharfedale
8644 6896 5090 5553 2590 7287 8020
4648
8644 6641 7350 2707 6896 5952
White
4648 4469 8644 6896 2499
Westinghouse
Windsor
5355 3840
Sindstar
5896
Ultravox
5090 5531 4469 5605 8644 6896
UMA
4648
Windy Sam
6896
Unic Line
8644 6896 4659 7014
Winston
3637 4648
Unimor
4648
Wintel
8060
75
United
Universal
Universum
8060 8644 6381 6896 7733 3840 8299
7066
8644 6896
6092
5186
7430
7647
3840
6896
4819
6640
8377
6634
4917
7660
5265
3350
8020
3634
4849
2517
Univox
8644 6896 5605
Uranya
3637
Utax
5605
V7
Videoseven
Vanguard
4659
5531
7287
7507
5319
3637
2620
6753
6538
8644
4265
4648
4752
6736
5553
3835
5605
7839
5355
8394
6812
3488
5991 5393 3118 4698 7855
3637
Veco
3637
Vestel
8644 5605 6896 5355 3840 5319 4648
Vexa
7647 8644 6896 3637 4648
Victor
4638
Video System 4648
Videologic
4016 4469
Videologique 4469 4016
Videosat
5531
VideoSystem 8644 6896
Videotechnic 4469 5090
Videoton
5605
Vidion
3637
Vidtech
6812 5393
ViewSonic
5991
Visiola
4469
Vision
8644 3488 6896 3637 4648
Vistar
3350
Vocson
4648
Vortec
8644 6896 4648
Voxson
8644 6896 2438 5553 5605 5393
Waltham
Wards
Watson
5553 4422 8644 6896 5355 7430 3840
5605 5119
4648
3840 4596 8644 6896 5605 7647 5355
4016 4698 7839 3637 4648 7350 3158
7733 4917
Watt Radio
5605 4469
Wega
8644 6896 6812 3802
Wegavox
7647 8644 6896 3637 4648
Welltech
8060
Weltblick
8644 6896 4648
Weston
8644 6896
Wharfedale
8644 6641 7350 2707 6896 5952
White
4648 4469 8644 6896 2499
Westinghouse
Windsor
5355 3840
Sindstar
5896
Windy Sam
6896
Winston
3637 4648
Wintel
8060
76
Specifications and features are subject to change without notice.
Product may not be exactly the same as shown.