1
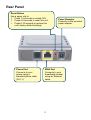
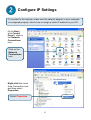
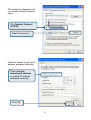
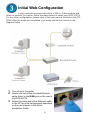
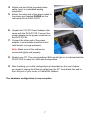
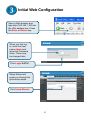
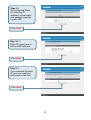
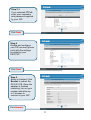
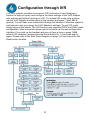
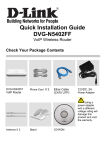
DVG-2101S
This product can be set up
using any current web browser,
i.e., Internet Explorer 6 or
Netscape Navigator 6.2.3.
VoIP Telephone Adapter
Before You Begin
1. If you purchased this VoIP Telephone Adapter to share your high-speed
Internet connection with other computers, you must have an established
Internet account from an Internet Service Provider (ISP).
2. It’s best to use the same computer that is connected to your router for
configuring the DVG-2101S VoIP Telephone Adapter. The DVG-2101S acts
as a DHCP Client and will be assigned all the necessary IP address
information from your network. See the Quick Installation Guide or the Manual
on the CD-ROM for setting each network adapter to automatically obtain an
IP address.
Check Your Package Contents
D-Link DVG-2101S VoIP Telephone Adapter
CD-ROM (containing Manual and Q.I.G.)
Ethernet Cable
Phone Cable
12V, 1.5A Power Adapter
Quick Installation Guide
Using a power supply
with a different voltage rating
will damage and void the
warranty for this product.
If any of the above items are missing, please contact your reseller.
©2007 D-Link Corporation, Inc. All rights reserved. Trademarks or registered trademarks are the property of their
respective holders. Software and specifications subject to change without notice.
1
Hardware Overview
Front Panel
Register LED
This LED will light solid if the phone
account registers successfully. This LED
will flash during registering and light off if
registering fails.
Power LED
This LED will light solid when the
device finishes a self-test and booting
up. This LED will flash during device
self-test and booting and light off if
Provision LED
This LED will light solid if the
device provisions successfully.
This LED will flash during
provisioning and light off if
provisioning fails.
Phone LED
This LED will light solid
when the telephone is
off-hook. A fast blinking
LED indicates an
incoming call and a slow
blinking LED indicates a
message is waiting. This
LED will light off if the
phone connected to the
phone port is on-hook.
WAN LED
This LED will light solid when a
connection is established and
blink to indicate activity. If this
LED does not light up when a
cable is connected, verify the
cable connections and make
sure your devices are powered
on.
2
Rear Panel
Reset Button
Use a paper clip to:
1. Press 1-2 seconds to enable IVR.
2. Press 4-6 seconds to reset this unit.
3. Press 8-10 seconds to restore this
unit’s factory default settings.
Phone Port
Connects to your
phone using a
standard phone cable
(RJ-11).
Power Receptor
Connects to the provided
power adapter.
WAN Port
Connects to your
broadband modem
using an Ethernet
cable.
3
Configure IP Settings
To connect to the network, make sure the network adapter in your computer
is configured properly. Here’s how to assign a static IP address to your PC.
Go to Start >
click Control
Panel > click on
the Network
Connections
icon.
Click on the
Network
Connections
icon.
Right-click the Local
Area Connection icon,
and then select
Properties.
Select Properties.
4
The dialog box displays a list
of currently installed network
items.
Click Internet Protocol
(TCP/IP).
Select Properties.
Make the choice to get the IP
address assigned manually.
Select Use the
following IP address
to get the IP settings
assigned manually.
Click OK.
5
Initial Web Configuration
If your computer connects directly to a DSL or Cable modem and
does not connect to a router, follow the steps below to install your DVG-2101S.
For any other configuration, please refer to the user manual located on the CDROM. After the steps are completed, your setup should look similar to the
diagram below.
1. Turn off your Computer.
2. Attach one end of the provided Ethernet
cable (blue) to the WAN port on the rear of
the DVG-2101S.
3. Attach the other end of this Ethernet cable
to the PC for initial configuration described
on the next chapter in this Quick
Installation Guide.
6
4. Attach one end of the provided phone
cable (gray) to a standard analog
telephone.
5. Attach the other end of the phone cable to
the phone port labeled PHONE on the
rear panel of the DVG-2101S.
6. Unpack the 12V DC Power Adapter that
came with the DVG-2101S. Connect the
power adapter to the power connecter on
the DVG-2101S.
7. Connect the other end of the power
adapter to an available electrical outlet
(wall socket or surge protector).
Note: Make sure all the cables are
connected tightly and properly.
8. Restart your PC. The corresponding LEDs would light on to indicate that the
DVG-2101S is ready for initial web configuration.
9. After finishing your initial configuration as described on the next chapter,
you need to unplug the Ethernet cable from the PC. And attach this end to
the LAN port of your router or Cable/DSL Modem.
The hardware configuration is now complete.
7
Initial Web Configuration
Open a Web browser and
type http://192.168.1.150 into
the URL address box. Press
the Enter or Return key.
When you first log
in, enter the User
name admin and
leave the Password
blank. These may
be changed later.
Click Login button.
Setup Wizard will
guide you through the
quick setup steps.
Click Setup Wizard.
8
Click Next.
Step 1
You can change the
login password during
this step or just leave
them the same as the
default values.
Click Next.
Step 2
Select your time zone
from the drop-down list.
Then select a NTP time
server or configure your
preferred time server.
Click Next.
9
Step 3-1
If you selected Static
IP, enter the IP
address, subnet mask
and gateway supplied
by your ISP.
Click Next.
Step 3-1-1
Static IP users have to
set the DNS address.
Click Next.
Step 3-1
If you selected Dynamic
IP, you may enter the
host name in the field.
Click Next.
10
Step 3-1
If you selected PPPoE,
enter your username
and password supplied
by your ISP.
Click Next.
Step 4
Enable and configure
your SIP account (phone
port) with the settings
provided by your
ISP/ITSP.
Click Next.
Step 5
Setup is finished. Click
Restart to reboot the
DVG-2101S. Once the
adapter is finished
rebooting, turn on your
modem and allow up
to 2 minutes to
connect to your ISP.
Click Restart.
11
Configuration through IVR
The VoIP Adapter provides a convenient IVR (Interactive Voice Response)
function to help you query and configure the basic settings of the VoIP Adapter
with a phone and without turning on a PC. To access IVR mode, plug a phone
into the VoIP Adapter and then pick up the handset and press * (star) 666 #
(pound). You will hear voice instructions through the handset. Follow the system’s
instructions to set up or query the VoIP Adapter’s settings. To exit IVR mode,
simply hang up the phone. The IVR function only supports DHCP and Static mode
configuration, other connection types need to be done via the web configuration
interface. If you pick up the handset and can not hear a tone or press *666#
without IVR response, please press the Reset button for 1-2 seconds and try
again. Please refer to the Rear Panel diagram on page 3 of this manual for the
Reset button location.
12
Ver.1.00
2007/12/27