1
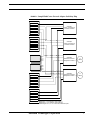
Marathon Technologies FTvirtual
Server TM and IBM BladeCenter TM
Installing and Configuring a Fault-Tolerant Windows
Environment for Mission Critical Applications
Marathon Technologies Corporation
www.marathontechnologies.com
888.682.1142
Notices
Marathon Technologies Corporation reserves the right to make
improvements to this guide and the product it describes at any
time and without further notice.
Copyright
© Marathon Technologies Corporation. 1996-2005. All rights
reserved.
This guide is copyrighted, and all rights are reserved. No part of
this guide or the products it describes may be reproduced by any
means or in any form, without prior consent in writing from
Marathon Technologies Corporation.
Printed in the U.S.A.
U.S. Patent Numbers: 5,600,784; 5,615,403; 5,787,485;
5,790,397; 5,896,523; 5,956,474; 5,983,371; 6,038,685;
6,205,565; and 6,728,898.
European Patent Numbers: EP0974912; EP0731945;
EP0993633; EP0986784; and EP1000397.
Other patents pending.
Software Copyright Notice
The software described in this document is covered by the
following copyright:
© Marathon Technologies Corporation. 1996-2005.
Trademark Notice
Endurance, Marathon Assured Availability, Marathon
FTvirtual Server, and the Marathon logo are either registered trademarks or trademarks of Marathon Technologies Corporation in the United States and/or other
countries.
Microsoft, MS-DOS, and Windows are registered trademarks of Microsoft Corporation in the United States and/
or other countries.
IBM eServer BladeCenter and IBM are registered trademarks of the International Business Machines Corporation in the United States and/or other countries.
All other brands and product names are trademarks of
their respective companies or organizations.
Software Revision
The revision of the software that this document supports is
Revision 6.1.1.
This section describes the technical changes made in
this edition of the Marathon Technologies FTvirtual ServerTM and IBM eServer BladeCenterTM - A Fault-Tolerant
Environment for Mission Critical Windows Applications
application note. Minor changes and editorial corrections
may also be included that are not identified.
Summary of changes
Summary of changes for
Marathon Technologies FTvirtual Server and IBM
eServer BladeCenterTM - A Fault-Tolerant Environment
for Mission Critical Windows
as created or modified on 9/2/05.
September 2005, First Edition
1.0.0
Contents
Contents
Notices . . . . . . . . . . . . . . . . . . . . . . . . . . . . . . . . . . . . . . . . . . . . . . . . . . . . . . . . . . . . . . . . . . . . ii
Copyright . . . . . . . . . . . . . . . . . . . . . . . . . . . . . . . . . . . . . . . . . . . . . . . . . . . . . . . . . . . . . . . . . . ii
Software Copyright Notice . . . . . . . . . . . . . . . . . . . . . . . . . . . . . . . . . . . . . . . . . . . . . . . . . . . . . ii
Trademark Notice . . . . . . . . . . . . . . . . . . . . . . . . . . . . . . . . . . . . . . . . . . . . . . . . . . . . . . . . . . . iii
Software Revision . . . . . . . . . . . . . . . . . . . . . . . . . . . . . . . . . . . . . . . . . . . . . . . . . . . . . . . . . . . iii
Summary of changes . . . . . . . . . . . . . . . . . . . . . . . . . . . . . . . . . . . . . . . . . . . . . . . . . . . . . . . . . iv
September 2005, First Edition . . . . . . . . . . . . . . . . . . . . . . . . . . . . . . . . . . . . . . . . . . . . . . . . . . iv
CHAPTER 1
Introduction
Fault-Tolerant Computing for Mission Critical Windows Applications . . . . . . . . . . . . . . . . . . . .
The Trend Toward Blades . . . . . . . . . . . . . . . . . . . . . . . . . . . . . . . . . . . . . . . . . . . . . . . . . . . . .
Mission-Critical Blades: The Need For Fault Tolerance. . . . . . . . . . . . . . . . . . . . . . . . . . . . . . .
Marathon FTvirtual Server - Fault-Tolerance Through Software . . . . . . . . . . . . . . . . . . . . . . . .
Conclusion . . . . . . . . . . . . . . . . . . . . . . . . . . . . . . . . . . . . . . . . . . . . . . . . . . . . . . . . . . . . . . . . .
CHAPTER 2
1
1
2
3
3
Planning and Preparation
Planning the Installation . . . . . . . . . . . . . . . . . . . . . . . . . . . . . . . . . . . . . . . . . . . . . . . . . . . . . . . 5
FTvirtual Server Boot Disk Options . . . . . . . . . . . . . . . . . . . . . . . . . . . . . . . . . . . . . . . . . . . . . . 5
Network Environment. . . . . . . . . . . . . . . . . . . . . . . . . . . . . . . . . . . . . . . . . . . . . . . . . . . . . . . . . 6
CoServer and Switchbay Network Connections . . . . . . . . . . . . . . . . . . . . . . . . . . . . . . . . . . . . 6
Figure - Sample BladeCenter Network Adapter Switchbay Map. . . . . . . . . . . . . . . . . . . . . 7
Network Adapter Configurations . . . . . . . . . . . . . . . . . . . . . . . . . . . . . . . . . . . . . . . . . . . . . . . . 8
Table - 4 NIC Configuration. . . . . . . . . . . . . . . . . . . . . . . . . . . . . . . . . . . . . . . . . . . . . . . . . 8
Table - 3 NIC Configuration. . . . . . . . . . . . . . . . . . . . . . . . . . . . . . . . . . . . . . . . . . . . . . . . . 8
Table - 3 NIC Alternate Configuration . . . . . . . . . . . . . . . . . . . . . . . . . . . . . . . . . . . . . . . . . 8
Table - 2 NIC Configuration. . . . . . . . . . . . . . . . . . . . . . . . . . . . . . . . . . . . . . . . . . . . . . . . . 9
Preparing to Install . . . . . . . . . . . . . . . . . . . . . . . . . . . . . . . . . . . . . . . . . . . . . . . . . . . . . . . . . . 10
BladeCenter Options . . . . . . . . . . . . . . . . . . . . . . . . . . . . . . . . . . . . . . . . . . . . . . . . . . . . . . . . 10
FTvirtual Server and Blade Configuration . . . . . . . . . . . . . . . . . . . . . . . . . . . . . . . . . . . . . . . . 11
Identifying Network Components . . . . . . . . . . . . . . . . . . . . . . . . . . . . . . . . . . . . . . . . . . . . . . . 11
Mapping the Switchbays . . . . . . . . . . . . . . . . . . . . . . . . . . . . . . . . . . . . . . . . . . . . . . . . . . . . . 12
Table - Adapter PCI-to-Switchbay Mappings . . . . . . . . . . . . . . . . . . . . . . . . . . . . . . . . . . 12
Marathon Technologies Corporation
1
Contents
CHAPTER 3
Installing the Endurance Software
Major Installation Tasks . . . . . . . . . . . . . . . . . . . . . . . . . . . . . . . . . . . . . . . . . . . . . . . . . . . . . . 13
Windows Installation. . . . . . . . . . . . . . . . . . . . . . . . . . . . . . . . . . . . . . . . . . . . . . . . . . . . . . . . . 14
Installing Windows on the CoServers. . . . . . . . . . . . . . . . . . . . . . . . . . . . . . . . . . . . . . . . . . . . 14
Event Log Recommendations . . . . . . . . . . . . . . . . . . . . . . . . . . . . . . . . . . . . . . . . . . . . . . . . . 14
Disk Partitioning and Formatting . . . . . . . . . . . . . . . . . . . . . . . . . . . . . . . . . . . . . . . . . . . . . . . 15
Installing the FTvirtual Server Boot Disk on a Physical Disk . . . . . . . . . . . . . . . . . . . . . . . . . . 16
Installing Endurance Software on the CoServers. . . . . . . . . . . . . . . . . . . . . . . . . . . . . . . . . . . 18
Before You Begin the Software Installation . . . . . . . . . . . . . . . . . . . . . . . . . . . . . . . . . . . . . . . 18
CoServer 1 Installation . . . . . . . . . . . . . . . . . . . . . . . . . . . . . . . . . . . . . . . . . . . . . . . . . . . . . . . 19
Starting the Installation . . . . . . . . . . . . . . . . . . . . . . . . . . . . . . . . . . . . . . . . . . . . . . . . . . . . . . . 19
Specify the Location of the Software . . . . . . . . . . . . . . . . . . . . . . . . . . . . . . . . . . . . . . . . . . . . 20
Configure the Network using the Endurance Network Setup Wizard . . . . . . . . . . . . . . . . . . . . 21
Table - Suggested CoServer1 CLink IP Addresses . . . . . . . . . . . . . . . . . . . . . . . . . . . . . 23
CoServer 2 Installation . . . . . . . . . . . . . . . . . . . . . . . . . . . . . . . . . . . . . . . . . . . . . . . . . . . . . . . 29
Table - Suggested CoServer2 CLink IP Address . . . . . . . . . . . . . . . . . . . . . . . . . . . . . . . 30
Installing Windows on and Configuring the FTvirtual Server . . . . . . . . . . . . . . . . . . . . . . . . . . 34
Select CoServer Devices for FTvirtual Server Use and Configure the FTvirtual Server Disk . 34
Install Windows on the FTvirtual Server Disk . . . . . . . . . . . . . . . . . . . . . . . . . . . . . . . . . . . . . . 38
Finish the Windows Installation . . . . . . . . . . . . . . . . . . . . . . . . . . . . . . . . . . . . . . . . . . . . . . . . 39
Install the Endurance FTvirtual Server Software . . . . . . . . . . . . . . . . . . . . . . . . . . . . . . . . . . . 40
Specify the Location of the Software . . . . . . . . . . . . . . . . . . . . . . . . . . . . . . . . . . . . . . . . . . . . 40
Finish the FTvirtual Server Installation . . . . . . . . . . . . . . . . . . . . . . . . . . . . . . . . . . . . . . . . . . . 41
Verifying the FTvirtual Server Installation. . . . . . . . . . . . . . . . . . . . . . . . . . . . . . . . . . . . . . . . . 42
What to do Next . . . . . . . . . . . . . . . . . . . . . . . . . . . . . . . . . . . . . . . . . . . . . . . . . . . . . . . . . . . . 43
2
Marathon Technologies Corporation
CHAPTER 1
Introduction
This chapter discusses the key advantages of IBM BladeCenter and Marathon Technologies FTvirtual Server and how they combine to create a truly
fault-tolerant environment for mission critical Windows applications.
Fault-Tolerant Computing for Mission Critical
Windows Applications
The Trend Toward Blades
Blade configurations like the IBM BladeCenter have become popular
because they provide several key advantages over conventional pedestal
or rack-mounted servers. These advantages include:
• Flexibility and Ease of Installation
Because blades get their electrical power and network interconnections
from the chassis, adding processing power to an existing chassis is as
simple as inserting the blade and configuring its software and network
address. No additional cabling or electrical power connections are
required.
• Ease of Management
System management tools like the IBM Director permit hundreds of
blade servers to be maintained remotely through use of a single graphical console. This tool provides a common management view across
multiple servers in a chassis and enables a smaller IT staff to manage
the same number of servers.
Marathon Technologies Corporation
1
Introduction
•
Reduced Floor Space Usage in the Data Center
Modular design reduces cost through more efficient use of valuable floor
space. The increased density can significantly reduce the space requirements in a data center.
• Reduced Cost of Power and Cooling
Blades servers integrate resources and share key components. Since
blades in a chassis share common power supplies, power is distributed
more efficiently and less heat is generated for a given amount of processing power.
• Increased Reliability and Availability
Since the BladeCenter may be configured with redundant hot-swap
power supplies and built-in network switches, it effectively eliminates
several key single points of failure and provides greater system availability than conventional rack-mount servers. The BladeCenter also
reduces down-time due to server failure by making replacement of a
failed server easy.
Mission-Critical Blades: The Need For Fault Tolerance
As enterprises move more compute load to blade servers, blades are
becoming increasingly mission-critical. Because downtime has significant
associated costs - lost sales, decreased customer satisfaction, lost productivity - the need for a simple, affordable way to keep blades running continuously is becoming urgent. Four trends are converging to further increase
the need for continuously available blades:
2
•
Improved server density and server consolidation increases the
potential risk to business operations in the event of downtime by
“putting all your eggs in one basket”
•
Increasingly stringent regulations require data retention and availability
•
More threats to security and physical systems
•
Increasing complexity of enterprise infrastructure, and impact of
system downtime
Marathon Technologies Corporation
Marathon FTvirtual Server - Fault-Tolerance Through Software
To address the need for continuous availability of mission-critical applications, Marathon Technologies has designed its FTvirtual Server software to
work with blade server configurations as well as traditional servers.
Marathon software harnesses the redundancy provided by two BladeCenter
servers to create a true, fault- tolerant environment for Windows applications.This is accomplished by loading the Marathon software on any two
blade servers and interconnecting them via the BladeCenter’s integrated
chassis switching matrix. The Marathon software synchronizes the two
servers and creates a virtual application environment that runs on both
servers simultaneously. If either server in the connected pair fails, the application environment continues to function uninterrupted, using the processing power of the other. Unlike typical clustering technologies which require
seconds or even minutes to “fail-over” application processing and may
incure data loss, there is no failover with Marathon software, so there is no
downtime.
The result is a truely fault-tolerant Windows environment for BladeCenter
configurations. Enterprises get all the cost savings and operational efficiencies of the BladeCenter while protecting their business-critical Windows
applications and data, even in the event of a blade failure.
Conclusion
Blade servers are helping companies save money and increase efficiency
and flexibility in their data centers. However, without adequate fault protection, these benefits are soon lost in the event of downtime. Marathon’s
FTvirtual Server software delivers a simple, affordable way to protect important applications and data running on IBM eServer BladeCenter configurations.
Marathon Technologies Corporation
3
Introduction
4
Marathon Technologies Corporation
CHAPTER 2
Planning and Preparation
This chapter describes BladeCenter features and options, key design concepts, and basic configuration guidelines you should be aware of before
beginning to install and setup a BladeCenter FTvirtual Server.
Planning the Installation
Before starting the Endurance software installation you should consider
several major configuration related issues, which will effect the overall operation and capability of your FTvirtual Servers.
FTvirtual Server Boot Disk Options
The Endurance software allows the FTvirtual Server boot disk to be
installed on either a separate physical disk or as a Virtual disk. If your blade
configuration is limited to a single on-board physical disk you will need to
use a Virtual boot disk for the FTvirtual Server. A virtual boot disk allows
you to share a single physical disk as both the CoServer and the FTvirtual
Server Windows boot disk. Disk space is allocated to a file on the CoServer
disk. The content of the file is then formatted, partitioned, and used as the
FTvirtual Server boot disk.
Marathon Technologies Corporation
5
Planning and Preparation
Network Environment
The optimal FTvirtual Server configuration uses 4 network adapters per
blade to support CoServer communications and client access links critical
to applications. These links provide the mechanisms and transport for redirected network I/O, FTvirtual Server communications and fault management activities.
When using the optimal network configuration, two of the adapters in each
blade will support CoServer Links (CSLink) 1 and 2, which are primarily
used for disk mirroring and memory synchonization operations. A third
adapter in each blade is used for CoServer out-of-band remote administration and SNMP management activities. The fourth serves as a redirected
network link permitting the FTvirtual Server to satisfy client and application
I/O requests.
CoServer and Switchbay Network Connections
A sample BladeCenter network map depicting the connections for two
FTvirtual Server configurations (FTv1 and FTv3) is shown in Figure 1. This
configuration demonstrates the optimal BladeCenter FTvirtual Server configuration, maximizing server fault-tolerance and network availability.
It should be mentioned that although each switchbay is internally interconnected with each slot of the BladeCenter chassis, these additional connections have been left out of the diagram for the sake of simplicity.
Note that in this 4 NIC configuration switchbays 1 and 2 provide dedicated
CSLink 1 and CSLink 2 switching capability for each of the FTv CoServers.
These connections are made internally to the BladeServer chassis and
none of the external ports available on these two switches are used for
external connections.
Switchbays 3 and 4 are configured for FTvirtual Server Redirected and
Management use. The four external ports available on these switches are
used to connect the FTvirtual Server/s to the public network.
6
Marathon Technologies Corporation
FIGURE 1.
Sample BladeCenter Network Adapter Switchbay Map
FTv1 CoServer 1
PCI 1:0:0 NIC
Switch Bay 1
CSLink 1 connections only
No external connections
PCI 1:0:1 NIC
PCI 2:2:1 NIC
PCI 2:2:0 NIC
FTv1 CoServer 2
PCI 1:0:0 NIC
Switch Bay 2
CSLink 2 connections only
No external connections
PCI 1:0:1 NIC
PCI 2:2:1 NIC
PCI 2:2:0 NIC
FTv2 CoServer 1
Switch Bay 3
Redirected for CoServer 1
Management for CoServer 2
To
Network
Switch Bay 4
Redirected for CoServer 2
Management for CoServer 1
To
Network
FTv2 CoServer 2
FTv3 CoServer 1
PCI 1:0:0 NIC
PCI 1:0:1 NIC
PCI 2:2:1 NIC
PCI 2:2:0 NIC
FTv3 CoServer 2
PCI 1:0:0 NIC
PCI 1:0:1 NIC
PCI 2:2:1 NIC
PCI 2:2:0 NIC
Blade Bays 1, 5, 9 are assumed to contain CoServer 1
Blade Bays 3, 7, 11 are assumed to contain CoServer 2
Blade Bay pairs 1 & 3, 5 & 7, 9 & 11 each make an Endurance system
Marathon Technologies Corporation
7
Planning and Preparation
Network Adapter Configurations
Depending upon your specific switchbay and blade on-board device configuration, it is possible that fewer than 4 adapters will be available for use.
When planning a BladeCenter network configuration your primary concern
should be to maximize the availability of the redirected network links and
minimize utilization of external networks by the CoServer links.
To maximize the availability of the redirected links, different switches
should be used to connect the CoServers to the external network. To minimize utilization of the external network by the CoServer links, both CoServers should use the same internal switch for a CSLink connection. Routing a
CSLink connection through the same switch will confine all associated traffic to that switch. Several recommended network configurations using 4, 3,
and 2 network adapters are shown in the following tables.
TABLE 1. 4
Function
CSLink 1
CoServer 1
Switchbay 1
CoServer 2
Switchbay 1
Comment
Internal Bandwidth
CSLink 2
Switchbay 2
Switchbay 2
Internal Bandwidth
Redirected
Switchbay 3
Switchbay 4
Redundant External Connection
Manage
Switchbay 4
Switchbay 3
Redundant External Connection
TABLE 2. 3
Function
CSLink 1
CoServer 1
Switchbay 1
NIC Configuration
CoServer 2
Comment
Switchbay 1
Internal Bandwidth
Redirected
Switchbay 2
Switchbay 3
Redundant External Connection
CSLink 2
Switchbay 3
Switchbay 2
Exposed network utilization
Requires network routed IP
addresss
TABLE 3. 3
Function
8
NIC Configuration
CoServer 1
NIC Alternate Configuration
CoServer 2
Comment
CSLink 1
Switchbay 1
Switchbay 1
Internal Bandwidth
Redirected
Switchbay 2
Switchbay 3
Redundant External Connection
Manage
Switchbay 3
Switchbay 2
Redundant External Connection
Marathon Technologies Corporation
TABLE 4. 2
Function
CoServer 1
NIC Configuration
CoServer 2
Comment
CSLink 1
Switchbay 1
Switchbay 2
Exposed network utilization.
Requires network routed IP
address.
Redirected
Switchbay 2
Switchbay 1
Redundant External Connection
For More Information
For more information on setting-up network configurations, Virtual boot
disks and other preparation issues consult the following resources located
on your Marathon software distribution CD-ROM:
•
•
•
Administrator’s Guide
Upgrading Endurance Software
Configuration and Installation Guide
Marathon Technologies Corporation
9
Planning and Preparation
Preparing to Install
BladeCenter Options
An IBM eServer BladeCenter may be configured using a variety of storage
and networking options. For example, the BladeCenter chassis using HS20
blade servers offers the following configuration features:
10
•
A rack-optimized 7U modular 14 slot chassis that can support a
total of 14 hot-swap BladeCenter HS20 blades.
•
A CD-ROM and floppy shared by all blade bays.
•
A maximum of two Management modules integrating remote management functions and a 14-port Keyboard/Video/Mouse switch.
•
Up to 4 Gigabit Ethernet Switch modules. Each switch has four
external ports as well as 14 internal ports (one to each bay).
•
HS20 hot-swappable blades supporting two XEON processors, 4port Gigabit Ethernet modules, on-board disks and/or a piggybacked SCSI drive Expansion Unit.
Marathon Technologies Corporation
FTvirtual Server and Blade Configuration
Each Endurance FTvirtual Server configuration is comprised of two blades.
Following installation of the Endurance software each will function as a
CoServer to create the FTvirtual Server environment.
Depending upon the specific configuration, a 14 slot BladeCenter chassis
can support a total of 7 Endurance FTvirtual Servers (2 slots per FTvirtual
Server), using single-slot blades configured with one or two on-board disks
and four network adapters. If each blade is configured with four network
adapters and a piggy-backed SCSI Expansion Unit option for increased
storage capacity, a total of 3 Endurance configurations (4 slots per FTvirtual
Server) may be supported.
It is important to note that the chassis slot position of a blade has no impact
on its function. After an Endurance system has been established, the
blades can be moved to any chassis slot and located in any order. Data
communications between Endurance configured blades is controlled by IP
addresses, which are unique to a blade and FTvirtual Server blade pair.
Identifying Network Components
To help simplify Endurance software installation it is suggested that you first
create a chart that maps blade configured network adapters to their corresponding ethernet switchbay connection. Since this mapping may vary
across blade (HSxx) models, it is important that you identify these connections prior to installation. Later, during the network setup phase of the installation you will be able to correlate a CoServer assigned networking role to
its corresponding adapter and ethernet switchbay connection.
A specific network adapter must be identified by its unique PCI bus location
in the system in terms of:
“PCI bus b, device d, function f”
Switchbays may be identified from the back of the BladeCenter cabinet by
the number of the particular bay they reside in.
Marathon Technologies Corporation
11
Planning and Preparation
Mapping the Switchbays
After installation of the Windows operating system on a blade you can fill-in
the switchbay mapping table for your particular configuration using the following procedure.
Note:
Do not perform PCI-to-Switchbay mappings when blades
within the chassis are operating within a production
environment.
1.
On one of the CoServer blades right-click My Network Places to view
the Network Connections dialog.
2.
From the back of the BladeCenter cabinet select a switchbay and unplug
it.
3.
Return to the CoServer console and observe the Network Connections
dialog and note which connection experiences a status change.
4.
Right-click on the connection that changed status to display the Local
Area Connection Properties.
5.
Click the Configure button to display the controller properties. Note the
switchbay number of the switch you unpluged and record the corresponding PCI location information for that adapter in Table 4. Plug the
switchbay back into its slot and wait for the connection status to return to
normal.
6.
Repeat this procedure for each configured ethernet switchbay until you
have identified all connections. Since these connections will hold for like
blade models this mapping will work for all other configured blades.
TABLE 5. Adapter
PCI-to-Switchbay Mappings
Blade Model
Switchbay 1
Switchbay 2
Blade HS20
8832 Chassis
1:0:0 (b:d:f)
1:0:1 (b:d:f)
2:2:1 (b:d:f)
2:2:0 (b:d:f)
Blade HS20
8843 Chassis
5:1:0
5:1:1
6:1:0
6:1:1
Blade HSXX
88nn Chassis
12
Marathon Technologies Corporation
Switchbay 3
Switchbay 4
CHAPTER 3
Installing the Endurance
Software
This chapter describes in detail how to install and configure the Endurance
software on each of the BladeCenter CoServers to create the FTvirtual
Server.
Major Installation Tasks
The major installation tasks are:
1.
Install Windows on both CoServers.
2.
Install Endurance software on CoServer 1.
3.
Install Endurance software on CoServer 2.
4.
Install Windows on and configure the FTvirtual Server
Marathon Technologies Corporation
13
Installing the Endurance Software
Windows Installation
Before you begin the Endurance installation, install Windows and set the
size of the event logs.
Installing Windows on the CoServers
On both CoServers:
Install the appropriate Windows software and Service Packs. Refer to the
Endurance Release Notes for information about hardware and software
requirements, including Windows Security Updates.
Note:
If the Manage Your Server or Configure Your Server window
appears, click Don’t display this page at logon, and then
dismiss the window.
Event Log Recommendations
On both CoServers:
For best results in tracking system events, make sure that the Application
Log and System Log on both CoServers are set to at least 16384 KB.
From Computer Management, select Event Viewer. For each log:
Right click, and select Properties.
If necessary, change the Maximum log size to at least 16384 KB. Verify
that the Overwrite events as needed box is checked.
14
Marathon Technologies Corporation
Disk Partitioning and Formatting
The Windows operating system for the FTvirtual Server will be installed on
a disk of each blade CoServer. You can select a physical disk in the CoServer for the FTvirtual Server boot disk or you can install the FTvirtual
Server on an Endurance Virtual disk. A Virtual boot disk is a CoServer disk
that you can create by allocating space in the file system of any existing
CoServer disk and then, using Endurance software, creating a Virtual disk
from this file space. The Virtual disk can then be mounted, formatted and
partitioned like any physical disk. This allows you to use one physical disk
for booting both the CoServer and the FTvirtual Server on blade systems
configured with only a single physical disk.
If you wish to install the FTvirtual Server boot disk on a physical disk, continue on with the next section. If you want to install the FTvirtual Server boot
disk on a Virtual disk skip the next section and proceed to Installing Endurance Software on the CoServers. Setup of the Virtual disk will be covered
later during the CoServer installation procedure.
Marathon Technologies Corporation
15
Installing the Endurance Software
Installing the FTvirtual Server Boot Disk on a Physical Disk
On CoServer 2:
The disk for the FTvirtual Server software must be Basic and formatted to
use the NTFS file system.
1.
Right-click My Computer, then select Manage
Computer Management
Storage and then Disk Management. Make sure Disk 1 is
basic, not dynamic.
2.
If the partition is not basic, right click and select Revert to Basic.Rightclick on unallocated Disk 1, and use the wizard that creates partitions to
create the FTvirtual Server boot drive.
3.
•
•
•
Select Primary partition.
•
•
Format the partition using NTFS.
Assign a drive letter. Record this drive letter for later use during
FTvirtual Server installation.
Rename the drive (volume label) FTv boot drive.
Mark the drive active.
•
16
Specify the partition size.
If you plan to use additional disks for applications, make sure that
they are designated Basic and not Dynamic.
Marathon Technologies Corporation
4.
Verify the destination on the Ready to Install window, and click Install.
5.
Click Finish on the Completing the Endurance Quorum Service
Setup Wizard.
Marathon Technologies Corporation
17
Installing the Endurance Software
Installing Endurance Software on the CoServers
Before You Begin the Software Installation
•
Have your Endurance software license number available. You need
to type it when you install the software on the CoServers.
•
Know the PCI location-to-switchbay mappings for each network
adapter. This information will be used when the Endurance Network Setup runs.
•
Make sure all network connections are Enabled and connected.
Right click on My Network Places and select Properties. Examine the status of each connection. If the connection is Disabled,
you must Enable that connection. Make sure each connection has
a status of Connected.
•
Gather information for installing Windows on the FTvirtual Server:
-
The Windows license type: Per server or Per seat
-
The computer name
-
The user name
-
The organization name
-
The Windows Product Key
Note:
18
If you are slip streaming for the FTvirtual Server’s Service Pack,
refer to the Microsoft documentation for information about
preparing the Windows installation. After the Service Pack is
applied, it takes the place of the Windows distribution media.
Marathon Technologies Corporation
CoServer 1 Installation
Starting the Installation
1.
Insert the Endurance CD. If your CD does not automatically launch the
Installation Launcher, browse the CD and double click on setup.exe.
2.
From the Installation Launcher, select Install CoServer, and follow the
prompts through the Welcome, License Agreement, and Information
dialogs to the Customer Information dialog.
3.
Type a user name, company name, and the license number (including
the dashes).
4.
Verify the name, company, and license number on the Registration
Confirmation page.
5.
In the Select Features window, choose the components you want to
install.
•
•
Select Basic Product, the default.
Marathon recommends that you also install the other defaults: Doc
umentation and SNMP Support.
Marathon Technologies Corporation
19
Installing the Endurance Software
6.
Select CoServer1 for installation.
Specify the Location of the Software
20
1.
On the Choose Destination Location window, save the files in the
default location C:\Program Files\Marathon\Endurance or
specify another location.
2.
On the Confirm New Folder window, click Yes.
3.
Verify the information on the Check Setup Information window. Click
Next.
Marathon Technologies Corporation
Configure the Network using the Endurance Network Setup Wizard
If you are installing on a Windows 2003 system, the following Security Alert
may appear.
Click Yes to continue with Endurance Network Setup.
Marathon Technologies Corporation
21
Installing the Endurance Software
The Endurance Network Setup wizard starts to guide you through the task
of configuring the adapters. Click Next to begin.
1.
22
On the Configure Redirected page, enter 1 in the Specify total number of Redirected adapters box and highlight the adapter you wish to
assign as redirected in the Connection column. Select the adapter to be
used based upon the PCI location-to-switchbay mapping you established during planning and preparation. Click Next to continue.
Marathon Technologies Corporation
2.
On the Configure CoServer Link1 page, highlight the adapter you wish
to assign as CoServer Link1 in the Connection column. Select the
adapter based upon the PCI location-to-switchbay mapping you established during planning and preparation. You can use Table 1 to assign IP
addresses for internal CLink connections.
TABLE 1. Suggested
Blade Pair 1
CSLink1
CSLink2
Note:
CoServer1 CLink IP Addresses
Blade Pair 2
Blade Pair 3
CoServer1
CoServer2
CoServer1
CoServer2
CoServer1
CoServer2
192.168.3.1
192.168.3.2
192.168.13.1
192.168.13.2
192.168.23.1
192.168.23.2
192.168.4.1
192.168.4.2
192.168.14.1
192.168.14.2
192.168.24.1
192.168.24.2
When installing multiple blade pairs, the first blade pair will have
the same IP for both the default IP and the currently configured
IP. This will not be the case for subsequent blade pairs.
Marathon Technologies Corporation
23
Installing the Endurance Software
Right click on the your adapter selection and choose Internet Protocol
Properties from the action menu. On the Internet Protocol Properties
page select Use the following IP address. Fill-in the appropriate IP
address from Table 1 for this adapter. Then, enter Subnet mask
255.255.255.0 and click OK.
24
Marathon Technologies Corporation
On the Endurance Network Setup page make sure that the desired
adapter is still highlighted and select Use currently configured IP
addressing. Click Next to continue.
3.
If your network configuration will not use CoServer Link 2, select No
Coserver Link 2 and then click Next without selecting an adapter.
If you will be using CoServer Link 2, then on the Configure CoServer
Link2 page, highlight the adapter you wish to assign as CoServer Link2
in the Connection column. Select the adapter based upon the PCI location-to-switchbay mapping you established during planning and preparation. You can use Table 1 to assign IP addresses for internal CLink
connections.
Right click on the adapter selection and choose Internet Protocol Properties from the action menu. On the Internet Protocol Properties page
select Use the following IP address and fill-in the appropriate address.
Then, enter Subnet mask 255.255.255.0 and click OK.
On the Endurance Network Setup page make sure that the desired
adapter is still highlighted and select Use currently configured IP
addressing. Click Next to continue.
Marathon Technologies Corporation
25
Installing the Endurance Software
4.
If your network will not use a CoServer Management connection, push
Next without highlighting an adapter.
If you will be using CoServer Management, then on the Configure CoServer Management page, highlight the adapter you wish to assign for
CoServer Management in the Connection column. Select the adapter
based upon the PCI location-to-switchbay mapping you established during planning and preparation.
If you wish to assign an IP address, right click on the selection and
choose Internet Protocol Properties from the action menu. On the
Internet Protocol Properties page select Use the following IP
address, fill-in the appropriate address, enter the desired Subnet mask
and click OK. Click Next to continue.
26
Marathon Technologies Corporation
5.
On the Endurance Network Setup page if the Update Network Connections adapter names box is checked, when you restart the system
Network Setup will reassign the adapter names. Click Apply.
6.
When the Endurance Network Setup Settings Applied page appears
click Exit.
7.
Click Yes to restart the CoServer.
8.
When the system restarts the Endurance Network Setup wizard starts
automatically to complete network configuration. On Windows 2003,
Hardware Installation pop-ups may appear. Click Continue Anyway.
9.
If the video quality pop-up message appears, choose the desired
response.
10.
The Endurance FTvirtual Server Desktop window will be displayed in
the top left corner of the CoServer desktop with the text Endurance
FTvirtual Server Offline.
Marathon Technologies Corporation
27
Installing the Endurance Software
11.
The message Do you want to create a virtual disk for use as the
FTvirtual Server boot disk? is displayed. A virtual boot disk is required
if there is only one physical disk in the CoServer. A virtual boot disk is
created as a way to share a single physical disk as both the CoServer
and the FTvirtual Server Windows boot disk. Disk space is allocated to a
file on the CoServer disk. The content of the file is then formatted, partitioned, and used as a member of the FTvirtual Server boot disk.
If you select No, skip ahead to the CoServer 2 installation section.
If you select Yes the Device Redirector Connections dialog is displayed. Click OK, to create a Virtual boot disk.
Create a Virtual Disk
•
28
On the displayed Device Redirector dialog set:
-
The virtual disk size. The default is 4 gigabytes.
-
The boot partition size. Specify a size less than or equal to the
virtual disk size. The default size is the virtual disk size.
-
A drive letter to use when you mount the virtual disk on
CoServer 1. The default is the next available drive letter.
-
Location on CoServer 1 of the file that becomes the virtual disk.
Marathon Technologies Corporation
•
Click Create to create the virtual disk.
This may take a few minutes, depending on the size of the virtual disk.
When the virtual disk is created, the Device Redirector displays a dialog
showing the name of the file that was created, the SCSI ID of the newly created virtual disk, and the drive letter associated with the NTFS-formatted
boot partition.
•
12.
Click OK.
Continue with CoServer 2 Installation.
CoServer 2 Installation
Press both media device select buttons on the front panel of the Blade you
have choosen for CoServer2 to assign connection of the console display
and CDROM to that server.
Marathon Technologies Corporation
29
Installing the Endurance Software
1.
Browse the CD and double-click setup.exe.
2.
From the Installation Launcher, select Install CoServer. Follow the
prompts as you did during CoServer 1 installation to set the license number, select features, choose CoServer 2 install, and define the installation location. When the Endurance Network wizard runs proceed to step
3 below.
3.
On the Configure Redirected page, enter 1 in the Specify total number of Redirected adapters, and highlight the adapter you wish to
assign as Redirected in the Connection column. Select the adapter
based upon the PCI location-to-switchbay mapping you established during planning and preparation.
4.
On the Configure CoServer Link1 page, highlight the adapter you wish
to assign as CoServer Link1 in the Connection column. Select the
adapter based upon the PCI location-to-switchbay mapping you established during planning and preparation. You can use Table 2 to assign IP
addresses for internal CLink connections.
TABLE 2. Suggested
Blade Pair 1
CSLink1
CSLink2
Note:
CoServer2 CLink IP Address
Blade Pair 2
Blade Pair 3
CoServer1
CoServer2
CoServer1
CoServer2
CoServer1
CoServer2
192.168.3.1
192.168.3.2
192.168.13.1
192.168.13.2
192.168.23.1
192.168.23.2
192.168.4.1
192.168.4.2
192.168.14.1
192.168.14.2
192.168.24.1
192.168.24.2
When installing multiple blade pairs, the first blade pair has the
same IP for both the default IP and the currently configured IP.
This will not be the case for subsequent blade pairs.
Right click on the adapter selection and choose Internet Protocol Properties from the action menu. On the Internet Protocol Properties page
select Use the following IP address and fill-in the appropriate address.
Then, enter Subnet mask 255.255.255.0 and click OK.
30
Marathon Technologies Corporation
On the Endurance Network Setup page make sure that the desired
adapter is still highlighted and select Use currently configured IP
addressing. Click Next to continue.
5.
If your network configuration will not use CoServer Link 2, select No
Coserver Link 2 and then click Next without selecting an adapter.
If you will be using CoServer Link 2, then on the Configure CoServer
Link2 page, highlight the adapter you wish to assign as CoServer Link2
in the Connection column. Select the adapter based upon the PCI location-to-switchbay mapping you established during planning and preparation.
Right click on the selection and choose Internet Protocol Properties
from the action menu. On the Internet Protocol Properties page select
Use the following IP address, fill-in the appropriate address, enter
Subnet mask 255.255.255.0 and click OK.
On the Endurance Network Setup page make sure that the desired
adapter is still highlighted and select Use currently configured IP
addressing. Click Next to continue.
6.
If your network will not use a CoServer Management connection, push
Next without highlighting an adapter
If you will be using CoServer Management, then on the Configure CoServer Management page, highlight the adapter you wish to assign for
CoServer Management in the Connection column. Select the adapter
based upon the PCI location-to-switchbay mapping you established during planning and preparation.
If you wish to assign an IP address, right click on the selection and
choose Internet Protocol Properties from the action menu. On the
Internet Protocol Properties page select Use the following IP
address, fill-in the appropriate address, enter the desired Subnet mask
and click OK. Click Next to continue.
7.
On the Endurance Network Setup page if the Update Network Connections adapter names box is checked, when you restart the system
Network Setup will reassign the adapter names. Click Apply.
8.
Click Exit.
Marathon Technologies Corporation
31
Installing the Endurance Software
9.
Click Yes to restart the CoServer.
10.
When the system restarts the Endurance Network Setup wizard starts
automatically to complete network configuration. On Windows 2003,
Hardware Installation pop-ups may appear. Click Continue Anyway.
11.
If the video quality pop-up message appears, choose the desired
response.
12.
The Endurance FTvirtual Server Desktop window will be displayed in
the top left corner of the CoServer desktop with the text Endurance
FTvirtual Server Offline.
13.
The message Do you want to create a virtual disk for use as the
FTvirtual Server boot disk? is displayed. You should select the same
response that was given during CoServer 1 installation by clicking the
approriate button.
If you select No, the installation will continue with installing Windows and
configuring FTvirtual Server. Skip ahead to the Installing Windows on
and Configuring the FTvirtual Server section.
If you select Yes the Device Redirector Connections dialog is displayed.
•
•
32
Click OK if both CoServer names are displayed.
If both CoServer names are not displayed:
-
Launch the Endurance Manager:
-
Start
-
When both CoServers appear bright green in the CoServer
CoServer View) showing that they are in the
View (View
Degraded state, enter the name of the missing CoServer in the
Device Redirector Connections dialogue box; and then click
OK.
Programs
Marathon Endurance
Marathon Technologies Corporation
Manager)
Create a Virtual Disk
•
•
On the displayed Device Redirector dialog set:
-
The virtual disk size. The default is 4 gigabytes.
-
The boot partition size. Specify a size less than or equal to the
virtual disk size. The default size is the virtual disk size.
-
A drive letter to use when you mount the virtual disk on
CoServer 2. The default is the next available drive letter.
-
Location on CoServer 2 of the file that becomes the virtual disk.
Click Create to create the virtual disk.
Marathon Technologies Corporation
33
Installing the Endurance Software
This may take a few minutes, depending on the size of the virtual disk.
When the virtual disk is created, the Device Redirector displays a dialog
showing the name of the file that was created, the SCSI ID of the newly created virtual disk, and the drive letter associated with the NTFS-formatted
boot partition. Record this drive letter for later use during the FTvirtual
Server installation.
•
Click OK.
The Device Redirector prompts you to prepare the FTvirtual Server disk for
the FTvirtual Server part of the installation. Click Yes in response to the Do
you want to configure the FTvirtual Server boot disk now? prompt.
•
Proceed to step 3 of the next section to configure the FTvirtual
Server boot disk.
Installing Windows on and Configuring the FTvirtual Server
Select CoServer Devices for FTvirtual Server Use and Configure
the FTvirtual Server Disk
1.
If the Device Redirector Connection dialog box is displayed, click OK if
both CoServer names appear.
If both CoServer names do not appear:
2.
34
•
Launch the Endurance Manager (Start
Endurance Manager).
•
When both CoServers appear bright green in the CoServer View
(View CoServer View) indicating that they are in a Degraded
state, enter the name of the missing CoServer in the Device Redirector Connection dialog box; and then click OK.
Programs
Marathon
The Device Redirector prompts you to prepare the FTvirtual Server disk
for the FTvirtual Server part of the installation. Click Yes in response to
the Do you want to configure the FTvirtual Server boot disk now?
prompt.
Marathon Technologies Corporation
3.
Configure the FTvirtual Server boot disk by selecting a set of disks, one
from each CoServer, and click OK.
4.
A warning message is displayed if the sizes of the disks are not equal.
The FTvirtual Server software has to be installed on the CoServer that
contains the smaller disk.
Click Yes to continue the installation. The excess disk space on the
larger disk will not be utilized.
Click No if you did not intend to have mismatched drive sizes, and return
to step 3.
Marathon Technologies Corporation
35
Installing the Endurance Software
5.
If your CoServer has any other disk drives that you want to redirect to
the FTvirtual Server, right click on Disk Drives, and then select Add.
Select a set of disks, one disk from each CoServer, and click OK. The
Device Redirector checks the sizes of the disks you selected. A warning
message is displayed if the sizes of the disks are not equal.
Click Yes to continue the installation.
Click No if you did not intend to have mismatched drive sizes, and repeat
step 5.
Repeat this step for each FTvirtual Server disk drive that you wish to redirect.
The Endurance Device Redirector runs on CoServer 2, and the redirected
network adapters have been automatically configured.
Note:
36
You cannot redirect the CDROM on the IBM eServer
BladeCenter because the CDROM is shared across all blades
and controlled by a built in USB switch.Install Windows on and
configure the FTvirtual Server Boot disk following the prompts.
6.
From the File menu select Write Device Settings, and then OK on the
Device Settings Saved window.
7.
Exit the Endurance Device Redirector.
8.
Click Yes in response to the prompt Do you want to install the FTvirtual Server now?
Marathon Technologies Corporation
The Install Wizard for Endurance Windows Preparation will be displayed.
Marathon Technologies Corporation
37
Installing the Endurance Software
Install Windows on the FTvirtual Server Disk
1.
Follow the prompts through the Welcome, License Agreement, and
Information dialogs, to the Customer Information dialog. Type a user
name and company name and then click Next.
2.
On the Windows Installation window:
•
Type the information requested including the Destination drive
which is the FTvirtual Server boot drive. You should specify the
drive letter that you recorded when formatting and partitioning the
physical FTvirtual Server boot drive or when you created the FTvirtual Server boot disk.
•
Select Install SNMP if you want to run the Endurance SNMP
Extension Agent to export management information through
SNMP.
•
Click NEXT.
3.
Verify the information on the Check Setup Information window and
click NEXT.
4.
Remove the Endurance CD.
5.
You are prompted for the Windows distribution media, either the Windows CD or the location of the Windows files.
If the Windows distribution media is on a CD, insert the Windows CD.
If a Windows auto-play page appears, select Take no action and click
OK.
If a Windows installation dialogue appears, exit it.
6.
Browse to the appropriate \i386 folder. Select the folder and click OK.
Select the same Windows release with the appropriate slip streamed
Service Pack as is installed on the CoServers.
38
Marathon Technologies Corporation
7.
A progress bar shows the files being copied to the FTvirtual Server boot
drive. This may take several minutes. When the installation completes,
remove the Windows CD if it is in the drive.
8.
Click Yes in response to the prompt, Both CoServers must be rebooted. Proceed?.
Finish the Windows Installation
1.
To monitor the installation, after the CoServers reboot, log in as Administrator on either CoServer.
The FTvirtual Server Desktop appears.
2.
Allow the installation to progress.
•
•
Ensure that the Endurance taskbar icon appears.
•
GUI mode setup starts and displays the standard Windows installation on the FTvirtual Server Desktop. GUI mode setup completes,
and the FTvirtual Server restarts.
•
If the installation prompts you, enter the requested information.
Text mode setup starts and displays a progress bar showing Windows being installed on the FTvirtual Server. Text mode setup completes, and the FTvirtual Server restarts.
Marathon Technologies Corporation
39
Installing the Endurance Software
Install the Endurance FTvirtual Server Software
The Endurance FTvirtual Server installation starts.
1.
Follow the prompts through the Welcome, License Agreement, and
Information dialogs to the Select Features window.
2.
In the Select Features window, choose the components you want.
•
Select Basic Product, the default.
•
If you selected SNMP when you installed Windows on the FTvirtual
Server, the SNMP Agent box is checked.
•
Click Next.
•
If the SNMP Service in Use window appears, click Yes.
Specify the Location of the Software
40
1.
On the Choose Destination Location window, save the files in the
default location C:\Program Files\Marathon\Endurance or
specify another location.
2.
On the Confirm New Folder window, click Yes.
3.
Verify the information on the Check Setup Information window and
then click Next.
Marathon Technologies Corporation
Finish the FTvirtual Server Installation
1.
The Endurance Network Setup wizard starts and configures the FTvirtual Server network adapters. Click Exit.
On Windows 2003 Service Pack 1, a Windows Security Alert may
appear indicating that the Windows Firewall has blocked some features
of the Endurance Taskbar Notification Icon. Click Unblock on this dialogue to allow operation of the taskbar icon. Also on Windows 2003 Service Pack 1, a Windows Security dialog may appear. Ignore this window
at this time, it will be displayed again by Windows after the next reboot.
The pop-up message The FTvirtual Server must be restarted to complete the installation. is displayed. Click Yes in response to the Restart
Now? prompt, and the FTvirtual Server is restarted.
2.
After the FTvirtual Server restarts, login using the FTvirtual Server desktop.
On Windows 2003, if the Manage Your Server window appears, click
Don’t display this page at logon, and then dismiss the window.
On Windows 2000, if the Configure Your Server window appears, click
I will configure this server later, and then dismiss the window.
Optionally, set the FTvirtual Server resolution to 1024x768.
On the FTvirtual Server desktop, right click and select Properties
Settings
Advanced. Click the Adapter tab and then List All Modes.
Select the resolution.
Marathon Technologies Corporation
41
Installing the Endurance Software
3.
Optionally, set the FTvirtual Server Desktop to Full Screen Mode, click
on the title bar of the FTvirtual Server Desktop, and select the option Full
Screen Mode.
To shift the input focus between the CoServer and the FTvirtual Server,
press the default hot key sequence: Ctrl/Shift/F12.
At any time that you are running the FTvirtual Server, you can check
whether your input is directed to the CoServer or the FTvirtual Server
Desktop. If the Scroll Lock indicator on your keyboard is blinking, the
focus is the CoServer. If it is not blinking, the focus is the FTvirtual
Server Desktop.
Verifying the FTvirtual Server Installation
Verify the installation of the Endurance FTvirtual Server:
1.
From the FTvirtual Server Desktop, launch the Endurance Manager.
The Endurance Manager starts in the FTvirtual Server view.
2.
From the menu bar of the Endurance Manager, select View
erver View.
CoS-
The CoServer View shown on the following page displays the two CoServers with a yellow arrow between the two disks, illustrating that data on
one CoServer are being copied to the other CoServer. When the copying
process is completed, the arrow disappears, the installation is complete,
and the components appear green.
42
Marathon Technologies Corporation
What to do Next
The Endurance software installation for this set of CoServers and setup of
the FTvirtual Server is now complete. If you have additional blade pairs to
setup return to the Installing Windows on the CoServer section at the beginning of this chapter.
For more information about using the FTvirtual Server, read Getting Started
with Endurance FTvirtual Server and the Endurance FTvirtual Server
Administrator’s Guide.
Marathon Technologies Corporation
43
Installing the Endurance Software
44
Marathon Technologies Corporation