1
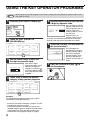
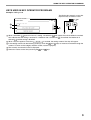
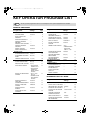
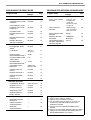
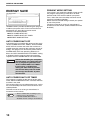
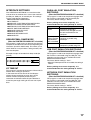
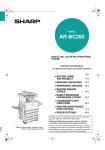
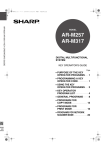
MODEL
AR-M236
AR-M276
DIGITAL MULTIFUNCTIONAL
SYSTEM
KEY OPERATOR'S GUIDE
Page
• PURPOSE OF THE KEY
OPERATOR PROGRAMS
• PROGRAMMING A KEY
OPERATOR CODE
• USING THE KEY
OPERATOR PROGRAMS
• KEY OPERATOR
PROGRAM LIST
• GENERAL PROGRAMS
• PROGRAMS FOR
COPY MODE
• PROGRAMS FOR
PRINT MODE
• PROGRAMS FOR NETWORK
SCANNER MODE
1
1
2
4
8
15
16
20
The key operator code is initially set to "00000" at the factory.
PURPOSE OF THE KEY OPERATOR
PROGRAMS
The key operator programs are used by the key operator (administrator of the machine) to customize certain
features of the machine to better meet the needs of users.
This guide explains key operator programs that are common to all functions of the multifunction system (copy
function, fax function, printer function, and network scanner function), as well as programs that are specific to the
copy function, printer function, and network scanner function. Programs that are specific to the fax function are
explained in the following manual:
• Fax function ............."AR-FX7 Operation manual" (Chapter 8)
In order to access the key operator programs, the key operator code must be entered.
PROGRAMMING A KEY OPERATOR CODE
The key operator code is a 5-digit number that must be entered in order to access the key operator programs. The
key operator (administrator of the machine) should change the default key operator code that was set at the factory
to a new 5-digit number. Be sure to remember the new key operator code, as it must be entered each time the key
operator programs are subsequently used. (Only one key operator code can be programmed.)
To change the key operator code, see "USING THE KEY OPERATOR PROGRAMS" on the following page.
The key operator code is initially set to "00000" at the factory.
1
USING THE KEY OPERATOR PROGRAMS
When using the key operator programs for the first time, change the factory default key operator code to a new
code. (Step 3 to step 5)
Note
1
Press the [CUSTOM SETTINGS] key.
2
CUSTOM SETTINGS
Touch the [KEY OPERATOR
PROGRAMS] key.
CUSTOM SETTINGS
3
EXIT
TOTAL COUNT
DISPLAY
CONTRAST
LIST PRINT
CLOCK
TRAY SETTINGS
ADDRESS
CONTROL
RECEIVE MODE
FAX DATA
FORWARD
KEYBOARD
SELECT
4
Touch the [OK] key. You will return to
the screen of step 4.
OK
Use the numeric keys to enter the
five-digit key operater code.
Each time a digit is
entered, the dash (-) that
indicates the digit will
change to an asterisk ( ).
The factory default setting
for the key operator code
is 00000.
Touch a key to select the desired
category of key operator programs.
KEY OPERATOR PROGRAMS
EXIT
ACCOUNT
CONTROL
ENERGY SAVE
OPERATION
SETTINGS
DEVICE CONTROL
COPY SETTINGS
PRINT SETTINGS
SCANNER
SETTINGS
FAX SETTINGS
LIST PRINT
KEY OPERATOR
CODE CHANGE
PRODUCT KEY
Example:
To change the key operator code, touch the [KEY
OPERATOR CODE CHANGE] key.
• Each time you need to configure a program, use this
procedure to select the program.
• In the following steps, the setting screen for the
selected program appears. Refer to the explanation
of the program to select the desired setting (the
explanations of the programs begin on page 8).
2
6
KEY OPERATOR PROGRAMS
KEY OPERATOR CODE
Use the numeric keys to enter the new
5-digit key operator code.
Use a number for the key
operator code that has not
been programmed as an
----account number for
00000
auditing mode (a number
that has been
programmed as an
account number cannot
be used). The entered number will be the new key
operator code. Be sure to remember this number.
LINE
DATA
B STATUS
5
7
This completes the
procedure for changing
the key operator code. If
you wish to configure
another program, touch
the key of the desired
program in the screen of
step 4.
Press the [CLEAR ALL] key (
exit the program.
) to
USING THE KEY OPERATOR PROGRAMS
KEYS USED IN KEY OPERATOR PROGRAMS
Example: Auditing mode
The following keys appear in screens that
require the entry of numerical values.
KEY OPERATOR PROGRAMS
1
2
20
OK
ACCOUNT CONTROL
AUDITING MODE
TOTAL PAGES PER ACCOUNT
(1
999)
1/3
3
RESETTING ACCOUNT
4
1
2
3
4
5
5
When a checkbox ( ) appears in front of a setting, a checkmark ( ) will appear when the checkbox is touched.
This indicates that the setting is enabled. If a checkbox with a checkmark ( ) is touched, the checkmark is
cleared ( ) and the setting is disabled.
When a key that appears in the form
is touched, the setting screen of that key will appear.
XXX
If the settings continue on the following screen(s), touch the
and
keys to move back and forth through the
screens. To return to the category selection screen, touch the [OK] key.
The currently set numerical value is displayed.
Numerical values can be set by touching the
and
keys.
3
02_keyope_list.fm 4 ページ
2004年7月27日 火曜日 午後1時11分
KEY OPERATOR PROGRAM LIST
Note
The key operator programs that can be accessed depend on the optional equipment that is installed.
GENERAL PROGRAMS
Program name
Factory default
settings
Page
Factory default
settings
Page
DEVICE CONTROL
ACCOUNT CONTROL
AUDITING MODE
Disabled
8
TOTAL PAGES PER
ACCOUNT
—
8
DISABLING OF
DOCUMENT FEEDER *2
Disabled
12
DISABLING OF DUPLEX
Disabled
12
Disabled
12
RESETTING ACCOUNT
—
8
DISABLING OF STAPLER *3
ACCOUNT NUMBER
CONTROL
—
9
OUTPUT TRAYS *4
PATTERN 1
13
13
—
9
OFFSET FUNCTION
SETTING
Enabled
ACCOUNT LIMIT SETTING
ACCOUNT NUMBER
SECURITY
Disabled
9
MEMORY FOR PRINTER
13
CANCEL JOBS OF
INVALID ACCOUNTS *5
Disabled
9
• 50%
• MEMORY AREA
FOR PRINT
HOLD *5 : 30%
DISABLING OF CENTRE
TRAY COUNTING
Disabled
13
ENERGY SAVE
AUTO POWER SHUT-OFF
Enabled
10
13
60 (min.)
10
RETURN FROM COPY
MODE TIMING
60 (sec)
AUTO POWER SHUT-OFF
TIMER
13
15 (min.)
10
MIX SIZE ORIGINAL
FEEDING MODE
Disabled
PREHEAT MODE SETTING
00000
14
PS3 EXPANSION KIT *5
—
14
NETWORK SCANNER
EXPANSION KIT *7
—
14
E-MAIL ALERT AND
STATUS *5
—
14
SERIAL NUMBER
—
14
OPERATION SETTINGS
AUTO CLEAR SETTING
60 (sec)
11
MESSAGE TIME SETTING
6 (sec)
11
KEYS TOUCH SOUND
• KEYS TOUCH
SOUND: Short
• KEYS TOUCH
SOUND AT
INITIAL POINT:
Disabled
11
• Time to entry:
0.0 (sec)
• DISABLE AUTO
KEY REPEAT:
Disabled
11
DISABLE INTERRUPT
PRINT JOB
Disabled
11
STREAM FEEDING MODE *2
Disabled
12
DISPLAY LANGUAGE
SETTING
ENGLISH
12
DISABLE DISPLAY
TIMEOUT
Disabled
12
DISABLING OF TRAY
SETTINGS
Disabled
12
TOUCH KEY OPERATION
SETTING
4
Program name
KEY OPERATOR CODE
CHANGE
PRODUCT KEY *5
PROGRAMS FOR COPY MODE
Program name
Factory default
Page
settings
COPY SETTINGS
INITIAL STATUS SETTINGS
—
15
ROTATION COPY SETTING
Enabled
15
EXPOSURE ADJUSTMENT
3
15
AUTO PAPER SELECTION
SETTING
PLAIN PAPER
15
SETTING A MAXIMUM
NUMBER OF COPIES
999
15
SORT AUTO SELECT *2
Enabled
15
DISABLING DELETION OF
JOB PROGRAMS
Disabled
15
KEY OPERATOR PROGRAM LIST
PROGRAMS FOR PRINT MODE
Program name
PROGRAMS FOR NETWORK SCANNER MODE
Factory default
Page
settings
Program name
Factory default
settings
Page
SCANNER SETTINGS *1
PRINT SETTINGS
DEFAULT SETTINGS
INITIAL FILE FORMAT
SETTING
• File type: TIFF
• Compression
mode: G4
• Number of pages
per file: All
20
INITIAL QUALITY
SETTING
• Original image
type: Text/Photo
• Exposure: Auto
20
PROHIBIT NOTICE PAGE
PRINTING
Disabled
16
PRINT DENSITY LEVEL
3
16
PROHIBIT TEST PAGE
PRINTING *5
Disabled
16
ROTATED PRINT
Enabled
16
FORCED OUTPUT OF
PRINT
Disabled
16
INITIAL RESOLUTION
SETTING
300 dpi
20
EXCLUDE BYPASS-TRAY
FROM ATS
Enabled
16
DEFAULT DISPLAY
SETTINGS
CONDITION
SETTINGS
20
DISABLE DEFAULT
SETTING CHANGES *5
Disabled
16
THE NUMBER OF DIRECT
ADDRESS / SENDER KEYS
DISPLAYED SETTING
8 (keys)
20
HEXADECIMAL DUMP
MODE *5
Disabled
17
I/O TIMEOUT
180 (sec)
60 (sec) *5
17
PARALLEL PORT
EMULATION SWITCHING *5
AUTO
17
USB PORT EMULATION
SWITCHING *5
PCL
17
NETWORK PORT
EMULATION SWITCHING *5
AUTO
17
PORT SWITCHING
METHOD *5
SWITCH AT
END OF JOB
18
ENABLE PARALLEL
PORT *5
Enabled
18
ENABLE USB PORT *5
Enabled
18
ENABLE NETWORK
PORT *5
Enabled
18
ENABLE ECP *5
Disabled
18
IP ADDRESS SETTING
DHCP: Enabled
18
ENABLE TCP/IP *6
Enabled
18
ENABLE NetWare *6
Enabled
18
ENABLE EtherTalk *6
Enabled
18
ENABLE NetBEUI *6
Enabled
19
RESET THE NIC
—
19
INTERFACE SETTINGS
NETWORK SETTINGS *5
INITIALISE AND/OR STORE SETTINGS *5
RESTORE FACTORY
DEFAULTS
—
19
STORE CURRENT
CONFIGURATION
—
19
RESTORE
CONFIGURATION
—
19
*1
*2
*3
*4
Appears when the scanner function is enabled.
Appears when a RSPF is installed.
Appears when a FINISHER is installed.
Can be enabled when the printer or fax function is
enabled and a JOB SEPARATOR TRAY KIT or
FINISHER is installed.
*5 Appears when the PRINTER EXPANSION KIT is
installed.
*6 Appears when the PRINT SERVER CARD is installed.
*7 Appears when the PRINTER EXPANSION KIT and
EXPANSION MEMORY are installed.
5
KEY OPERATOR PROGRAM LIST
KEY OPERATOR PROGRAM MENU
The key operator programs are arranged in the following menu.
Refer to this menu when enabling or disabling the settings that are explained beginning on page 8.
* Some programs contain an additional level of settings (setting screen).
Enter Key Operator Code
Level 1
Level 2
ACCOUNT CONTROL
AUDITING MODE
TOTAL PAGES PER ACCOUNT
RESETTING ACCOUNT
ACCOUNT NUMBER CONTROL
ACCOUNT LIMIT SETTING
ACCOUNT NUMBER SECURITY
CANCEL JOBS OF INVALID ACCOUNTS
ENERGY SAVE
AUTO POWER SHUT-OFF
AUTO POWER SHUT-OFF TIMER
PREHEAT MODE SETTING
OPERATION SETTINGS
AUTO CLEAR SETTING
MESSAGE TIME SETTING
KEYS TOUCH SOUND
TOUCH KEY OPERATION
SETTING
DISABLE INTERRUPT PRINT JOB
STREAM FEEDING MODE
DISPLAY LANGUAGE SETTING
DISABLE DISPLAY TIMEOUT
DISABLING OF TRAY SETTINGS
DEVICE CONTROL
DISABLING OF DOCUMENT FEEDER
DISABLING OF DUPLEX
DISABLING OF STAPLER
OUTPUT TRAYS
OFFSET FUNCTION SETTING
MEMORY FOR PRINTER
DISABLING OF CENTRE TRAY COUNTING
RETURN FROM COPY MODE
TIMING
MIX SIZE ORIGINAL FEEDING MODE
KEY OPERATOR CODE CHANGE
6
PRODUCT KEY
PS3 EXPANSION KIT
NETWORK SCANNER EXPANSION KIT
E-MAIL ALERT AND STATUS
SERIAL NUMBER
COPY SETTINGS
INITIAL STATUS SETTINGS
ROTATION COPY SETTING
EXPOSURE ADJUSTMENT
AUTO PAPER SELECTION SETTING
SETTING A MAXIMUM NUMBER OF COPIES
SORT AUTO SELECT
DISABLING DELETION OF JOB PROGRAMS
Level 3
KEY OPERATOR PROGRAM LIST
Level 1
Enter Key Operator Code
PRINT SETTINGS
SCANNER SETTINGS
Level 2
Level 3
DEFAULT SETTINGS
PROHIBIT NOTICE PAGE PRINTING
PRINT DENSITY LEVEL
PROHIBIT TEST PAGE PRINTING
ROTATED PRINT
FORCED OUTPUT OF PRINT
EXCLUDE BYPASS-TRAY FROM ATS
DISABLE DEFAULT SETTING CHANGES
INTERFACE SETTINGS
HEXADECIMAL DUMP MODE
I/O TIMEOUT
PARALLEL PORT EMULATION SWITCHING
USB PORT EMULATION SWITCHING
NETWORK PORT EMULATION SWITCHING
PORT SWITCHING METHOD
ENABLE PARALLEL PORT
ENABLE USB PORT
ENABLE NETWORK PORT
ENABLE ECP
NETWORK SETTINGS
IP ADDRESS SETTING
ENABLE TCP/IP
ENABLE NetWare
ENABLE EtherTalk
ENABLE NetBEUI
RESET THE NIC
INITIALISE AND/OR STORE SETTINGS
RESTORE FACTORY DEFAULTS
STORE CURRENT CONFIGURATION
RESTORE CONFIGURATION
INITIAL FILE FORMAT SETTING
INITIAL QUALITY SETTING
INITIAL RESOLUTION SETTING
DEFAULT DISPLAY SETTINGS
THE NUMBER OF DIRECT ADDRESS /
SENDER KEYS DISPLAYED SETTING
7
03_keyope.fm 8 ページ
2004年7月27日 火曜日 午後1時13分
GENERAL PROGRAMS
This chapter explains key operator programs that are common to all functions of the multifunction system (copy
function, fax function, printer function, and network scanner function).
ACCOUNT CONTROL
KEY OPERATOR PROGRAMS
ACCOUNT CONTROL
OK
AUDITING MODE
1/3
TOTAL PAGES PER ACCOUNT
This program is used to display the page counts of
each account. Misfed pages are not included in the
page counts. When the fax and network scanner
functions are used, the fax and network scanner page
counts show the number of pages transmitted.
TOTAL PAGES PER ACCOUNT
RESETTING ACCOUNT
Touch the [TOTAL PAGES PER ACCOUNT] key to
display the page count screen.
KEY OPERATOR PROGRAMS
"ACCOUNT CONTROL" consists of the following
programs.
● AUDITING MODE
● TOTAL PAGES PER ACCOUNT
● RESETTING ACCOUNT
● ACCOUNT NUMBER CONTROL
● ACCOUNT LIMIT SETTING
● ACCOUNT NUMBER SECURITY
● CANCEL JOBS OF INVALID ACCOUNTS*
* Appears when the PRINTER EXPANSION KIT is
installed.
AUDITING MODE
When AUDITING MODE is enabled, a count is kept of
the pages printed by each account (up to 100 accounts
can be established). The page counts can be viewed
in the display.
TOTAL PAGES PER ACCOUNT
ACCOUNT
NUMBER
COPIES
(LIMIT)
11111
123,456
(150,000)
123,456
(150,000)
123,456
(150,000)
123,456
(150,000)
22222
33333
44444
OK
PRINTS
SCAN
FAX SEND
123,456
123,456
123,456
123,456
123,456
123,456
123,456
123,456
123,456
123,456
123,456
123,456
1/2
RESETTING ACCOUNT
This program is used to reset the page counts of each
account to zero.
When the fax and network scanner functions are used,
this program resets the fax and network scanner page
counts to zero.
Touch the [RESETTING ACCOUNT] key to display the
account reset screen.
KEY OPERATOR PROGRAMS
RESETTING ACCOUNT
Note
After enabling "AUDITING MODE", program
account numbers using "ACCOUNT
NUMBER CONTROL".
ACCOUNT
NUMBER
COPIES
(LIMIT)
11111
123,456
(150,000)
123,456
(150,000)
123,456
(150,000)
123,456
(150,000)
22222
33333
When using the copy function, fax function, or network
scanner function, an account number must be entered
to scan an original.
44444
OK
PRINTS
SCAN
FAX SEND
123,456
123,456
123,456
123,456
123,456
123,456
123,456
123,456
123,456
ALL ACCOUNTS
123,456
123,456
123,456
RESET
1/2
● Resetting a single account
Touch the key of the account that you wish to reset,
and then select [YES] in the confirmation screen. If
the account that you wish to reset does not appear,
touch the
key or
key until the account
appears. When finished, touch the [OK] key.
● Resetting all accounts
Touch the [RESET] key and then select [YES].
When finished, touch the [OK] key.
8
GENERAL PROGRAMS
ACCOUNT NUMBER CONTROL
ACCOUNT LIMIT SETTING
This program is used to store, delete, and change
account numbers for AUDITING MODE. A maximum
of 100 account numbers can be stored.
A limit for the number of copies that can be made can
be set for a single account or for all accounts at once.
The maximum limit that can be entered is 999,999.
Touch the [ACCOUNT LIMIT SETTING] key to display
the account limit setting screen.
● Storing a new account number
To store a new account number, touch the [ENTER]
key and then use the numeric keys to enter a 5-digit
account number. Touch the [ENTER] key to store
the number. After storing the account number, you
can continue storing other account numbers.
Note that the same number as the key operator
code cannot be stored.
● Deleting an account number
To delete an account number, touch the [DELETE]
key and then select whether you wish to delete a
single account number or all account numbers.
To delete a single account number, use the numeric
keys to enter the account number that you wish to
delete and then touch the [ENTER] key.
To delete all account numbers, touch the [DELETE]
key and then touch [YES] in the screen that appears
to confirm the deletion.
● Changing an account number
To change an account number, touch the
[CHANGE] key and use the numeric keys to enter
the account number that you wish to change. Enter
the new account number and then touch the
[ENTER] key. After changing the account number,
you can continue changing other account numbers.
If you make a mistake while entering the account
number that you wish to change and enter a number
that is not in use, an alarm will sound and the display
will change to hyphens (-).
KEY OPERATOR PROGRAMS
ACCOUNT LIMIT SETTING
OK
INPUT ACCOUNT NUMBER TO BE LIMITED.
ACCOUNT
NUMBER
----LIMIT
NUMBER OF
COPIES MADE
123,456
MAXIMUM
---,--ENTER
● Setting a limit for a single account
Use the numeric keys to enter the number of the
account for which you wish to set a limit, and then
enter the limit. When finished, touch the [ENTER]
key.
If you enter an account number that already has a
limit, the limit will appear in the display. To change
the limit, press the [CLEAR] key ( ) (the display
will change to hyphens (-)) and then enter the new
limit.
If you touch the [ENTER] key while the display
shows hyphens (-) for the limit, the limit set for the
account will be cancelled. When you have finished
setting a limit for one account, you can continue
setting limits for other accounts.
When finished, touch the [OK] key to exit.
● Setting a limit for all accounts
Touch the [LIMIT] key. [ALL] will appear in the
account number entry screen.
Enter a limit for all acounts in the same way as
explained above for a single account.
When finished, touch the [OK] key to exit.
ACCOUNT NUMBER SECURITY
This program is used to display an alarm and prohibit
entry of account numbers for one minute if an incorrect
acount number is entered three times in a row when
"AUDITING MODE" is enabled. (This prevents
unauthorised people from attempting to guess an
account number.)
CANCEL JOBS OF INVALID ACCOUNTS
This program is used to control use of the printer
function when "AUDITING MODE" is enabled. When
this program is enabled, the machine will not print a
print job if the operator enters an invalid account
number at the computer or fails to enter an account
number.
When the program is disabled, print jobs received
without the entry of a valid account number will be
printed and the number of pages will be included in the
[OTHERS] count.
9
GENERAL PROGRAMS
ENERGY SAVE
PREHEAT MODE SETTING
KEY OPERATOR PROGRAMS
OK
ENERGY SAVE
AUTO POWER SHUT-OFF
AUTO POWER SHUT-OFF TIMER
60min
PREHEAT MODE SETTING
15min
"ENERGY SAVE" provides the following four programs
to reduce your power costs. From an environmental
perspective, this also helps conserve natural
resources and reduce pollution.
● AUTO POWER SHUT-OFF
● AUTO POWER SHUT-OFF TIMER
● PREHEAT MODE SETTING
AUTO POWER SHUT-OFF
If the machine is not used for the amount of time set in
"AUTO POWER SHUT-OFF TIMER", AUTO POWER
SHUT-OFF will activate and switch the machine to a
standby state that conserves the maximum amount of
energy. This program can be used to prevent AUTO
POWER SHUT-OFF from operating. When this is
done, the "AUTO POWER SHUT-OFF TIMER" setting
is disabled. Use this program when circumstances
require that AUTO POWER SHUT-OFF be disabled.
Caution
Rather than disabling the auto power
shut-off feature, we suggest that you
first try lengthening the time set in
"AUTO POWER SHUT-OFF TIMER"
In most cases a suitable timer
setting will allow work to proceed
with minimal delay and still enable
you to enjoy the benefits of power
conservation.
AUTO POWER SHUT-OFF TIMER
This program is used to set the amount of time after
which "AUTO POWER SHUT-OFF" activates when the
machine is not used.
This function allows you to reduce power costs, and at
the same time helps conserve natural resources and
reduce pollution.
The time can be set to as long as 240 minutes in
increments of one minute.
Note
10
• Select a suitable time according to your
pattern of use of the machine.
• If "AUTO POWER SHUT-OFF" is
disabled, the time setting is also disabled.
If the printer is not used for the length of time set with
this program after printing is finished, it will enter
preheat mode. This function reduces your power
costs, and at the same time helps conserve natural
resources and reduce pollution.
Select the most suitable setting to match your pattern
of use of the printer.
The time can be set to as long as 240 minutes in
increments of one minute. (Preheat mode cannot be
disabled.)
GENERAL PROGRAMS
OPERATION SETTINGS
KEY OPERATOR PROGRAMS
OPERATION SETTINGS
OK
AUTO CLEAR SETTING
60sec
MESSAGE TIME SETTING
6sec
1/3
KEYS TOUCH SOUND
KEYS TOUCH SOUND
This program is used to select whether or not a beep is
sounded when a key is touched, and if sounded, what
type of beep.
The program is also use to select whether or not a
special key touch beep is sounded at the initial point of
a setting.
KEY OPERATOR PROGRAMS
OK
KEYS TOUCH SOUND
The "OPERATION SETTINGS" are related to basic
operation of the machine and consist of the following
programs:
● AUTO CLEAR SETTING
● MESSAGE TIME SETTING
● KEYS TOUCH SOUND
● TOUCH KEY OPERATION SETTING
● DISABLE INTERRUPT PRINT JOB
● STREAM FEEDING MODE
● DISPLAY LANGUAGE SETTING
● DISABLE DISPLAY TIMEOUT
● DISABLING OF TRAY SETTINGS
AUTO CLEAR SETTING
If no action is taken for a certain length of time when
viewing information on finished jobs, jobs in progress,
or stored jobs, the auto clear function activates and
returns the display to the initial screen of copy mode or
the job status screen. AUTO CLEAR SETTING is used
to set the amount of time that must elapse for the auto
clear function to activate. The time can be set from 10
seconds to 240 seconds in increments of 10 seconds,
or the auto clear function can be disabled. (This setting
only operates in copy mode and network scanner
mode.)
MESSAGE TIME SETTING
This program is used to set the length of time that
messages appear in the display (this applies to
messages that appear for a certain length of time and
then automatically disappear.)
The time can be set to as long as 12 seconds in
increments of one second.
KEYS TOUCH SOUND
KEYS TOUCH SOUND AT INITIAL POINT
key .... Touch this key to select a short beep
volume. A single short beep indicates a
valid key, and a double short beep
indicates an invalid key.
key .... Touch this key to select a long beep
volume. A single long beep indicates a valid
key, and a double long beep indicates an
invalid key.
key .... Touch this key to disable key touch beeps.
Select the [KEYS TOUCH SOUND AT INITIAL POINT]
checkbox to have three long beeps sound (when the
beep volume is set to long) or three short beeps sound
(when the beep volume is set to short) when the initial
point of a setting is reached while selecting basic settings.
The initial point settings are as follows:
Mode
Initial point (set from initial screen)
Copy mode
Ratio: 100%
Exposure: 3
Fax mode
Exposure: 3
Network scanner
mode
Exposure setting: 3
TOUCH KEY OPERATION SETTING
These programs are used to set the length of time that
must elapse until a setting is entered after a key is
touched, and to disable key repeat.
The setting entry time can be set from 0.0 seconds to
2.0 seconds in increments of 0.5 seconds.
When [DISABLE AUTO KEY REPEAT] is enabled, only
one touch is registered if key is touched continuously.
DISABLE INTERRUPT PRINT JOB
(When the printer function is enabled)
Enable this program if you wish to prevent pausing of
printing for interrupt copy jobs.
11
GENERAL PROGRAMS
STREAM FEEDING MODE
(When a RSPF is installed)
Use this program to enable stream feeding mode.
When this mode is enabled and originals are scanned
from the RSPF, an original can be added to the RSPF
within 5 seconds after the previous original is fed, and
be automatically scanned using the settings of the
previous original. This function can be used with the
copy function and the scanner function.
DISPLAY LANGUAGE SETTING
This program is used to change the language used in
the display.
DISABLE DISPLAY TIMEOUT
When this program is disabled, the display will close
the screen that is currently open and return to the
initial screen if no keys are touched for 60 seconds.
When the program is enabled, the display will not
close the screen that is currently open.
DISABLING OF TRAY SETTINGS
This program can be enabled to prohibit changes to
the paper tray settings in the user settings.
Note that bypass tray settings will still be possible.
DEVICE CONTROL
KEY OPERATOR PROGRAMS
DEVICE CONTROL
DISABLING OF DOCUMENT
FEEDER
OK
1/3
DISABLING OF DUPLEX
DISABLING OF STAPLER
Use these programs when a peripheral device on the
machine has failed or when you wish to temporarily
disable a device. The programs can also be used to
change the function setting of a device as required by
your conditions of use.
"DEVICE CONTROL" consists of the following
programs:
● DISABLING OF DOCUMENT FEEDER
● DISABLING OF DUPLEX
● DISABLING OF STAPLER
● OUTPUT TRAYS
● OFFSET FUNCTION SETTING
● MEMORY FOR PRINTER
● DISABLING OF CENTRE TRAY COUNTING
● RETURN FROM COPY MODE TIMING
● MIX SIZE ORIGINAL FEEDING MODE
DISABLING OF DOCUMENT FEEDER
(When a RSPF is installed)
Use this program when the RSPF is not operational or
you wish to disable the automatic feeding function.
(Originals can still be scanned using the document
glass.)
DISABLING OF DUPLEX
Use this program when you wish to disable the
two-sided printing function or the function has failed.
When this program is enabled, only one-sided printing
is possible.
DISABLING OF STAPLER
(When a FINISHER is installed)
Use this program to disable stapling.
When this program is enabled, stapling does not take
place.
12
GENERAL PROGRAMS
OUTPUT TRAYS
RETURN FROM COPY MODE TIMING
(When the printer or fax function is enabled and a JOB
SEPARATOR TRAY KIT or FINISHER is installed)
This program is used to select the respective output
trays for the copy, printer, and fax functions.
Example: When a FINISHER is installed.
* Settings that can be selected vary depending on the
options that are installed.
Settings
Description
PATTERN 1
Copy: Offset tray
Printer: Centre tray
Fax: Top tray
PATTERN 2
Copy: Centre tray
Printer: Offset tray
Fax: Top tray
PATTERN 3
(When the fax
function is enabled)
Copy: Centre tray
Printer: Offset tray
Fax: Centre tray
PATTERN 4
(When the fax
function is enabled)
Copy: Offset tray
Printer: Centre tray
Fax: Centre tray
(When the printer function or fax function is enabled)
This program is used to set the amount of time that
must elapse after a copy job is finished before the
printer or fax function resumes operation. The amount
of time can be set from 1 second to 60 seconds in
increments of 1 second.
MIX SIZE ORIGINAL FEEDING MODE
(When a RSPF is installed)
When this program is enabled, originals of mixed
length (the widths must be the same) can be scanned
in copy mode and each original copied onto the
corresponding length of paper.
OFFSET FUNCTION SETTING
This program is used to enable or disable the offset
functions of the centre tray and offset tray (when a
FINISHER is installed).
MEMORY FOR PRINTER
This program is used to set the amount of IMC
memory that is allocated to the printer function. The
amount of memory can be set from 30% to 70% in
increments of 10%.
● Memory allocated to print hold
(When the PRINTER EXPANSION KIT is installed)
To set the amount of memory allocated to print hold,
touch the [THE MEMORY AREA FOR PRINT
HOLD] key. The amount of memory can be set from
30% to 70% in increments of 10%. If 0% is selected,
the print hold function cannot be used.
DISABLING OF CENTRE TRAY
COUNTING
This program is used to disable counting of pages
delivered to the centre tray.
When this program is enabled, centre tray full
detection does not take place.
13
GENERAL PROGRAMS
KEY OPERATOR CODE
CHANGE
This program is used to change the key operator code
that must be entered to configure the key operator
programs. When the machine is first used, the key
operator (adminstrator of the machine) should change
the key operator code that was set at the factory to the
desired 5-digit code. (A number that has been
programmed as an account number cannot be used.)
Only one key operator code can be programmed.
The factory default setting for the key operator code is
00000.
PRODUCT KEY
(When the PRINTER
EXPANSION KIT is installed)
KEY OPERATOR PROGRAMS
OK
PRODUCT KEY
PS3 EXPANSION KIT
NETWORK SCANNER EXPANSION KIT
E-MAIL ALERT AND STATUS
SERIAL NUMBER
Use these programs to enter the product keys for the
following options.
PS3 EXPANSION KIT
(When the PRINTER EXPANSION KIT is
installed)
This program is used to enter the product key that
enables the machine to be used as a PostScript
printer. Ask your dealer for the product key.
NETWORK SCANNER EXPANSION KIT
(When the PRINTER EXPANSION KIT and
EXPANSION MEMORY are installed)
This program is used to enter the product key for the
network scanner function. Ask your dealer for the
product key.
E-MAIL ALERT AND STATUS
(When the PRINTER EXPANSION KIT is
installed)
This program is used to enter the product key for
E-MAIL ALERT AND STATUS, which enables
customer product support via a network system. Ask
your dealer for the product key.
SERIAL NUMBER
Use this program to display the serial number of the
machine. The serial number is required when
obtaining product keys for PS3 EXPANSION KIT,
NETWORK SCANNER EXPANSION KIT and the
E-MAIL ALERT AND STATUS.
14
PROGRAMS FOR COPY MODE
This chapter explains the key operator programs that are used for copy mode.
COPY SETTINGS
EXPOSURE ADJUSTMENT
KEY OPERATOR PROGRAMS
COPY FUNCTION SETTINGS
OK
1/3
INITIAL STATUS SETTINGS
This program is used to adjust the exposure level
when "Auto" is used for the copy exposure.
The auto exposure level can be set separately for the
document glass and RSPF.
[1] is the lightest level and [5] is the darkest level.
ROTATION COPY SETTING
EXPOSURE ADJUSTMENT
AE:3
AE:3
"COPY SETTINGS" consists of the following
programs:
● INITIAL STATUS SETTINGS
● ROTATION COPY SETTING
● EXPOSURE ADJUSTMENT
● AUTO PAPER SELECTION SETTING
● SETTING A MAXIMUM NUMBER OF COPIES
● SORT AUTO SELECT
● DISABLING DELETION OF JOB PROGRAMS
INITIAL STATUS SETTINGS
The copy settings revert to the default settings when
the power switch is turned on, when the [CLEAR ALL]
key ( ) is pressed, or when the auto clear time
elapses. This program is used to change the default
settings, or return changed default settings to the initial
factory default settings.
Defaults for the following copy settings can be
changed:
• Paper tray
• Exposure mode
• Copy ratio
• Duplex function
• Post-processing functions* (non-sort, sort, staple
sort, and group)
*Settings for the post-processing functions vary
depending on whether or not a FINISHER is
installed.
Note
AUTO PAPER SELECTION SETTING
This program is used to select the paper type* that is
used when the automatic paper selection function
operates. "PLAIN PAPER" or "PLAIN AND RECYCLE
PAPER" can be selected. Auto paper selection can
also be disabled with this program.
* The paper type set for each tray in the tray settings of
the user settings. (See "CUSTOM SETTINGS" in the
operation manual for copier.)
SETTING A MAXIMUM NUMBER OF
COPIES
This program is used to set the maximum number of
copies that are allowed per original.
Any number from 1 to 999 can be set for the
maximum.
SORT AUTO SELECT
(When a RSPF is installed)
This program can be used to disable automatic
selection of the sort function.
DISABLING DELETION OF JOB
PROGRAMS
This program is used to prevent copy settings stored in
job programs from being changed or deleted.
If this program is used to change the default
setting for the duplex function to other than
"one-sided" "one-sided" and the RSPF
fails or is disabled, the setting will revert to
"one-sided" "one-sided".
* DISABLING OF DOCUMENT FEEDER (p.12)
DISABLING OF DUPLEX (p.12)
ROTATION COPY SETTING
When this program is enabled, the original image is
automatically rotated 90 degrees in the event that the
original and the paper are in different orientations.
(Rotation can only take place when auto paper
selection and automatic ratio selection are used.)
15
PROGRAMS FOR PRINT MODE
This chapter explains key operator programs that are used for the printer function. These programs can only be
configured on models that have the printer function.
PRINT SETTINGS
FORCED OUTPUT OF PRINT
KEY OPERATOR PROGRAMS
PRINT SETTINGS
OK
DEFAULT SETTINGS
INTERFACE SETTINGS
NETWORK SETTINGS
INITIALISE AND/OR STORE
SETTINGS
DEFAULT SETTINGS
These programs allow you to change certain default
settings for the printer function.
The "DEFAULT SETTINGS" consist of the following
programs:
● PROHIBIT NOTICE PAGE PRINTING
● PRINT DENSITY LEVEL
● PROHIBIT TEST PAGE PRINTING
● ROTATED PRINT
● FORCED OUTPUT OF PRINT
● EXCLUDE BYPASS-TRAY FROM ATS
● DISABLE DEFAULT SETTING CHANGES
PROHIBIT NOTICE PAGE PRINTING
This program is used to prohibit the printing of notice
pages. For an explanation of notice pages, see "If a
Notice Page is printed" in the online manual for printer.
PRINT DENSITY LEVEL
The print density can be set to one of five different
levels. [1] is the lightest level and [5] is the darkest
level.
PROHIBIT TEST PAGE PRINTING
(When the PRINTER EXPANSION KIT is installed)
This program is used to prohibit the printing of test
pages.
When the program is enabled, a test page cannot be
printed from the user settings. (See the operation
manual for copier)
ROTATED PRINT
This program is used to enable or disable rotation of
the print image when an A4R, B5R, or 8-1/2" x 11"R
(Letter R) document is being printed but there is no
paper loaded in that orientation.
16
This program is used to enable or disable automatic
printing on a different size of paper when no paper
trays have the selected size of paper.
EXCLUDE BYPASS-TRAY FROM ATS
This program is used to exclude paper in the bypass
tray when automatic paper selection is used.
DISABLE DEFAULT SETTING
CHANGES
(When the PRINTER EXPANSION KIT is installed)
This program is used to prevent the configuration
setting defaults from being changed.
PROGRAMS FOR PRINT MODE
INTERFACE SETTINGS
The "INTERFACE SETTINGS" are used to monitor
and set limits for the data that is sent to the machine’s
parallel port, USB port, or network port. The settings
consist of the following programs:
● HEXADECIMAL DUMP MODE
● I/O TIMEOUT
● PARALLEL PORT EMULATION SWITCHING
● USB PORT EMULATION SWITCHING
● NETWORK PORT EMULATION SWITCHING
● PORT SWITCHING METHOD
● ENABLE PARALLEL PORT
● ENABLE USB PORT
● ENABLE NETWORK PORT
● ENABLE ECP
HEXADECIMAL DUMP MODE
(When the PRINTER EXPANSION KIT is installed)
This program is used to print out the print data from the
computer in hexadecimal and in the corresponding text
characters (based on ASCII code). This allows you to
check whether or not print data is being correctly sent
from the computer.
PARALLEL PORT EMULATION
SWITCHING
(When the PRINTER EXPANSION KIT is installed)
This program is used to set the printer language when
the machine is connected using the parallel port.
The factory default setting is "AUTO".
Unless printing errors occur frequently, it is
recommended that the setting be kept at "AUTO".
Selections
Description
AUTO
The printer language is
automatically changed to match
the data received from the
computer.
PostScript
(When the PS3
EXPANSION
KIT is installed)
The data received from the
computer is printed using
PostScript.
PCL
The data received from the
computer is printed using PCL.
USB PORT EMULATION SWITCHING
(When the PRINTER EXPANSION KIT is installed)
Example of output in hexadecimal dump mode (A4
portrait)
I/O TIMEOUT
This program is used to set the amount of time until I/O
timeout when waiting for print data.
In the event that the set amount of time elapses
without the port receiving any print data, the I/O
timeout function temporarily breaks the port
connection and intiates automatic port selection or
makes the port begin waiting for the next set of print
data.
This program is used to set the printer language when
the machine is connected using the USB port. The
selections are the same as for "PARALLEL PORT
EMULATION SWITCHING".
The factory default setting is "PCL*".
* When the PS3 expansion kit is installed, the setting is
"AUTO".
Unless printing errors occur frequently, it is
recommended that the setting be kept at "AUTO".
NETWORK PORT EMULATION
SWITCHING
(When the PRINTER EXPANSION KIT is installed)
This program is used to set the printer language when
the machine is connected using the USB port. The
selections are the same as for "PARALLEL PORT
EMULATION SWITCHING".
The factory default setting is "AUTO".
Unless printing errors occur frequently, it is
recommended that the setting be kept at "AUTO".
17
PROGRAMS FOR PRINT MODE
PORT SWITCHING METHOD
NETWORK SETTINGS
(When the PRINTER EXPANSION KIT is installed)
(When the PRINTER EXPANSION KIT is installed)
This program is used to set the method for switching
printer ports.
The machine can use the following three printer ports:
• Parallel port
• USB port
• Network port
The NETWORK SETTINGS are used when the
machine is used as a network printer. The "NETWORK
SETTINGS" consist of the following programs:
● IP ADDRESS SETTING
● ENABLE TCP/IP *
● ENABLE NetWare *
● ENABLE EtherTalk *
● ENABLE NetBEUI *
● RESET THE NIC
* When the PRINT SERVER CARD is installed.
Selections
Description
SWITCH AT
END OF JOB
Automatic printer port selection
at the end of each print job.
SWITCH AFTER
I/O TIMEOUT
Automatic printer port selection if
the time set in "I/O TIMEOUT"
elapses.
Caution
ENABLE PARALLEL PORT
(When the PRINTER EXPANSION KIT is installed)
Note
This program is used to enable or disable printing via
the parallel port.
ENABLE USB PORT
(When the PRINTER EXPANSION KIT is installed)
This program is used to enable or disable printing via
the USB port.
ENABLE NETWORK PORT
(When the PRINTER EXPANSION KIT is installed)
This program is used to enable or disable printing via
the network port.
ENABLE ECP
(When the PRINTER EXPANSION KIT is installed)
Enable this program when you wish to use ECP mode
on the parallel port.
Consult your network administrator
before configuring the NETWORK
SETTINGS.
• After changing the settings, you must turn
off the machine’s power switch, wait
briefly, and then turn the switch back on in
order to make the changes take effect.
• Some programs in the following are
marked by "*1". This indicates that a
message will appear at the end of the
setting procedure asking you to confirm
execution of the new setting. If needed,
you can cancel the new setting by
touching the [NO] key.
IP ADDRESS SETTING
This program is used to set the IP address (IP
address, Subnet Mask, and Gateway) of the machine
when TCP/IP protocol is used on the network.
When "DHCP" is selected, the machine will obtain an IP
address automatically. This is the factory default setting.
When the print server card is installed and the
machine is used on a TCP/IP network, be sure to
enable the "ENABLE TCP/IP" program.
Caution
When DHCP is used, the IP address
assigned to the machine may
automatically be changed on
occasion. If this happens, printing
will not be possible.
ENABLE TCP/IP
This program must be enabled to use the machine on
a TCP/IP network. "IP ADDRESS SETTING" must
also be configured.
ENABLE NetWare
This program must be enabled to use the machine on
a network that uses NetWare protocol.
ENABLE EtherTalk
This program must be enabled to use the machine on
a network that uses EtherTalk protocol.
18
PROGRAMS FOR PRINT MODE
ENABLE NetBEUI
This program must be enabled to use the machine on
a network that uses NetBEUI protocol.
RESET THE NIC *1
This program is used to restore all network settings to
the factory default settings.
INITIALISE AND/OR STORE SETTINGS
(When the PRINTER EXPANSION KIT is installed)
These programs are used to return the configuration
settings (See the online manual for network printer)
and the "PRINT SETTINGS" (p.16) to the factory
default settings. The programs are also used to store
the current settings and to restore stored settings.
"INITIALISE AND/OR STORE SETTINGS" consists of
the following programs:
● RESTORE FACTORY DEFAULTS
● STORE CURRENT CONFIGURATION
● RESTORE CONFIGURATION
Note
Some programs in the following are marked
by "*1". This indicates that a message will
appear at the end of the setting procedure
asking you to confirm execution of the new
setting. If needed, you can cancel the new
setting by touching the [NO] key.
RESTORE FACTORY DEFAULTS *1
This program is used to return the configuration
settings (see the online manual for network printer)
and the "PRINT SETTINGS" (p.16) to the factory
default settings. If you need a record of the current
settings before restoring the factory defaults, use
"Data list print" in the user settings to print a list of the
current settings. (See "CUSTOM SETTINGS" in the
operation manual for copier.)
STORE CURRENT CONFIGURATION *1
This program is used to store the current configuration
settings (see online manual for network printer) and
"PRINT SETTINGS" (p.16). The stored settings will not
be erased even if the power is turned off. To restore
the stored settings, use the "RESTORE
CONFIGURATION" program.
RESTORE CONFIGURATION *1
This program is used to restore settings that were
stored using the "STORE CURRENT
CONFIGURATION" program.
The current settings will change to the restored
settings.
Note
If any of the "NETWORK SETTINGS" (p.18)
were changed before execution of this
program, you must turn off the machine’s
power switch, wait briefly, and then turn the
switch back on in order to make the settings
take effect.
19
PROGRAMS FOR NETWORK
SCANNER MODE
This chapter explains key operator programs that are used for the network scanner function. These programs can
only be configured on models that have the network scanner function.
SCANNER SETTINGS
KEY OPERATOR PROGRAMS
SCANNER SETTINGS
OK
INITIAL FILE FORMAT SETTING
1/2
INITIAL QUALITY SETTING
INITIAL RESOLUTION SETTING
The "SCANNER SETTINGS" consist of the following
programs:
● INITIAL FILE FORMAT SETTING
● INITIAL QUALITY SETTING
● INITIAL RESOLUTION SETTING
● DEFAULT DISPLAY SETTINGS
● THE NUMBER OF DIRECT ADDRESS / SENDER
KEYS DISPLAYED SETTING
INITIAL FILE FORMAT SETTING
Use this program to change the default file format (file
type, compression mode, and number of pages per
file) that is used when sending an image by Scan to
E-mail, Scan to Desktop, or Scan to FTP.
INITIAL QUALITY SETTING
This program is used to set the default original type
and exposure level for network scanner mode.
For informatin on these settings, see the operation
manual for network scanner.
INITIAL RESOLUTION SETTING
This program is used to set the default resolution for
network scanner mode.
DEFAULT DISPLAY SETTINGS
Use this program to select the initial screen that
appears when the [SCAN] key is pressed to switch to
network scanner mode, or when the [CLEAR ALL] key
( ) is pressed in scanner mode.
Three selections are available for the initial screen:
• CONDITION SETTINGS
• ADDRESS BOOK (ABC)
• ADDRESS BOOK (GROUP)
20
THE NUMBER OF DIRECT ADDRESS /
SENDER KEYS DISPLAYED SETTING
This program is used to select the number of
one-touch keys that are displayed in the address book
screen and sender selection screen. Selections are
[6], [8], and [12].
Note
Each displayed one-touch key name can be
up to 18 characters long when the number
of displayed one-touch keys is 6 or 8. Each
name can only be 10 characters long when
the number of displayed one-touch keys is
12.
AR-236_SUK_keyope_cover1_4.fm 2 ページ
2004年7月26日 月曜日 午後4時10分
AR-M236/AR-M276
SHARP ELECTRONICS (U.K.) LTD.
Sharp House, Thorp Road, Newton Heath, Manchester
M40 5BE
SHARP CORPORATION
Printed on 100% post-consumer recycled paper
PRINTED IN CHINA
2004H
KS2
TINSE1031QSZZ