1
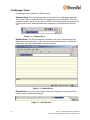
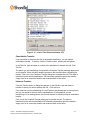
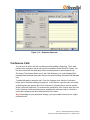
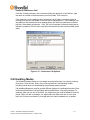
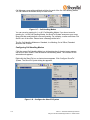
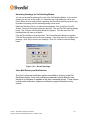
Using
the
Call Manager Features
(Student Guide)
Document and Software Copyrights
Copyright © 1998-2005 by ShoreTel Inc., Sunnyvale, California, U.S.A.
All rights reserved. Printed in the United States of America. Contents of this publication may not be
reproduced or transmitted in any form or by any means, electronic or mechanical, for any
purpose, without prior written authorization of ShoreTel, Inc. ShoreTel, Inc. reserves the right to make
changes without notice to the specifications and materials contained herein and shall not be responsible
for any damage (including consequential) caused by reliance on the materials presented, including, but
not limited to typographical, arithmetic or listing errors.
Trademarks
ShoreCare, ShoreTel, Shoreline, ShoreWare, ShoreGear, and AnyPhone are registered
trademarks of ShoreTel, Inc. in the United States and/or other countries. Shoreline4 is a trademark of
ShoreTel in the United States and/or other countries. Microsoft, Windows, Windows NT, and ActiveX are
either registered trademarks or trademarks of Microsoft Corporation in the United States and/or other
countries. VxWorks is a trademark of Wind River Systems. All other copyrights and trademarks herein are
the property of their respective owners.
Version Information
Using the ShoreTel Personal Call Manager
April, 2005
Company Information
ShoreTel, Inc.
960 Stewart Drive
Sunnyvale, California 94085
(408) 331-3300
(408) 331-3333 fax
www.shoretel.com
Table of Contents
LESSON 1: ShoreWare Call Manager Features
ShoreWare Call Manager
Launching Call Manager:
Quitting Call Manager:
Call Manager Views
Compact:
Detailed:
Docked:
QuickDialer
Active Call List
Dial Number:
Directory Viewer:
Dialing from the History Viewer:
Handling Calls
Answering Calls:
Placing a Call on Hold:
Hanging up a Call:
Transferring Calls
Just-In-Time Transfer:
Transfer to Mailbox:
Consultation Transfer:
Intercom Transfer:
Transferring to Auto Attendant:
Transferring to Voice Mail:
Keyboard Transfer:
Conference Calls
Intercom Conference Call:
Call Handling Modes
Configuring Call Handling Modes:
Recording Greetings for Call Handling Modes:
Voice Mail Delivery and Notifications:
Find Me Call Handling:
Voice Mail Preferences:
Outlook Integration
Voice Mail Integrations:
Installing Automatic Call Handling:
Memorized Phone Number Management
Getting Warnings in Nonstandard Modes:
Changing the Login ID
Call Pick Up Using Call Manager
AnyPhone Feature
Speed Dialing
Adding Speed Dial Entries:
1-31
Dialing from Your Speed Dial List:
Configuring the Call Stack
1-31
1-32
LESSON 2: SoftPhone
SoftPhone
Handling Calls
Receiving Calls:
Call Waiting:
2-1
2-3
2-6
2-6
2-7
Using the ShoreTel Call Manager Features – Student Guide
1-1
1-3
1-3
1-3
1-4
1-4
1-4
1-4
1-6
1-7
1-7
1-7
1-8
1-9
1-9
1-10
1-11
1-12
1-12
1-12
1-13
1-13
1-14
1-14
1-15
1-16
1-17
1-17
1-18
1-21
1-21
1-22
1-24
1-25
1-25
1-25
1-25
1-27
1-28
1-29
1-30
1-31
I
Placing a Call on Hold:
2-7
Transferring a Call:
Making a Conference Call:
Managing Soft Phone Calls via Call Manager
Web Access
To Open ShoreTel Web Access:
2-7
2-7
2-8
2-8
2-8
LESSON 3: Workgroup Call Manager
Workgroup Call Manager
Agent Call Manager
Workgroup Queue Monitor
Agent Monitor
3-1
3-3
3-3
3-4
3-5
LESSON 4: Operator Call Manager
Operator Call Manager
Extension Monitor
4-1
4-3
4-5
APPENDIX:
Things to Remember
Lab Exercises
Lab 1 – Using the Personal Call Manager
Lab 2 – Using the Workgroup Call Manager
Lab 3 – Using the Operator Call Manager
A-3
A-5
A-5
A-9
A-11
II
Using the ShoreTel Call Manager Features – Student Guide
Lesson 1:
ShoreWare Call Manager Features
Introduction
ShoreWare Call Manager software provides a complete set of enterprise-class desktop
communications tools delivering improved productivity across an enterprise, despite
office size or location. All Call Manager software provides several features that enhance
productivity.
This lesson covers the features and functions of the ShoreWare Personal Call Manager.
Objectives
At the end of this lesson you will:
• Use the Personal Call Manager features and functions.
• Configure Outlook integration.
Resources
•
System Administration Guide
•
Planning and Installation Guide
Lesson 1: ShoreWare Call Manager Features
Using the ShoreTel Call Manager Features – Student Guide
1-1
1-2
Lesson 1: ShoreWare Call Manger Features
Using the ShoreTel Call Manager Features – Student Guide
ShoreWare Call Manager
Each ShoreWare Call Manager application provides different levels of control and
management to match the role of each individual within your organization, from general
employees to specialized operators and workgroup agents.
Personal Call Manager is an intuitive, point-and-click interface, which gives quick access
to commonly used features, such as transfer and conference. In addition, the Personal
Call Manager makes every phone a multi-line phone, allowing the user to visually
manage up to 16 calls simultaneously.
The Personal Call Manager makes voice mail accessible and easy to manage. There is
a separate application for viewing messages, the ShoreTel Voice Mail Viewer. If Outlook
was installed prior to installing PCM, the user is given the option of using Outlook as the
default voice mail client.
Launching Call Manager:
There are two ways to start Call Manager: from the Windows Start menu or by setting
Call Manager to auto-start each time you log in to your computer. For the program autostart, simply add it to the Windows Startup folder using the Settings tab in the ShoreTel
System dialog box.
To start your Call Manager from the Start menu:
• Click Start, select Programs, select ShoreTel Communications, and click
ShoreTel Call Manager. Call Manager opens.
To auto-start Call Manager at log in:
• Right-click the ShoreTel icon, a shortcut menu will appear. Click Configure
ShoreTel System. The ShoreTel System dialog box appears.
• Click the Settings tab. Select Start Call Manager automatically when I log into
Windows. Click OK.
Quitting Call Manager:
To quit Call Manager - Right-click the Call Manager icon in the Windows status area. A
shortcut menu appears. Click Exit. The Call Manager application quits.
Lesson 1: ShoreWare Call Manager Features
Using the ShoreTel Call Manager Features – Student Guide
1-3
Call Manager Views
Call Manager can be viewed in 3 different ways:
Compact View: This view appears when you first open the Call Manager application.
This view provides a compact interface for managing your communications. This view
contains a toolbar, Active Call list, and QuickDialer. The toolbar provides access to most
functions in this view. Additional features are available if you right-click the ShoreTel
icon.
Figure 1.1 – Compact View
Detailed View: This view provides the QuickDialer, the Active Call list and the Call
Details area at the same time. In this view, the menus provide access to all features.
Additionally, there are toolbar buttons for many features.
Figure1. 2 – Detailed View
Docked View: This view is like a toolbar that can be docked for quick access at the
bottom or top of the Windows desktop.
Figure1. 3 – Docked View
1-4
Lesson 1: ShoreWare Call Manger Features
Using the ShoreTel Call Manager Features – Student Guide
To switch between Compact and Detailed views: - From the Compact view, click the
Expand button, the view changes to Detailed. From the Detailed view, click the Collapse
button, the view changes to Compact.
To switch from the Compact or Detailed view to the Docked view: - Drag the Call
Manager window to the top or bottom of the Windows desktop. You can expand or
collapse the Docked view by clicking the Expand or Collapse button.
Note: You can use the View menu in the Detailed or Docked view to switch to any other
view.
Call Manager windows can be maximized and minimized in any view. When you click
the x in the upper right corner in any of Call Manager's windows, you are minimizing the
application. When the application is minimized a Call Manager icon appears in the
Windows status area. Maximizing Call Manager, simply double-click the Call Manager
icon in the Windows status area. The Call Manager window will launch in the last view
you were using.
Note: You can have Call Manager maximized automatically when you receive or make a
call.
You can use the following buttons to perform various Call Manager functions and
operations. Different subsets of these buttons are available at any given time, depending
on the view you are in.
Figure 1.4 – Function Buttons
Lesson 1: ShoreWare Call Manager Features
Using the ShoreTel Call Manager Features – Student Guide
1-5
QuickDialer
Automatic Look up with the QuickDialer provides an intelligent search of both
personal and system directories and Outlook contacts to find and dial a number
instantly.
The QuickDialer gives you a way to quickly make phone calls without picking up the
phone and dialing the number yourself.
Figure 1.5 – QuickDialer
In QuickDialer, you can:
•
Type the name of the person you want to call
•
Type the phone number of the person you want to call
•
Dial contacts from various sources, including MS Outlook
•
Redial recently dialed numbers. You can also dial numbers like 1-800FLOWERS and QuickDialer will translate the letters to numbers
automatically.
Outlook Contacts with company names are now read by PCM so you can
also enter the company name to show a filtered list of contacts from the
same company.
•
In QuickDialer, begin typing the name or phone number of the party you want to call, and
as you continue typing more characters, the search narrows. This approach can be used
to match entries in your personal or system directories or Outlook contact folders. (If
you type the phone number, remember to include country, city, and area codes for
numbers outside your local calling area.)
Note: When you enter a number, or a number appears from a directory or your Outlook
contacts folders, and it indicates a main number followed by an internal extension,
indicated with a character such as the X or x character, the character is not converted to
a digit and cannot be dialed; therefore, the number is not dialed.
After selecting the correct number from the matching list, or you type an extension in the
QuickDialer and press Enter, your phone rings. (This is true only if you are using an
analog phone. If you are using an IP Phone, the phone will automatically go off-hook in
speakerphone mode and the call will be placed). When you answer, the call is
connected.
Note: If your company uses three-digit extensions, when you dial n-n11 (for example, 9411 for information), the Quickdialer displays the name of the person who has the
internal n11 extension. However, the call connects to the external n11 number.
1-6
Lesson 1: ShoreWare Call Manger Features
Using the ShoreTel Call Manager Features – Student Guide
Active Call List
Current calls appear in the Active Call list. The Active Call list shows the caller ID (if
available), the call duration, the number the caller dialed, and the caller's name (if the
caller ID matches an entry in a directory or in MS Outlook). Caller ID (name and number)
can come from the PSTN on inbound calls. Also, the Active Call list shows the trunk
group name and port/channel.
Figure 1.6 – Active Call List
To make a call by dragging a number, or select a number in an open document or Web
page, simply drag the number onto the Active Call list. The Active Call list displays the
status of the outgoing call and the Outgoing call icon.
Dial Number:
To make a call using the Dial Number dialog box, right-click the ShoreTel icon. A
shortcut menu appears. Click Make New Call. The Dial Number dialog box appears.
Type the name of the party until a match is found and selects the matching name from
the list. Click Dial to start the call.
Tip: If you type letters for the number (for example, 1-800-Flowers, the letters are
converted to the correct numbers (1-800-356-9377). If the extension is available, the call
status and availability of the other users in the system appear in the QuickDialer and in
the New Call dialog box. Call status of other extensions only appear if the user is
configured to use Advanced Call Manager.
Directory Viewer:
For users who don't use Microsoft Outlook, the Directory Viewer keeps track of all your
system and personal phone numbers. You can manually add personal contacts, import
personal contacts from Outlook (or other address books like ACT or Goldmine), and
export system and personal contacts to Outlook or other address books from the
Directory Viewer. The Directory Viewer is shown in diagram below.
Lesson 1: ShoreWare Call Manager Features
Using the ShoreTel Call Manager Features – Student Guide
1-7
Figure 1.7 – Directory Viewer
Dialing from the History Viewer:
Easy-to-Use Call History allows you to quickly view inbound and outbound call
information, including phone number, caller ID, time, date, and call duration.
The ShoreTel History Viewer displays information about previous calls you have made,
received or missed. It can be used to display calls you made and the phone numbers of
people who called you, and allows you to view and add notes to the call routing slips of
all calls.
You can view the routing slip of a call in the ShoreTel History Viewer by right-clicking the
ShoreTel icon. A shortcut menu appears. Click History. The ShoreTel History Viewer
appears with the most recent call at the top of the list. Select and right-click the entry you
want to view. A shortcut menu appears. Click Properties. The Call Log Entry Properties
dialog box appears. Click the Routing Slip tab. The routing slip for the selected entry
appears.
The History Viewer includes the number of an outgoing call's destination, the number of
an incoming call's source, and the start time and duration of each call.
The History Viewer shows the last 1000 calls. A call gets added to the list when the call
is complete. Old calls (which exceed the 1000 limit) are deleted when the application
quits.
Note: If the received or dialed number matches an entry in the System directory, your
personal contacts, or your Outlook contacts, the name is also displayed.
To dial a number in the History Viewer, right-click the ShoreTel icon and a shortcut menu
appears. Click History, the ShoreTel History Viewer appears with the most recent call at
the top of the list.
1-8
Lesson 1: ShoreWare Call Manger Features
Using the ShoreTel Call Manager Features – Student Guide
Select History Viewer, and then right-click the number you want to call. A shortcut menu
appears. Click Dial. Call Manager dials the selected number.
Figure 1.8 – History Viewer
Handling Calls
The following features allow you to handle calls quickly and efficiently.
Answering Calls:
When you receive a call, the Active Call list displays the incoming caller information and
the Incoming Call icon. The caller information includes the caller's telephone number
and a matching name if it is available in the System directory, your Personal directory, or
in your Outlook contacts. You'll also see the number that the caller dialed.
Note: If multiple matches are found, only the first match shows in the Call Manager.
Click the call status in the Active Call list displays Connected and the Connected icon
appears. Begin talking.
Note: If you are in Handsfree Mode, using a headset or speakerphone, you should leave
your phone off the hook.
Lesson 1: ShoreWare Call Manager Features
Using the ShoreTel Call Manager Features – Student Guide
1-9
Figure 1.9 – Answer Incoming Call
Placing a Call on Hold:
You can place a call on hold using the Call Manager when you need to check some
information or answer another call. The call appears in the Active Call list. The call
status displays Connected and the Connected icon appears.
Double-click the call in the Active Call list to place it on hold. The call status changes to
On Hold and the On Hold icon appears.
To take a call off hold, double-click the call on hold in the Active Call list or pick up the
receiver. You can also click the Hold button again to take the call off hold.
When you place a caller on hold and hang up, the telephone rings once after 10
seconds notifying you that a call is on hold. If the first recall is ignored, the phone rings
on a 60-second interval until the holding party either is connected or hangs up.
1-10
Lesson 1: ShoreWare Call Manger Features
Using the ShoreTel Call Manager Features – Student Guide
Figure 1.10 – On Hold
Hanging Up a Call:
How you hang up a call depends on the mode in which you answer the call. To hang up
an active call, place the receiver on the hook. Your active call is disconnected.
To hang up an active call in the Handsfree mode, from the Compact view, click the
Toolbar Extender, an additional toolbar appears. Click Hang up, your active call is
disconnected.
Lesson 1: ShoreWare Call Manager Features
Using the ShoreTel Call Manager Features – Student Guide
1-11
Figure 1.11 – Hang up
Transferring Calls
Just-in-time Transfer:
The Just-in-Time (JIT) feature allows you to see if the internal user you want to transfer
the call has activated a non-standard Call Handling Mode and how many calls the user
is currently handling. If you see that the user is in a non-standard Call Handling Mode,
you can send the call to the user's voice mail or select another extension to transfer the
call to.
Transfer to Mailbox:
To transfer a call to another party – Click the Transfer button, a dialog box will appear. In
the Dial box, type the name or number of the destination to transfer the call. Click the
Transfer button again to complete the transfer. To transfer a call to another person's
voice mailbox, click the Transfer button and in the Dial box, type the name or number of
the person to whom you want to transfer the call. Click To Mailbox.
1-12
Lesson 1: ShoreWare Call Manger Features
Using the ShoreTel Call Manager Features – Student Guide
Figure1.12 – Just in Time Extension Status (JIT)
Consultation Transfer:
If you would like to announce the call to the transfer destination, you can make a
consultation transfer. To do this, click the Transfer button, a dialog box will appear.
In the Dial box, type the name or number of the destination to transfer the call. Click
Consult.
The phone you are transferring to rings and the Complete Transfer message appears on
your computer. When the party answers, announce the transfer before completing the
transfer. Click Yes in the Complete Transfer dialog box to transfer the call. The caller is
transferred to the selected destination, OR should the destination refuse the transfer,
simply click No to cancel the transfer and reconnect back to the caller.
Intercom Transfer:
Click the Transfer button, a dialog box appears. In the Dial box, type the name or
number of where you want to transfer the call. Click Intercom.
If the extension you are transferring to is an IP phone, the phone plays an interrupt tone
and you can speak to the user via the speakerphone. If the extension you are
transferring to is an analog phone, the intercom transfer is offered just like a consultation
transfer.
Click Yes in the Complete Transfer dialog box to transfer the call. The caller is
transferred to the selected destination OR should the destination refuse the transfer,
simply click No to cancel the transfer and reconnect back to the caller.
Lesson 1: ShoreWare Call Manager Features
Using the ShoreTel Call Manager Features – Student Guide
1-13
Transferring to Auto Attendant:
You can transfer an incoming call to the Auto Attendant. After being transferred, the
caller can determine how to complete the call by listening to the Auto Attendant's menu.
If in the Compact view, click the Toolbar Extender. An additional toolbar appears. If you
are in the Detail view, the toolbar will already be present. Click Auto Attendant, a dialog
box appears prompting you to confirm the transfer to the Auto Attendant. When you click
Yes, the transfer is completed.
Figure 1.13 – Transfer to Auto Attendant
Transferring to Voice Mail:
If you don't want to be interrupted when you are busy and a call comes in, you can send
the call to Voice Mail. To send a call to Voice Mail, in the Compact view, click Voice Mail.
The caller is connected to your voice mailbox and hears the greeting for the current Call
Handling Mode.
1-14
Lesson 1: ShoreWare Call Manger Features
Using the ShoreTel Call Manager Features – Student Guide
Figure 1.14 – Transfer to Voice Mail
Keyboard Transfer:
You can also answer and transfer calls using the function keys. This time-saving feature
is particularly useful for Operators and others who answer and transfer numerous calls.
Note: If you are using an analog phone, you must be in Handsfree Mode to answer a
call using the keyboard.
Press F8 (or Ctrl+A) to answer the call. Press F10 to transfer the call. In the Quick
Dialer, enter the name or phone number of the person to whom you want to transfer the
call, and click Enter to complete the transfer.
Lesson 1: ShoreWare Call Manager Features
Using the ShoreTel Call Manager Features – Student Guide
1-15
Figure 1.15 – Keyboard Shortcuts
Conference Calls
You can turn an Active call into a conference call by adding a third party. The 2 other
parties in the conference call do not need to be members of the ShoreTel System. You
can also consult with the third party before connecting them to the conference call.
The Just-in-Time feature allows you to see if the third party is in a non-standard Call
Handling Mode and how many calls they are currently handling. Advanced Call Manager
only.
To add a third party to an active call - From the Compact view, click the Conference
button and a Conference dialog box appears. In the Dial box, type the name or number
of the third party you want to add. Click Conference. All parties are on the line and the
Active Call list will reflect this. To announce the conference, click Consult, then click Yes
in the Complete Conference dialog box to establish the conference call, or Click No to
cancel the conference call and reconnect back to the caller.
Note: Depending on your permission settings, you may be able to have up to a 6 party
conference call.
1-16
Lesson 1: ShoreWare Call Manger Features
Using the ShoreTel Call Manager Features – Student Guide
Intercom Conference Call:
Click the Conference button, the Conference dialog box appears. In the Dial box, type
the name or number of the third person you want to add. Click Intercom.
If the extension you are adding to the conference is an IP phone, the phone plays an
interrupt tone and you can speak to the user via the speakerphone. If the extension you
are adding to the conference has an analog phone, the intercom conference is offered
just like a consultation conference. Click Yes in the Complete Conference dialog box to
add the new person OR click No to cancel the conference call and reconnect back to the
caller.
Figure 1.16 – Conference Call Options
Call Handling Modes
Call Handling options allows you to manage incoming calls when in a meeting, working
from home, or out of town. Every user on the system has 5 call handling modes
providing a wide array of call forwarding and personal greeting options.
Call Handling Modes are used to provide different options for handling phone calls. Each
mode can have different call forwarding options and different voice mail greetings. For
example, when you are out of the office, you might want your calls forwarded to your cell
phone. When you are in meetings, you might want your calls to be sent to your voice
mail. And if you are on vacation, you might want your calls forwarded to a co-worker.
Lesson 1: ShoreWare Call Manager Features
Using the ShoreTel Call Manager Features – Student Guide
1-17
Call Manager comes with predefined activities for each of the five Call Handling Modes.
You can redefine the default activity for each mode.
Figure 1.17 – Call Handling Modes
You can record a greeting for 1 or all 5 Call Handling Modes. If you do not record a
greeting for 1 of the Call Handling Modes, the ShoreTel System announces your name
along with that mode's default voice mail greeting. For example, a caller would hear "Pat
Smith is out of the office. Please leave a message at the tone."
The five Call Handling Modes are: Standard, In a Meeting, Out of Office, Extended
Absence and Custom.
Configuring Call Handling Modes:
Click the current Call Handling Mode icon in the status bar. A shortcut menu appears
with a list of the 5 modes. Click the desired Call Handling Mode. The indicator for the
selected mode appears.
Right-click the ShoreTel icon, a shortcut menu appears. Click Configure ShoreTel
System. The ShoreTel System dialog box appears.
Figure 1.18 – Configure the ShoreTel System
1-18
Lesson 1: ShoreWare Call Manger Features
Using the ShoreTel Call Manager Features – Student Guide
Figure 1.19 – Configure ShoreTel System - Telephony
Click the Edit Call Handling Modes button. The Configure Call Handling dialog box
appears. Click the tab of the Call Handling Mode you want to configure. Select the
desired options for the mode you are configuring.
•
Call Forwarding Condition - specifies when your calls are forwarded. You
can have your extension ring several times first or forward immediately.
•
Call Forwarding Destination - specifies where the calls are forwarded.
You can elect to forward directly to your voice mail (one of the extension
choices in the drop-down menu), or to another extension, or to an
external number. The current forwarding destinations are displayed. To
edit the forwarding destinations, click Edit Destination.
Note: If you want to forward calls to an off-system extension (an extension in your
company that is not on the ShoreTel System), type the extension number in the Number
field. If the extension has not been set up as an off-system extension, you must enter the
entire telephone number in the Number field. To determine if a non-ShoreTel extension
is set up as an off-system extension, try dialing it from your telephone as an extension,
or ask your system administrator.
Lesson 1: ShoreWare Call Manager Features
Using the ShoreTel Call Manager Features – Student Guide
1-19
•
Greeting - designates the greeting that callers receive when they reach
your voice mail. Each Call Handling Mode can have a different greeting.
•
Personal Assistant - designates who is called if the caller presses 0 (zero)
when listening to the voice mail greeting. Begin typing the name or
extension of the desired personal assistant, and continue typing until the
correct name and number appear.
•
Notification - specifies whether notifications are sent to your pager or your
phone when you get a new message. Note: You can set only one
notification device (either your pager or your phone). You use this option
to turn notification on and off.
•
Find Me - enables Find Me call handling. You can configure up to two
alternate numbers where callers who reach your voice mail box can try to
find you. Click Edit Find Me to configure this option.
•
Notes - only seen by the operator when monitoring your extension. Notes
can be used to provide additional information, such as when you will
return.
•
Click OK twice to close the dialog boxes.
Figure 1.20 – Configure Call Handling
1-20
Lesson 1: ShoreWare Call Manger Features
Using the ShoreTel Call Manager Features – Student Guide
Recording Greetings for Call Handling Modes:
You can record specific greetings for each of the Call Handling Modes. If you record a
greeting for only one of the modes, it is used only when call handling is set for that
mode. When set for a mode without a greeting, the ShoreTel4 System announces your
recorded name along with the standard greeting of that mode.
Right-click the ShoreTel icon, a shortcut menu appears. Click Configure ShoreTel
System. The ShoreTel System dialog box appears. Click the Edit Call Handling Modes
button. The Configure Call Handling dialog box appears. Click the tab of the Call
Handling Mode you want to configure.
Click the Review/Record Greeting button. The Prompt Recorder dialog box appears.
Click the Record button and record your message. Click Stop when you complete your
message. Click Play to review your message. Click OK 3 times to close the dialog
boxes.
Figure 1.21 – Record Greetings
Voice Mail Delivery and Notifications:
The User’s voice mail notification options are edited by clicking on the Edit
Notification button. Voice mail notification parameters specify what the user
should do if notification is enabled at the time a message arrives. These options
include email notification, telephone notification, pager notification and try
options.
Lesson 1: ShoreWare Call Manager Features
Using the ShoreTel Call Manager Features – Student Guide
1-21
Figure 1.22 – Voice Mail Notification
Find Me Call Handling:
You can use Find Me call handling to allow callers who reach your voice mailbox to try
and find you at alternate numbers by pressing “1” during your outgoing greeting. There is
no prompt instructing the caller on this option. You must inform callers of this option in
advance or in your recorded greeting.
When the callers press 1, they hear a prompt telling them that the Find Me destinations
are being called. If the call is not accepted at either of the Find Me destinations, the call
is sent to your voice mail.
You can specify up to two alternate numbers where you want callers to be able to find
you. You must also set the number of rings (6 second intervals) that Find Me call
handling will wait for an answer at each destination.
You can enable/disable Find Me call handling for each of the 5 call handling modes.
When a call is forwarded to a Find Me destination, the phone at the Find Me destination
displays the caller ID of the voice mail. When you answer the call, you hear a prompt
announcing who the call is for and the original caller ID.
You are prompted with the following options:
1-22
•
Press 1 to accept the call.
•
Press 2 to send the call back to the original voice mail box.
•
Press 3 to repeat the name and caller ID.
Lesson 1: ShoreWare Call Manger Features
Using the ShoreTel Call Manager Features – Student Guide
Figure 1.23 – Find Me
Lesson 1: ShoreWare Call Manager Features
Using the ShoreTel Call Manager Features – Student Guide
1-23
Voice Mail Preferences:
Select the Voice Mail tab to set your voice mail preferences which include envelope
information, playing & record .wav files through your PC, recording your name prompt
which is used in the Auto Attendant “Dial by Name Directory” and your voice mail
default greetings, along with shortcuts to set your notification settings and Find Me
options.
Figure 1.24 – Voice Mail Preferences
1-24
Lesson 1: ShoreWare Call Manger Features
Using the ShoreTel Call Manager Features – Student Guide
Outlook Integration
You can integrate Outlook to Call Manager in three areas: voice mail, call handling, and
memorized phone number management. You can install these integrated components
from the Outlook tab of the ShoreTel System dialog box.
Voice Mail Integration:
After you have installed voice mail integration, you have the option to:
• Use Outlook as the default voice mail client
• Attach voice mail to messages when moved
• Delete voice mail from messages when moved
Installing Automatic Call Handling:
Although the ShoreWare Call Manager installation installs the components for
Microsoft Outlook integrated voice messaging; it does not install the components for
the Microsoft Outlook Automated Call Handing feature. You install these components
from the ShoreTel System control panel.
Memorized Phone Number Management:
You have the option of importing Outlook contacts to the Call Manager Quick Dial
feature.
To set the option under Memorized Phone Number Management:
Step 1 In the Memorized Phone Number Management section, click Read
phone numbers from Outlook on startup option.
Step 2 If you want to exclude FAX numbers from the search, click Don't
include FAX numbers.
Step 3 If you want Outlook Contact to appear when you have an incoming
call, click Pop Outlook contacts on incoming call.
Step 4 Click More Options to select which Outlook contacts to import. The
MAPI Import Options dialog box appears.
Step 5 Click Enable Disk Caching if you want Outlook contacts to be
Lesson 1: ShoreWare Call Manager Features
Using the ShoreTel Call Manager Features – Student Guide
1-25
available without delay when Call Manager starts. When you have
enabled disk caching, you can set when Call Manager imports contacts.
If disk caching is not enabled, Call Manager imports contacts every
time it starts.
Step 6 Click the Import Configurator tab.
Step 7 Click the locations where you want Call Manager to search for contact
information.
To select individual folders, click Details and check the folders you
want searched for contact information.
Step 8 Click OK.
Step 9 If you want to import contacts now, return to the Disk Cache Options
tab and click Read Contacts Now.
Note: If you do not click this button, the Outlook contacts will be
imported the next time you start Call Manager.
Figure 1.25 – Outlook Integration
1-26
Lesson 1: ShoreWare Call Manger Features
Using the ShoreTel Call Manager Features – Student Guide
Getting Warnings in Nonstandard Modes:
You can configure Call Manager to warn you on start up if you are not in the Standard
Call Handling Mode.
Right-click the ShoreTel icon, a shortcut menu appears. Click Configure ShoreTel
System. The ShoreTel System dialog box appears. Click the Settings tab. In the On
Startup section, select the Warn when not using Standard Call Handling. Click OK to
close the dialog box.
The next time you start Call Manager and it is not in the Standard Call Handling Mode, a
message appears asking if you want to switch to Standard Mode.
Figure 1.26 – Settings
Lesson 1: ShoreWare Call Manager Features
Using the ShoreTel Call Manager Features – Student Guide
1-27
Changing the Login ID
You can change the Call Manager Login information (user name and server name) in the
ShoreTel System dialog box.
Note: Changes should be made only if directed by your system administrator.
To change the Login information from within Call Manager Right-click the ShoreTel icon.
A shortcut menu appears. Click Configure ShoreTel System. The ShoreTel System
dialog box appears. Click the Login and Passwords tab. Click Change Login Information.
The Login Editor dialog box appears.
Change the user name or server name in the appropriate boxes. Click OK twice to apply
these changes. To change the Login information if you cannot open Call Manager on
your computer, click Start, click Settings, and click Control Panel. Double-click the
ShoreTel System icon. The ShoreTel Dialog box appears.
Figure 1.27 – Login & Passwords
1-28
Lesson 1: ShoreWare Call Manger Features
Using the ShoreTel Call Manager Features – Student Guide
Call Pick Up Using Call Manager
Call Pickup is useful if you need to answer another ringing phone.
Note: Your System Administrator must configure your extension to be able to use the
Pickup feature.
To pick up a ringing phone, right-click the ShoreTel icon. A shortcut menu appears. The
Pickup Ringing or Parked Call on Extension dialog box appears. Click Pickup. In the
QuickDialer, type the user's name (or the number) of the ringing phone you want to pick
up. QuickDialer displays a list of active calls. Select the call you want to pick up when it
appears. Unpark transfers the parked call to your extension. If your receiver is on the
hook, your phone rings and the Active Call list displays the call status On-Hook pickup
and the On-Hook icon. Answer the phone. You are connected to the call. The call status
in the Active Call list display changes to Connected and the Connected icon appears.
Close On Action will automatically close this dialog box when the selected number has
been picked up.
Figure 1.28 – Call Pickup
Lesson 1: ShoreWare Call Manager Features
Using the ShoreTel Call Manager Features – Student Guide
1-29
Figure 1.29 – Call Pickup Dialog Box
AnyPhone Feature
The AnyPhone feature allows you to receive calls and log on to your voice mail from any
phone connected to the ShoreTel System. To find out if you have AnyPhone access,
contact your System Administrator.
You activate the AnyPhone feature from a system telephone, temporarily reassigning
your home extension and voice mail to a different extension in the ShoreTel System.
The easiest way to reassign your extension to your home port is to click Go Home on the
File menu in the Call Manager.
To assign your extension to a system phone, log on to voice mail from any ShoreTel
System phone.
1-30
•
To change mailbox options, press 7.
•
To reassign your extension, press 3.
•
To assign your extension to the telephone you are calling from, press 1.
The phone you are calling from becomes your current extension and you
can check your voice mail from this phone. Also, your calls will ring at this
new phone. Your previous phone becomes unassigned and will not ring
until you reassign it.
Lesson 1: ShoreWare Call Manger Features
Using the ShoreTel Call Manager Features – Student Guide
•
To unassign your extension, press 2; your "home" phone becomes your
extension again.
Note: If another user is assigned to your home telephone, your extension is assigned to
the SoftSwitch until your home telephone becomes available. You can “override” the
other user from your home telephone by re-assigning their extension to their home
telephone.
Speed Dialing
Adding Speed Dial Entries:
Your speed-dialing list can contain up to 20 entries. To add or edit a number in the
Speed Dial list, right-click the ShoreTel icon. A shortcut menu appears, click Speed Dial
and click Configure Speed Dial. The Configure Speed Dial dialog box appears. Click the
Add button to add an entry and the Add New Speed Dial dialog box appears, or select
the name with the label you want to edit, and click the Edit Label to modify an existing
entry.
Type in the name or number you want to add to the speed dial. As you type, any
matches display in the box below. If the number you want appears in the match list,
select the name or number you want to add. If it is not available in the match list, you
can type the number. Assign the number a name in the Label box. Click OK.
The Configure Speed Dial dialog box appears and the name is added to the list.
Dialing from Your Speed Dial List:
You can quickly call a phone number using speed dialing. To make a Speed Dial call,
right-click the ShoreTel icon, a shortcut menu appears. If you have configured your
Speed Dial numbers, point to Speed Dial. A list of numbers appears. Click the number
that you want to dial. Call Manager dials the number. Speed dial numbers can also be
programmed to appear on your telephone.
Lesson 1: ShoreWare Call Manager Features
Using the ShoreTel Call Manager Features – Student Guide
1-31
Figure 1.30 – Configure Speed Dial
Configuring the Call Stack
The call stack size determines the number of calls you can receive before the next call is
treated as busy.
Even when your call stack is full, Call Manager lets you place one more outgoing call to
perform a consultation, or conference, or a transfer.
To configure your call stack size, right-click the ShoreTel icon. A shortcut menu appears.
Click Configure ShoreTel System. The ShoreTel System dialog box appears. Click the
Telephony tab. In the Telephone section, type the stack size in the Select your Call
Stack size box. Click OK to close the dialog box.
Note: Your call stack size cannot exceed the number configured by your System
Administrator. Consult your System Administrator if you need to increase your call stack
size beyond its current limit.
1-32
Lesson 1: ShoreWare Call Manger Features
Using the ShoreTel Call Manager Features – Student Guide
Figure 1.31 – Configure Call Stack
Lesson 1: ShoreWare Call Manager Features
Using the ShoreTel Call Manager Features – Student Guide
1-33
1-34
Lesson 1: ShoreWare Call Manger Features
Using the ShoreTel Call Manager Features – Student Guide
Lesson 2:
SoftPhone
Introduction
Soft Phone is available feature in the Call Manager software with an additional license.
SoftPhone installs automatically with the Call Manager client and your extension is
automatically assigned to the SoftPhone when you start it.
The Web Client allows users to manager their personal feature preferences through a
browser. This is a great application for those users who will not have access to the Call
Manager software or who do not have a Windows PC, like Mac users.
This lesson covers the features and functions of the ShoreWare SoftPhone and web
Client applications.
Objectives
At the end of this lesson you will:
• Configure your SoftPhone.
• Use your SoftPhone features.
• Access the web client.
• Use the web client features.
Resources
•
System Administration Guide
•
Planning and Installation Guide
Lesson 2: SoftPhone
Using the ShoreTel Call Manager Features – Student Guide
2-1
2-2
Lesson 2: SoftPhone
Using the ShoreTel Call Manager Features – Student Guide
SoftPhone
SoftPhone is an available Call Manager feature for licensed users. To provide a user
with Soft Phone, you must obtain a keyed Soft Phone license and enable Soft Phone
use from the User edit screen in ShoreWare Director. Soft Phone installs automatically
with the Call Manager client and your extension can be automatically assigned to the
Soft Phone when you start it.
Figure 2.1 – Launch the SoftPhone
Figure 2.2 – Soft Phone
Lesson 2: SoftPhone
Using the ShoreTel Call Manager Features – Student Guide
2-3
Figure 2.3 – Soft Phone ShoreTel Control Panel
While the Soft Phone can be configured for different types of audio endpoints (headset,
speakers, handset), ShoreTel recommends a USB headset be used for supportable
voice quality.
Soft Phone supports Flash and Mute functions. The Soft Phone Flash provides the same
functions as the analog ShorePhones. To mute a call, click Mute. Click Mute again to
restore voice.
Once you have activated the Soft Phone through ShoreWare Director, you should set
the Soft Phone options.
To set the Soft Phone options: These options should not be touched unless there is a
need to troubleshoot problems
2-4
•
Launch the Soft Phone from Call Manager.
•
Click Options. The MGCP tab of the Soft Phone Configuration dialog box
appears.
•
The End Point Name is the read-only MGCP end point identifier. This is
the identifier that appears on the IP phone list in ShoreWare Director.
Lesson 2: SoftPhone
Using the ShoreTel Call Manager Features – Student Guide
•
Click the Audio tab. The Audio tab appears as shown below.
Figure 2.4 – Audio Tab
Recording - Select the device used for recording from the Recording drop-down list.
Playback - Click the device used for playback from the Playback drop-down list.
Use only configured devices – Check if you do not want Soft Phone to use any Windows
preferred audio devices. Select 1 of 3 device types; Headphones, Desktop Speakers, or
Telephone. Click OK.
Lesson 2: SoftPhone
Using the ShoreTel Call Manager Features – Student Guide
2-5
To start Soft Phone: Right-click the ShoreTel icon, a shortcut menu appears. Click Soft
Phone. The Soft Phone appears on your desktop.
With Soft Phone you can perform the following basic phone functions:
•
Dialing from Soft Phone - You can use either your mouse or keyboard.
•
Using the mouse and cursor—Click the numbers you want to dial. To
correct mistakes, select the incorrect number(s) with the cursor and
retype the correct numbers. To dial the number, click Talk.
•
Using the keyboard—Type the number you want to dial from the
keyboard. To correct mistakes, use the backspace or delete keys. To dial
the number, press Enter on the keyboard.
•
From Call Manager – You can also place Soft Phone calls from Call
Manager just as you would with an analog or IP Phone. To place Soft
Phone calls from Call Manager, you must first take the Soft Phone offhook. If you try to place a call from Call Manager while the Soft Phone is
on-hook, you will hear ring-back to alert you that the Soft Phone is still onhook. Also, you can use Handsfree Mode to suppress the dial tone on the
Soft Phone.
Handling Calls
The SoftPhone features allow you to handle calls quickly and efficiently.
Receiving Calls:
To receive a call, click Talk on the Soft Phone or press Enter from the keyboard. The
Soft Phone does not have an auto-off-hook feature. To achieve this, set your Call
Manager to handsfree mode. If you are already off-hook, you can press the Answer
button in the Call Manager.
2-6
Lesson 2: SoftPhone
Using the ShoreTel Call Manager Features – Student Guide
Figure 2.5 – Soft Phone Answer
Call Waiting:
If you are enabled for call waiting and hear the call waiting tone, press Flash to answer
the second call. The first call is automatically placed on hold. To return to the first call,
press Flash again.
Placing a Call on Hold:
To put a call on hold, press Flash and replace the handset. To return to the call, pick up
the handset. (While a call is on hold, your phone rings intermittently as a reminder that a
caller is waiting.)
Transferring a Call:
To transfer a call, press Flash and wait for dial tone. Dial a number and listen for ringback tone.
To blind transfer, hang up upon hearing the ring back tone or to announce the transfer,
wait for the party to answer. (Your original call is placed on hold during consultation.)
After consulting with the third party, hang up your handset to complete the transfer and
end your original call.
Making a Conference Call:
To conference a third party into a call, press Flash and wait for dial tone. Dial the
number and wait for the ring back-tone.
To add the third party, press Flash upon hearing the ring back tone, or to consult with
the recipient before adding them into the conference, wait for the party to answer before
pressing Flash. (Your original call is placed on hold during consultation.) After consulting
with the third party, press Flash to initiate the conference call.
Lesson 2: SoftPhone
Using the ShoreTel Call Manager Features – Student Guide
2-7
After the conference call is in progress, drop the last person added press the Flash
button.
Managing Soft Phone calls via Call Manager
From Call Manager, activate Handsfree Mode and you can manage Soft Phone calls via
Call Manager like any other call – including Hold, Transfer, Conference, and Hang Up.
Figure 2.6 – Handsfree Mode
Web Access
Web Client is a browser-based interface that allows users to change their call handling mode
and personal options. Mobile users can change their call handling options from any computer
connected to the intranet or Internet. Web Access can be a public URL for remote access or
restricted to the WAN.
To open ShoreTel Web Access:
Step 1: Open your browser.
http://<servername (or IP address)>/shorewarewebclient in the URL address text box, where
<servername> is the name or IP address of your ShoreTel server.
Step 2: Press Enter. The Web Access login page appears in your browser.
2-8
Lesson 2: SoftPhone
Using the ShoreTel Call Manager Features – Student Guide
Figure 2.7 – Web Client Login Screen
Figure 2.8 – Web Client
The Web Client allows you to activate a Call Handling Mode or change your personal
settings:
•
Call Handling Settings like forwarding destinations and Personal Assistant.
•
Voice Mail Notification like email notification or phone notification
Lesson 2: SoftPhone
Using the ShoreTel Call Manager Features – Student Guide
2-9
•
Find Me destinations
•
Other settings like your PCM and Voice Mail passwords.
Note: if you have Delegation permission, under the “other” tab is where you would be
able to activate the Call Handling Mode for another user’s extension.
Figure 2.9 – Web Client - Delegation
2-10
Lesson 2: SoftPhone
Using the ShoreTel Call Manager Features – Student Guide
Lesson 3:
Workgroup Call Manager
Introduction
The Workgroup Call Manager provides users with an all-purpose tool for managing
telephone operations and enables instant productivity. The Workgroup Call Manager
makes every phone a multi-line phone, allowing the user to virtually manage up to a
maximum of 16 calls simultaneously.
The Workgroup Call Manager contains the Agent monitor used by supervisors and the
queue monitor used by supervisors and agents in the workgroup.
This lesson covers the features and functions of the Workgroup Call Manager software.
Objectives
At the end of this lesson you will:
• Use Workgroup Call Manager to Log into and out of a Workgroup
• Use the Queue Monitor.
• Use the Agent Monitor.
• Use the ShoreTel Voice Mail Viewer.
Resources
•
System Administration Guide
Lesson 3: Workgroup Call Manager
Using the ShoreTel Call Manager Features – Student Guide
3-1
3-2
Lesson 3: Workgroup Call Manager
Using the ShoreTel Call Manager Features – Student Guide
Workgroup Call Manager
The Workgroup Call Manager gives users an all-purpose tool for managing telephone
operations. When receiving an inbound call, detailed information including caller name,
number, trunk-identification and routing history is presented. This allows professional call
handling.
An intuitive point-and click interface gives quick access to commonly-used features such as
transfer and conference. In addition, the Workgroup Call Manager makes every phone a multiline phone, allowing the user to visually manage up to a maximum of 16 calls simultaneously.
The Workgroup Call Manager includes:
Agent Call Manager – Intended for workgroup agents providing complete login
and logout capabilities. Everyone in the workgroup also has access to the
Workgroup Queue Monitor and the ShoreTel Voice Mail Viewer.
Workgroup Supervisor Call Manager – Designed for use by supervisory
personnel and provides real-time monitoring of agents and their call activity.
Everyone in the workgroup also has access to the Workgroup Queue Monitor
and the ShoreTel Voice Mail Viewer.
Agent Call Manager
The Agent Call Manager provides login and logout capabilities. Everyone in the workgroup also
has access to the Workgroup Queue Monitor, which provides real-time updates on waiting
callers.
The Agent Call Manager can be viewed in compact, detailed or docked views.
Figure 3.1 – Workgroup Agent Call Manager
Lesson 3: Workgroup Call Manager
Using the ShoreTel Call Manager Features – Student Guide
3-3
Workgroup Queue Monitor
The Workgroup Queue Monitor displays real-time information on waiting callers. Information on
the inbound calls includes: caller name, number, trunk-identification and routing history.
Figure 3.2 – Workgroup Queue Monitor
Agents are also alerted when thresholds for wait time and number of callers waiting has
been exceeded. If the Agent has permission, they can pickup calls directly from queue,
irrespective of the caller’s position in the queue.
Workgroup supervisors can set alert thresholds for maximum wait time and number of
callers waiting. Supervisors can change the workgroup call handling parameters as
needed by activating a pre-set schedule.
Workgroup Voice Mailboxes can also be created. These mailboxes are only accessible
from the Voice Mail Viewer even if the agent has installed Outlook Integration. (Only
personal VM will appear in Outlook.)
3-4
Lesson 3: Workgroup Call Manager
Using the ShoreTel Call Manager Features – Student Guide
Figure 3.3 – ShoreTel Voice Mail Viewer
Agent Monitor
The Agent Monitor is designed for supervisors so that they can monitor their agents in
real-time.
With the Agent Monitor, designated supervisors can view the status of each agent,
including caller information, agent login and logout states and wrap-up status.
Supervisors can also change the state of each agent, or use the Silent Monitoring, Barge
In, and Call Record features.
Figure 3.4 – Agent Monitor
.
Lesson 3: Workgroup Call Manager
Using the ShoreTel Call Manager Features – Student Guide
3-5
3-6
Lesson 3: Workgroup Call Manager
Using the ShoreTel Call Manager Features – Student Guide
Lesson 4:
Operator Call Manager
Introduction
The Operator Call Manager provides operators and administrative assistants with realtime information about every user on the system so that they can make decisions on
where to route callers.
This lesson covers the features and functions of the Operator Call Manager software.
Objectives
At the end of this lesson you will:
• Use the Operator Call Manager
• Use the Extension Monitor
Resources
•
System Administration Guide
Lesson 4: Operator Call Manager
Using the ShoreTel Call Manager Features – Student Guide
4-1
4-2
Lesson 4: Operator Call Manager
Using the ShoreTel Call Manager Features – Student Guide
Operator Call Manager
The Operator Call Manager has been designed specifically for the needs of operators and
executive assistants. Real-time information is provided about every user on the system as calls
are placed to them or transferred to them.
The Operator Call Manager provides instant access to call status, call handling mode, and call
notes for every user enabling professional, accurate call answering. In high call volume
applications, operators will appreciate the "Handsfree Mode" feature used in conjunction with a
headset as well as keyboard shortcuts for fast, efficient call handling. Executive assistants will
benefit from the information provided on selected users on the system. An extension monitor
with multiple docking options provides a virtual "Busy Lamp Field" delivering more features and
more functionality than proprietary hardware solutions.
Note: If an operator is assigned to a workgroup then the Operator Call Manager includes all the
features of the Workgroup Supervisor Client.
Figure 4.1 – Operator Call Manager
Lesson 4: Operator Call Manager
Using the ShoreTel Call Manager Features – Student Guide
4-3
Operators and Executive Assistants can select up 250 system extensions they want monitor
“real-time”. Just check the box next to each extension you want to monitor.
Figure 4.2 – System Extension Directory List
Selected extensions automatically appear in the Extension Monitor window. You can see “realtime” call activity to each extension and have instant access to call control activities like Call
Pickup, Dial, Intercom, Whisper Page, and Silent Monitor & Barge In. Additionally you may
transfer calls from your extension to any of these monitored extensions using a “drag & drop”
between windows.
4-4
Lesson 4: Operator Call Manager
Using the ShoreTel Call Manager Features – Student Guide
Figure 4.3 – Extension Monitor
Lesson 4: Operator Call Manager
Using the ShoreTel Call Manager Features – Student Guide
4-5
4-6
Lesson 4: Operator Call Manager
Using the ShoreTel Call Manager Features – Student Guide
APPENDIX:
Things to Remember
Lab Exercises
Appendix – Things to Remember & Lab Exercises
Using the ShoreTel Call Manager Features – Student Guide
A-1
A-2
Appendix – Things to Remember & Lab Exercises
Using the ShoreTel Call Manager Features – Student Guide
Things to Remember
•
Personal Call Manager makes every phone a multi-line phone, allowing
the user to visually manage up to 16 calls simultaneously.
•
Every user on the system has 5 call handling modes providing a wide
array of call forwarding and personal greeting options.
•
Call Manager can be viewed in 3 different modes: Compact View,
Detailed View, Docked View
•
The QuickDialer gives you a way to quickly make phone calls without
picking up the phone and dialing the number yourself.
•
Current calls appear in the Active Call list.
•
The History Viewer allows you to quickly view inbound and outbound call
information, including phone number, caller ID, time, date, and call
duration.
•
How you hang-up a call depends on the mode in which you answer the
call.
•
The AnyPhone feature allows you to receive calls and log into your voice
mail from any phone connected to the ShoreTel System.
•
The speed-dialing list can contain up to 20 entries.
•
The call-stack size determines the number of calls you can receive before
the next call is treated as busy.
•
You can change the Call Manager Login Information in the ShoreTel
System dialog box.
•
The ShoreTel SoftPhone is an available feature for licensed users and
install automatically with the Call Manager software.
•
The ShoreTel Web Client is a browser-based interface that allows users
to change their call handling mode and personal options.
•
The Agent Call Manager provides complete login, logout, and queue
monitoring.
Appendix – Things to Remember & Lab Exercises
Using the ShoreTel Call Manager Features – Student Guide
A-3
A-4
•
Agents can be alerted when thresholds for wait-time and number of
callers waiting are exceeded.
•
The Workgroup Voice Mailbox is only accessible from the Voice Mail
viewer. Only personal voice mail messages appear in Outlook.
•
If given permission, agents can pickup calls directly from queue,
irrespective of the caller’s position in the queue.
•
The Workgroup Supervisor Call Manager allows real-time monitoring of
agents and provides caller information, agent login and logout state and
wrap-up status.
•
Supervisors can set alert thresholds for maximum wait time and number
of callers in queue.
•
Supervisors can change the state of each agent and workgroup call
handling parameters as needed.
•
Supervisors can activate the Silent Monitoring, Barge In, and Call Record
features using the Agent Monitor window.
•
Operators, using the Operator Call Manager, can instantly access call
status, call handling modes, and call notes for every user on the system
to route calls more professionally and quickly.
•
Operators can use the “Hands Free” mode with a headset and keyboard
shortcuts.
•
If an operator is assigned to a workgroup then the Operator Call Manager
includes all the features of the Workgroup Supervisor Client.
Appendix – Things to Remember & Lab Exercises
Using the ShoreTel Call Manager Features – Student Guide
Lab 1 – Using the Personal Call Manager
As a team or as individuals, use the Personal Call Manager (PCM) software to perform
the following:
Resource Materials
•
System Administration Guide
•
Planning and Installation Guide
•
The Telephone User Interface Guide
Launch
Launch the Personal Call Manager (PCM).
Call Control
Make call - From the QuickDialer, dial another extension by typing a partial
name.
Take call - From another extension, call another extension and have them
answer the call.
Conference – Have students in the group setup up a 3 party conference. During
the conference, drop one of the parties
Docking Options - Try out the different docking options and views.
Continue making, taking and transferring calls until students are comfortable with
the interface.
Appendix – Things to Remember & Lab Exercises
Using the ShoreTel Call Manager Features – Student Guide
A-5
Configure ShoreTel System / Call Handling Modes
Greeting – Record the personal greeting in the standard call handling mode.
Phone Message Notification – Set up message notification such that if you get an
urgent message, another extension will ring and play the message. Test this.
Email Message Notification – Set up email notification to send you an email at
your personal email account like Yahoo or AOL.
Find Me – Configure Find Me destinations. Test this.
History Viewer
Call back – Open the History Viewer and call back someone.
Properties – Take a look at the properties of a call, add a note, and review the
routing slip.
Directory Viewer
View – View the system directory.
Outlook integration
Contacts
•
Dialing - Use the QuickDialer to dial a contact in Outlook.
•
Screen pop – Configure your desktop to pop Outlook Contacts.
Voice Mail
•
Take message – Receive a call. Check “To Voice Mail” to redirect
inbound call immediately.
•
Play – Play the message over the telephone or PC speakers.
•
Forward message to an email as well as voice mail address.
Calendar
•
Configure the calendar for integration. Create an appointment in Outlook
and select “In A Meeting” for the Call Handling Mode option. Call your
extension and test this.
Anyphone
A-6
Appendix – Things to Remember & Lab Exercises
Using the ShoreTel Call Manager Features – Student Guide
Exchange extensions with someone else in the group. Configure this phone as
your extension.
Note: login procedure from the new phone location: press #,#, then enter your
extension number, then the VM password, then dial slowly 7,3,1 to assign your
extension to this new phone.
Call your extension. What happens?
Send yourself back to your home switch port.
•
Using the Personal Call Manager (PCM) click the yellow telephone icon in
lower right hand corner of PCM.
•
Using the Telephone User Interface log into VM and dial slowly 7,3,2.
Soft Phone.
Launch the Soft Phone: from the PCM RIGHT mouse Click the ShoreTel logo and select
Soft Phone.
•
Configure the Soft Phone OPTIONS
•
Plug in a USB headset and place a call. Did it work?
•
Now click the TALK button (so you hear a dial tone) in the Soft Phone and
then minimize the Soft Phone window (do not close the application).
•
From PCM activate Handsfree Mode. Your headset is now live & off-hook so
you can do all your dialing through PCM. Place a call, did it work?
Web Client
From Desktop or Laptop open Internet Explorer Browser
Access the Web Client using the following URL:
http://<server name or IP Address of the ShoreTel Server>/ShoreWareWebclient
•
Log in and check out the various options available to you.
Note: this would be useful for people who travel or do not have a
Windows PC to run PCM.
Appendix – Things to Remember & Lab Exercises
Using the ShoreTel Call Manager Features – Student Guide
A-7
A-8
Appendix – Things to Remember & Lab Exercises
Using the ShoreTel Call Manager Features – Student Guide
Lab 2 – Using the Workgroup Call Manager
Workgroup Agent and Supervisor Call Manager
Launch the Workgroup Supervisor Call Manager.
Bring up the Agent Monitor Window:
•
Login and logout agents from the Agent Monitor window.
•
Make a call to the workgroup and do a call pickup from the Agent Monitor.
•
Transfer the call back to the agent using the left and right mouse drag and drop
options between windows.
•
Use the docking options.
•
From the Agent Monitor window, dial an agent’s extension.
Bring up the Queue Monitor window:
•
Place a couple of calls to the workgroup extension and watch calls in the queue.
•
Reset the thresholds from the Queue Monitor window.
•
Use view options (compact, detail).
Launch the ShoreTel Voice Mail Viewer: (This can be done from the Windows
START/PROGRAMS/SHORETEL menu links.)
•
View the personal and shared Workgroup mailbox.
•
Forward a workgroup message to an Agent’s personal mailbox.
•
Change the Subject field.
Appendix – Things to Remember & Lab Exercises
Using the ShoreTel Call Manager Features – Student Guide
A-9
A-10
Appendix – Things to Remember & Lab Exercises
Using the ShoreTel Call Manager Features – Student Guide
Lab3 – Using the Operator Call Manager
Extension Monitor
From the Operator Call Manger open the Extension Monitor
•
File – Extension Monitor
•
Check the boxes next to three extensions you want to appear in the
Extension Monitor window
From another phone call one of the extensions you are monitoring. Double Click
with your mouse on the ringing icon. What happened?
Call the Operator extension and answer the call. Using a left mouse click, drag
the active call from your Call Manager window to an idle extension in the
Extension Monitor window. What happened?
Call the Operator extension again and answer the call. This time using a right
mouse click, drag the active call from your Call Manager window to an idle
extension in the Extension Monitor window. What happened?
Call the Operator extension again and answer the call. This time using a left
mouse click, drag the active call from your Call Manager window to a busy
extension in the Extension Monitor window. (Note: you will have to set up
another call between to extensions for this to work.) What happened?
Set up a three party conference. During the conference, drop one of the parties.
Try different docking options and views for the Extension Monitor.
Appendix – Things to Remember & Lab Exercises
Using the ShoreTel Call Manager Features – Student Guide
A-11
A-12
Appendix – Things to Remember & Lab Exercises
Using the ShoreTel Call Manager Features – Student Guide