1
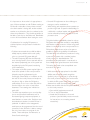
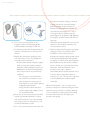
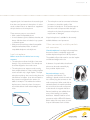
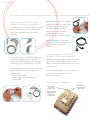
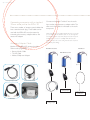
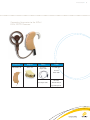
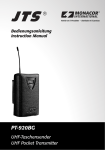
56 •
AN EDUCATOR’S GUIDE
CHAPTER 7
Accessories and assistive listening devices
• Introduction to
FM systems
• Troubleshooting the
FM systems
• FM compatibility guide
• Other assisted listening
devices
Introduction to FM section
All children with hearing loss require a good listening environment
and because most schools are noisy places, a child with hearing
loss should always be evaluated for an assistive listening system. A
personal FM, in which the teacher’s voice is transmitted directly to
the child’s cochlear implant processor, will provide the highest
signal-to-noise ratio (SNR) and therefore the best sound signal.
Sound field systems—either area-wide or on the student’s desk—
will improve the SNR, but not as much as a personal FM. Signalnoise-ratio is defined as the difference, in decibels, between the
speaker’s voice and the surrounding background noise. For
example, if the background noise in a classroom was 55 decibels
(not unusual in the typical school) and the sound source (or
teacher’s voice) at the child’s ear was 60 decibels, the SNR would
be 5. The SNR for a child with a cochlear implant should be at
least 15 decibels.18,19 As the day goes on, two things often happen:
(1) the teacher becomes fatigued and his/her voice level drops
and (2) the children become restless and classroom sounds are
amplified. Thus, without an FM system, the intensity level of the
sound source tends to go down by a few decibels in the afternoon
while the noise level in the room increases—making the situation
even worse! For additional information on acoustics, please refer
to Chapter 5.
18. American Speech-Language-Hearing Association. (2005). Acoustics in educational settings:Technical report. Available at http://www.asha.org/members/deskref-journals/deskref/default
19. American Speech-Language-Hearing Association. (2005). Guidelines for addressing acoustics in educational settings. Available at http://www.asha.org/members/deskrefjournals/deskref/default
AN EDUCATOR’S GUIDE
The chart below illustrates the improvements in
signal-to-noise ratio aided by use of a FM system,
use of a hearing aid on the opposite ear, or use of
both. Using FM on the child’s implanted side
added more than 13 decibels to the SNR while a
bilateral fitting with FM on both ears provided the
best possible performance in a typical noisy classroom environment.
Bilateral/Bimodal Study
Schafer and Thibodeau (2005)
FM input to first or both sides allowed for best speech recognition in noise performance!
CI Alone
2nd
CI+FM
CI+FM
2nd
CI
2nd+FM
CI+FM
2nd+FM
CI
= 1.1 dB
= 13.3 dB
= 13.9 dB
= 4.6 dB
= 16.2 dB
Improvements in speech recognition relative to CI Alone!
FM Technology and Federal Law
There are a number of Federal laws that support
the provision of FM systems for children with hearing loss in school settings. For a child with an IEP
under the Individuals with Disabilities Education Act
(IDEA), FM technology is an eligible accommodation. Some children with cochlear implants have
been excluded from receiving services under IDEA
because they are performing at an age appropriate
level and have been determined to not have an
“educationally significant disability.” Without
attempting to argue the appropriateness of such
exclusions, other disability laws remain in effect that
require provision of an FM for a child with a
cochlear implant. Section 504 of the Rehabilitation
Act of 1973 requires that any program receiving
Federal funds must be accessible to individuals with
disabilities. Hence, children in public school settings
would be covered by this provision even if they did
not have an IEP
While children in private schools are not covered
by either the IDEA or Section 504, they are
covered by the Americans with Disabilities Act
(ADA). The ADA mandates that every public
facility provide communication access if necessary,
unless doing so would impose an undue burden.
Since FM systems are relatively inexpensive, a
purchase would not be considered burdensome
and provision of FM would almost always be
required.
In addition to providing FM amplification, the
classroom acoustical environment should be
evaluated and, where needed, improvements
should be made. A poor acoustical environment
can interfere with the proper function of an FM
system, so provision of FM and acoustics are not
an “either/or” proposition—both accommodations
need to be evaluated and, where appropriate,
provided for the child with a cochlear implant.
Acoustical needs in the classroom are discussed
in Chapter 5 of this guide.
• 57
58 •
AN EDUCATOR’S GUIDE
There are three primary types of
FM systems
An area-wide sound field FM system will improve
the SNR in the classroom by using a microphone
(the transmitter) to amplify the teacher’s voice, and
speakers (the receivers) placed around the room.
This type of FM system has been found to benefit
normally hearing students, as well as students with
minimal hearing loss, or those who are learning
English, for example. 20
Children with hearing impairment should sit as
close to the teacher as possible to minimize the
negative impact of a noisy and reverberant classroom. A desktop speaker FM system can provide
an increase in word recognition for children with
moderate-to-severe hearing loss who have a high
level of word recognition scores in quiet.2
The third type of FM system is a personal FM
system, which inputs the FM signal directly into the
cochlear implant sound processor and/or hearing
aid. This type of system provides the highest
degree of benefit in most cases. But, it can also
introduce more management challenges. It
requires knowledge of how the receiver connects
to the sound processor, as well as how to adjust
the sound processor when necessary. Listening to
the sound processor and FM receiver together,
while sound is being transmitted, is also part of the
daily listening check. In contrast, systems that utilize
area-side or desktop speakers are much easier to
troubleshoot and adjust.
For any FM system, the teacher needs to be aware
of proper microphone placement and use. The
microphone should be worn six to eight inches
from the mouth at all times, and should point
upward and toward the mouth. Be careful that
jewelry or clothing does not generate noise that,
while probably not noticeable to you, is amplified
for the student. The cord that connects the
microphone to transmitter can sometimes also be
the antenna; therefore, it should be fully extended
as opposed to coiled for convenience. Consult the
FM manufacturer for instructions specific to the
transmitter and microphone being used.
20. American Speech-Language-Hearing Association.
(2002). Guidelines for fitting and monitoring FM systems.
ASHA Desk Reference. Crandell, C, Smaldino, J, & Flexer,
C: An Overview of Sound Field FM Amplification.
The Hearing Review
AN EDUCATOR’S GUIDE
It is important to know when it is appropriate to
turn off the transmitter as well. Children wearing an
FM should not be able to hear private conversations their teacher is having with another student,
teacher, or any discussion that is not related to the
classroom presentation. They should especially not
be able to hear trips to the bathroom! Remember
to turn off the transmitter when leaving the room.
Considerations for coupling FM systems to
cochlear implant sound processors include the
following:
• Cochlear recommends that a child be able to
reliably report problems with sound quality
prior to a personal FM system being fit.
• The radio frequency (RF) that the externally
worn sound processor uses to transmit data to
the internal (implanted) part of the system can
be picked up by the FM system, introducing
noise interference.
• The output of the FM system may be higher or
lower than optimal for the sound processor
(therefore requiring adjustment by the
audiologist). Alternatively, or in addition to this,
the level of the sound processor microphone
may be too high to allow the FM signal to
predominate, or too low to allow the child to
monitor his/her own voice or hear his/her
classmates. These settings are individual to
each child.
• The child may experience poor sound quality
due to environmental interference such as
fluorescent lighting, computer equipment, or
metal barriers, to name a few. Decisions must
be made about situations in which FM use is
preferred. In addition, noise management
techniques can be programmed into the sound
processor for the child who is able to manage
the use of more than one program in the
device. These techniques are referred to as
SmartSound technologies.
• Personal FM equipment can be a challenge to
manage, as well as troubleshoot.
• With training and experience, these systems can
provide a high level of speech understanding for
a child with a cochlear implant, well above what
can be achieved by listening through the sound
processor alone
This guide includes compatibility charts for various
FM systems that have been tested for compatibility
with Nucleus sound processors. When using patch
cables to connect body worn sound processors to
FM receivers, keep the two units as far apart as
possible to reduce the possibility of interference.
The ideal fitting and verification procedure for using
a personal FM system with a cochlear implant
sound processor is described below. This
procedure can be performed in a test booth, or,
more ideally, in the typical classroom environment.
This testing may need to be accomplished over
more than one session.
1. With test materials appropriate for the child’s
abilities, test the child’s speech recognition
(auditory only, no visual cues) in quiet through
the sound processor alone, in the environment
in which the FM system will be used, at a typical
distance from which the teacher will speak.
2. Next, test the child with the FM system attached
to the sound processor.
a. Start with all equipment turned off.
b. Turn on the FM transmitter.
c. Attach the FM receiver to the sound
processor (see individual processor manuals
for instructions on connecting external
accessories).
• 59
60 •
AN EDUCATOR’S GUIDE
d. Turn on the sound processor to the
program location recommended by the
cochlear implant audiologist for FM use.
e. If necessary, synchronize the transmitter and
receiver so that they are on the same FM
channel.
f. Reduce the microphone sensitivity of the
sound processor to zero.This disables the
sound processor microphone.
• Test the child’s speech recognition (again,
auditory-only) with speech presented
through the FM transmitter microphone.
• Performance should be similar between
the sound processor-only and FM-only
conditions.
- If not, the gain on the FM receiver
may need to be increased. In some
cases, however, too much gain can
cause distortion of the signal, resulting
in degraded performance.
- Testing should continue, therefore,
until the optimal gain setting is found
for the individual child.
g. Now, turn off the sound processor (and FM
receiver if powered separately). It is best
that the FM receiver is not removed while
the sound processor is still turned on. Turn
off the FM transmitter as well.
h. Turn on the sound processor, and return the
microphone sensitivity setting to the level
used by the child for everyday listening.
i. With the teacher at typical classroom
distance, the audiologist can measure the
sound level at the student’s ear. Then, a
noise signal, which is 5dB less than the
speech signal, can be placed at 90 degrees to
the student’s cochlear implant side, about 3
feet away.
j. Obtain the speech recognition score for the
speech in noise condition (auditory only,
sound processor alone).
k. Finally, re-activate the FM system and repeat
testing in noise. For the Spectra, SPrint™,
and ESPrit™ series sound processors,
microphone sensitivity setting typically needs
to be reduced slightly below the everyday
use setting in order to allow the FM signal to
be predominant, yet also allow the child to
monitor his/her own voice and hear his/her
classmates. With the Freedom sound
processor, a mix ratio is applied
automatically, which reduces the level of the
sound processor microphone when an
accessory is in use. This mix ratio may need
to be modified by the cochlear implant
audiologist.
When the FM system is not in use, the sound
processor microphone sensitivity setting should be
returned to the level used for everyday listening,
or, for the Freedom sound processor the setting
should be returned to the “M” setting (see
processor user guide).
AN EDUCATOR’S GUIDE
Troubleshooting
If the student reports a problem during use of the
sound processor and personal FM system, a first
step would be to listen to the sound processor
alone, as per the instructions in the section on
troubleshooting the sound processor in this
booklet (Chapter 6).
If the sound processor is working properly, evaluate
the FM system alone.
the microphone sensitivity on the processor to
zero. The monitor headphones will time-out after
90 seconds, and can be re-activated by pressing the
Increase and Decrease buttons on the processor at
the same time.
If you are unable to listen to the receiver alone
and encounter a problem when listening to FM
transmission through the ESPrit 3G or Freedom
processor, the problem could be either the FM
receiver or the accessory jack on the sound
processor (assuming you have listened to the
processor alone, and did not find a problem).
Body worn FM receivers can often be monitored
with headphones. The Phonak MLxS may be
plugged into a speaker through the MicroLink CI.
Have someone speak into the transmitter, and
check the quality of the sound through the receiver.
If a speaker is not available, the MLxS can be
connected to the MicroLink adapter and plugged
into the ESPrit™ 3G -only if there is a program
location in which the monitor earphones are
enabled and the rotary control is set for
microphone sensitivity - (you may need to
confirm these settings with the cochlear implant
audiologist). Reduce the microphone sensitivity to
zero and have someone speak into the transmitter
to listen to the FM system alone. The cord on the
monitor earphones acts as an antenna, so some
low level hum may be picked up: this is normal.
For the ESPrit 3G, ensure that the MicroLink
adapter is in the FM+M position (reducing the
microphone sensitivity is the recommended
method for listening to FM only). Ensure the
connection is secure, and that the processor was
turned off, then back on, to recognize the
accessory. The MLxS should be in the “double dot”
position. To evaluate the accessory jack, plug in
another accessory, such as the lapel microphone,
or personal audio cable (attach this to an audio
source such as a CD player that is playing music).
If the accessory jack works, the problem may lie
with either the MicroLink adapter or the MLxS,
thus the importance of being able to evaluate the
MLxS alone.
With the Phonak MicroLink Freedom receiver, you
will need to listen through the Freedom sound
processor. To listen to the FM system alone, reduce
For the Freedom processor, ensure the processor
is in external accessory mode. The simplest way to
do this is to turn off the processor, then turn it
• 61
62 •
AN EDUCATOR’S GUIDE
back on. Again, remember that the monitor
earphones time out – if this happens, press the
Increase and Decrease buttons together and
observe the letters “EA” flashing on the LCD
screen. If you don’t hear sounds, replace the
MicroLink Freedom with the standard Freedom
battery holder and listen to another accessory as
suggested above. If you hear through the alternate
accessory, the MicroLink Freedom may be faulty.
If both the sound processor and the FM system
are working properly individually the next step is
troubleshooting the two systems when interfaced
with one.
The personal audio cable is designed only
for battery-operated components. If a
component is powered by household
electricity, use the TV/HiFi cable.
When using the personal audio cable,
your processor’s microphone will
remain active. To eliminate background
noise, reduce the microphone’s
sensitivity. Reducing the microphone sensitivity
does not affect the level of sound coming through
the cable.
TV/HiFi cable
If the child complains of noise, static, or buzzing, see
if you perceive the same through the system, ideally
in the classroom where he or she sits. Move
around the classroom to see if the sound quality
changes. Try a different transmission channel, if you
are using a multi-channel system, making sure that
you synchronize the transmitter and receiver.
If the problems cannot be resolved, you may want
to contact the child’s implant audiologist, the FM
system manufacturer, or Cochlear Americas.
Nucleus Accessories
Personal audio cable
Enhancing sounds from portable audio
components. Connect the cable directly to a CD
player, tape player, two-way radio or to any batterypowered, portable music or gaming system. The
personal audio cable transmits
sound directly to the implant,
improving sound quality. One end
connects to the Nucleus processor
and the other end connects to the
audio component.
Connecting the Nucleus processor to an
electrically powered TV, stereo, or computer.
A TV/HiFi cable allows one to connect
the Nucleus implant directly to a TV,
stereo or computer. Simply insert the
cable into the headphone jack.The
TV/HiFi cable can be used with any
battery or 120-volt electrical powered
equipment.
When using the TV/HiFi cable, the processor’s
microphone will remain active. To eliminate
background noise, reduce the microphone’s
sensitivity. If a sensitivity MAP is being used,
reducing the microphone sensitivity will not affect
the level of sound coming through the cable.
Telecoil
Delivering greater clarity for listening on the
phone, to a movie, or to the stereo. A telecoil
can provide the extra help the child needs to hear
with more clarity and ease in a wide range of
environments. A telecoil is a miniature receiver
that picks up magnetic sound signals from telecoilcompatible phones and assistive listening systems
(ALS). In many situations, the child may hear this
AN EDUCATOR’S GUIDE
magnetic signal a lot better than the acoustic signal
from the sound processor’s microphone. In other
words, a telecoil acts as an alternate or supplemental input device to the microphone.
There are many ways to use a telecoil:
• With a telecoil-compatible phone.
• In movie theaters, sports stadiums, churches, and
lecture halls that have an induction loop system
or infrared system.
• With personal neck-loops, telecoil-compatible
headphones/headsets, Hatis®, or telecoilcompatible telephone and cell phone.
Lapel microphone
Make it easier for the child to hear in noisy
situations:
• The microphone allows the child to hear more
clearly in noisy environments. The microphone
should be clipped to the sound source.
• The microphone can capture sounds coming
from multiple directions. Many cochlear implant
users hear with only a single implant. The lapel
microphone picks up the sound coming from the
side without an implant. It can be connected to
the processor and placed in the center of a
table, for example. This enables the cochlear
implant user to hear the voices of everyone
around the table and will reduce background
noise.
• The microphone can be connected to Nucleus
processors to check the quality of the
processor’s microphone. If the student reports
that the sound has improved with the lapel
microphone in place, the processor microphone
may be wet or damaged.
A lapel microphone is available for all currently
available Nucleus sound processors.
Other commercially available products
and accessories
Closed headphones have large hollow earpieces
that can be used to completely enclose the
cochlear implant microphone or BTE processor.
The padded cuff provides comfort over the implant
and reduces background noise.
In absence of a patch cable, closed headphones can be used successfully by
many cochlear implant users.
Personal neckloops work in
conjunction with telecoils. The
neckloop is placed around the neck and
has a 3.5mm plug that connects to the
audio component. When used with an
activated telecoil, the neckloop delivers
the sound from the audio component
to the telecoil via magnetic induction.
Personal neckloops are available from
many of the hearing loss specialty
businesses. Nucleus Freedom sound
processors and the ESPrit 3G feature a
built-in telecoil for easy access to neckloops and silhouettes such as Hatis®.
• 63
64 •
AN EDUCATOR’S GUIDE
Using accessories and ALDs with
Nucleus Freedom sound processor
The accessory port is located on the “shoe” at the
base of the processing unit. The picture below
shows the configuration for the body worn
controller.
Lapel microphone – For use in difficult
listening environments, or when sound
is coming from the side opposite
the child’s processor. The lapel
microphone can also be used to
troubleshoot the processor
microphone or an attached accessory.
Monitor Earphones – For troubleshooting the processor microphone,
built-in telecoil or an attached
accessory.
The accessory port for the Freedom BTE option
is located at the bottom of the controller.
Nucleus Freedom accessories connect directly to
the accessory port. No adapters are necessary.
The following Freedom accessories can be used
with standard audio components that have a
headphone jack.
• Personal Audio Cable
(battery operated components only)
• TV HiFi Cable
Using accessories and ALDs with
Nucleus 24 SPrint sound processor
All SPrint accessories (except Monitor Earphones)
have a 3.5mm audio plug that connects to the
accessory input socket under the flap on top of the
sound processor.
Monitor earphones attach at the keyed connector
to the left of the Accessory Input Socket
(see illustration below).
SPrint Accessory Connection
Keyed connector
for monitor
earphones only
Monitor earphones
will always detect
headset plus
accessory input
External input via
3.5mm jack plug for
all accessories
AN EDUCATOR’S GUIDE
TV HiFi Cable
Personal Audio Cable
Using accessories and ALDs
with ESPrit 3G sound
processor
(for Nucleus 22 and Nucleus 24 cochlear
implant systems)
The Accessories Adapter must be connected to
ESPrit 3G sound processor.
• Remove the socket cover on the bottom of
ESPrit 3G
• Connect the accessories adapter to the
accessories port
The following accessories can be connected
directly to the L shaped connector on the
accessories adapter
• ESPrit Lapel Microphone
• Accessory Adapter Cable
• ESPrit Cordless Telecoil
• ESPrit Telecoil (with cable)
Monitor Earphones
Lapel Microphone
Locate the round pin connector on one side of
the accessories adapter (see illustration below).
This is the socket for connection of the ESPrit 3G
monitoring earphones. The earphones are used to
check the function of the processor microphone or
accessories like an FM receiver when used with
individuals who are unable to provide feedback.
Plug for your ESPrit 3G
Socket for your
monitoring earphones
Socket for your accessories or
wired assistive listening devices
*When using the above accessories connected to the L shaped
connector on the accessories adapter, the processor microphone is
disabled (non-mixing).
Always turn ESPrit 3G off before connecting accessories directly to the processor or the Accessory
Adapter. Then turn the processor back on.
Turn off
“0” for
• 65
66 •
AN EDUCATOR’S GUIDE
Connecting accessories with a standard
3.5mm audio jack to the ESPrit 3G
There are a number of accessory patch cables that
have a standard audio plug. These cables can be
used with the ESPrit 3G sound processor by
connecting the accessory adapter cable to the
accessories adapter.
Connect end marked “Cochlear” into the audio
input socket on the accessory adapter cable. The
other end of the cable is connected to the audio
component.
*When using the accessories with the ESPrit 3G sound processor, the
processor microphone should still be active. To cut out background
sound while using audio components, simply reduce the microphone
sensitivity on the processor. A “sensitivity” MAP will reduce the
microphone input so the sound coming from the audio component
Accessory Adapter Cable
Nucleus for the ESPrit 3G accessories with a
3.5mm audio plug include:
• Personal Audio Cable
• TV HiFi Cable
• Nucleus Telephone Adapter
is prominent (audio mixing).
With Telecoil
With SPrint Accessories
With ESPrit Accessories
Flip to “T”
Accessory Adapter Cable
Personal Audio Cable
ESPrit FM Cable
matching your system
Neckloop connecting to
your FM system
TV HiFi Cable
Nucleus Telephone Adapter
FM Interface Cable
matching your system
AN EDUCATOR’S GUIDE
Connecting Accessories to the ESPrit /
ESPrit 22 BTE Processor
Processor
Adapters
Cables
Cables
ESPrit / ESPrit 22
Audio cover
Accessory
adapter cable
TV / HiFi cable
Personal
Audio Cable
FM cables
No adapter cable
External Telecoil
Lapel Microphone
• 67