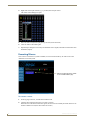
1
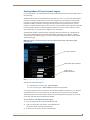
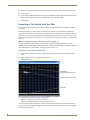
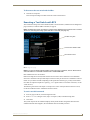
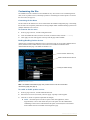
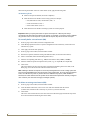
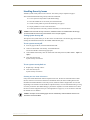
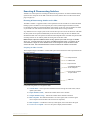
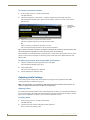
Instruction Manual
APWeb
Version 1.6.0
AMX AutoPatch TCP/IP Control
Release: 2/19/09
Contents
Contents
Initial APWeb Setup by Network Admin .............................................................1
Overview ................................................................................................................................. 1
Opening the APWeb Server .................................................................................................... 2
Overview of the Admin Home Page ........................................................................................ 3
Setting a Static IP Address ...................................................................................................... 4
Using a DHCP IP Address (Optional) ....................................................................................... 4
Setting Admin & User Account Logins..................................................................................... 5
Executing a Test Switch with the XBar .................................................................................... 6
Executing a Test Switch with BCS ........................................................................................... 7
Customizing the Site ............................................................................................................... 8
Customizing Bootup Operations ............................................................................................. 9
Customizing the Control Options .......................................................................................... 10
Defining Virtual Matrices (Manually Configuring VMs) .......................................................... 13
Handling Security Issues ........................................................................................................ 15
Opening a Telnet Session ...................................................................................................... 16
Executing & Disconnecting Switches ..................................................................................... 17
Adjusting Audio Settings....................................................................................................... 18
Executing Macros .................................................................................................................. 20
Using APWeb ....................................................................................................22
Connecting to APWeb ........................................................................................................... 22
Home Page............................................................................................................................ 23
Executing & Disconnecting Switches ..................................................................................... 23
Executing Macros .................................................................................................................. 26
Additional APWeb Info for Network Admin ......................................................27
Embedding the XBar Applet ................................................................................................. 27
Changing the Proxy Setting .................................................................................................. 28
APWeb Instruction Manual
i
Contents
ii
APWeb Instruction Manual
Initial APWeb Setup by Network Admin
Initial APWeb Setup by Network Admin
Overview
Applicability Notice: The information in this manual covers APWeb Version 1.6.0.
(The version number is in the upper right on the Home page.) For a list of currently supported
products, see the Release Notes.
The APWeb server delivers HTML pages and Java applets, which allow for remote control and
diagnostics of an AMX AutoPatch Routing System using PC-based Internet browsing software.
In addition, one of the pages opens a Telnet server, providing a standard terminal interface for entering
AMX AutoPatch BCS (Basic Control Structure) commands.
Before the APWeb server can be accessed, the AMX AutoPatch Routing System must be equipped with
an APWeb expansion board or a TCP/IP connector integral to an enclosure or a standalone APWeb
Server module. The APWeb (expansion board, module, or integral TCP/IP connection) is connected via
an RJ-45 link cable to a LAN (Local Area Network), the Internet, or a network card in a PC (which could
then connect to a LAN or the Internet). For cabling information, see the expansion board, enclosure, or
module documentation.
Note: A single PC can access multiple AMX AutoPatch Routing Systems, as long as each system
has TCP/IP capability (e.g., an Epica-128 with an APWeb module or an Optima with an APWeb
expansion board); each APWeb server must be assigned a unique IP address and a custom site
name. Furthermore, each system can contain multiple enclosures, as long as it is configured as a
single system.
The APWeb server can also function as a Tunneling Access Point (TAP). As a TAP, it can be used to
control a system (e.g., with third party controllers) using any software that supports XNNet or BCS
protocol over TCP/IP.
The APWeb interface information is divided into three chapters.
This first chapter provides APWeb setup information for the Network Administrator doing the initial
setup or ongoing server maintenance. It includes information on:
Opening the APWeb server
Changing the server’s configuration properties
Setting user names and passwords
Testing control operations
Customizing the site and the control options
Manually configuring virtual matrices
Handling security issues
Controlling the system
The second chapter, “Using APWeb,” contains instructions for the person controlling an AMX
AutoPatch Routing System, through an APWeb server after the setup is complete. We suggest making
a copy of this chapter to give to the user, along with the user name and password that you set for them.
The third chapter, “Additional APWeb Info for Network Admin,” covers embedding the XBar applet
and changing the proxy setting.
Caution: We strongly recommend a Network Administrator set up the system even if DHCP
(Dynamic Host Configuration Protocol), gateways, firewalls, etc. are not being used.
APWeb Instruction Manual
1
Initial APWeb Setup by Network Admin
System Requirements
PC with Windows XP Professional®, Windows 2000®, or Windows NT®
Web browser (e.g., Internet Explorer or Firefox)
JRE v1.4.x or greater (Java Plug-in for the XBar Controller, see page 17)
Design Requirement
AMX highly recommends deploying only one APWeb server per system. This is a design requirement:
any configuration violating this recommendation may not be backed by the technical support agreement.
APWeb offers a single, remote access point to a system, and its interactions with that system can cause
interference and collision issues if more than one APWeb server is present.
Opening the APWeb Server
Caution: We strongly recommend that the APWeb server site be placed inside your network firewall
and that system security be turned on.
A worksheet to record connection information is provided at the end of this chapter (see page 21).
To set up the APWeb server:
1.
Follow the directions in the APWeb Server Module Quick Reference Guide that shipped with the
system (or in the switcher’s instruction manual for an integral TCP/IP connection or an expansion
board) for connecting the TCP/IP connector to a LAN or to a network card in a PC.
2.
Launch a browser on your PC.
3.
Type http://192.168.0.251 (default IP address) in the address bar of the browser and press Enter.
The PC must be on the same subnet (192.168.0.x).
The Enter Network Password dialog box opens.
Note: If the Enter Network Password dialog box does not open, see page 28 for troubleshooting
strategies.
2
4.
Enter the (case sensitive) default admin user name: super
5.
Enter the (case sensitive) default admin password: super
6.
Click OK.
APWeb opens to the Home page for the Network Administrator.
(The user’s Home page has limited access and can be opened by entering the default user name and
password of none and none, i.e., the character string n-o-n-e.)
APWeb Instruction Manual
Initial APWeb Setup by Network Admin
Overview of the Admin Home Page
APWeb’s Admin Home page has links for complete site access, while the links on the user’s Home page
are limited to control access. The Admin Home page displays information on the system’s virtual
matrices (VMs) and the number of macros currently defined in APWeb. It also displays information
regarding the discovery of hardware devices and channel names during bootup if these features are
enabled.
Customizable site name
Click logo for AMX Website
APWeb version number
Current virtual matrix configurations
Number of macros defined in APWeb
Bootup discovery information
Links
FIG. 1 Admin Home page
The links on the left side of the Home page access the pages listed below:
Link
Page
Function
Home
Home
The main page in the APWeb site
Controller
XBar Controller
The controller interface for executing and disconnecting switches
(page 17) and adjusting audio (page 18)
Execute Macro Execute Macro
For executing macros (page 20)
Create Macro
Create/Edit Macro
For creating or deleting macros (page 12)
Define VM
Define VM (Manual
Configuration)
For manually defining and deleting virtual matrices (page 13)
Configuration
APWeb Configuration
For specifying site settings, such as display parameters (page 11)
and the site name (page 8), and for enabling features
Diagnostics
Diagnostics
For sending a test BCS command (page 7) or launching a Telnet
session to enter BCS commands (page 16)
Administration
APWeb Administration For accessing Account Profile (user names and passwords) and Site
Security information (page 5); it also includes the enable/disable
services preferences (page 8) and the IP address and port settings
(page 4)
Contact Info
Contact Information
APWeb Instruction Manual
Displays the AMX address, phone and fax numbers, and website link
3
Initial APWeb Setup by Network Admin
Setting a Static IP Address
The current (default) IP address is displayed on the APWeb Configuration page under the section for
Current APWeb Settings. A field is provided on the APWeb Administration page under Configure
APWeb Settings for entering a static IP address.
Current APWeb Settings
Reboot APWeb
Click for explanation and
requirements for enabling the
Device Discovery UDP Beacon
Service for an AMX AutoPatch
Duet control module
Set APWeb Site Name
Change Display Settings
Scroll for additional options
FIG. 2 APWeb Configuration page
Note: The APWeb Configuration page also includes fields for additional settings and bootup
operation options (see page 9).
To enter a static IP address:
1.
From any page in the site, click the Administration link.
2.
Under Configure APWeb Settings, enter the static IP address in the IP Address field.
3.
Click Apply; click OK when prompted to reboot.
Important: Any time you select “Reboot” as an option from the APWeb Configuration page
or from any dialog box opened from the APWeb site, the APWeb server reboots. The reboot may
update information between the AMX AutoPatch routing system and the APWeb server.
The routing system itself does not reboot.
Using a DHCP IP Address (Optional)
The APWeb server offers the option of using a DHCP (Dynamic Host Configuration Protocol)
IP address. The settings on the APWeb Configuration page will typically be for a fixed or static
IP address.
To force invocation of a DHCP IP address:
4
1.
From any page in the site, click the Administration link.
2.
Under Configure APWeb Settings, enter 0.0.0.0 in the IP Address field.
3.
Click Apply.
4.
Click OK when prompted to reboot.
The APWeb server begins searching for a DHCP server.
If the search times out, the address will revert to the default APWeb IP address (192.168.0.251).
APWeb Instruction Manual
Initial APWeb Setup by Network Admin
Setting Admin & User Account Logins
For security purposes, we recommend that the Network Administrator set the account profiles as part of
the initial setup.
APWeb uses HTTP basic access authentication with multi-tier access (i.e., the Network Administrator
and the user accounts each have their own user name and password). Resetting the account profiles
(see page 16) requires physical access to the system. If further security is required, we recommend
locking the module (or enclosure with integral TCP/IP connection or expansion board) in a secure
location. User names and passwords are sent in clear text over the network, thus leaving them vulnerable
to network sniffers. We also recommend deploying APWeb in a secure LAN environment. To allow
remote Internet access, you will need to configure your LAN firewall.
APWeb boards (modules, expansion boards, and integral TCP/IP connections) are configured at the
factory with a default login for the Network Administrator and another one for the user. APWeb’s
Account Profile / Site Security page is accessed by clicking the Authentication button on the APWeb
Administration page.
Note: Site security can also be turned on and off at the Account Profile / Site Security page
(see page 15).
User login information
Administration login information
Scroll to access
Disable Site Security
FIG. 3 Account Profile / Site Security page
Default User Name & Password
Administration Account Login – super and super
User Account Login – none and none (the character string n-o-n-e)
User names and passwords are case sensitive with a maximum length of 24 characters. User names for
Administration and User Account Logins must be different; however, passwords can be the same.
The following steps assume this is the first time the Account Profile has been changed. If not, use the
current user name and password instead of the defaults.
To set the User and Admin Account Logins:
1.
From any page in the site, click the Administration link.
2.
Under Account Profile / Site Security, click Authentication.
The Account Profile / Site Security page opens.
3.
Enter the new user name in the New Username field.
APWeb Instruction Manual
5
Initial APWeb Setup by Network Admin
4.
Enter the new password in the New Password field, and confirm by reentering it in the next field.
5.
Click Submit.
6.
Under Change Administration Account Login, enter super in both the Admin Username and Admin
Password fields, and then enter the new information in the applicable fields.
7.
Click Submit.
Executing a Test Switch with the XBar
We recommend executing a test switch with the XBar Controller (see below) or with BCS commands
(see page 7).
Before executing the test switch, make sure the first two source devices and the first two destination
devices are connected to the input and output connectors exactly as shown in the “AutoPatch Connector
Guide” for the routing system. Depending on the signal and connector type, you may need to attach more
than one input and output for a signal (e.g., a Y/c signal routed over two BNC connectors; one for Y and
one for c).
Note: For complete information on the XBar Controller, see page 17.
The test switch below routes Input (source channel) 2 to Output (destination channel) 1 on VM 0
(normally the All virtual matrix of audio-follow-video). If the system does not have a VM 0, use the VM
in the VM title block. (For directions on changing VMs, see page 18).
To execute a test switch with the XBar:
1.
Install the Java Plug-in* if necessary. (The plug-in is required before the XBar Controller can be
used.)
2.
From any page in the site, click the Controller link.
The XBar launches.
VM title block
(click to select virtual matrix)
Click crosspoint for test switch
Status bar
3.
Click the blue crosspoint for Input 2 and Output 1.
(Inputs are on the left; outputs are across the top.)
The blue crosspoint image turns red as the switch is routed.
* The Java Plug-in must be installed on your PC before the XBar Controller will work. This free Java
software may be downloaded from http//www.java.com (administrative login to the PC may be required
to install the Java Plug-in).
6
APWeb Instruction Manual
Initial APWeb Setup by Network Admin
To disconnect the test switch with the XBar:
1.
Click the red crosspoint.
The red crosspoint image turns blue as the test switch is disconnected.
Executing a Test Switch with BCS
We recommend routing a test switch with BCS (Basic Control Structure) commands on the Diagnostics
page (see below) or with the XBar Controller (see page 6).
Note: The Diagnostics page also displays Communication Statistics and provides access to a Telnet
session for controlling the routing system with BCS commands (see page 16).
Test BCS string field
Communication Statistics table
Telnet Session button
FIG. 4 Diagnostics page
Note: If you are not familiar with BCS (Basic Control Structure) commands, see the “BCS Protocol
Instruction Manual” on the AMX AutoPatch CD or at www.amx.com.
BCS commands are not case sensitive.
Before executing the test switch, make sure the first two source devices and the first two destination
devices are connected to the input and output connectors exactly as shown in the “AutoPatch Connector
Guide” for your matrix switcher. Depending on the signal and connector type, you may need to attach
more than one input and output for a signal (e.g., a Y/c signal routed over two BNC connectors; one for
Y and one for c).
The following test switch routes Input 1 to Output 2 on Level 0. If the system does not have a VM 0,
use the level indicated on the “AutoPatch Connector Guide.”
To send a test BCS command:
1.
From any page in the site, click the Diagnostics link.
2.
Enter CL0I1O2T (Change Level 0, Input 1 to Output 2, Take) in the BCS string field.
3.
Click Send.
The system response for the command displays directly under the BCS string field. When the exact
command that was entered appears, the command has been successfully executed.
APWeb Instruction Manual
7
Initial APWeb Setup by Network Admin
Customizing the Site
The APWeb site can be customized in several different ways. This section covers customizing the site
name, access to product services, and bootup operations. Customizing the control options is covered in
the next section (see page 10).
Customizing the Site Name
The site name for the APWeb server can be customized at the APWeb Configuration page. Customizing
the site name can be especially useful when accessing multiple AMX AutoPatch Routing Systems from
multiple APWeb servers on one PC.
To customize the site name:
1.
From any page in the site, click the Configuration link.
2.
Under Set APWeb Site Name, enter the new name (36 character limit, excludes: = ’ \ ? < >).
3.
Click Apply. The new name appears at the top of all the pages within APWeb.
Enabling/Disabling Product Services
APWeb can be customized for additional access to the system using any or all of three different means
(Telnet, XNNet tunnel, and BCS tunnel). These means can be enabled or disabled from the
APWeb Administration page. The default for all three is on.
Account Profile / Site Security
Enable / Disable Product Services
Configure APWeb Settings
FIG. 5 APWeb Administration
Note: The APWeb Administration page also provides access to the Account Profile /
Site Security page (see page 5).
To enable or disable product services:
1.
From any page in the site, click the Administration link.
2.
Select the access service (see below), and click Apply. A prompt to reboot appears.
3.
Click Ok. (A reboot is required to implement the changes.)
Telnet – check this option to be able to open a Telnet client application, such as
HyperTerminal, to access and control the system. This option must be enabled before
establishing a Telnet session with APWeb. If this option is turned off, the Launch Telnet
Session button will not be available on the Diagnostics page.
8
APWeb Instruction Manual
Initial APWeb Setup by Network Admin
XNNet Tunnel (not supported on all systems) – check this option to be able to open a
Tunneling Access Point (TAP) for AMX AutoPatch’s proprietary XNNet configuration
protocol. With this service turned on, XNConnect configuration software can be used to
discover and configure the attached routing system over TCP/IP. When site security is turned
on, the Admin user name and password are required to log into this service. Be sure to change
the XNNet Tunnel Port number if you plan on using a different one than the default (3500).
BCS Tunnel – check this option to be able to open a Tunneling Access Point (TAP) for
entering BCS control commands. This is especially useful for third-party controllers, which
can control the attached routing system using IP connectivity.
Unlike all other access points in APWeb, the BCS tunnel is not authenticated, even if site
security is turned on.
We strongly recommend that this service be turned off when not in use. (Note that disabling this
option will also disable the Device Discovery UDP Beacon Service which allows an AMX
AutoPatch Duet control module to connect to APWeb.) Be sure to change the BCS Tunnel Port
number if you plan on using a different one than the default (3600).
Customizing Bootup Operations
During bootup, APWeb discovers configuration data that is stored on the attached routing system
(does not apply to heritage systems; see page 13) and displays it. Several options are available for
customizing bootup operations from the APWeb Configuration page.
Important: Any time you perform a reboot from the APWeb site, the APWeb server reboots. The
reboot updates information between the AMX AutoPatch Routing System and the APWeb server.
The AMX AutoPatch system itself does not reboot.
To customize bootup operations:
1. From any page in the site, click the Configuration link.
The APWeb Configuration page opens.
2.
Under Bootup Operations, select (or unselect) the options (see below) to determine which parts
(if any) of the configuration to retrieve during APWeb bootup.
3.
After all selections are made, click Apply and reboot when prompted.
Bootup Operations Options
Discover System Configuration: This higher-level option must be selected before the three
sub-options for discovery are available. The sub-options are not dependent on each other;
any or all of them can be selected at any time. (For heritage systems, turn option off.)
The default setting for this option is on.
If the setting is off, APWeb will not make any retrieval attempts from the attached system
during a reboot; instead, it will display whatever was in memory the last time it was running.
Force VM Discovery: Check this option to force APWeb to query the attached system for
its virtual matrix (VM) definitions and to replace any existing VMs in memory.
The default setting for this option is on.
When this option is off, APWeb reuses the stored VM definitions upon bootup.
Discover Channel Names (not supported on all systems): Check this option for APWeb to
query the attached system for the channel names on all VMs. The custom channel names
will then be displayed in the XBar instead of the default names. This process can take a
noticeable amount of time, depending on the size of the system’s configuration.
The default setting for this option is on.
Since channel names are not stored in memory, they are lost when APWeb is shut down.
Check this option if you want the custom names displayed in the XBar.
APWeb Instruction Manual
9
Initial APWeb Setup by Network Admin
Channel names are defined in XNConnect and will appear truncated in the XBar.
To display the full 23-character channel names in the XBar, see below.
Discover Hardware Devices: Check this option for APWeb to query the attached system
for its hardware devices.
The default setting for this option is off.
Since hardware information is not stored in memory, it is lost when APWeb is shut down.
Be sure to check this option if you want the hardware information displayed on the Home
page.
Customizing the Control Options
APWeb’s two options for controlling an AMX AutoPatch Routing System are the XBar Controller and
custom macros (switches that execute simultaneously).
Customizing the XBar
The XBar displays the crosspoints for the input and output channels. The options for customizing the
XBar are:
Customizing and displaying channel names
Enabling audio control in the XBar
Setting the size of the XBar window
Setting the initial virtual matrix (VM) for XBar control
Customizing and Displaying Channel Names
Instead of using the default names, you can use custom channel names for the XBar if they have been
created in XNConnect. XNConnect is the software program for working with the configuration file for
AMX AutoPatch Routing Systems. Once the names are customized in XNConnect, the configuration file
must be loaded to the system (see the Help file for instructions).
The names will be truncated unless you want to display their full 23-character names. To display
customized names in the XBar, complete Step 1 below. To display the full customized channel names,
complete all five steps.
To display the full customized channel names in the XBar:
1.
From any page in the site, click the Configuration link.
Under Bootup Operations, make sure that Discover Channel Names is selected. (If not selected,
see page 9.)
2.
From any page in the site, click the Controller link.
The XBar launches.
3.
Click the VM title block in the upper left corner.
The VM Selection Pad dialog box opens.
Display full names
10
4.
Click the Display full names check box.
5.
Close the VM Selection Pad dialog box.
The full channel names display in the XBar.
APWeb Instruction Manual
Initial APWeb Setup by Network Admin
You also have the option of displaying channel numbers instead of channel names.
To remove customized channel names in the XBar:
1.
From any page in the site, click the Configuration link.
2.
Under Bootup Operations, unselect Discover Channel Names.
3.
Click Apply, and reboot when prompted to do so.
Only the channel numbers will display in the XBar.
Enabling Audio Control
If the system has audio, volume and input gain controls are available from the XBar; however, they must
be enabled first from the APWeb Configuration page.
Important: If the system does not have audio, volume and input gain must not be enabled.
To enable audio control in the XBar:
1.
From any page in the site, click the Configuration link.
2.
Under Audio Support, select Allow Gain Control and/or Allow Volume Control.
3.
Click Apply. The next time the XBar is launched, the enabled audio features are available.
After audio adjustments are made, you can disable one or both of these features so the user cannot
change the settings (the adjusted settings will remain in effect until the audio control option is enabled
again and new adjustments are made).
Setting the Size of the XBar Window
The size of the XBar applet can be changed from the APWeb Configuration page. The default size for
the window is 800x580 (minimum = 300x300, maximum = 2000x2000). You may need to experiment a
little to find the optimal display size for your PC.
To set the size of the XBar applet window:
1.
If the XBar is open, close before proceeding.
2.
From any page in the site, click the Configuration link.
3.
Under Window Size, enter the desired width and height for the window.
4.
Click Apply. The next time the XBar is launched, it will open at the new setting size.
Setting the Initial VM to Display
From the APWeb Configuration page, the initial virtual matrix can be set for executing switches. The
VM is displayed in the VM title block in the upper left corner of the XBar. The default VM for executing
switches that will display for all XBar Controllers that are launched for the system can be specified on
the APWeb Configuration page.
To set the initial virtual matrix that will display in the XBar:
1.
From any page in the site, click the Configuration link.
2.
Under Initial VM Displayed, enter the virtual matrix number.
Note: If you want the default VM to be the first virtual matrix discovered during bootup (no matter
what its number), enter a value of -1.
3.
Click Apply. The next time the XBar is launched, the newly designated default VM will display in
the VM title block.
APWeb Instruction Manual
11
Initial APWeb Setup by Network Admin
Creating/Editing Macros
A macro is a sequence of BCS (Basic Control Structure) control commands that are executed
simultaneously. Up to 50 macros can be created on the Create/Edit Macro page and executed from the
Execute Macro page. (A macro can contain up to 63 individual command characters).
Note: If you are not familiar with BCS (Basic Control Structure) commands, see the “BCS Protocol
Instruction Manual” on the AMX AutoPatch CD or at www.amx.com.
APWeb macros should not be confused with local presets (called macros on some systems) or with
global presets. Local presets are defined using XNConnect; global presets are defined using BCS
commands or a control panel. Both types of presets are stored on the distribution matrix. APWeb macros
are defined and stored on APWeb and cannot be executed from other control points (e.g., control panels,
HyperTerminal, etc.). APWeb macros can, however, include preset commands that were defined
elsewhere (see the example below). Since a global preset replicates a predefined total system state, its
command string should not be in an APWeb macro command that includes other BCS commands.
A macro BCS command (not case sensitive) is one or a series (shown in the first example below) of
complete BCS commands. Do not enter a space (or any other character) between the “T” ending one
command and the start of the next command.
Macro Examples
BCS Command
Action
CL0I2O7TCL0I5O21 23 24T
Creates a macro that switches Input 2 to Output 7 and Input 5 to
Outputs 21, 23, and 24 on Level 0
R7T
Creates a macro to execute global preset 7 (defined on control panel)
Specify Macro Contents
Delete Macro
FIG. 6 Create/Edit Macro page
We recommend writing down the BCS command(s) used for each macro, as the contents of a macro
cannot be retrieved after it is created. We also suggest making the names of the macros very descriptive
(so the user can easily determine what the macro switches) and providing the user with a list of macro
names with descriptions of each macro’s contents.
12
APWeb Instruction Manual
Initial APWeb Setup by Network Admin
To create a macro:
1.
From any page in the site, click the Create Macro link.
2.
Enter the BCS commands (63 character maximum) in the BCS String field.
3.
Enter a unique name up to 23 characters for the macro in the Macro Name field.
4.
Click Create. The macro is added to the list on the Execute Macro page.
Tip: A macro can be created to disconnect the switches in an existing macro.
The contents of a macro can be redefined at the Create/Edit Macro page.
To redefine the contents of an existing macro:
1.
From any page in the site, click the Create Macro link.
2.
Enter the new BCS commands in the BCS String field.
3.
Enter the exact name of the macro which is being redefined in the Macro Name field.
4.
Click Create. The macro now contains the new information.
Macros can also be deleted from the Create/Edit Macro page.
To delete a macro:
1.
From any page in the site, click the Create Macro link.
2.
Under the Delete Macro section, select the macro to be deleted from the macro list.
3.
Click Delete. The macro is removed from the list on the Execute Macro page.
Defining Virtual Matrices (Manually Configuring VMs)
Normally, APWeb loads the VM (configuration) information from the AMX AutoPatch Routing System.
However, it is possible to manually specify the virtual matrices in APWeb. With this feature you can
provide selective access to the system for control. This feature is also used when controlling heritage
systems. (For a list of currently supported products, see the Release Notes.)
The Define VM (Manual Configuration) page allows you to define the virtual matrix by specifying
a VM number and VM name and to enter the number of inputs and outputs for the system.
Specify VM Parameters
Delete VM
FIG. 7 The Define VM (Manual Configuration) page is used for defining virtual matrices
APWeb Instruction Manual
13
Initial APWeb Setup by Network Admin
When entering the number of the new virtual matrix (VM), apply the following rules:
VM Numbering Rules
Must be a unique VM number (cannot be a duplicate).
Must match the level numbers on the routing system, for example:
All (audio-follow-video) virtual matrix (VM) = 0
Video virtual matrix (VM) = 1
Audio virtual matrix (VM) = 2
Must match the level numbers on heritage systems for control purposes.
Important: When you specify the number of inputs and outputs for a VM, they will always
correspond to the first inputs and outputs in the system. For example, if you want to create a VM that
only provides access to 16 outputs in a system with 48 outputs, they will be the first 16 outputs.
To manually define a virtual matrix (VM):
1.
From any page in the website, click the Configuration link.
2.
Under Bootup Operations (Discover System Configuration must be selected), unselect the Force
VM Discovery option.
3.
Click Apply and reboot when prompted.
4.
From any page in the website, click the Define VM link.
5.
If desired or required, delete the existing VM definitions first (see the instructions below).
6.
Enter a VM number (follow the Numbering Rules above).
7.
Enter the corresponding VM name (e.g., All (for audio-follow-video), Video, or Audio).
8.
Enter the number of inputs and outputs for the system (e.g., No. Inputs 48, No. Outputs 16).
9.
Click Create.
The VM is added to the drop down list in the VM Selection Pad dialog box for the XBar, to the
Home page, and to the list of VMs under the Delete VM section.
Note: Deleting a VM that corresponds to one of the preconfigured levels on the routing system will
remove it from the APWeb server but not from the routing system itself. To recover the preconfigured
levels, turn VM discovery back on (reselect the Force VM Discovery option). When APWeb is
rebooted, the virtual matrices from the system will be retrieved and replace the manually configured
ones in the list. (This note does not apply to heritage systems.)
To delete an existing virtual matrix (VM):
14
1.
From any page in the website, click the Define VM link.
2.
Under the Delete VM section, select one or more VMs to be deleted from the VM list
(to multi-select, hold down the Control key on your PC as you click each VM).
3.
Click Delete.
The VM is removed from the list (and is also removed on the Home page and from the drop down
list in the VM Selection Pad dialog box for the XBar).
APWeb Instruction Manual
Initial APWeb Setup by Network Admin
Handling Security Issues
APWeb’s system security limits access to the site. The security setup is explained on page 5.
We recommend that the following security measures be followed:
Leave system security turned on (the default setting).
Place the APWeb server site inside your network firewall.
Set the account profiles as part of the initial setup (see page 5).
Deploy APWeb in a secure LAN environment.
If extra precaution is necessary, lock the enclosure(s) in a secure location.
Caution: Even if the site security is turned on, the BCS tunnel is not authenticated. We strongly
recommend that this service be turned off when not in use (see page 8).
Turning System Security Off
The option to turn system security on or off is on the Account Profile / Site Security page (accessed by
clicking the Authentication button on the APWeb Administration page).
To turn system security off:
1.
From any page in the site, click the Administration link.
2.
Under Account Profile / Site Security, click Authentication.
The Account Profile / Site Security page opens.
3.
Under Disable Site Security, enter the Admin user name and password (Admin default – super and
super).
4.
Click Turn Security Off.
System security is turned off.
To turn system security back on:
1.
Repeat Steps 1 through 3 above.
2.
Click Turn Security On.
System security is turned on.
Resetting the User Name & Password
If any of the client-defined user names and passwords are lost, the Service switch below the TCP/IP
(RJ-45) connector can be used to reset them to the default values (all values including those for the
IP Address and Subnet Mask are reset in the process). When the switch is flipped down or to the left
(depending on its orientation on the module or expansion board), it is set for normal functioning. As long
as security is turned on (the default setting), a password is required to access the APWeb server. When
the Service switch is flipped to the up or to the right (FIG. 8 on page 16), it is set for Service mode and
the APWeb server is disabled.
Caution: The steps on the following page will also automatically reset the default values for the
IP Address and Subnet Mask.
APWeb Instruction Manual
15
Initial APWeb Setup by Network Admin
To reset the user name and password to their default values:
1.
Flip the Service switch up or to the right to place it in Service mode (FIG. 8).
FIG. 8 Service switch in Service mode
2.
Log on to the Admin Home page, using the Admin user name and password (default: super and
super).
3.
From any page in the site, click the Configuration link.
4.
On the APWeb Configuration page, click Reboot APWeb.
5.
Wait approximately 20 to 30 seconds; then flip the Service switch down or to the left to
automatically reboot and return to normal functioning.
6.
Optional – If you do not want to use the default values, enter new user names and passwords by
following the steps on page 5.
7.
Optional – Enter an IP Address and Subnet Mask (see page 4).
Opening a Telnet Session
Important: Before a Telnet session can be opened, the Telnet option must be enabled under the
Enable/Disable Product Services options on the APWeb Administration page (see page 8).
A Telnet session for controlling the routing system with BCS commands can be opened by clicking the
Launch Telnet Session button on the Diagnostics page. The button opens the PC’s default terminal
emulation program (e.g., HyperTerminal on Windows). A Telnet session may also be launched outside
of the APWeb server as a direct connection by specifying the correct IP address and port number.
Note: The Diagnostics page also allows you to enter a test BCS (Basic Control Structure) command
(see page 7) and view Communication Statistics.
Since only one client at a time can initiate a Telnet session, other clients who try to use Telnet or the
XBar Controller will be notified that they cannot control the system until the initial session is closed.
When site security is turned on (the default setting), the Admin user name and password are required to
log into this service.
To open a Telnet session:
16
1.
From any page in the site, click the Diagnostics link.
2.
Click Launch Telnet Session to open your terminal emulation program.
3.
Enter your APWeb Admin user name and password.
The program is ready to accept BCS commands.
APWeb Instruction Manual
Initial APWeb Setup by Network Admin
Executing & Disconnecting Switches
APWeb’s two control points for executing and disconnecting switches on an AMX AutoPatch Routing
System are the crosspoints on the XBar Controller (see below) and the macros on the Execute Macro
page (see page 20).
Executing & Disconnecting Switches on the XBar
The XBar Controller is a graphic interface control panel that executes switches on an AMX AutoPatch
Routing System. The XBar can control specific parts of the system through virtual matrices (VMs).
For example, the XBar can switch audio-follow-video signals on one VM, video on another, and audio
on yet another. The VM selected will determine which virtual matrix is being controlled.
Any APWeb server for a single system can be accessed from up to five PCs at the same time. The XBar
for that system can be operated simultaneously from all of the PCs using the same or different VMs.
Simultaneous XBar users can open the VM Selection Pad and update status as needed. Keep in mind that
executing switches on one VM may affect the routing state on the other VMs.
Note: Multiple independent AMX AutoPatch Routing Systems (each with some type of APWeb
server, e.g., a TCP/IP connector on the CPU, an APWeb expansion board, or a module) can be
controlled from a single PC. Each APWeb server can be assigned a unique IP address and a
custom site name. The individual addresses can then be entered as needed in the browser.
Navigating the XBar Controller
The crosspoint images in the XBar’s crossbar field represent the intersections of the input channels and
the output channels.
Output channels
VM title block
Input channels
Crossbar field with blue
& red crosspoints
Cursor shows crosspoint
I/O pair numbers
Status bar
Use the following features to navigate the XBar:
VM title block – click to open the VM Selection Pad to change the virtual matrix (VM) or
update system status
Input channels (on left) – indicate the numbers of the source channels
Output channels (on top) – indicate the numbers of the destination channels
Blue crosspoint – blue indicates that there is no active signal; click to route the signal
(the crosspoint will remain blue if the switch is not completed)
Red crosspoint – red indicates an actively routed signal; click to disconnect the signal
Cursor over crosspoint – move over I/O pairs to display channel numbers
APWeb Instruction Manual
17
Initial APWeb Setup by Network Admin
To execute or disconnect switches:
1.
From any page in the site, click the Controller link.
The XBar launches.
2.
Optional (to change the virtual matrix) – Click the VM title block in the upper left corner.
The VM Selection Pad dialog box opens. From the VM list, select the new VM. Close the VM
Selection Pad.
Select VM
(virtual matrix)
from list
3.
Click a blue (inactive) crosspoint to execute a switch.
The blue crosspoint image turns red as the switch is routed.
Or
Click a red (active) crosspoint to disconnect a switch.
The red crosspoint image turns blue as the switch is disconnected.
Tip: To select or unselect consecutive crosspoints, hold down the Control key and move the mouse
across the desired crosspoints (do not hold down any of the mouse buttons).
When the XBar is used simultaneously by multiple users or when other control options (such as control
panels or external serial controllers) are also being used, system status can be updated from the VM
Selection Pad.
To update system status when using multiple control points:
1.
Click the VM title block in the upper left corner of the XBar.
The VM Selection Pad dialog box opens.
2.
Click Update Status.
The most current routing state is displayed.
3.
Exit the VM Selection Pad when done.
Adjusting Audio Settings
If the routing system contains audio, both volume and input gain can be adjusted from the XBar
controller after they are enabled (see page 11).
Note: This functionality is only available on VMs that support these functions (most systems use
VM 0 for routing audio-follow-video and VM 2 for routing audio).
Adjusting Volume
The volume feature must be enabled. After volume adjustments are made, you can disable this feature so
the user cannot change the settings (the adjusted settings will remain in effect until the audio is enabled
again and new adjustments are made) or you can leave it enabled for the user.
To adjust volume:
18
1.
From any page in the site, click the Controller link.
The XBar launches.
2.
Check to be sure the selected VM supports audio operations.
If not, see above for selecting VMs.
APWeb Instruction Manual
Initial APWeb Setup by Network Admin
3.
Right click on the output channel (e.g., O_Ch:0004) needing adjustment.
The Audio Control dialog box opens.
4.
Move the slider to adjust the volume (up increases; down decreases) or click the Mute button to
mute or unmute.
5.
Close the Audio Control dialog box.
6.
Repeat Steps 3 through 5 as necessary for additional outputs.
Adjusting Input Gain
The purpose of “Input Gain Control” is to allow input (source) signals of varying amplitudes to be
equalized before they are routed and the volume is adjusted. Equalizing input signals provides a
consistent reference for volume adjustments and eliminates jumps in audio level when routing a new
input to an output.
Typical uses for input gain (the nominal level of the signal from the source device) include switching
consumer and professional grade audio equipment (whose levels can vary noticeably) in the same matrix
switcher. Input gain adjustment is also used for equalizing amplitudes between balanced and unbalanced
source inputs.
Caution: We strongly recommend that input gain adjustments be made only by a qualified dealer or
installer.
The input gain feature must be enabled (see page 11) for use in APWeb. After audio adjustments are
made, we recommend that you disable this feature so the user cannot change the settings (the adjusted
settings will remain in effect until the audio is enabled again and new adjustments are made).
The following steps tell how to adjust input gain as part of the process of equalizing input levels.
To adjust input gain:
1.
From any page in the site, click the Controller link.
The XBar launches.
2.
Check to be sure the VM supports audio operations. If not, you will need to change the virtual
matrix (see page 18).
3.
Route a source (input) to the desired destination (output) by clicking the desired I/O crosspoint.
APWeb Instruction Manual
19
Initial APWeb Setup by Network Admin
4.
Right click on the input channel (e.g., I_Ch:0001) that was just routed.
The Audio Control dialog box opens.
5.
Move the slider to adjust the input gain (up increases; down decreases).
6.
Close the Audio Control dialog box.
7.
Repeat Steps 3 through 6 as necessary for additional sources (inputs) that will be routed to the same
destination (output).
Executing Macros
Once a macro is created for a system on APWeb, it can be executed from any PC with access to the
APWeb server for that system.
Macros are listed after being created
on the Create/Edit Macro page
FIG. 9 Execute Macro page
To execute a macro:
20
1.
From any page in the site, click the Execute Macro link.
2.
Click the macro button for the macro you want to execute.
When the text on the macro button turns green, the macro has successfully executed. (If the text on
the macro button turns red, the macro failed to execute.)
APWeb Instruction Manual
Initial APWeb Setup by Network Admin
**********************************************************
APWeb Connection Information Worksheet
This worksheet is provided for your convenience.
Print or photocopy as many copies of this form as necessary.
Login Names (Required)
Login Names (user name) and Passwords for administrative and user access
are required. (The user names and passwords are case sensitive.)
Addresses (Must Be Supported)
Fixed or Static IP Address: ______ . ______ . ______ . ______
(The default APWeb address is 192.168.0.251)
Subnet Mask: ______ . ______ . ______ . ______
(The default Subnet Mask is 255.255.255.0)
Gateway Address: ______ . ______ . ______ . ______
DNS (Domain Name Server) Server Addresses
Primary DNS Server IP Address: ______ . ______ . ______ . ______
Secondary DNS Server IP Address: ______ . ______ . ______ . ______
TCP/IP
XNNet Tunnel Port: ___________ (default is 3500)
BCS Tunnel Port: ___________ (default is 3600)
**********************************************************
APWeb Instruction Manual
21
Using APWeb
Using APWeb
This chapter starts with four easy steps for connecting to APWeb after the initial setup by the Network
Administrator. It explains how to use APWeb’s two control options for executing and disconnecting
switches: the XBar Controller (a crosspoint interface) and Macros (which are programmed by the
Network Administrator).
Connecting to APWeb
To connect to the APWeb server:
22
1.
Launch a browser (e.g., Internet Explorer or Firefox) on your PC.
2.
Type http://192.168.0.251 (or the address provided by the Network Administrator) in the address
bar of the browser and press Enter.
The Enter Network Password dialog box opens.
3.
Enter the user name and password (both are case sensitive) provided by your Network
Administrator.
The default user name and password are none and none (the actual character string n-o-n-e).
4.
Click OK.
The APWeb Home page opens.
APWeb Instruction Manual
Using APWeb
Home Page
The Home page for APWeb contains information on the system’s virtual matrices (VMs) and the number
of macros currently defined in APWeb. The site name can be customized to uniquely identify your
system (contact your Network Administrator).
Customizable site name
Click for AMX Website
Current virtual matrices
Number of macros defined in APWeb
Links
FIG. 10 APWeb’s Home page
Home Page Links
The links on the left side of the Home page access the pages listed below:
Link
Page
Function
Home
Home
Controller
XBar Controller The controller interface for executing and disconnecting switches (below)
The main page in the APWeb site
Execute Macro Execute Macro
For executing predefined macros (page 26)
Contact Info
Displays the AMX address, phone and fax numbers, and website link
Contact Info
Note: Contact your Network Administrator if you need to change the name of the site.
Executing & Disconnecting Switches
XBar Controller Overview
Switches can be executed and disconnected on the routing system by using the XBar, a graphic interface
control panel. The XBar controls specific parts of the system through virtual matrices. For example, the
XBar may switch audio-follow-video signals on one virtual matrix, video on another, and audio on yet
another. The virtual matrix selected will determine which part of the system is available for control in the
XBar.
An APWeb server provides access to a single routing system from a specific IP address and can be
accessed from up to five PCs at the same time. If you are controlling the same system as other users, you
can open the VM Selection Pad and update status as needed (see page 26). The VM Selection Pad is also
used to change virtual matrices. Keep in mind that executing switches on one virtual matrix may affect
the routing state on the other virtual matrices.
APWeb Instruction Manual
23
Using APWeb
Navigating the XBar Controller
Output channels
VM title block
Input channels
Crossbar field with blue
& red crosspoints
Cursor shows crosspoint
I/O pair numbers
Status bar
The crosspoint images in the XBar’s crossbar field represent the intersections of the input channels and
the output channels.
VM title block – click to open the VM Selection Pad to change the virtual matrix or update
system status
Input channels (on left) – indicate the numbers of the source channels
Output channels (on top) – indicate the numbers of the destination channels
Blue crosspoint – blue indicates that there is no active signal; click to route the signal
(the crosspoint will remain blue if the switch is not completed)
Red crosspoint – red indicates an actively routed signal; click to disconnect
Cursor over crosspoint – move over I/O pairs to display channel numbers
Executing & Disconnecting Switches on the XBar
Use the following directions to control the routing system from the APWeb site.
To execute or disconnect switches with the XBar:
1.
From any page in the site, click the Controller link.
The XBar launches.
2.
Optional (to change virtual matrix) – Click the VM title block in the upper left corner.
The VM Selection Pad dialog box opens.
3.
From the VM list, select the new virtual matrix.
4.
Close the VM Selection Pad.
Select VM
(virtual matrix)
from list
24
APWeb Instruction Manual
Using APWeb
5.
Click a blue (inactive) crosspoint to execute a switch.
The blue crosspoint image turns red as the switch is routed.
Or
Click a red (active) crosspoint to disconnect a switch.
The red crosspoint image turns blue as the switch is disconnected.
Tip: To select or unselect consecutive crosspoints, hold down the Control key and move the mouse
across the desired crosspoints (do not hold down any of the mouse buttons).
Adjusting Volume
If the system supports audio and the volume adjust feature is not working, verify with the Network
Administrator that it has been enabled.
Note: This functionality is only available on VMs that support volume adjustment (most systems use
VM 0 for routing audio-follow-video and VM 2 for routing audio).
To adjust volume:
1.
From any page in the site, click the Controller link.
The XBar launches.
2.
Check to be sure the selected VM supports audio operation.
If not, see page 24 for selecting VMs (virtual matrices).
3.
Right click on the output channel (e.g., O_Ch:0004) needing adjusting.
The Audio Control dialog box opens.
4.
Move the slider to adjust the volume (up increases; down decreases) or click the Mute button to
mute or unmute.
5.
Close the Audio Control dialog box.
6.
Repeat Steps 3 through 5 as necessary for additional outputs.
APWeb Instruction Manual
25
Using APWeb
Updating Status on the XBar
The XBar can be updated from the VM Selection Pad to show changes in system status. This can be
helpful when the XBar is used simultaneously by multiple users or when other control options (such as
control panels or external serial controllers) are also being used.
To update system status when using multiple control points:
1.
Click the VM title block in the upper left corner of the XBar.
The VM Selection Pad dialog box opens.
2.
Click Update Status.
The most current routing state is displayed.
3.
Close the VM Selection Pad.
Executing Macros
A macro is a sequence of control commands that are executed simultaneously. Macros can be executed
on the routing system from the Execute Macro page.
Macro list
FIG. 11 Execute Macro page
Note: If you need additional macros, contact your Network Administrator.
To execute a macro:
26
1.
From any page in the site, click the Execute Macro link.
2.
Click the macro button for the macro you want to execute.
When the text on the macro button turns green, the macro has successfully executed.
(If the text on the macro button turns red, the macro failed to execute. Click again. If still not
successful, contact your Network Administrator.)
APWeb Instruction Manual
Additional APWeb Info for Network Admin
Additional APWeb Info for Network Admin
This chapter contains information on embedding the XBar applet (see below) and on changing the proxy
setting (see page 28).
Embedding the XBar Applet
The XBar applet can be embedded in a custom website by using the applet tag shown below.
Make any of the following adjustments to the code to fit your particular system’s requirements.
Replace the code base value with the IP address for your system if it is different than the
default IP address.
Set the width and height for the display based on the initial virtual matrix size (smaller VMs
look fine in a smaller size, while larger VMs require a larger size to minimize scrolling).
Optional – Specify the "InitialVM" value, or the lowest numbered VM will display by default.
Optional – Include the "VMLockDown" information if you want to limit control to a
particular virtual matrix; otherwise, all virtual matrices will be accessible from the VM title
block. Specify "locked" or "unlocked" for the value. The XBar defaults to the unlocked state
if this option is not included in the tag.
Optional – Specify the "AllowGain" value, if you want the input gain adjustment feature
enabled. Specify "true" for the value.
Optional – Specify the "AllowVolume" value, if you want the output volume adjustment
feature enabled. Specify "true" for the value.
Important: If you do not want either or both of the “Allow Gain” and “Allow Volume” options, omit
those parameter(s) entirely.
XBar Applet Tag
<HTML>
<BODY>
<!-- Your custom html code goes here. -->
<APPLET code="CrossBar.class" codebase="http://192.168.0.251"
archive="CrossBar.jar" width=400 height=500 >
<param name = "InitialVM" value = "0">
<param name = "VMLockDown" value = "locked">
<param name = "AllowGain" value = "true">
<param name = "AllowVolume" value = "true">
</APPLET>
</BODY>
</HTML>
APWeb Instruction Manual
27
Additional APWeb Info for Network Admin
Changing the Proxy Setting
If the Enter Network Password dialog box does not open during setup, try the following APWeb
troubleshooting strategies:
Check all power, signal, and link connections.
Check the Link indicator LED on the TCP/IP connection on the APWeb module (or expansion
board).
If the indicator is not illuminated, check the cable type. An RJ-45 crossover cable is required
from the TCP/IP connector to a PC, and an RJ-45 straight-through patch cable is required
from the TCP/IP connector to a network/hub.
Ping the system (at the DOS prompt enter: ping 192.168.0.251).
Try connecting to the APWeb server again.
If the Enter Network Password dialog box still does not open, you may need to add an exception in the
Proxy Setting dialog box (see below) and try connecting again.
The following instructions apply to Internet Explorer. To change these settings in another browser,
consult its Help file.
To add an exception to the proxy setting information:
1.
28
From the Tools menu on the browser, select Internet Options.
The Internet Options dialog box opens.
APWeb Instruction Manual
Additional APWeb Info for Network Admin
2.
Select the Connections tab.
3.
Click LAN Settings.
The Local Area Network (LAN) Settings dialog box opens.
If the Proxy server box is checked, go to Step 4.
If the Proxy server box is not checked, check it before going to Step 4.
Proxy server box must be checked
APWeb Instruction Manual
29
Additional APWeb Info for Network Admin
4.
Click Advanced.
The Proxy Settings dialog box opens.
Enter APWeb IP address
30
5.
In the Exceptions field, enter the appropriate APWeb IP address (the default is 192.168.0.251).
6.
Click OK to exit each of the dialog boxes used in these steps.
APWeb Instruction Manual
AMX. All rights reserved. AMX and the AMX logo are registered trademarks of AMX. AMX reserves the right to alter specifications without notice at any time.
©2009
2/09
It’s Your World - Take Control™
3000 RESEARCH DRIVE, RICHARDSON, TX 75082 USA • 800.222.0193 • 469.624.8000 • 469-624-7153 fax • 800.932.6993 technical support • www.amx.com