1
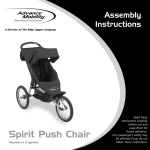
Assembly instructions
for Tailwind Trailer and
Switchback Trailer Hybrid
1
Amazing Quick Fold
System
2
1
1
2
2
3
(patented)
3
3
Switchback Trailer/Hybrid
These products comply with ASTM F1975-02
Tailwind Trailer
Read these instructions carefully
before use and keep them
for future reference.
Your children’s safety
may be affected if you
do not follow these instructions.
Safety GuidElines
• WARNING: Avoid serious injury from falling or
sliding out. Always use safety harness(es).
•W
ARNING: Do not use with children who
exceed the weight limitations.
• Always use the crotch strap(s) in combination
with the waist belt(s).
• WARNING: Do not use cleaning solvents;
clean only with mild soap and water
• WARNING: Securely attach hitch and safety
strap prior to use. Failure to do so can cause an
accident and result in a serious injury.
• CAUTION: Allow extra clearance when making
turns, wide turning radius is required.
Do not turn sharply.
• WARNING: Do not install a car seat or any
other seating device not approved by the
manufacturer inside this trailer.
• This unit sits one to two passengers. When
used with one passenger, the passenger
must be seated in the center position.
• WARNING: Make no modifications to this
trailer.
• Always use flag for increased visibility.
• WARNING: Do not allow any of the child’s body,
clothing, shoe laces, or toys to come in contact
with moving parts.
• WARNING: Never leave child unattended in the
trailer.
• WARNING: A reflector that complies with
CPSC regulations shall be visible on the rear
of the trailer.
• WARNING: Before each ride, ensure the
attached trailer does not interfere with braking,
pedaling, or steering of the bicycle.
• WARNING: Never ride bicycle at night
without adequate lighting. Obey all local legal
requirements for lightning. Failure to comply
with the manufacturer’s instructions can lead to
serious injury or death of the passenger/rider.
• Make sure your bicycle brakes work properly.
Braking distance is increased when pulling
a trailer.
• Maximum weight capacity – 100lbs (45 kg)
(combined passenger(s) and baggage weight.)
• Not for use at high speed, do not exceed 10mph.
Slow down to less than 6 mph around corners.
• Children must be at least 12 months and able
to sit upright unassisted to ride in trailer.
• Passenger must wear a CPSC or CE approved
bicycle helmet when riding in trailer.
• Check tire pressure before each use. Refer to
the number on the tire wall for the optimum
tire pressure for your tires.
• We strongly recommend that the bicycle on
which the trailer will be attached to, undergo
a safety check by a qualified bicycle mechanic
before attaching the trailer to it.
Frame
2 Before unfolding trailer frame, you will need
to unsnap storage straps on both sides.
These are located near the trailer handle.
1
S et wheels aside for now.
3 Flip trailer frame so handle
is laying on top.
4 Pull handle up until frame locks into place.
Warning: Ensure that all locking devices are engaged before use.
Failure to do so could cause the Trailer to collapse.
Rear Wheels
• To install rear wheel, gently slide
the wheel’s rear axle into the
trailer’s axle end until you hear it
click into place.
• To remove rear wheels, simply
push the red release button on
the trailer’s rear axle while pulling
the wheel out.
IMPORTANT: To ensure the wheel is
properly secured to the frame, test by
trying to pull the wheel out after installing.
Tow Bar
Tow Bar
1 Locate tow bar under front end of
trailer frame.
2 Pull tow bar up and to the side.
3 Insert tow bar into frame bracket by pushing down on the tow bar’s quick release skewer.
Once the quick release skewer has popped into place, secure tow bar by pressing quick
release lever until it is locked into position.
(To ensure tow bar is properly secured, test by pushing inward.)
Warning: Failure to lock Tow Bar’s Quick Release Skewer properly to the frame
could cause an unstable condition resulting in serious injury or death.
Securing Hitch to Bicycle
If your rear wheel bicycle has a quick release skewer please skip to page 5.
Rear Wheel With Lock Nut
1
Remove lock nut (turning counterclockwise)
from bicycle’s rear wheel hub.
The adaptor piece isn’t needed on this
style hub, you may want to store it for
future need.
2
Mount hitch to bicycle’s rear wheel
bolt with lock nut and tighten (turning
clockwise) using a wrench while holding
the hitch in place to prevent it from
moving.
IMPORTANT: We strongly recommend that the bicycle on which the trailer will be attached,
undergo a safety check by a qualified bicycle mechanic before attaching the trailer.
Warning: FAILURE TO PROPERLY TIGHTEN LOCK NUT TO BICYCLE COULD CAUSE
HITCH FAILURE AND WHEEL LOSS RESULTING IN A SERIOUS INJURY OR DEATH.
Securing Hitch to Bicycle
If your rear wheel bicycle has a lock nut, please follow instructions on page 4.
Rear Wheel With Quick Release Skewer (Use only a standard Chromoly steel skewer.
Trailer mounting bracket is not designed for use with lightweight or speciality skewers.)
Adaptor
Hitch
1 Remove the quick
release skewer
from bicycle’s rear
wheel hub.
2 Insert skewer through
adaptor and mounting
hole in the hitch.
You will find the adaptor
secured to the hitch.
IMPORTANT: We strongly recommend that the bicycle on
which the trailer will be attached, undergo a
safety check by a qualified bicycle mechanic
before attaching the trailer.
3 Secure hitch and adapter
piece using the quick
release skewer to bicycle’s
rear wheel and tighten
skewer by securing the nut
on the opposite side until
finger tight. You will need
to hold the hitch in place
to prevent it from moving.
Continue on page 6
Warning: FAILURE TO PROPERLY TIGHTEN BICYCLE’S QUICK RELEASE SKEWER COULD
CAUSE HITCH FAILURE AND WHEEL LOSS RESULTING IN A SERIOUS INJURY OR DEATH.
Securing Hitch to Bicycle
3 Now you will need to prepare the tow bar so that it can connect to the hitch already
on the bicycle. Release the trailer’s quick release pin from tow bar.
4 Insert tow bar into hitch and secure with trailer quick release pin.
5
6
Release safety strap from tow bar by unclipping from storage peg and metal D-Ring.
Wrap safety strap around bicycle frame and clip it back to the metal D-Ring on the tow
bar. (The quick release lever should face to the rear of the bike to prevent it from getting
accidentally caught on something and opening.)
Warning: Do not use the hitch if you cannot properly install the back-up
safety strap to your bicycle.
Failure to properly install and tighten quick release skewer or axle nut could
cause hitch failure and wheel loss resulting in a serious injury or death.
Do not ride without a flag. Failure to use high visibility flag could result
in an otherwise avoidable accident.
Storing Tow Bar
1 Lay trailer back so it is resting on handle with front end in the air. Secure tow bar under
trailer making sure to push down at center of tow bar until it clicks into place and the
lock lip is over the tow bar.
2 To store the trailer quick release pin,
insert pin into front of trailer as shown.
(To secure safety strap clip safety strap back
onto the metal D-ring and secure back to
storage peg. Refer to SECURING HITCH TO
BICYCLE, step 5)
Front Wheel
Applies to Switchback
Trailer Hybrid Model Only
when in stroller mode
Front Wheel Fork Legs
1 Tip trailer back on its handle
to reveal the front fork.
2 Slide front wheel fork legs into the closed position until they lock
into place.
Axle Flats
3 Insert front wheel into forktips
Forktips
by aligning the axle flats with the
forktip flats. Secure front wheel to
frame by turning the front wheel
lever while holding the lock nut
on the opposite side. Tighten until
you feel tension on lever and then
flip wheel lever over so that the
word “closed” is visible. The wheel
lever should face the rear of the
trailer to prevent it from getting
accidentally caught on something
and opening up during use.
Continue on page 10
Accordion
Cable Protector
Cable
Guide
Tube
Cantilever
Latch
4 Pull on cable guide with your right hand while pushing the cantilever latch with your thumb.
With your left hand push the other caliper arm toward your right hand and secure cable guide
tube into cantilever latch. You will have to pull the accordion cable protector back in order to see
better when securing the cable guide tube into the cantilever latch.
V-Brake Components
E
D
F
C
B
A
A. Cable Guide Tube (turn pipe)
B. Accordion Cable Protector
C. Easy Fitting Cable Fixing Bolt
D. Cartridge Type Pad
E. Caliper Arm
F. Cantilever Latch
Storing Front Wheel Fork (Switchback Model)
Lock Tab Button
10
Lay trailer back so it’s resting on handle with front end in the air. Remove front wheel.
Release front wheel forks by pushing the lock tab button and sliding forks under trailer.
Hand Brake
Applies to Switchback
Trailer Hybrid Model Only
when in stroller mode
Adjusting
Hand Brake
The hand brake will only
function when front wheel
is attached to trailer.
• To use the parking button
feature, simply squeeze the
brake handle and push the
park brake button.
• If you do not have
Parking
good braking
Button
action, simply
squeeze the brake
handle five or
Cylinder
six times. If the
Small Ring
Ring
problem persists,
loosen the brake’s
cylinder ring to
adjust the small
ring, and then move the small ring away from the handle
to tighten the cable. (Please do not over tighten!) To lock
the rings, tighten the cylinder ring against the handle while
holding the small ring in place.
Rear Wheel Parking Brake
• P ush brake pedal
down to engage
rear parking brake.
• To release rear
parking brake,
simply lift up on
brake pedal.
Warning: Engage rear wheel parking brake before loading
and unloading passenger(s).
11
Safety Flag
2 Insert flag
1 Locate flag and
connect both
parts of flag pole
together.
Flag
Pocket
pole into
flag pocket
located
on the left
side when
standing
behind trailer
making sure
to go in
between the
canopy fabric
and plastic
bracket as
shown.
3 To store and protect safety flag when not in
use, remove safety flag and disconnect the
two poles. Standing behind trailer un-Velcro
canopy’s back flap and flip over top of trailer
to locate flag pouch. Roll flap up and insert
into flag pouch and Velcro pouch closed.
Warning: Do not ride without flag in place.
Failure to use the high visibility flag could
results in an otherwise avoidable accident.
12
Note: Make sure to remove the
safety flag before folding trailer.
Canopy Cover
1 Zip mesh flap all the
way around to keep
child(ren) safe from
flying debris.
2 During cooler weather
use the rain flap
to keep child(ren)
warmer.
3 During warm weather
you can roll rain flap
up. Secure rain flap
by using the elastic
loops on both sides.
4 For more ventilation,
unzip one or both of
the side window vents
and secure them open
with the elastic loops.
Warning: Failure to use the Mesh cover could expose your child(ren)
to flying rocks and other debris. Please make sure to have the mesh cover
closed at all times.
13
Warning: When used with
only one child, the child
should be seated in the
center seating position.
Safety Harness
Plastic Guide
1
1. To make the necessary adjustments to
the safety harness, detach the trailer
seat padding from the back of the
trailer to reveal the webbing straps.
2. To adjust shoulder straps, hold plastic
guide and slide webbing strap to
lengthen or shorten.
3. To make shoulder straps longer, feed
webbing through Tri-Glide and pull on
bottom webbing strap.
4. P ull shoulder strap through seat
padding. Repeat steps 1-4 to remaining
shoulder straps.
14
2
3
5. V
elcro seat padding to back of trailer.
6. To adjust waist straps, feed webbing
through buckles to lengthen or shorten.
7. To adjust crotch strap, feed webbing
through Tri-Glide and slide webbing
strap to lengthen or shorten.
8. S ecure shoulder straps to D-Ring on
crotch strap.
9. S ecure waist straps through the crotch
strap and buckle up.
7
kg)
WEIGHT.)
BRAKING DISTANCE IS INCREASED WHEN PULLING A TRAILER.
• ALWAYS USE FLAG FOR INCREASED VISIBILITY.
ND ABLE
AILER.
PROPER FIVE POINT HARNESS CONFIGURATIONS
Warning: Child(ren) must wear helmets when trailering.
Helmets can prevent or significantly reduce head injury
in event of accident. Check child periodically to ensure
that they have not slipped from correct seating position.
Only passengers who have proper neck strength to hold
head up with helmet and sit upright on their own, should
ride in a bicycle trailer.
ROVED
QUIRED.
LLING
ESS(ES).
BINATION
ONE PASSENGER
TWO PASSENGERS
ichmond, VA 23227 • T: 800.241.1848 • F: 804.262.6277 • www.babyjogger.com
5
4
6
Warning: Failure to properly attach
seat belts could result in serious
injury or death to occupant(s) in the
event of an accident.
Failure to seat a single child in
the center position could cause an
unstable condition causing Trailer
to tip over.
Always adjust shoulder harness
and crotch strap so they meet at
child’s lower chest. Adjusting harness
and buckles near your child’s neck
could cause a serious injury.
8
9
15
Folding
1 Stand in front of trailer to locate the fold handle straps on each side. Pull on fold handles
with a snap and lift up to fold.
2 To keep trailer in the closed
position when folded, secure
storage strap to its partner strap
located on the opposite side of
the trailer frame when folded.
You will need to remove the rear
wheels to secure storage straps.
Replace rear wheels once the
storage straps have been secured.
16
Maintenance and Storage
Hitch Maintenance
Check the hitch and back up safety straps are properly secured to trailer before every ride.
Periodically check the hitch for damage or cracks; if any damage is found do not use trailer!
Any damage/deterioration on any parts of your trailer, should be replaced immediately to
reduce the risk of personal injury. Contact our Customer Service Department at 800.241.1848.
Canopy Care
You can machine wash your trailer’s canopy in cold water, gentle cycle with a mild detergent.
To minimize shrinkage, simply re-attach canopy to frame to dry. (Please do not put canopy
fabric in the dryer!) Be sure to remove the boards from seats before washing. Trailer frame
can be cleaned using a soft, dry cloth, and an occasional spray of household wax will
maintain its healthy glow.
Before Each Ride:
Wheels tightly attached
Tire pressure
Hitch properly secured with safety strap
Maximum load 100lbs (40kg)
B icycle safety check, especially brakes
and tires
Helmets
Safety flag in place
C hildren are securely fastened in
safety harness
Monthly Checklist
Windows
Plastic windows can crack at these low temperatures. If carrier is stored or left out in the cold
weather you will need to let it warm up before folding or assembling unit.
Wheels and Axles
Check wheels for loose spokes and axles before every use. Moisture – especially from the
beach – can rust the wheels, footbrake and parts of frame. Spraying regularly with a silicone
lubricant will keep your trailer looking healthy.
Storage
Store your trailer in a dry, well ventilated area. To avoid mildew, make sure carrier is dry
before storing. Sunshine can fade fabric and dry out tires, so storing your trailer indoors
will prolong its good looks. However if you do store it outside, using a tarp will help protect
against weather wear. Do not store the carrier attached to your bicycle.
Inspect hitch for damage or loose parts
Inspect tow bar for smooth operation:
it should fold and unfold freely.
Inspect frame tubing and hardware
for cracks, damage or loose parts
Inspect tires for wear and cracks
Inspect wheels for trueness, cracks
and bearings for wear
Inspect fabric parts, child seat,
safety harness for any damage
Please contact an authorized Baby Jogger
dealer or distributor for replacement parts if
you find any damage or worn out parts.
Warning: Do not use or store trailer at temperatures below 32°F (0°C), as plastic
connector can become brittle and possibly break, causing accident resulting in
serious injury.
Thank You!
We wish you many happy journeys with your new trailer! Your
trailer is a great product, and we are proud to manufacture it.
If you have any questions or comments, please give us a call at.
1.800.241.1848
Baby Jogger is a Division of Dynamic Brands
8575 Magellan Parkway, Suite 1000 • Richmond, VA 23227
T: 800.241.1848 • F: 804.262.6277
www.babyjogger.com
BJC Trailer 3.1.07