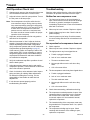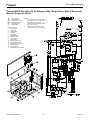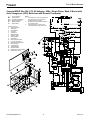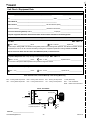
1
Installation and Maintenance Manual IM 447-11 Group: WSHP Part Number: 910153322 Date: April 2014 Legacy Console Water Source Heat Pumps 3/4 to 1½ Ton Unit Sizes 009-019 R-410A Models – For Replacement of McQuay Console Models: WAA, WAF, WAG, WAH, WAS, WAX, WCB, WCQ, WDA, WDB, WDC, WDD, WDE, WDF, WDG, WDH, WDJ, WDL ,WDN, WDS, WDU, WDX, WDY, WDZ, WFQ, WLA, WLB, WLC, WLL, WLZ, WMA, WMB, WMC, WMD, WME, WMF, WMG, WMH, WMJ, WMK, WML, WMM, WMN, WMO, WMP, WMQ, WMR, WMS, WMT, WMU, WMV, WMW, WMX, WMY, WMZ, WSQ, WST, WXA, WXB, WXC, WXD, WXE, WXF, WXG, WXJ, WXK, WXQ, WXS, WXU, WZA, WZC, WZD, WZE, WZF, WZG, WZH, WZK, WZL, WZM, WZP, WZQ, WZS, WZZ People and ideas you can trust.™ Contents Nomenclature . . . . . . . . . . . . . . . . . . . . . . . . . . . . . . . . 4 Multiple Unit Control Panel for Mark IV . . . . . . . . . . 20 Product Identifiers . . . . . . . . . . . . . . . . . . . . . . . . . . . . 5 Field Installed Outside Air Damper (Accessory) . . 21 Physical Data . . . . . . . . . . . . . . . . . . . . . . . . . . . . . . . . 5 Manual Outside Air Damper . . . . . . . . . . . . . . . . . . . 21 Receiving and Storage . . . . . . . . . . . . . . . . . . . . . . . . 6 Motorized Outside Air Damper . . . . . . . . . . . . . . . . . 21 Pre-Installation . . . . . . . . . . . . . . . . . . . . . . . . . . . . . . . 6 Motorized Outside Air Damper Wiring . . . . . . . . . . . 22 General: . . . . . . . . . . . . . . . . . . . . . . . . . . . . . . . . . . 6 Unit Operation Check List . . . . . . . . . . . . . . . . . . . . 23 Unit Location . . . . . . . . . . . . . . . . . . . . . . . . . . . . . . . 7 Troubleshooting . . . . . . . . . . . . . . . . . . . . . . . . . . . . 23 Installing the Unit . . . . . . . . . . . . . . . . . . . . . . . . . . . . 7 Neither fan nor compressor runs: . . . . . . . . . . . . . . . 23 Water Connections . . . . . . . . . . . . . . . . . . . . . . . . . . . 8 Fan operates but compressor does not: . . . . . . . . . 23 Unit Piping Connection . . . . . . . . . . . . . . . . . . . . . . . 8 Compressor attempts to start but doesn’t: . . . . . . . . 24 Shutoff/Balancing Valve . . . . . . . . . . . . . . . . . . . . . . 8 Compressor runs in short cycle: . . . . . . . . . . . . . . . . 24 Suggested Hose Kit Installation . . . . . . . . . . . . . . . . 8 Insufficient cooling or heating: . . . . . . . . . . . . . . . . . 24 Adding Motorized & Valve Assemblies . . . . . . . . . . . 8 Insufficient water flow through condenser: . . . . . . . . 24 Piping . . . . . . . . . . . . . . . . . . . . . . . . . . . . . . . . . . . . . 10 Water drips from conditioner: . . . . . . . . . . . . . . . . . . 24 Cleaning and Flushing System . . . . . . . . . . . . . . . . . 11 Noisy unit operation: . . . . . . . . . . . . . . . . . . . . . . . . 24 Standard Electrical Connection . . . . . . . . . . . . . . . 11 Maintenance . . . . . . . . . . . . . . . . . . . . . . . . . . . . . . . . 25 Cord & Plug Electrical Connection (Field Installed) . . 11 Typical Wiring Diagrams . . . . . . . . . . . . . . . . . . . . . . 26 Operating Limits . . . . . . . . . . . . . . . . . . . . . . . . . . . 13 Typical Mark IV/AC . . . . . . . . . . . . . . . . . . . . . . . . . . 26 Electrical Data . . . . . . . . . . . . . . . . . . . . . . . . . . . . . . 13 Console WSHP Size 009–019, All Voltages, 60Hz / Single Phase, Mark IV Board with Manual Changeover (MCO) . . . . . . . . . . . . . . . . . . . . . . . . . . . . . . . . . . . . 27 General . . . . . . . . . . . . . . . . . . . . . . . . . . . . . . . . . . 13 Operating Voltages . . . . . . . . . . . . . . . . . . . . . . . . . . 13 Unit Electrical Data Table . . . . . . . . . . . . . . . . . . . . . 14 Units with Boilerless System Electric Heat . . . . . . . . 14 Unit Operation – General . . . . . . . . . . . . . . . . . . . . . 15 Mark IV/AC-Control Units . . . . . . . . . . . . . . . . . . . . 15 Motorized Valve & Relay for Unit Sizes 009 to 019 . 16 Control Options on Mark IV/AC Units . . . . . . . . . . . . 17 Thermostat Connection Diagrams . . . . . . . . . . . . . . 18 Programmable Electronic Thermostat Two-Stage Heat/Two-Stage Cool, 7-Day Programmable . . . . . . 18 Dimensions . . . . . . . . . . . . . . . . . . . . . . . . . . . . . . . 18 Specifications . . . . . . . . . . . . . . . . . . . . . . . . . . . . . . 18 Non-Programmable, Auto or Manual Changeover Two Stage Heat/Two Stage Cool, Night Setback Override . . . . . . . . . . . . . . . . . . . . . . . . . . . . . . . . . . 18 Console WSHP Size 009–019, All Voltages, 60Hz / Single Phase, Mark IV Board with Auto Changeover (ACO) . . . . . . . . . . . . . . . . . . . . . . . . . . . . . . . . . . . . 28 Console WSHP Size 009–019, All Voltages, 60Hz / Single Phase, Mark IV Board with Auto Changeover (ACO) Remote Thermostat . . . . . . . . . . . . . . . . . . . 29 Console WSHP Size 009–019, All Voltages, 60Hz / Single Phase, Mark IV Board with Manual Changeover (MCO) Boilerless Constant Fan . . . . . . . . . . . . . . . . 30 Console WSHP Size 009–019, All Voltages, 60Hz / Single Phase, Mark IV Board with Auto Changeover (ACO) Boilerless with Remote Thermostat . . . . . . . 31 Water Source Heat Pump Equipment Check, Test and Start Form . . . . . . . . . . . . . . . . . . . . . . . . . . . . . . 32 Unit Check / Equipment Data . . . . . . . . . . . . . . . . . . 33 Commercial Check, Test and Start Worksheet . . . . . 34 Dimensions . . . . . . . . . . . . . . . . . . . . . . . . . . . . . . . 18 Specifications . . . . . . . . . . . . . . . . . . . . . . . . . . . . . . 18 Optional Remote Sensor . . . . . . . . . . . . . . . . . . . . . . 19 (Used with Thermostats 668375301 & 668375401) . 19 Optional Remote Sensor Installation . . . . . . . . . . . . 19 www.DaikinApplied.com 3 IM 447-11 Model Nomenclature Nomenclature Note: Text displayed in Bold-Italics designate standard offering. Category Product Category Code Item Code Option 01 1 Product Identifier 02 2-4 Design Series (Vintage) 03 5 Code Designation & Description (Bold-Italic = Standard) W = Water Source Heat Pump WXH = WXL = WXM = WXN = WXP = WXR = WXT = WXV = WZB = WZJ = WZN = WZU = WZV = WZW = WZX = WZY = Slope Top Wall Mtd/High Sill/DDC Less Board/Chassis Only Flat Top Wall Mtd/High Sill/DDC Less Board/Chassis Only Flat Top Wall Mtd/Low Sill/DDC Less Board/Chassis Only Flat Top Wall Mtd/High Sill/DDC Less Board Flat Top Wall Mtd/Low Sill/DDC Less Board Slope Top Wall Mtd/High Sill/DDC Less Board Slope Top Wall Mtd/Low Sill/DDC Less Board/Chassis Only Slope Top Wall Mtd/Low Sill/DDC Less Board Flat Top Wall Mtd/Low Sill/Mark IV Flat Top Wall Mtd/High Sill/Mark IV Slope Top Wall Mtd/Low Sill/Mark IV Slope Top Wall Mtd/High Sill/Mark IV/Chassis Only Slope Top Wall Mtd/Low Sill/Mark IV/Chassis Only Flat Top Wall Mtd/High Sill/Mark IV/Chassis Only Flat Top Wall Mtd/Low Sill/Mark IV/Chassis Only Slope Top Wall Mtd/High Sill/Mark IV 2 3 = = Design Series 2 Design Series 3 = = = = 9,000 Btuh Nominal Cooling 12,000 Btuh Nominal Cooling 15,000 Btuh Nominal Cooling 19,000 Btuh Nominal Cooling Nominal Capacity 04 6-8 009 012 015 019 Voltage 05 9 A = 115-60-1 (Size 009 and 012 only) E =208-230/60/1 J = 265/277-60-1 (Size 009 and 015 only) Coil Options 06 10 G = Cupro-Nickel Coax Coil, Geothermal S = Copper-Steel Coax Coil T = Cupro-Nickel Coax Coil W = Copper-Steel Coax, Geothermal Heating Options 07 11-12 00 =None (Not available in 115/60/1 voltage) 20 = 1.0 kW Electric Heat Nominal 30 = 2.0 kW Electric Heat Nominal Note: See Table 7 on page 14 for allowable maximum kW based on voltage selection Hand Orientation 08 13 U =Right V =Left Controls 09 14-15 11 12 13 *Note: Code 00 designed for use with 25 field-installed Alerton control board 00 Discharge 10 16-17 = = = = = Unit-Mounted ACO Unit-Mounted MCO 24V Wall T-Stat Setup Unit-Mounted ACO with Low Limit, NSB and Override None (DDC Less Control)* AA =Top Return Air 11 18-19 13 = 14 = Front (Low sill only) Bottom (High sill only) Power Connection 12 20 A = C = P = Std. Electrical Junction Box Cord (Chassis Only) Power Cord w/Fused Disconnect (Available with cabinet and chassis combination) Color13 21 B = Putty Beige (Flat-top only) C = Cupola White (Slope-top and Flat-top) G = Soft Gray (Flat-top only) I = Antique Ivory (Standard color for slope-top, option for flat-top) Z =None IM 447-11 4 www.DaikinApplied.com Product Identifiers Cabinet Subbase Height Previous Model Replacement Model Slope Top WAH, WDD, WDN WXH ● WDC, WDZ, WXG WXL ● Flat Top – WXM ● WAF, WAX, WDF, WDG, WDL, WDU, WDX, WXC, WXF, WXJ, WXQ, WZK, WZK WXN ● WAA, WDA, WXE WXP ● WAG, WAS, WDH, WDS, WDY, WZC, WZD, WZG, WZH, WST, WDS WXR ● Controls 1DDC Less Board Chassis Only2 ● ● ● ● ● ● ● ● High Sill Low Sill Mark IV ● ● ● ● ● ● ● WDE WXT ● ● ● WDB, WDJ, WXA, WXB, WZL WXV ● ● ● WCB, WLB, WMB, WMJ, WMW, WXD, WXU WZB ● WFQ, WLL, WME, WMF, WMX, WXS, WZF, WZP WZJ ● WLC, WMA, WMP, WSQ, WZA WZN ● WMG, WMN, WZQ WZU ● WZV ● WMC, WMK, WMT, WMU, WZM WZW ● WMD, WML, WMQ, WMV, WZE WZX ● WLA, WLZ, WMO, WMR, WMS, WMY, WMZ, WZS WZY 2 Subbase ● ● ● ● WCQ, WMH, WMM, WXK, WZZ 1 Field-supplied ● ● ● ● ● ● ● ● ● ● ● ● ● ● ● ● ● ● control board not included Physical Data Table 1: Physical Data Unit Size 009 012 015 019 Fan Wheel - D x W (in.) 5-3⁄4 x 9.15 5-3⁄4 x 9.15 6 x 7.8 6 x 7.8 Fan Motor (hp) 1/24 1/15 1/8 1/8 Coil Face Area (ft.2) 1.4 1.4 1.9 1.9 Coil Rows 3 3 3 3 Refrigerant Charge (oz.) 21.5 21.5 33.0 33.5 Filter Size (in.) 9-3⁄4 x 23-3⁄4 9-3⁄4 x 23-3⁄4 9-3⁄4 x 31-3⁄4 9-3⁄4 x 31-3⁄4 Water Connections, Tube (in.) 5/8 O.D. 5/8 O.D. 5/8 O.D. 5/8 O.D. Condensate Connection, I.D. (In.)* Weight, Operating (lbs.) Weight, Shipping (lbs.) 3/4 3/4 3/4 3/4 Cabinet & Chassis 164 166 185 193 Chassis Only 125 127 129 131 Cabinet & Chassis 184 186 215 223 Chassis Only 145 146 153 156 * Condensate hoses are 14″ long. www.DaikinApplied.com 5 IM 447-11 Receiving and Storage Upon receipt of the equipment, check carton for visible damage. Make a notation on the shipper’s delivery ticket before signing. If there is any evidence of rough handling, the cartons should be opened at once to check for concealed damage. If any damage is found, notify the carrier within 48 hours to establish your claim, and request their inspection and a report. The Warranty Claims Department should then be contacted. Do not stand or transport the machines on end. For storing, each carton is marked with “up” arrows. In the event that elevator transfer makes upended positioning unavoidable, absolutely insure that the machine is in the normal upright position for at least 24 hours before operating. Temporary storage at the jobsite must be indoors, completely sheltered from rain, snow, etc. High or low temperatures naturally associated with weather patterns will not harm the conditioners. Excessively high temperatures of 140°F (60°C) may deteriorate certain plastic materials and cause permanent damage. In addition, the solid-state circuit boards may experience operation problems. Note: Care should be taken when handling this equipment. Rough handling can create damage to internal electrical and refrigeration components. IMPORTANT This product was carefully packed and thoroughly inspected before leaving the factory. Responsibility for its safe delivery was assumed by the carrier upon acceptance of the shipment. Claims for loss or damage sustained in transit must therefore be made upon the carrier as follows: VISIBLE LOSS OR DAMAGE Any external evidence of loss or damage must be noted on the freight bill or carrier’s receipt, and signed by the carrier’s agent. Failure to adequately describe such external evidence of loss or damage may result in the carrier’s refusal to honor a damage claim. The form required to file such a claim will be supplied by the carrier. CONCEALED LOSS OR DAMAGE Concealed loss or damage means loss or damage which does not become apparent until the product has been unpacked. The contents may be damaged in transit due to rough handling even though the carton may not show external damages. When the damage is discovered upon unpacking, make a written request for inspection by the carrier’s agent within fifteen (15) days of the delivery date and file a claim with the carrier. IM 447-11 Pre-Installation WARNING The installer must determine and follow all applicable codes and regulations. This equipment presents hazards of electricity, rotating parts, sharp edges, heat and weight. Failure to read and follow these instructions can result in property damage, severe personal injury or death. This equipment must be installed by experienced, trained personnel only. General: Units must be installed in accordance with all applicable codes. To prevent damage, this equipment should not be operated for supplementary heating and cooling during the construction period. Inspect the carton for any specific tagging numbers indicated by Daikin per a request from the installing contractor. At this time, the voltage, capacity and model should be checked against the plans. Check the unit size against the plans to be sure that the unit will be installed in the correct location. Units should be kept in shipping carton until installed. At the time the unit is to be placed in its final position and only then should the carton be removed. Retain the carton and cut away one side and bottom. Take the remaining portion of the carton and place it over the unit. This will insure the unit is protected from paint spotting, dirt, dust and lint that can affect proper unit operation, and will also prevent needless cleaning adding to installation cost. The installing contractor will find it beneficial to confer with other contractors; i.e., plumbing, electrical, pipe fitters, etc., before installing any conditioners. Remove the front panel by removing a screw on each side of the cabinet at the subbase. All piping and electrical wiring should be flexible so that vibrations are not transmitted to the building structure. Ensure all electrical connections are in place and tight. Locate the unit in an area that allows easy removal or accessibility for service personnel to perform maintenance and repair. If units are placed on a concrete floor or other hard surface, it is recommended that the floor be free from all construction debris that may add to the operating noise level of the unit. It is recommended that the unit be placed on rubber matting to prevent distortion and/or vibration. 6 www.DaikinApplied.com Unit Location 5. Using a carpenter’s square and level, make sure unit is level and that it is at a 90-degree angle with the wall and floor. 2. All units are to be installed against a wall. Note: If the floor and wall are not at right angles, it will be necessary to shim the subbase for proper installation. Daikin will not accept responsibility for units that may need to be shimmed. Poor or inadequate installation could create noisy unit operation. 6. The cabinet backwrap has slots on the back flange to mount the assembly to the wall. It is the contractor’s responsibility to select the correct fastener for each unit, using a minimum of three (3) fasteners, Figure 1. 1. Console water source heat pumps are designed to be installed in a controlled environment. 3. Each unit should be located on the architectural plans. The supply, return, and condensation piping should be located accordingly, making sure the piping will fit into the confines of the subbase and cabinet. Installing the Unit WARNING Installation and maintenance are to be performed by qualified personnel who are familiar with local codes and Regulations, and experienced with this type of equipment. 7. After securing the subbase and backwrap assembly in place, insert the chassis if it has been removed. Next, the electrical connection should be made, Figure 2 on page 8 CAUTION Figure 1: Cabinet backwrap & subbase Sharp edges can cause personal injury. Avoid contact with them. 1. Consult job blueprints for unit location. Clean area where unit is to be installed, removing all construction dirt and debris. Backwrap A IMPORTANT Clean unit mounting area of all construction debris. Check that the floor is level and at 90 degrees to the wall. Daikin McQuay recommends the placement of a sound absorbing mat beneath the unit footprint before continuing to the next installation step. Subbase 2. Remove unit from shipping carton and save the carton. Remove the front panel by removing a screw on each end of the cabinet. Lift the cabinet up, forward and off. 3. Each chassis is mounted to cabinet backwrap and subbase assembly by six screws for shipment. Remove four screws, two on each side of the chassis at the subbase. B 10.0"* (245mm) Table 2: Dimensions in inches (mm) STOP!If an outside air damper kit is to be installed, refer to “Field Installed Outside Air Damper (Accessory)” on page 21 for the manual damper or the motorized damper kit and install it now. 4. Position cabinet backwrap and subbase against the wall where unit is to be installed. Ensure adequate room exists for piping and electrical connection in the subbase by checking the connection end of the subbase. www.DaikinApplied.com C 7 Unit Type Unit Size A B C Standard Height 009-012 46 (1168) 45 (1143) 25 (635) 015-019 54 (1372) 53 (1346) 25 (635) Note: *Total unit is 10-3/4″ (273mm) deep. The cabinet extends beyond the subbase 1/4″ (6mm) in the back and 1/2″ (14mm) in the front. IM 447-11 Figure 2: Chassis (Left-hand slope top unit shown) Escutcheon Plate Control Diagram Air Coil Compressor/Control Box Access Cover Water Return W ater Supply All Pipe Fittings Are To Be Field Installed Junction Box Flexible Hoses Wiring Diagram Ball Valves Fan/Coil Section Access Panel Electric Conduit 9.0" (229mm) Condensate Line–14" (356mm) Clear Vinyl Hose Clamp 5.0" (127mm) Water Connections All piping connections should be made using good plumbing practices and in accordance with any and all local codes that may apply. Note: It will be helpful to read, “Piping” on page 10 Unit Piping Connection Each heat pump is supplied with extended copper tubing on the water-to-refrigerant coil and 1/2" (12.7mm) OD tubing. The connections are for both the supply and return water connections. Note:Valves – Shut off Combination Balancing Valves, Hoses – Supply Return, Condensate Drain Hose and 90º Elbows are all factory available as accessories, (to be mounted in the field by others). Shutoff/Balancing Valve Each heat pump requires a shutoff valve on both the supply and return lines for easy serviceability and removal if it becomes necessary. We suggest using our combination shutoff/balancing valves installed in the field between the contractor’s piping and the heat pump unit. Constructed of brass and rated at 400 psig (2758 kPa) maximum working pressure. Valves have a built-in adjustable memory stop to eliminate rebalancing. The valve installed on the return line acts as a balancing valve to adjust the proper water flow. Each shutoff/balancing valve has 1/2" FPT × 1/2" FPT threaded connections. IM 447-11 Suggested Hose Kit Installation Field installed piping can be brought up from the floor or through the wall. Notes: 1. Hoses are available in multiple lengths to acommodate various piping locations and optional components. 2. Make sure the pipes fit the confines of the piping compartment of the heat pump unit. See Figure 4 on page 9. Attach the field installed combination shut/off balancing valve to the building water supply and return piping. Next add the female pipe adapter connection to unit supply and return coil connection by sweating them in place using silver solder. Next, using the specified hose kit, screw the fixed end into the shut-off/balancing valve. Remove the 1/2" adapter from the other end of the hose. Insert the adapter into the female fitting. Using two crescent wrenches, one to hold the pipe connection and the second to tighten the adapter, insert the swivel end of the hose on the adapter and tighten. This completes the hose connection to standard heat pump equipment. Adding Motorized & Valve Assemblies All console water source heat pumps can be field installed with a motorized valve. All valves are mounted on the return line of each unit. All valve assemblies terminate with 1/2" NPT threaded connections and will also accommodate factory supplied hose kits. 8 www.DaikinApplied.com Note: All plumbing connections are made the same way whether or not the unit has valve packages. Whether or not you utilize our hose kits and shutoff/balancing valve all piping connections will have to conform with all local piping and building codes. The ability to remove the unit in order to perform repairs is imperative. Table 3: 90 Degree Pipe Elbow Dimensions for Figure 3 Note: Valves, hoses and 90-degree elbows are factory available accessories, to be field-mounted by others. A - Nominal Size A B C D E F 1/2" × 1/2" .627"/.631" 1/2" FPT .50 .43 .81 1.08 Condensate Hose Connection Each unit is supplied with a 3/4" (19mm) I.D. clear vinyl condensate hose internally trapped within the chassis. The hose extends 14" (356mm) out of the chassis within the piping compartment to reach the floor or the back wall. Field condensate piping must enter within the confines of the cabinet (back wall or floor) similar to the supply and return piping. Slide the vinyl hose over the condensate pipe and clamp it. Pipe Elbows 90-degree, 1/2" SWT × 1/2" FPT Cast Bronze elbow fittings can be ordered to make sweat connections to the unit supply and return pipe stubs to accept the threaded connection of flexible hoses. Figure 3: 90 Degree Pipe Elbow (See Table 3 for letter dimensions) A B - Thread Size C D F Ref. E Figure 4: Hose kit installation (field-installed) Escutcheon Plate Control Box Air Coil Water Return Water Supply NOTE: Valves, (shut-off combination balancing valves), Hoses, (supply and return, condensate drain hose), also 90 o elbows are all factory available as accessories, to be mounted in the field by others. All Pipe Fittings Are To Be Field Installed Compressor/Control Box Access Cover Junction Box Flexible Hoses Ball Valves Fan/Coil Section Access Panel Condensate Line–14" (356mm) Clear Vinyl 9.0" (229mm) www.DaikinApplied.com Wiring Diagram Hose Clamp 5.0" (127mm) 9 IM 447-11 Piping 1. All units are recommended to be connected to supply and return piping in a two-pipe reverse return configuration. A reverse return system is inherently self-balancing and requires only trim balancing where multiple quantities of units with different flow and pressure drop characteristics are connected to the same loop. A simple way to check for proper water balance is to take a differential temperature reading across the water connections when in the cooling mode. To insure proper water flow, the differential should be 10˚F to 14˚F (-5˚C to -8˚C). A direct return system may also be made to work acceptably, but proper water flow balancing is more difficult to achieve and maintain. 2. The piping can be steel, copper or PVC, but must comply with local codes. 3. Supply and return runouts are usually connected to the unit by short lengths of high pressure flexible hose which are sound attenuators for both unit operating noise and hydraulic pumping noise. Note: When using the flex hose connections you must add a 90 degree elbow kit, for making the connection. This elbow is sweat on one end – female 1/2" FPT on the other end. One end of the hose should have a swivel fitting to facilitate removal for service. Hard piping can also be brought directly to the unit, although it is not recommended since additional noise 4. Some flexible hose threaded fittings are supplied with sealant compound. If not, apply Teflon tape to assure a tight seal. 5. Supply and return shutoff valves are required at each conditioner. The return valve is used for balancing and should have a “memory stop” so that it can always be closed off, but can only be reopened to the proper position for the flow required. 6. No unit should be connected to the supply and return piping until the water system has been cleaned and flushed completely. After the cleaning and flushing has taken place, the initial connection should have all valves wide open in preparation for water system flushing. 7. Condensate piping can be steel, copper, or PVC. Each unit is supplied with a clear vinyl condensate hose. 8. Units are internally trapped. Copper or PVC condensate lines can be used. A means of disconnection must be furnished to facilitate chassis removal. 9. No point of the drain system may be above the drain pan of any unit. 10. Automatic flow control devices must not be installed prior to system cleaning and flushing. 11. A high point of the piping system must be vented. 12. Check local code for the need for electric fittings. Figure 5: Typical 2-Pipe Reverse Return Configuration IM 447-11 10www.DaikinApplied.com Cleaning and Flushing System 1. Prior to first operation of any conditioner, the water circulating system must be cleaned and flushed of all construction dirt and debris. If the conditioners are equipped with water shutoff valves, either electric or pressure operated, the supply and return runouts must be connected together at each conditioner location. This will prevent the introduction of dirt into the unit. Additionally, pressure operated valves only open when the compressor is operating. Figure 6: Temporary Connection for Flushing System Piping Swivel 1/2" (13mm) I.D. Hose Adapter 1/2" MPT x 37 Flare JIC 1/2" (13mm) MPT Steel Fitting Supply Valve Return Valve Floor Line 2. The system should be filled at the city water makeup connection with all air vents open. After filling, vents should be closed. The contractor should start main circulator with pressure reducing valve makeup open. Vents should be checked in sequence to bleed off any trapped air to assure circulation through all components of the system. Power to the heat rejector unit should be off, and the supplementary heat control set at 80˚F (27˚C). While circulating water, the contractor should check and repair any leaks in the piping. Drains at the lowest point(s) in the system should be opened for initial flush and blowdown, making sure city water fill valves are set to make up water at the same rate. Check the pressure gauge at pump suction, and manually adjust the makeup to hold the same positive steady pressure, both before and after opening the drain valves. Flush should continue for at least two hours, or longer if required, to see clear, clean drain water. 3. Supplemental heater and circulator pump should be shut off. All drains and vents should be opened to completely drain down the system. Short circuited supply and return runouts should now be connected to the conditioner supply and return connections. Teflon tape is recommended versus pipe dope for pipe thread connections. Use no sealers at the swivel flare connections of hoses. 4. Trisodium phosphate was formerly recommended as a cleaning agent during flushing. However, many states and localities ban the introduction of phosphates into their sewage systems. The current recommendation is to simply flush longer with 80˚F (27˚C) water. www.DaikinApplied.com11 5. Refill the system with clean water. Test and treat as required to leave the water slightly alkaline (pH 7.5 to 8.5). The specified percentage of antifreeze may also be added at this time. Use commercial grade antifreeze designed for HVAC systems only. Do not use automotive grade antifreeze. 6. Set the system control and alarm panel heat add setpoint to 70˚F (21˚C) and heat rejection setpoint to 85˚F (29˚C). Supply power to all motors and start the circulating pumps. After full flow has been established through all components, including the heat rejector (regardless of season), and air vented and loop temperatures stabilized, each of the conditioners will be ready for check, test, and startup and for air and water balancing. 7. It is not Daikin’s policy to make recommendations on water treatment. The general contractor or owner should contact a local water treatment company regarding water treatment. However, this topic is critical and care should be taken to make sure it is done properly to prevent problems related to flow. A fouled closed loop water system will lead to premature component failure. Standard Electrical Connection Each chassis comes with a junction box mounted on the side of the chassis and contains the field electrical connection. Note: If electrical wiring or conduit comes through the floor, all wires or conduit should be sealed at this point. It will prevent any condensation or water leakage that may occur due to lack of preventive maintenance. Each unit has an internal condensate trap that will require cleaning. We suggest wiring coming through the wall should also be sealed to stop cold air infiltration through the wall cavity which could affect unit thermostat operation. Remove the junction box cover, selecting the proper knockout and remove it. Install a strain relief and pass the wires through the strain relief into the junction box making the connection and reinstall the junction box cover. Note: Check the local code concerning correct electrical connection. Cord & Plug Electrical Connection (Field Installed) Cord connected equipment comes with a box and appropriate voltage receptacle. However, a disconnect switch and fuses can also be provided in the box. As an option, the box comes factory mounted on the backwrap and is ready to be field wired to the incoming power. The box is mounted on the same side as the piping. It is the responsibility of the installing contractor to make the proper electrical connection to the electrical box, using the same method as described in the standard electrical connection. See Figure 7 and Figure 8 on page 12. IM 447-11 Figure 7: Standard electrical connection - Junction box Control Box Escutcheon Plate Air Coil Compressor Cover Junction Box Electrical Conduit Floor Wiring Diagram 1.0"* (25mm) *1.0" (25mm) from inside surface of wall Fan Motor Cover 9.0" (229mm) 5.0" (127mm) Figure 8: Cord & plug connection (field-installed) Power Cord Figure 9: Cabinet power connection (field-installed) Receptacle, Fuses & Disconnect Switch (Requires plug cord on chassis.) Receptacle Plug RECEPTACLE GR/YE Fuse Holder PK Switch Fuse Backwrap BK PK WH WH BK Fuse Fuse Disconnect Box Disconnect Switch BK 10.0" (254mm) IM 447-11 5.00" (127mm) WH or RD Fused Disconnect Box REV Wire Diagram 61408101 0 12www.DaikinApplied.com Electrical Data Operating Limits Environment This equipment is designed for indoor installation only. Sheltered locations such as attics, garages, etc., generally will not provide sufficient protection against extremes in temperature and/or humidity, and equipment performance, reliability, and service may be adversely affected. Additional Information Units are designed to start and operate with entering air at 40˚F (4˚C), with entering water at 70˚F (21˚C), with both air and water at the flow rates used in the ISO Standard 13256-1 rating test, for initial start-up in winter. Note: This is not a normal or continuous condition. It is assumed that such a start-up is for the purpose of bringing the building space to occupancy temperature. Table 4: Air limits in °F (°C) Air Limits Cooling Heating 40°F (4°C) 40°F (4°C) Rated Ambient 80°F (27°C) 70°F (21°C) Maximum Ambient Air2 100°F (38°C) 85°F (29°C) Minimum Entering Air1 50°F (10°C) 40°F (4°C) Rated Entering Air 80/67°F (27°/19°C) 70°F (21°C) Maximum Entering Air2 100/83°F (38/28°C) 80°F (27°C) Minimum Ambient Air 1 Table 5: Fluid limits Fluid Limits Cooling Heating Minimum Entering 30°F (-1°C) 20°F (-6°C) Normal Entering 77°F (25°C) 40°F (4°C) Maximum Entering 110°F (43°C) 90°F (32°C) Minimum GPM/Ton 1.5 Nominal GPM/Ton 3.0 Maximum GPM/Ton 4.0 General 1. Be sure the available power is the same voltage and volt operation unless specified for 230 volts. phase as that shown on the unit serial plate. Line and voltage wiring must be done in accordance with local codes or the National Electrical Code, whichever is applicable. 2. Apply correct line voltage to the unit. A disconnect switch near the unit is required by code. Power to the unit must be sized correctly and have dual element (Class RK5) fuses or HACR circuit breaker for branch circuit overcurrent protection. See the nameplate for correct ratings. 3. All 208-230V single phase units are factory wired for 208 volt operation unless specified for 230 volts. Operating Voltages 115/60/1.............................104 volts min.; 127 volts max. 208-230/60/1.....................197 volts min.; 253 volts max. 265/60/1............................238 volts min.; 292 volts max. 230/50/1............................197 volts min.; 253 volts max. Note: Voltages listed are to show voltage range. However, units operating circuit overcurrent protection. See the nameplate for with overvoltage or undervoltage for extended periods of time will experience correct ratings. premature component failure. Notes: 1. Maximum and minimum values may not be combined. If one value is at maximum or minimum, the other two conditions may not exceed the normal condition for standard units. Extended range unit may combine any two maximum conditions, but not more than two, with all other conditions being normal conditions. 2. This is not a normal or continuous operating condition. It is assumed that such a start-up is for the purpose of bringing the building space up to occupancy temperature. www.DaikinApplied.com13 IM 447-11 Unit Electrical Data Table Table 6: Unit Electrical Data Unit Size 009 012 015 019 Power Compressor Volt Hz Phase RLA LRA Motor FLA Total Unit FLA Min. Volts Min. Circuit Ampacity Max. Fuse Size 115 60 1 8.0 50 0.63 8.63 104 10.6 15 208/230 60 1 3.7 22 0.40 4.10 197 5.0 15 265 60 1 3.5 22 0.35 3.85 240 4.7 15 115 60 1 9.5 50 1.60 11.10 104 13.5 20 208/230 60 1 4.7 25 0.60 5.30 197 6.5 15 208/230 60 1 5.6 29 0.82 6.42 197 7.8 15 265 60 1 5.0 28 0.55 5.55 240 6.8 15 208/230 60 1 7.4 33 0.82 8.22 197 10.1 15 Units with Boilerless System Electric Heat Table 7: Units with Boilerless System Electric Heat Unit Size Power Volt/Hz/Phase Electric Heater kW Nominal 208/60/1 230/60/1 009 012 IM 447-11 Min. Volts Min. Circuit Ampacity Max. Fuse Size 22 0.40 4.10 197 5.0 15 LRA 0.62 3.0 3.7 Actual 3.3 3.7 22 0.40 4.10 197 5.0 15 1.00 3.8 3.5 22 0.35 3.85 240 5.2 15 208/60/1 1.23 5.9 3.7 22.0 0.40 4.10 197 5.0 15 1.5 6.5 3.7 22.0 0.40 4.10 197 5.0 15 265/60/1 2.0 7.5 3.5 22.0 0.35 3.85 240 5.2 15 208/60/1 0.62 3.0 4.7 25 0.60 5.30 197 6.5 15 0.75 3.3 4.7 25 0.60 5.30 197 6.5 15 1.23 5.9 4.7 25.0 0.60 5.30 197 6.5 15 1.5 6.5 4.7 25.0 0.60 5.30 197 6.5 15 1.23 5.9 5.6 29 0.82 6.42 197 8.4 15 1.50 6.5 5.6 29 0.82 6.42 197 9.9 15 265/60/1 2.00 7.5 5.0 28 0.55 5.55 240 10.1 15 208/60/1 1.23 5.9 7.4 33 0.82 8.22 197 10.1 15 1.50 6.5 7.4 33 0.82 8.22 197 10.1 15 230/60/1 208/60/1 2.0 1.0 2.0 208/60/1 019 Total Unit FLA RLA 0.75 230/60/1 015 Motor FLA Amps 265/60/1 230/60/1 1.0 Compressor 230/60/1 230/60/1 2.0 2.0 14www.DaikinApplied.com Unit Operation – General Mark IV/AC-Control Units Note: At start-up of unit, ensure that temperature, flow rate and voltage are within specified limits required for proper unit operation. Each unit has its own control or remote control, utilizing an internal thermostat (unit mounted) and touch-pad selector switch or a wall mounted thermostat (remote control units). Each unit has a Mark IV/AC version printed circuit board. Its control is available in unit mounted or remote wall thermostat. The Mark IV/AC controller has a 14-pin low voltage terminal strip for a hardwired interface for all the necessary field connections interfacing to external equipment (see Table 8). The low voltage output from the low voltage terminal strip is always 24 volts AC. Terminals F and V on the low voltage terminal strip supply 24 volts DC-power. Table 8: 14-Position Terminal Strip Pin Designation Description 1 C Transformer ground (0vac) 2 R Transformer supply (24vac) 3 V – DC power connection 4 P Pump request output 5 A Alarm fault output 6 U Unoccupied input 7 L Load shed input 8 E Remote shutdown input 9 F +DC power connection 10 Y1 Occupied cooling mode input 11 W1 Occupied heating mode input 12 G Fan only input 13 W2 Unoccupied heating mode input 14 O Tenant override input The 24 volt low voltage terminal strip is set up so R-G or F-G energizes the fan, R-Y1 or F-Y1 energizes the compressor for cooling operation, R-W1 or F-W1 energizes the compressor and reversing valve for heating operation. The reversing valve is energized in the heating mode. The circuit board has a fan interlock circuit to energize the fan whenever the compressor’s on if the thermostat logic fails to do so. www.DaikinApplied.com15 Remember the output to the wall stat can be AC current or DC current. Terminal (R) on the wall stat can be connected to terminal (R) on the PC board for AC voltage or to terminal (F) on the PC board for DC voltage. AC current DC current R to G = fan only F to G = fan only R to Y1 = cooling F to Y1 = cooling R to W1 = heat F to W1 = heat Continuous Fan: Units are factory wired for continuous operation. When power is applied and the start switch is depressed, the fan will run. Cooling or Heating – Auto Operation: Rotate the thermostat knob to either warmer or cooler. Select fan speed. Depress the start button. Unit will start within 0 to 32 seconds. Lockout Circuit: Each unit has its own lockout circuit to lock out compressor operation when an abnormal condition should appear. During unit operation, the compressor will be automatically turned off due to one of the two safety openings. High pressure is set at 600 psi (4136 kPa) and low temperature switch is set at 28˚F (-2˚C). Condensate overflow and brownout protection are also included. Remote Reset of Automatic Lockouts: The Remote Reset feature provides the means to remotely reset automatic lockouts generated by high-pressure and/or low-temperature (in heating) faults. When the Mark IV board is in automatic lockout due to one of these faults, and the cause of the fault condition has been alleviated, energizing the O-terminal for 10 seconds or more will force the Mark IV board to clear the lockout. A unit power cycle can also be used to clear an automatic lockout if the conditions causing the fault have been alleviated. Fault Retry To Minimize Nuisance Trips: The Fault Retry feature helps to minimize nuisance trips of automatic lockouts caused by high-pressure and/or lowtemperature (in heating) faults. This feature clears faults the first two times they occur within a 24-hour period and triggers an automatic lockout on the 3rd fault. The retry count is reset to zero every 24 hours. Cooling or Heating – Manual Operation: Rotate the thermostat knob to either warmer or cooler. Select fan speed, depress the heat or cool button, and unit will start within 0 to 32 seconds. The Mark IV/AC-circuit board system has built-in features such as random start, compressor time delay, night setback, load shed, shutdown, condensate overflow protection, defrost cycle, brownout, and LED/ fault outputs. Table 9 shows the LED and fault output sequences. The 24 volt low voltage terminal strip is set so R-G energizes the fan. R-W1 energizes the fan and compressor and reversing valve for heating operation. The reversing valve is set up to be energized in the heating mode. The circuit board has a fan interlock circuit to energize the fan whenever the compressor is on. IM 447-11 The Mark IV/AC control board has a lockout circuit to stop compressor operation if any one of its safeties opens (high pressure or low temperature). If the low temperature thermostat opens, the unit will go into the cooling mode for 60 seconds to defrost any slush in the water-to-refrigerant heat exchanger. After 60 seconds, the compressor is locked out. If the condensate sensor detects a filled drain pan, the compressor operation will be suspended only in the cooling mode. The unit is reset by opening and closing the disconnect switch on the main power supply to the unit in the event the unit compressor operation has been suspended due to low temperature (freezestat) switch, or high pressure switch. The Mark IV/AC control circuit has a fault output signal to an LED on a wall thermostat. Table 9 shows in which function the fault output is “on” (sending a signal to the LED). Table 9: Mark IV/AC LED & fault outputs LED Indication Fault Yellow Green Red Output Off On Off Off Normal Mode Pressure Fault Off On Flash On Low Temperature Fault* Flash Off Off On Condensate Overflow** On Dim Off On Brownout Off Flash Off On Load Shed Off Off On Off Unoccupied Mode On On Off Off Unit Shutdown Off Flash Off On * Only in the heating mode ** Only in the cooling mode Motorized Valve & Relay for Unit Sizes 009 to 019 Wired as shown below the motorized valve will open on a call for compressor operation. Valves for unit sizes 009 to 019 are 1/2" power-open spring-return. Other thermostat combinations may be used. Valve and auxiliary relay are purchased separately. Notes: 1. Connectors on valve must be cut off and stripped back and the wires twisted to make connections to the H8 (IV/PR) terminals on the Mark IV controller. 2. All plumbing connections are made the same, whether or not the unit has valve packages. Plumbing connections must conform with local piping and building codes. The ability to remove the unit in order to perform repairs is imperative. Figure 11: Motorized Valve Kit Use Upper Knockout Conduit, Fitting Conduit PC Boar Terminal S Bushing Conduit, Fitting Conduit BL6 GN7 Motorized Valve Control Relay OR YE Figure 10: Normally Closed, Power Open Motorized Valve Motorized Wiring Valve Anti-short Bushing Conduit, Fitting Bushing Motorized Valve Note: The wiring shown below can only be used when the “P” terminal is not being used as a pump restart signal to other equipment. If the “P” terminal must be used as a pump restart signal to other equipment, then wire theElbow auxiliary relay’s yellow Water Flow Water Tube Extension wire to “Y1”, white wire to “W1”, and orange wire Use Upper Conduit, Fitting Bushing to “C”, then the valve will open on a call for ocKnockout cupied heating or cooling from the thermostat. Actuator & Valve Bushing Assembly Anti-short Bushing Elbow Water Tube Extension Water Flow WH BL6 BL9 BL8 BL9 BL8 PC Board Terminal Strip GN7 6 3 1 Receptical Connector IM 447-11 Conduit Connector Pin(s), female connect to terminal H8 Notes: 1.Use soft solder process on water tubing outside of chassis. 2.Route wires along with power leads. 3.Left hand installation shown - right hand installation is “mirror” opposite. 4.Motorized valve (511) to be parallel to the end panel. 5.Copper to be washed prior to soldering. 6.Route conduit so it does not interfere with manual operation of motorized valve. 16www.DaikinApplied.com Control Options on Mark IV/AC Units Figure 12: Auxiliary Relay WSHP Mark IV/AC Board Low Voltage Terminal Strip Operation: In this example the auxiliary relay contacts can be used to indicate a fault condition. With the auxiliary relay connected as shown, the normally open contacts will close during a fault condition. Note: The auxiliary relay is designed to interface external equipment with the Mark IV/AC board. The auxiliary relay has been provided with the components necessary to protect from electrical damage that may occur to the Mark IV/ AC board when using standard off-the-self relays. The auxiliary relay can be used to provide fault signals, unit operation signals, or to provide a means for remote equipment to control the Mark IV/AC board. The orange, yellow, and white connections are short flying leads pre-attached to the board. The diagrams shown are some connection examples. WSHP Mark IV/AC Board Low Voltage Terminal Strip Operation: In this example the auxiliary relay contacts can be used to signal WSHP fan operation to another device. In this example when the thermostat energizes the “G” terminal the auxiliary relay normally open contacts will close. www.DaikinApplied.com17 IM 447-11 Thermostat Connection Diagrams Programmable Electronic Thermostat Two-Stage Heat/Two-Stage Cool, 7-Day Programmable Dimensions Non-Programmable, Auto or Manual Changeover Two Stage Heat/Two Stage Cool, Night Setback Override Dimensions Specifications Specifications Electrical Rating: Electrical Rating: • 24 VAC (18 to 30 VAC/VDC) • 24 VAC (18 to 30 VAC/VDC) • 1 amp maximum per terminal • 1 amp maximum per terminal • 4 amp maximum total load • 4 amp maximum total load • Easy access terminal block • Easy access terminal block Temperature Control Ranges: Temperature Control Ranges: • 45°F to 90°F (7°C to 32°C), Accuracy: ± 1°F (± 0.5°C) System Configurations: • 45°F to 90°F (7°C to 32°C), Accuracy: ± 1°F (± 0.5°C) System Configurations: • Two-stage heat / two-stage cool • Two-stage heat/Two-stage cool Timing: Terminations: • R, C, W1, Y1, W2, Y2, G, S1, S2 • Backlight Operation: 13 seconds after mode change or button press Figure 13: Wiring Terminations: • +R, -C, W1, Y1, W2, Y2, G, O, S1, S2 WSHP Mark IV/AC Board Low Voltage Terminal Strip O W2 G W1 Y1 F E L U A P V R C Figure 14: Wiring L U A P V R C R W1 Y1 W2 Y2 G E - C Thermostat Terminals O W2 G W1 Y1 F + R W1 Y1 W2 Y2 G + - C Thermostat Terminals WSHP Mark IV/AC Board Low Voltage Terminal Strip IM 447-11 18www.DaikinApplied.com Optional Remote Sensor Optional Remote Sensor Installation (Used with Thermostats 668375301 & 668375401) 1. Remove cover from remote sensor housing. 2. Select an appropriate location for mounting the remote sensor. 3. Mount remote sensor unit using hardware provided. 4. Install two strand shielded wire between remote sensor and thermostat. Shielded wire must be used. Note: Do not run remote sensor wire in conduit with other wires. • Wire 1 should run between the S1 terminal on the thermostat and the S1 terminal on the remote sensor The fast, easy solution for temperature sensing problems. • For tamper prone areas • Wire 2 should run between the S2 terminal on the thermostat and the S2 terminal on the remote sensor • Poor airflow areas • Connect the shielding of the wire to the S2 terminal on the thermostat • Troubled applications • Foam gasket prevents drafts through wall opening • Mounts to standared 2" × 4" outlet box 5. Disable the main sensor (R12) on the thermostat by cutting it from the circuit board. • 2-3/4"W × 4-1/2"H Figure 15: Remote Sensor Wiring Thermostat Remote Sensor S1 S2 S1 S2 Wire 2 Cut R12 from circuit board Wire 1 www.DaikinApplied.com19 IM 447-11 Multiple Unit Control Panel for Mark IV The multiple unit control board is an accessory used when you need to control up to 3-units from a single thermostat. The board is typically mounted in the unit control box closest to the thermostat. A maximum of 2 boards may be used together if up to 6-units must be connected and controlled from a single thermostat. Low voltage wiring between terminal blocks and the Daikin wall thermostat should be made in conformancewith applicable codes. A color-coded low voltage cable is recommended. This version of the board uses VAC relays and should not be used in combination with any other accessories or equipment that require VDC connections to the “G”, “W1”, or “Y1” terminals (i.e. Boilerless System Kit). The multiple unit control board provides the components necessary to protect the Mark IV/AC board from electrical damage that may occur when using standard off-the-shelf relays. Do not use the unoccupied (U-terminal) feature with the multiple unit control board. Up to 3 Units (Part No. 056794201) Figure 16: Multiple Unit Control Panel and Board MUCP Circuit Board Figure 17: Wiring MUCP up to 3 units Mark IV Unit Control Board Low Voltage Terminal Strip - Unit #1 Multiple Unit Control Panel Circuit Board O W W Y 2 G 1 1 F E L U A P V R Deluxe Auto Changeover Thermostat Terminals C K3 W Y W W Y 1 1 R 3 2 2 G O A C K1 TB4 Y G W C O R Y G W TB2 R K2 R Y G W TB3 W W Y 2 G 1 1 F E L U A P V R Low Voltage Terminal Strip - Unit #2 R Y G W TB1 C O IM 447-11 W W Y 2 G 1 1 F E L U A P V R C Low Voltage Terminal Strip - Unit #3 20www.DaikinApplied.com Field Installed Outside Air Damper (Accessory) CAUTION To prevent infiltration of ambient conditions, it is the responsibility of the contractor to assure that factory installed gasketing matches up with the wall opening, or that additional material is used to assure a positive seal. Cold Weather Operation: Console water source heat pumps may experience erratic operation during cold ambient conditions with the outside air damper in the open position. Refer to the “Operating Limits” in the unit catalog 1140-x. Manual Outside Air Damper Motorized Outside Air Damper Figure 18: Rear inlet - typical manual damper installation Figure 19: Rear inlet - typical motorized damper installation Backwrap Backwrap Subbase Gasket Subbase Gasket *10" (245mm) *10" (245mm) Table 10: Dimensions, in inches (mm) Unit Type Standard Height Note: Unit Size A B C 009-012 46 (1168) 45 (1143) 25 (635) 015-019 54 (1372) 53 (1346) 25 (635) *Total unit is 10-3/4″ deep. The cabinet extends beyond the subbase 1/4″ (6mm) in the back and 1/2″ (14mm) in the front. Figure 20: Left-hand & right-hand views A A Gasket Gasket .62" (16mm) C1 2.25" (57mm) Opening .50" (13mm) Gasket D .62" (16mm) D .50" (13mm) .50" (13mm) B Front View - Left Hand Piping Back Panel With Outside Air Damper Inlet C B Front View - Right Hand Piping Back Panel With Outside Air Damper Inlet Table 11: Outside air damper opening location Unit Size A B C C1 D E 009 - 012 46 (1168) 45 (1143) 21.09 (536) 11.38 (289) 12.53 (318) 2.25 (57) 015 - 019 54 (1372) 53 (1346) 22.25 (565) 22.25 (565) 12.53 (318) 2.25 (57) www.DaikinApplied.com21 IM 447-11 Motorized Outside Air Damper Wiring Figure 21: Right-hand unit installation detail Bushing, Strain Relief Wire Tie Screws (See Note 1) Housing Plug Snap Bushing Gasket (See Note 2) Housing Receptacle Front View of Unit Figure 22: Left-hand unit installation detail Bushing, Strain Relief Route wires along with power wires Chassis Screws (See Note 1) Wire Tie Gasket (See Note 2) Damper Assembly Housing Plug Subbase Housing Receptacle Front View of Unit Notes: 1. Remove appropriate knock-outs and install damper using two (2) #8-18 screws provided. 2. Install gasket material as shown to prevent infiltration of ambient conditions. It is the responsibility of the installing contractor to assure that field-installed gasketing matches up with the wall opening or that additional material is used to assure a positive seal. Figure 23: Mark IV Motorized Damper typical wiring diagram IM 447-11 22www.DaikinApplied.com Unit Operation Check List Troubleshooting Adjust all valves to their full open positions. Turn on the line power to all heat pumps. Neither fan nor compressor runs: Connect supply power to the unit and confirm green LED illuminates on the Mark IV control board. Note: Room temperature should be within the minimum-maximum ranges. During start-up checks, loop water temperature entering the heat pump should be between 55°F [13°C] and 90°F [32°C]. If either return air temperature or water temperature are at a minimum or maximum level, the other must be at normal condition for proper operation of the heat pump. Adjust the unit thermostat to the fan only position and check for fan operation. With the thermostat in “Auto” adjust to minimum setpoint. Compressor start-up could take up to 6 minutes depending on thermostat configuration. Verify compressor operates and cool air is delivered. Complete start-up sheet beginning on page 32 of this manual. Confirm unit capacity is within 10% of the catalog THR. It is not necessary to connect refrigeration gauges unless unit troubleshooting is required and all external air and water conditions are verified to be adequate. Verify the condensate trap fills to provide a air seal with the drain system. Adjust thermostat to warmest setting and confirm compressor operation. Confirm warm air is delivered after a few minutes of operation. Check for vibration, noise and water leaks. Inspect piping and wiring for rubbing. Make adjustments as needed for rubbing lines or wiring. It is the responsibility of the installer to make final unit adjustments. If unit does not operate properly perform troubleshooting as needed. Should a major problem develop, refer to the following information for possible cause and corrective steps. 1. The fuse may be blown or the circuit breaker is open. Check electrical circuits and motor windings for shorts or grounds. Investigate for possible overloading. Replace fuse or reset circuit breakers after fault is corrected. 2. Wires may be loose or broken. Replace or tighten. 3. Supply voltage may be too low. Check it with the power company. 4. Control system may be faulty. Check thermostat for correct wiring and check 24 volt transformer for burnout. Fan operates but compressor does not: 1. Check capacitor. 2. Wires may be loose or broken. Replace or tighten. 3. The high pressure may have tripped due to: a. Fouled or plugged condenser. b. Lack of or no condenser water. c. Too warm condenser water. d. Not enough airflow over the coil due to dirty filters. e. Coil or fan motor failure. 4. The low temperature switch may have tripped due to: a. Fouled or plugged condenser. b. Lack of or no condenser water. c. Too cold condenser water. d. Not enough airflow over the coil due to dirty filters. e. Coil or fan motor failure. 5. Check thermostat setting, calibration and wiring. 6. The compressor overload protection is open. If the compressor dome is extremely hot, the overload will not reset until cooled down. If the overload is external, replace it. If the overload is internal, replace the compressor. 7. The internal winding of the compressor motor may be grounded to the compressor shell. If so, replace the compressor. 8. The compressor winding may be open. Check continuity with ohmmeter. If the winding is open, replace the compressor. www.DaikinApplied.com23 IM 447-11 Compressor attempts to start but doesn’t: Water drips from conditioner: 2. Check for defective compressor by making resistance check on winding. 2. Check for dirty filter. 1. Check capacitor. 3. Check run capacitor. Compressor runs in short cycle: 1. Check thermostat mounting and location. 2. Check all relays, relaying and contacts. 3. Check run capacitor. 1. Check for plugged condensate drain. 3. Check to see if condensate drain runs uphill. 4. See if blower motor is up to speed. 5. Check for loose or mispositioned blower. 6. Are drains properly trapped? Noisy unit operation: 4. Check high pressure switch. 1. Check for fan wheel hitting the housing. Adjust for clearance. 5. Check low temperature switch. 2. Check for bent fan wheel. Replace if damaged. 6. See if reversing valve has not fully shifted to either side. 3. Check for loose fan wheel on shaft. Tighten. Insufficient cooling or heating: 4. Make sure compressor is floating free on its isolator mounts. 1. Check thermostat for improper location. 2. Airflow may be insufficient. Check and clean the filter, or placement of furniture or other articles that may cause restrictions such as drapes, etc. 5. Check for tubing touching compressor or other surface. Readjust tubing by bending slightly. 6. Check screws on all panels. Tighten. 3. The reversing valve may be defective, creating a bypass of refrigerant. If the unit will not heat, check the reversing valve coil. 7. Check for chattering or humming in the contactor relays due to low voltage or a defective holding coil. Replace component. 4. Check capillary tubes for possible restriction of refrigerant flow. 8. Check water balance to unit for proper water flow rate. 5. Check for restriction in water flow. Insufficient water flow through condenser: 1. Check to see that valves are open all the way. 2. Check for air in lines. 3. Check circulating pump. IM 447-11 24www.DaikinApplied.com Maintenance 1. Filter changes are required at the regular intervals. The time period between changes will depend upon the project requirements. Some applications such as motels, produce a lot of lint from carpeting and linen changes, and will require more frequent filter changes. It is suggested that the filter be checked at 60 day intervals for the first year until experience is acquired. If light cannot be seen through the filter when held up to sunlight or a bright light, it should be changed. A more critical standard may be desirable. 2. The condensate drain pan should be checked annually and cleaned and flushed as required. Note: Mark IV/AC equipment has a condensate overflow control device. In cooling, if compressor will not operate, it may be due to unit compressor lockout on condensate overflow. 3. Recording of performance measurement of volt amps and water temperature differences (both heating and cooling) is recommended. A comparison of logged data with start-up and other annual data is useful as an indicator of general equipment condition. 4. Inspect and clean air coil using a soft bristle brush and a vacuum as neccessary. 5. Inspect condensate drain lines twice per year and clean as needed to prevent build-up lint and other particles that could cause overflow. www.DaikinApplied.com25 6. Periodic lockouts almost always are caused by air or water problems. The lockout (shutdown) of the conditioner is a normal protective result. Check for dirt in the water system, water flow rates, water temperature, airflow rates (may be dirty filter), and air temperatures. If the lockout occurs in the morning following a return from night setback, entering air below machine limits may be the cause. 7. When checking unit operation, it is important to gather the correct information. a. Take voltage reading. b. c. Water temperature difference in both cooling and heating mode. d. Amp reading in both cooling and heating mode operation. Fan and compressor Amp readings should be recorded annually and should not be greater than 10% over nameplate rating. Air temperature difference in both cooling and heating mode. Air temperature difference in cooling mode should include both wet and dry bulb temperatures. 8. Also record model, catalog, and serial numbers. NOTICE It is not neccesary or recommended to check refrigerant pressures on a regular schedule. They should only be checked if a water and air side evaluation would require further evaluation of the unit performance. IM 447-11 Typical Wiring Diagrams Typical Mark IV/AC Component Layout 1 Compressor Contactor L1 2 Fan Contactor L2 Ground 3Transformer 4 PC Board Compr Motor 5 Auxiliary Relay 6 Circuit Breaker Heater 070 - Blk 060 - Blk 048 - Red 042 - Blk 036 - Blk 030 - Blk Fan Motor CC - Compressor Contactor HTR - Crankcase Heater (Optional) CAP - Motor Capacitor CC Lo Temp Hi Pressure Condensate Sensor Lo Pressure Reversing Valve Solenoid (24 VAC) 0 WGW Y F E L U A P V R C 2 1 1 Compressor L1 Fan Common Mark IV PC Board Notes: 1. Unit is factory wired for 208V operation. If 230V power supply is used, transformer must be rewired by disconnecting the power lead from the red transformerprimary wire and connecting the power lead to the orange transformer primary wire. Place an insulation cap on the red transformer primary wire. 2. All temperature and pressure switches are normally closed. 3. Component layout shown below is typical. Some components may not be used on this model or voltage. 4. Mark IV/AC controller board contains a static sensitive microprocessor. Proper grounding of field service personnel should be observed or damage to controller may result. 5. Terminal block on Mark IV/AC board provides 24 VAC at terminals R and C. All other outputs are 24 VDC. 6. Field supplied relays installed on the input terminals (W1, W2, Y1 or G) may interfere with proper unit operation. Never install relay coils in series with inputs. 7. For more information pertaining to the Mark IV/AC controller, refer to OM120. IM 447-11 26www.DaikinApplied.com Typical Wiring Diagrams Console WSHP Size 009–019, All Voltages, 60Hz / Single Phase, Mark IV Board with Manual Changeover (MCO) TB ACO MCO BR HR - Plug Connection Terminal Block Automatic Changeover Manual Changeover Boilerless Relay Heater Relay Component Layout 1. Rotary Switch 2. Thermostat 3. Terminal Block 4. PC Board 5. Transformer 6. Boilerless Relay 7. Shutdown Relay 8. Auxiliary Relay 9. Heater Relay 10. Water Reg Valve Relay 11. Low Limit Thermostat 12. Night Setback Thermostat 14. Terminal Board 1 15. Terminal Board 2 17. Standby Electric Heat Switch Notes: 1. Terminal block on PC board provides 24 VAC at terminals C and R. All other terminals are 24 VDC output. 2. All temperature and pressure switches are normally closed. 3. Component layout is typical, some components shown may not be used. www.DaikinApplied.com27 IM 447-11 Typical Wiring Diagrams Console WSHP Size 009–019, All Voltages, 60Hz / Single Phase, Mark IV Board with Auto Changeover (ACO) TB ACO MCO BR HR - Plug Connection Terminal Block Automatic Changeover Manual Changeover Boilerless Relay Heater Relay Component Layout 1. Tap-Touch Switch 2. Thermostat 3. Terminal Block 4. PC Board 5. Transformer 6. Boilerless Relay 7. Shutdown Relay 8. Auxiliary Relay 9. Heater Relay 10. Water Reg Valve Relay 11. Low Limit Thermostat 12. Night Setback Thermostat 13. Override Switch 14. Terminal Board 1 15. Terminal Board 2 16. Stop/Start Switch 17. Standby Electric Heat Switch IM 447-11 Notes: 1. Terminal block on PC board provides 24 VAC at terminals C and R. All other terminals are 24 VDC output. 2. All temperature and pressure switches are normally closed. 3. Component layout is typical, some components shown may not be used. 28www.DaikinApplied.com Typical Wiring Diagrams Console WSHP Size 009–019, All Voltages, 60Hz / Single Phase, Mark IV Board with Auto Changeover (ACO) Remote Thermostat TB ACO MCO BR HR - Plug Connection Terminal Block Automatic Changeover Manual Changeover Boilerless Relay Heater Relay Component Layout 1. Tap-Touch Switch 2. Thermostat 3. Terminal Block 4. PC Board 5. Transformer 6. Boilerless Relay 7. Shutdown Relay 8. Auxiliary Relay 9. Heater Relay 10. Water Reg Valve Relay 11. Low Limit Thermostat 12. Night Setback Thermostat 13. Override Switch 14. Terminal Board 1 15. Terminal Board 2 16. Stop/Start Switch 17. Standby Electric Heat Switch Notes: 1. Terminal block on PC board provides 24 VAC at terminals C and R. All other terminals are 24 VDC output. 2. All temperature and pressure switches are normally closed. 3. Component layout is typical, some components shown may not be used. www.DaikinApplied.com29 IM 447-11 Typical Wiring Diagrams Console WSHP Size 009–019, All Voltages, 60Hz / Single Phase, Mark IV Board with Manual Changeover (MCO) Boilerless Constant Fan TB ACO MCO BR HR - Plug Connection Terminal Block Automatic Changeover Manual Changeover Boilerless Relay Heater Relay Component Layout 1. Rotary Switch 2. Thermostat 3. Terminal Block 4. PC Board 5. Transformer 6. Boilerless Relay 7. Shutdown Relay 8. Auxiliary Relay 9. Heater Relay 10. Water Reg Valve Relay 11. Low Limit Thermostat 12. Night Setback Thermostat 14. Terminal Board 1 15. Terminal Board 2 17. Standby Electric Heat Switch IM 447-11 Notes: 1. Terminal block on PC board provides 24 VAC at terminals C and R. All other terminals are 24 VDC output. 2. All temperature and pressure switches are normally closed. 3. Component layout is typical, some components shown may not be used. 30www.DaikinApplied.com Typical Wiring Diagrams Console WSHP Size 009–019, All Voltages, 60Hz / Single Phase, Mark IV Board with Auto Changeover (ACO) Boilerless with Remote Thermostat TB ACO MCO BR HR - Plug Connection Terminal Block Automatic Changeover Manual Changeover Boilerless Relay Heater Relay Component Layout 1. Tap-Touch Switch 2. Thermostat 3. Terminal Block 4. PC Board 5. Transformer 6. Boilerless Relay 7. Shutdown Relay 8. Auxiliary Relay 9. Heater Relay 10. Water Reg Valve Relay 11. Low Limit Thermostat 12. Night Setback Thermostat 13. Override Switch 14. Terminal Board 1 15. Terminal Board 2 16. Stop/Start Switch 17. Standby Electric Heat Switch 18. Boilerless Fan Relay Notes: 1. Terminal block on PC board provides 24 VAC at terminals C and R. All other terminals are 24 VDC output. 2. All temperature and pressure switches are normally closed. 3. Component layout is typical, some components shown may not be used. www.DaikinApplied.com31 IM 447-11 Water Source Heat Pump Equipment Check, Test and Start Form This form must be completed and submitted within ten (10) days of start‑up to comply with the terms of the Daikin warranty. Forms should be returned to Daikin Warranty Department. Installation Data Job Name __________________________________________________________ Check, Test & Start Date _________________ City or Town___________________________________________ State__________________________ Zip_________________ Who is Performing CTS______________________________________ Equipment Type (Check all that apply) □Closed Loop □Open Loop □Geothermal □Other (specify)______________ General Contractor__________________________________________ Essential Items Check of System – Note: “No” answers below require notice to installer by memorandum (attached copy.) Essential Items Check A. Voltage Check___________ Volts Loop Temp.____________ °F Heating B. Yes □ □ □ □ □ □ □ □ □ No □ □ □ □ □ □ □ □ □ □ □ □ □ System Water P.H. Levels___________ Set For____________ °F Cooling Condition Comments Loop Water Flushed Clean __________________________________________________________________ Closed Type Cooling Tower __________________________________________________________________ Water Flow Rate to Heat Pump Balanced _______________________________________________________ Standby Pump Installed ____________________________________________________________________ System Controls Functioning ________________________________________________________________ Outdoor Portion of Water System Freeze Protected _______________________________________________ Loop System Free of Air ____________________________________________________________________ Filters Clean _____________________________________________________________________________ Condensate Traps Installed __________________________________________________________________ Note: “No” answers below require notice to installer by memorandum (attached copy.) Outdoor Air to Heat Pumps: _________________________________________________________________ Other Conditions Found: ____________________________________________________________________ Please include any suggestions or comments for Daikin Applied:____________________________________________________ _______________________________________________________________________________________________________ _______________________________________________________________________________________________________ _______________________________________________________________________________________________________ Above System is in Proper Working Order For Internal Use Note: This form must be filled out and sent to the warranty administrator before any service money can be released. Date Release: SM _________________________ CTS _________________________ T _________________________ Signature for Sales Representative Signature for Customer Service Manager Approval Date IM 447-11 Form WS-CTS-00.01 (Rev. 4/14) 32www.DaikinApplied.com Unit Check / Equipment Data Installation Data Job Name____________________________________________________ Check Test Date:___________________________ City ___________________________________________________________ State________________ Zip_______________ Daikin Model #_______________________________________________________ Daikin Serial #________________________________________ Job site Unit ID # (HP #)______________________________ General Contractor:______________________________________ Mechanical Contractor:______________________________ Technician Performing Start-Up: Name_______________________________ Employer:______________________________ Complete equipment data from measurements taken at the locatons indicated on the drawing below. Equipment Data Flow Rate EWP - LWP = ∆P 1 EWP - PSI In__________________minus 2 LWP - PSI Out___________ equals ∆P_____________ The first step in finding GPM is to subtract leaving water pressure from entering water pressure. The difference between the two is referred to as ∆P. ∆P can be converted to GPM by looking in the equipment specificaton catalog. Caution ∆P ≠ GPM Note: A conversion table must be used to find GPM from (Delta) ∆P measurements. Loop Fluid Temperature Rise / Drop through Coaxial Heat Exchanger EWT - LWT = ∆T 4 LWT - °F Out___________________ equals Fluid ∆T________________ 3 EWT - °F Out__________________ minus ∆T is the rise or drop in the fluid temperature as it passes through the Coaxial. Air Temperature Rise / Drop through the air coil ∆T x CFM x 1.08 = BTUH Sensible 6 LAT - °F Out____________________ equals Air ∆T__________________ 5 EAT - °F In____________________ minus Note: Perform Check, Test and Start-Up in the Cooling Mode Only. EWT- Entering Water Temperature EWP- Entering Water Pressure EAT- Entering Air Temperature ∆- Delta (Differential) LWT - Leaving Water Temperature LWP - Leaving Water Pressure LAT - Leaving Air Temperature CFM - Cubic Feet/Minute BTUH-British Thermal Units/Hour Check, Test & Start LAT V Discharge Hot Gas V C O I L Reversing Valve 6 V V EAT Air Temperature °F OUT V 5 A I R Suction COAX Expansion Valve Compressor Loop Fluid Pressure (In PSI) EWP 1 Loop Fluid Temperature °F EWT 3 V IN INOUT V 2 LWP 4 LWT Form No._____________________________ www.DaikinApplied.com33 IM 447-11 Commercial Check, Test and Start Worksheet (Complete all equipment measurements indicated for each unit per installation on page 2) Model Serial # H.P. # EWT 3 LWT 4 EWP 1 LWP 2 EAT 5 LAT 6 Volts Amps Cooling Check Air Filter and Coil Comments (more comments on back) 1. 2. 3. 4. 5. 6. 7. 8. 9. 10. 11. 12. 13. 14. 15. 16. 17. 18. 19. 20. 21. 22. 23. 24. 25. 26. 27. 28. 29. 30. 31. 32. 33. 34. 35. 36. 37. 38. 39. 40. 41. 42. Part No.______________________________ IM 447-11 34www.DaikinApplied.com Notes / Comments Form WS-CTS-00.01 (Rev. 4/14) www.DaikinApplied.com35 IM 447-11 Daikin Applied Training and Development Now that you have made an investment in modern, efficient Daikin equipment, its care should be a high priority. For training information on all Daikin HVAC products, please visit us at www.DaikinApplied.com and click on Training, or call 540-248-9646 and ask for the Training Department. Warranty All Daikin equipment is sold pursuant to its standard terms and conditions of sale, including Limited Product Warranty. Consult your local Daikin Applied representative for warranty details. Refer to Form 933-430285Y. To find your local Daikin Applied representative, go to www.DaikinApplied.com. Aftermarket Services To find your local parts office, visit www.DaikinApplied.com or call 800-37PARTS (800-377-2787). To find your local service office, visit www.DaikinApplied.com or call 800-432-1342. This document contains the most current product information as of this printing. For the most up-to-date product information, please go to www.DaikinApplied.com. Products manufactured in an ISO Certified Facility. IM 447-11 ©2013 Daikin Applied (12/13) | (800) 432–1342 | www.DaikinApplied.com