1
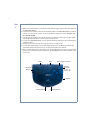
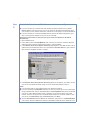
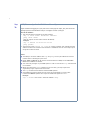
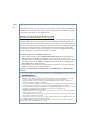
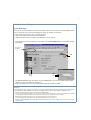
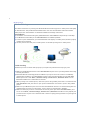
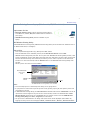
1
AXIS 5800 Mobile Quick Start
The instructions in this guide apply to AXIS 5800 Mobile print servers with firmware version
6.20 and above.
This guide covers Windows 95, 98, NT & 2000 and UNIX/Linux over TCP/IP and
Macintosh over Appletalk for cable networks. The instructions for wireless printing cover
BLUETOOTHTM Wireless Technology.
For installation instructions covering NetWare, OS/2 and Windows over NetBIOS/NetBEUI
and IPX/SPX, see the AXIS 5800 Mobile User’s Manual, located on the AXIS Product CD v2.1
(and up) and on www.axis.com.
IMPORTANT!
The instructions in this guide are based on settings found in a new and unconfigured
AXIS 5800 Mobile. To establish this status in an already configured AXIS 5800 Mobile,
you can perform a factory default. See Print Server Maintenance: Performing a Factory
Default, on page 9 for instructions.
Table of Contents:
Connect the Hardware . . . . . . . . . . . . . . . . . . . . . . . . . . . . . . . . . . . . . . . . . . . . . . . . . . . . . . 2
Check if the Print Server’s IP Address was Set Automatically . . . . . . . . . . . . . . . . . . . . . . . 3
Windows only: Set the IP Address Manually . . . . . . . . . . . . . . . . . . . . . . . . . . . . . . . . . . . . 4
Macintosh only: Set the IP Address Manually . . . . . . . . . . . . . . . . . . . . . . . . . . . . . . . . . . . 5
UNIX/Linux only: Set the IP Address Manually . . . . . . . . . . . . . . . . . . . . . . . . . . . . . . . . . . . 6
Configure a Printer . . . . . . . . . . . . . . . . . . . . . . . . . . . . . . . . . . . . . . . . . . . . . . . . . . . . . . . . . 7
Axis Print Server Management . . . . . . . . . . . . . . . . . . . . . . . . . . . . . . . . . . . . . . . . . . . . . . . 9
Wireless Printing . . . . . . . . . . . . . . . . . . . . . . . . . . . . . . . . . . . . . . . . . . . . . . . . . . . . . . . . . . 10
Wireless Printing from a Laptop (Windows 98, ME, NT and 2000) . . . . . . . . . . . . . . . . . . 11
Wireless Printing from the Ericsson R520 Mobile Phone . . . . . . . . . . . . . . . . . . . . . . . . . 12
Features in Firmware Version 6.20 for AXIS 5800 Mobile . . . . . . . . . . . . . . . . . . . . . . . . . 13
2
Step
1
Connect the Hardware
1. Make sure that the printer is switched off and that the power supply is disconnected from
the AXIS 5800 Mobile.
2. Locate the serial number, found on the underside label of the AXIS 5800 Mobile, and write
it down. You can use this number to set the IP-address of the print server. Example: Ser.
No. 00408C1802FB
3. Connect your printer(s) to the print server’s LPT1 or LPT2 port using a printer cable. Make
sure the Bluetooth antenna is pointing towards the ceiling.
4. Connect your AXIS 5800 Mobile to your network (Ethernet Connector), using a twisted pair
category 5 cable
5. Switch on your printer(s) and make sure the printer is ready for use.
6. Connect the power supply to the Power Supply Connnector. The Network Indicator will
start flashing when the print server is correctly connected to the network.
7. Wait 1 minute and press the test button once. A test page will be printed on the connected
printer, keep it handy during the installation. The test page will show the IP address of the
print server.
LPT2
LPT1
Power Supply Connector
Ethernet
Connector
Bluetooth
Antenna
(10 base &
100 base TX)
Test Button
Power Indicator
Network Indicator
3
Step
2
Check if the Print Server’s IP Address was Set Automatically
If you are working in a network that uses dynamic IP address assignment (e.g. DHCP,
BOOTP, RARP or Auto-IP), your print server will obtain an IP address automatically when
you connect it to the network. Follow the instructions on this page to verify the IP address.
■ If you are working in a network that does not use dynamic IP address assignment, go to
Step 3 to assign an IP address to the print server manually.
Follow these instructions to verify that your print server has obtained an IP address
automatically:
1. Open a Web browser.
2. In the Web browser’s Location/Address field, enter the print server’s IP address (Internet
address), found on the test page printed in Step 1, and press Enter.
3. If the Network Print Server (Printer Overview) page appears in your Web browser, the IP
address was set automatically when you connected the AXIS 5800 Mobile to your network.
Skip to Step 4 Configure a Printer, on page 7.
■
Network Print Server (Printer Overview) page
4. If the Network Print Server (Printer Overview) page does not appear, you need to set the
print server’s IP address manually using one of the methods described in Step 3.
Notes:
■ It is important that you use a Web browser with JavaScript support!
■ If you are working in a WINS/DDNS network, you can log in to the print server’s web pages
using its default host name: In the Web browser’s Location/Address field, enter the default
print server name AXIS<nnnnnn> where <nnnnnn> are the last six digits of the serial
number, found on the print server’s underside label. Example: If the serial number of your
print server is 00408C1802FB, type: AXIS1802FB and press Enter.
■ See the AXIS 5800 Mobile User’s Manual for installation instructions in a NetBIOS/NetBEUI
environment. The User’s Manual is located on the AXIS Product CD and on www.axis.com
4
Step
3a
Windows only: Set the IP Address Manually
If you succeeded in logging in to your print server’s web pages in Step 2, your print server has
already received a valid IP address. Skip to “ Configure a Printer ” (Step 4)!
Use AXIS Print System version 1.20 (described here) or AXIS IP JumpStarter to set the IP
address of print servers with firmware version 6.20 and above. AXIS Print System and AXIS
IP JumpStarter are available on the AXIS Product CD and on www.axis.com. AXIS Print System
is software used for setting the IP address of a print server and for configuring network
printers. It can be used in Windows 95, 98, NT and 2000.
Set the IP address:
1. Download AXIS Print System version 1.20 (or higher) to your host and install it.
2. From the AXIS Print System Available Printers/Print Servers view, select the unconfigured
Axis print server icon:
3. Double-click the print server icon. The AXIS Print System Add Printer Wizard will appear.
The print server will have a temporary IP address, which was assigned to it through
Auto-IP. The default Auto-IP address structure is: 169.254.xxx.xxx. This temporary IP
address should be changed to a new and unused one:
4. In the IP Address field, enter the new IP address of the print server.
5. Set the Subnet Mask and Default Gateway according to your network configuration. Click
Next> to continue.
6. Next, you will be prompted to enter an Administrator password, the default password is
pass. Click OK.
7. Next, AXIS Print System will start looking for printers attached to the print server. Click the
radio-button next to the printer you want to add to My Printers and click Next>. Continue
to Configure a Printer in Windows 95, 98, NT & 2000, on page 7 to install an appropriate
printer driver.
ATTENTION!
AXIS IP Installer is not compatible with firmware 6.20 and above!
Notes:
Click the AXIS Print System Help button for information on the Default Gateway and
Subnet Mask.
■ AXIS Print System can be installed for both Client-Server and Peer-to-Peer printing. For
Peer-to-Peer printing, AXIS Print System needs to be installed on each workstation. The
print server will then, together with AXIS Print System, emulate the behavior of a local
printer port. For Client-Server printing, AXIS Print System can be used to create printer
objects on one server. The installed printers must then be configured to be shared to allow
clients to use them.
■
5
Step
3b
Macintosh only: Set the IP Address Manually
If you succeeded in logging in to your print server’s web pages in Step 2, your print server has
already received a valid IP address. Skip to “ Configure a Printer ” (Step 4)!
In Macintosh, you set the IP address of the print server using a text editor:
Set the IP address:
1. Open the Chooser from the Apple menu.
2. Select a network printer driver, any LaserWriter will do.
3. Select the printer port which name ends with "_CFG" and to which you want to assign an
IP address.
4. Close the Chooser.
5. Open a text editor, e.g. SimpleText. Write a text file containing the IP address parameters
you want to set:
INT_ADDR.:192.16.253.80
6. Print the text file to the printer port you have chosen. The settings will be stored in the
print server.
7. Close the Chooser.
Note:
■ The _CFG port disappears 60 minutes after the AXIS 5800 Mobile has been powered on. If
you want it to reappear, you must restart your AXIS 5800 Mobile.
6
Step
3c
UNIX/Linux only: Set the IP Address Manually
If you succeeded in logging in to your print server’s web pages in Step 2, your print server has
already received a valid IP address. Skip to “ Configure a Printer ” (Step 4)!
Set the IP address:
1. Type the following commands in the shell window:
arp -s <host name> <Ethernet address>
ping <host name>
(You can replace the host name with the IP address)
Example:
arp -s PS5800 00:40:8c:10:00:86
ping ps5800
2. The host will return ps5800 is alive, or a similar message. This indicates that the
address has been set and that communication is established. You are now ready to print
using FTP or Reverse Telnet.
Notes:
■ The ability to set the IP address with arp and ping will only be enabled the first ten
minutes after re-booting the print server
■ DHCP, RARP and BOOTP can be used to set the IP address in UNIX, see the AXIS 5800
Mobile User’s Manual for details.
■ You need root privileges on your UNIX system in order to execute the arp command and
run axinstall.
■ When you execute the ping command for the first time, you may experience a
significantly longer response time than usual.
■ The arp command varies between different UNIX systems.
■ Some BSD type systems expect the host name and node address in reverse order.
Furthermore IBM AIX systems will require the additional argument ether.
Example:
arp -s ether <host name> <Ethernet address> temp
7
Step
4
Configure a Printer
Follow these instructions to make network printers ready for printing in Windows, UNIX/Linux
and Macintosh. In some cases, you need to install printing software. The software is available
on the Axis Product CD v2.1 and on www.axis.com
Configure a Printer in Windows 95, 98, NT & 2000
Install Software: AXIS Print System version 1.20 and up
AXIS Print System is the recommended tool for configuring a network printer, setting the print
server’s IP address, printer discovery and printer driver installation. AXIS Print System can be
installed for both Peer-to-Peer and Client-Server printing. For Peer-to-Peer printing, AXIS Print
System must be installed on all printing clients. The print server will then, together with AXIS
Print System, emulate the behavior of a local printer port. For Client-Server printing, AXIS
Print System can be used to create printer objects on one server. The installed printers must
then be configured to be shared to allow clients to use them.
To configure a printer with AXIS Print System 1.20:
1. Select a network printer from the Available Printers/Print Servers list and double-click.
AXIS Print System will suggest which driver to use for the printer you have chosen.
2. Highlight a driver in the list and click Next>. If you wish to choose a driver from the AXIS
Print System driver list, click More. To locate alternative printer drivers, click Browse to
Driver Setup File and install the driver.
3. Enter a name for the printer (if you wish), follow the instructions on the screen and click
Finish to complete the printer driver installation.
You have now completed the installation of the AXIS 5800 Mobile in a Windows cable
network.
Alternative for Windows 95, 98, NT, 2000:
Install AXIS Print Monitor to configure printers. For details, see the AXIS 5800 Mobile User’s Manual or the AXIS
Print Monitor Help.
■ Alternative for Windows 2000:
Configure a Printer using IPP (Internet Printing Protocol). No need to install any additional software, the IPP
function is an integrated part of Windows 2000. In this example the print server’s IP address is
http://192.16.253.80, the printer is connected to the AXIS 5800 Mobile printer port LPT1. The default port
number ’:631’ needs to be specified in the address:
1.Go to Start | Settings | Printers and click the Add Printer icon. The Add Printer Wizard will start and ask you
if you want to install a local printer or a network printer. Choose Network Printer and click Next.
2.Click the ’Connect to a printer on the Internet or on your intranet’ radio button and enter the print servers
http: address, the default port number (port 631) and the printer port in the URL field: e.g.
http://192.16.253.80:631/LPT1 and click Next.
3.If you do not have a driver corresponding to the destination printer installed on your computer, the Wizard
will prompt you to install one. Click OK:
4.The Installation Wizard will ask you to select a printer driver corresponding to the destination printer. Select
the printer driver from the list and click OK.
5.The Wizard will ask you if you want the printer to be your default destination printer. Make your choice and
click Next to complete the Add Printer Wizard installation.
See the AXIS 5800 Mobile User’s Manual for IPP configuration instructions in other OS. In OS other than Windows
2000, you need to install client software to print over IPP.
■
8
Configure a Printer in UNIX/Linux over TCP/IP
Install Software: axinstall script
The axinstall script is an installation and management utility for print servers. With this
automatic installation script, the printer connected to the Axis print server will appear as
though it is directly connected to the host print spooler. If you want to integrate your AXIS
5800 Mobile into your host spooler, you can use the Axis installation script axinstall, or
perform a manual integration.
1. Download axinstall to your host using FTP by logging in to the AXIS 5800 Mobile and typing: ftp <host name> or ftp <IP address> in the UNIX shell window.
2. Enter root as the default user id and pass as the default Administrator password.
3. Download the axinstall script by typing:
get axinstall(When downloading axinstall, make sure you use the ascii transfer
mode).
4. Make the axinstall script executable.
5. Install the AXIS 5800 Mobile using the axinstall script. Type the command in the UNIX
shell window:
sh axinstall
6. Follow the instructions that appear when the script is started.
Note:
■ LPRng is not supported by axinstall.
You have now completed the installation of the AXIS 5800 Mobile in a UNIX/Linux cable
network.
Configure a Printer in Macintosh:
Configuring a printer is done from the Chooser:
1. Open the Chooser from the Apple menu.
2. Click the LaserWriter, alternatively the LaserWriter 8.0 icon.
3. If your network has more than one zone, click the name of the default zone. If your network has no zones, this box does not appear.
4. Click the name of the printer port you want to use. The default printer name is shown as:
AXIS<nnnnnn>_<port>, where <nnnnnn> is the last six digits of the serial number, and
<port> is LPT1 or LPT2.
5. For LaserWriter 8.0 printer driver only: Click Setup..., and then select Auto Setup. If the
printer and the print server support bi-directional printing, the installation will be performed automatically. If not, you will be prompted to select a PPD file matching your
printer. Click OK and click the Close box. This completes the configuration. Repeat this
procedure for each Macintosh client using the AXIS 5800 Mobile.
Notes:
Basic configuration in AppleTalk is performed simply by opening the Chooser window and
selecting a printer.
■ You can change the default name of your Axis print server or any default parameters by
editing the config file. See the AXIS 5800 Mobile User’s Manual for details.
You have now completed the installation of the AXIS 5800 Mobile in a Macintosh cable
network.
■
9
Axis Print Server Management
Internal Web Pages
All Axis print servers have built-in internal web pages that can be accessed via a standard Web browser.
Log in to the print server’s internal web pages to modify its settings, for example:
■ Specify the name, location, etc. of a network printer
■ View network printer status and network statistics
■ Upgrade the print server’s firmware and obtain print server support
1. Enter the print server’s IP address (or host name) in the Location/Address field of your Web browser.
Press Enter.
Print Server’s
IP address
help
admin
button
root
pass
2. The Printer Overview page will appear. Click the admin button to access the Administration Web
pages. You will be prompted for a password.
3. Enter the default user name: root and the default password: pass. Click OK.
Print Server Maintenance: Performing a Factory Default
IMPORTANT!
A Factory Default will reset the internal settings of the print server to default and should be performed with caution. All parameters
except Node Address (NODE_ADDR), Internet Address (IP_ADDR) and DHCP enabled or disabled (DHCP_ENABLE.) are reset.
1. Remove the external power supply to switch off the AXIS 5800 Mobile.
2. Press and hold down the test button, while you plug the external power supply back in. Continue to hold down the test button,
until the network indicator begins to flash at one second intervals. This should take at least 5 seconds.
3. Release the test button and wait until the network indicator flashes at least five times.
4. Press and hold the test button again until the network indicator remains constantly lit.
5. Restart the AXIS 5800 Mobile by disconnecting and reconnecting the external power supply. The print server is now reset to
factory default.
10
Wireless Printing
Wireless Printing
Some basic instructions for printing over Bluetooth Wireless Technology from a mobile phone and laptop
are described here. See your Bluetooth Software Suite 1.07 user documentation and Ericsson R520
mobile phone user documentation for detailed installation and usage instructions.
Printing Basics
■
■
■
■
Information is transmitted using the global Bluetooth 2.4 GHz ISM band at speeds up to 723 kbps.
The Bluetooth functionality of the AXIS 5800 Mobile is enabled by default.
In order to print via Bluetooth, your other Bluetooth units (laptop or mobile phone) must be properly
installed and configured.
Use the print server’s LPT1 port on a PCL4 printer for wireless printing from a mobile phone.
Trouble-shooting
Check that you have set these items properly if you experience problems when trying to print:
■
■
■
■
■
Make sure the Bluetooth antenna of the AXIS 5800 Mobile print server is pointing towards the ceiling
for best performance.
Bluetooth Wireless Technology must be enabled on your print server: this function is enabled by
default upon installation. To enable/disable: browse to the internal web pages of your AXIS 5800
Mobile print server. Click admin | Network settings | Detailed view | Bluetooth. Make sure the
Bluetooth Enabled "Yes" radio-button is selected.
When printing from a mobile phone, make sure you are using a PCL4 printer that is connected to the
AXIS 5800 Mobile LPT1 port. Refer to your printer manufacturer to find out if you are using a PCL4
printer.
Make sure your Bluetooth print server and the other Bluetooth devices it is communicating with are
located within 10 meters from each other, closer if there are solid objects in between.
Make sure that your printer is connected to the correct printer port of the AXIS 5800 Mobile print
server. Go to admin | Network settings | Detailed view | Bluetooth and make sure the physical port
you have chosen to print from is selected: LPT1 or LPT2 for laptop printing and LPT1 for printing from
a mobile phone.
11
Wireless Printing
Wireless Printing from a Laptop (Windows 98, ME, NT and 2000)
Requirements for Use
■
■
Bluetooth Software Suite 1.07 (or later) PC card and drivers
from Motorola, Toshiba, IBM, Dell or NEC must be installed on
your laptop.
AXIS Wireless Printing Utility must be installed on your
laptop.
AXIS Wireless Printing Utility
Install AXIS Wireless Printing Utility. AXIS Wireless Printing Utility can be located from www.axis.com or
the AXIS Product CD (2.1 and higher).
How to Print
1. From any Windows application (e.g. Word), select File | Print.
2. From the Windows list of available printers, select Axis Wireless Printer and click OK.
3. AXIS Wireless Printing Utility will start. The very first time AXIS Wireless Printing Utility is used, it will
search for Bluetooth printers and display the units that were detected in the area. These printers will
then be saved and show up the next time you want to print. In order to perform a new search (for
instance in a new environment) click the Refresh button in the AXIS Wireless Printing Utility main
window.
4. Select a printer from the list and click Print.
Default Bluetooth
print server
name
Refresh
button
Help
The AXIS Wireless Printing Utility main window
Notes:
■ You can always print to a selected printer during an on-going search.
■ If you perform a search while a specific printer is busy printing a print job, that specific printer will
not show up in the list.
■ In AXIS Wireless Printing Utility, the AXIS 5800 Mobile default name will be ’AXISXXXXXX’. The six Xs
represent the last six digits of the print server’s serial number, found on its backside label. If Axis
Wireless Printer doesn’t show up in the Printer list, you need to create it. See the AXIS Wireless
Printing Utility Help (from Start | Programs) for instructions.
■ The print server’s Administrator can assign new names to the items displayed under "Name" by
logging into the print server’s web pages: admin | This Print Server | General | Print Server Name.
12
Wireless Printing
Wireless Printing from the Ericsson R520 Mobile Phone
Requirements for Use
■
■
The Bluetooth function of the mobile phone must be on. See
your Ericsson R520 user documentation for detailed
information on the mobile phone.
Any PCL4-compatible printer can be used for wireless printing
from a Bluetooth mobile phone. The printer must be connected to the print server’s LPT1 port.
What You Can Print From the Ericsson R520
Some examples of what you can send to a printer from the Ericsson R520 are described here. You will
find detailed instructions in the Ericsson R520 user documentation.
■ Text messages
■ Appointments and Tasks
■ Monthly, weekly or daily overviews
■ Contacts
■ Business cards
Activating the Bluetooth Function in the Mobile Phone
Your phone must be set to either On or Automatic. This is set in Extras | YES | Bluetooth | YES |
Operation mode | YES.
• Automatic - the Bluetooth function is activated automatically when you start sending information such as business cards or when you receive an incoming call.
• On - the mobile phone is on all the time (until you change it). The mobile phone can send and
receive information to and from a paired Bluetooth device.
After selecting Bluetooth as the transfer method, the phone will search for available printing devices in
the area. A list of devices will appear. Select the device you want to send the item to and press YES.
Example I: Print a Contact from the mobile phone:
1. Scroll to Phone book | YES | Business Cards | YES | Send contact | YES.
2. Find the contact and press YES.
3. Select transfer method (Via Bluetooth) and press YES. A list of devices will appear. Select the printing
device you wish to send the item to and press YES.
Example II: Print a Calendar View from the mobile phone:
1.
2.
3.
4.
Scroll to Extras | YES | Calendar | YES | Send | YES.
Select a view: Send day, Send week or Send month and press YES.
Scroll to the day, week or month you want to print and press YES.
Scroll to Send | YES | Via Bluetooth | YES. Select the printer in the list of devices and press YES.
Note:
■ The AXIS 5800 Mobile default name appears in the mobile phone’s window as ’AXISXXXXXX’. The six
Xs represent the last six digits of the print server’s serial number, found on its backside label.
13
Features in Firmware Version 6.20 for AXIS 5800 Mobile
The AXIS 5800 Mobile has built-in firmware, which comprises the following new features in version 6.20:
■ Auto IP-Functionality: The Print Server will always receive an IP address automatically
■ Automatic Restart: If the print server detects errors, it will automatically restart in order to ensure
highest possible availability (Watchdog)
■ E-mail Notification: The Print Server automatically notifies administrators by e-mail when the
printer needs assistance (e.g. toner or paper refill)
■ NetWare Packet Signature (NetWare Packet Signature, Level 3 = best possible): Improved security
feature that makes it possible to encrypt printed material, which has high security requirements such
as medical records and legal documents. This new feature enables sending confidential information
across the network without the risk of interception.
■ Safe Flash Loading: Safe flashloading is possible to do since the AXIS 5800 Mobile is equipped with a
2 MB RAM. Thanks to this, a new version of firmware can be downloaded and stored in the memory
before the old version of the firmware is deleted.
■ Flash Loading from the Web: Now even easier to upgrade, as you can do it directly over the web
without client software
■ Manual Network Speed Selection: Possibility to select network speed manually (10/100)
■ Multi-Language Support: Now also available in Spanish, French and German, besides English.
■ Automatic Printer-type Selection in AppleTalk: The print server automatically selects binary
protocol and printer type, which needed to be done manually before.
All Axis print server firmware upgrades are obtainable from the Axis Communications web site. You can
also download this firmware by logging in to the print server’s admin web pages.
QUICK START AXIS 5800 EN
Part No: 18340
Copyright © Axis Communications AB, 2001
Revision1.0
Date: March 2001
Bluetooth Trademark: BLUETOOTH TM are trademarks owned by Telefonaktiebolaget L M Ericsson, and licensed to Axis Communications AB.
Regulatory information
Tested to comply with FCC Standards FOR HOME OR OFFICE USE.
This product must be installed and used in strict accordance with the instructions given in the user documentation. The AXIS 5800 Mobile complies with
the following radio frequency and safety standards:
Canada - Industry Canada (IC)
This device complies with RSS 210 of Industry Canada
Europe - EU Declaration of Conformity
This device complies with the requirements of the R&TTE Directive 1999/5/EC with essential test suites as per standards:
EN 60950 Safety of Information Technology equipment
ETS 300 328 Technical requirements for radio equipment
ETS 300 826 General EMC requirements for radio equipment
USA - Federal Communications Commission FCC
This device complies with Part 15 of FCC Rules. Operation of the device is subject to the following two conditions:
(1) This device may not cause harmful interference
(2) This device must accept any interference that may cause undesired operation.